Configuration Item Types (CI Types)
Configuration Item Types (CI Types) denotes the broad classification of different entities with which you can categorize the CIs. It forms the uppermost level in the CI structure, enabling you to easily add and modify the CIs and their relationships. For a granulated CI Type structure, you can further drill it down to Sub Types. The CI Types are defined with certain attributes and relationships that are unique for the CIs classified under them.
To access the Configuration Item Type page,
Click Admin tab in the header pane.
Click Configuration Item Types icon
 in CMDB
block. The configuration item types list view page opens, listing the
default CI Types.
in CMDB
block. The configuration item types list view page opens, listing the
default CI Types.
From this page, you can add CI Types, create new CIs for a CI Type, view CIs under a CI Type, and also view the relationship map with the default relationship attributes.
|
Representation of Icons in the CI Type List View
|
The following operations are discussed under this section:-
Adding New CI Type - Know how to add CI Types and its Sub Types while developing your CMDB.
Setting Attributes for CI Type - Set unique attributes for the CI Type using the drag and drop customizable fields. These attributes will be available to all the CIs under the CI Type.
Setting Relationship Attributes - Set default relationships to provide feasibility while adding relationships between CIs.
From the Configuration Item Types list view page, click Add New CI Type link. The Add New CI Type dialog pops-up.
Enter the CI Type Name under which the CIs should be classified. Say, Workstations, People, Department. This field is mandatory.
If the structure of the CI Type is granulated, then you need to further drill it into Sub Types. For instance, the CI Type - Workstation can be further drilled down into Sub Types like IBM Workstation, Unix Workstation and Windows Workstations.
If the entered CI Type name is a sub type, then select the Parent Type from the drop down.
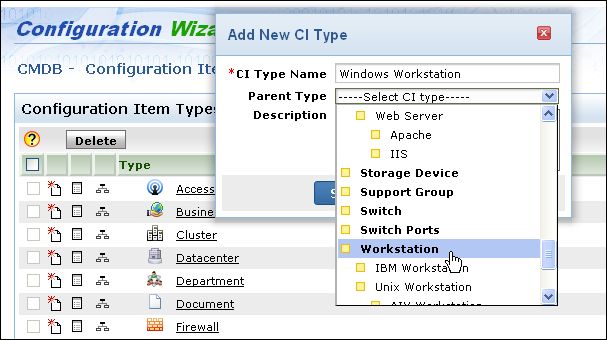
Enter a brief Description about the CI Type in the field provided.
Click Save. The page navigates to the Edit Configuration Item Type with the CI Type name, Parent Type and Description pre-populated with the specified values.
Choose an Icon to depict this CI Type in the list view. By default, an icon is uploaded for the CI Type. To upload a different icon, click change link. Select Choose File, to browse through the files and click Import Image.
Note: Please note that only jpg, gif and png formats are supported.To track the CIs under the CI Type as IT or Non-IT assets/components in the Asset module, enable Track as asset check box. Select the Category and asset Type from the drop down.
Note: If 'Track as asset' option is enabled for the parent type, then this option will not appear for its sub types.
Setting Attributes for CI Type
You can set attributes for the CI Type from the Attributes tab. Certain attributes are common to all the CI Types namely, Default Attributes while the others are unique or specific to the CI Type. Additional default attributes applicable to all the CI Types can be configured by clicking the Edit button, and configuring the attributes in the pop-up window. The attributes added in this section applicable to the CIs under all the CI Types.

The attributes specific to the CI Type are configured using the Drag and Drop fields. For instance, the attributes specific to CI Type 'Workstations' are Service Tag, Processor Speed and IP Address to name a few.
Using Drag and Drop Fields
The Drag and Drop Field section holds different types of customizable fields such as, Single line, Multi line, Pick List, Numeric and Date fields. Apart from these customized fields, System Attributes (entries configured in the Admin tab or data fetched during scan) can also be set as attributes for the CI Type.
Adding System Attributes
Drag the System Attribute field in the form. The System Attributes form opens.
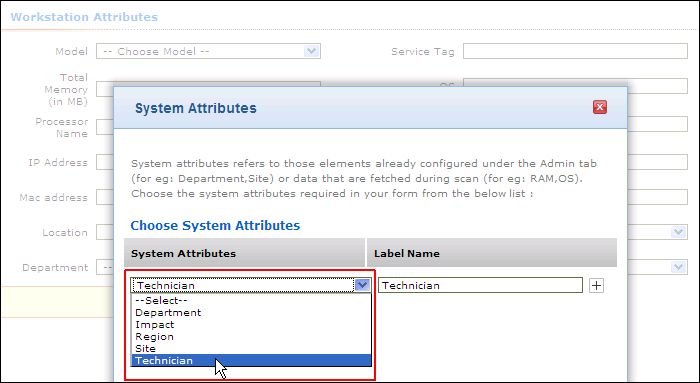
Choose the system attributes from the drop down. You can label a different name in the Label Name field.
Click Add. The system attribute is added in the form.
Click Save.
Adding Customizing field
To add the other customized fields,
Drag and drop the field (Single line, Multi line, Pick list, Numeric or Date field) in the CI Type attribute form.
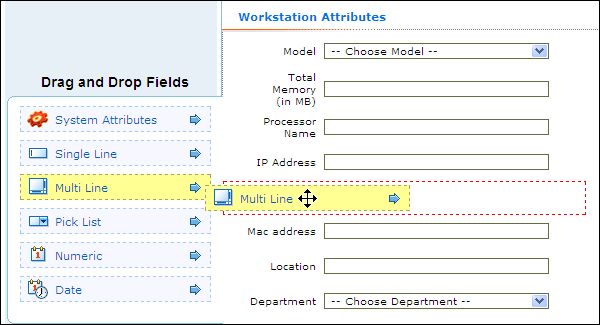
The Add Attribute form pops up where you need to enter the Attribute Name and Description. In the case of Pick list fields, enter the options to add to the list.
Click Save. The customizable field is added in the form.
|
|
1. You cannot create a sub type for the CI Type - People. Instead you can create sub types for Requesters and Technicians.
2. The sub types obtain the Attributes and Relationships from the parent CI Type. Apart from this, attributes and relationships can also be configured for sub type.
3. You cannot add customizable fields for Default Attributes.
4. Fields in the form can be re-arranged by dragging the field and placing it over a highlighted area. |
Editing Attributes
To edit a customized attribute,
Click the Edit icon
 beside
the field to modify. The Edit Attribute
form pops up with the values pre-filled while adding the attribute.
beside
the field to modify. The Edit Attribute
form pops up with the values pre-filled while adding the attribute.Modify the Attribute Name and Description field.
Click Save. The form is populated with the newly added changes.
Deleting Attributes
To delete a customized attribute,
Click the Delete icon
 beside the field. A confirmation dialog appears
 Click Ok to proceed. The field is removed from the form and is added to system attributes list.
Setting Relationship Attributes
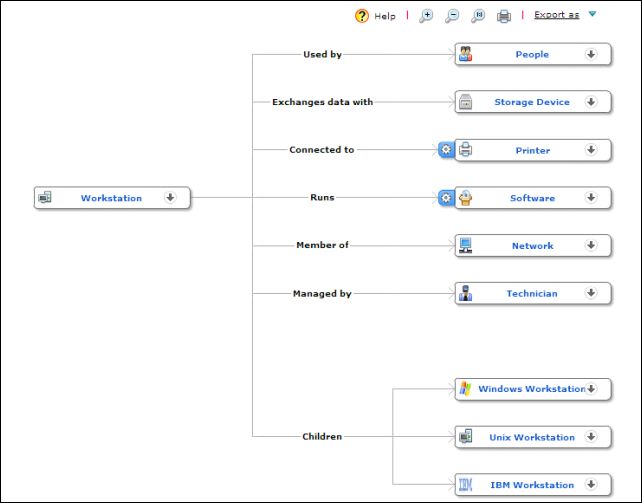
You can establish default relationships between the newly added CI Type and other CI Types from the Relationships tab. For instance, the relationship set for the CI Type Workstation can be,
Workstation Runs Software
(Newly added CI Type) (Relationship Type) (CI Type)
the inverse of this relationship type will be automatically added for Software CI Type,
Software Runs on Workstation
(CI Type) (Relationship Type) (CI Type)
Setting default relationships provides feasibility while adding relationship between the CIs categorized under the CI Type. For a sub type, the parent CI Type relationships are adapted, apart from which new relationships can also be created. Using the Relationship Map, the relationship configured with other CI Types can be viewed from where the map can be exported or printed.
Adding Relationships
To establish a relationship between two CI Types,
Click Relationships tab in Edit Configuration Item Type form.
Click Add button. The Add Relationship form pops up.
Select the nature of the relationship between the CI Type and another CI Types from Relationship Type drop down.
Select the CI Type to which the relationship is established. Both the Relationship Type and CI Type are mandatory fields.
Click Save.
On defining the relationship with other CI Types, the attributes associated to the relationship can be set. The relationship attribute provides additional information on a relationship between the CI Types. For instance, the Installation path of the software in the workstation, the version installed, the date of installation and so on.
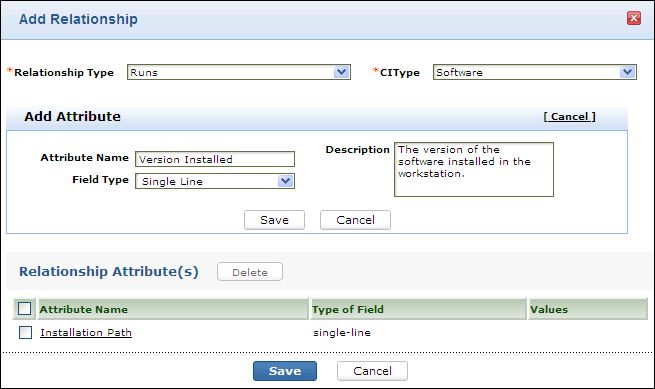
Adding Relationship Attributes
Relationship Attributes provides more information on the related CI Type. Say, for instance, if the CI Type is "Software", then you can add attributes such as Version of the software installed, the Installation path, Installed on, service pack details and so on.
Click Add New Attribute button.
Enter the Attribute Name. Say, Version Installed.
Select the Field Type from the drop-down. The field type can be either Single line, Multi line, Pick List, Numeric or date field.
If required, enter Description on the attribute in the field provided.
Click Save. The attribute is added to the relationship attribute list.
To delete a relationship attribute,
Enable the check box beside the Attribute Name in the Relationship form.
Click the Delete button. A confirmation dialog appears.
Click Ok to proceed. The relationship attribute is deleted from the list.
Editing Relationships
To edit a CI Type relationship,
Click the edit icon
 beside
the CI Type relationship to edit. The Edit
Relationship Type form pops up pre-filled with values configured
while adding the relationship.
beside
the CI Type relationship to edit. The Edit
Relationship Type form pops up pre-filled with values configured
while adding the relationship.Modify the Relationship Type and CI Type. Both the fields are mandatory.
Even while editing, you can add new relationship attributes or edit the existing relationship attributes by clicking on the Attribute Name link.
Click Save.
Deleting Relationships
To delete a CI Type relationship,
Click the delete icon
 beside the CI Type relationship. A confirmation dialog
appears.
beside the CI Type relationship. A confirmation dialog
appears.Click Ok to proceed. The relationship is deleted from the CI Type relationship list.
Relationship Map
The default relationships configured with other
CI Types is viewed in the Relationship
Map. Click Relationship Map
icon ![]() to view the map.
to view the map.
From the relationship map you can,
Add CI(s) under a CI Type
View CI(s) under a CI Type
View the relationship attributes under a CI Type
Print the relationship map and,
Export the relationship map.