Scheduled Data Backup
Scheduled Data Backup enables administrators to automatically back up Endpoint Central data at predefined intervals, ensuring that critical configuration and management information is regularly preserved without manual intervention. This helps maintain up-to-date recovery points and ensures data can be restored in the event of system failures, data loss, or other unforeseen issues.
How Scheduled Backup Works
Scheduled backup runs automatically at the time scheduled while the Endpoint Central server remains operational. No downtime or manual intervention is required. Each backup includes all your settings, reports, and configuration files, saved as a single protected file.
Before You Begin
General Requirements
- Server must be running — scheduled backups only run while the Endpoint Central service is active. If the server is stopped at the scheduled time, the backup will not be taken and no retry will occur until the next scheduled time.
- Storage space: At least 2—2.5× the current database size of free space on the local drive and the backup destination.
- Backup location: Choose a folder on a different drive or network share (not the same drive as your server). Ensure the service account has write access.
Database-Specific Requirements
No additional steps needed. Backups are handled automatically.
What you need to ensure
- The remote PostgreSQL database server must be running and reachable at the scheduled backup time
- The firewall must allow connections on port 5432 (or your custom port) between the Endpoint Central server and the database server
What you need to ensure
- The SQL Server database must be running and reachable
- The SQL Server service account must have write access to the backup folder
- Required database permissions must be configured — see MSSQL Permissions for setup steps
Steps to schedule backup
- Open the Administration Settings
Go to Admin → Database Settings → Database Backup - Choose a Backup Time
Enter the desired time in 24-hour format (e.g., 18:00 for 6:00 PM). We recommend overnight or early morning hours when the system is least busy. - Set How Many Backups to Keep
Choose how many backup copies to save (default: 7). Older backups are automatically deleted to save space. - Choose Where to Save Backups
Enter the folder location where backup files should be saved. For safety, use a location on a different computer or network folder.
Default location:UEMS_CentralServer/ScheduledDBBackup/ - Set a Backup Protection Password (Recommended)
Under the Backup Protection section, set a password to protect your backup files. You can provide a password hint to help recall this password later.TipRecovery Key: A recovery key is automatically sent to all administrators via email every 45 days. Keep these emails safe — you can use it to restore a backup if you forget your password. - Enable Failure Alerts (Recommended)
Turn on notifications to receive an email if a backup fails. Enter the email addresses that should receive alerts.
When failure notifications are enabled, you receive an email each time a backup fails, along with details about what went wrong.
- Save Your Settings
Click Save Changes to activate scheduled backups.
Best practices for Network Path Backup
- The backup is first created locally on your server, then copied to the network path. Ensure your server has enough local disk space for the full backup.
- The network folder must be accessible and reachable from your Endpoint Central server.
- The Endpoint Central service account must have write access to the network folder. Do not grant access to “Everyone” — restrict it to the service account only.
- Use a network path within the same network domain as your server for reliable transfers.
- If the network copy fails, the backup will remain on the local drive only.
- After setting up a network path, verify that backups are saving successfully.
Setting Up Network Share Permissions
If saving backups to a network share, the service account must have write access. Follow these steps:
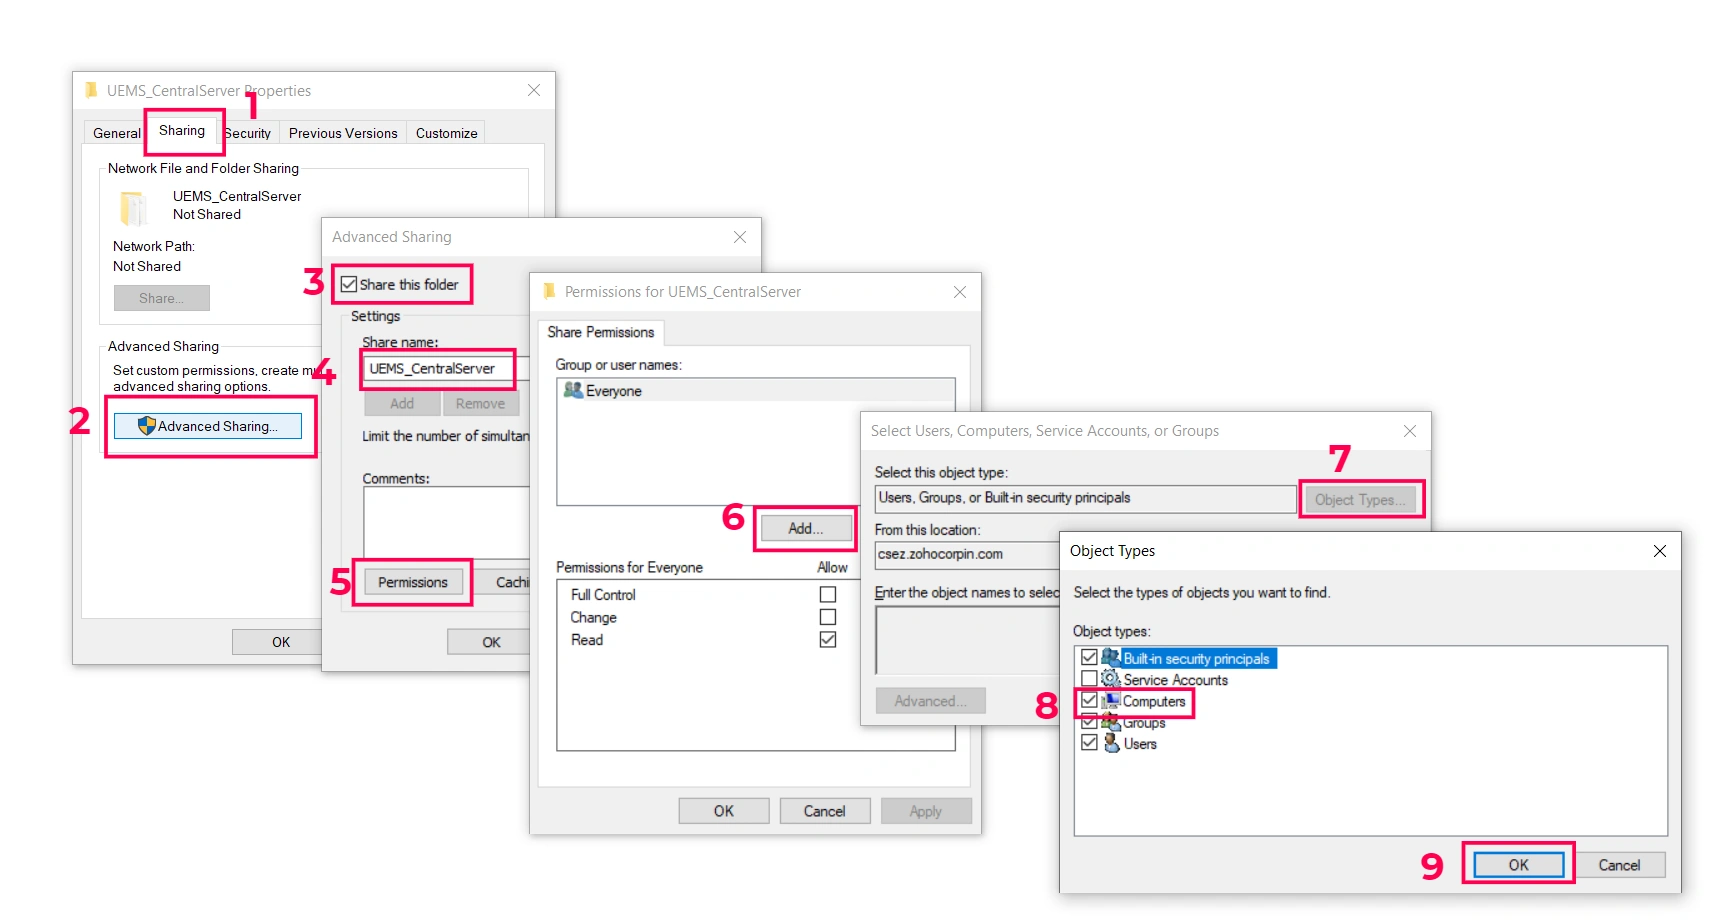
Open the Sharing Tab
Right-click the backup folder (e.g.,
UEMS_CentralServer) → Properties → select the Sharing tab.Open Advanced Sharing
Click Advanced Sharing… under the Advanced Sharing section.
Enable Sharing
Check Share this folder.
Set the Share Name
Enter a share name (e.g.,
UEMS_CentralServer). This is the name that will appear on the network.Open Share Permissions
Click Permissions to configure who can access this share.
Add the Service Account
In the Permissions dialog, click Add… to add a new user or computer.
Select Object Types
Click Object Types… in the Select Users, Computers, Service Accounts, or Groups dialog.
Enable Computers
Ensure Computers is checked (along with Users and Groups as needed), then click OK.
NoteThis allows you to add machine accounts (e.g., for services running as the local system account).Enter the Account Name
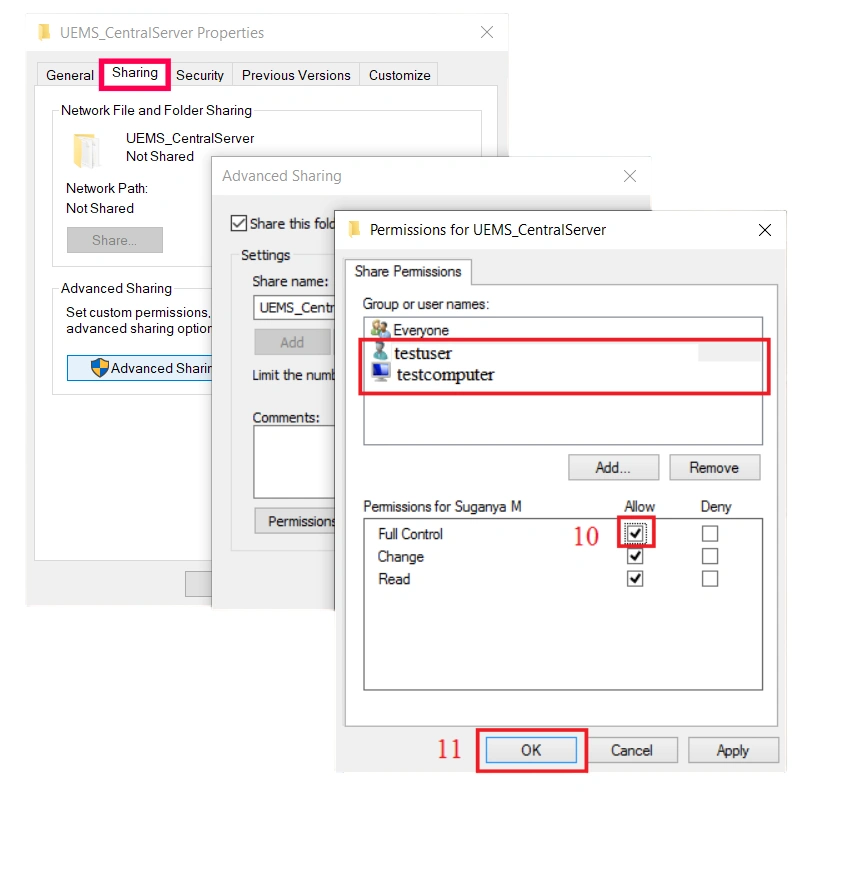
Type the service account name or computer name, then click OK to add it to the permissions list.
Grant Full Control
Select the account you just added. Under Permissions, check Full Control in the Allow column (Change and Read will be automatically selected as well).
Apply and Close
Click OK to save the share permissions, then click OK again to close the Advanced Sharing dialog.