Patch Management for Closed Networks
This page explains how to configure Endpoint Central for environments where the server has no direct Internet access — covering proxy settings, patch database configuration, vulnerability database synchronization, and manual patch download and deployment. The standard workflow uses the lightweight Closed Network Tool, while Red Hat and SUSE systems require a separate Internet-connected Endpoint Central server because access to their patch repositories must be authenticated.
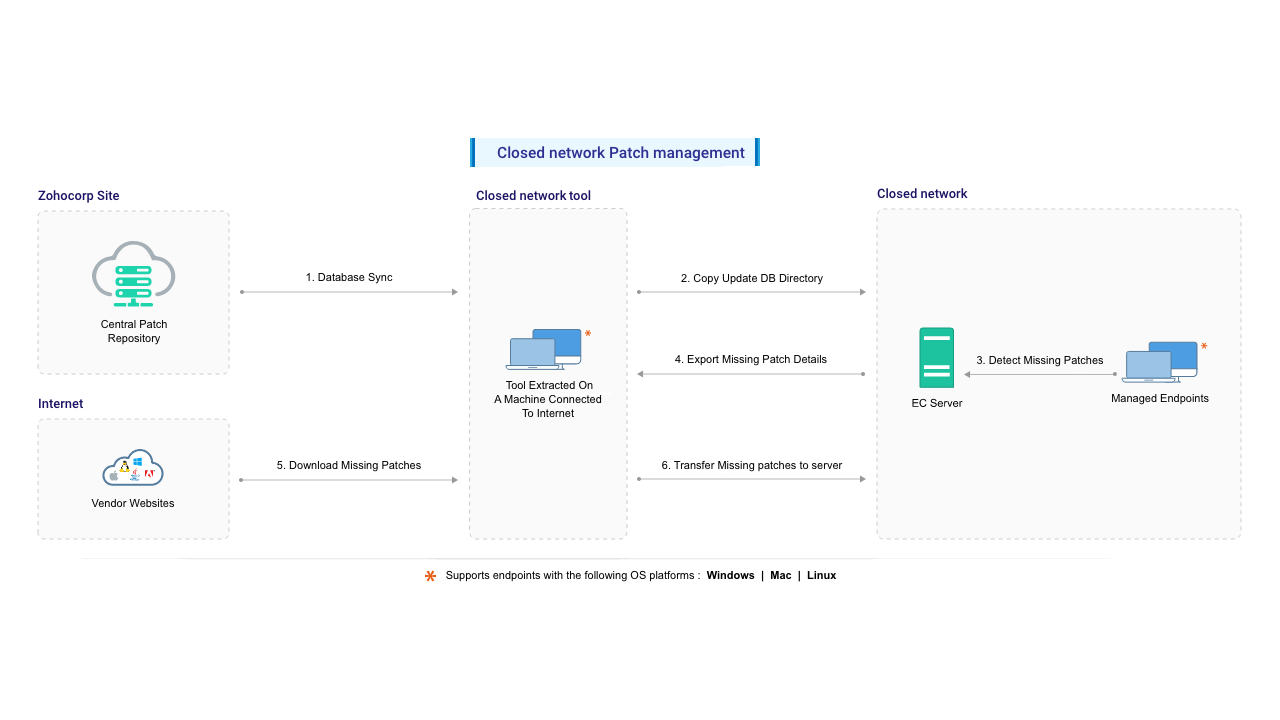
Overview
When Endpoint Central is deployed in an environment without direct Internet access, core patching functions — such as vulnerability database synchronization, automatic patch downloads, and vendor update retrieval — cannot be performed online.
This limitation applies to closed networks where outbound Internet connectivity is intentionally blocked, regardless of where the server is placed. A Demilitarized Zone (DMZ) is one such placement scenario — a segmented network zone positioned between an internal network and external or untrusted networks, designed to host systems that require strict access control and isolation. While DMZs can allow tightly controlled Internet access, they are frequently configured without outbound connectivity in high-security environments, effectively operating as closed networks.
In more restrictive setups, such as air-gapped networks, the server is fully isolated with no physical or logical connectivity to external networks. Although these environments differ in topology and isolation level, they share a common constraint: the server cannot communicate directly with external update sources. As a result, patching and vulnerability remediation must be performed using offline or manual workflows.
The following steps explain how to complete this process end-to-end:
Configure Proxy Settings
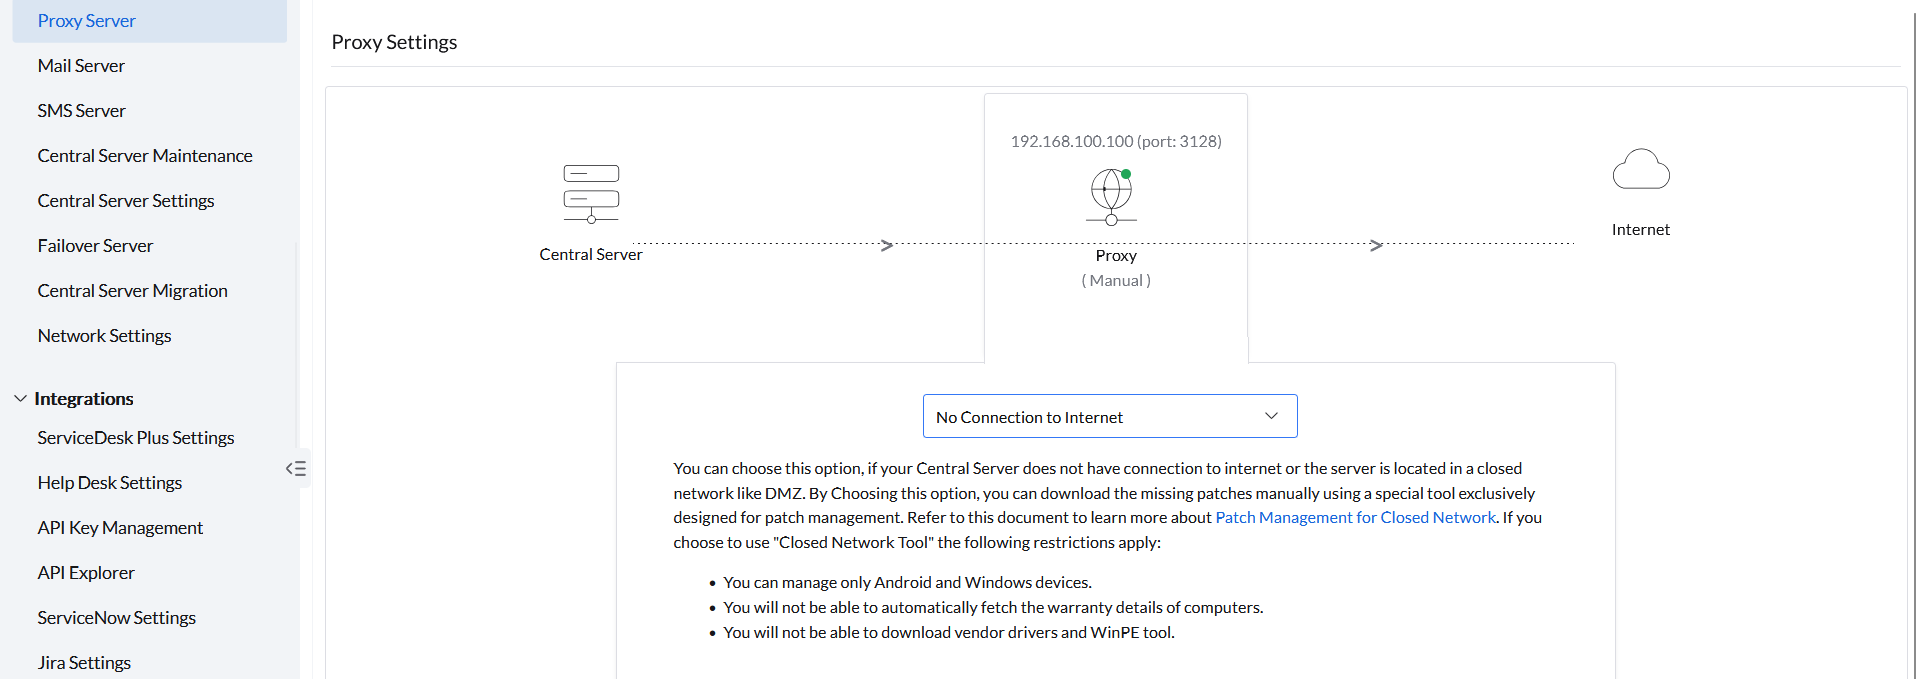
Configure the proxy settings in the Endpoint Central console to indicate that the server has no direct Internet connection.
- Open the Endpoint Central console and navigate to Admin → Server Settings → Proxy Server.
- Click Edit under the Proxy Server icon.
- Select No connection to Internet.
- Click OK to save changes.
Configure Patch Database Settings
Disable the automatic vulnerability database sync schedule to prevent failed sync attempts before the required data has been placed in the server directory.
- Open the Endpoint Central console and navigate to Admin → Patch Settings → Patch Database Settings.
- Under Schedule Vulnerability Database Update, disable the Schedule toggle.
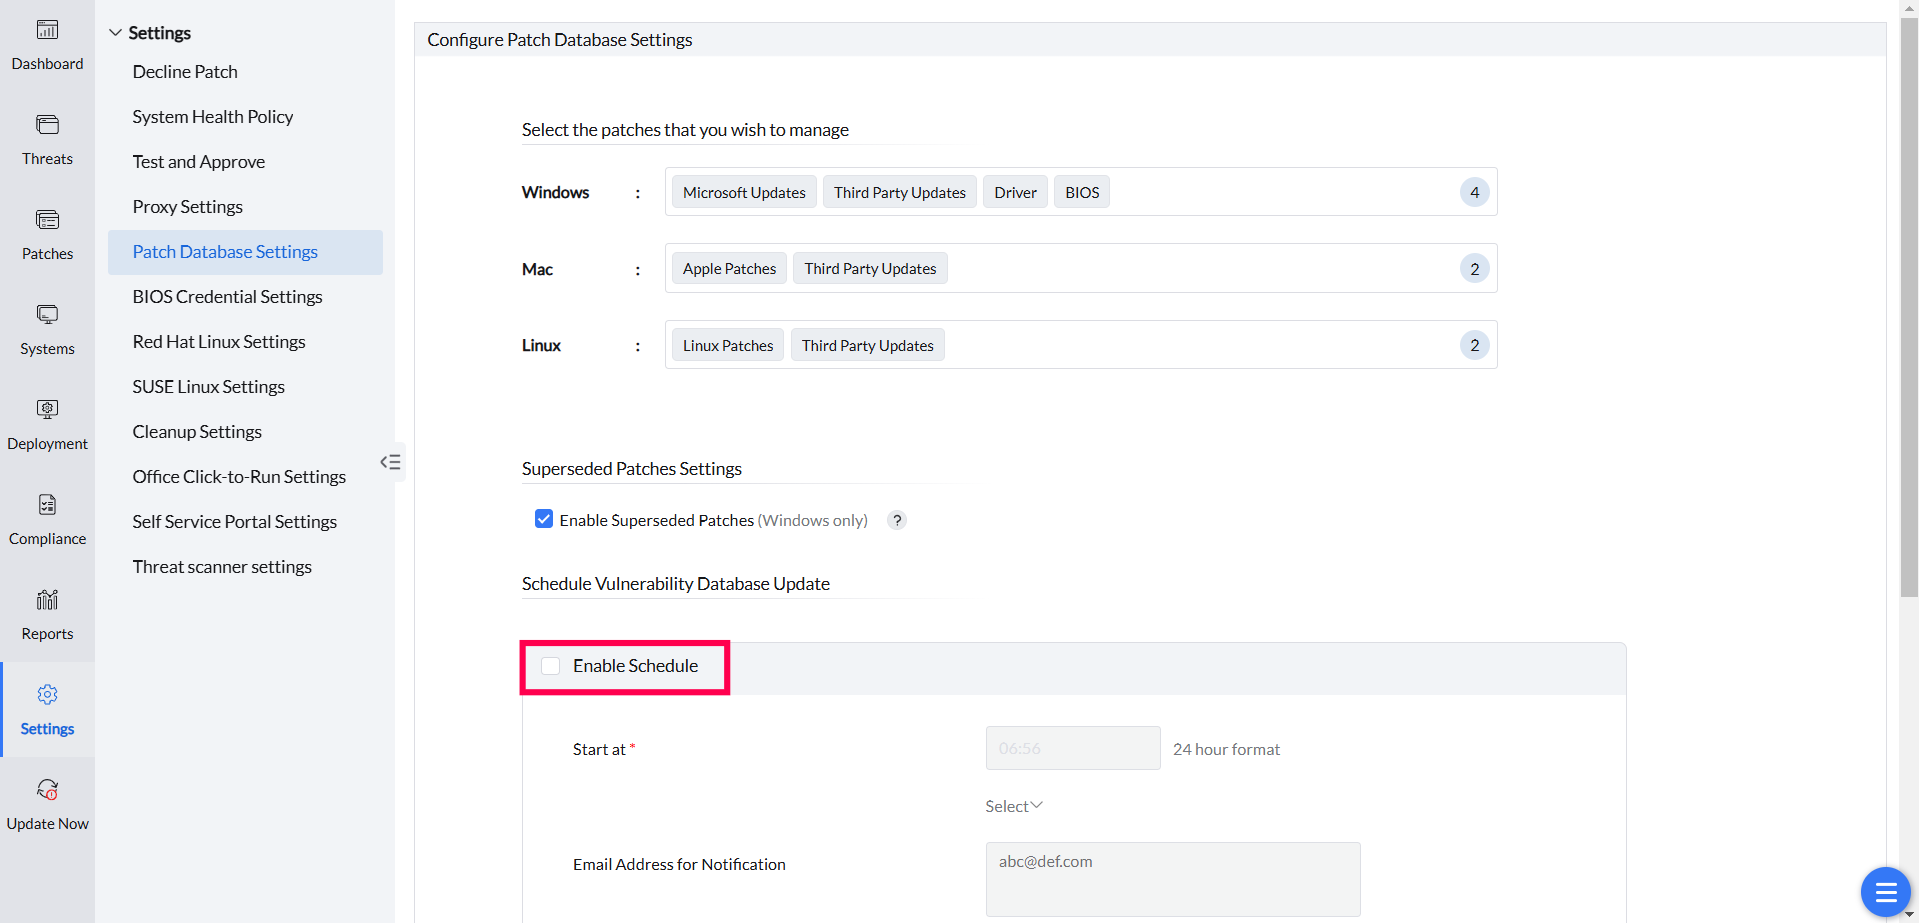
<InstallDirectory>/conf/CRSData directory. The updatedb folder in that directory is erased after a successful sync, so a subsequent sync will fail if the folder has not been repopulated with fresh data.Download and Set Up the Closed Network Tool
The Closed Network Tool is used on an Internet-connected machine to download vulnerability data and patch files for manual transfer to the isolated server. This setup is a one-time operation.
- Download the UpdateManager.zip file and extract it on a computer that has Internet access.
- The tool is ready to use. Proxy and tool configuration are one-time operations. Updating the vulnerability database and downloading patches must be repeated each time you want to scan for vulnerabilities and deploy the latest missing patches.
- If the Internet-connected computer itself uses a proxy, open the
downloadMgr.propfile in the extracted directory and provide the proxy server address, port, and authentication details. - If you are running a TAA-compliant Patch Manager Plus Server, download the Closed Network Tool from this link instead.
Configure Closed Network Patching for Red Hat and SUSE
Red Hat and SUSE systems use a different closed network workflow. Instead of the lightweight Closed Network Tool, they require a second Endpoint Central server with Internet access. This Internet-connected server works alongside the closed network server and must run the same product build version.
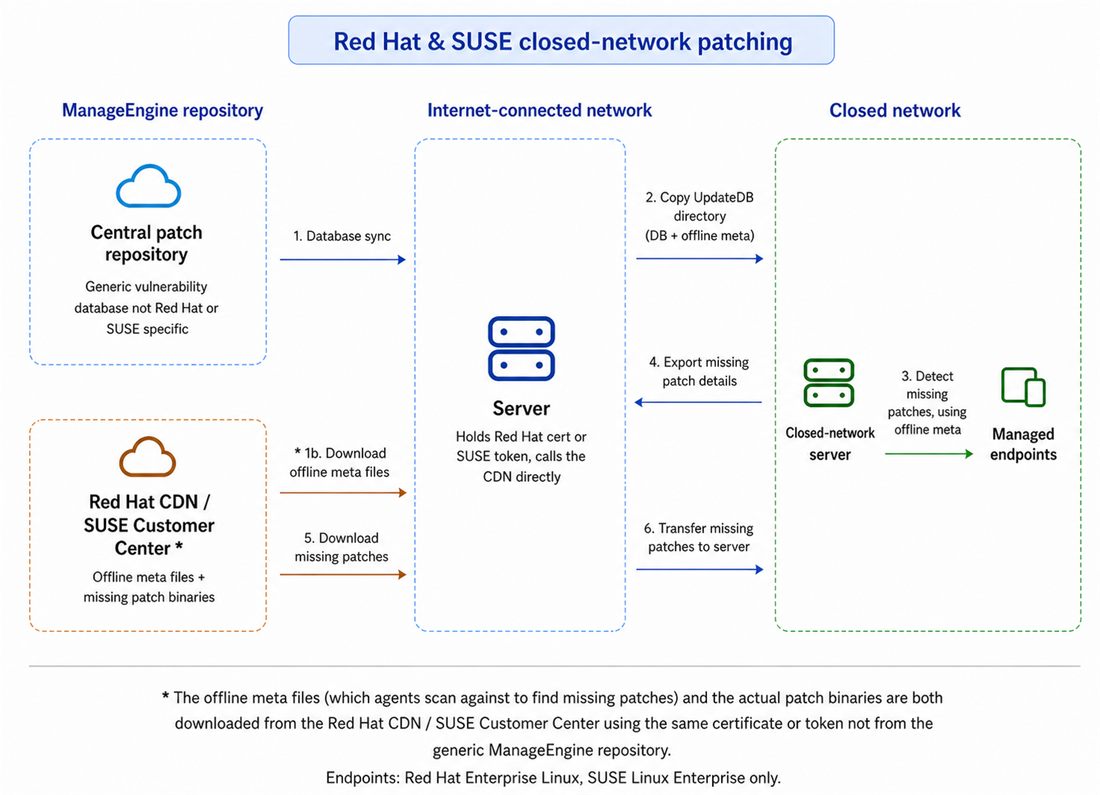
Why an Internet-Connected Server Is Required
Red Hat and SUSE require authenticated access to download both the offline metadata used to identify missing patches and the patch and dependency packages required for deployment:
- Red Hat: Upload a valid Red Hat certificate to the Internet-connected server.
- SUSE: Provide a valid SUSE registration token on the Internet-connected server.
The Closed Network Tool is designed for one-time data export and does not maintain the credentials or authenticated connection required by these vendors. Therefore, a full Internet-connected server is required for Red Hat and SUSE patch downloads.
Add Matching Red Hat and SUSE Systems
Add a matching registered system to the Internet-connected server for every Red Hat edition or SUSE flavor managed in the closed network:
- For Red Hat, install the agent on a registered system for each edition in use, such as Server, Workstation, or Desktop. To know detailed steps of Red Hat patching refer to this page.
- For SUSE, add a registered SUSE system for each flavor being managed. To know detailed steps of SUSE patching refer to this page.
You only need to add the editions and flavors present in the closed network. Without a matching system, the Internet-connected server cannot download the corresponding offline metadata and dependency packages.
Synchronize Red Hat and SUSE Patch Data
After configuring the required credentials and adding the matching systems, synchronize the patch data between the two servers:
- On the Internet-connected Endpoint Central server, initiate DB Sync.
- Initiate Package Manager File Download. This authenticated operation downloads the offline metadata and required dependency packages from Red Hat or SUSE.
- After the download is complete, locate the
UpdateDBfolder in the Internet-connected server's home directory. - Manually copy the
UpdateDBfolder to<Server Home>/conf/CRSDataon the closed network server. - On the closed network server, initiate DB Sync and Package Manager File Download. These operations process the transferred files locally and do not require Internet access.
- Scan the Red Hat and SUSE systems to identify missing patches, and then deploy the required updates.
Update the Vulnerability Database
Run the Closed Network Tool on the Internet-connected machine to download the latest vulnerability data, then transfer it to the Endpoint Central server and trigger a database update.
Run the Tool on Windows
- On the Internet-connected machine, open a command prompt and navigate to the directory where you extracted
UpdateManager.zip. - Execute the appropriate command for the operating systems you manage:
- Windows and Mac only:
patchsync.bat -c updatedb -b <BUILD_NUMBER>- Windows, Mac, and Linux:
patchsync.bat -c updatedb -i linux -b <BUILD_NUMBER>-i linux option is available only in the Closed Network Tool workflow and limits the offline download to Linux vulnerability data. In a connected installation, vulnerability database synchronization from the product console updates the configured database as a whole; the console does not provide a per-operating-system sync option.<BUILD_NUMBER> with the build number of your installed Endpoint Central server. Ensure the format is correct — for example, 11.3.2400.1 or 113240001. You can find the build number by clicking your profile icon in the top-right corner of the console.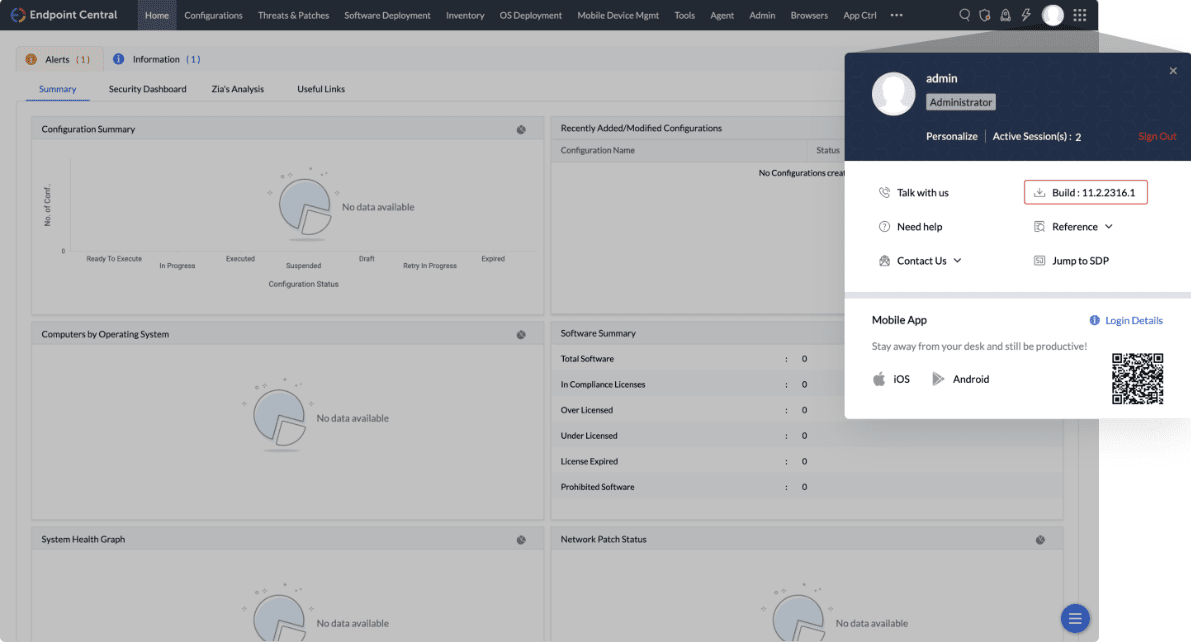
- The command downloads the latest vulnerability information from the Central Vulnerability Database to the local machine. After the download completes, the data is saved to the
updatedbdirectory in the extracted tool location. - Copy the
updatedbdirectory to the Endpoint Central server at<Installation Directory>/conf/CRSData.
updatedb folder already exists in <Installation Directory>/conf/CRSData, delete it first, then replace it with the latest version. Do not delete or modify any other contents of the CRSData folder — doing so may disrupt patch management in closed networks.- In the Endpoint Central web console, navigate to Threats & Patches → Update Now and click the Update Now button under Update Vulnerability DB. This copies the data from the
updatedbdirectory into the local database, giving the server the latest patch information. - Scan the computers in the network to identify missing patches.
Download and Deploy the Required Patches
Export the missing patch details from the console, use the Closed Network Tool to download the patch files on the Internet-connected machine, transfer them to the server, and then deploy from the Downloaded Patches view.
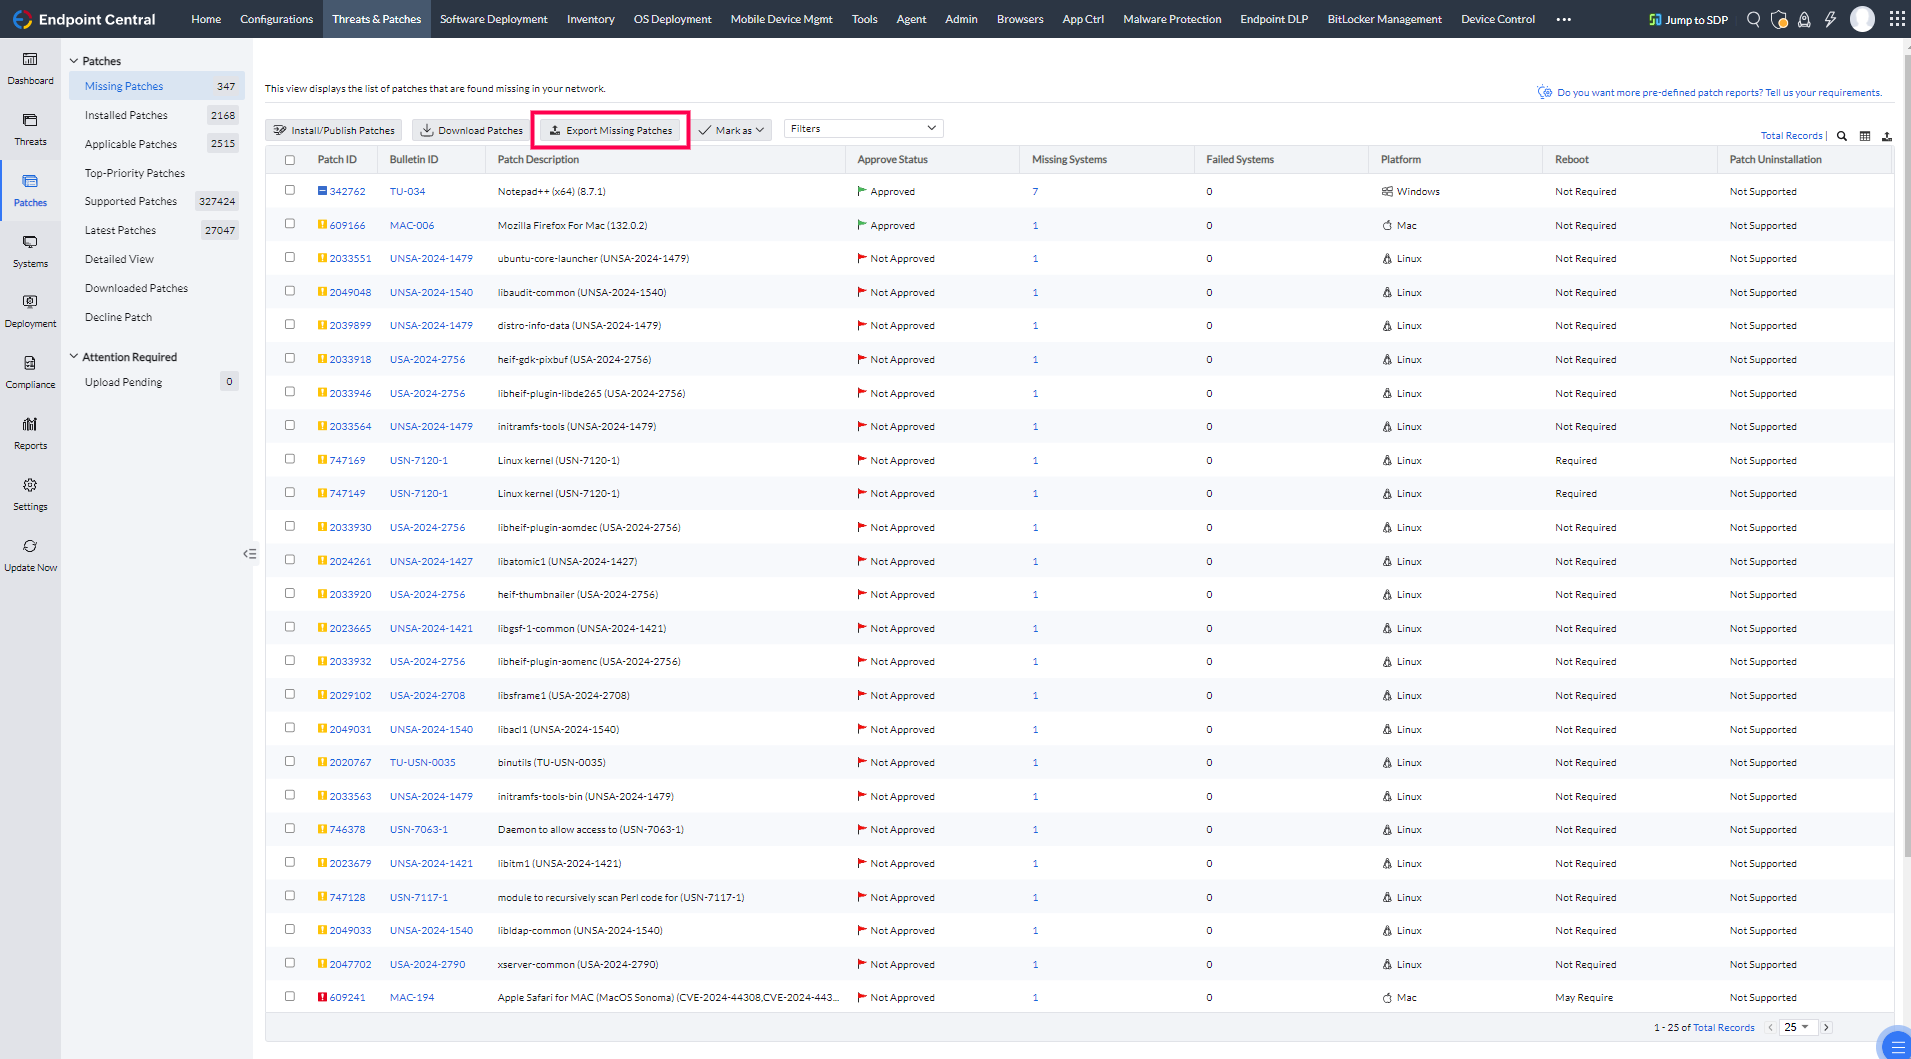
updatedb folder into the server installation directory, and sync. You can select specific missing patches before you export. The download command is case-sensitive.- In the Endpoint Central console, navigate to the Missing Patches view, select the patches to be downloaded, and click the Export Missing Patches button. This exports the details of all missing patches, including dependent patches, as a file named
downloadUrlJson.txt.
- Copy
downloadUrlJson.txtto the directory on the Internet-connected machine where you extractedUpdateManager.zip. - Open a command prompt on that machine and run:
patchsync.bat -c dwnpatch -f downloadUrlJson.txt- After all files have downloaded, copy the contents of the
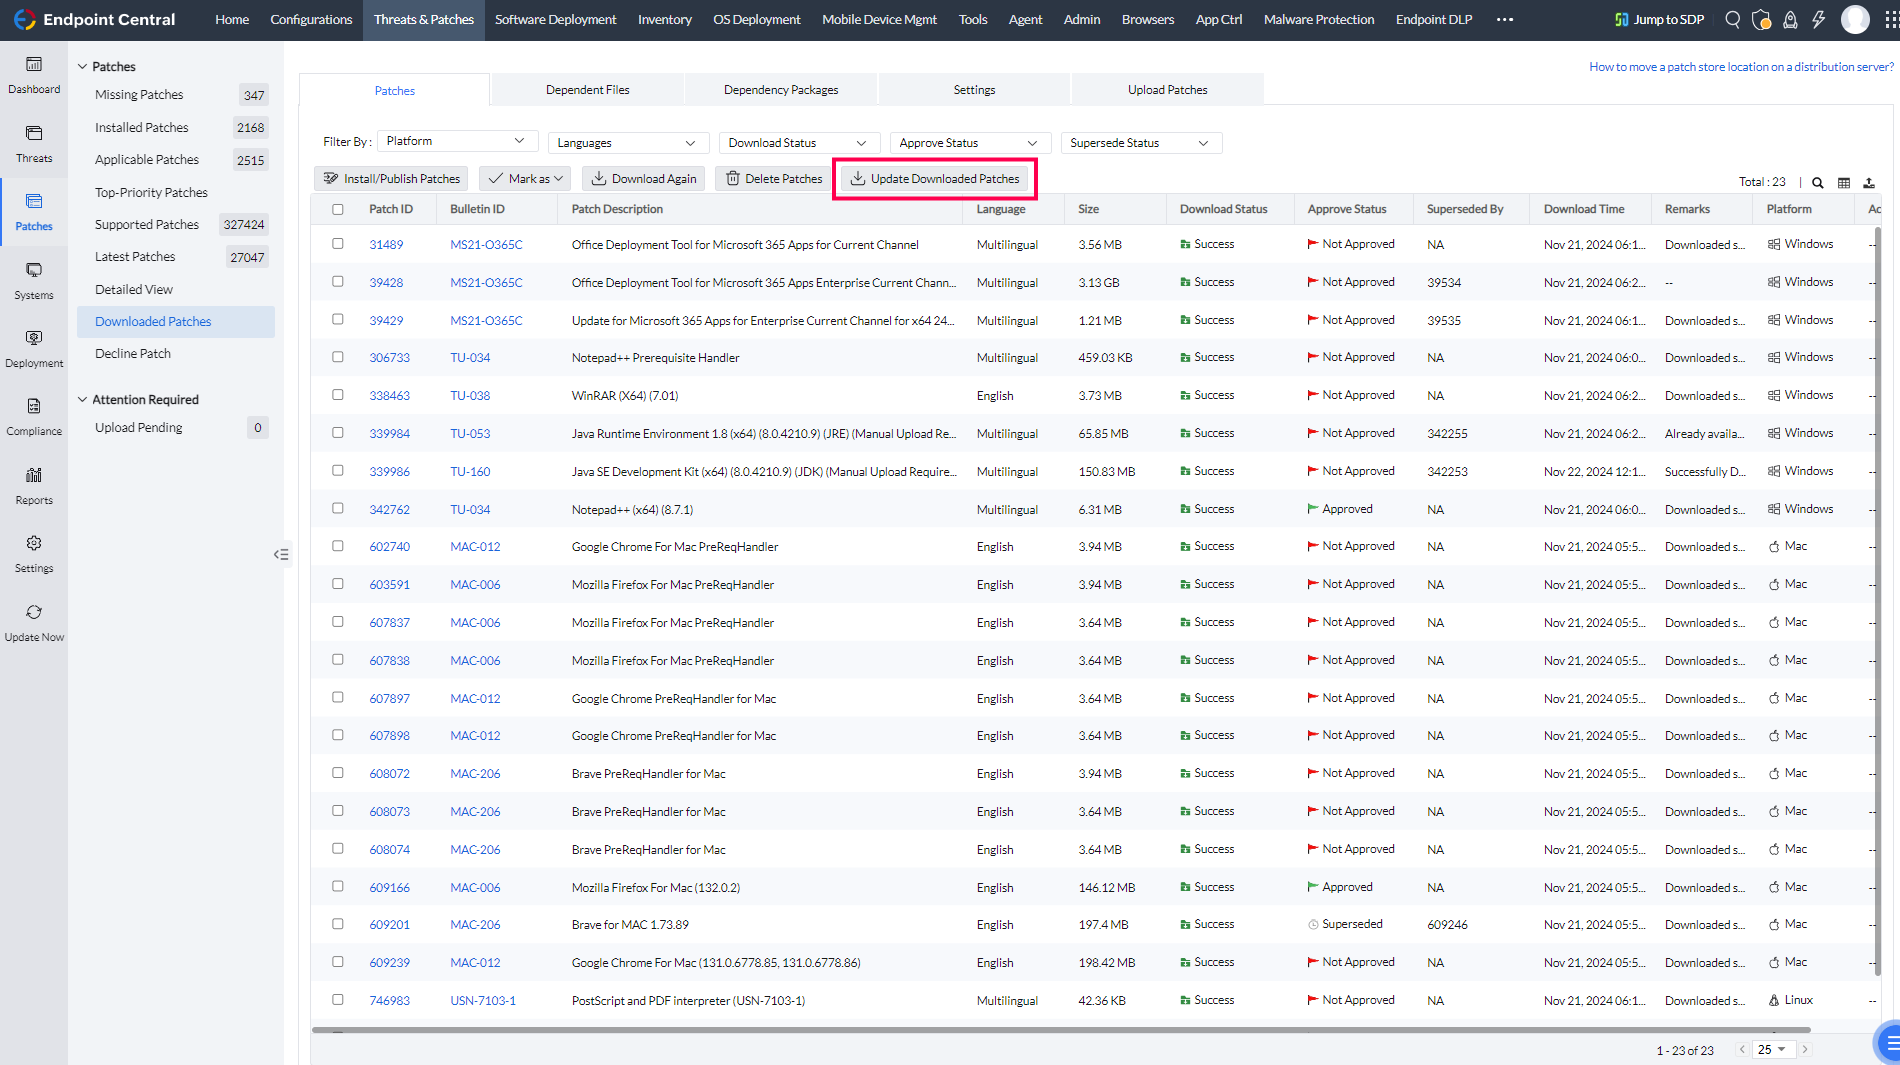
storedirectory to the Endpoint Central server at<Installation_Dir>/webapps/DesktopCentral/Store. This is the default location. If the store path has been changed, copy the files to the configured location. - In the console, open the Downloaded Patches view and click Update Downloaded Patches to register the copied patches in the server database.
- All manually downloaded patches will now appear in the Downloaded Patches view and can be deployed to the required computers.
Patch management has now been successfully configured for the closed network environment.
Running the Tool in a Linux Environment
Use the shell script equivalents of the Windows commands when the Closed Network Tool is run on a Linux machine.
Linux Commands
Update the vulnerability database for Windows and Mac:
./patchsync.sh -c updatedb -b <BUILD_NUMBER>Update the vulnerability database for Windows, Mac, and Linux:
./patchsync.sh -c updatedb -i linux -b <BUILD_NUMBER>Download missing patches:
./patchsync.sh -c dwnpatch -f downloadUrlJson.txtPrerequisites — Java Version
Before running the tool on Linux, ensure the correct Java version is installed and JAVA_HOME is set accordingly.
Java 8 Builds
Ensure jre_1_8_0_192 is installed and set JAVA_HOME as:
/usr/lib/jvm/jre_1_8_0_192Java 11 Builds
Install java-11-openjdk-amd64 and set JAVA_HOME as:
/usr/lib/jvm/java-11-openjdk-amd64After completing the Java prerequisites, follow the steps in Download and Set Up the Closed Network Tool to proceed.