Click here to expand

    Migrate EventLog Analyzer Data from MySQL to MS SQL Database

    EventLog Analyzer allows you to migrate the existing EventLog Analyzer data available in MySQL database to MS SQL database.

    This procedure is applicable only if you are already using EventLog Analyzer with MySQL and you want to change the database to MS SQL.

    Note: Before making changes to the database with the changeDBServer.bat file, it's crucial to ensure that the product is fully operational. Once confirmed, proceed to shut down the product. Once the product has successfully stopped, run the changeDBServer.bat file.
    Note:

    Re-registering the Managed Server after the database has been changed:

    • When the Managed Server is installed, it is registered with Admin Server as Managed Server with MySQL.
    • If the database of the Managed Server is changed from MySQL to MS SQL, the database of the Admin server also needs to be changed from MySQL to MS SQL.
    • Then, the managed server has to be re-registered with Admin Server with the help of <EventLog Analyzer Home>/troubleshooting/registerWithAdminServer.bat file (or registerWithAdminServer.sh file)

    After changing the database, when the Managed Server is started as a service, there will not be any prompt to re-register. The user has to ensure that the Managed Server is re-registered with the Admin Server.

    If the user is migrating a distributed setup, the user needs to migrate the entire distributed setup to MSSQL. All Managed servers along with the admin server should be migrated to MSSQL.

    If you want to configure MS SQL for a fresh installation of EventLog Analyzer server, please refer the Configuring MS SQL Database page and follow the procedure given there.

    The steps to migrate and run the EventLog Analyzer server with SQL SERVER as the database is given below:

    1. Stop the EventLog Analyzer Server/Service.
    2. From the installed MS SQL SERVER, copy the files bcp.exe and bcp.rll to <EventLog Analyzer Home>/bin folder.
    3. Note: If you are copying the above file from SQL server (Version 2012 and above) and EventLog Analyzer is installed in another machine, please install the SQL native client as per the SQL version and CPU type of the EventLog Analyzer machine.

      For MSSQL version 2012, install the native client and for the remaining versions of MSSQL, install the ODBC driver (links given below).

      MSSQL 2012

      https://www.microsoft.com/en-us/download/confirmation.aspx?id=50402

      MSSQL 2014

      https://www.microsoft.com/en-us/download/details.aspx?id=36434

      MSSQL 2016

      https://www.microsoft.com/en-us/download/details.aspx?id=50420

      MSSQL 2017

      https://www.microsoft.com/en-us/download/details.aspx?id=53339

      MSSQL 2019

      64bit link: https://go.microsoft.com/fwlink/?linkid=2137027

      32bit link: https://go.microsoft.com/fwlink/?linkid=2137028

      MSSQL 2022

      64bit link: https://go.microsoft.com/fwlink/?linkid=2249006

      32bit link: https://go.microsoft.com/fwlink/?linkid=2249005

    4. Invoke the <EventLog Analyzer Home>/tools/changeDBServer.bat in command prompt to configure the MS SQL SERVER credentials like ServerName, Port, User Name and Password.
    5. Database Setup Wizard pops-up.
    6. In the wizard screen, select Server Type as SQL Server. Available SQL Server Instances are listed in a combo box. Enter the Device Name and Port of the SQL Server from the instances.
    7. Select the authentication type using the "Connect Using:" option.
    8. The options are:
    9. Note: Ensure that both EventLog Analyzer Server and MS SQL Server are in the same domain and logged in with the same Domain Administrator credentials.

      Windows Authentication

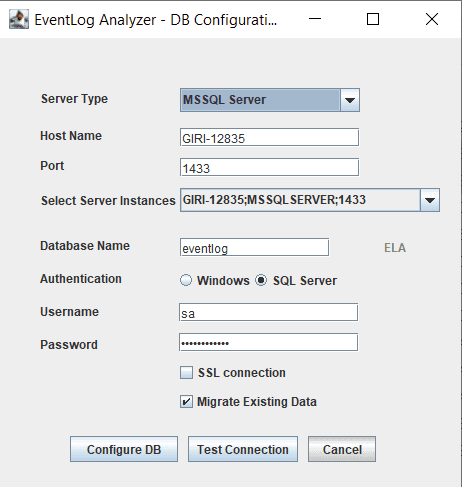
      For EventLog Analyzer version 8.0 (Build 8010) onwards,

      Windows Authentication

      SQL Server Authentication

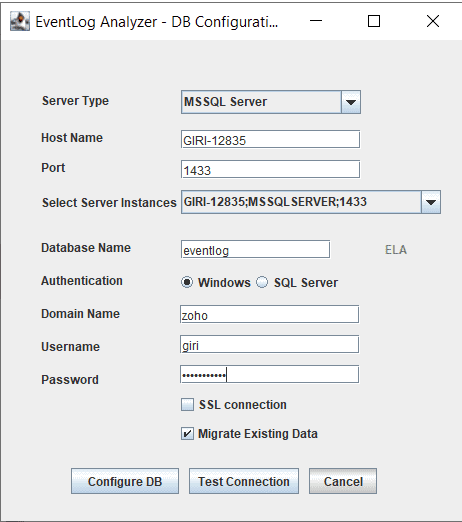
      For SQL Server Authentication, enter the User Name and Password.

      SQL authentication
    10. Click the Test Connection button to verify the correctness of the credentials. If the test fails, recheck and enter the correct credentials.
    11. Click the Configure DB button to save the SQL Server configuration. Note that configuring the settings of the SQL Server database may take a few minutes.
    12. The product will start automatically after the configuration is complete.

    Don't see what you're looking for?

    •  

      Visit our community

      Post your questions in the forum.

       
    •  

      Request additional resources

      Send us your requirements.

       
    •  

      Need implementation assistance?

      Try onboarding

       
    Get download link