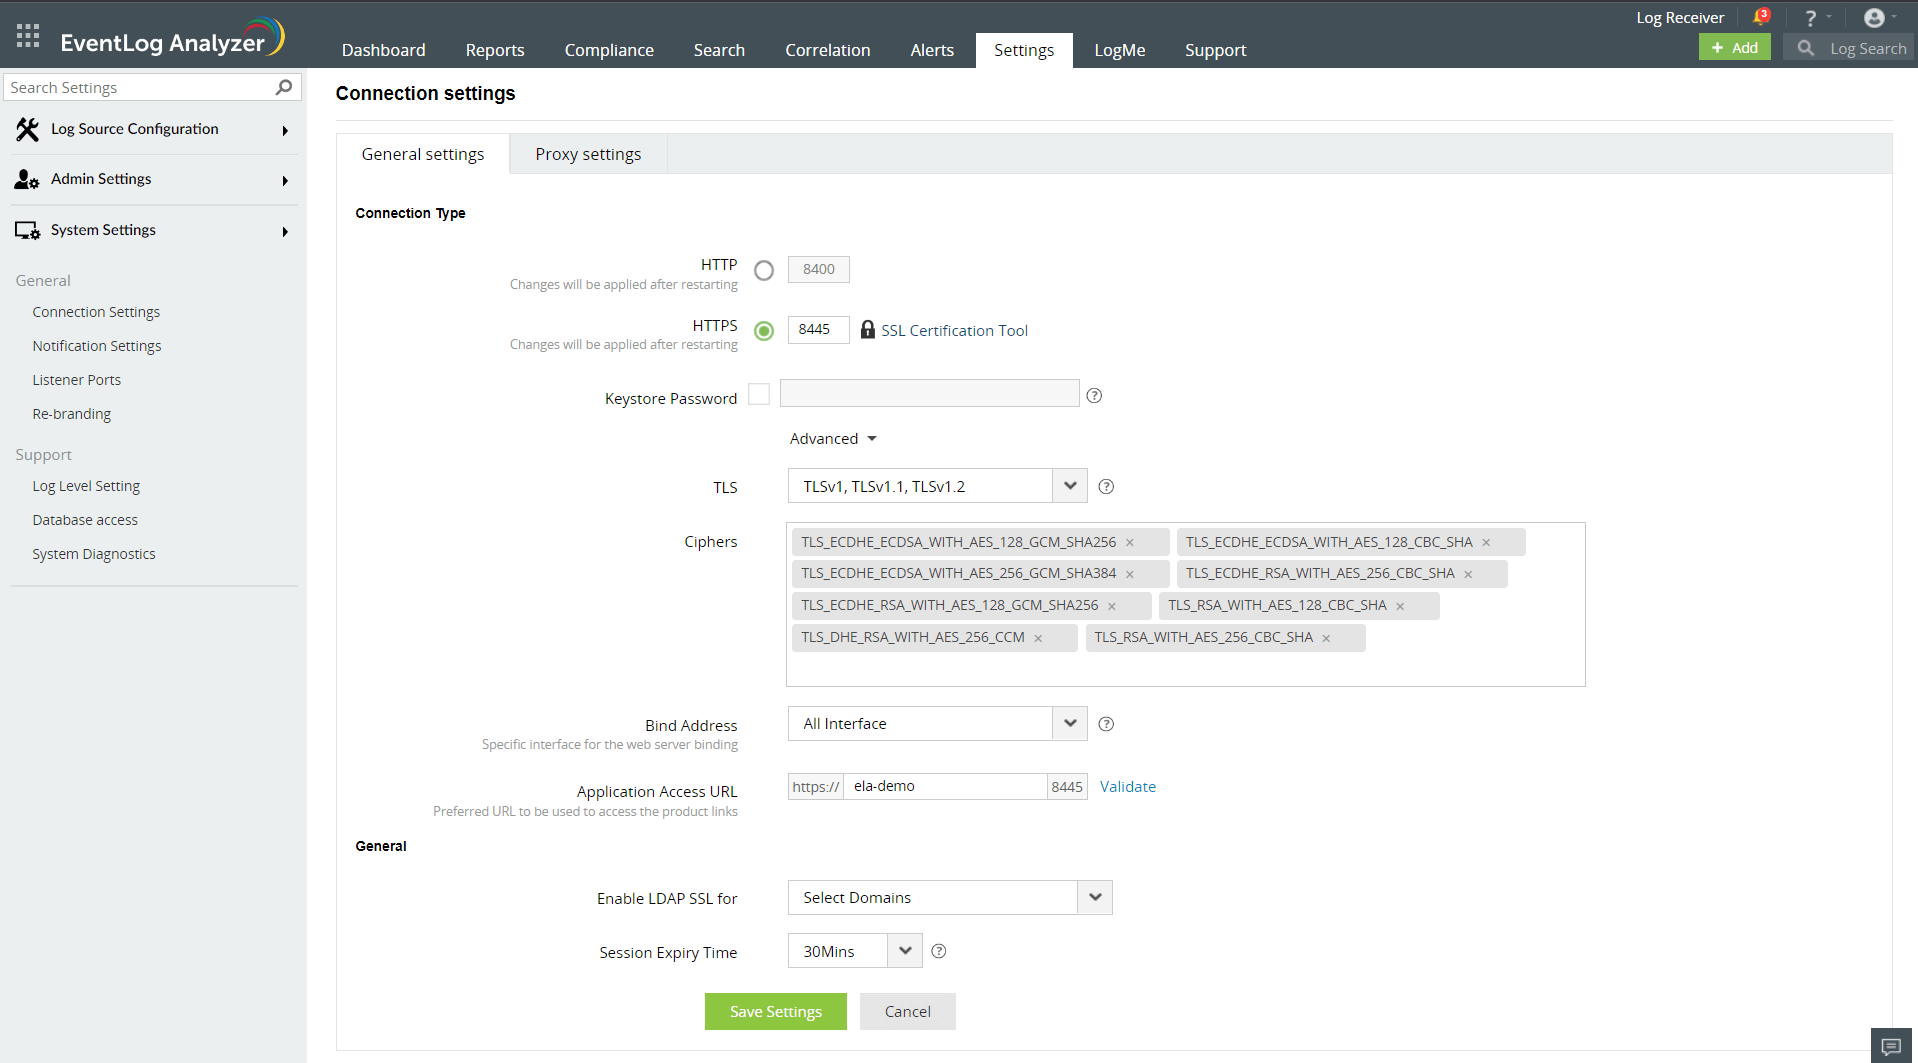
The connection settings for EventLog Analyzer can be modified in the following page:
Settings tab > System Settings > Connection Settings
The Connection Settings page appears as follows:
Enter the following details:
Application Port Number: Specify the http port through which EventLog Analyzer connects to the web client.
SSL Port Number: Specify the SSL port for a secure http connection. EventLog Analyzer also provides a tool to generate a CSR file for SSL certification here.
Note: The http and https port numbers should be different from each other.
Keystore Password: If you require the keystore password to be encrypted, enable this option and provide the required password.
Session Expiry Time: Mention the maximum duration for which a session of EventLog Analyzer can stay idle, following which it expires.
Advanced Settings
TLS: Configure the required TLS protocol to bound with Eventlog Analyzer Server
Ciphers: Select the respective cipher suites compatible with the Above selected TLS version
The list of default ciphers supported in ELA are:
TLS_ECDHE_ECDSA_WITH_AES_128_GCM_SHA256
TLS_ECDHE_ECDSA_WITH_AES_128_CBC_SHA
TLS_ECDHE_ECDSA_WITH_AES_256_GCM_SHA384
TLS_ECDHE_RSA_WITH_AES_256_CBC_SHA
TLS_ECDHE_RSA_WITH_AES_128_GCM_SHA256
TLS_DHE_RSA_WITH_AES_256_CCM
TLS_ECDHE_RSA_WITH_AES_256_GCM_SHA384
Bind address: Select the IP address to which the Eventlog Analyzer web port and its underlying listners should be bound with.
Application Access URL: Specify the DNS host name using which Eventlog Analyzer Network communication would take place between agents
Click on "Save" to save the settings.
Restart EventLog Analyzer for the settings to take effect.
SSL Certification Tool
Steps to apply SSL certificate and enable HTTPS
Let’s see how to generate and apply a SSL certificate for Eventlog Analyzer
Navigate to Settings tab > System Settings > Connection Settings → SSL Certification Tool.
If you don’t have a SSL certificate, select the Generate Certificate option and follow the steps here.
If you already have a SSL certificate, select the Apply Certificate option and follow the steps here.
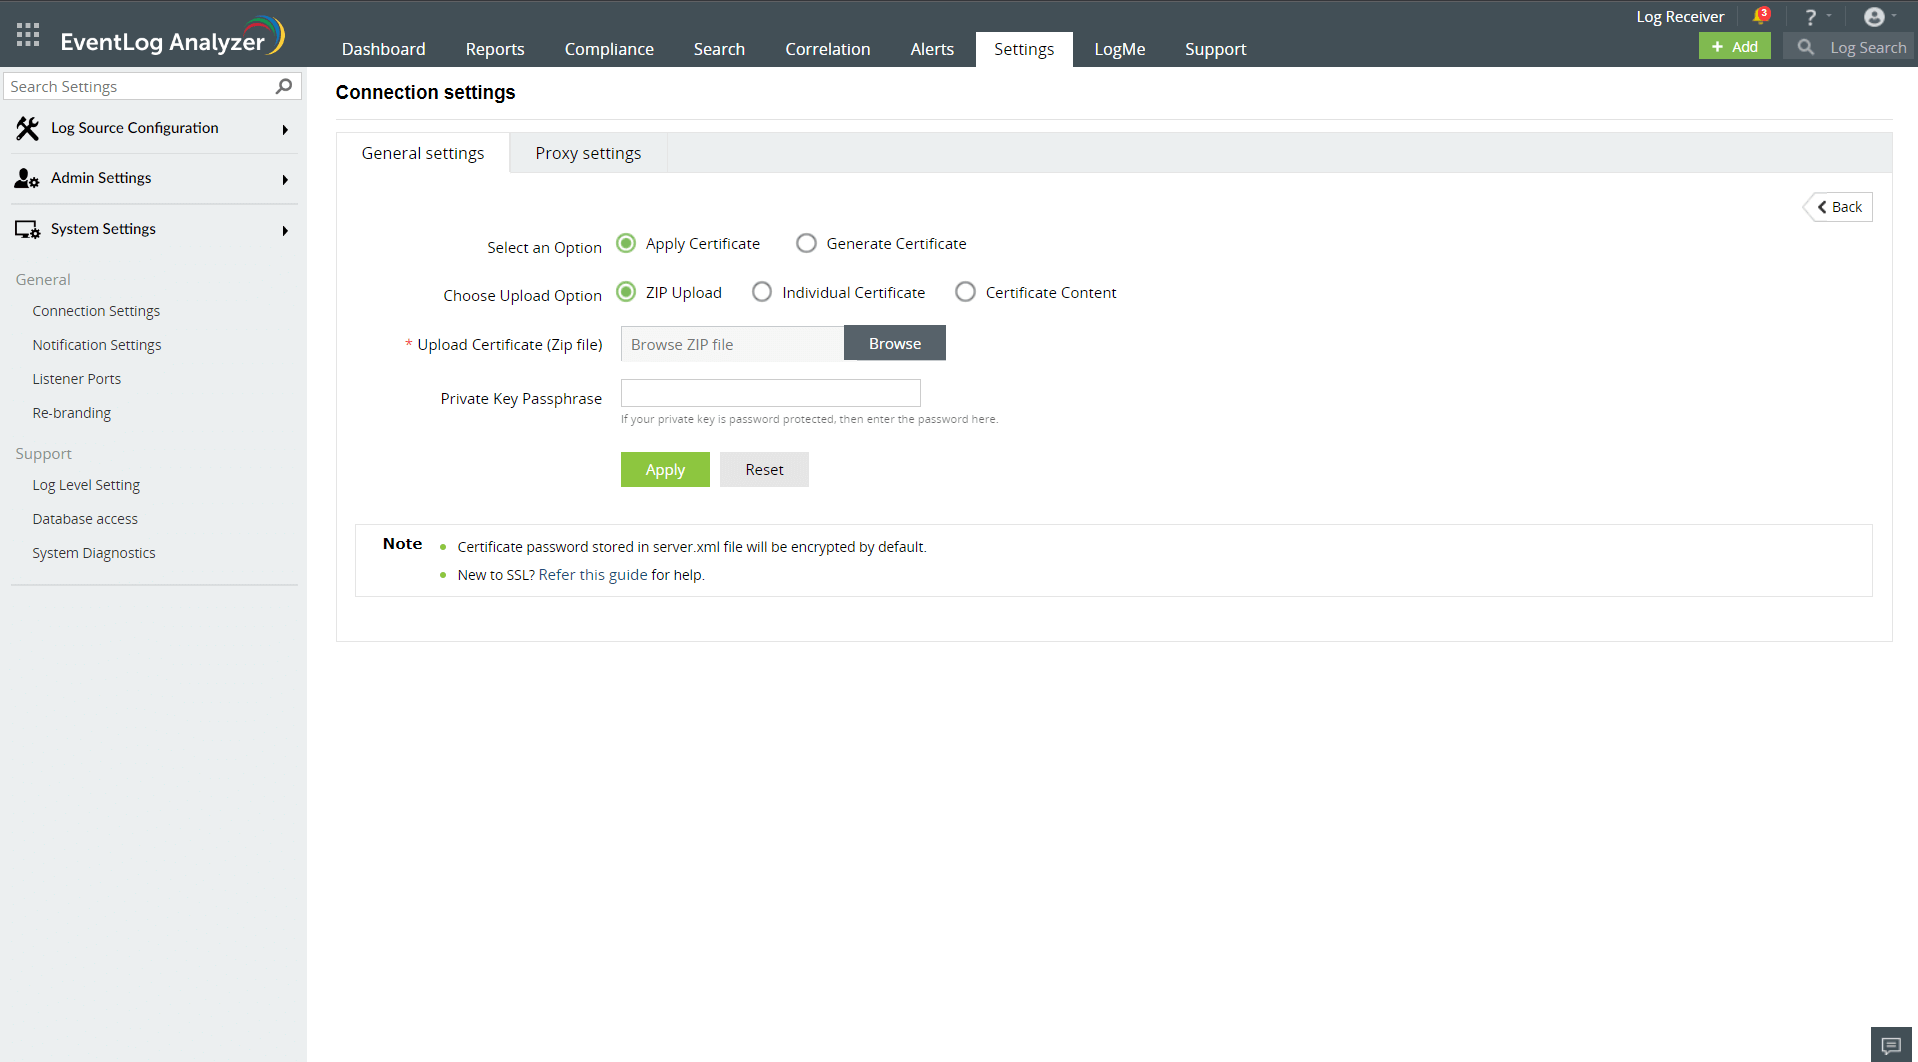
Apply Certificate
If you already have a SSL certificate, follow the steps listed below to apply it.
In the Apply Certificate to drop-down, select the component for which you want to apply the SSL certificate.
Choose an Upload Option based on the certificate file type.
ZIP upload:
If your CA has sent you a ZIP file, then select ZIP Upload, and upload the file.
If your CA has sent you individual certificate files—user, intermediary, and root certificates, then you can put all these certificate files in a ZIP file and upload it.
Individual Certificates:
If your CA has sent you just one certificate file (PFX or PEM format), then select Individual Certificates, and upload the file.
If your CA has sent the certificate content, then paste the content in a text editor and save it as a CER, CRT, or PEM format, and upload the file.
Certificate Content:
If your CA has sent just the certificate content, then choose Certificate Content option, and paste the entire content.
If the certificate file requires a password, then enter it in the Certificate Password field. Or, if the certificate contains a password-protected private key, enter the password in the Private Key Passphrase field.
Note: Only Triple DES encrypted private keys are currently supported.
Click Apply.
Finally, restart EventLog Analyzer.
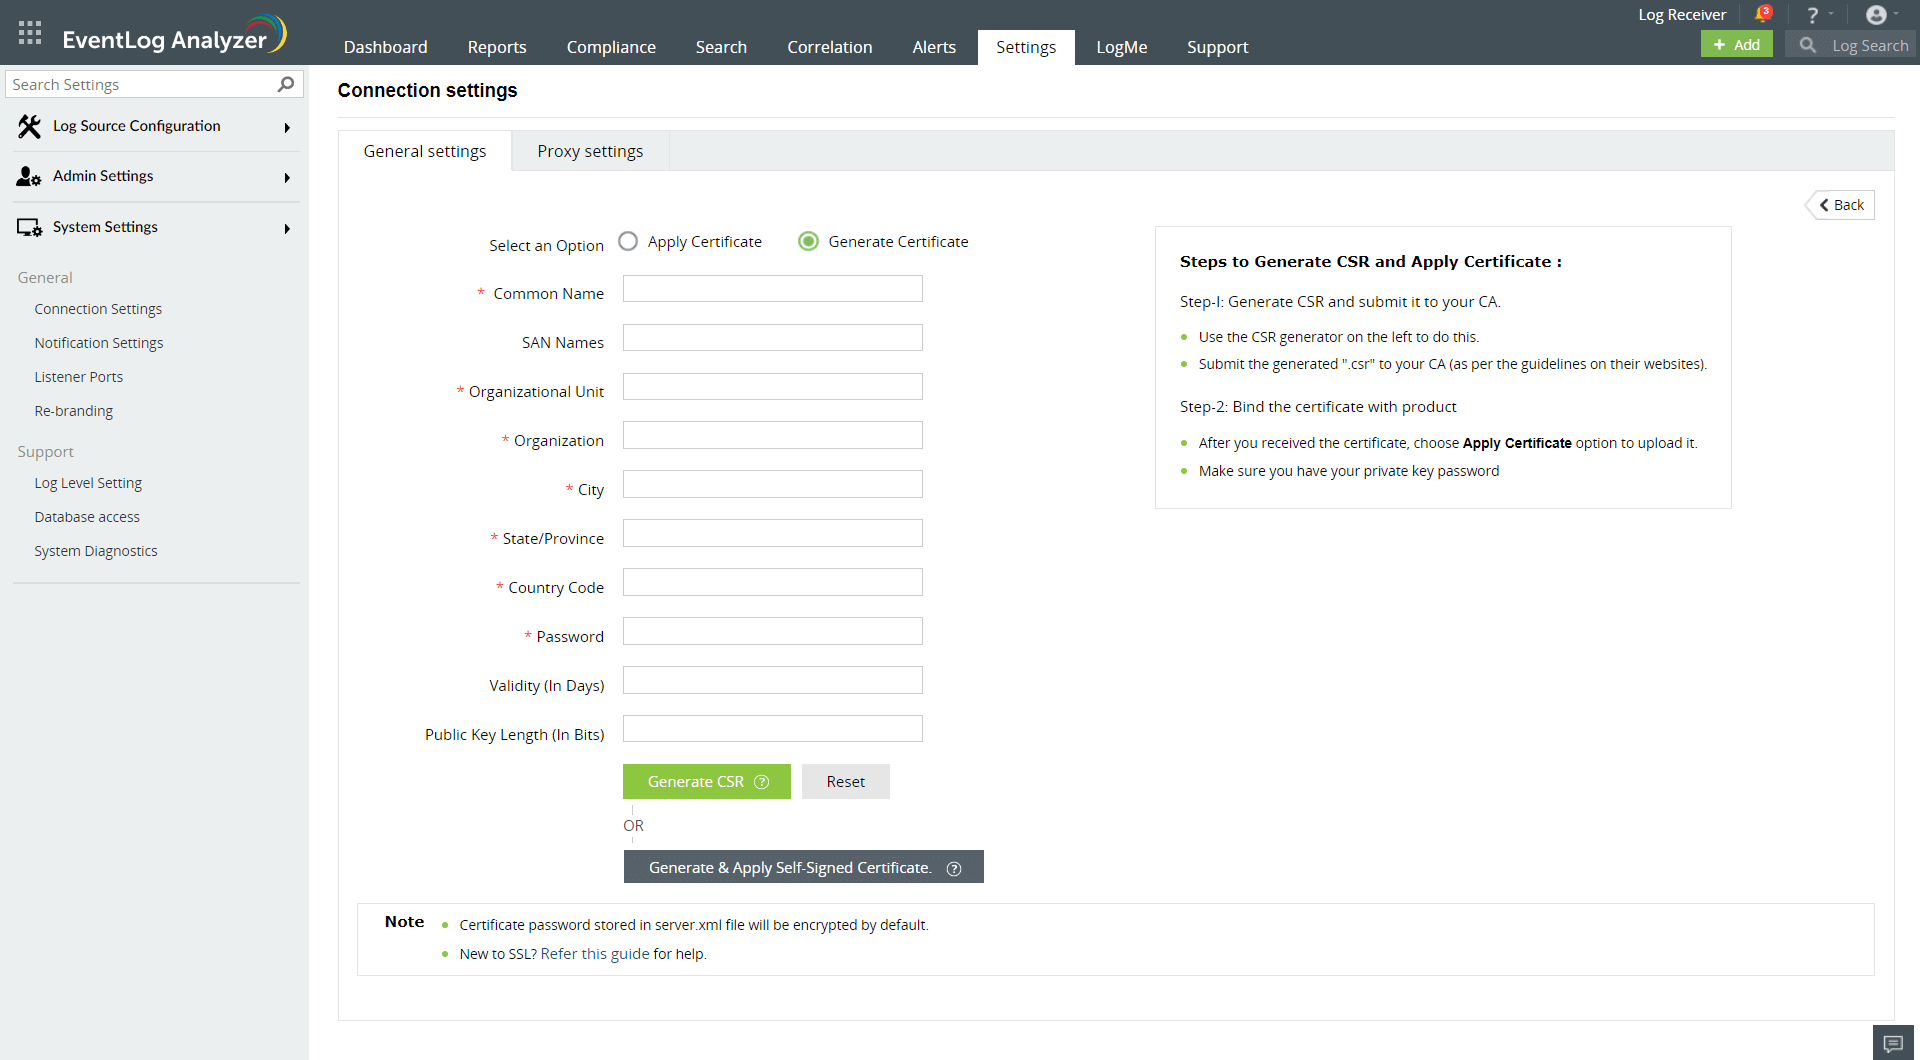
Generate Certificate
In the Common Name field, enter the name of the server.
Example: For the URL https://servername:9251, the common name is servername.
In the Organizational Unit field, enter the department’s name which you want to be displayed in the certificate.
In the Organization field, enter the legal name of your organization.
In the City field, enter the name of the city as provided in your organization’s registered address.
In the State/Province field, enter the name of the state or province as provided in your organization’s registered address.
In the Country Code field, enter the two letter code of the country where your organization is located.
In the Password field, enter a password that consists of at least 6 characters to secure the keystore.
In the Validity (In Days) field, specify the number of days for which the SSL certificate will be considered valid.
Note: When no value is entered, the certificate will be considered to be valid for 90 days.
In the Public Key Length (In Bits) field, specify the size of the public key.
Note: The default value is 2048 bits and its value can only be incremented in multiples of 64.
After all values have been entered, you can select either of these two options:
Generate CSR
This method allows you to generate the CSR file and submit it to your CA. Using this file, your CA will generate a custom certificate for your server.
Click Download CSR or manually get it by going to the <Install_dir>\Certificates folder.
Once you have received the certificate files from your CA, follow the steps listed under Apply Certificate to apply the SSL certificate.
Apply Self-signed Certificate
This option allows you to create a self-signed certificate and apply it instantly in the product. However, self-signed SSL certificates come with a drawback. Anyone accessing the product secured with a self-signed SSL certificate will be shown a warning telling them that the website is not trusted, which may cause concern.
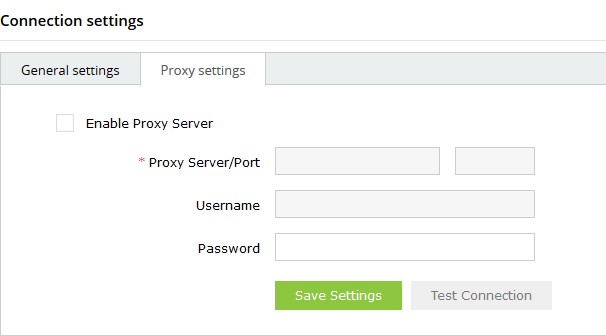
Proxy Settings
Navigate to Settings > System Settings > Connection Settings > Proxy Settings.
In Proxy Settings, select the Enable Proxy Server check box.
Configure the server by entering Server Name/Port, Username and Password in provided fields.
Click on Save Settings to save the configured proxy server.
Extract EventLog Analyzer SSL Certificate
If EventLog Analyzer utilizes a self-signed certificate, proceed as follows to extract the certificate in the desired format. If a self-signed certificate hasn't been generated through EventLog Analyzer's Certification Tool, begin by generating the certificate through the tool, then continue with the subsequent steps.
 Click here to expand