Two-Factor Authentication
You can enable Two-Factor Authentication in Exchange Reporter Plus to secure all logins. Exchange Reporter Plus supports five modes of authentication. You can choose one or more methods that work best for you; if you configure multiple login modes, the technician is given the liberty to choose one method from the list. To enable Two-Factor Authentication:
- Go to the Settings tab.
- Navigate to Admin → Utilities → Two-Factor Authentication.
- Click the button corresponding to Two-Factor Authentication to enable this feature.
Note: You can also disable this feature for all technicians at any point of time using the same steps. Click the same button again to disable it.
Supported authentication methods
Exchange Reporter Plus supports the following authentication methods:
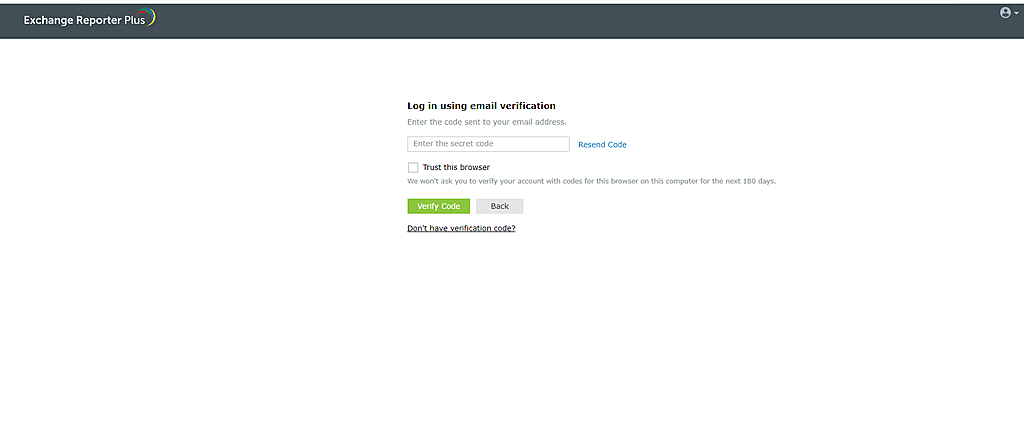
Email Verification
Technicians can receive verification codes from Exchange Reporter Plus via email, which they can enter to log in to the product. To enable the Email Verification method:
- Go to the Email Verification drop-down.
- Select Enable Email Verification.
- Modify the Subject and Message content as required.
- You can also attach other attributes, like username or codes, to the message by clicking the Macros option in the bottom-right corner.
- Click Save.
Note: This setting fetches values from the already configured email server in Exchange Reporter Plus. If you haven’t already configured an email server, you can click the Configure Now option corresponding to Email Verification to add email server details.
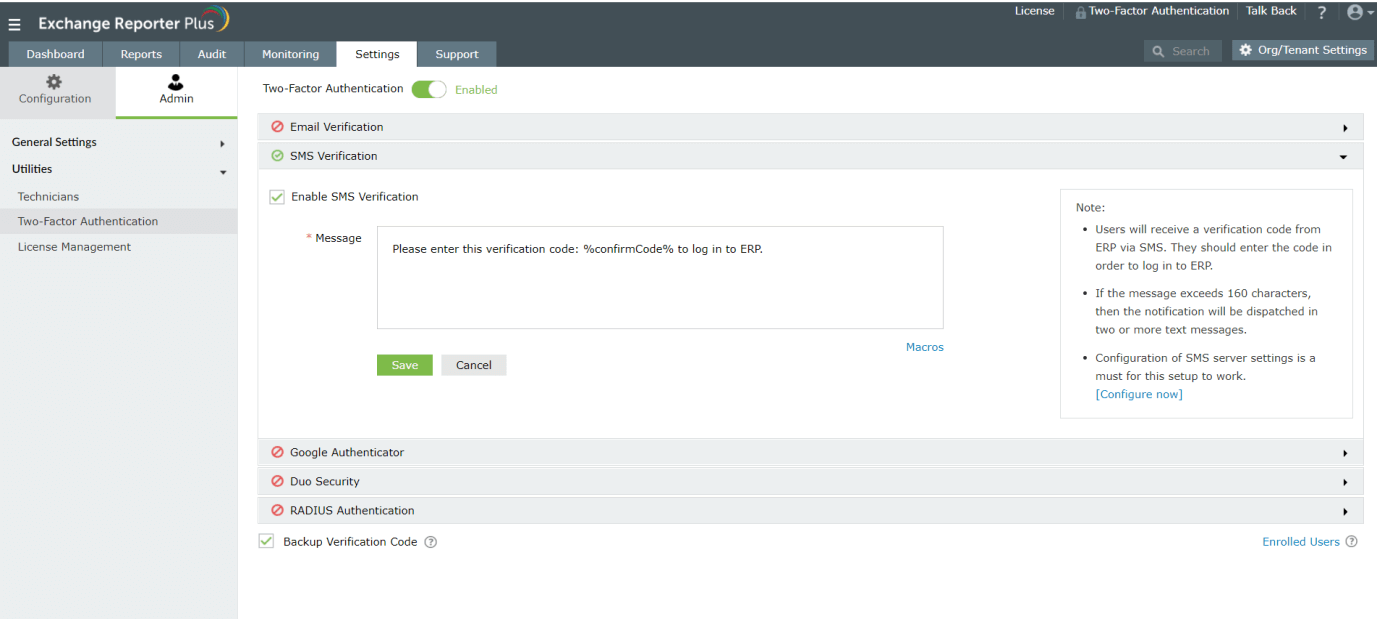
SMS Verification
Technicians can also receive verification codes from Exchange Reporter Plus via SMS. To enable the SMS Verification method:
- Go to the SMS Verification drop-down.
- Select Enable SMS Verification.
- Modify the Message content as required.
Note: Please note that if the message exceeds 160 characters, the notification will be dispatched in two or more text messages.
- You can also attach other attributes, like username or codes, to the message by clicking the Macros option in the bottom-right corner.
- Click Save.
Note: This setting fetches values from the already configured SMS server in Exchange Reporter Plus. If you haven’t already configured an SMS server, you can click the Configure Now option corresponding to SMS Verification to add SMS server details.
Google Authenticator
If your organization uses Google Authenticator for security purposes, Exchange Reporter Plus supports that too. To enable the Google Authenticator method for verification:
- Go to the Google Authenticator drop-down.
- Select Enable Google Authenticator.
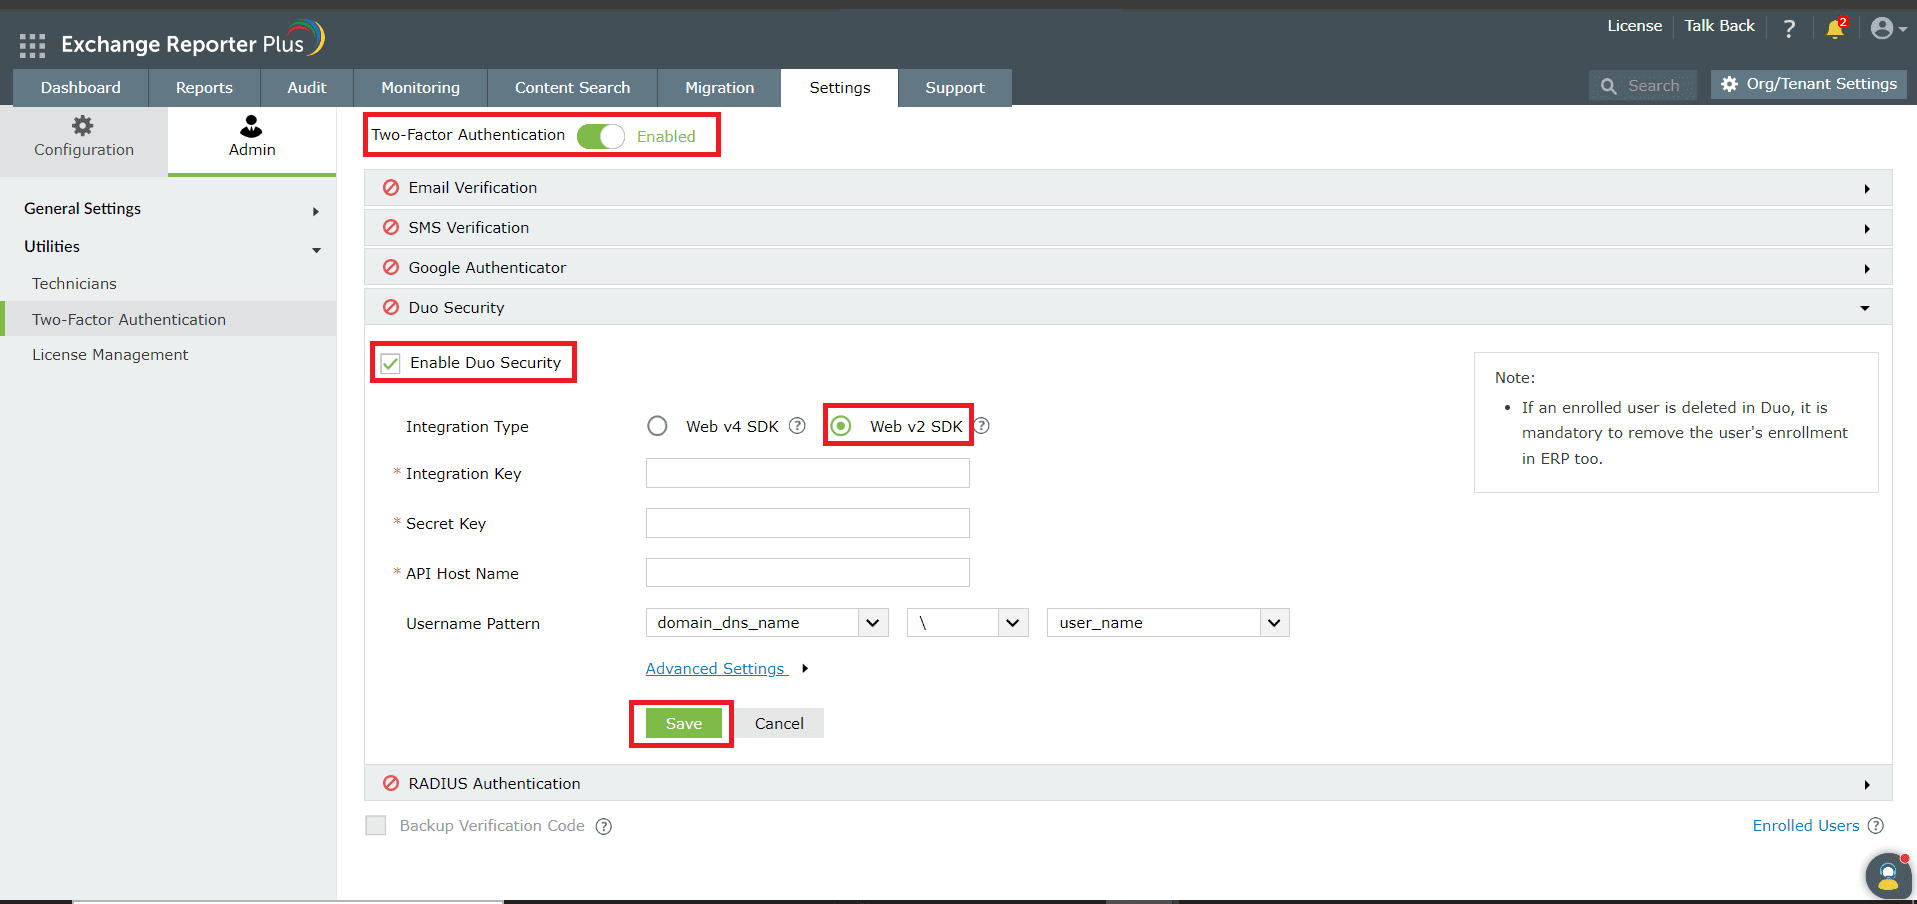
Duo Security
If your organization uses Duo Security for two-factor authentication, it can be integrated with Exchange Reporter Plus to secure logins. Users can approve a push notification or enter the six-digit security code generated by the Duo mobile app to log in to Exchange Reporter Plus. Authentication via Duo Security can be configured in two ways in Exchange Reporter Plus: Web v2 SDK and Web v4 SDK.
Web v2 SDK uses a traditional Duo prompt, which will be displayed in an iframe in Exchange Reporter Plus, whereas Web v4 SDK uses Duo's OIDC-based Universal Prompt with a redesigned UI that redirects users to Duo for authentication.
Note: Duo Security has phased out Web v2 SDK, so it is recommended to switch to Web v4 SDK.
Prerequisite:
- Add the API hostname and admin console (e.g., https://admin-325d33c0.duosecurity.com) as a trusted site or intranet site in the users' machines if they are using older versions of Internet Explorer.
Web v4 SDK configuration steps
Note: For secure Web v4 SDK authentication, a secure connection (HTTPS) is required. To ensure Duo authentication works properly, please avoid accessing the product using its IP address.
- Log in to your Duo Security account (e.g., https://admin-325d33c0.duosecurity.com) or sign up for a new account and log in.
- Go to Applications and click Protect an Application.
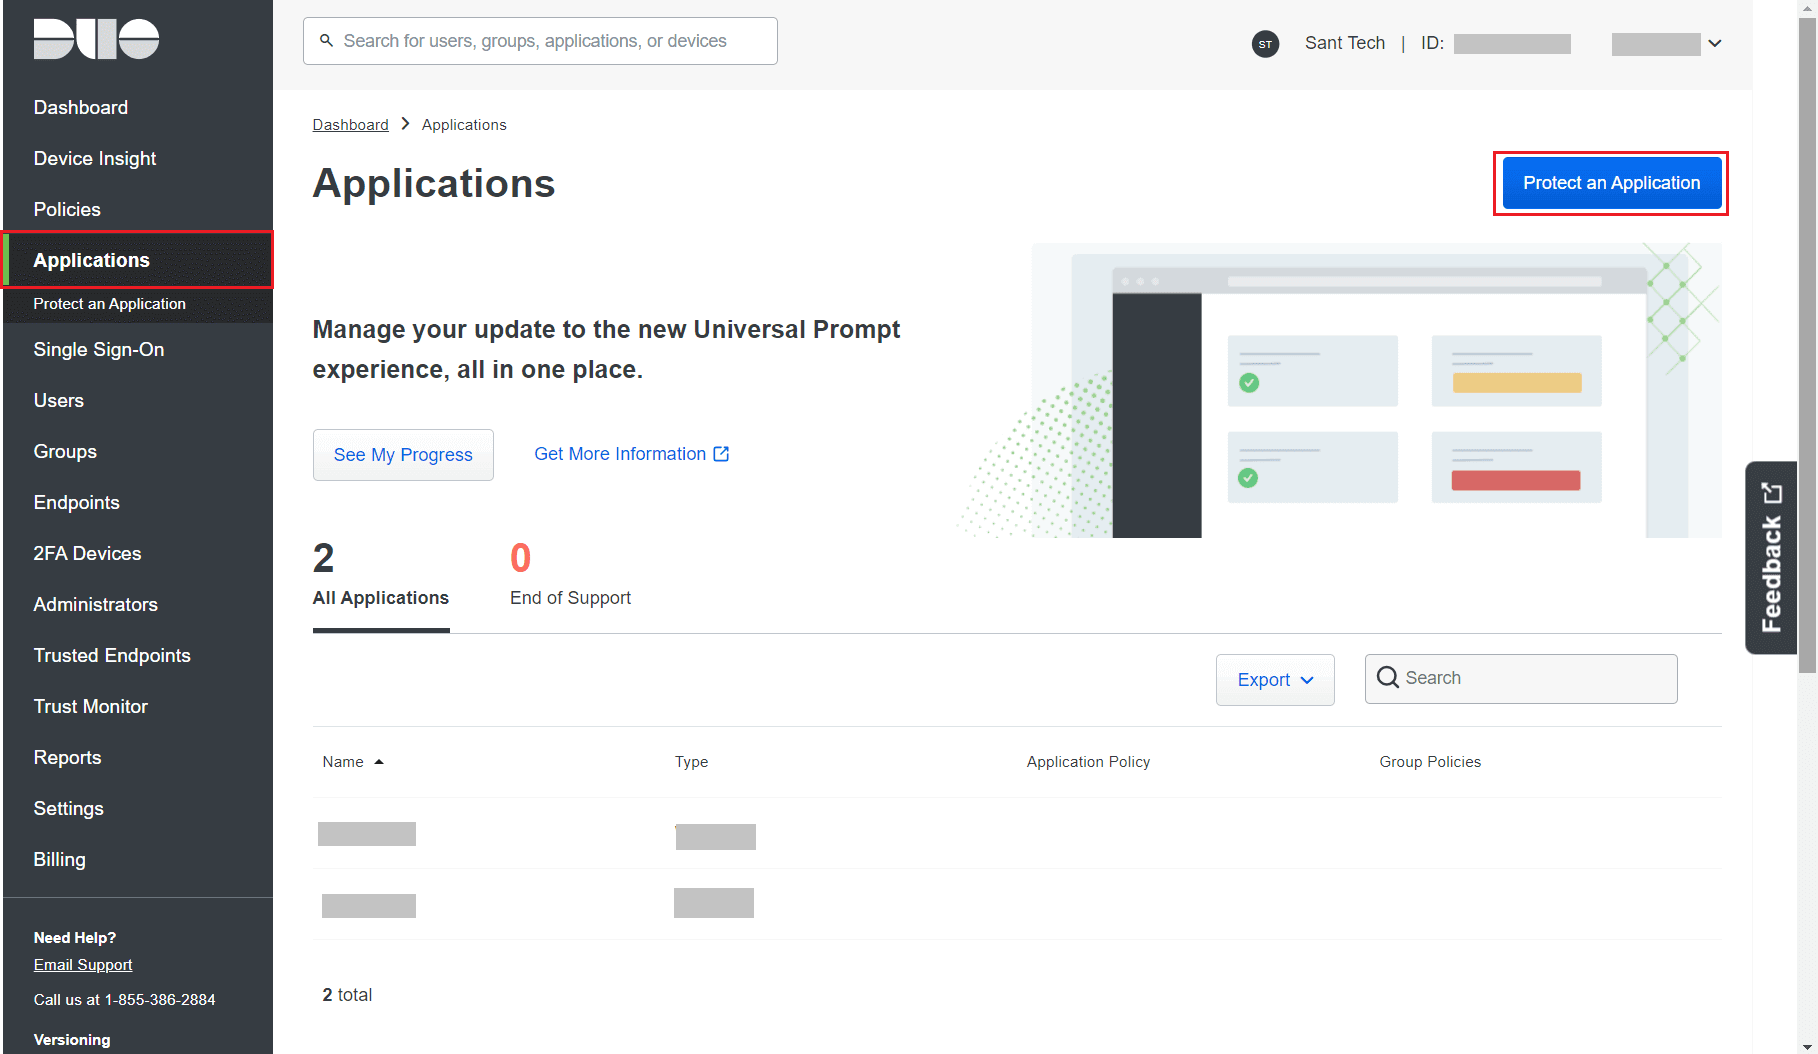
- Search for Web SDK and click Protect.

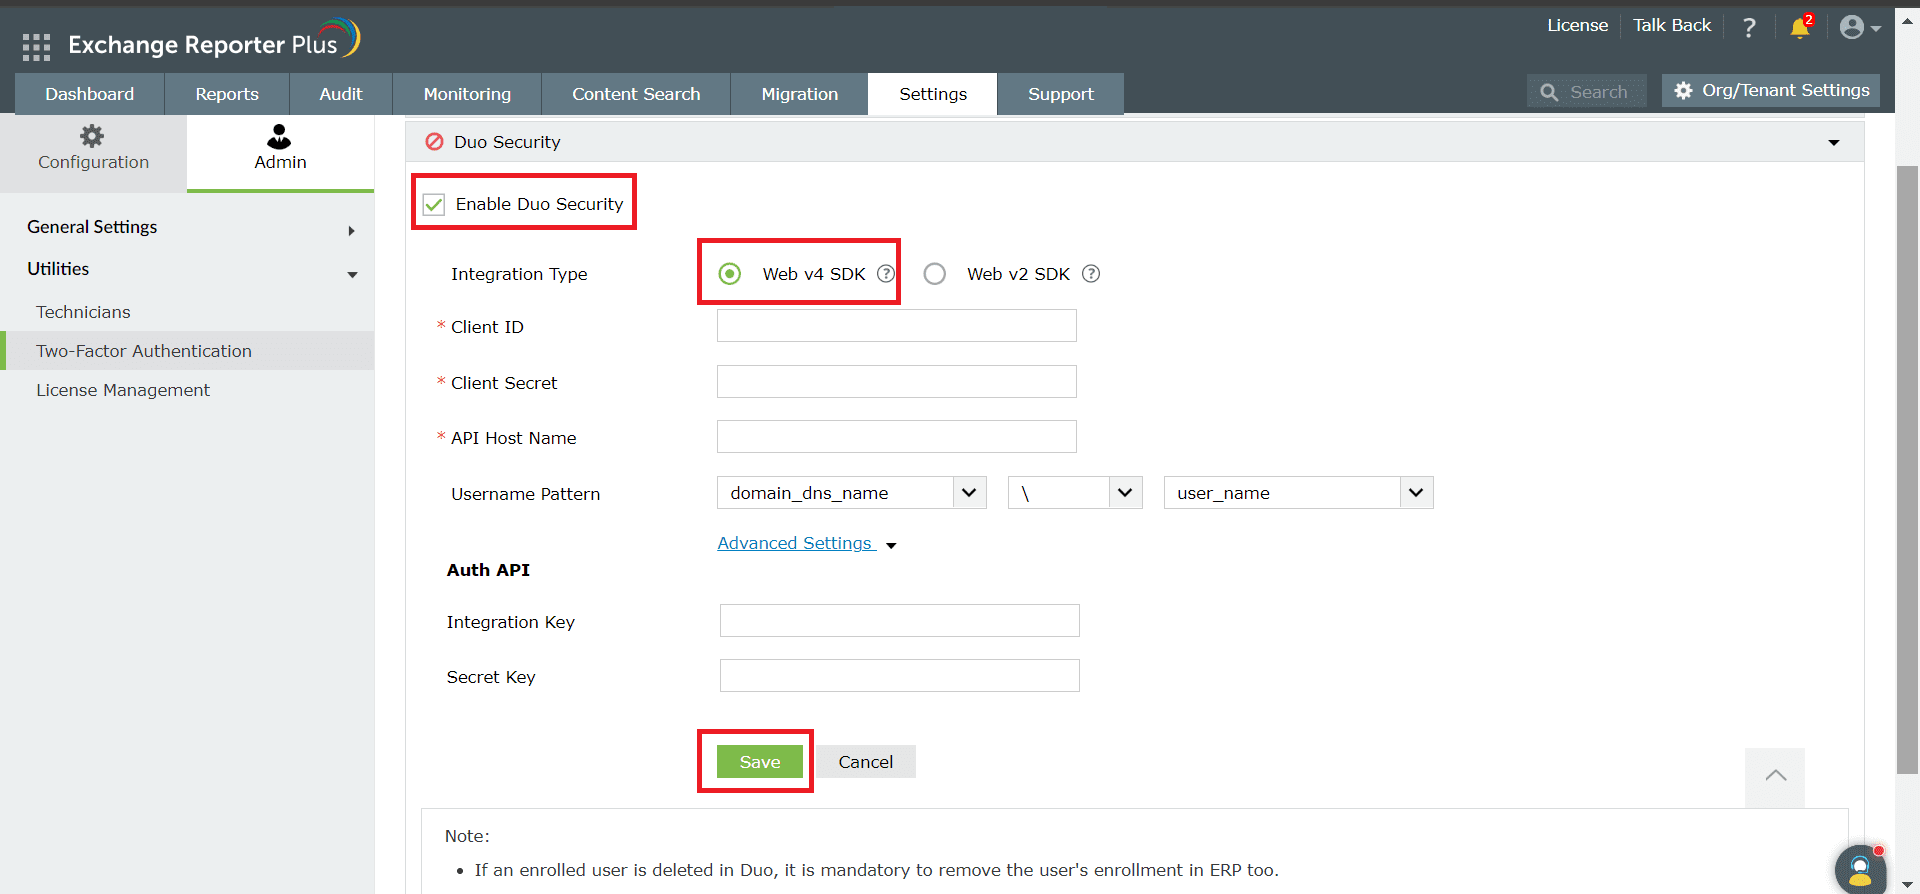
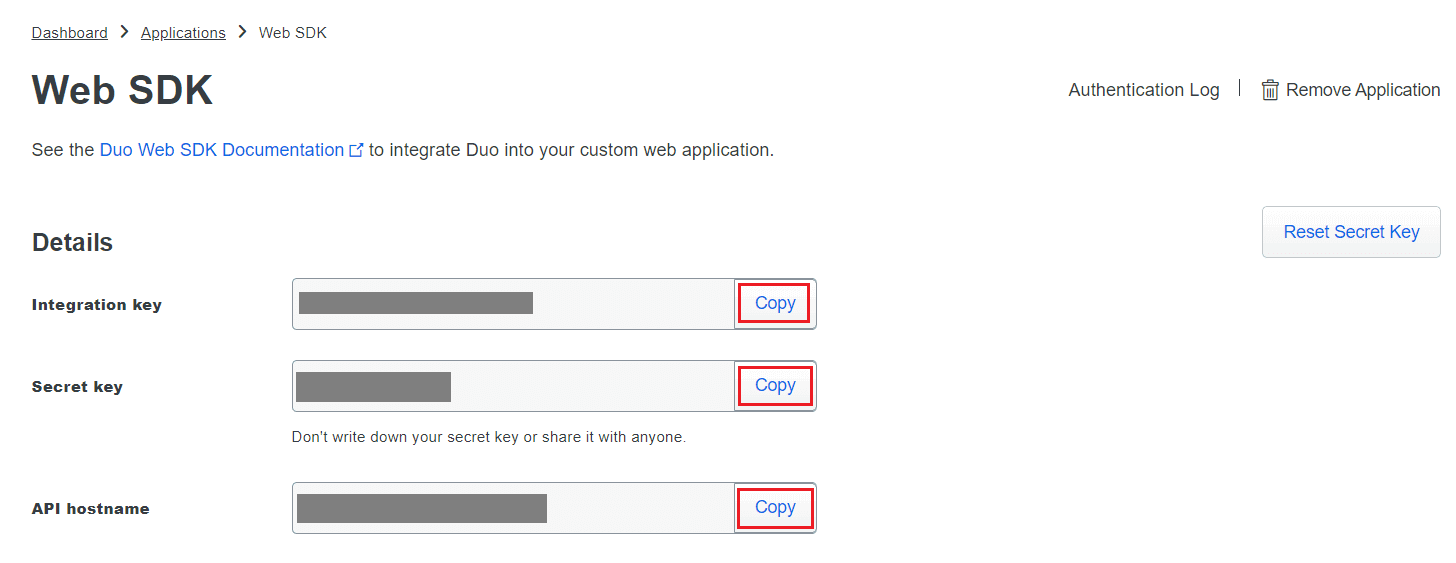
- Copy the Client ID, Client Secret, and API Host Name values.
- In Exchange Reporter Plus, navigate to Settings > Admin > Utilities > Two-Factor Authentication.
- Check the Enable Duo Security box and select Web v4 SDK for the Integration Type.
- Paste the Client ID, Client Secret, and API Host Name obtained from the Duo Admin Panel in the respective fields.
- Enter the same username pattern used in Duo Security in the Username Pattern field.
- Click Save.
Web v2 SDK configuration steps
- Log in to your Duo Security account (e.g., https://admin-325d33c0.duosecurity.com) or sign up for a new account and log in.
- Go to Applications and click Protect an Application.

- Search for Web SDK and click Protect.

- Copy the Integration key, Secret key, and API hostname values.
- In Exchange Reporter Plus, navigate to Settings > Admin > Utilities > Two-Factor Authentication.
- Check the Enable Duo Security box and select Web v2 SDK for the Integration Type.
- Paste the Integration Key, Secret Key, and API Host Name obtained from the Duo Admin Panel in the respective fields.
- Enter the same username pattern used in Duo Security in the Username Pattern field.
- Click Save.
Note: If an enrolled user is deleted in Duo Security, it is mandatory to also remove the user's enrollment in Exchange Reporter Plus and reconfigure it.
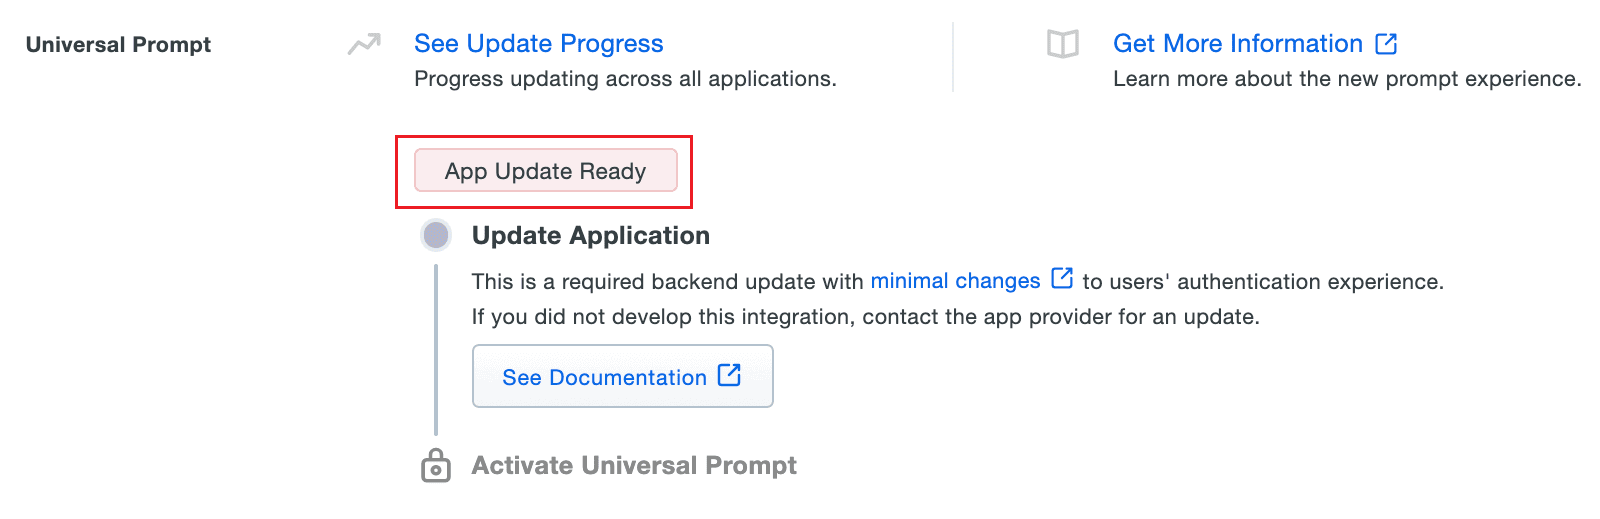
Steps to migrate to the new Universal Prompt
- In the Duo Admin Panel, select the Web SDK application, which was previously configured for Exchange Reporter Plus, and copy the Integration key, Secret key, and API hostname values.
- Scroll down to the Universal Prompt section. The App Update Ready message will be displayed, indicating that Universal Prompt can now be activated for Exchange Reporter Plus.
- In Exchange Reporter Plus, navigate to Settings > Admin > Utilities > Two-Factor Authentication > Duo Security.
- Click Web v4 SDK and paste the Integration key, Secret key, and API hostname values in the Client ID, Client Secret, and API Host Name fields respectively.
- Once the Web v4 SDK is configured in Exchange Reporter Plus and a user authenticates through the frameless Duo v4 SDK, the App Update Ready message in Duo Admin Panel will be updated and the New Prompt Ready message will be displayed.
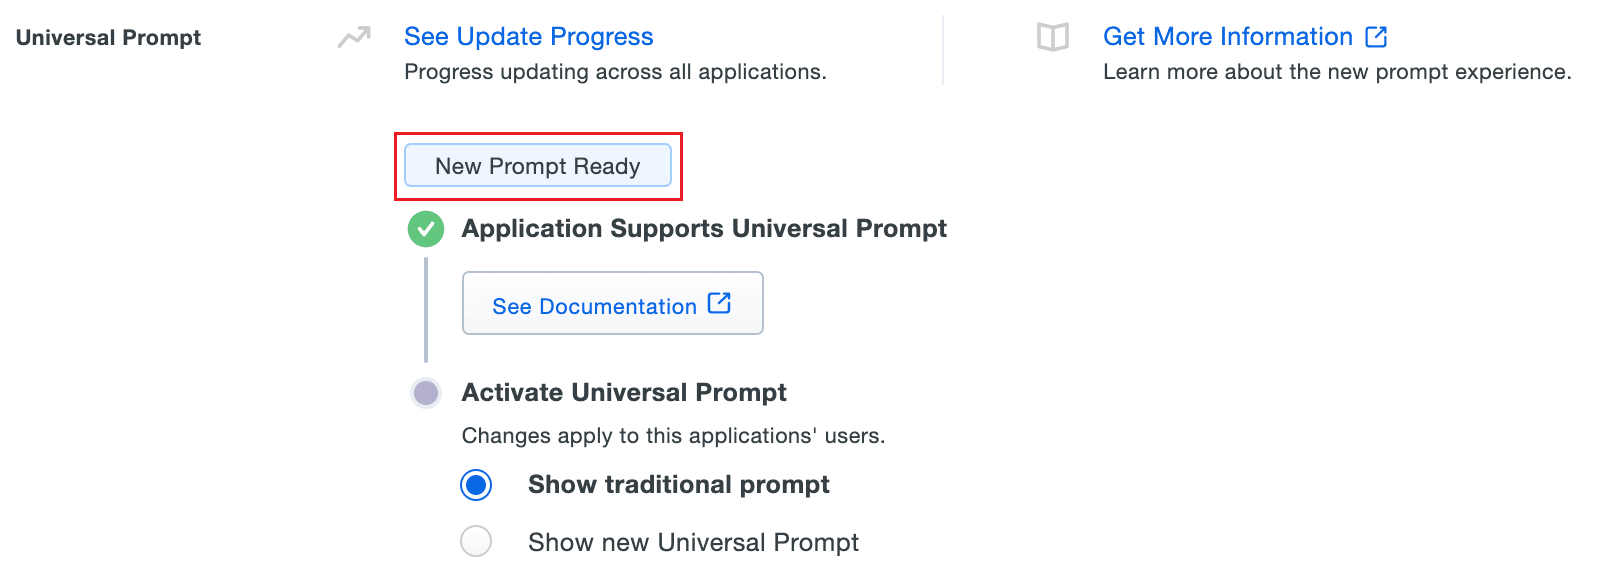
- Select Show new Universal Prompt to activate the Universal Prompt for Exchange Reporter Plus.
RADIUS Authentication
When RADIUS Authentication is enabled, end users can use their username and password in the RADIUS server to log in to Exchange Reporter Plus. To enable the RADIUS Authentication method for Exchange Reporter Plus:
- Go to the RADIUS Authentication drop-down.
- Select Enable RADIUS Authentication.
- Enter the Server Name or IP Address and Server Port.
Note: By default, the server port used is 1812.
- Enter the Authentication Scheme, Secret Key, and Username Pattern for your RADIUS server.
- You can also choose a Request Time Out value for the server if you prefer.
- Click Save.
Note: When high availability is enabled, please add Exchange Reporter Plus' virtual IP address in the RADIUS server client machine.
Other features
- Backup Verification Code
Select the Backup Verification Code checkbox if you would like to provide backup support for user logins. In some cases, technicians may face issues with the configured login methods, or could lose access to the corresponding asset (like mobile phones for SMS verification). The backup verification codes generated can be used to access the product easily. You can access the five backup verification codes generated by following the steps below:
- Go to the Settings tab.
- Navigate to Admin → Utilities → Two-Factor Authentication.
- Click the Two-Factor Authentication option in the top-right corner of the page.
- Click Manage backup verification codes. A pop-up displaying your five backup codes will open.
- You can download, print, or email the backup codes to your personal email address for safekeeping.
- Click OK.
- Enrolled Users
This option in the bottom-right corner of the page gives you the list of technicians who have logged in using the Two-Factor Authentication method. An admin can use this option to delete a technician’s account in order to make them enroll again.
- Click the Enrolled Users option.
- Select the names of the technicians.
- Click the
 icon corresponding to each account to delete from the list.
Note: The deleted technicians must complete the entire enrollment process again.
- Click OK.
- Modify Authentication Mode
You can, at any point in time, make changes to the authentication mode configured by following the steps below:
- Go to the Settings tab.
- Navigate to Admin → Utilities → Two-Factor Authentication.
- Click the Two-Factor Authentication option in the top-right corner of the page.
- Go to Modify Authentication mode.
- Enter the new inputs prompted in regards to the configuration method.
- Confirm by entering the code generated. Changes will be saved automatically once you click Verify Code.
Once the Two-Factor Authentication settings are configured, technicians will be prompted to enter the necessary credentials for a second mode of authentication at the next login.
On choosing the Trust this browser option, a technician will not be prompted to enter credentials related to the second authentication factor for the next 180 days while accessing Exchange Reporter Plus from the same browser.
Reset two-factor authentication enrollment
If you have lost your authentication device or cannot retrieve the verification code required to complete authentication, you can reset the secondary factor in two-factor authentication for the default admin account using this option.
Note: Authentication factor reset can be done only for the default admin account.
To reset the authentication factor:
- Navigate to the <installation directory>\bin folder. By default, the installation path is C:\Program Files\ManageEngine\Exchange Reporter Plus\bin.
- Click and run the resetAdminTFAEnrollment.bat file available under this path.
- Restart Exchange Reporter Plus.
- You can now re-enroll for the secondary authentication factor by logging in to Exchange Reporter Plus and following the steps mentioned above on this page.
 ADManager Plus
 ADAudit Plus
 ADSelfService Plus
 M365 Manager Plus