Installing an SSL certificate in ADSelfService Plus
Overview
The SSL certification tool is where you put an SSL certificate in place so that ADSelfService Plus can serve its portal over an encrypted HTTPS connection. It secures the link between the ADSelfService Plus server and the web browsers of the people who use the portal, protecting credentials and other data while they travel between the two.
Administrators use the tool in one of two ways: to apply an SSL certificate they already have, or to create a new one. When creating a certificate, the tool can generate a certificate signing request (CSR) to send to a Certificate Authority for signing, or generate a self-signed certificate and apply it immediately. The tool is the single place to complete certificate setup for ADSelfService Plus, whichever route an organization's security policy calls for.
Prerequisites
- ADSelfService Plus must be set to run over HTTPS. You open the SSL certification tool from the Connection Settings tab after selecting ADSelfService Plus Port [https].
- To apply an existing certificate, have the certificate file ready, along with its password if the file is password protected.
How it works
SSL encrypts the data exchanged between the ADSelfService Plus server and the browsers of the people using the portal, so that sensitive information cannot be read in transit. For the server to use SSL, it needs an SSL certificate, which proves the server's identity to browsers and provides the key material used to establish the encrypted connection.
A certificate can either be issued by a Certificate Authority or self-signed. A CA-signed certificate is vouched for by an authority that browsers already trust, so connections are established without any warning; obtaining one involves generating a certificate signing request that packages the server's identifying details and its public key for the CA to sign, while the matching private key stays on the server in a keystore. A self-signed certificate is generated and signed by ADSelfService Plus itself and encrypts traffic just as effectively, but because no trusted authority vouches for it, browsers warn users that the connection is not trusted.
Configuration instructions
Opening the SSL certification tool
- Navigate to Admin > Product Settings > Connection.
- On the Connection Settings tab, select ADSelfService Plus Port [https].
- Click Apply SSL Certificate. The Apply SSL Certificate page opens.
| Tip: If you are new to SSL certificates, click New to SSL? on this page for introductory information. To return to the Connection Settings page at any time, click Back. |
|---|
Applying an existing certificate
Use these steps when you already have an SSL certificate, including a certificate returned by a Certificate Authority after you submitted a CSR.
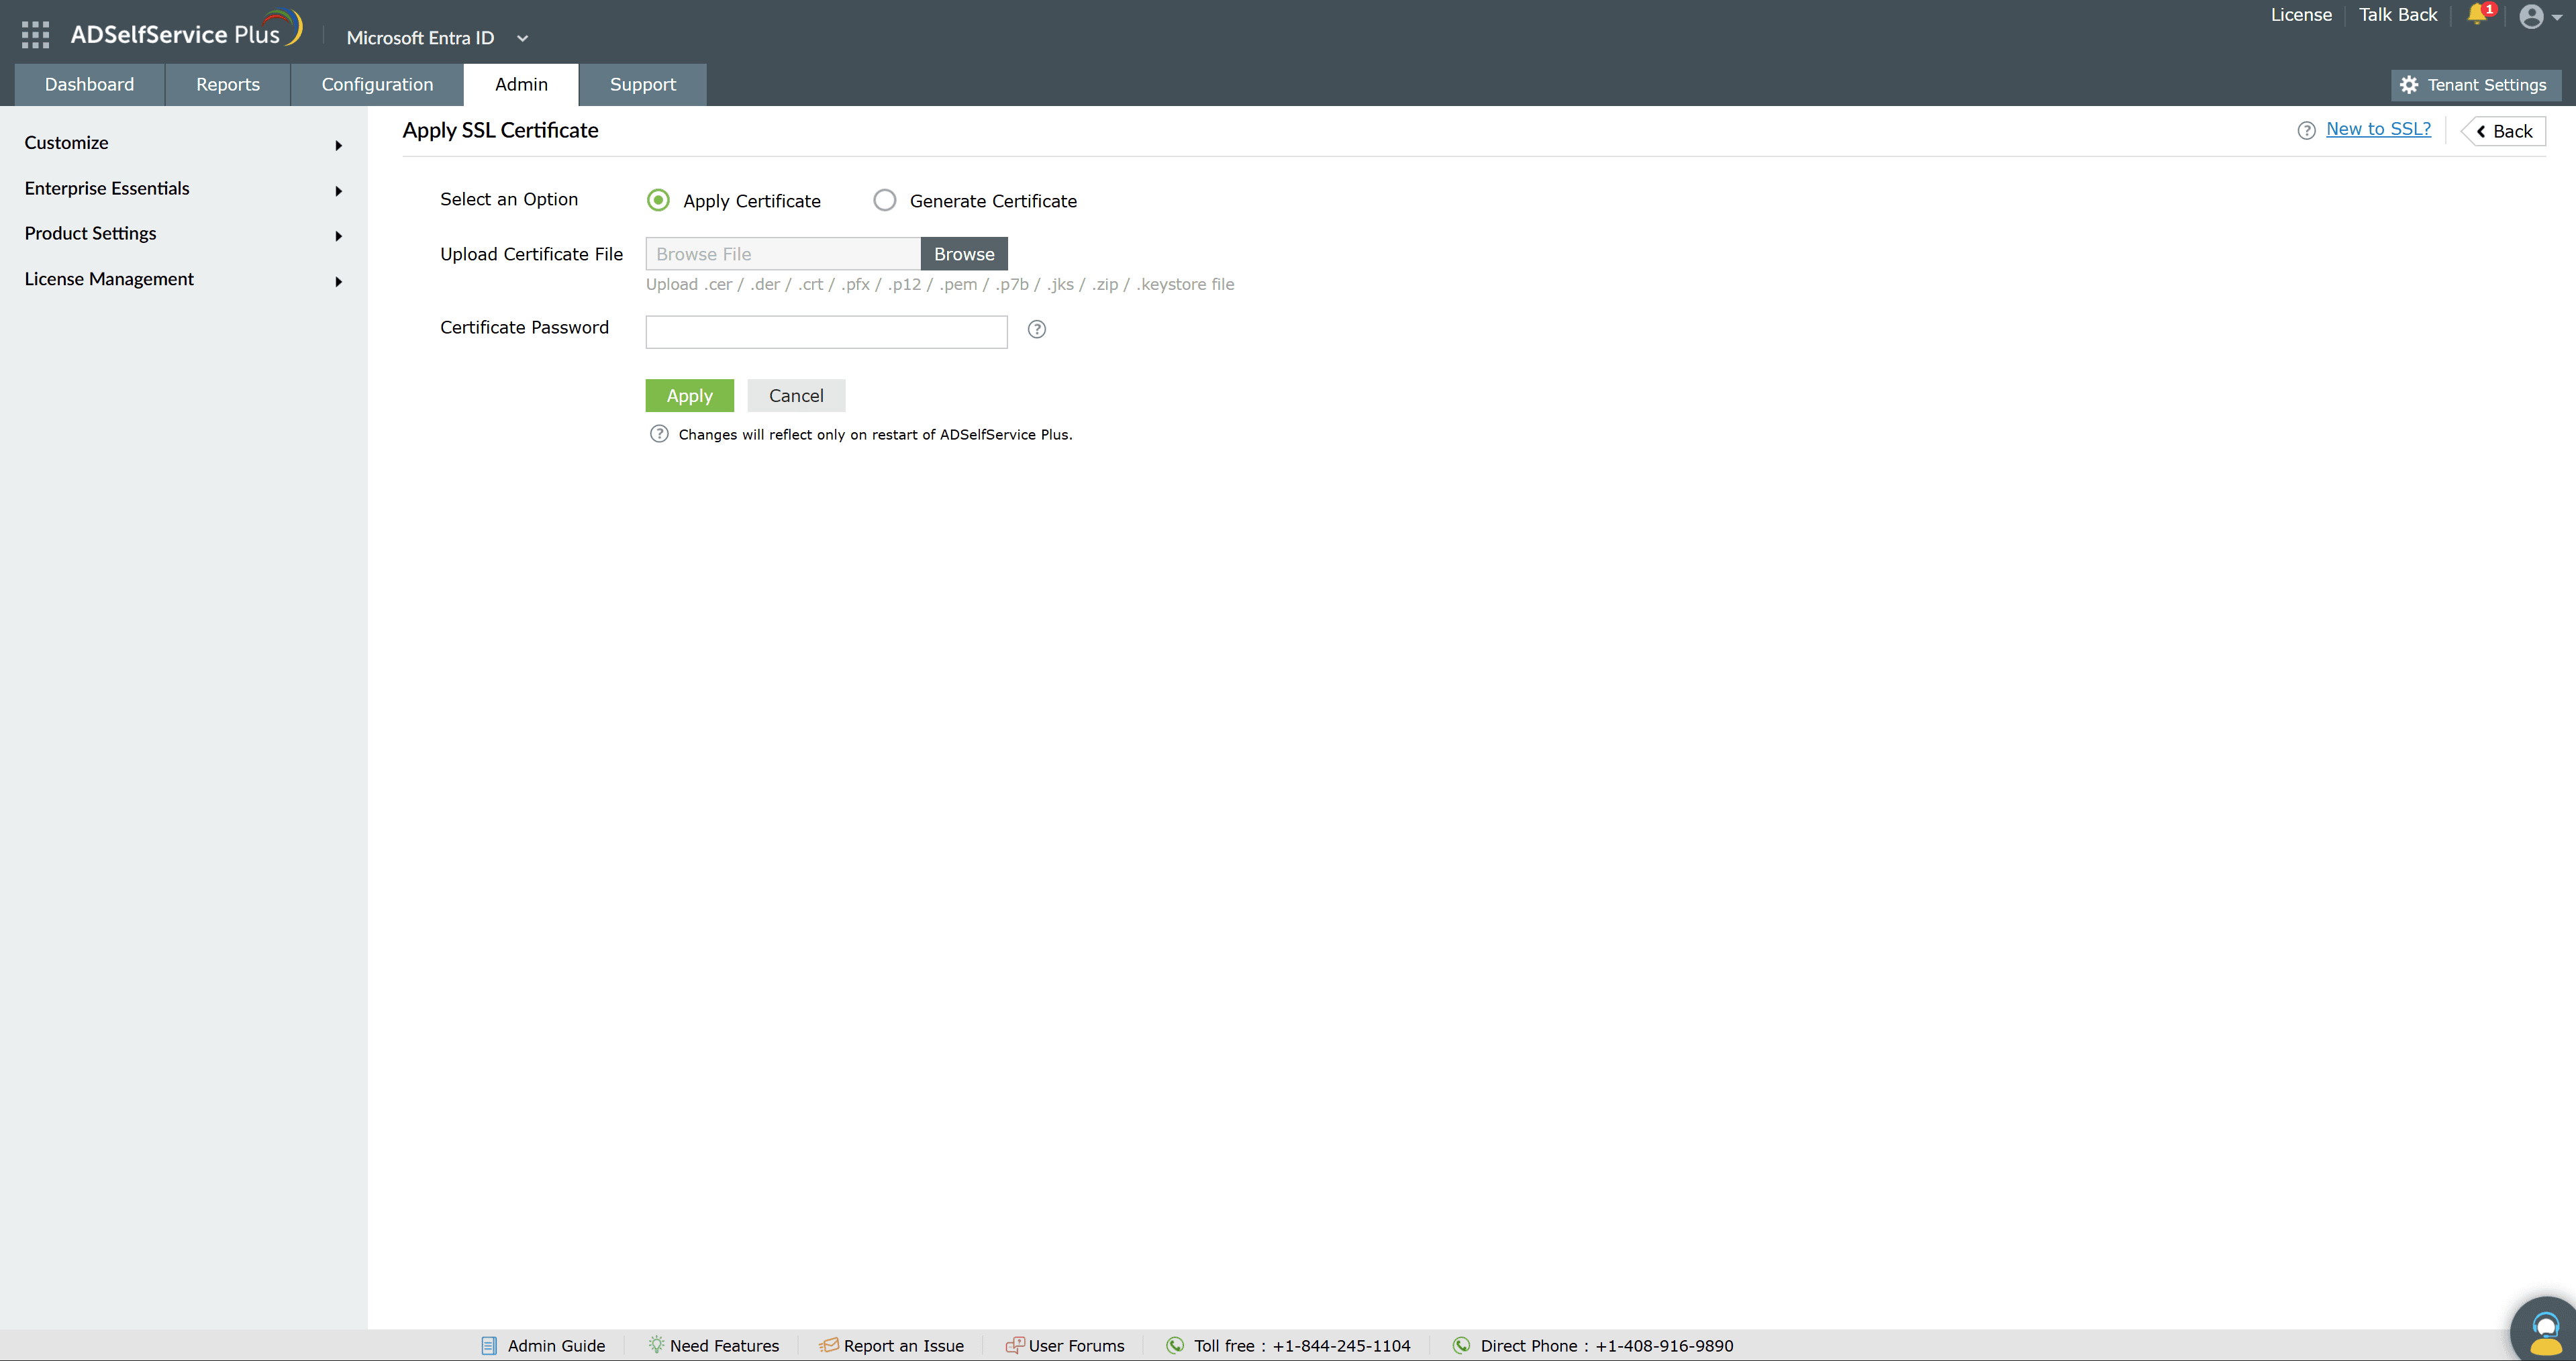
- On the Apply SSL Certificate page, under Select an Option, select Apply Certificate.
- Click Browse next to Upload Certificate File and select your certificate file. The tool accepts .cer, .der, .crt, .pfx, .p12, .pem, .p7b, .jks, .zip, and .keystore files.
- If the certificate file is password protected, enter its password in the Certificate Password field.
- Click Apply. To discard your entries instead, click Cancel.
- Restart ADSelfService Plus so that the certificate takes effect.
Generating a CSR for a CA-signed certificate
Use these steps to request a certificate from a Certificate Authority. This is a two-stage process: first generate and submit the CSR, then apply the signed certificate the CA returns.
- On the Apply SSL Certificate page, under Select an Option, select Generate Certificate.
- Fill in the certificate details described in the table below. Common Name, Organizational Unit, Organization, City, State/Province, Country Code, and Password are required. SAN Name, Validity (In Days), and Public Key Length (In Bits) are optional.
| Field | Description |
|---|---|
| Common Name | The name of the server on which ADSelfService Plus runs. |
| SAN Name | The additional host names or IP addresses that the certificate should also protect. |
| Organizational Unit | The department name that you want to appear in the certificate. |
| Organization | The legal name of your organization. |
| City | The city in your organization's registered address. |
| State/Province | The state or province in your organization's registered address. |
| Country Code | The two-letter code of the country in which your organization is located. |
| Password | A password that protects the certificate's private key. It must be at least six characters. A more complex password provides better security. |
| Validity (In Days) | The number of days the certificate stays valid. If you leave this field blank, it is set to 90 days. |
| Public Key Length (In Bits) | The length of the public key. A larger value makes a stronger key. The default is 1024 bits, and the value can be increased only in multiples of 64. |
- Click the Generate CSR. button. ADSelfService Plus creates two files: a SelfService.csr file, which is the request to send to your Certificate Authority, and a SelfService.keystore file, which holds the matching private key.
| Note: In the ADSelfService Plus installation, the SelfService.csr file is saved in the <install_dir>\webapps\adssp\certificates folder, and the SelfService.keystore file is saved in the <install_dir>\jre\bin folder. To clear every field and start over, click Clear. |
|---|
- Submit the SelfService.csr file to your Certificate Authority, following the guidelines on the CA's website.
- When the Certificate Authority returns the signed certificate, apply it by following the steps in "Applying an existing certificate." Keep the password you set in step 2 ready, because it is the private key password.
Generating and applying a self-signed certificate
Use these steps to create a certificate signed by ADSelfService Plus itself and apply it in one step, without involving a Certificate Authority.
- On the Apply SSL Certificate page, under Select an Option, select Generate Certificate.
- Fill in the certificate details, as described in the table under "Generating a CSR for a CA-signed certificate."
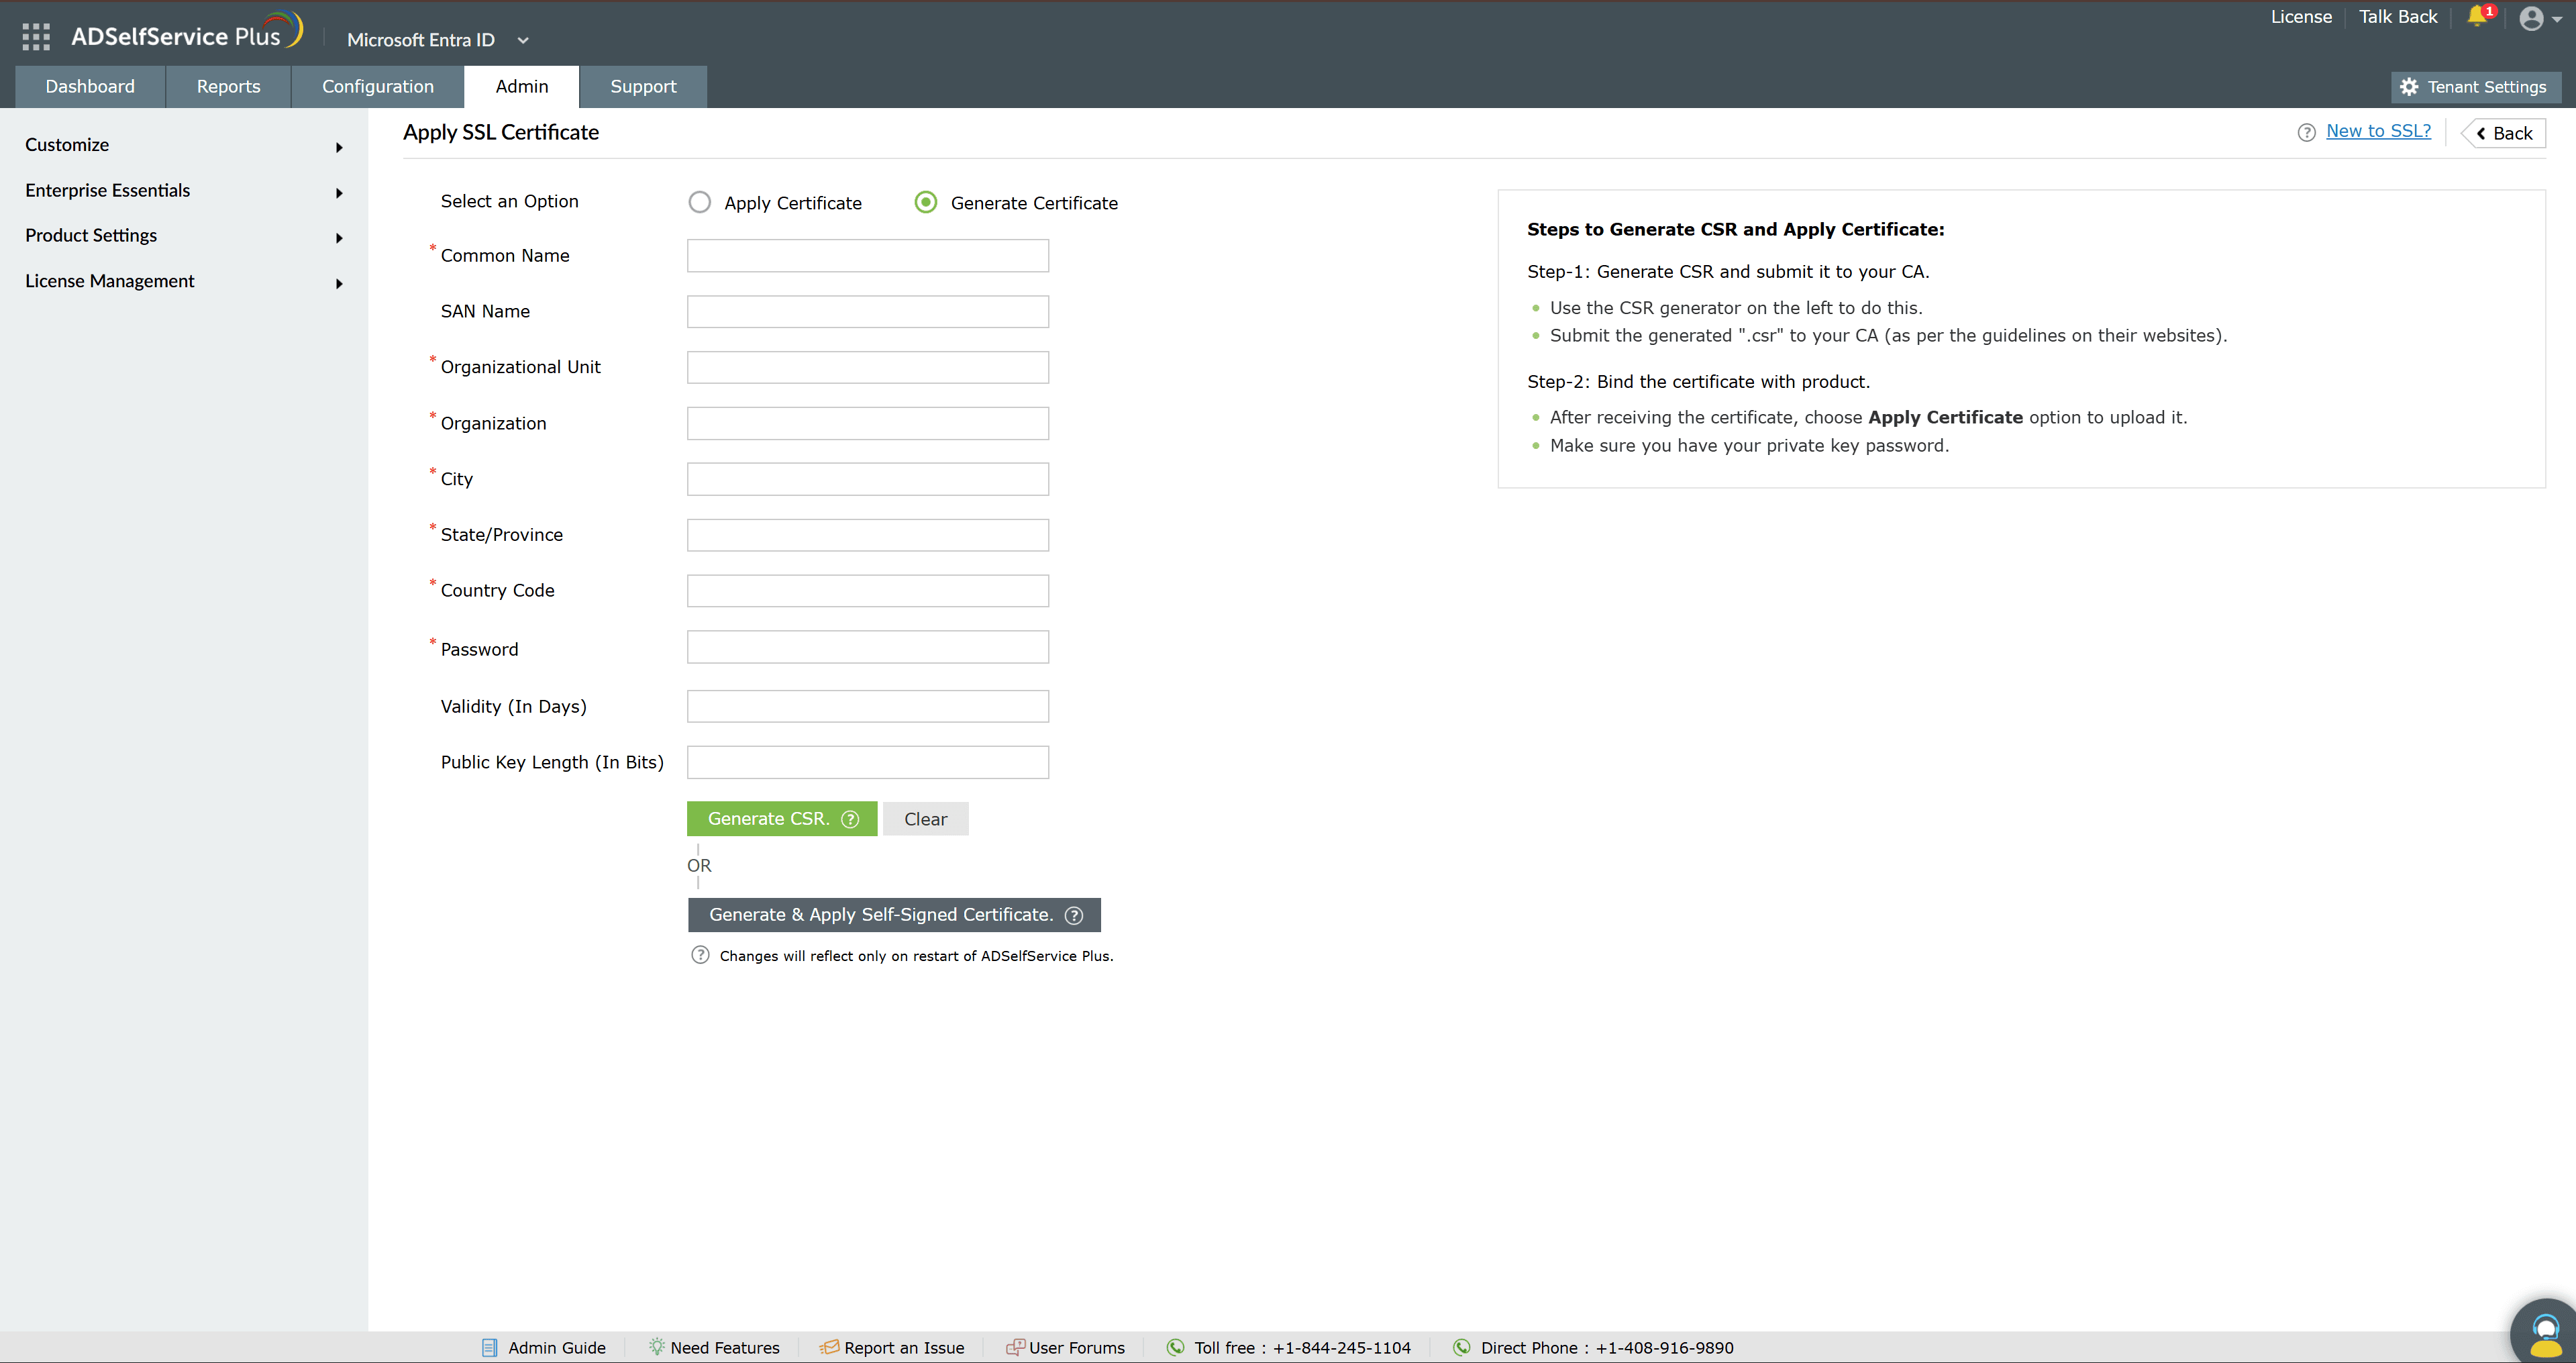
- Click the Generate & Apply Self-Signed Certificate. button. ADSelfService Plus generates the self-signed certificate and applies it.
- Restart ADSelfService Plus so that the certificate takes effect.
| Note: The default path of the ADSelfService Plus installation directory is: C:\Program Files\ManageEngine\ADSelfService Plus |
|---|
Tips
- Use a CA-signed certificate in a production environment. Reserve self-signed certificates for test environments, where browser trust warnings are acceptable.
- When you generate a CSR, store the password safely. You need it as the private key password when you apply the CA-signed certificate that the Certificate Authority returns.
- A longer public key is harder to break, so choose the largest key length that your environment supports.
- Plan the restart for a maintenance window, since a newly applied certificate takes effect only after ADSelfService Plus restarts.