SAML Single Sign-On Configuration
ADSelfService Plus uses the secure and widely adopted industry standard Security Assertion Markup Language 2.0 (SAML 2.0) to provide SSO. It also supports multi-factor authentication during login to ensure security.
Identity Provider-initiated vs. Service Provider-initiated flow:
There are two ways through which users can log in to an application or a service using SSO.
Here, the Identity provider (IdP) refers to ADSelfService Plus and the Service provider (SP) refers to the cloud application or service. To initiate SSO, users can begin at either the IdP or the SP.
In an IdP-initiated SSO, users log in to the ADSelfService Plus page, and click an application. The application will open in a new tab and the users will be logged in automatically.
In a SP-initiated SSO, when users click on an application link, they will be taken to the login page of the SP. After entering their username or selecting the SAML SSO option, the SP will redirect the users to the IdP. Users then need to log in to the IdP to be able to access the SP.
ADSelfService Plus supports only one of these flows for some applications.
Supported Applications
ADSelfService Plus lets you provide Active Directory-based SSO for any SAML-enabled application.
- Custom applications
- Pre-integrated applications
A
B
C
D
E
F
G
H
I
J
K
L
M
N
O
P
Q
R
S
SAML Assertion Attributes
With this setting, you can choose the attributes to be included in the SAML response token sent to the service provider by ADSelfService Plus to prove a user's identity. This is also useful in just-in-time provisioning for service providers that require specific attributes to complete configuration, and thus, enable login.
- Go to Configuration → Self-Service → Password Sync/Single Sign On → Add Application.
- Select the desired application, and go to the configuration page.
- Navigate to Advanced → SAML Assertion Attributes.
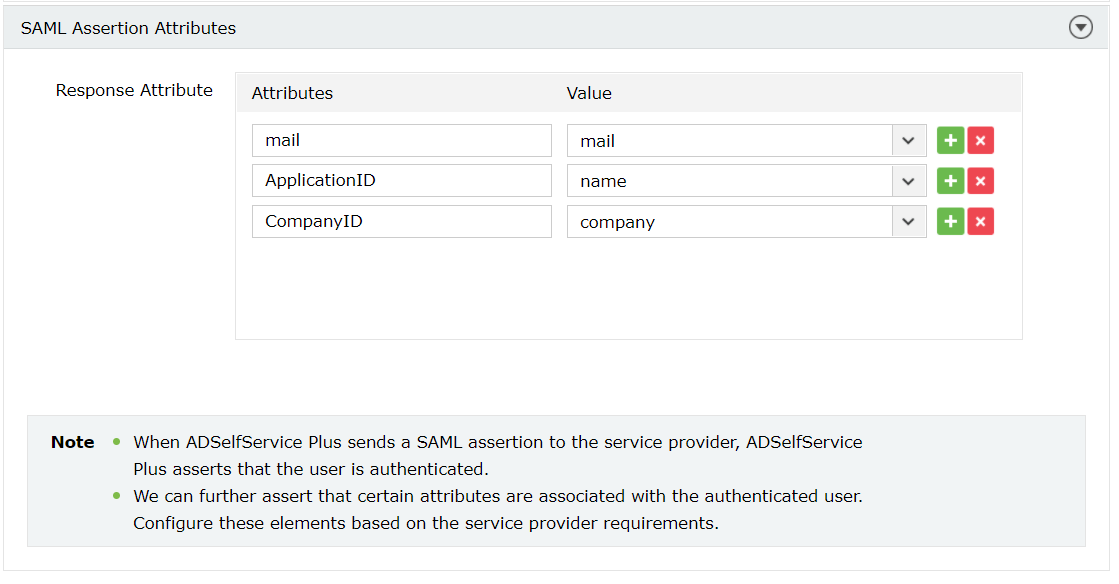
- Click the
 icon to add a new SAML assertion attribute, and enter the following:
- Attribute: Name of the attribute in the service provider's end, i.e., ApplicationID.
- Value: Active Directory attributes and the custom attributes added through ADSelfService Plus are listed in this drop-down menu. You should select the option that stores the same value as the service provider's attribute selected previously, i.e., name.
- Click Save.
- By default, first name, last name, and email address are sent in the SAML response token.
- You can find the attributes required by a service provider in the metadata file provided by them. You can also contact their support team if you need help in finding them.
SAML certification renewal
A SAML certificate is essential to establish a trust relationship between the identity provider (IdP) and the service provider (SP). It ensures that messages are travelling between the expected SP and IdP. This certificate has an expiration date, and it is essential to renew the certificate before expiration to ensure that users don't face any problem in accessing the applications through single sign-on.
- Log in to ADSelfService Plus.
- Go to Configuration → Self-Service → Password Sync/Single Sign On.
- From the list of displayed applications, click the Renew button under the Certificate Expiry column next to the application for which you want to renew the SAML certificate.
- After clicking Renew, a pop-up will appear. Click on Download X.509-Certificate from the pop-up to download the latest SAML certification.
- Next, from the same pop-up, click Download IdP Metadata to download the latest metadata file.
- Some applications' SSO configurations require both the certificate and the metadata while others might require only one of these. Read the SSO configuration steps for the target application before renewing the SAML certificate for that application.
- The generated SAML certificate will be valid for two years from the time of renewal.
- Update the latest certificate and metadata in the target application's SAML settings.

