|
|
Mobile Client
Instead of sending e-mails or calling up the help desk to report an issue, you can instantly raise request from your iPhone or Blackberry mobile phones using ServiceDesk Plus - MSP Mobile Client. The Mobile Client helps you raise requests instantly and provides easy access to track your requests, anywhere, anytime. The Mobile Client is compatible with mobile devices such as Blackberry and iPhone, and is accessed through the mobile browser on typing the URL http://<machine-name>:<port-number>, which redirects to the 'mc' context.
Features
Limitations
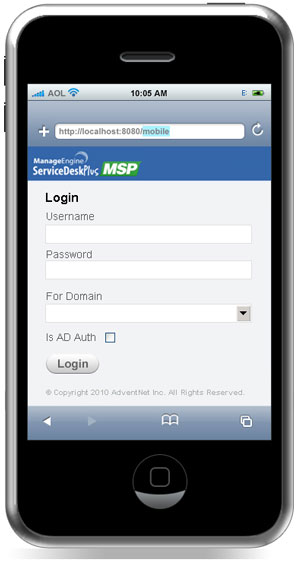
Getting Started On connecting your mobile device to http://<machine-name>:<port-number>/mc, the screen opens to displays the login page.
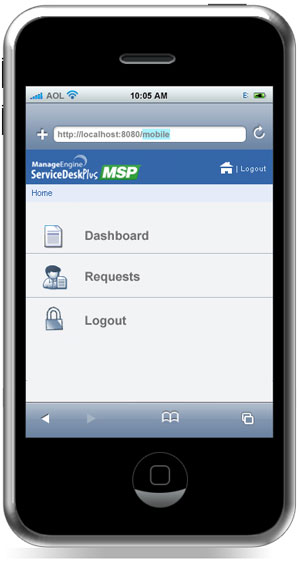
NOTE: ServiceDesk Plus - MSP Mobile Client does not support Single Sign-On (SSO) Click Login button. On logging into the application from your mobile device, the home page displays the Dashboard, Requests and Log out options.
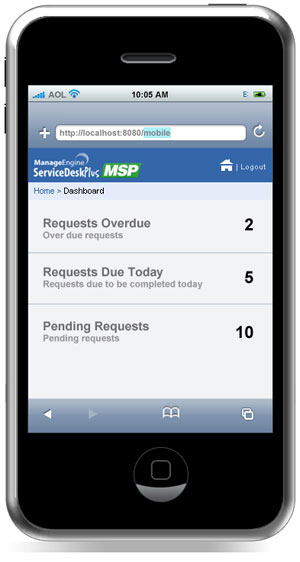
Dashboard The dashboard of the logged in requester comprises of the number of overdue requests, pending requests and all requests raised by the requester. Click an option to display the list of requests under it. To revert back to the Home page click the Home icon
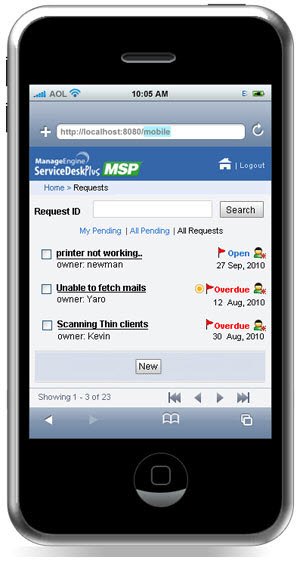
Requests Selecting Requests from the dashboard takes you to 'My Pending' requests by default. The requests view options comprises of My Pending Requests, All Pending Requests and All Requests.
Request List View Request List View displays the title of the request, requester, status of the request, created date and time, technician assign icon, priority color code, first response time overdue flag, request overdue flag, and first response and resolution overdue flag. Representation of icons from the Request List View
Operations performed from the Request List View
The request list view displays a total of five requests in a page. You can navigate to other pages using the navigation options below the page. To revert back to the Home page, click the Home icon
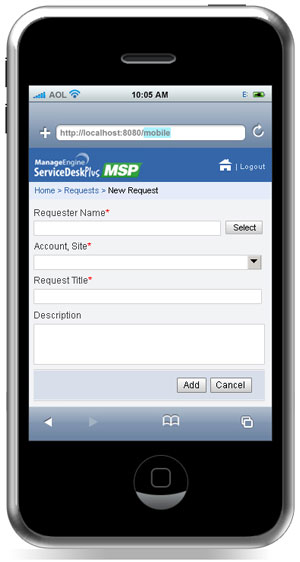
Creating a New Request Creating new requests is simple and instant. All you need to do is enter the Request Title and Description of the issue you are facing. To create new request, click New button from the Request List View. In the New Request form, enter the following details,
Click Add button. The request is saved and appears in the Request List View. NOTE: Requests cannot be created through Request Template though templates are configured in the server.
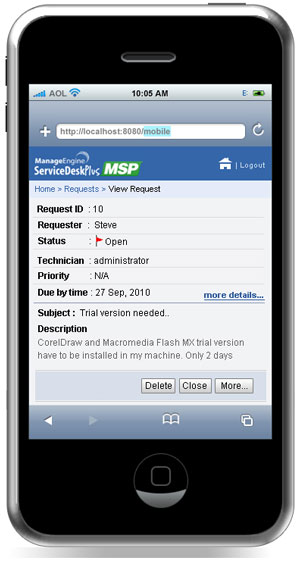
Viewing Request Details Click the request you want to view from the request list view page. The request details page displays the Request ID, Requester, Status of the request along with the overdue flag, Technician assigned to the request, Priority along with color code, Due by Time of the request, Subject and Description. Click More details... link to get the entire detail of the request such as, request type, impact, status, due by time, response due by time and so on. Click Back button to go back to View Request page. If the description exceeds 250 characters then (More...) link appears. Click the link to view the entire description.
|