Configuring Business Units
Organizations with various marketing segments can be best thought of as a number of businesses, that supports their own set of accounts, customers and vendors. Hence, the customer support operations in these enterprises are complex, interconnected and extremely difficult to organize.
In ManageEngine SupportCenter Plus, you can configure individual segment or division as a "Business Unit", with which, you can organize and manage your support team effectively.
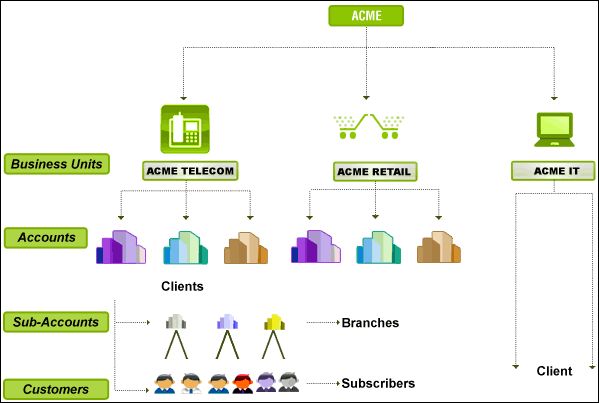
For instance, let´s take the company Acme Corporation. It has 3 Strategic Business Units which include Telecom, Retail and IT. Each Business Units can have their own customers (Accounts) and each customer can have multiple branches (Sub Accounts). The Accounts and Sub accounts can have their own contacts (Customer Contacts), who will be raising the requests.
Before getting into the configurations and modules based on departments, let us understand the roles and privileges offered to a support representative in departments.
Support Representative: Ability to be associated to multiple departments, and assigned with different roles for every department.
-
 Global Administrator: All the business units is governed by a global administrator, who will have a wholesome view of all the business unit operations.
-
 Business Unit Administrator: Each Business Unit can have its own Business Unit Administrator, who will have the rights to maintain the different accounts, sub-accounts and other related operations of the business unit.
If you have enabled multi tendency feature in ManageEngine SupportCenter Plus, the configuration wizard opens to view the following tabs,
-
Manage Business Units
-
Business Unit Settings
-
Global Settings
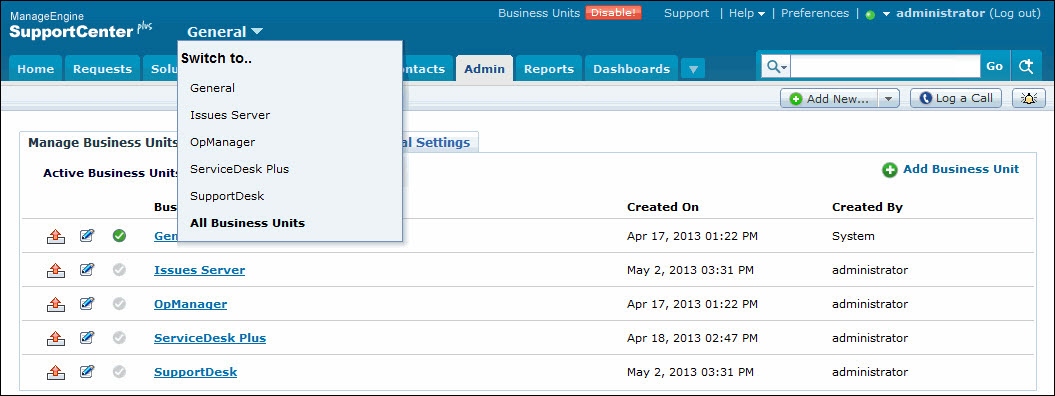
Manage Business Units
- You can manage and organize all your Business Units from this tab. Manage Business Units lists all the Business Units added in SupportCenter Plus from which you can add, edit and move Business Units to archive state. In addition, you can also set a Business Unit as default by cliking on the Set as Default Business Unit icon beside the business unit. The default Business Unit accumulates requests which are not aliased to any business unit. The business unit which is set as default cannot be archived.
- hjh
- njn
-
Add Business Unit
-
Click on Add Business Unit link.
-
Specify the name of the Business Unit. The name is a mandatory field.
-
Select the Time Zone of the specified Business Unit.
-
Enter a brief description on the Business Unit in Description field.
-
If you wish to make this Business Unit available in Customer Portal then enable the check box "Make it available in the Customer Portal".
-
Click Add Business Unit to add the business unit and return to the list view page. If you do not wish to add the Business Unit then click Cancel.
Note: The number of Business Units added depends on the license purchased. If you have purchased a 5 Business Unit license then only 5 business units can be added along with the default Business Unit present in the application.
Edit Business Unit
-
From the list of Active Business Units, click the Edit icon  beside the Business Unit you wish to edit.
-
Modify the required fields and click Update.
Setting Up Jira.xml Configuration
-
Open the Jira.xml file copied under "[SCP_Home]/server/default/conf" directory.
-
Specify the URL, username and password of the JIRA instance on which you would like to create the issue.
|
<request>
<url>http://[Jira_server]:[Port_Number]/rest/api/2/issue/</url> <!-- Specify the URL of JIRA instance-->
<!-- Example, <url>http://atlassian-adam:8080/rest/api/2/issue/</url> -->
<username>[Jira_Username]</username> <!-- Specify the username of JIRA instance-->
<!-- Example, <username>administrator</username> -->
<password>[Jira_Password]</password><!-- Specify the password of JIRA instance-->
<!-- Example, <password>administrator</password> -->
|
-
Project, IssueType, Summary are mandatory fields when creating a JIRA issue. You can configure the values as shown below,
URL Format
|
The URL format for the Request operation - View/Read Request Description
For xml output
http://<server-name>:<port-number>/api/xml/getRequestDescription
For json output
http://<server-name>:<port-number>/api/json/getRequestDescription
|
Parameters
Either of the following parameters should be passed via HTTP method.
|
Parameter
|
Value
|
Description
|
|
id
|
string
|
Request ID of the request to be viewed.
|
|
htmlDescription
|
True/False
|
Displays output as html or plain text format. If True, the output is displayed as html format. If False, the output is displayed as a plain text.
|