Viewing Reports
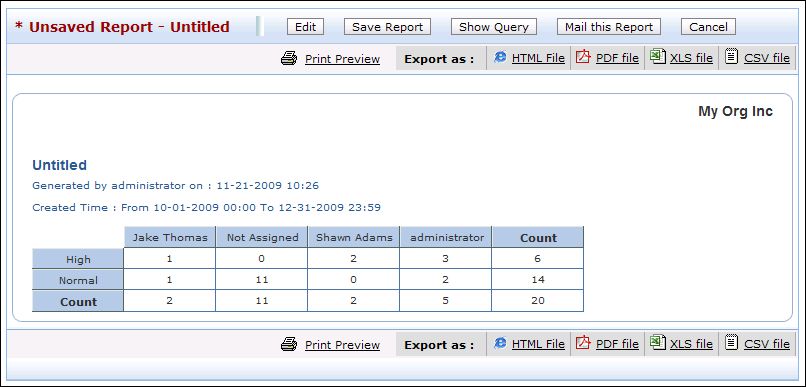
While viewing a custom report, whether its Tabular or Matrix, you can perform actions such as Edit, Save the report, Schedule the report, Mail the report and View the Report Query.
-
Editing Reports: Edit a custom report to choose fields of your choice.
-
Save Reports: Create and save your customized report.
-
Schedule Reports: Schedule to run the reports daily, weekly or monthly using this option. On scheduling the report, the selected report gets generated automatically on the specified date and time and the generated report is sent to the respective person through e-mail.
-
Mail this report: Mail the report instantly to support reps and account managers as a PDF, HTML, XLS or CSV format.
-
Share: You can share the reports to contacts in an accounts.
Editing Reports
You can edit the report either from the reports list view or while viewing an individual report.
Reports List View
-
From the All Reports page, click Edit link available against the custom report that you wish to edit. The Report Wizard page opens.
-
Modify the necessary details and Save the report
Viewing Reports
-
Click on the Edit button. The Report Wizard page opens.
-
Modify the necessary details and Save the report.
Delete Reports
You can delete the custom reports that you have created and saved. From the All Reports page, click Delete link available against the custom report that you wish to delete. This will delete the report.
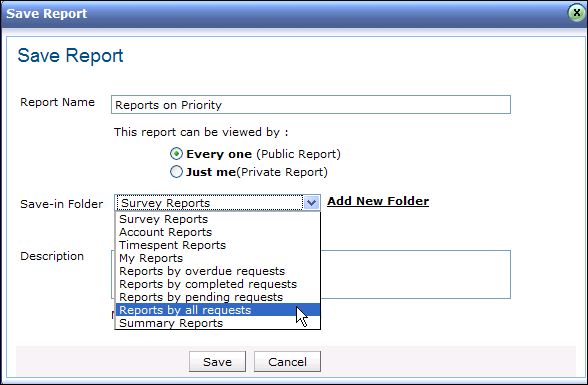
Saving Reports
If you wish to save the report,
-
Click Save Report as button.
-
Specify the Report Name and share the report as public or private.
-
Select the Folder in which you would like to share the report. You can also add a new folder if required using Add New Folder link.
-
Enter Description regarding the report.
-
Click Save. The report is saved in the folder specified.
Viewing Query
You can also view the SQL Query used in the database to run the report.
-
Click Show Query button. The SQL Query of the report is displayed in a pop up.
-
You can also view the Query in the Query Editor on clicking Open With Query Editor.
Mailing Report
-
Click Mail this Report button. The mail this report dialog appears.
-
Select the Format from the drop down. Say, PDF, HTML, XLS and CSV
-
Specify the To address in the given text field.
-
Specify the Subject and Description of the mail.
-
Send the mail.
Sharing Report
The Share button appears on saving and viewing the Custom report. You can share reports to all accounts or only to selected accounts.
-
Click Share button.
-
From the Share Report pop up, select the radio button from the options All Accounts, Do not share this report and Selected Accounts.
-
On selecting Selected Accounts, the list of available account name is displayed. You can choose the accounts and move them to Selected Accounts block using the >> button.
-
Click Share. The report is shared to the selected accounts.
You have an option to export this report to HTML file, PDF file, XLS file and CSV file. To know how to export to PDF, refer to the section Exporting Report as PDF.