Canned Responses
Canned Response are pre defined email notification for frequent replies, with which the support reps can reply to emails with ease. Other than customized template for individual mails [refer notification rules], canned response can be sent to the frequently raised requests. It reduces the response time and also provides a personal touch to the request. The response can be made private or public according to your convenience. You can add, manage and share a canned response.
Manage Canned Response
Manage Canned Response gives the list view of all the available canned response along with its template name and access ability. From the this page you can add, edit and delete the canned response.
-
Click on the Request tab in the header pane to open the request list view page.
-
Click the Subject link of a request.
-
From the request details page, select More Actions drop down menu -> Manage Canned Responses option under Canned Responses block. The page opens to view the list of available canned response. From this page, you can add, edit and delete a canned response.
Add New Canned Response
To add a new canned response,
-
Click on Add New Canned Response link available on the right hand side of the page. The New Canned Response page opens.
|
Note

|
1. You can also add a New Canned Response from Add New drop down link.
2. Alternatively, you can also add a new canned response from Actions drop down menu -> Add New Canned Response option.
|
-
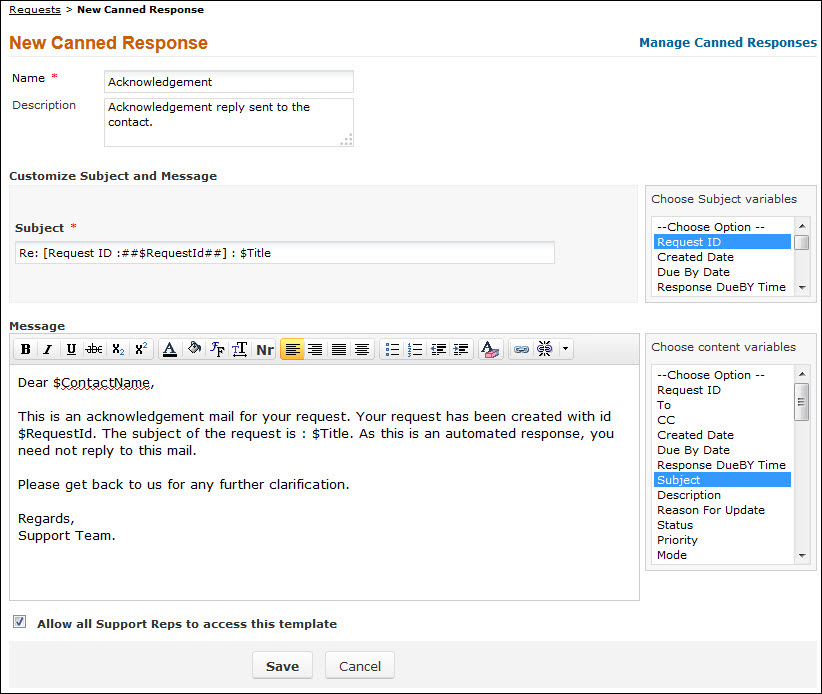
Specify a unique Name for the canned response. This field is mandatory.
-
Enter a brief Description of the canned response in the field provided.
-
You can customize the Subject and Message content by typing the text of your choice and also adding other variables that you wish to display as a part of the subject or message content.
-
Click the corresponding variable from the list box beside the respective field to add variables.
-
The response can be made either private or public accordingly to your convenience. You can share the canned response with other support reps by enabling Allow all Support Reps to access this template check box.
-
Click Save. If you do not wish to add a canned response then click Cancel.
Editing Canned Response
You can edit the canned response from the manage canned response list view page. To edit a canned response,
-
Click the Edit icon  beside the Template name you wish to edit.
-
From the Edit Canned Response form, edit the details and Save the changes.
Deleting Canned Response
You can delete the canned response from the manage canned response list view page. To delete a canned response,
-
Click the Delete icon  beside the Template Name you wish to delete. A pop up window confirming the delete operation appears.
-
Click Ok to proceed. The template is deleted from the available list.
Replying via Canned Response
You can reply to a request (frequently raised) using canned response by,
-
From the request details page, click Reply button to open the Reply To Contact pop up.
-
By default, the Subject and the Description fields are pre populated with the specified values.
-
If the email address of the contact is specified in the application then the same is populated in the To field.
-
You can also send the same information to more than one person by specifying the mail address in CC field.
-
If you do not wish to disclose the recipient then specify the mail address in the BCC field.
-
Click Attach a file button to attach relevant files.
-
Select Canned Responses drop down to open the list of available canned response.
-
Select the canned response you wish to use from the list. A alert message stating that the Subject and description field will be overwritten appears.
-
Click Ok to proceed.
-
The customized subject and message content is displayed.
-
Click Send to send the mail to the concern person. Click Save if you wish to save the mail to edit it in future.
-
Click Save and Send for review if you wish to save the mail and send it for review to the concern authority. Enter the mail address of the concern authority to review the reply in the To field.
If you do not wish to reply to the request, click Cancel.