Google connects SecureAI to your Google Workspace directory and to the agents your teams build on Google Cloud. A single Google instance can serve three purposes at once: it can act as the identity provider that an MCP gateway authenticates against, it can discover the agents deployed in your Gemini Enterprise Agent Platform environment, and it can assess the security posture of your Gemini usage. Which of those you get depends on the services you select when you create the instance.
What a Google instance covers
The Google card sits under Directories/Agent Platforms in the application catalogue and offers three services, grouped by what they are used for.
- Google Workspace, under Identity Provider & Protection, acts as the identity provider for secure access protection.
- Gemini AI, under AI Risk Assessment, is used as a data source to perform risk assessment on agents operating across your Google Gemini environment.
- Gemini Enterprise Agent Platform, under Governance, is used as a data source to discover and manage agents deployed within your Gemini Enterprise Agent Platform environment.
Note: Gemini AI stays unavailable until you select Google Workspace, because the risk assessment reads the Workspace administrative APIs. Gemini Enterprise Agent Platform does not depend on Google Workspace and can be selected on its own.
The tags on the Google card name the capabilities the application contributes to. Two are shown, and clicking +2 reveals the rest, so the full set is Governance, Access Protection, Identity Provider and Risk Assessment. All three services are selected by default when you open the card.
Note: Gemini has no application card of its own. It reaches SecureAI through these two Google services, Gemini Enterprise Agent Platform for agent governance and Gemini AI for risk assessment.
Prerequisites
Before you add a Google instance, arrange the following on the Google side.
- A Google Cloud project that hosts the agents you want discovered, and its project ID.
- A service account in that project, with a key downloaded as a JSON file. SecureAI uploads that file, and the key cannot be downloaded again afterwards, so keep it somewhere safe. See Create and delete service account keys.
- Domain-wide delegation authorised for that service account's client ID in the Google Admin console, with the OAuth scopes the services need. See Control API access with domain-wide delegation.
- The email address of a Google Workspace administrator for SecureAI to impersonate through that delegation.
- Your Google Workspace customer ID, which SecureAI uses for the Gemini admin, reports, alert center and vault APIs. Find it in the Google Admin console under Menu > Account > Account settings > Profile, beside Customer ID. See Find your customer ID.
- The regions your agents are deployed in, since SecureAI reads each region you select and no others.
Creating a Google instance
- Go to Application Settings and click Manage Applications.
- Click the Google card. The Instance Creation - Google panel opens on the General step.
- In Instance Name, enter a name that identifies the Google environment this instance points at. SecureAI fills the field in for you, and the name has to be unique.
Note: If you keep a name that is already in use, SecureAI reports An instance named 'Google Instance 1' already exists. Please use a different name. Nothing was saved.
- To record what the instance is for, click Description and type into the box that appears. The description is optional and shows in the instance list.
- Under Choose Capabilities, leave selected the services you want and clear the rest.
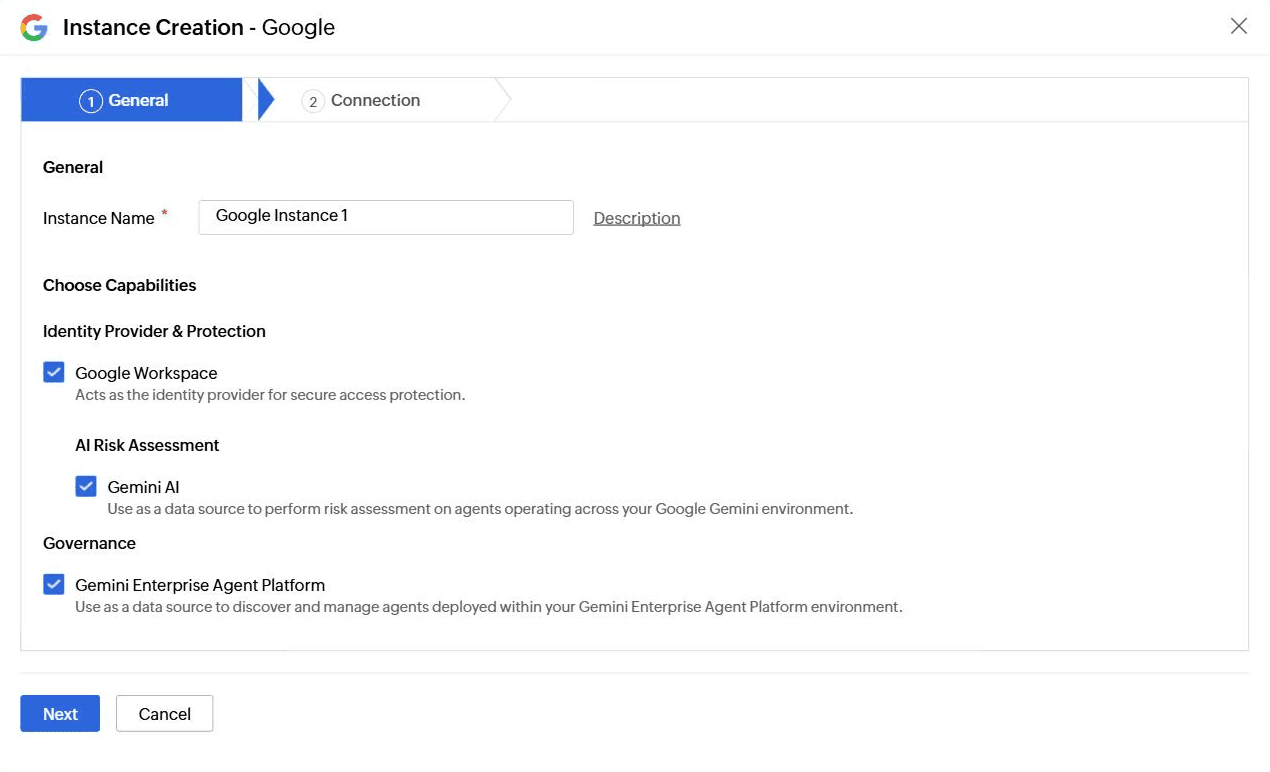
Fig 1: Choosing capabilities on the General step of Instance Creation - Google. - Click Next.
Note: Next saves the instance straight away. It appears in the instance list with the status Not Configured and stays that way until you finish the connection.
Setting up the connection
The Connection step gathers everything SecureAI needs to reach Google, in three groups. Fill them in from the top down, because the service account key determines what SecureAI can read.
- Check Connection Name, which SecureAI fills in for you and which you can rename.
- In Admin Email, enter the Google Workspace administrator SecureAI should act as through domain-wide delegation.
- Beside Service-Account Key, click Browse and select the JSON key file for your service account. SecureAI names the file it accepted underneath the field.
- Check Service-Account Email. SecureAI reads it from the key file and fills it in, and the field cannot be edited. This is the address whose client ID must hold the domain-wide delegation.
- Under Gemini Enterprise Agent Platform, enter the Project Id of the Google Cloud project that hosts your agents.
- Beside Location, click the add icon and select every region your agents are deployed in. Twenty regions are offered: us-central1, us-east1, us-east4, us-east5, us-west1, us-west4, us-south1, europe-west1, europe-west2, europe-west3, europe-west4, europe-west9, europe-north1, asia-south1, asia-southeast1, asia-northeast1, asia-east1, australia-southeast1, northamerica-northeast1, and southamerica-east1. Click Select to confirm, or Cancel to close the picker unchanged.
- Under Google Gemini & Workspace, enter your Customer Id.
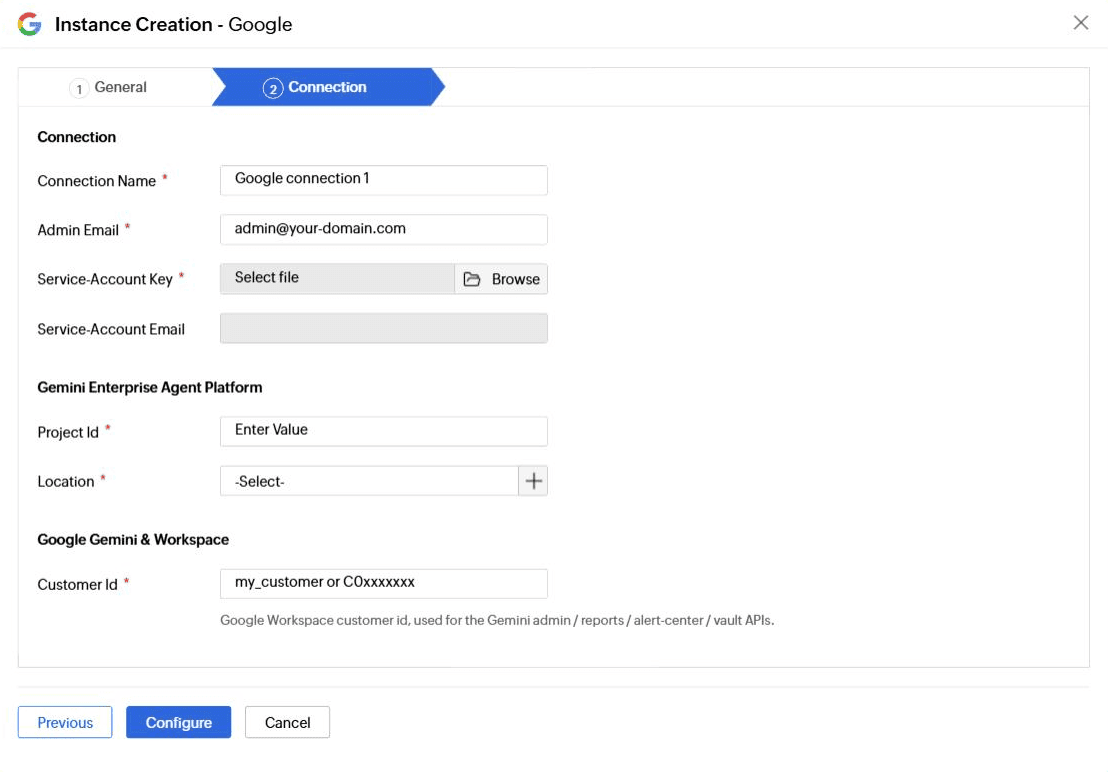
Fig 2: The Connection step of Instance Creation - Google. - Click Configure.
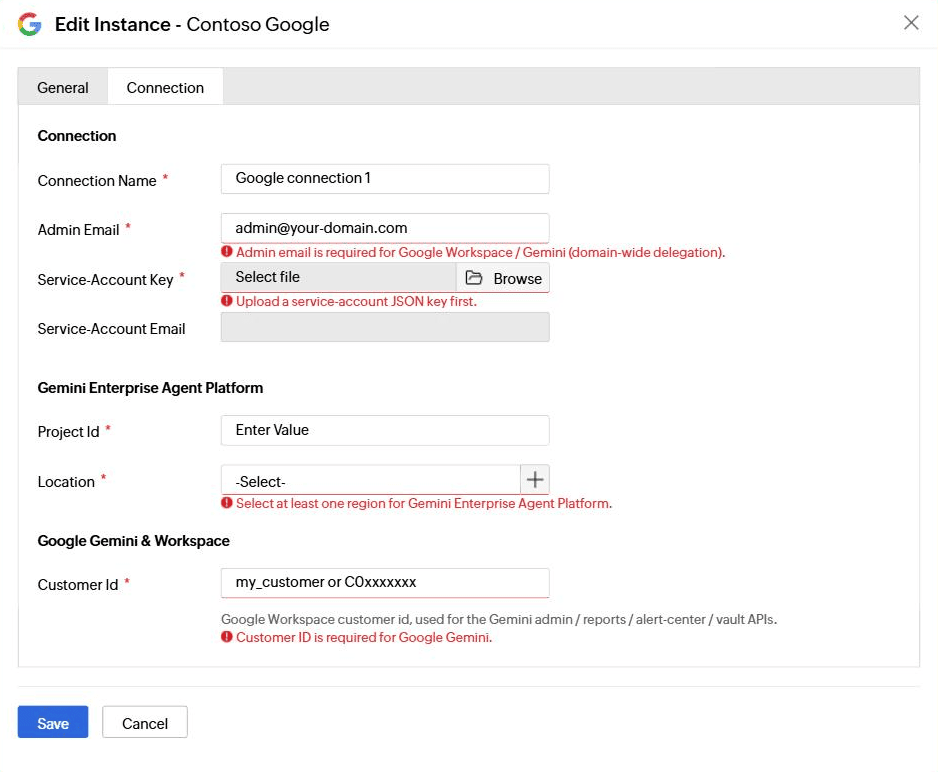
SecureAI checks the required fields before it tries the connection and reports anything missing against the field it belongs to.
- Admin email is required for Google Workspace / Gemini (domain-wide delegation).
- Upload a service-account JSON key first.
- Select at least one region for Gemini Enterprise Agent Platform.
- Customer ID is required for Google Gemini.
Managing a Google instance
The instance list on the Application Settings page is where a saved instance is maintained. Alongside the name, description and application, it reports Associated Services, when data last came in, how often SecureAI re-fetches, and a status.
- Not Configured means the instance was saved but its connection was never completed.
- Configured means the connection is in place.
- Not synced means no data has been fetched yet.
- Sync in progress means a fetch is running.
- Sync completed means the last fetch finished.
- Sync failed means the last fetch did not finish.
To pull data straight away rather than waiting for the schedule, click Fetch beside the instance in Last Fetch Time.
To change how often SecureAI re-fetches, click the edit icon beside the value in Fetch Interval, select Hourly, Daily or Weekly, set the Every value, then click Apply.
To change an instance, click the edit icon in Actions. The Edit Instance panel presents the same content as creation, split across a General tab and a Connection tab, with Save to commit.
Note: Service-Account Key shows the name of the key file already in use. Leave the field alone to keep that key, or browse to a new JSON file to replace it.
To remove an instance, click the delete icon in Actions, then click Delete to confirm or Cancel to keep it. Deleting an instance permanently removes it along with every service, connection and discovered configuration under it, and every agent, user, model and tool synced through it, including their reports and dashboard data. The action cannot be undone.