Change or Migrate PostgreSQL to Microsoft SQL Server
RecoveryManager Plus is bundled with a PostgreSQL database by default. To migrate from PostgreSQL to Microsoft SQL, follow the steps below and initiate the migration.
The following versions of Microsoft SQL are supported:
- Microsoft SQL server 2022
- Microsoft SQL server 2019
- Microsoft SQL server 2017
- Microsoft SQL server 2016
- Microsoft SQL server 2014
- Microsoft SQL server 2012
- Microsoft SQL server 2008 R2
- Microsoft SQL server 2008
- Microsoft SQL server 2005
In a simple three stage process, you can migrate the PostgreSQL data and run RecoveryManager Plus with Microsoft SQL Server.
Backing up PostgreSQL Data
Before migrating from PostgreSQL to Microsoft SQL Server, it is important to back up the existing PostgreSQL database to preserve product data and allow recovery if needed. The steps below explain how to perform the backup.
- Stop the RecoveryManager Plus Server or Service.
- Invoke the <RecoveryManager Plus Home>\bin\backupDB.bat in command prompt, to backup the data available in PostgreSQL database. By default backup files will be stored in <RecoveryManager Plus Home>\Backup\ as OfflineBackup_YYYYMMDDHHmmss.
Configuring the Microsoft SQL Server
This section explains the necessary configurations required when migrating from PostgreSQL to Microsoft SQL Server in RecoveryManager Plus. The steps include:
Configuring common Microsoft SQL Server settings
Perform the following steps in SQL Server Configuration Manager:
- Open the SQL Server Configuration Manager.
- Go to SQL Server Services and ensure the service SQL Server Browser is running.
- Navigate to SQL Server Network Configuration > Protocols for SQLEXPRESS (the instance given when configuring the Microsoft SQL) >
- Enable TCP/IP.
- Restart the SQL Server (SQLEXPRESS - the given instance) Service.
- Set the following configuration for the SQL Server Configuration Manager:
- SQL Server Network Configuration > Protocols for <instances> > Enable everything.
- SQL Native Client Configuration > Client Protocols > Enable all.
Assigning user credentials and permissions
The user account associated with RecoveryManager Plus must have access and appropriate permissions for the Microsoft SQL instance where the database or data will be moved.
Note: If SQL Server Authentication is used to move the database and/or data, access and permissions to the Microsoft SQL instance are automatically provided. However, when Windows Authentication is used, access and permissions have to be granted. Follow the steps listed below to assign permissions.
To grant access,
- Log in to Microsoft SQL Server Management Studio using an account with the Sysadmin role.
- Select the server instance to which you will be migrating and navigate to Security > Logins.
- Verify if the account used by RecoveryManager Plus is listed under Logins.
- If the account exists, proceed to the grant permissions section.
- If not, right-click Logins > New Login, create a new login for the account, and then proceed to the grant permissions section.
To grant permissions,
- Right click on the existing user account or the one created in Step 3 of the previous section and click Properties > Server Roles.
- Go to Server Roles and check if the sysadmin role is assigned.
- If not, select the sysadmin checkbox and click OK.
Note: For more details about user roles, refer to the following:
The server role of the user should be sysadmin and the database role of the user should be db_owner. The members of the sysadmin server role can perform any activity in the Microsoft SQL Server and have complete control over all database functions. The members of db_owner database role can perform any activity in the database.
Setting up Microsoft SQL Server on local or remote machines
CDepending on whether SQL Server is installed locally or remotely, follow the steps below to set up Microsoft SQL Server for RecoveryManager Plus.
To configure Microsoft SQL Server on a local computer:
Copy the following files to <RecoveryManager Plus Home>\bin folder.
- bcp.exe- <Microsoft SQL Installation Dir>\Tools\Binn\bcp.exe
- bcp.rll- <Microsoft SQL Installation Dir>\Tools\Binn\Resources\1033\bcp.rll
To configure Microsoft SQL Server on a remote computer:
Note: Install the corresponding SQL Native Client or Command Line Utilities in the RecoveryManager Plus machine as per the Microsoft SQL Server version and CPU type of RecoveryManager Plus machine.
After installation, copy the following files to RecoveryManager Plus Home>\bin folder.
- bcp.exe → Microsoft SQL Installation Dir → \Tools\Binn\bcp.exe
- bcp.rll → Microsoft SQL Installation Dir → \Tools\Binn\Resources\1033\bcp.rll
Configuring Windows firewall settings
If Windows Firewall is enabled on the Microsoft SQL Server:
- Ensure the default UDP port 1434 is open.
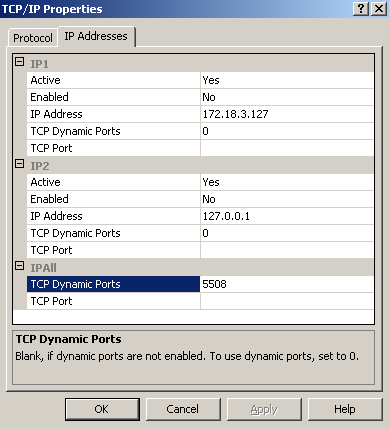
- Verify the TCP port settings in SQL Server Configuration Manager:
- Go to SQL Server Network Configuration > Protocols for <instances>.
- Right-click TCP/IP > Properties > IP Addresses tab.
- Scroll down to TCP Dynamic Ports and note the port number.
- Add this port to the firewall.
Migrating PostgreSQL data to Microsoft SQL
- Stop the RecoveryManager Plus server.
- To stop RMP if it is running as a console:
Run the shutdown.bat file from <RecoveryManager Plus Home>\bin\ folder in the Command Prompt to stop the RecoveryManager Plus server.
- To stop RecoveryManager Plus when it is running as a service: Go to services.msc > stop RecoveryManager Plus service.
- To migrate the database from PostgreSQL to Microsoft SQL with all data intact:
Open Command Prompt and navigate to <RecoveryManager Plus Home>\bin. Enter changeDB.bat command to migrate the database with the data intact.
(OR)
To change the database from PostgreSQL to Microsoft SQL without migrating the data: Open Command Prompt and navigate to the location <RecoveyManager Plus Home>\bin. Enter the command changeDB.bat false to migrate the database without data.
- The Database Setup Wizard pop-up will appear on the next screen.
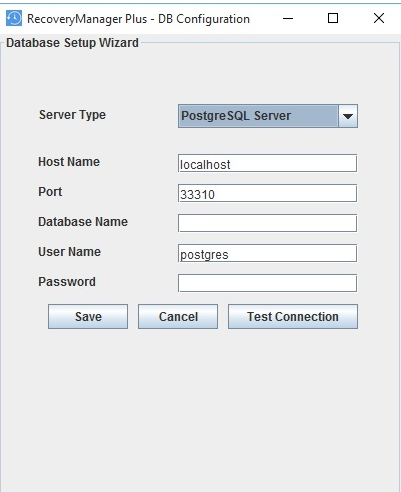
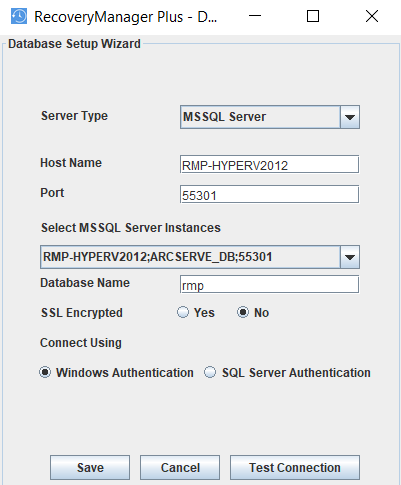
- Select Server Type as Microsoft SQL Server. Choose one of the available Microsoft SQL server instances listed in the corresponding drop-down box. Enter the Host Name and Named instance of the SQL Server from the instance drop-down.
- Under Connect Using options, select one of the authentication types. The options are:
- Windows Authentication
For Windows authentication, the credentials of the Domain user are automatically taken.
- SQL Server Authentication
For Microsoft SQL Server Authentication, enter the User Name and Password.
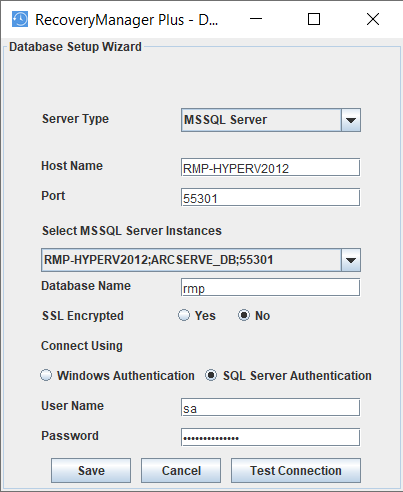
- Click Test Connection to check whether the credentials are correct. If the test fails, the credentials may be wrong; recheck and enter the correct credentials.
- Click Save to save the Microsoft SQL Server configuration. Note that it will take a few minutes to configure the settings of the SQL Server database.
- Start the RecoveryManager Plus service to work with the Microsoft SQL server as the database.
If the Microsoft SQL server you wish to migrate to has Force encryption enabled, select the check box against SSL connection and follow the steps mentioned below.
- Covert your Microsoft SQL server certificate to .cer format.
- Open IIS Manager.
- In the middle pane, click Server Certificates.
- Open the certificate you want to use, then click the Details tab.
- Click Copy to file.
- Click Next in the Certificate Export Wizard window that appears.
- On the Export Private Key screen, select No, do not export the private key, then click Next.
- On the Export File Format screen, select either DER encoded binary X.509 (.CER) or Base-64 encoded X.509 (.CER), then click Next.
- Enter a name for the file, click Next, and then Finish.
- Copy the CER file and place it in <Installation_folder>\RecoveryManagerPlus\conf on the machine where RecoveryManager Plus is running.
- Open Command Prompt and navigate to <Installation directory>\jre\bin folder of RecoveryManager Plus. Use the command below to associate the Jave KeyStore:
keytool -import -v -trustcacerts -alias myserver -file pathofthecert\certname.cer -keystore"..\lib\security\cacerts" -keypass changeit -storepass changeit -noprompt, where pathofthecert is the location where the certificate has been stored and certname is the certificate name. The certificate will be added to your Java KeyStore.
 ADManager Plus
 ADAudit Plus
 ADSelfService Plus
 M365 Manager Plus