Emailing Reports and Dashboards
- Emailing Reports
- Emailing Dashboards
- Emailing Multiple Views
- Scheduling an Email
- Managing email schedule
ManageEngine Analytics Plus allows you to email your reports and dashboards to your colleagues for collaborative analysis and insightful decision making.
Emailing Reports
You can email reports by selecting the E-mail option from the toolbar and following the steps below:
- Open the corresponding table or report that you wish to mail as an attachment.
- Select the Email this View option under the Email icon and choose one of the following formats:
- CSV: The underlying data in the report will be sent as a CSV attachment.
- Excel: The underlying data will be sent as an excel file.
- PDF: A PDF attachment of the report or table will be emailed.
- HTML: The reports will be mailed as a HTML.
- Image: This option is available only for charts and the image will be emailed either as a .png or a .jpg file.

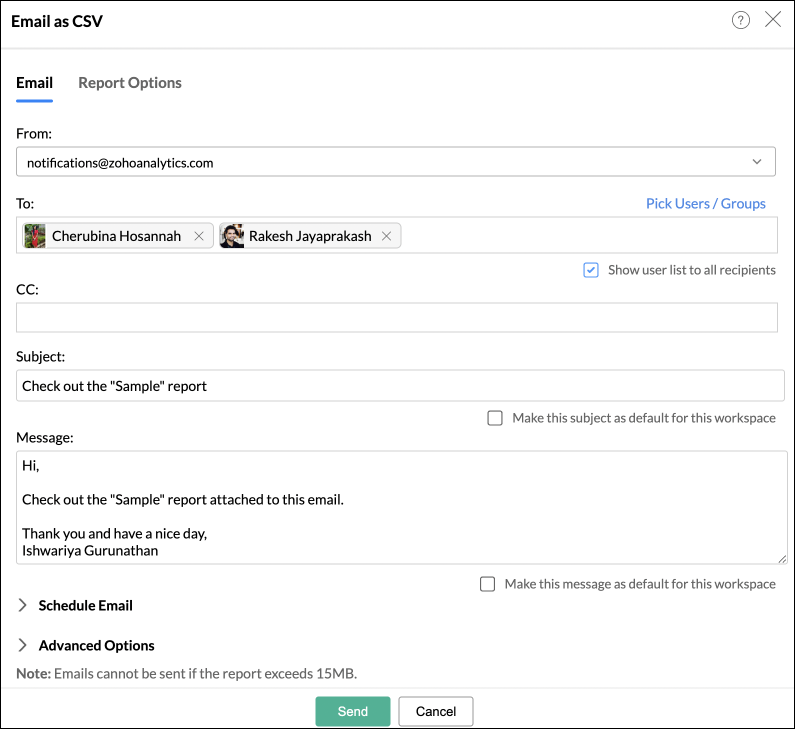
- In the Email Settings page that appears, specify the required settings in the Report Options tab. Several customization options are available, including the facility to set a password to protect your email attachments. To do this, select the Set Passwords checkbox and enter the required password. However, this password cannot be shared to users through the application interface and will need to be shared individually.

- In the Email tab, specify the email addresses of the users you wish to email the view to. You can enter the email addresses manually, specifying one in each line. You can also use the Pick Users / Groups option to select the users or groups you wish to email.
- Enter the email address to whom you wish to send a copy of the email in the CC field.
- You can also email the report with a filter criteria to multiple users and groups.
- You can customize the subject or the body of the mail, and set the customized subject and message as default using the Make this Subject/Message as a default for this workspace checkbox.
Note: The Set Password option will only work when reports are sent as attachments and not when they are emailed as inline images.
You can also schedule this email to be sent at periodic intervals. - You can further customize your email exports in the Advanced Options section by specifying the following settings.
Apply corresponding share filter criteria: Report will be emailed after filtering data based on the filter criteria specified while sharing the view to the users.
Apply default user filters: Report will be emailed after filtering data based on the default User Filters values used in the reports. If the view does not have any default user filter, then it will be emailed with all data.
Do not send this email when there is no data in the report: View will not be emailed if there is no data in the report.
Append email sent time in subject: The time when the email was sent will be included in the mail subject. - Click Send to send the table or report as an attachment to the specified users.
Emailing Dashboards
You can email dashboards only in two file formats - HTML and PDF.
Emailing a dashboard as a HTML
- Open the corresponding dashboard that you wish to email.
- Click Email > Email as HTML or you may also click Export > Export as HTML > Email.
- The Email as HTML: Settings window opens, containing two tabs a Report Options tab and an Email tab. The options available in the report options tab is the same as that in Export as HTML.
- In the Email tab, specify the email addresses of the users to whom you wish to send the dashboard one per line.
- You can use the Add Users From link and select the email addresses of the users to whom you have shared the dashboard or the workspace.
- You can also email the report with specific filter criteria applied.
- You can also customize the subject or the body of the mail. You can also set a customized subject and message as default for every email you send using the Make this Subject/Message as default for workspace checkbox.
- You can Set Password to password protect your email attachments. Select Report Options tab under the Settings window. Select the Set Password checkbox to enter the password for your e-mail attachment. Analytics Plus does not offer options to share your password through the application interface. It has to be shared with users separately.
Note: The Set Password option will only work when reports are sent as attachments and not when they're emailed as inline images. - You can also schedule this email to be sent at periodic intervals (refer this section).
- Click Send.
Emailing a dashboard as a PDF
ManageEngine Analytics Plus allows you to email the dashboard as PDF in two different layouts.
- Layout as in Dashboard - This option will email the dashboard in the same layout as arranged in dashboard.
- Each Report in a New Page - This option will email the dashboard in a single column layout displaying each report in a new page in the PDF.
To email a dashboard as PDF:
Open the corresponding dashboard that you wish to email.
Click Email > Email as PDF > Layouts as in Dashboard to email the dashboard in the same layout as arranged in the dashboard. Alternatively, you may also email the dashboard by selecting Export > Export as PDF > Layouts as in Dashboard > Email.
(or)
- Click Email > Email as PDF > Each Report in a New Page to email the dashboard with each report in a new page. Alternatively, you may also email the dashboard by selecting Export > Export as PDF > Each Report in a New Page> Email.
- The Email as PDF: Settings window opens, containing two tabs a Report Options tab and a Email tab. The options available in the report options tab is the same as that in Export as PDF.
- In the Email tab, specify the email addresses of the users to whom you wish to send the dashboard one per line.
- You can use the Add Users From link and select the email addresses of the users to whom you have shared the dashboard or the workspace.
- You can also email the report with a specific filter criteria applied.(the filter criteria that you have used while sharing the report gets applied here - refer this help documentation)
- You can also customize the subject or the body of the mail. You can also set a customized subject and message as default using the Make this Subject/Message as default for workspace checkbox.
- You can Set Password to password protect your email attachments. Select Report Options tab under the Settings window. Select the Set Password checkbox to enter the password for your e-mail attachment. Analytics Plus does not offer options to share your password through the application interface. It has to be shared with users separately.
Note: The Set Password option will only work when reports are sent as attachments and not when they're emailed as inline images. - You can also schedule this email to be sent at periodic intervals.
- Click Send.
Emailing Multiple Views
Emailing multiple views is similar to emailing a single view. You can email reports by selecting Export > Export multiple views > E-mail or alternatively you may follow the below steps
- Open the corresponding table or report you want to mail as an attachment.
- Click Email > Email Multiple View.
- You can select one of the available options
- CSV - The underlying data will be exported as a CSV file and then will be sent as an attachment.
- PDF — The table/reports will be exported as PDF file and then will be sent as an attachment.
- HTML — The table/reports will be exported as HTML file and then will be sent as an attachment.
- Image — The Chart will be exported as a GIF or PNG image and then will be sent as an attachment (available for Chart alone).
- The Email as: Settings window will open.
- In the Report Options tab, select the tables/reports you wish to to email. By default all reports will be selected.
Note: Dashboards will not be included when exporting multiple views together.
- In the Email tab, specify the email address of the user to whom you want to send the table/report one per line.
- You can use the Add Users From link and select the email addresses of the users to whom you have shared the report or the workspace.
- Customize the Subject and Message if required. You can also set the customized subject and message as default using the Make this Subject/Message as default for workspace check boxes.
- You can Set Password to password protect your email attachments. Select Report Options tab under the Settings window. Select the Set Password checkbox to enter the password for your e-mail attachment. Analytics Plus does not offer options to share your password through the application interface. It has to be shared with users separately.
Note: The Set Password option will only work when reports are sent as attachments and not when they're emailed as inline images. - You can also schedule this email at periodic intervals.(refer this section)
- Click Send.
The table/report will be sent as an attachment to the users.
Scheduling Emails
You can periodically schedule emails containing the reports to your users. This helps you update your users with the latest modification in the data.
To Schedule an Email:
- Open the corresponding view which you want to email as attachment.
- Click Email > Email this View/Email Multiple views and then choose the required format.
- In the Email as: Settings window that opens, specify the email address of the users to whom you want to send the reports.
- In the Schedule this Email section, set your preferred time interval for scheduling. By default schedule will be set to Send Now(Once).
- Specify a Schedule name, which is mandatory.
The below table contains the various options available for scheduling emails at different intervals.
| Option | Description |
| Daily | |
| Repeat Every | Specify the interval in days to email the views. |
| Time | Specify the time to email the views. You can change the Timezone by clicking on the change link. |
| Weekly | |
| Repeat Every | Specify the interval in weeks to email the views. |
| Repeat On | Specify the days of the week when you want to email the views by selecting the corresponding check boxes.You can select all the working days (Monday to Friday) using the Select Working Days link. |
| Time | Specify the time to email the views. You can change the Timezone by clicking on the change link. |
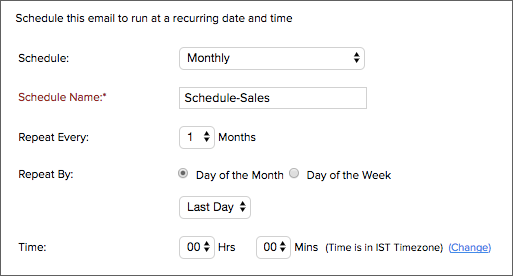
| Monthly | |
| Repeat Every | Specify the interval in months to email the views. |
| Repeat By: | Specify the day of the month when you want to email the view. This field contains two options. 1. Day of the Month : Example - 15th of every month or last day of the month; 2. Day of the Week : Example - 3rd Tuesday of every month. |
| Time | Specify the time to email the views. You can change the Timezone by clicking on the change link. |
| Yearly | |
| Repeat Every | Specify the interval in years to email the views. |
| Month and Date: | Specify the date when you want to email the views. This field contains two drop-down for month and date. |
| Time | Specify the time to email the views. You can change the Timezone by clicking on the change link. |
Selecting Do not send this email when there is no data in the report , will not email the report to its recipients when it does not contain any data.
The report will be sent as attachment at the specified interval.
Note: Five email addresses can be added in each email schedule.
Editing Email Schedules
To edit an email schedule follow the steps below.
- Open any table/report from the corresponding workspace.
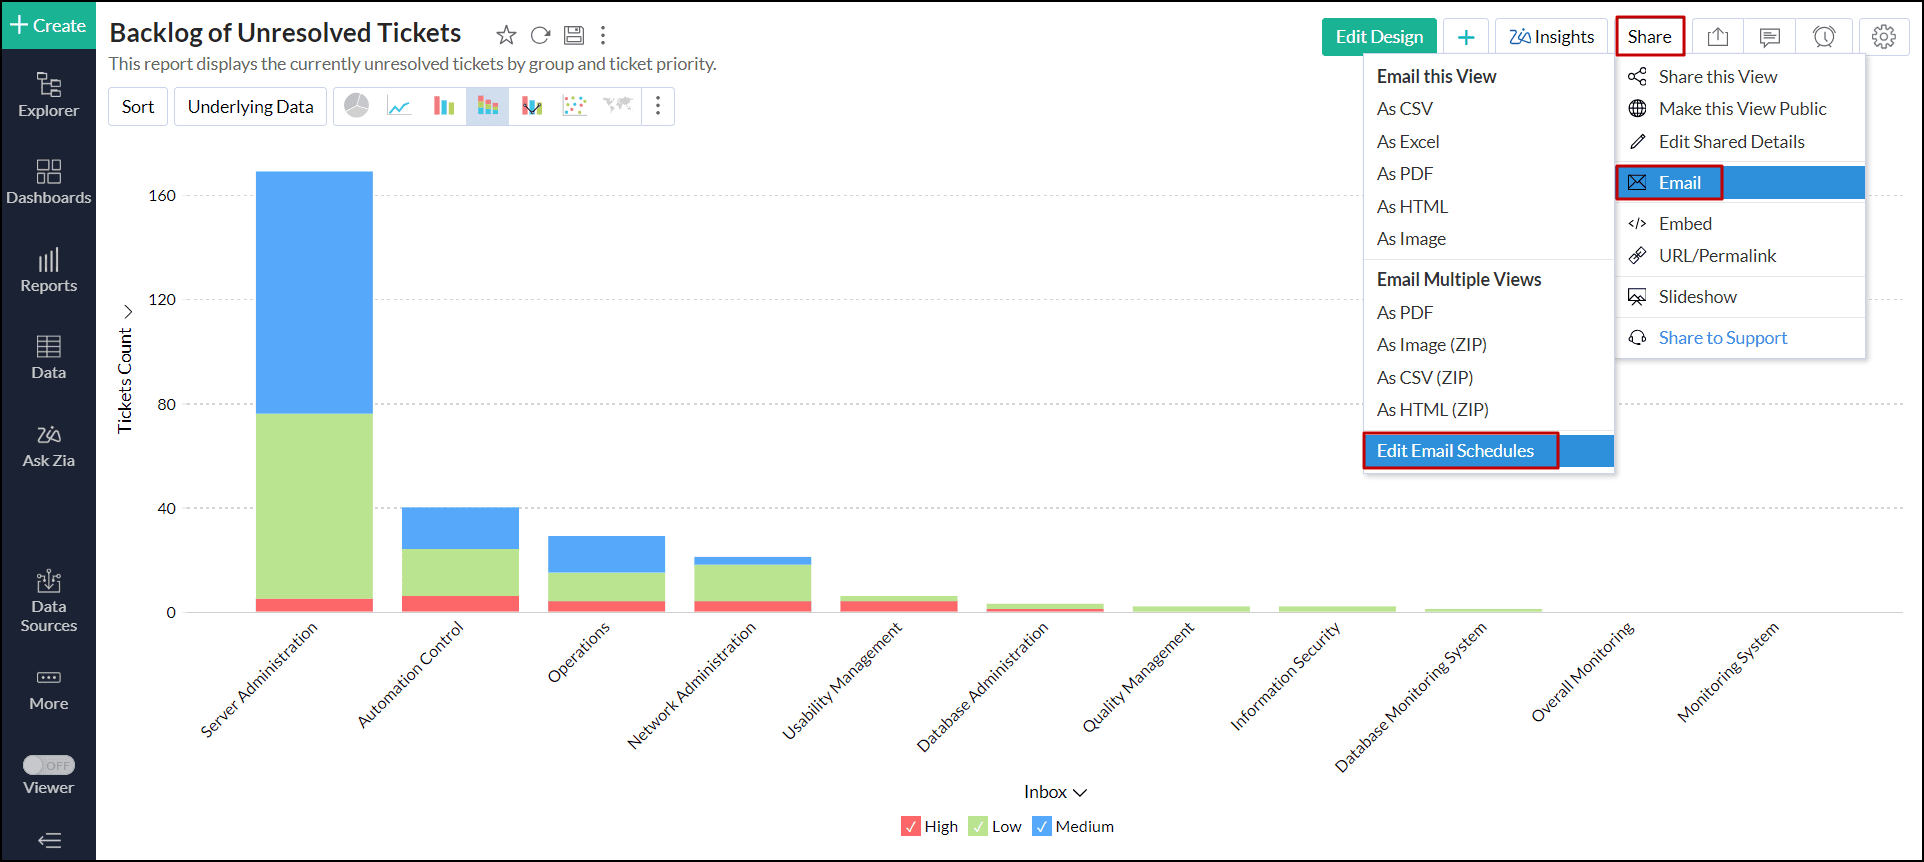
- Click Email > Edit Email Schedule.
- The Edit Email Schedule window will open listing all the schedules created in the workspace in the All Schedules tab.
- The All Schedules tab, will display all the email schedules. The Active tab will display only the active email schedules and the Inactive tab will display only the inactive schedules.
- Hover the mouse over the schedule, list of options to edit the schedule will appear.The options are:
- Edit — Click this link to open the Email setting screen. Edit the Email and Export setting, the schedule will be modified accordingly.
- Pause - Click this link to pause the schedule.
- Run — Click this link to run the paused schedule.
- Delete — Click this link to delete the schedule.
- Send Now — Click this link to mail the views immediately.
- You can run, pause or delete multiple schedules together by selecting the check boxes adjacent to the schedules and then click the corresponding edit option at the top.
Note: In case the email schedule fails for 5 times or more, it becomes inactive. An email notification will be sent to your email address, every time the schedule fails.
Managing email schedules
1. How do I manage email schedules of a view?
Analytics Plus lets you manage the email schedules of a particular view from the Manage Email Schedules page. Follow the steps below to do this:
- Open any view, and click Share > Email > Edit Email Schedules.
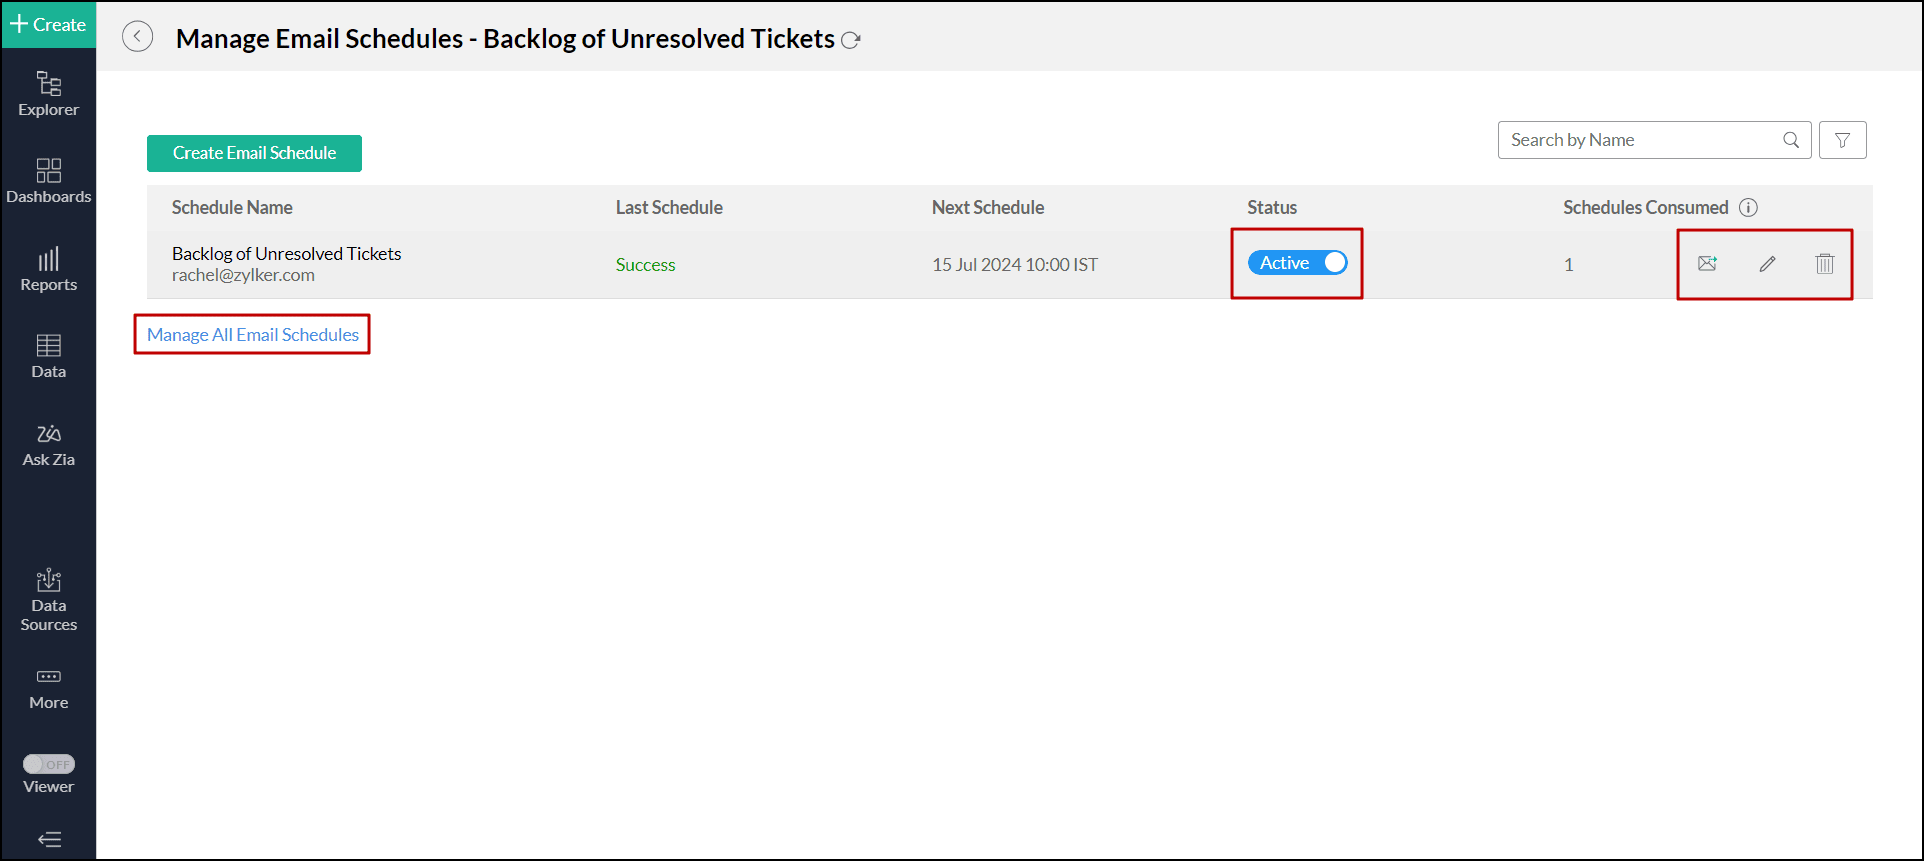
- In the dialog that opens, you can find the list of all the email schedules associated with the view. Each schedule is accompanied by essential details, such as the last schedule status, the next scheduled time, the schedule status, and the total schedules consumed by this schedule.
- Toggle the Active button to activate or deactivate an email schedule.
- Hover at the end of the schedule name to explore options such as Send Now, Edit, and Delete:
- Send Now: This option allows you to send the email instantly as specified in the email schedule.
- Edit: This option allows you to edit the email schedule information.
- Delete: This option allows you to delete the selected email schedule.
- Click Manage All Email Schedules to explore all the email schedules created within your workspace. Click here to learn more.
2. Can I view and manage all the email schedules of a workspace?
Analytics Plus allows you to efficiently manage all the email schedules within your workspace. To do this, click Workspace Settings from the side pane, and navigate to the Email Schedule tab. The email schedules are organized into three distinct groupings to streamline the management process as follows:
- By Name
- By Users
- By Views
To learn more about managing email schedules at the workspace level, click here.