Prerequisites to ensure database connectivity
In order to connect to a database, there are some prerequisites that must be met.
Common prerequisites
The following prerequisites are applicable to all databases.
Provide database read permissions to the Analytics Plus server.
Ensure you have the correct login credentials for your database. As a best practice, try connecting to your target database from the Analytics Plus server, using the native database management software available for the respective database.
Database-specific prerequisites
Ensure the common conditions are met before proceeding with the database-specific prerequisites listed below.
MSSQL Server
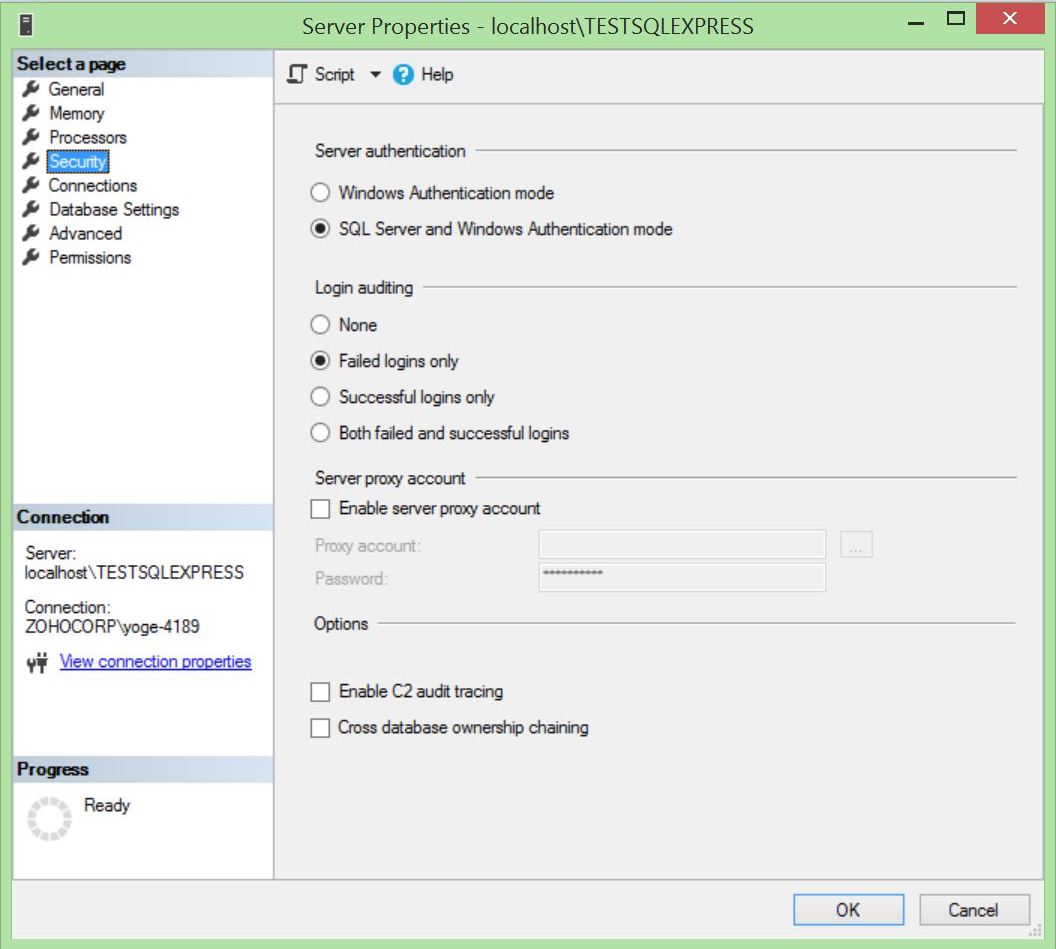
- Analytics Plus supports both Windows authentication and SQL authentication to connect to your MSSQL server. If you wish to use SQL or Windows authentication, make sure you have the SQL server and Windows authentication mode enabled in your security settings.
- In the SQL Server Configuration Manager page, click the SQL Server Network configuration option, choose the required SQL Server instance name and enable the Shared memory, Named pipes and TCP/IP properties.

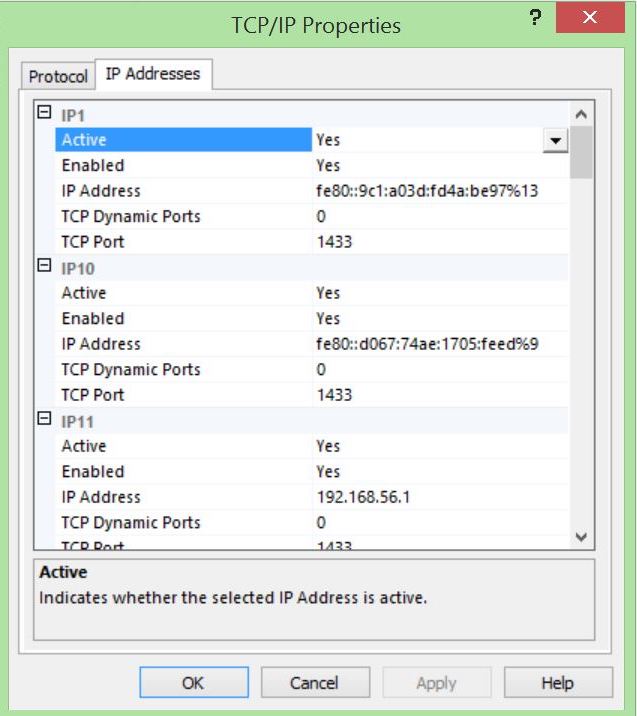
- Right-click on TCP/IP, navigate to Properties and head to the IP Addresses tab. Ensure the Active and Enabled fields are set to 'Yes', and configure the TCP/IP Port. Click OK to proceed.
- Once you've made these changes, restart your MSSQL services. (You can restart using the Management and Server Config tools or from Windows services.)
To import data from MSSQL into Analytics Plus, refer this documentation.
Database user permissions
The user account that is used to connect with MSSQL server should have the following roles associated in the respective database.
| Database name | User role |
| AMDB | Public, db_owner |
| Master | Public, db_datareader |
| msdb | Public, db_datareader |
If you would like to connect SQL Server using an SQL named instance, ensure that the 'SQL Browser Service' is running on the MSSQL host server, and provide View Database State permissions to the user.
To provide the View Database State permission,
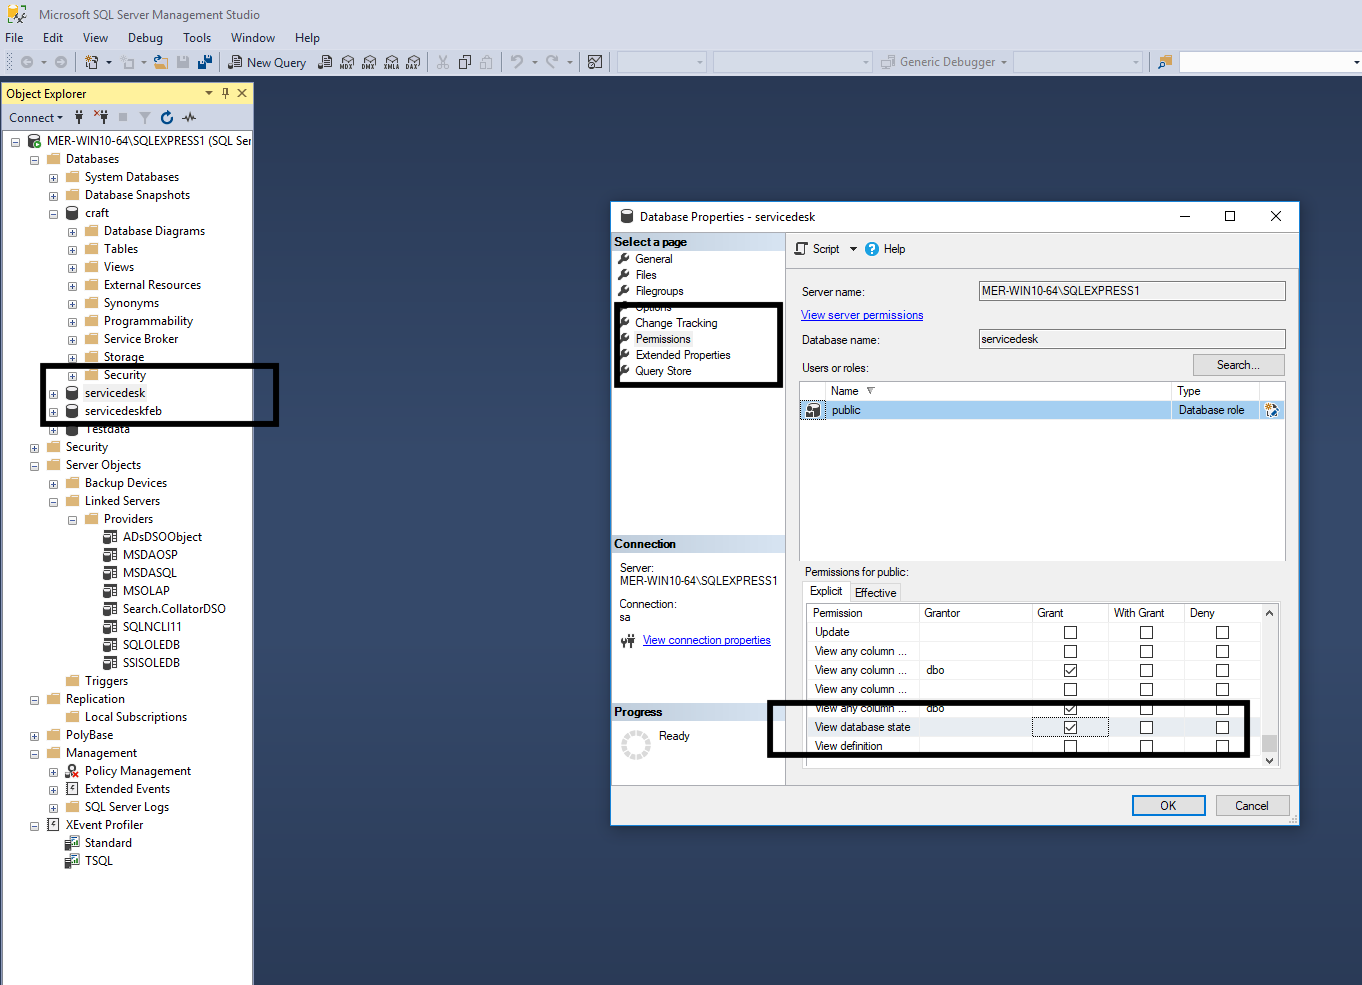
- Open the MSSQL Server Management Studio.
- Right-click on the database you wish to import and select Properties.
- On the Permissions tab of the Properties dialog box, select Permissions for public, navigate to the View Database State listing, and select the corresponding Grant checkbox.
PostgreSQL
Enable remote connections
Follow the steps below to enable remote connections:
- Open the file pg_hba.conf found under the <PostgreSQL_Home>/data/ folder. (<PostgreSQL_Home> refers to the directory where PostgreSQL database is installed.)
- Add the following line, and save the file.
host all all <IP address> trust
Replace <IP address> with the IP address of the Analytics Plus server. The IP address must be mentioned along with the subnet mask. For example: 192.168.1.1/24.
- Open the file postgresql.conf found under the same <PostgreSQL_Home>/data/ folder.
- Find the key listen_address= and add the IP address of the Analytics Plus server.
listen_address = '<IP address>'
Replace <IP address> with the IP address of the Analytics Plus server. For example: 192.168.1.1.
To import data from PostgreSQL into Analytics Plus, refer this documentation.
MySQL
Enable remote connections
Login to your MySQL database as a root user. Navigate to the <MySql_Home>\bin folder in terminal/command prompt, and run the following command.
mysql -u root -p
- Enter your MySQL root password.
- Run the following command to enable GRANT access.
mysql> GRANT ALL ON <Database Name>.* TO <Username>@<IP address> IDENTIFIED BY <Password>;
Note:
- <IP address> must be replaced with the IP address of the Analytics Plus server.
- <Database Name> must be replaced with the name of the database with which you are trying to establish a connection.
- <Username> must be replaced with the database user name.
- <Password> must be replaced with the corresponding password.
To import data from MySQL into Analytics Plus, refer this documentation.
Oracle
To connect to an Oracle database, you must set the operating system environment variable.
Setting environment variables in Windows
On the Windows platform, environment variables are stored in the Windows registry, and are automatically set for you. You need not set them manually.
Setting environment variables in Linux
To set environment variables when connecting remotely from Oracle Database XE, enter one of the following commands in a terminal session at the remote computer.
For Bourne, Korn, or Bash shell:
source <Oracle_Home>/product/11.2.0/client/bin/oracle_env.sh
For C shell:
source <Oracle_Home>/product/11.2.0/client/bin/oracle_env.sh
To import data from Oracle into Analytics Plus, refer this documentation.
Note: To connect to the Oracle database, a user with both CONNECT and SELECT_CATALOG_ROLE is required.
Sybase
Enable remote access
By default, the remote access is enabled when you install Adaptive Server. However you can enable remote access by running the following from command prompt/terminal on the Sybase database server host.
sp_configure "allow remote access",1
Allow remote access is dynamic and does not require your adaptive server to be restarted to take effect. Only a system security officer can set allow remote access.
Database user permissions
Follow the below steps to grant user permissions to connect with a Sybase server.
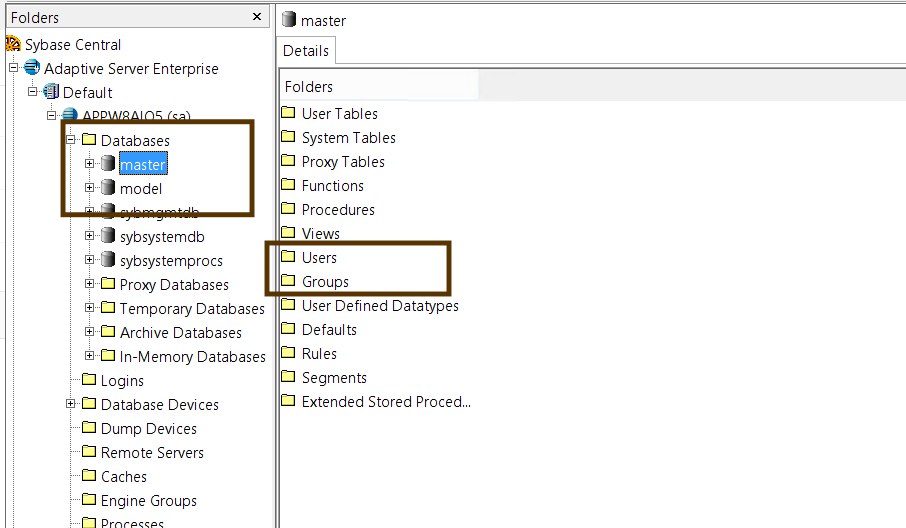
- Connect to the target database.
- Double-click on the name of the database in the access panel.
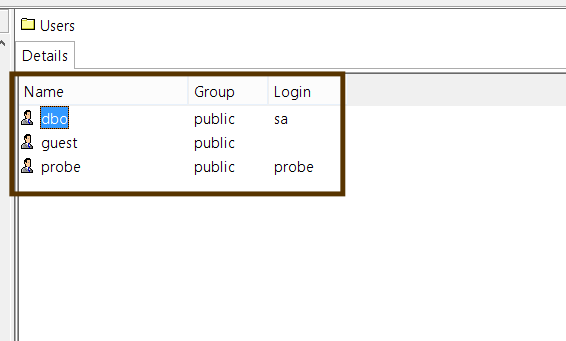
- Double-click Users in the explorer window.
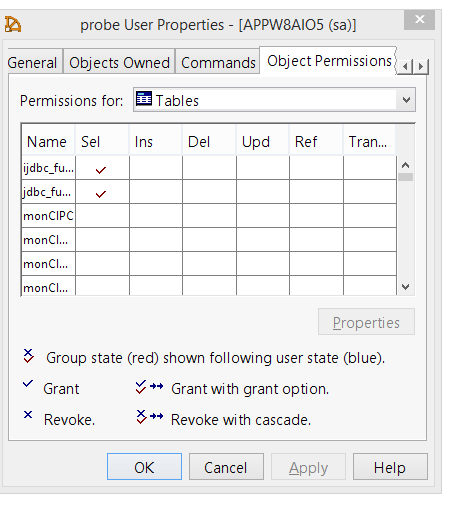
- Right-click the user you wish to provide permissions to, and select Properties--> Object Permissions.
- Click the fields beside the user or group to set specific permissions. Permissions are indicated by a check mark.
IBM Informix
Enable remote connection
These instructions assume that IBM InfoSphere DataStage has already been installed on your local machine and that the parallel engine is available on the remote machine.
Verify that the INFORMIX sqlhosts file on the remote machine has a TCP interface. A TCP interface is necessary to use the remote connection functionality.
Copy the INFORMIX etc/sqlhosts file from the remote machine to a directory on your local machine. Set the INFORMIX HPLINFORMIXDIR environment variable to this directory.
For example, if the directory on the local machine is /apt/informix, the sqlhosts file should be in the directory /apt/informix/etc, and the HPLINFORMIXDIR variable should be set to /apt/informix.
Set the INFORMIXSERVER environment variable to the name of the remote INFORMIX server.
Add the remote INFORMIX server nodes to your PX node configuration file located in $APT_ORCHHOME/../../config; and use a nodepool resource constraint to limit the execution of the Informix enterprise stage to these nodes.
In the example configuration file below, the local machine is fastname local_machine, and the INFORMIX remote server machine is fastname remote_machine. The nodepool for the remote nodes is arbitrarily named "InformixServer". The configuration file must contain at least two nodes, one for the local machine and one for the remote machine.
Go to the Stage page Advanced tab of the Informix enterprise stage. Select Node pool and resource constraints and Nodepool along with the name of the node pool constraint (i.e., "InformixServer" in the example configuration file above).
Set up environment variables. Remote access to an INFORMIX database requires the use of two HPLINFORMIXDIR environment variable settings, one for the local InfoSphere DataStage workstation which is set up in step 2 above, and one for the workstation with the remote INFORMIX database. The remote variable needs to be set in a startup script which you must create on the local workstation. This startup script is executed automatically by the parallel engine.
HPLINFORMIXDIR = /usr/informix/9.4
export INFORMIXDIR
INFORMIXSQLHOSTS=$HPLINFORMIXDIR/etc/sqlhosts
export INFORMIXSQLHOSTS
shift 2
exec $*
- Set the environment variable APT_STARTUP_SCRIPT to the full path name of the startup.apt file.
Database user permissions
To connect to an IBM Informix database, a user requires Connect database-level privileges and access to sysmaster database.
JDBC Driver
To connect to IBM Informix DB, make sure that the ifxjdbc.jar file is found under the <Analytics Plus home>/reports/lib folder. The jar file can be copied from the IBM Informix installation location, <IBM Informix Home>\jdbc\lib\jar. Restart Analytics Plus after copying the file.
Troubleshooting
If you are still unable to connect to the IBM Informix database, try making the following changes to your sqlhosts file on the local workstation.
- In the fourth column in the row corresponding to the remote INFORMIX server name, replace the INFORMIX server name with the INFORMIX server port number found in the /etc/services file on the remote workstation.
- The third column contains the host name of the remote workstation. Change this to the IP address of the remote workstation.
Pervasive database
To access Pervasive database from a remote server, you need to register the server. Follow these instructions to register a remote server engine
- In Pervasive PSQL Explorer, right-click on the top node in the tree (Pervasive PSQL).
- Click New > Server.
- Identify the server you wish to register.
- Type the name by which the server is identified on the network or type the IP address of the server.
- Click Finish.
- The server should now appear in the Pervasive PSQL Explorer window of PCC under the Engines mode.
Database user permissions
To connect to Pervasive SQL, make sure the pervasiveJDBC jars (jpscs.jar, pvjdbc2.jar, pvjdbc2x.jar) are present in the <installation directory>/reports/lib folder, and restart Analytics Plus.
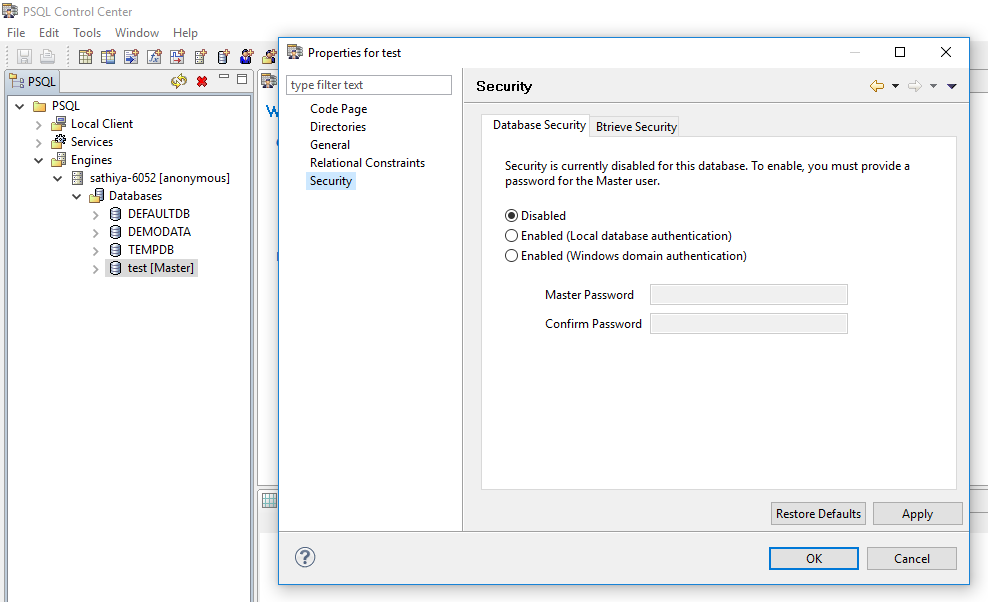
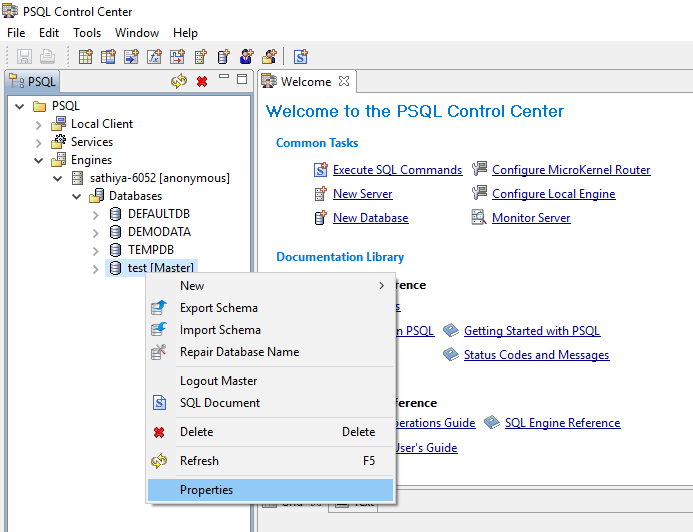
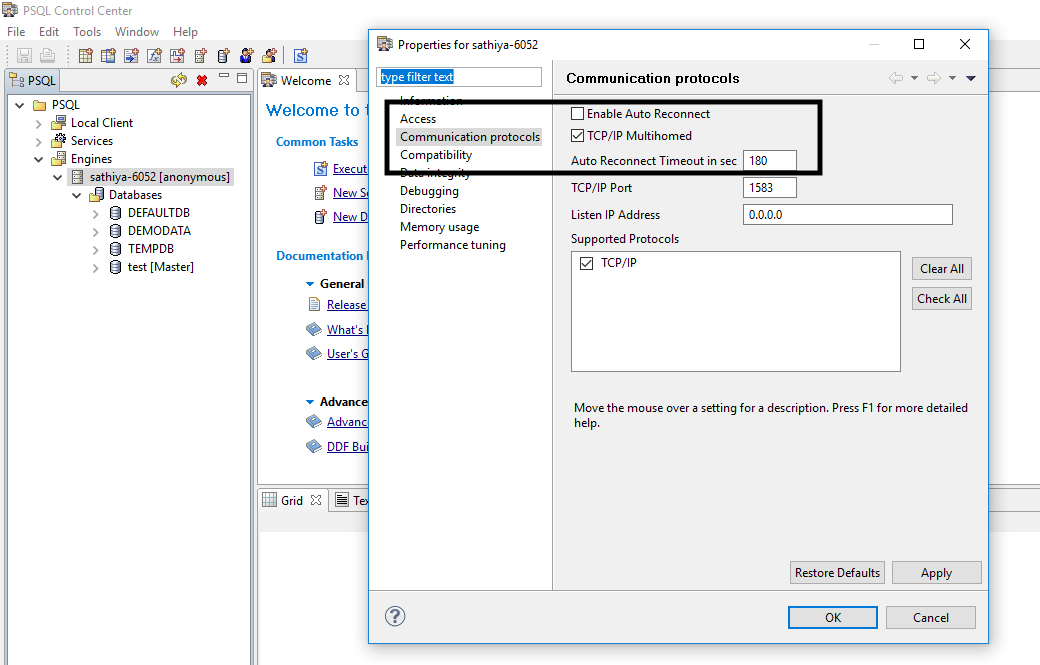
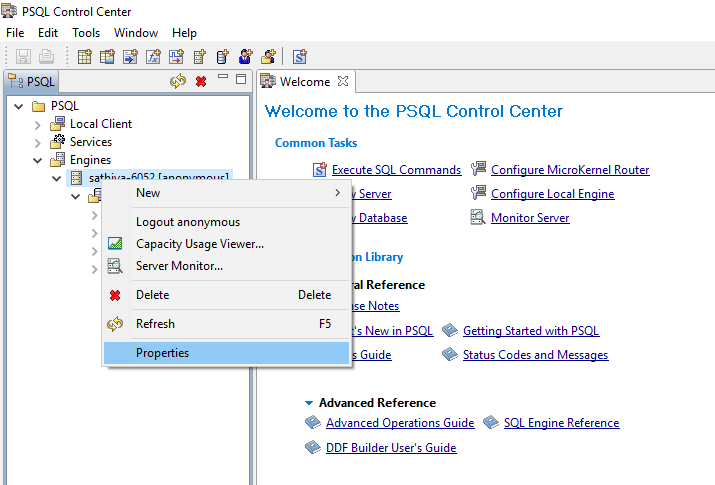
- Open the Pervasive SQL control center. Right-click on the engine name and click Properties.
- Select Communication protocols. Enable the TCP/IP multihomed option.
- Right-click on the database you wish to connect with Analytics Plus, and click Properties.
- In the Security tab, if security is disabled, connect with your username, and if the security is enabled, connect with the username and password.