Active Directory
Analytics Plus provides support for importing and regularly synchronizing users from your Active Directory. You can also configure single sign-on functionality for your Active Directory users, which allows users to access Analytics Plus seamlessly without having to manually log in every time.
Note: Only Analytics Plus administrators can set up an Active Directory configuration.
This section explains how to set up the Active Directory configuration and enable single sign-on for Active Directory users.
- Active Directory configuration
- Single Sign-on for Active Directory users
Active Directory configuration
Follow the steps below to configure a new Active Directory domain in Analytics Plus.
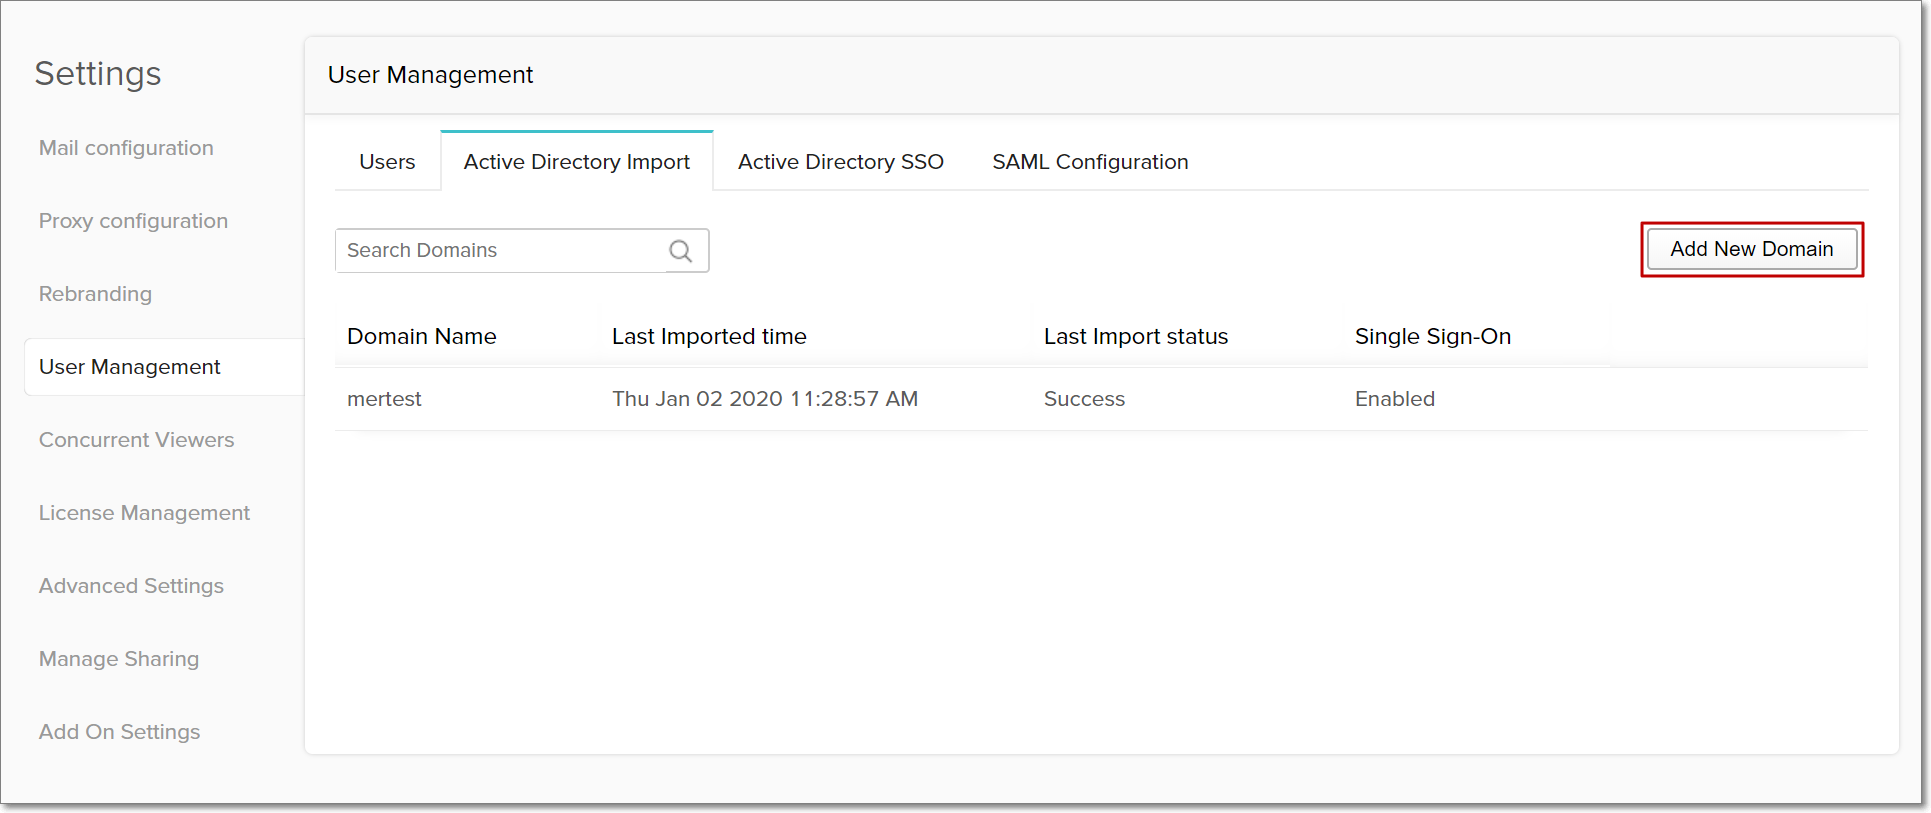
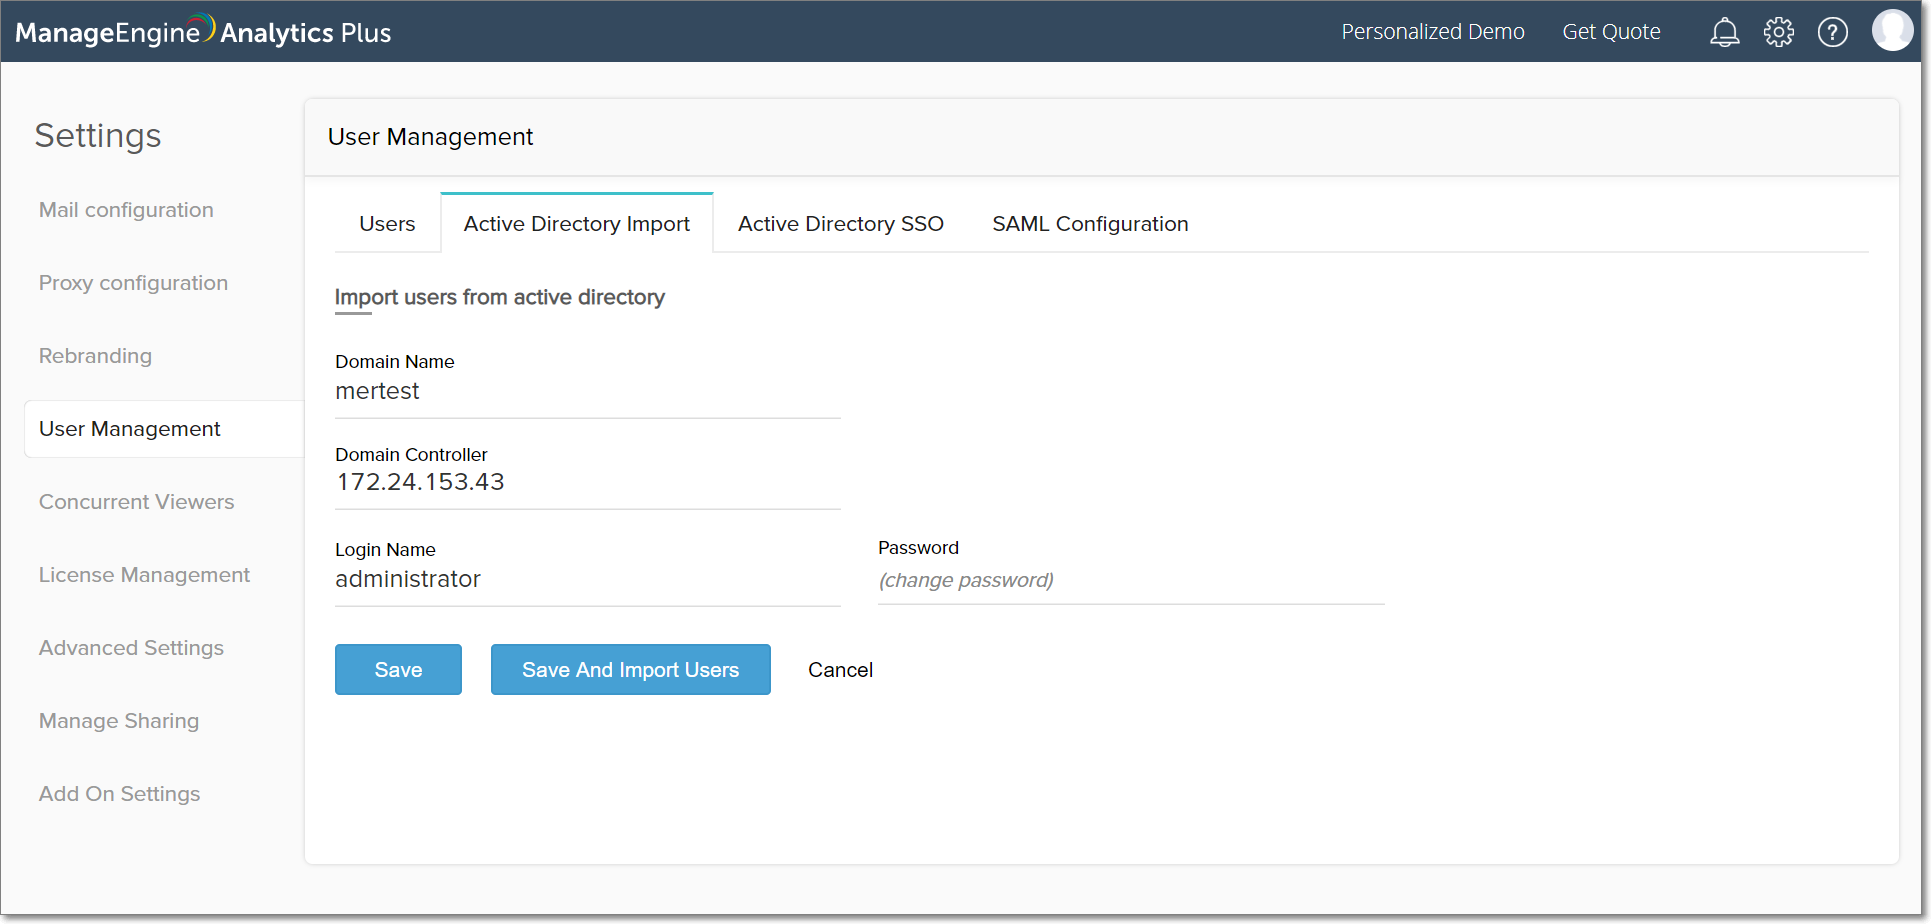
Navigate to the User Management section in the Settings page, and click the Active Directory Import tab.
Click the Add New Domain button at the top right corner of the page.
Enter the Active Directory domain name, domain controller, login name and password.
Click Save to the save the configuration and add Active Directory users later or click Save and Import Users to save the configuration and add users immediately.
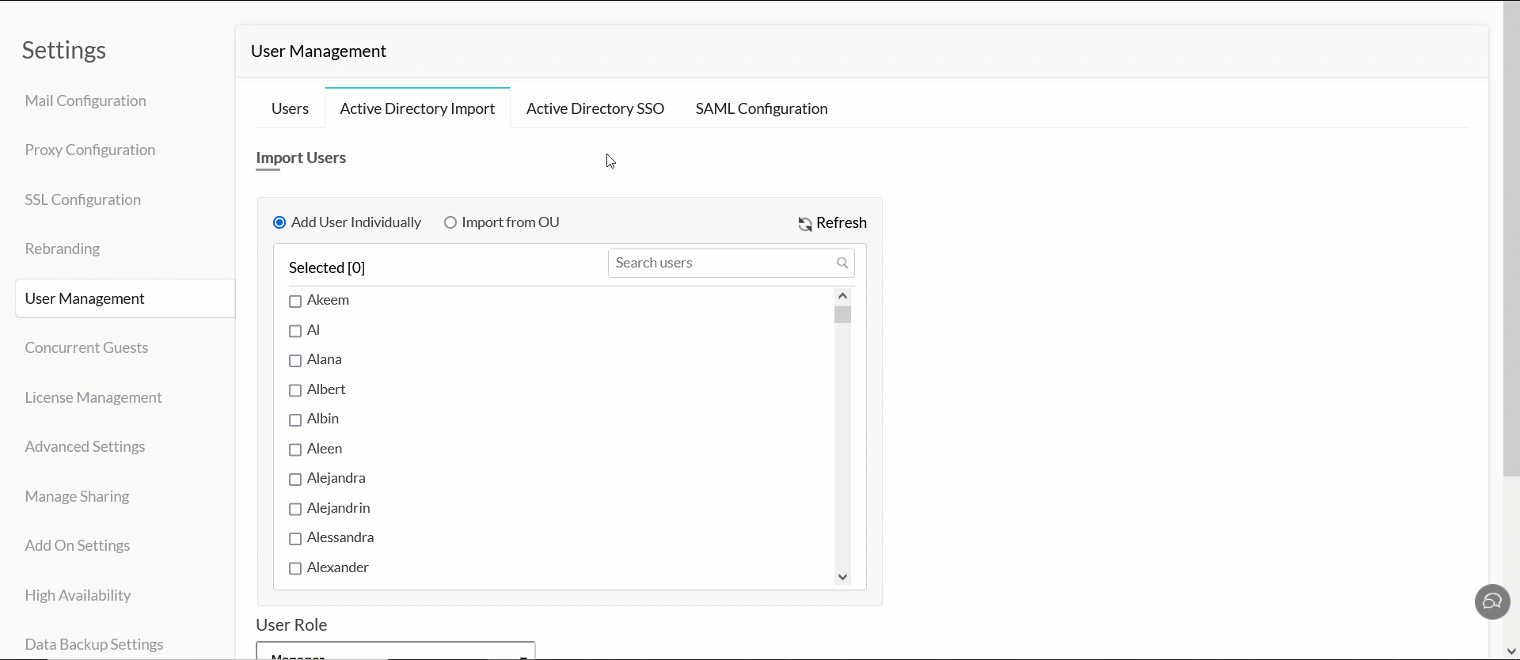
Search and choose users individually, or select the required Organizational Units (OUs).
Choose the desired role from the User Role drop-down.
Enable the Send login details to all new users via e-mail checkbox to share the login details to all the new Active directory users via email.
- Select the Allow user to perform configuration changes checkbox to enable users with the Manager role to perform admin level changes such as adding or editing users, managing licenses, etc.
Click Import to import your Active Directory users.
To learn more about importing Active Directory users to Analytics Plus, click here.
Edit the Active Directory configuration
To edit your Active Directory configuration, navigate to the Active Directory Import tab in your User Management page. Click the Edit domain configuration button to make changes to the respective domain.
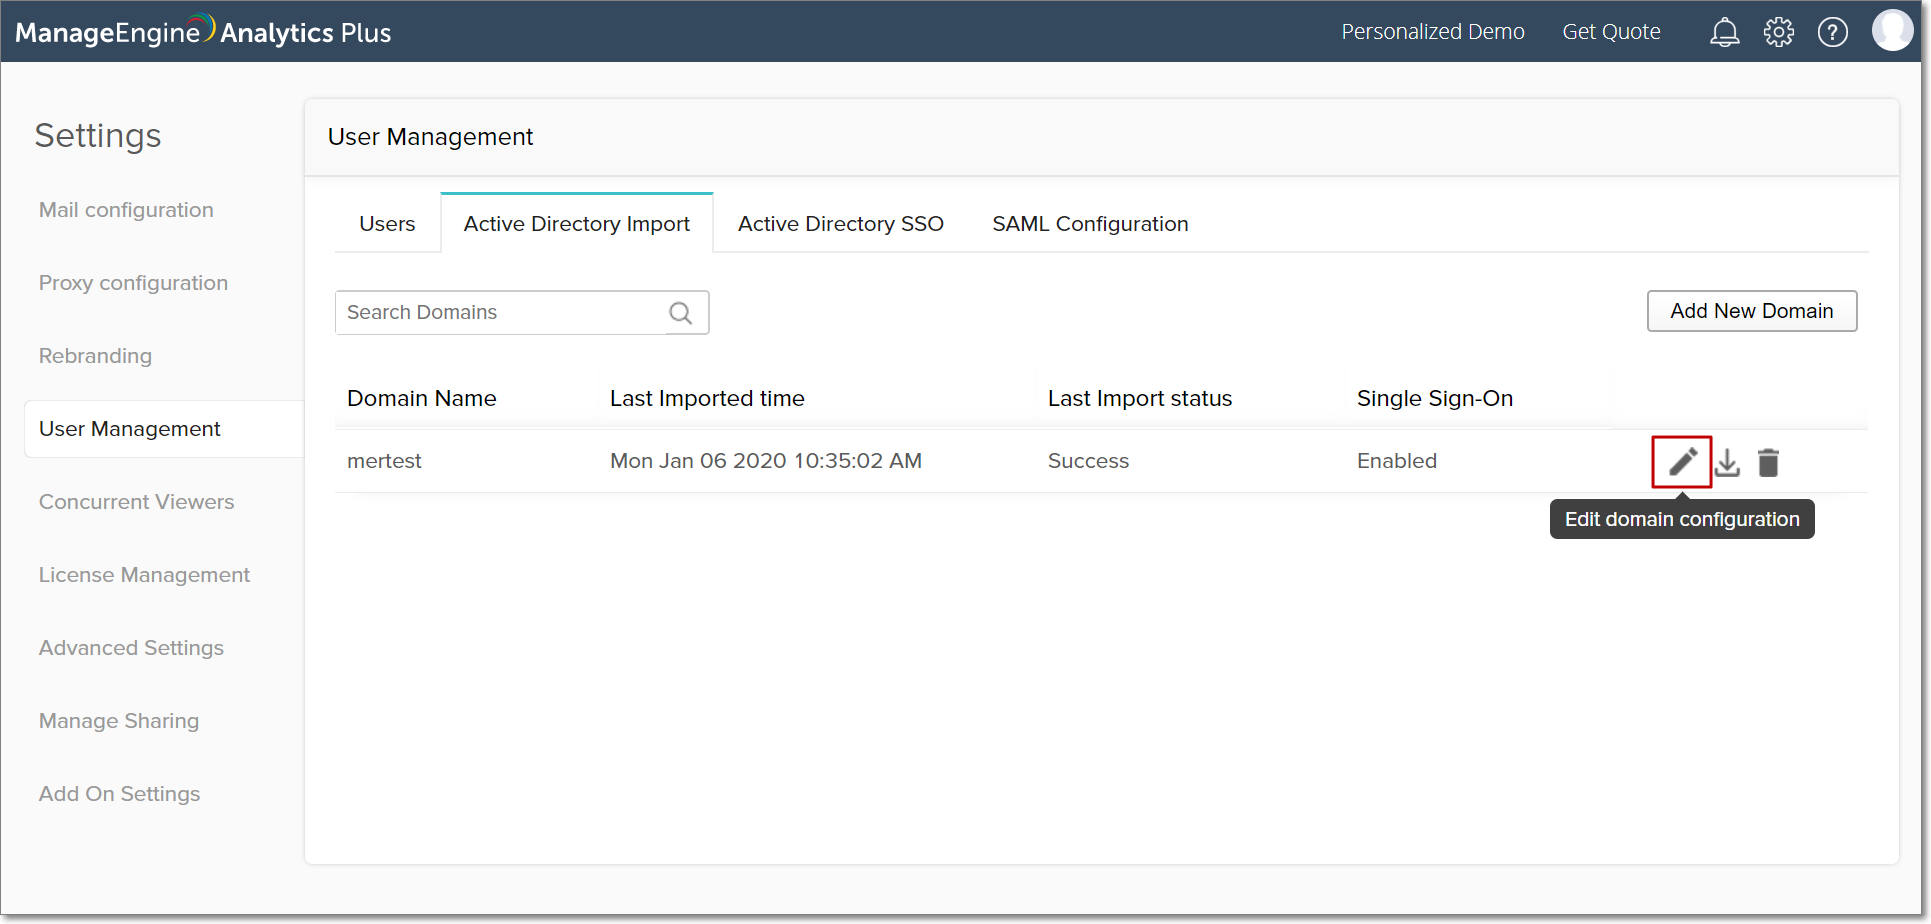
Make the necessary changes to the configuration, and click Save.
Delete the Active Directory configuration
To delete your Active Directory configuration, navigate to the Active Directory Import tab in your User Management page. Click the Delete domain button to remove the respective domain.
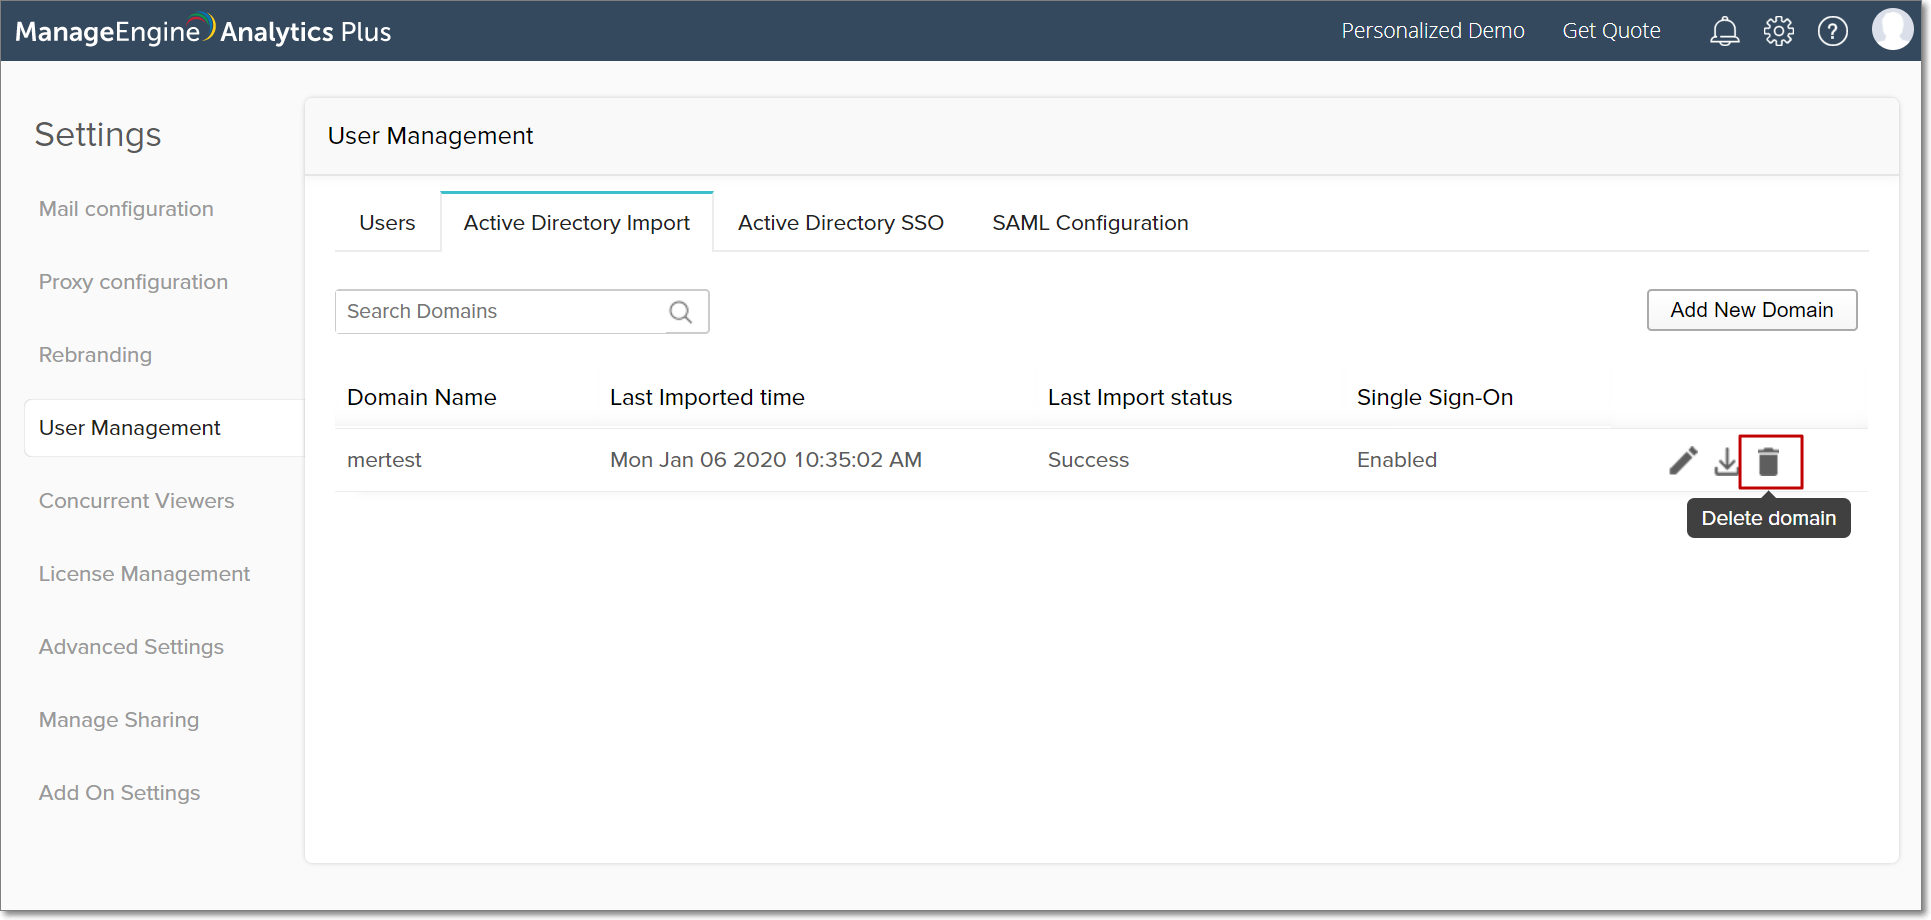
Note: Deleting the Active Directory domain configuration will also delete all the users associated to that domain.
Active Directory Single Sign-on
Single sign-on allows users to access Analytics Plus seamlessly, without having to provide login credentials. To enable single sign-on for Active Directory users, Active Directory Federation Services (AD FS) configuration needs to be set up. AD FS is a single sign-on solution by Microsoft, and a part of the Active Directory Services, that grants authenticated access to applications through Active Directory. By configuring AD FS for Analytics Plus, Active Directory users can seamlessly log in to Analytics Plus.
Set up Active Directory Single Sign-on
To set up single sign-on for Active Directory users, the following steps need to be carried out:
Configure and download the AD FS certificate
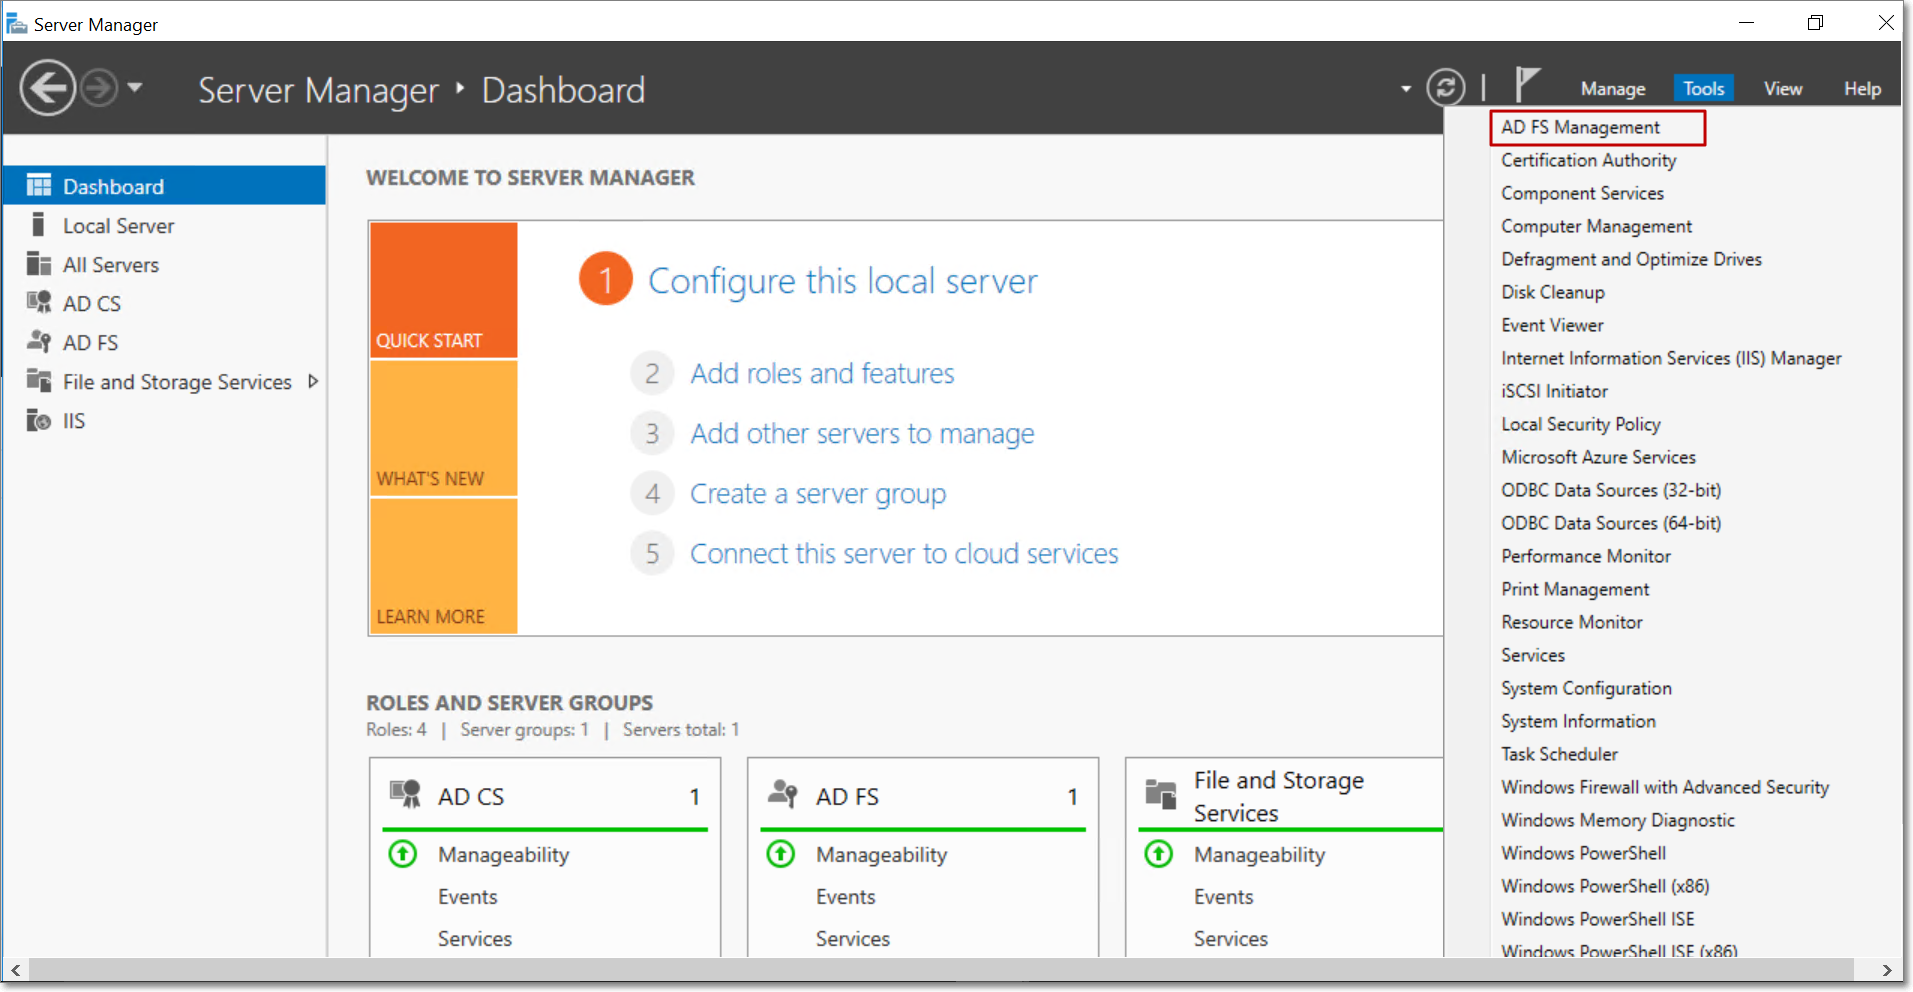
Open Server Manager in the Windows system where AD FS is installed. Click the Tools option in the top right corner, and select AD FS Management.
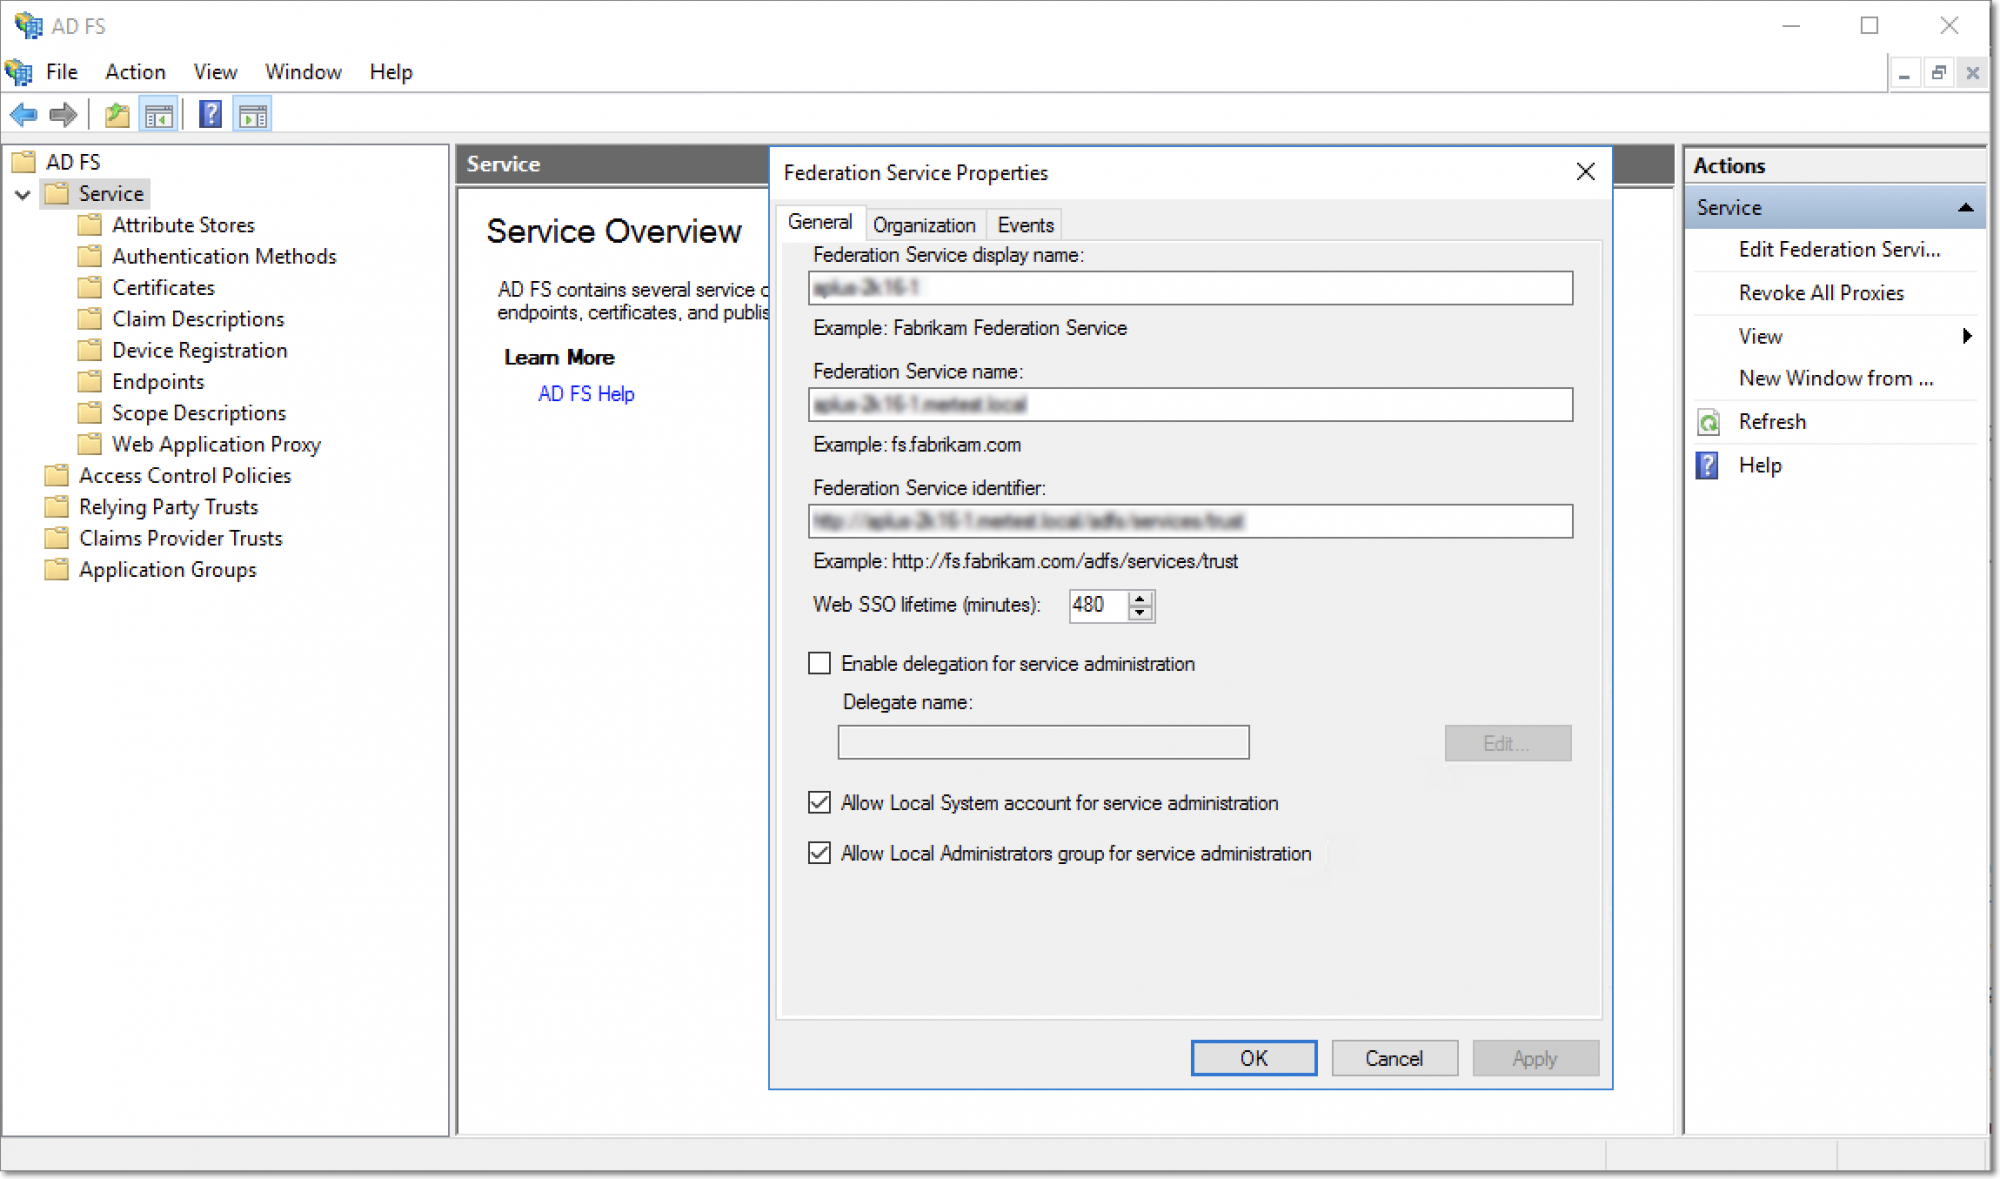
Click the Service option from the panel on the left, and provide the Federation Service Name, Display name and Identifier. Click OK.
Note: The Federation Service name should be the fully qualified domain name of the machine AD FS is installed in.
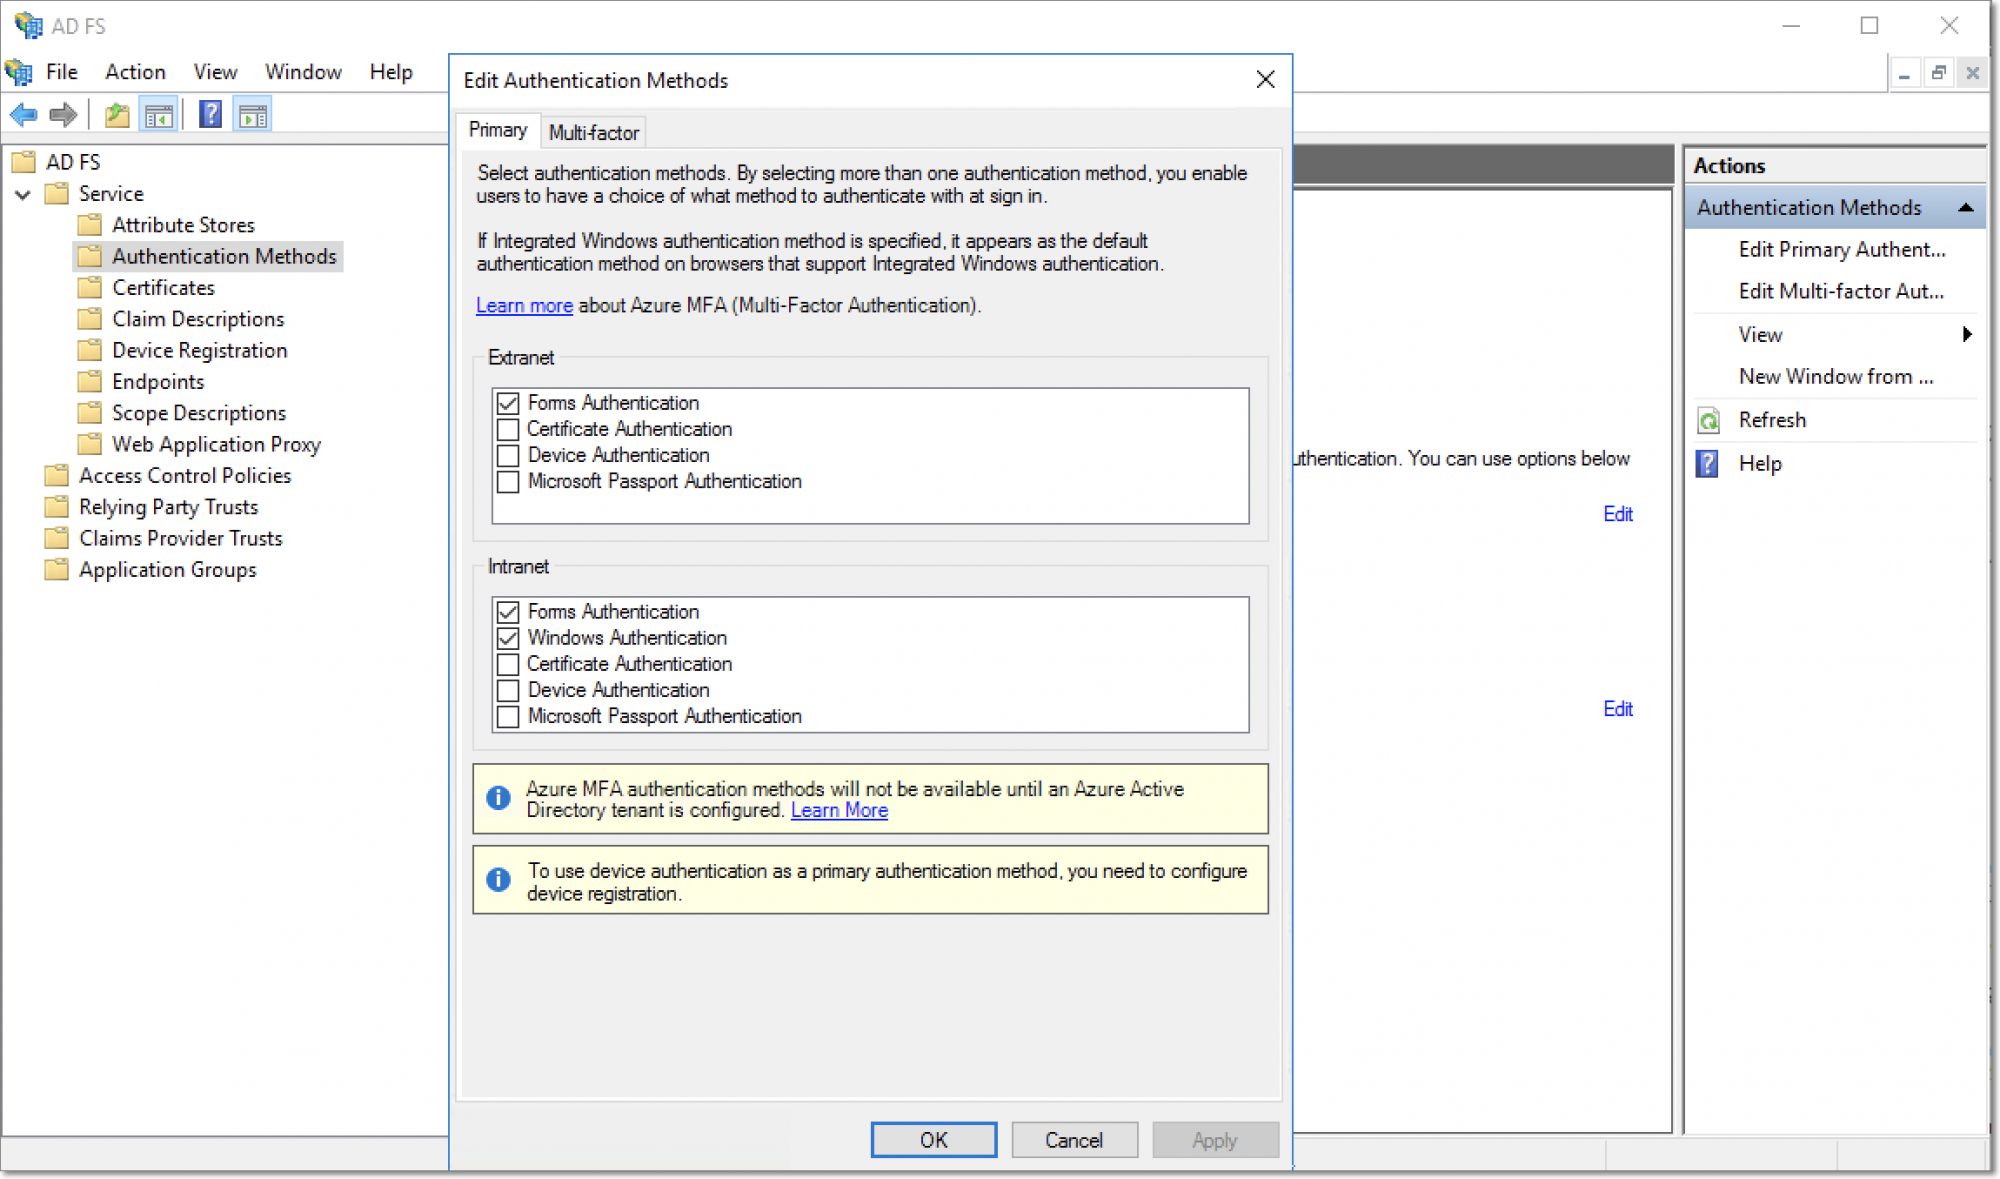
Click the Authentication Methods option under Service from the left panel.
Under Primary Authentication Methods, select the Forms Authentication option in the Extranet section and the Forms Authentication and Windows Authentication options from the Intranet section. Click OK.
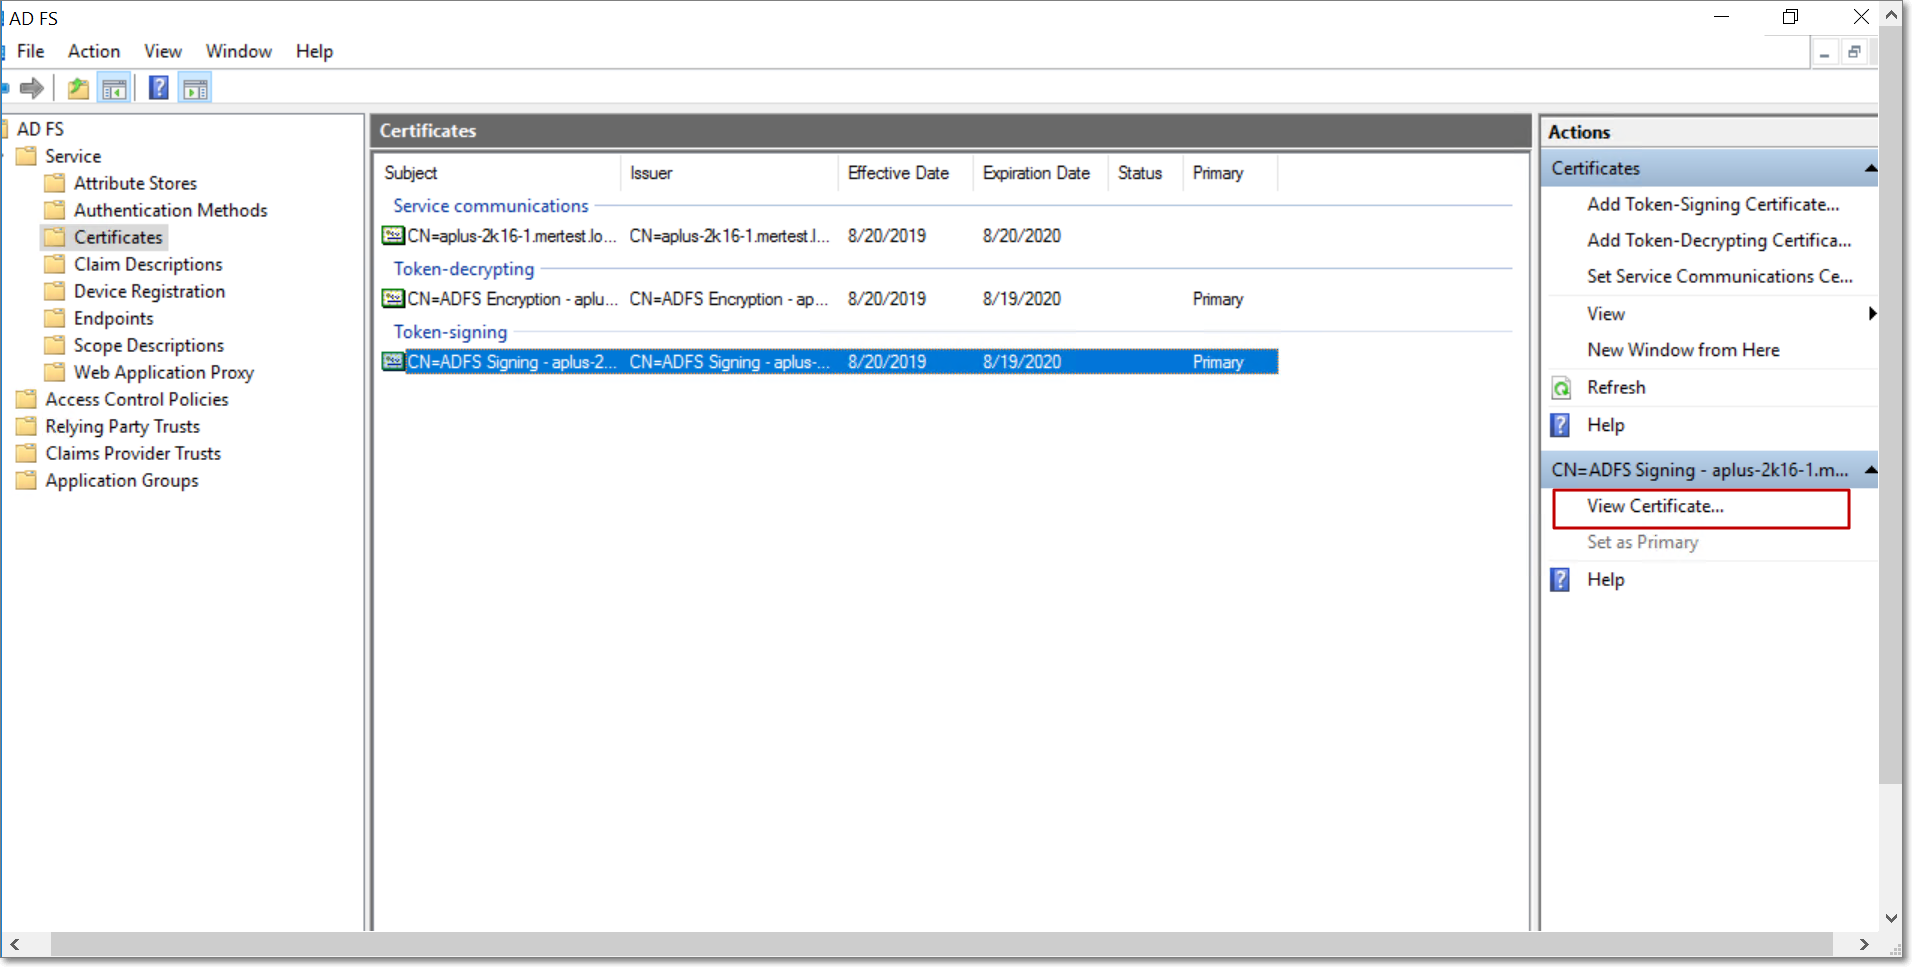
The AD FS certificate is now successfully configured. To download the certificate, navigate to the Certificates option in the left panel. Select the Token-signing certificate, and click the View Certificate option from the right panel.
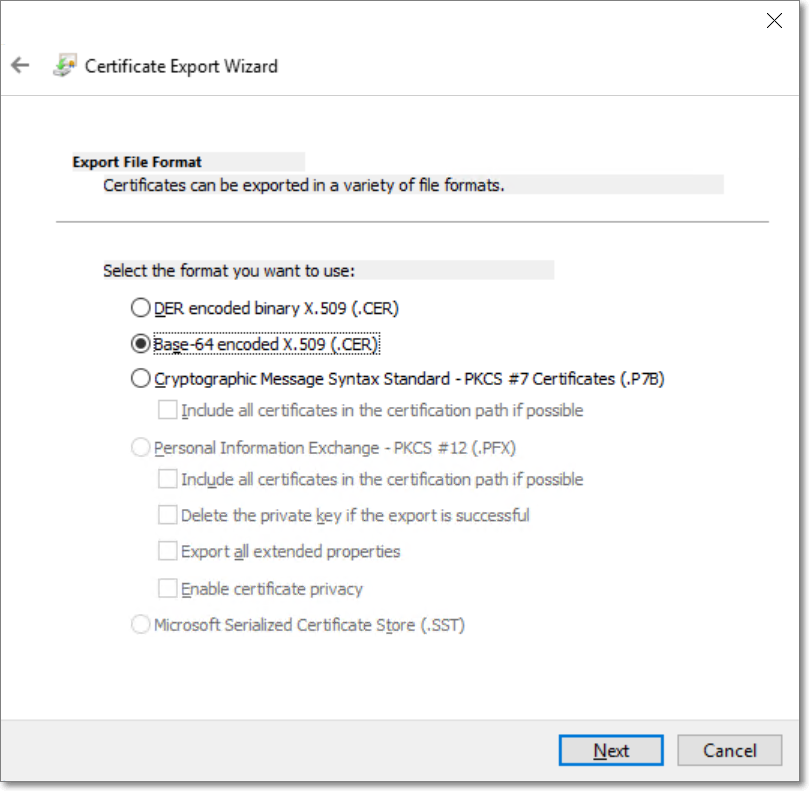
In the Certificate popup that appears, navigate to the Details tab. Click Copy to File. In the Certificate Export Window, click Next and select the export file format as Base-64 encoded X.509 (.CER).
Specify a name and location for the exported file, and click Next.
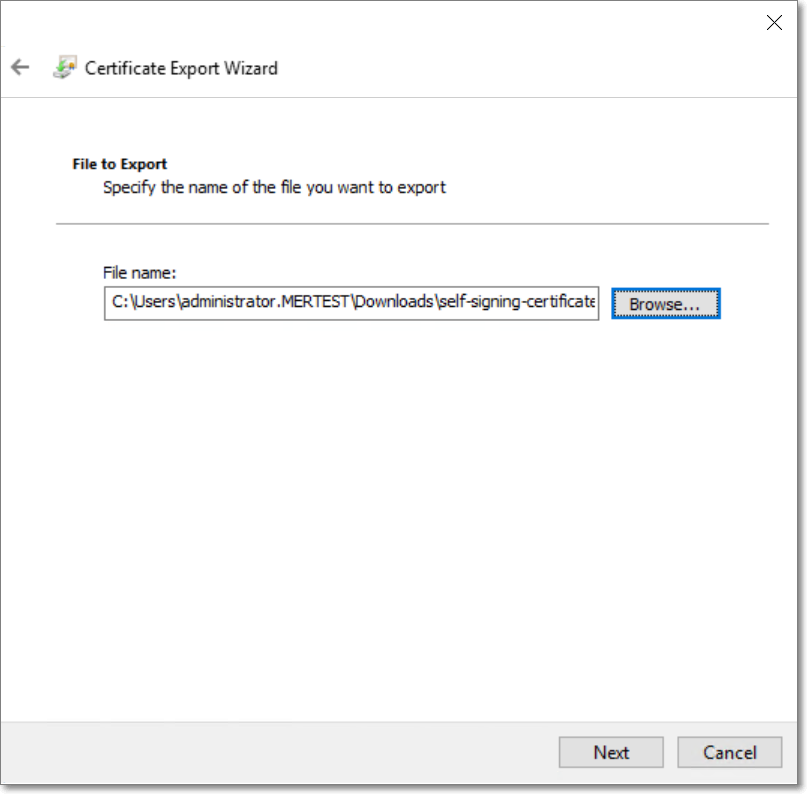
Click Finish to complete the export process.
After exporting the AD FS certificate, navigate to the below URL:
"https://<ADFS_SERVICE_HOSTNAME>/FederationMetadata/2007-06/FederationMetaData.xml"
where <ADFS_SERVICE_HOSTNAME> is the domain name of the host machine where AD FS is configured.
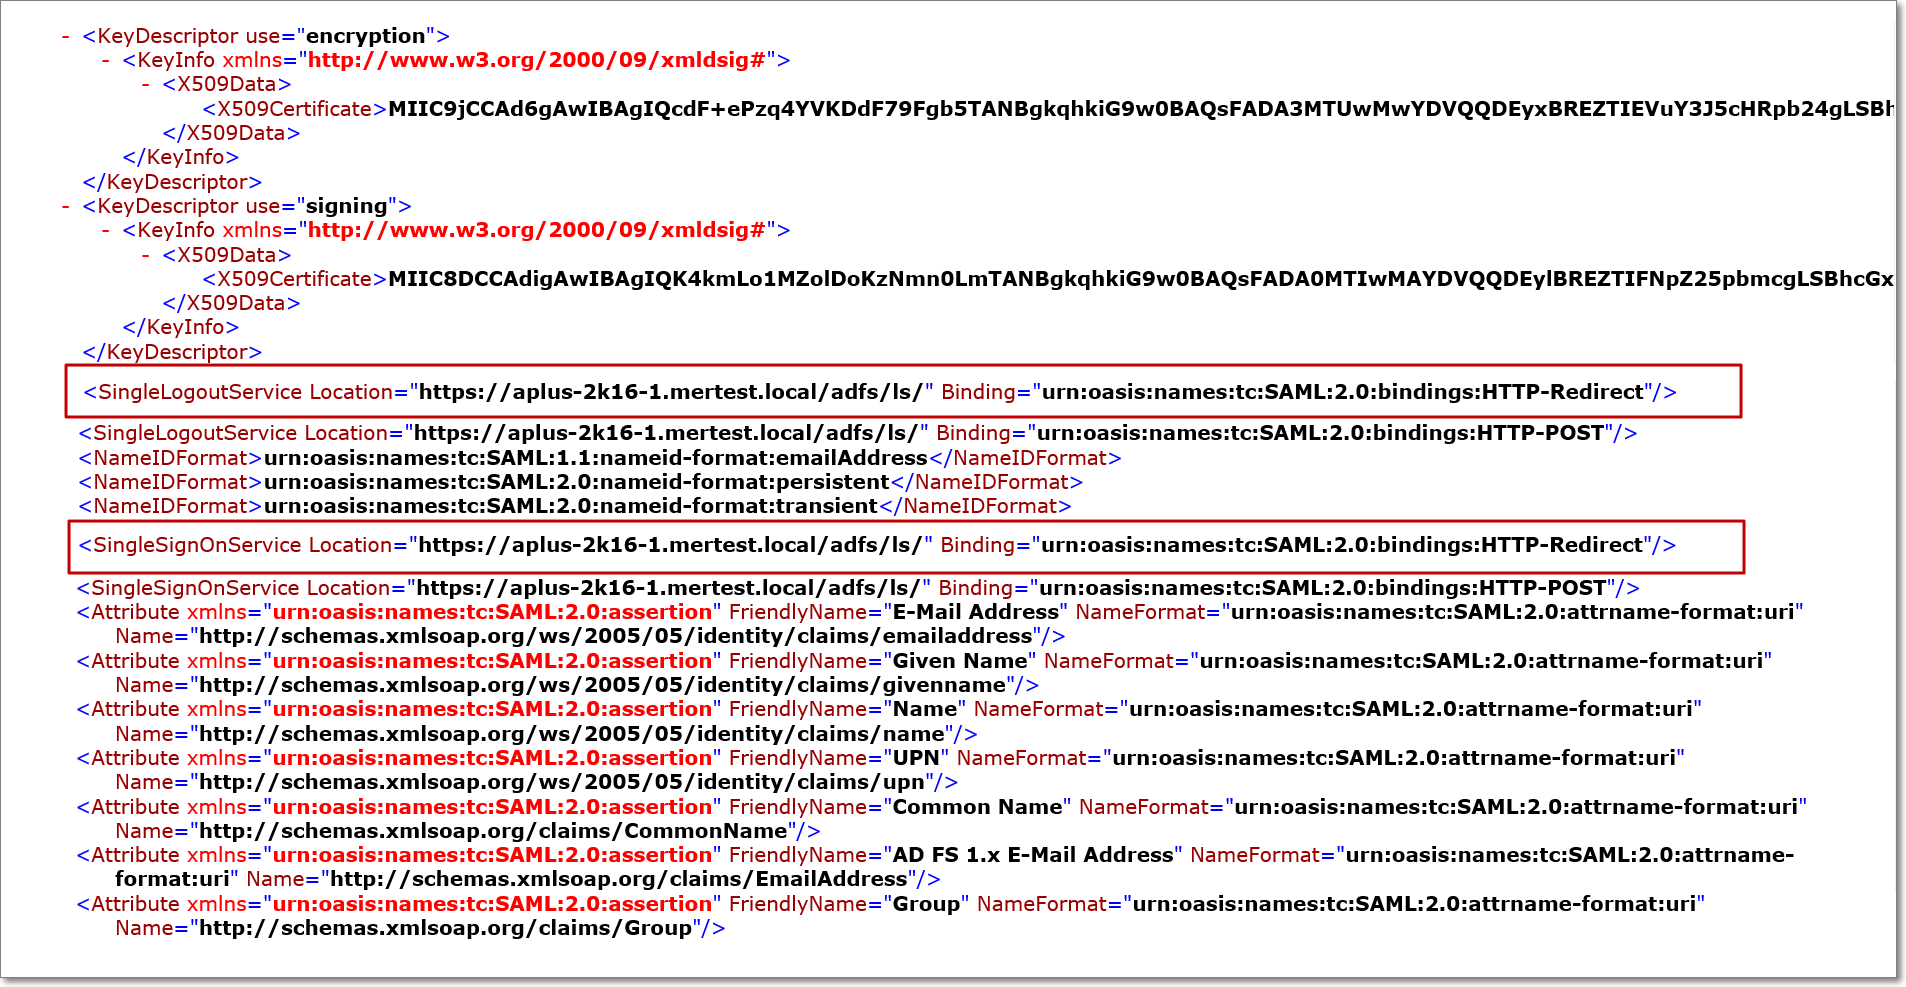
This automatically downloads the Federation MetaData.xml file from your AD FS software. Open the file, and copy the URLs associated to the SingleSignOnService and the SingleLogoutService tags, which are your Identity Provider Login and Logout URLs. These URLs, along with the downloaded AD FS certificate, will be used to set up the single sign-on configuration in Analytics Plus.
Configure Active Directory Single Sign-on in Analytics Plus
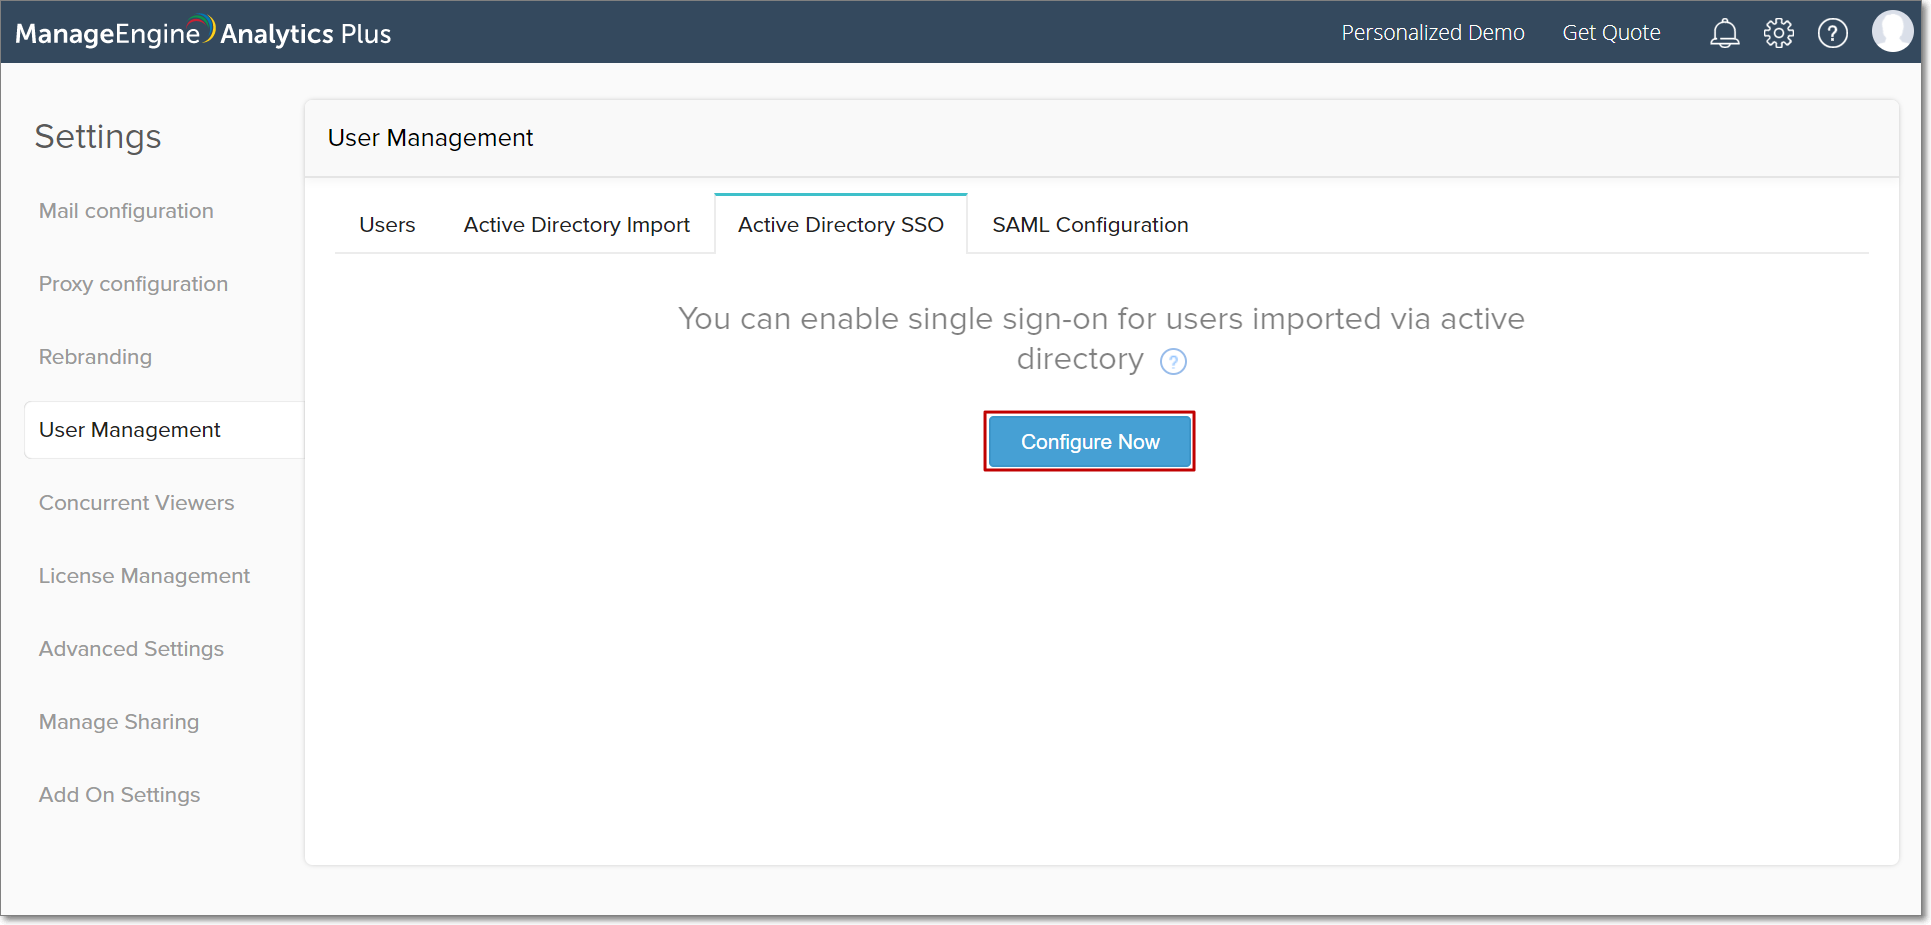
Open your Analytics Plus instance and navigate to the User Management section of the Settings page. Select the Active Directory SSO tab, and click Configure Now.
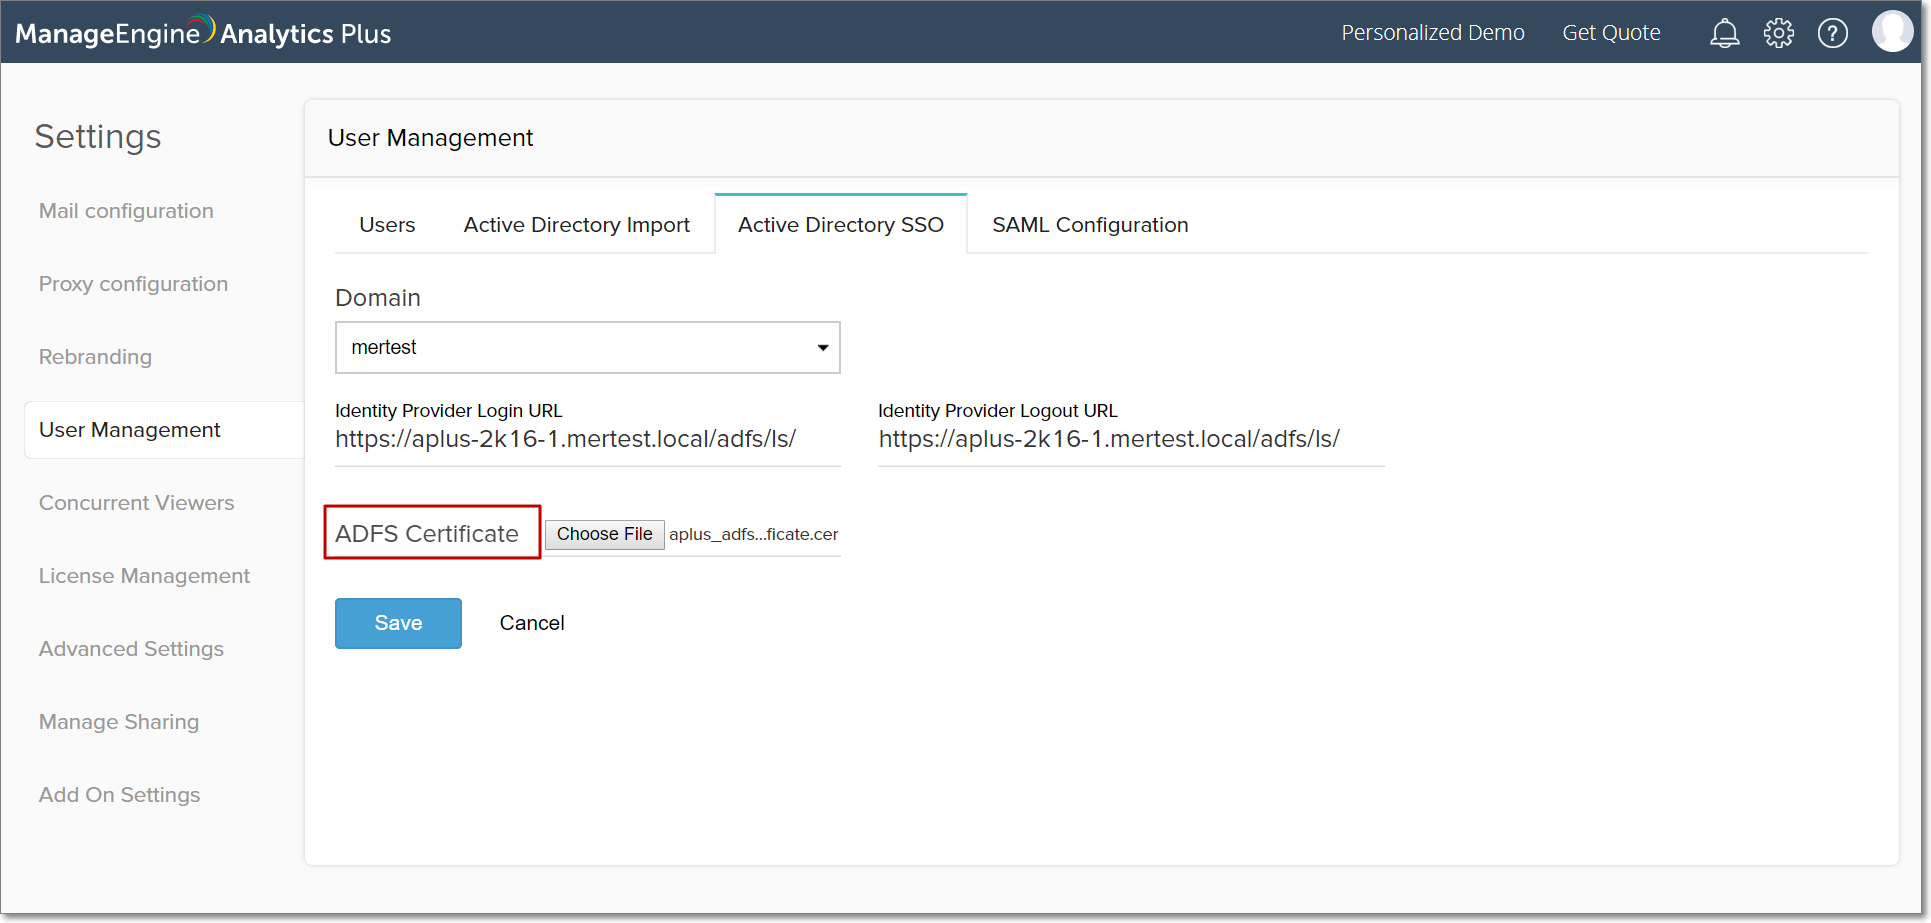
Select the configured Active Directory domain and provide the Identity Provider Login and Logout URLs. Upload the downloaded AD FS certificate, and click Save.
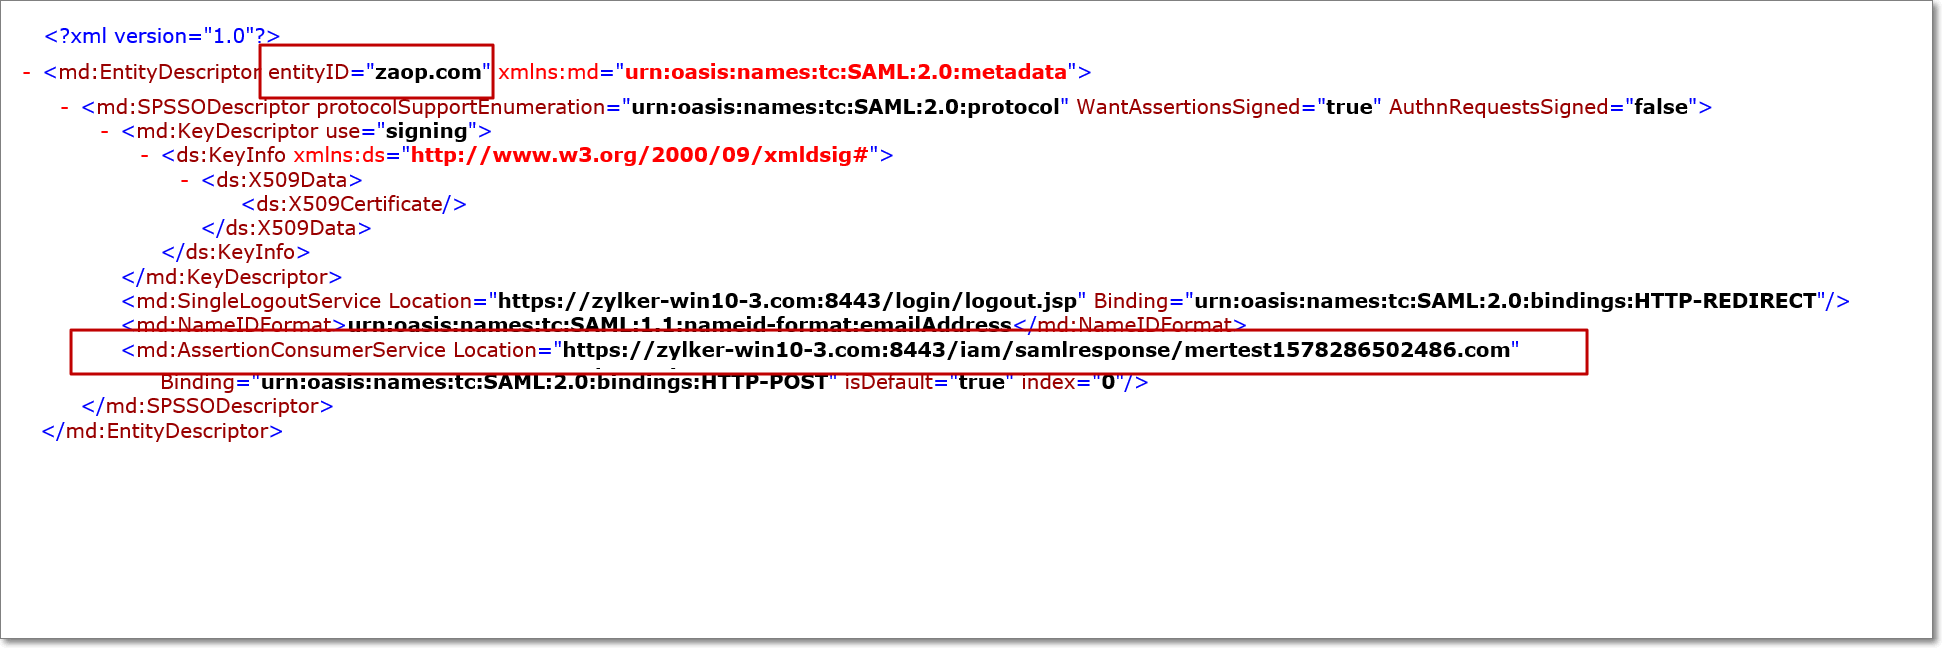
After setting up the single sign-on configuration in Analytics Plus, download the metadata file from the Active Directory SSO tab.

This metadata file contains the Assertion Consumer Service (ACS) URL and the identifier name, under the AssertionConsumerService Location and the entityID tags respectively. The ACS URL and the identifier name will be used in configuring relying party trusts in your AD FS software.
Configure relying party trust and claim rules in AD FS
The ACS URL and identifier name attained from Analytics Plus' metadata file can be used to set up the relying party trust, which will identify Analytics Plus to the AD FS software. Claim rules can then be added, that will determine the claims (or statements) that are to be sent to Analytics Plus for authorizing Active Directory users.
Follow the steps below to configure relying party trust in AD FS.
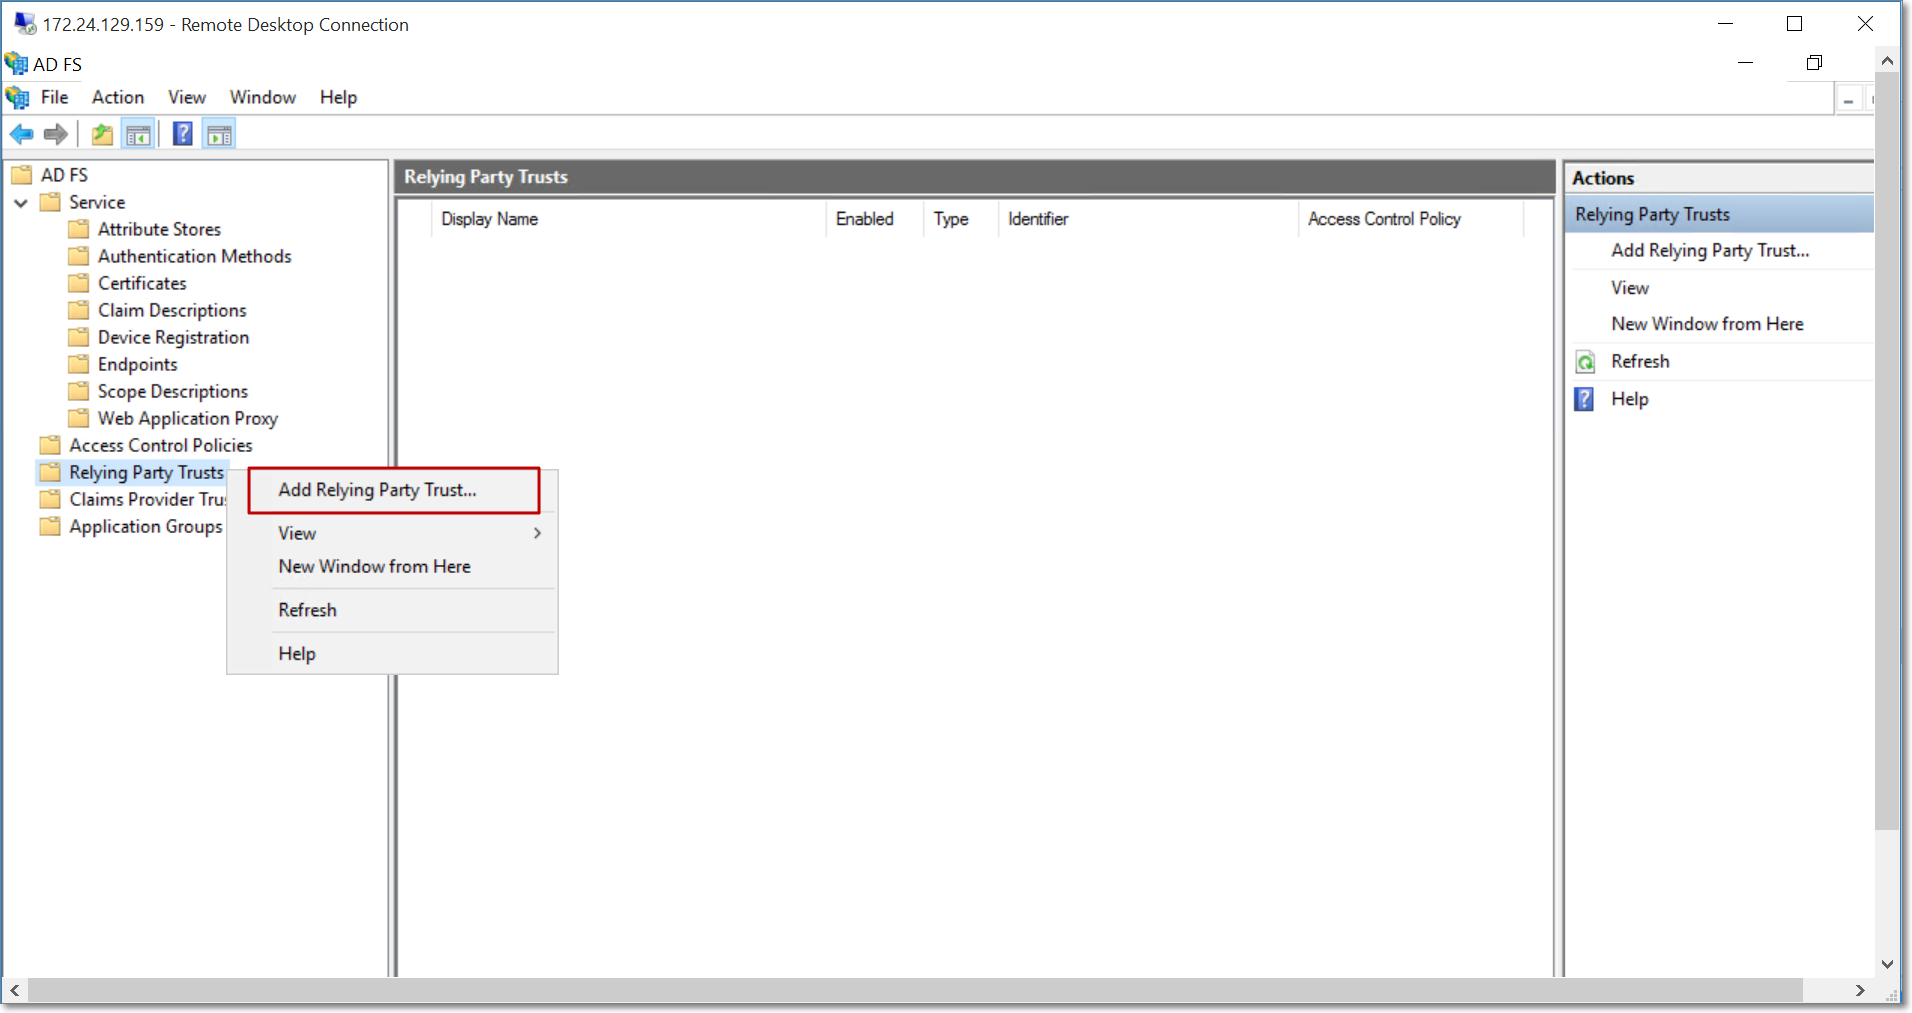
In the AD FS installed machine, navigate to the AD FS Management page in the Server Manager.
Right click the Relying Party Trusts option in the left panel, and select Add Relying Party Trust.
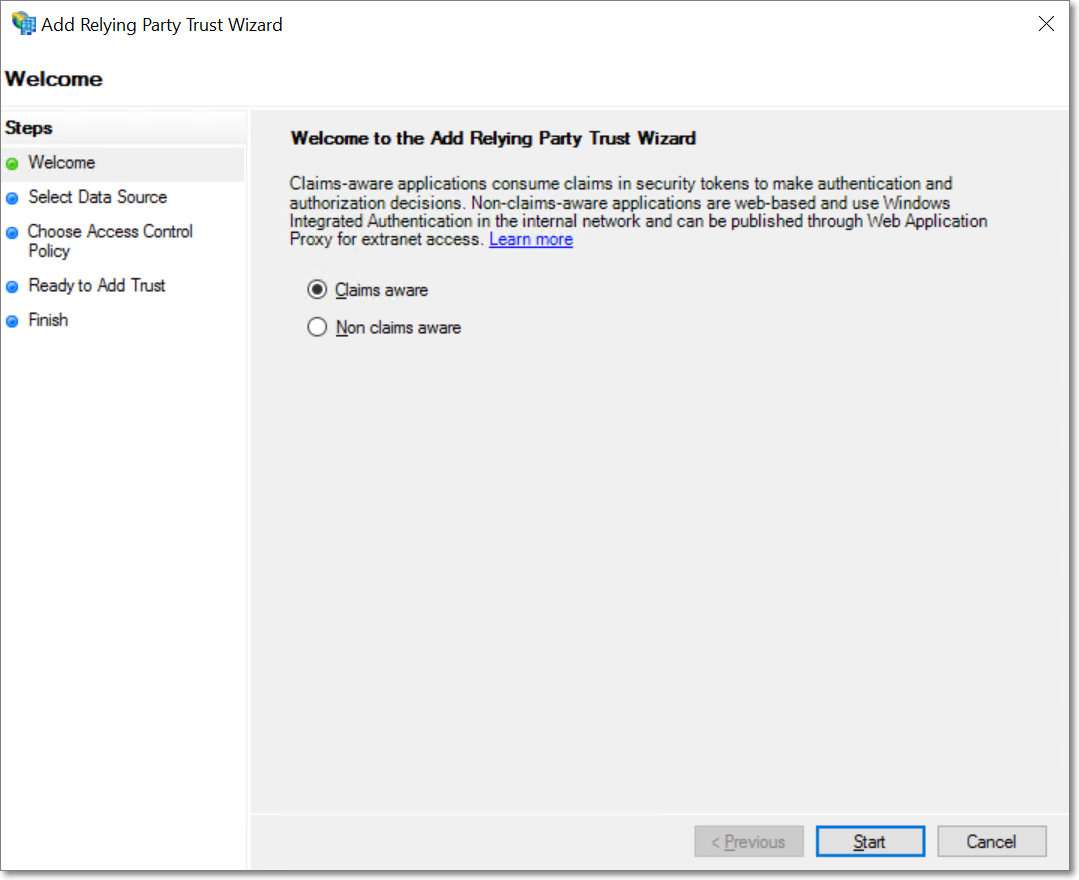
In the popup that appears, select the Claims aware option and click Start.
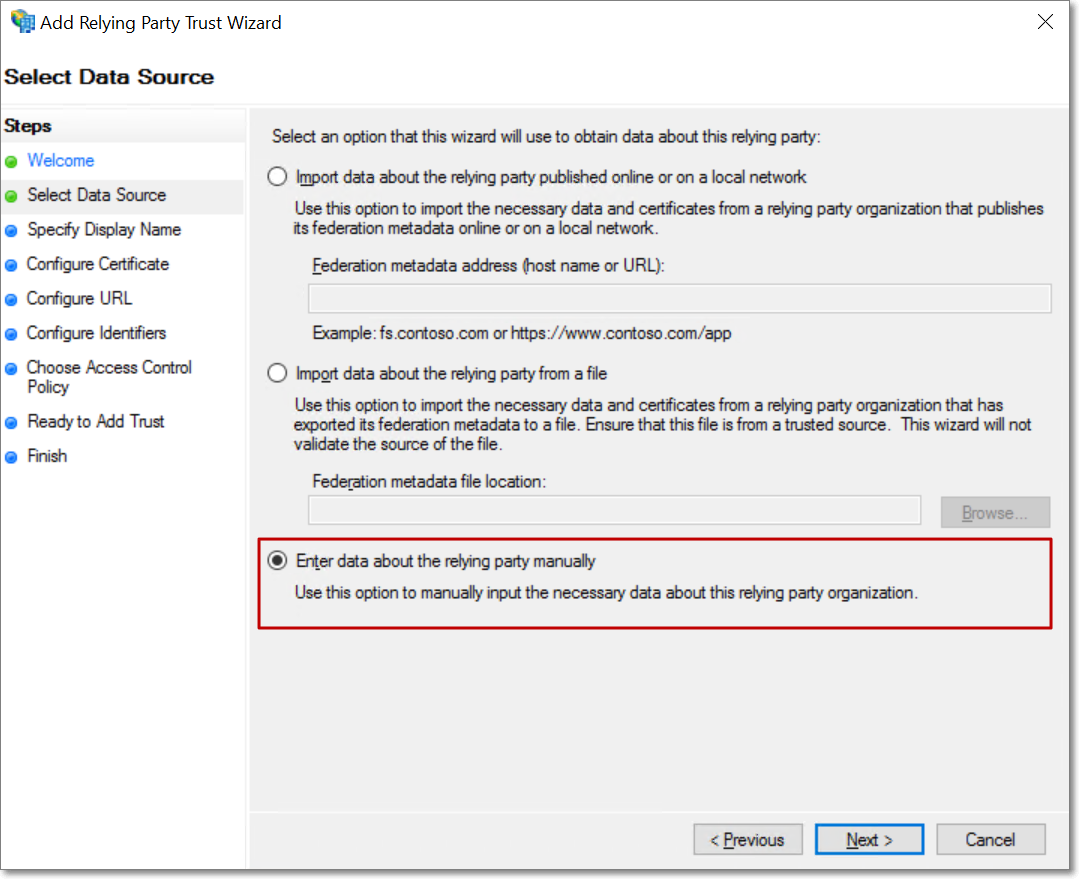
Select the Enter data about the relying party manually option, and click Next.
Provide a display name for the relying party, and click Next.
Click Next in the Configure Certificate screen that appears.
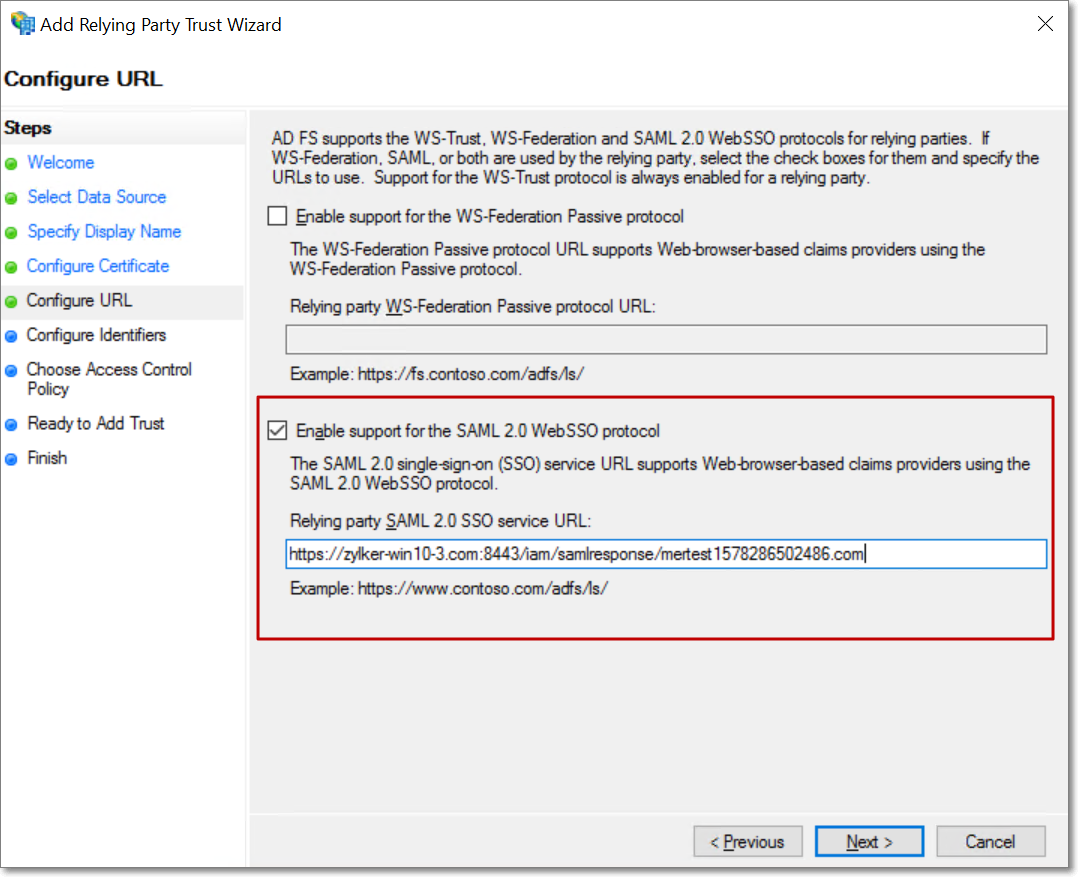
In the following Configure URL screen, select the Enable support for the SAML 2.0 WebSSO protocol option, and enter the ACS URL obtained from the metadata file downloaded from Analytics Plus. Click Next to proceed.
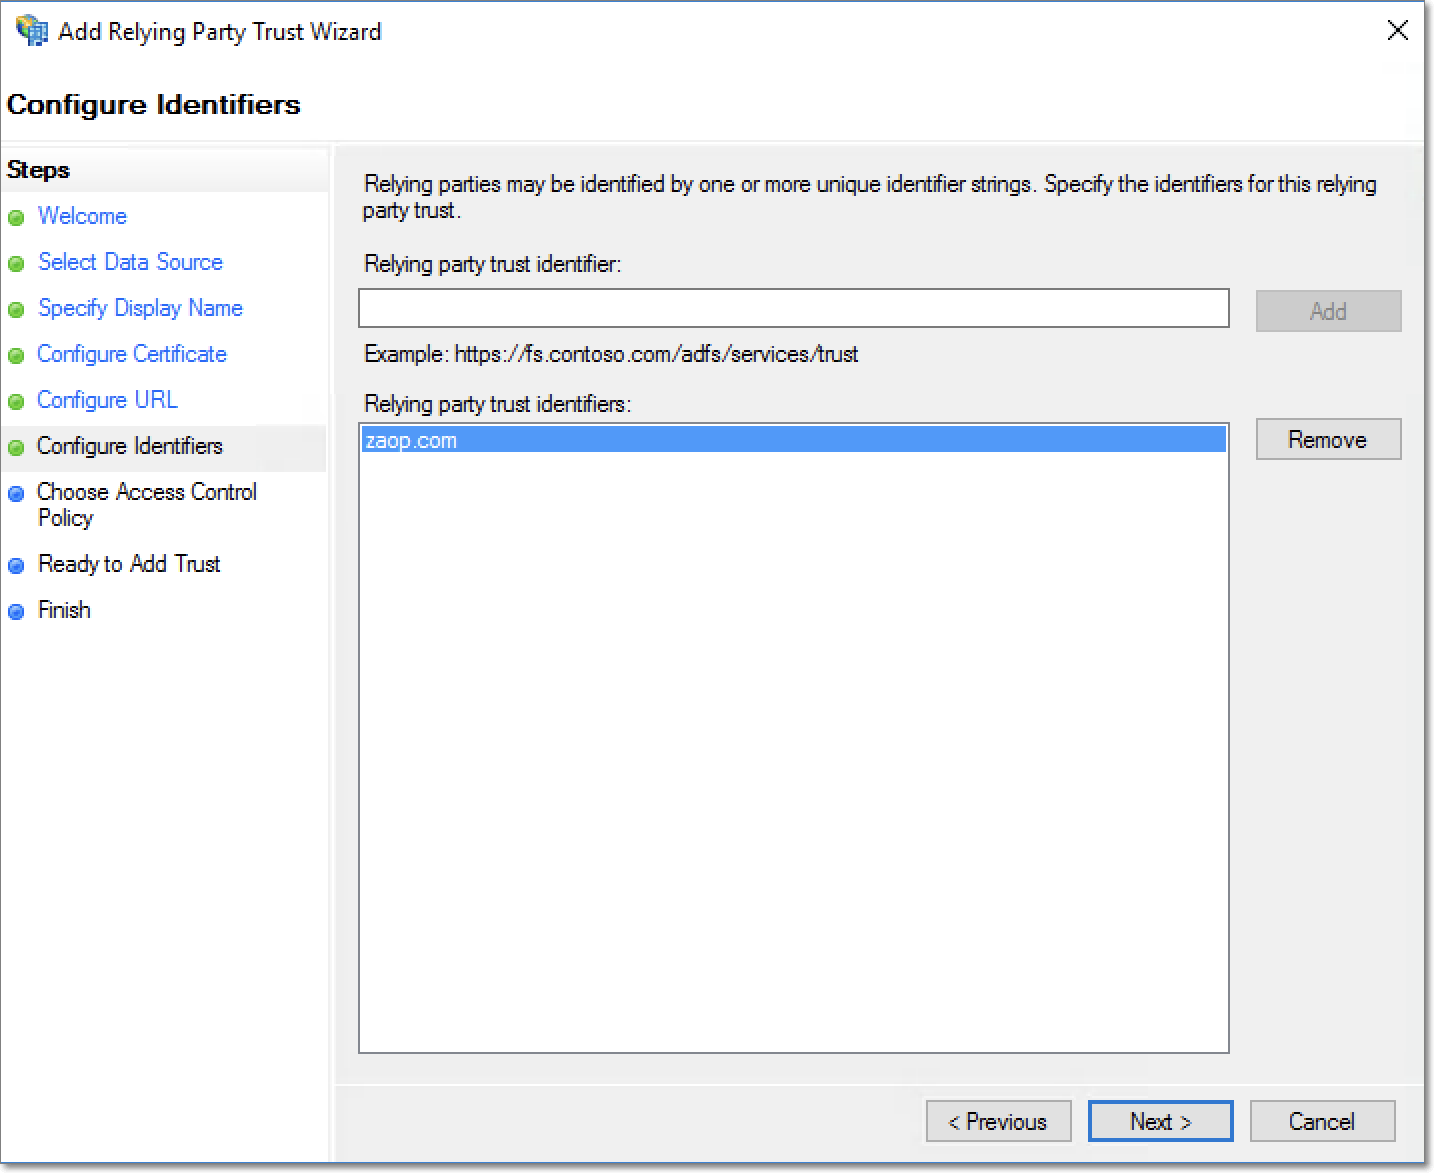
In the Configure Identifiers page, enter the identifier name obtained from Analytics Plus' metadata file.
Click Add.
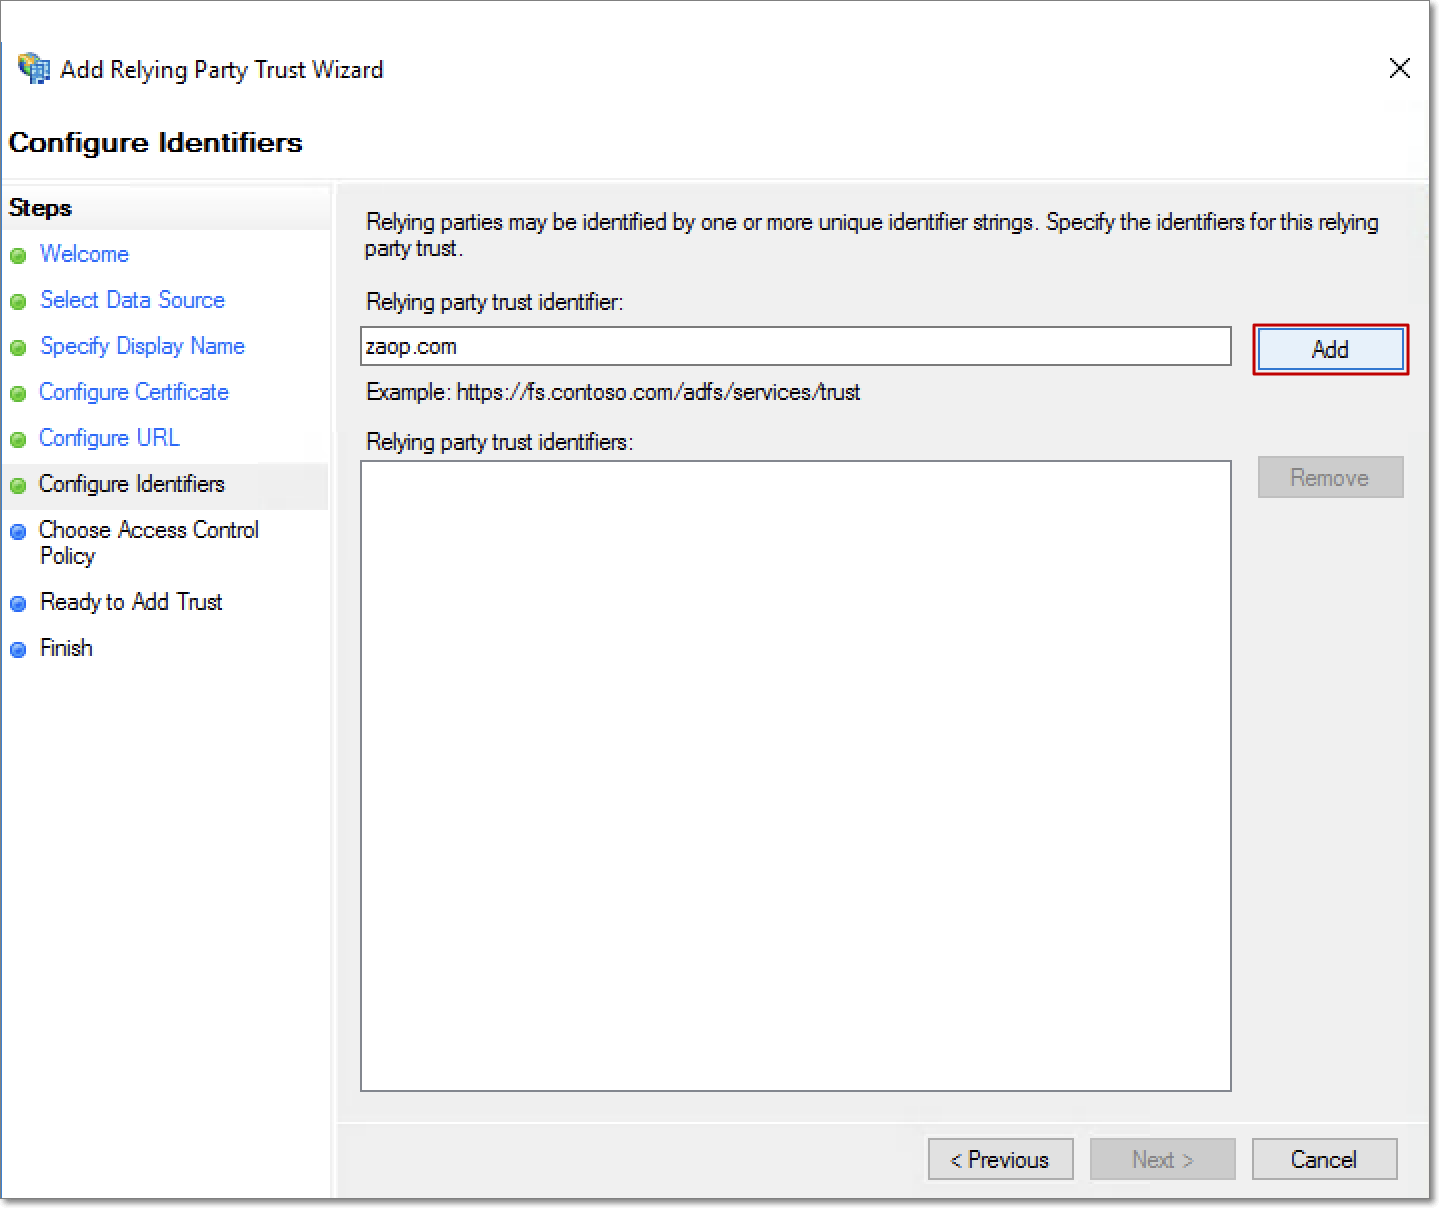
The new identifier will be included in the Relying Party Trust Identifiers section of the Configure Identifiers page. Click Next to proceed.
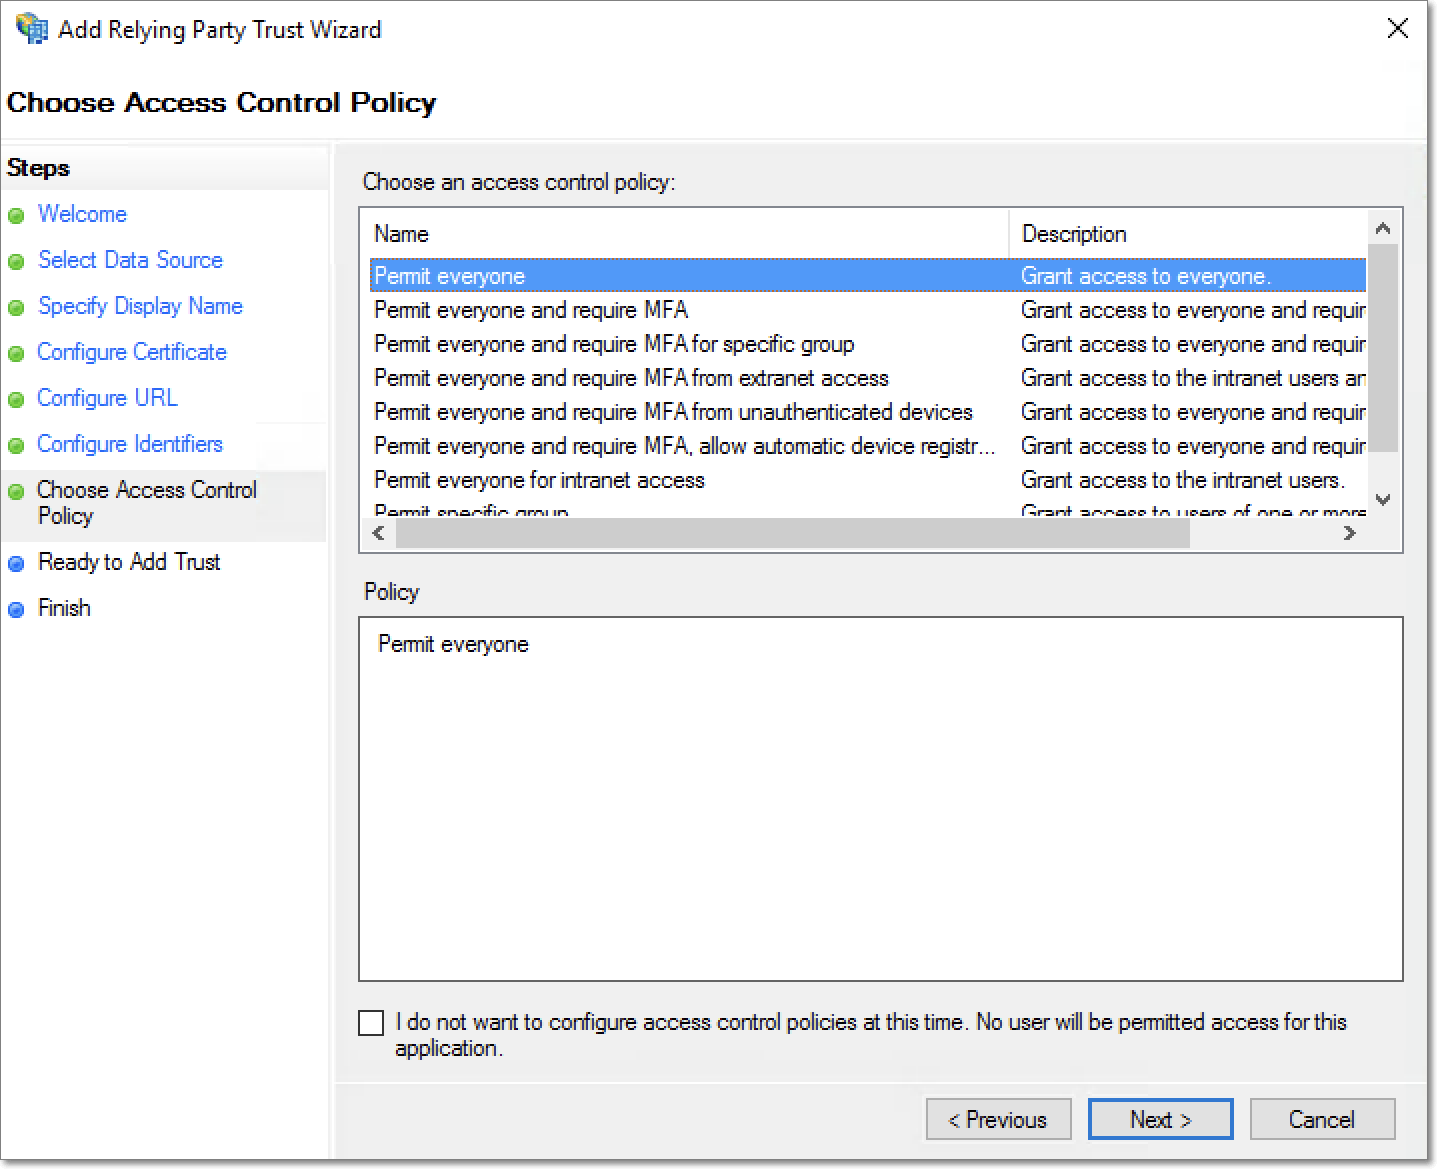
Choose the Permit everyone access control policy, and click Next.
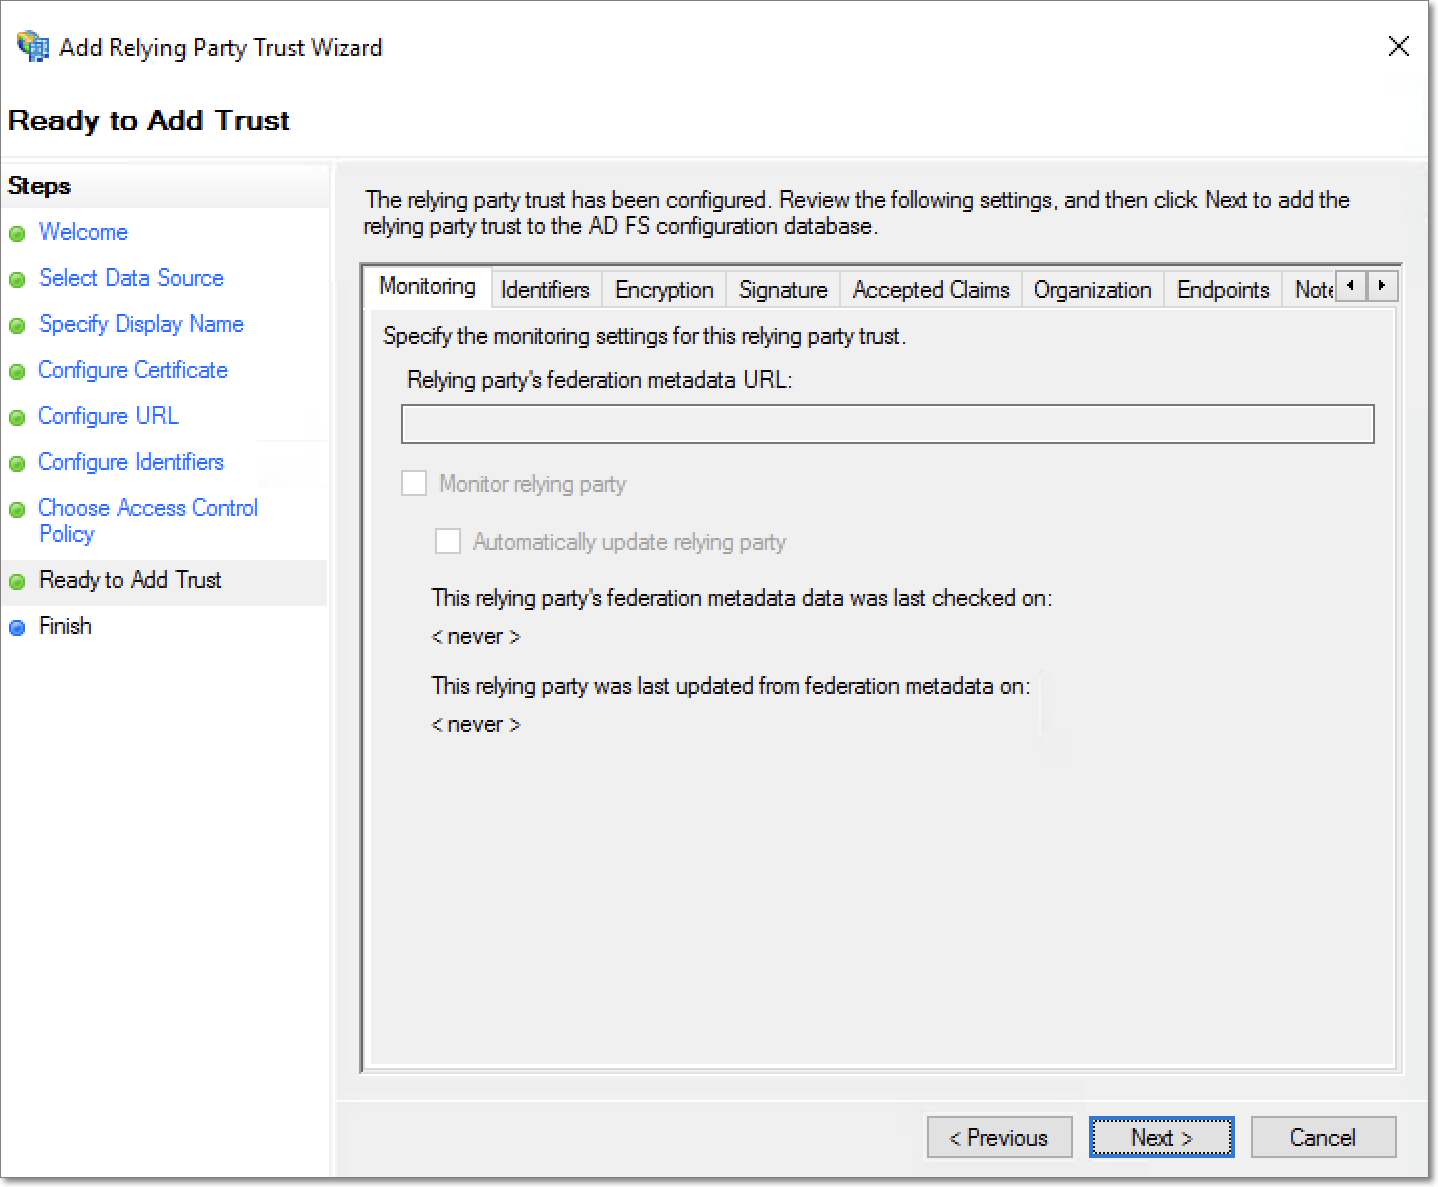
Review the configured settings, and click Next. The relying party trust will now be added to the AD FS configuration database.
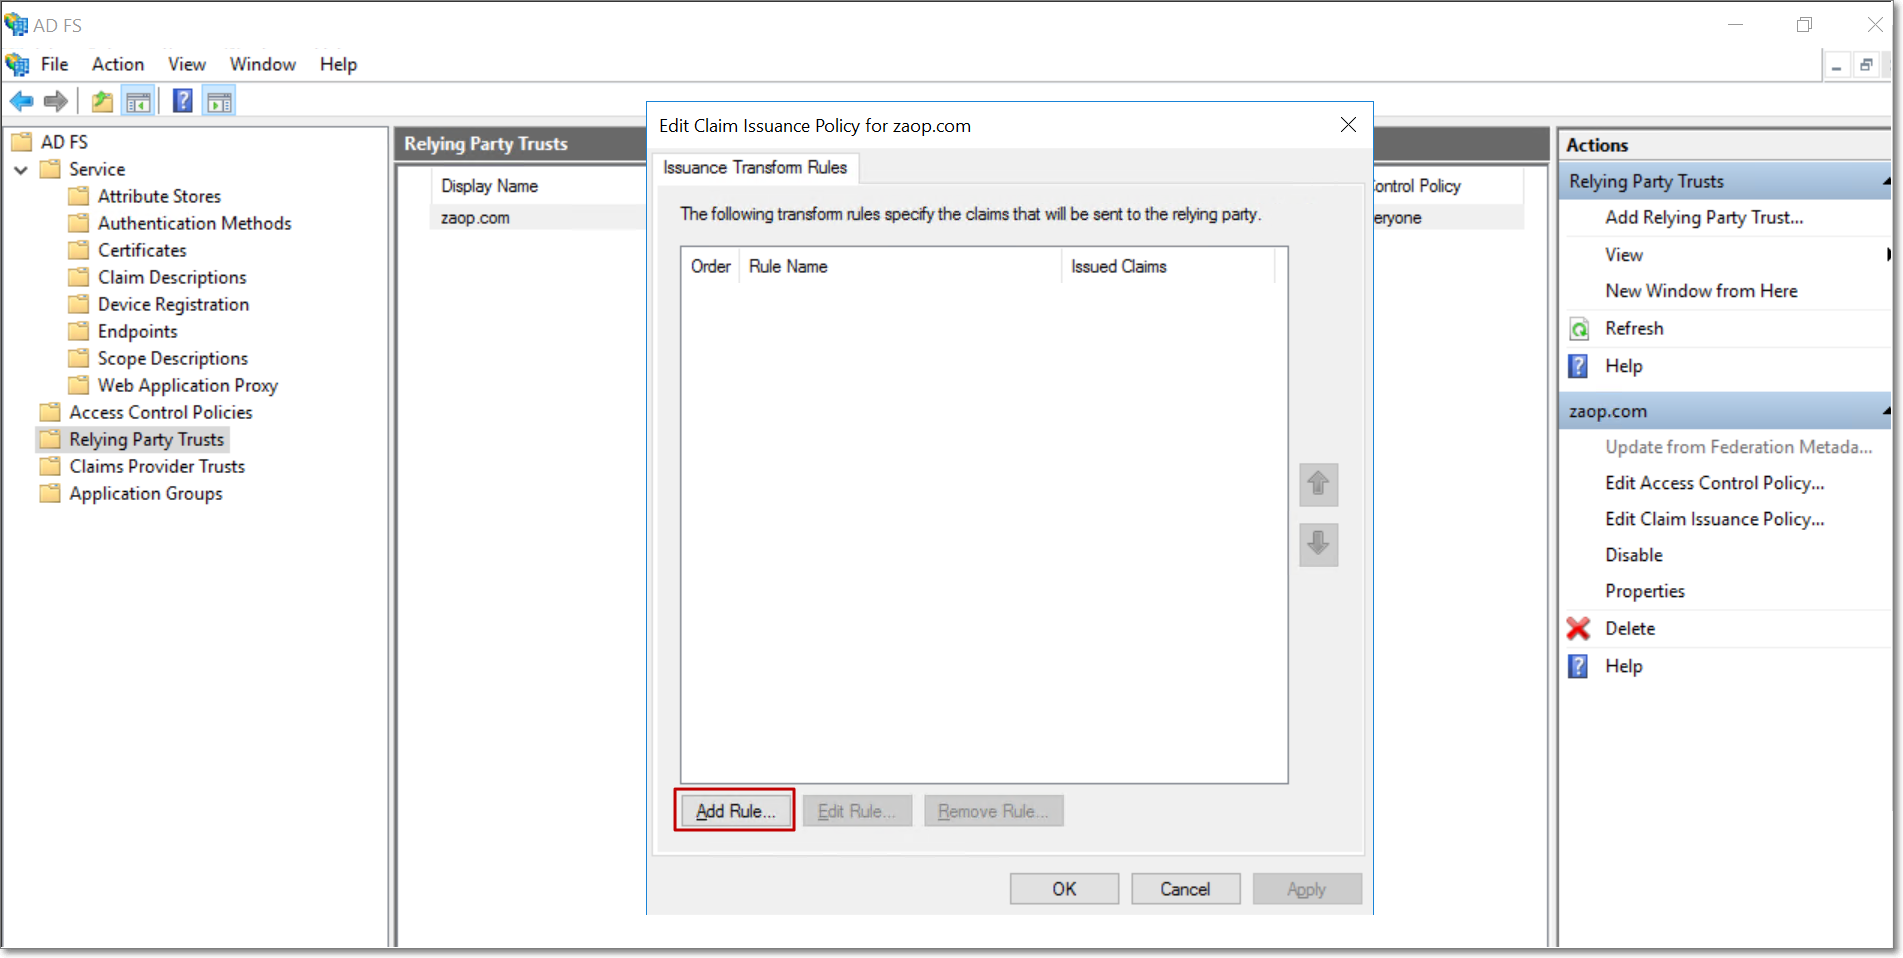
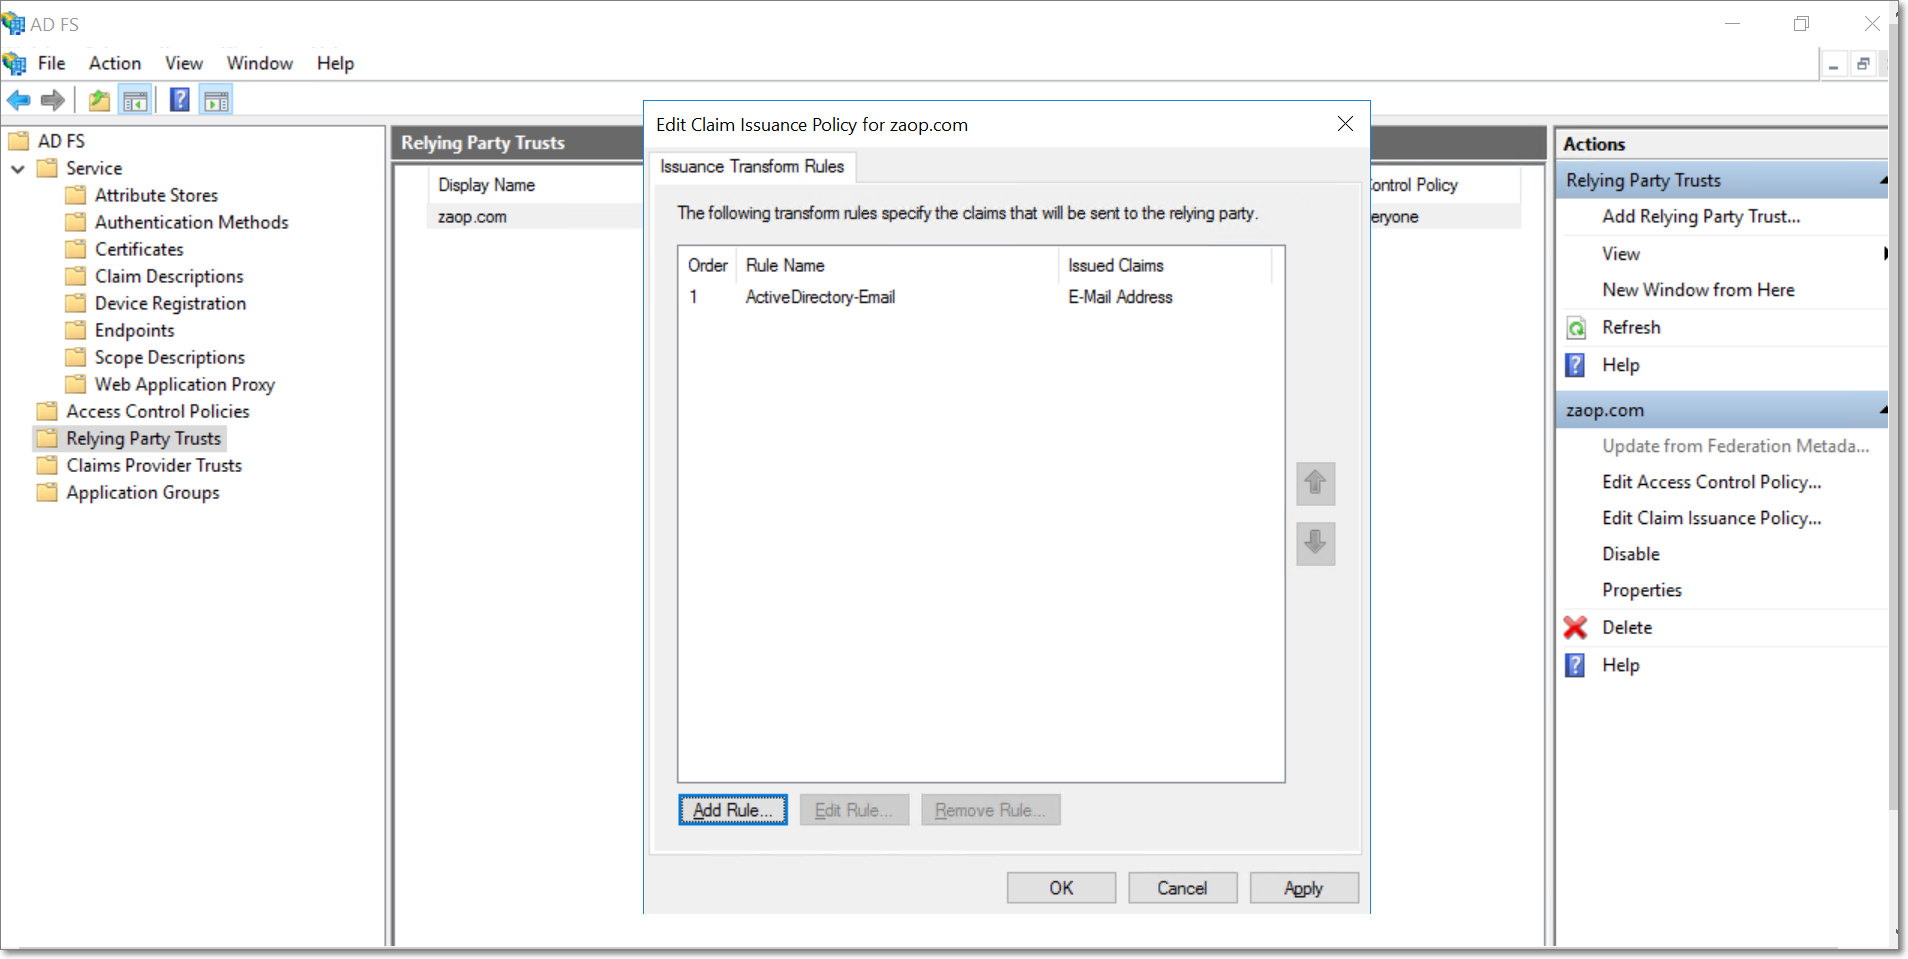
The final step in the set up process is the creation of claim rules. To create claim rules in AD FS, right click the newly added relying party trust, and select the Edit Claim Issuance Policy option.
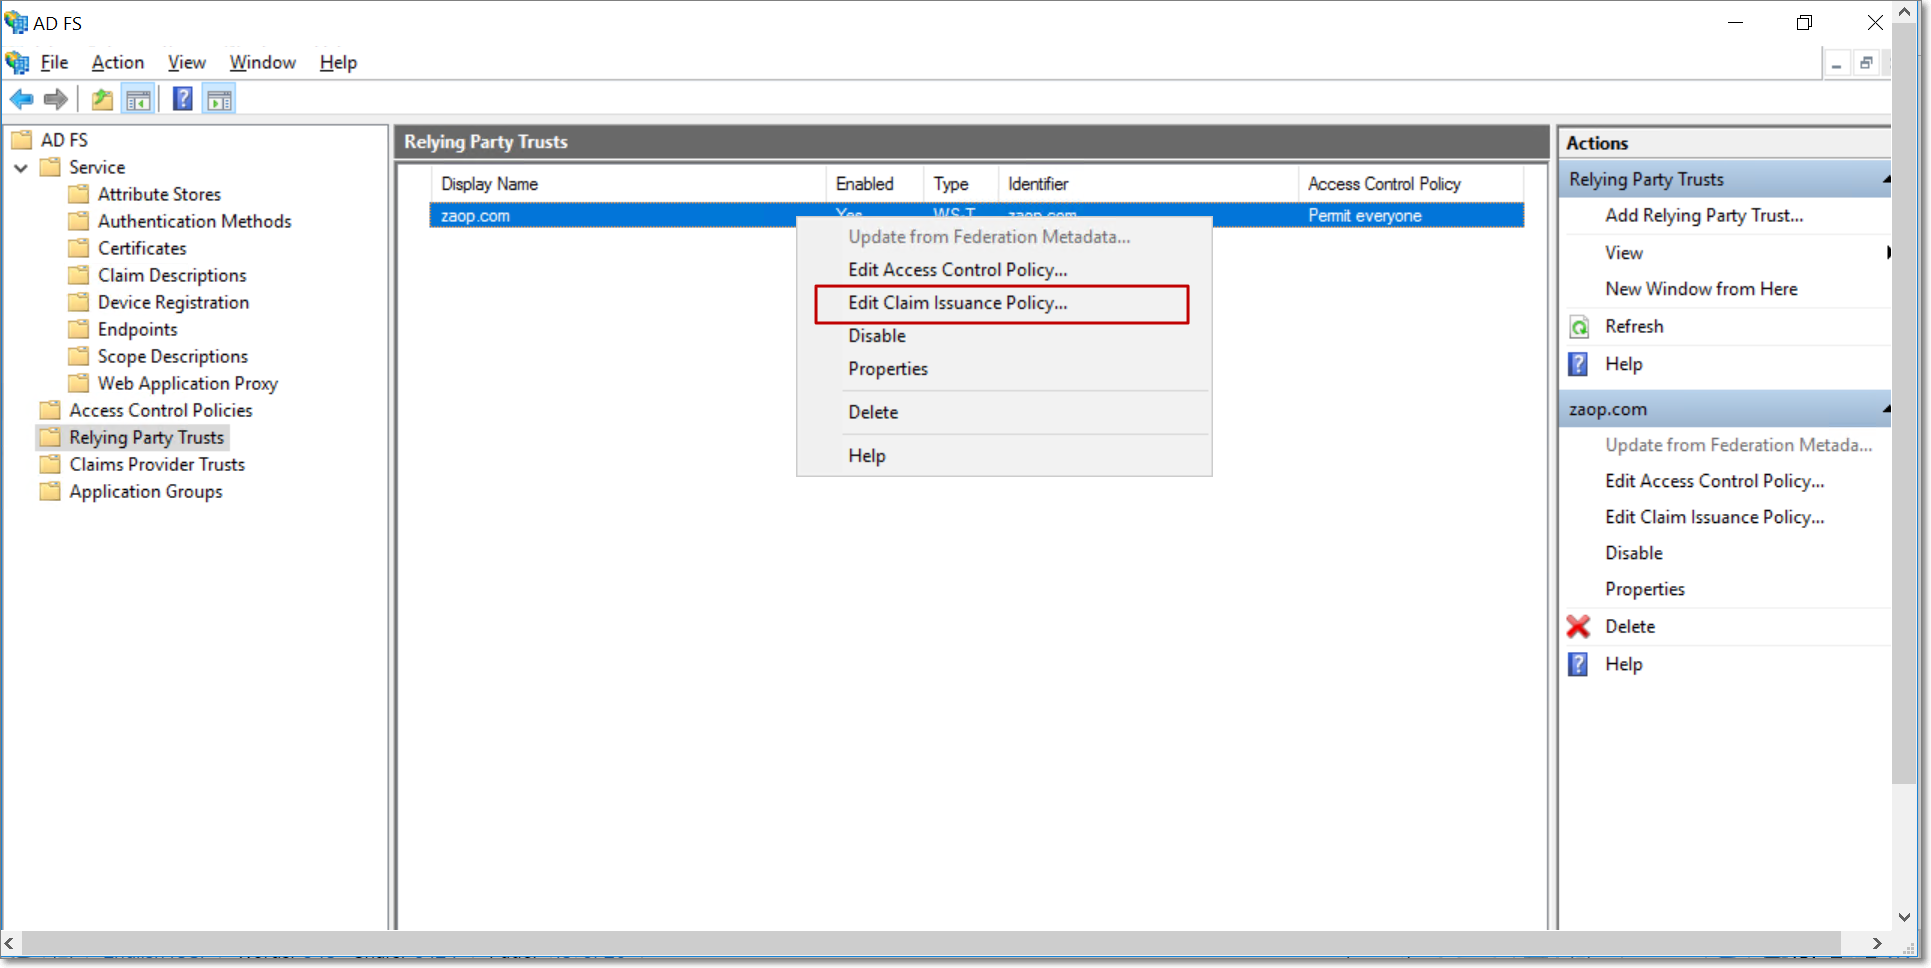
Click Add Rule.
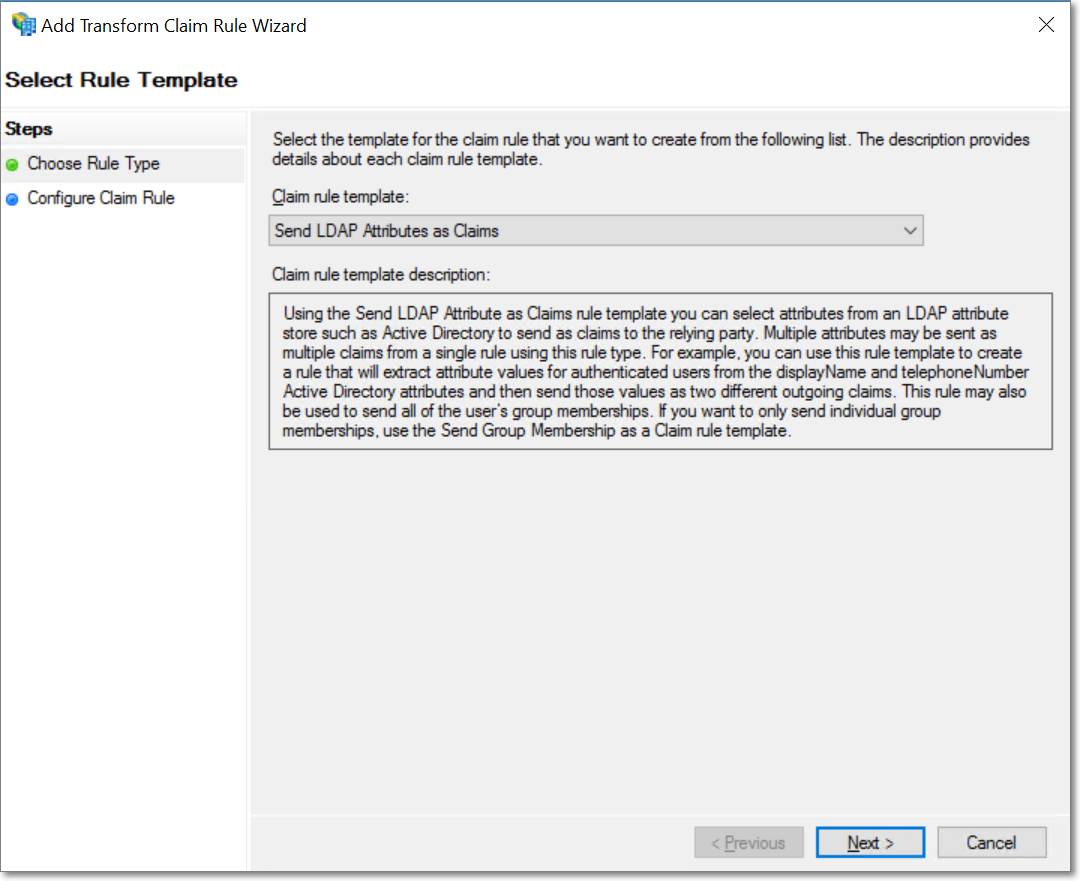
Select the Send LDAP Attributes as Claims claim rule template, and click Next.
Provide a name for the claim rule, and select the Attribute store as Active Directory. Select E-Mail Address for both the LDAP Attribute and Outgoing Claim Type fields, and click Finish.
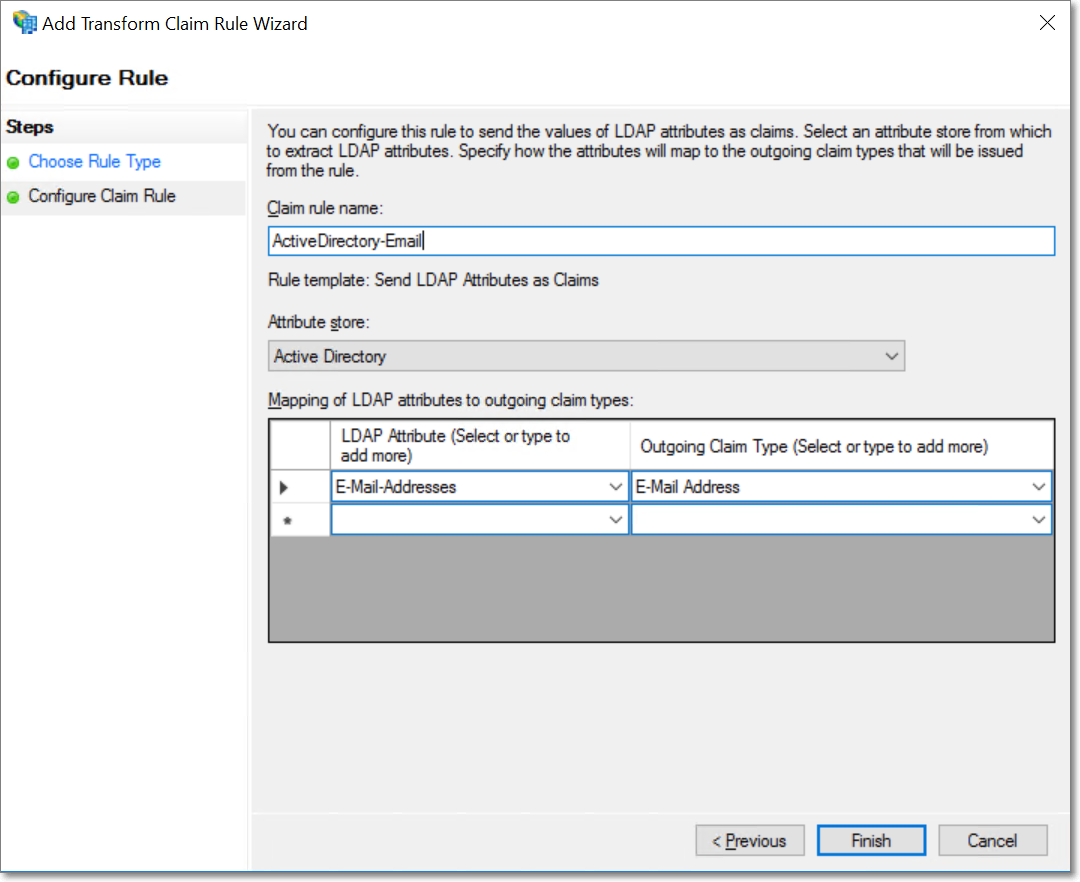
The new rule will now be listed under the Issuance Transform Rules section.
To add another claim rule, click the Add Rule button. In the popup that appears, select the Transform an Incoming Claim option under the Claim rule template, and click Next.
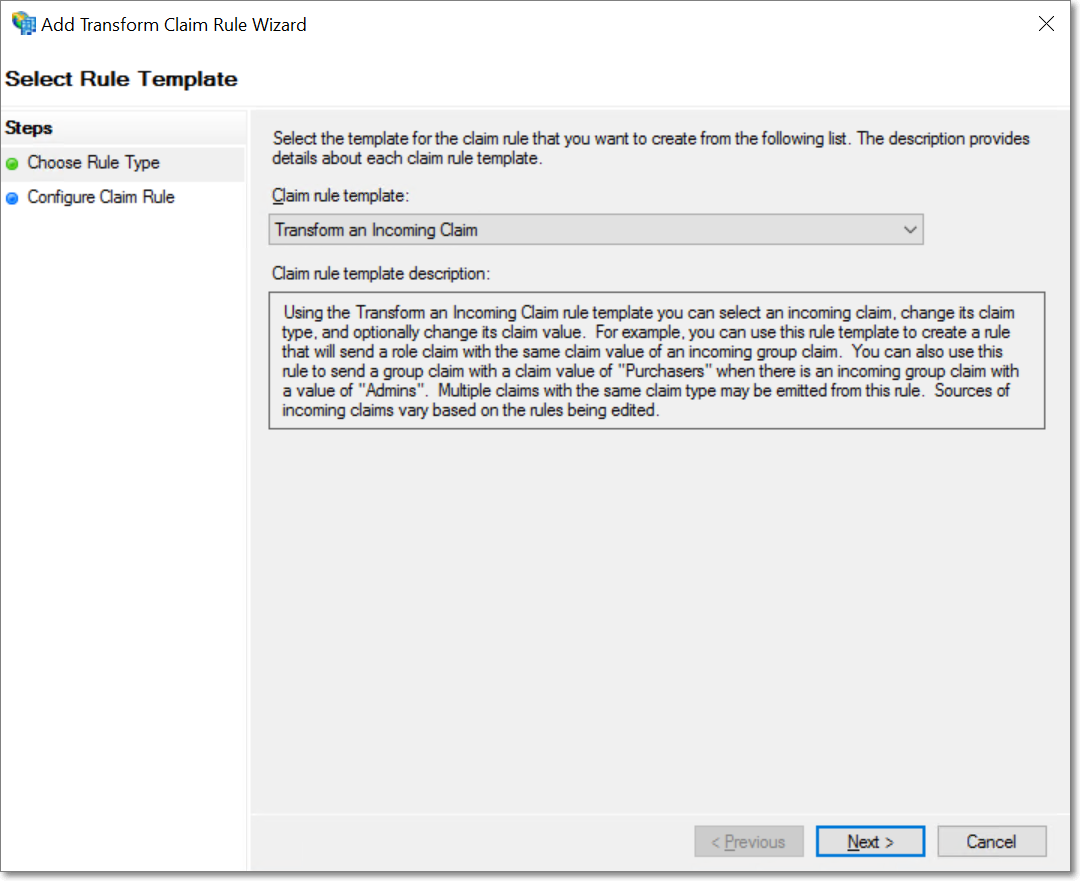
Provide a name for the claim rule, and select the Incoming and Outgoing claim types as E-Mail Address and Name ID respectively. Choose the Outgoing claim ID format as Email, and click Finish.

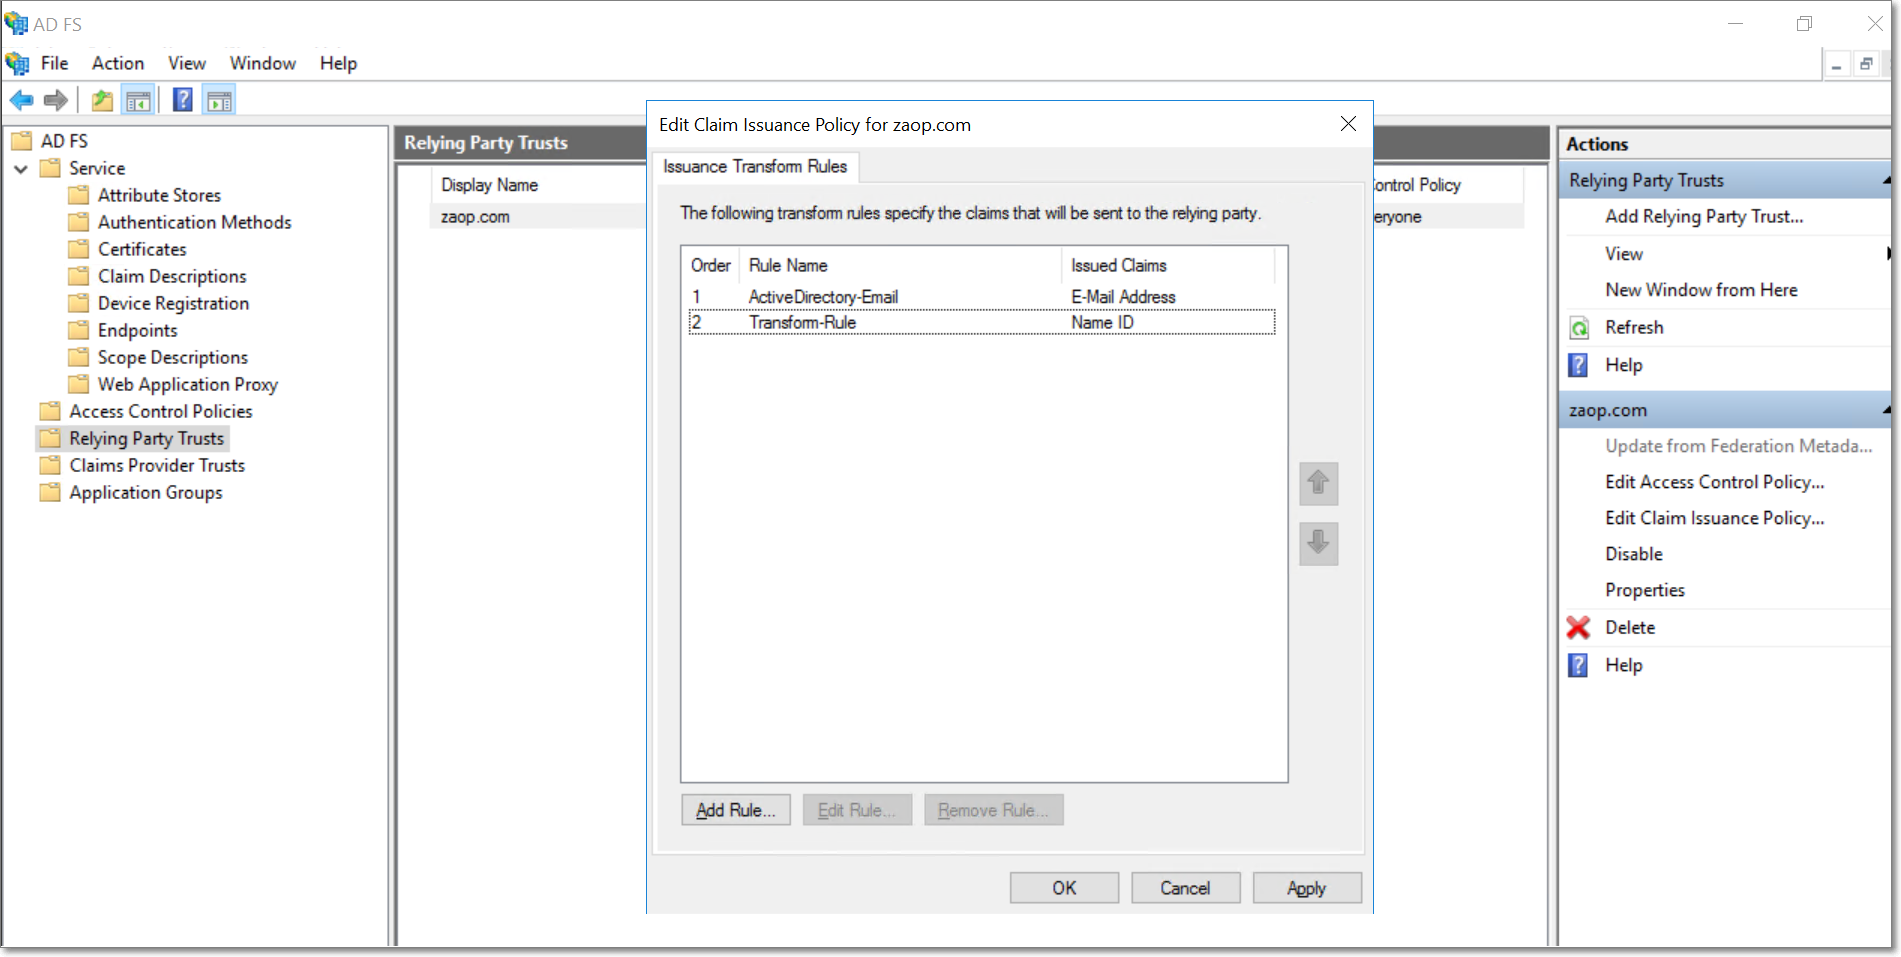
Both rules are now created under the Issuance Transform Rules section. Click Apply and OK to apply the rules to the Relying Party Trust.
Single sign-on has now been configured for your Active Directory domain. Please note that only Administrators can set up the Active Directory and Active Directory single sign-on configurations.
Disable single sign-on for Active Directory users
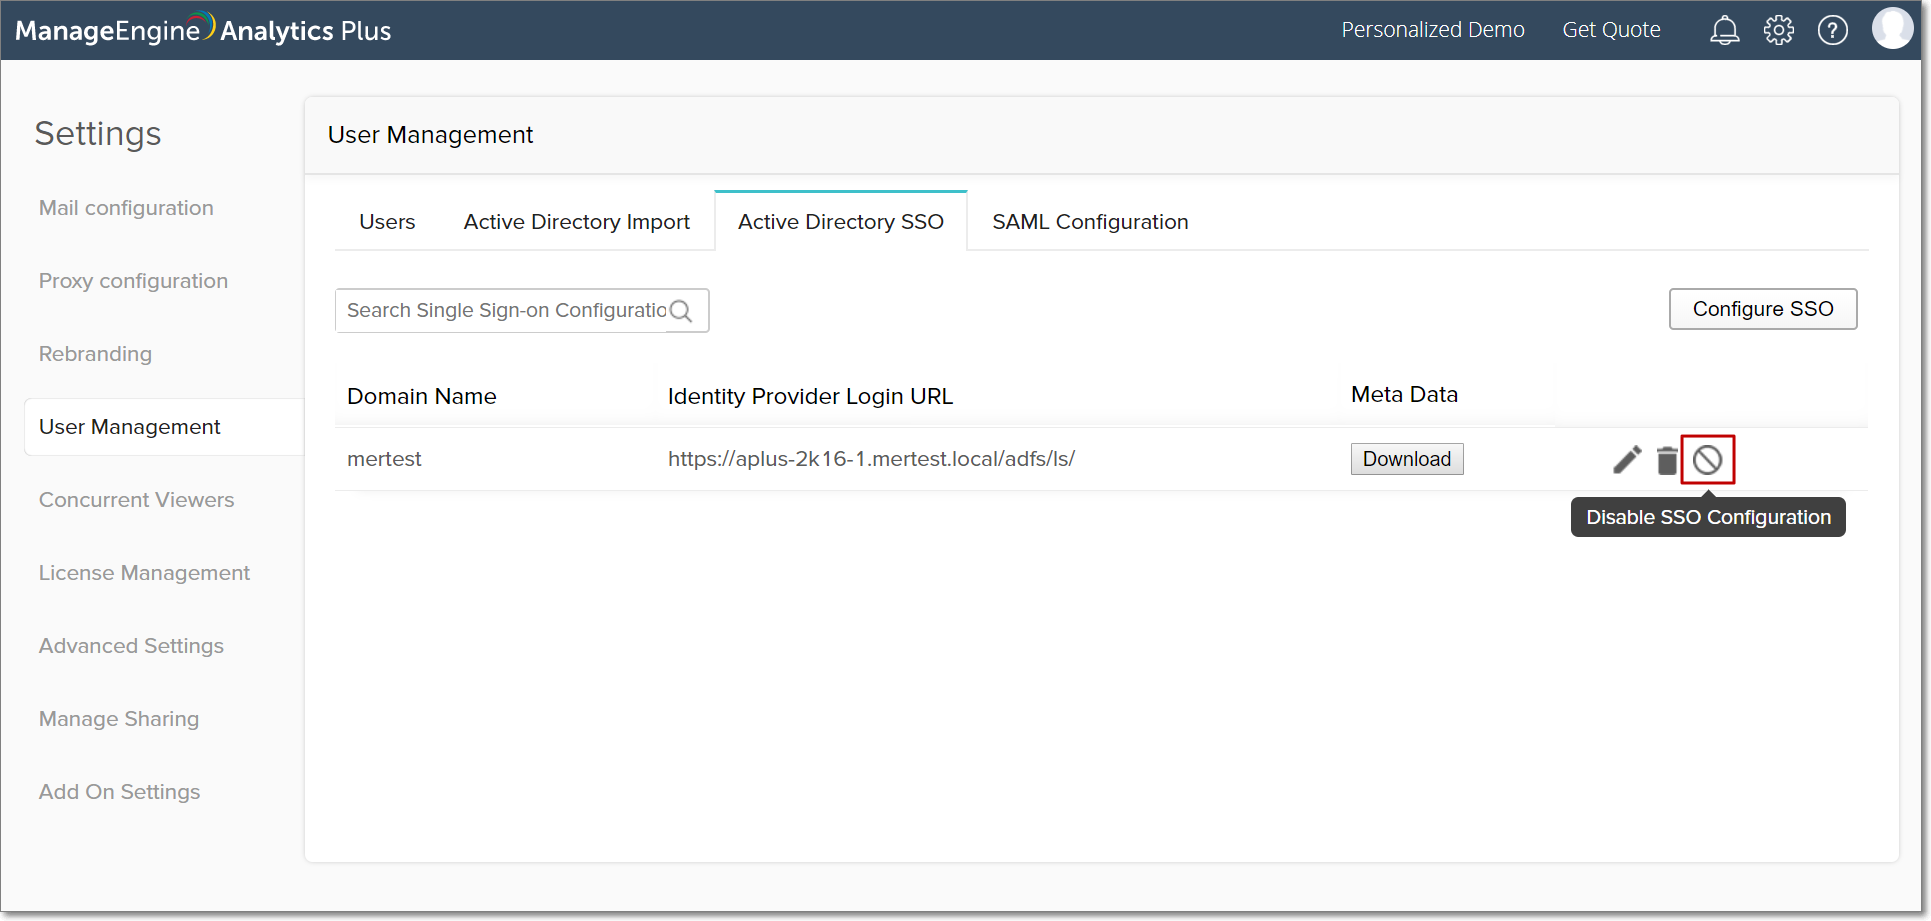
To disable your Active Directory single sign-on configuration, click the Active Directory SSO tab from the User Management page. Navigate to the required single sign-on configuration and select the Disable SSO Configuration button that appears on mouse over.
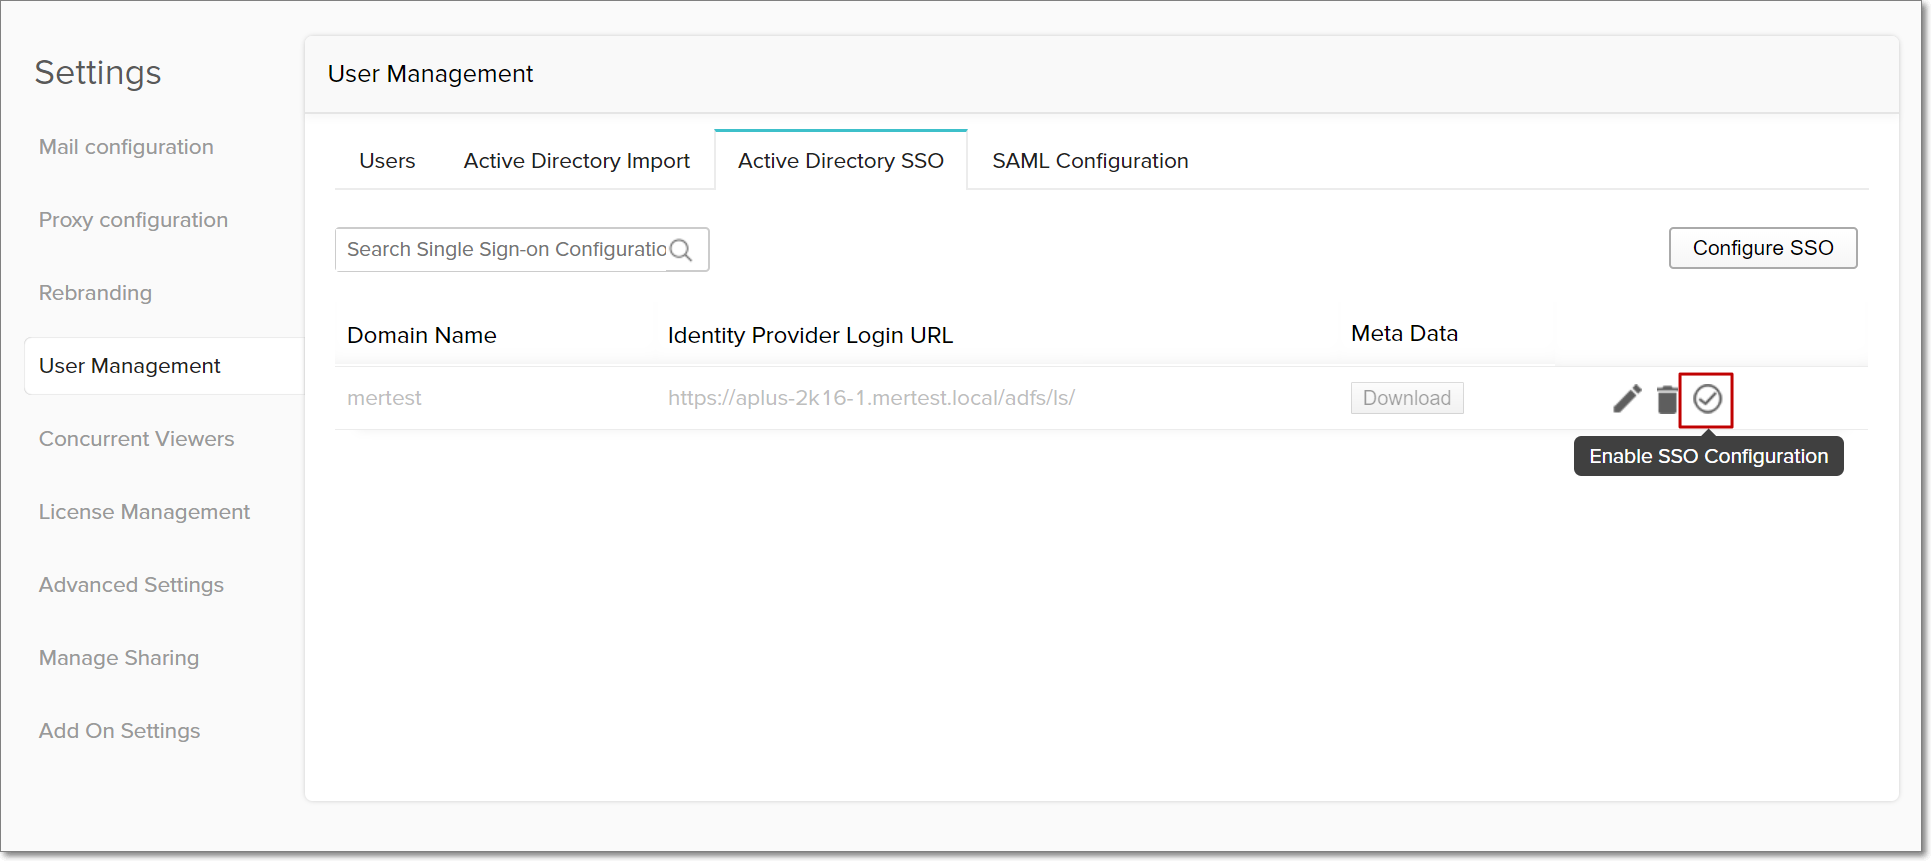
Enable single sign-on for Active Directory users
Once a single sign-on configuration is set up, single sign-on functionality is automatically enabled for all Active Directory users associated to the configured domain. However, to activate disabled domain configurations, navigate to the required configuration in the Active Directory SSO tab, and click the Enable SSO Configuration button that appears on mouse over.
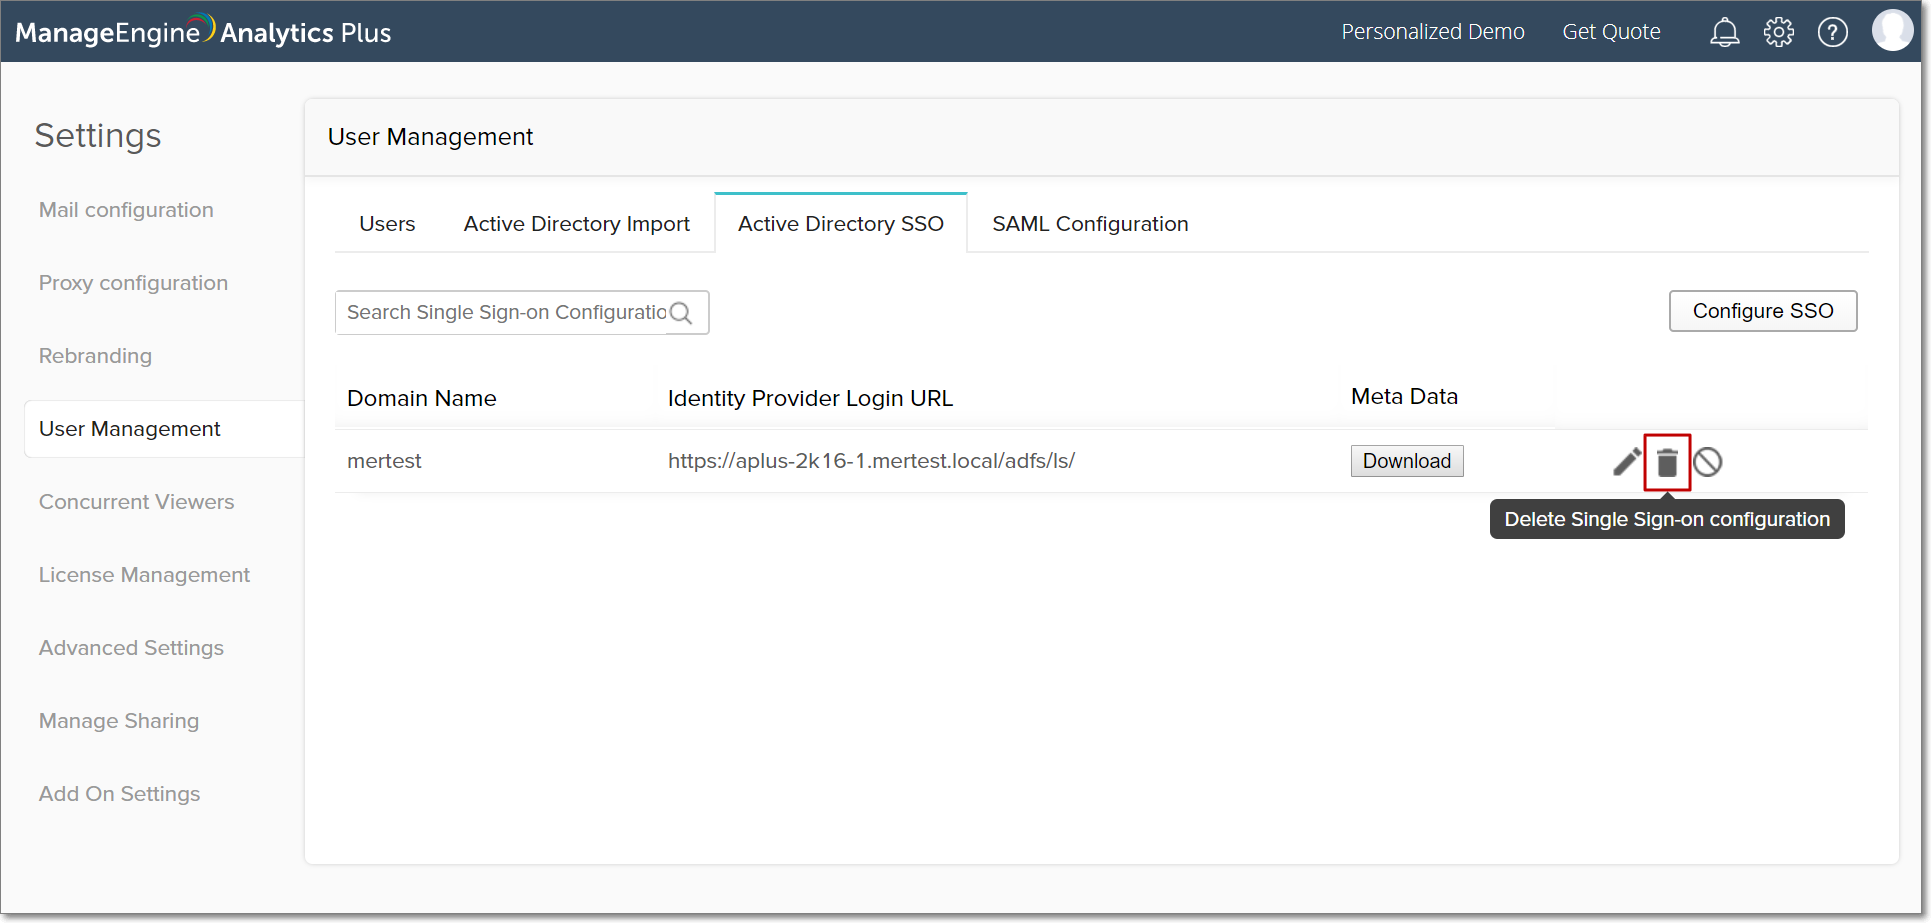
Delete the Active Directory Single Sign-on configuration
An Active Directory's single sign-on capabilities can be deleted from Analytics Plus, which will disable the single sign-on functionality for all users associated with that domain.
To delete your Active Directory's single sign-on configuration, navigate to the Active Directory SSO tab. Select the Delete Single Sign-on configuration button that appears (on mouse over) beside the required single sign-on configuration, and confirm your action in the popup that appears.