Database Backup
M365 Manager Plus can automatically back up its database at regularly scheduled intervals as scheduled by admins and technicians. Using this option, you can back up the built-in PostgreSQL database or external PostgreSQL and MS SQL databases configured in the product.
Supported database versions:
- PostgreSQL: 10 to 15.7
- MS SQL: 2008 and above
Prerequisites
For External pgSQL
- In the machine where pgSQL is installed, go to <postgresql_installdir>/data and open the posgresql.conf file. Search for wal_level entry. Uncomment the entry and change its value to archive.
- Copy all the files in <postgresql_installdir>/lib and <postgresql_installdir>/bin folders, and paste them in <Installation_Folder>/pgsql/lib and <Installation_Folder>/pgsql/bin folders respectively. <Installation_Folder> refers to the home directory of M365 Manager Plus that you're configuring the auto backup scheduler.
- Restart the external pgSQL server.
- Repeat Steps 1 to 3 from above whenever you update the pgSQL server.
Steps to schedule a backup:
- Log in to M365 Manager Plus as an administrator.
- Go to the Settings tab.
- Navigate to Admin → General Settings → Database Backup.
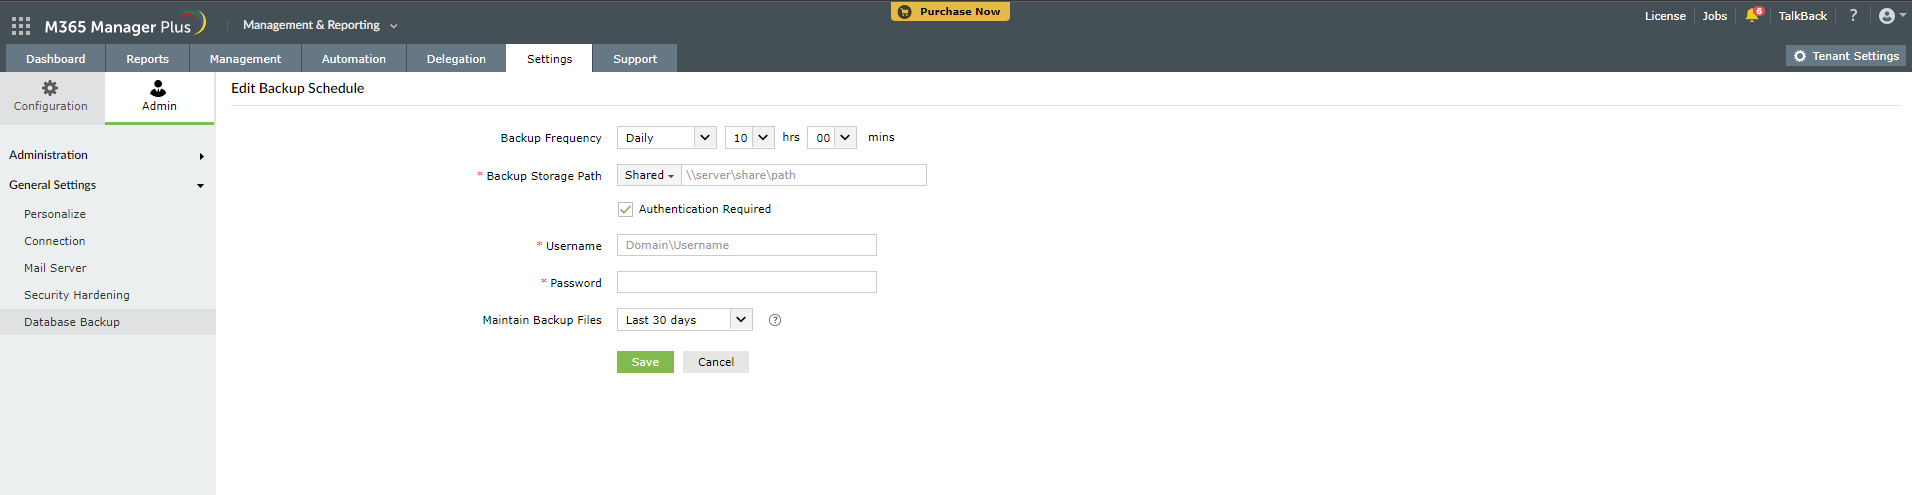
- Select the frequency that you want the database to be backed up using the drop-down list named Backup Frequency.
- The drop-down list allows you to select the frequency. You have three options to choose from: Daily, Weekly, and Monthly.
- In the Backup Storage Path field, specify the local or shared folder where you would like to store the backup file.
- Check the Authentication Required option and provide the required credentials if the specified shared folder requires permissions to store the backups.
- If the shared folder is located on a workgroup computer, then create a new domain account in AD. This new account should have the same username and password as a local account on the workgroup computer. Use the credentials of this new account for authentication.
- If the specified path is wrong or unreachable, the backup will be stored in the default backup folder (<Installation_Folder>\Backup).
- Select the retention period for the backup file using the Retention Criteria drop-down list.
- Once done, click Save to save the configurations.
Once a scheduler has been created, you can view the following information, and perform the following actions:
- You can view the time of the next scheduled backup, the location where the backup is stored, the last time the scheduler ran, and the status (success/failure) of the last backup. Refresh this set of information by clicking on
 icon. You can also run the backup operation manually by clicking on Backup Now.
- Click the
 /
/  icon under the Actions column of the backup schedule to disable or enable the schedule.
- Click on the
 icon under the Actions column to edit the backup schedule.
- Click the
 icon to view the history of recent backups.
Note:
- If you use MS SQL, two backup files are created every time a backup operation is run. An .ezip file is created in the <Installation_Folder>\backup and a .bak file is created in the <MS SQL_directory>\backup. Both backup files are required to carry out any restoration. When you configure a retention period, only the .ezip file in <Installation_Folder>\backup will be deleted. The .bak files in the <MS SQL_directory>\backup will not be deleted. To delete the .bak files, set up a maintenance plan in Microsoft SQL Server management studio based on your retention period.
- To view the steps on how to restore from a database backup file, click here.
Restoring backup from an old version of MS SQL server to a new MS SQL server
If you've installed a new version of MS SQL server and want to configure it in M365 Manager Plus in place of the old MS SQL server, you can do so by using the backup you've taken using M365 Manager Plus. Just note that, in addition to the backup you've taken using M365 Manager Plus, you need to copy the files in <MS_SQL_Old_Version>/Backup to <MS_SQL_New_Version>/backup.
Troubleshooting tips
If you get an error while backing up the database, please check if the following conditions are met:
- The database server is running.
- There is sufficient space in the backup storage location.
- Elasticsearch migration is not running while the database is being backed up.
- The credentials used in the Authentication field have sufficient permissions to write data in the backup storage location.
 ADManager Plus
 ADAudit Plus
 ADSelfService Plus
 M365 Manager Plus