Installing OpManager agent in your devices
OpManager's agent-based monitoring feature allows you to deploy an agent on your end-device. The agent comprehensively collects the data from your end-device and sends it to OpManager for further inspection and analysis. Furthermore, even if the connection between OpManager and the end-device is lost, the agent stores the data locally and then sends it to OpManager the moment the connection is reestablished.
You can install the OpManager agent in your network devices in 3 different ways. Before proceeding with the installation, ensure that all prerequisites for agent installation are met. Once the agent is successfully installed, the devices are automatically discovered, and monitoring will begin immediately.
Installation for Windows
1. From OpManager's web console:
To remotely install the agent in your device from OpManager's web console:
- Go to Settings → Discovery → Deploy Agent.
- Enable the "Push Remotely" option to initiate the installation process.
- First, provide the name/IP address of the device you wish to install the agent in.
- Next, provide the credentials for the device. You can choose from existing credential profiles, or you can manually provide the credentials.
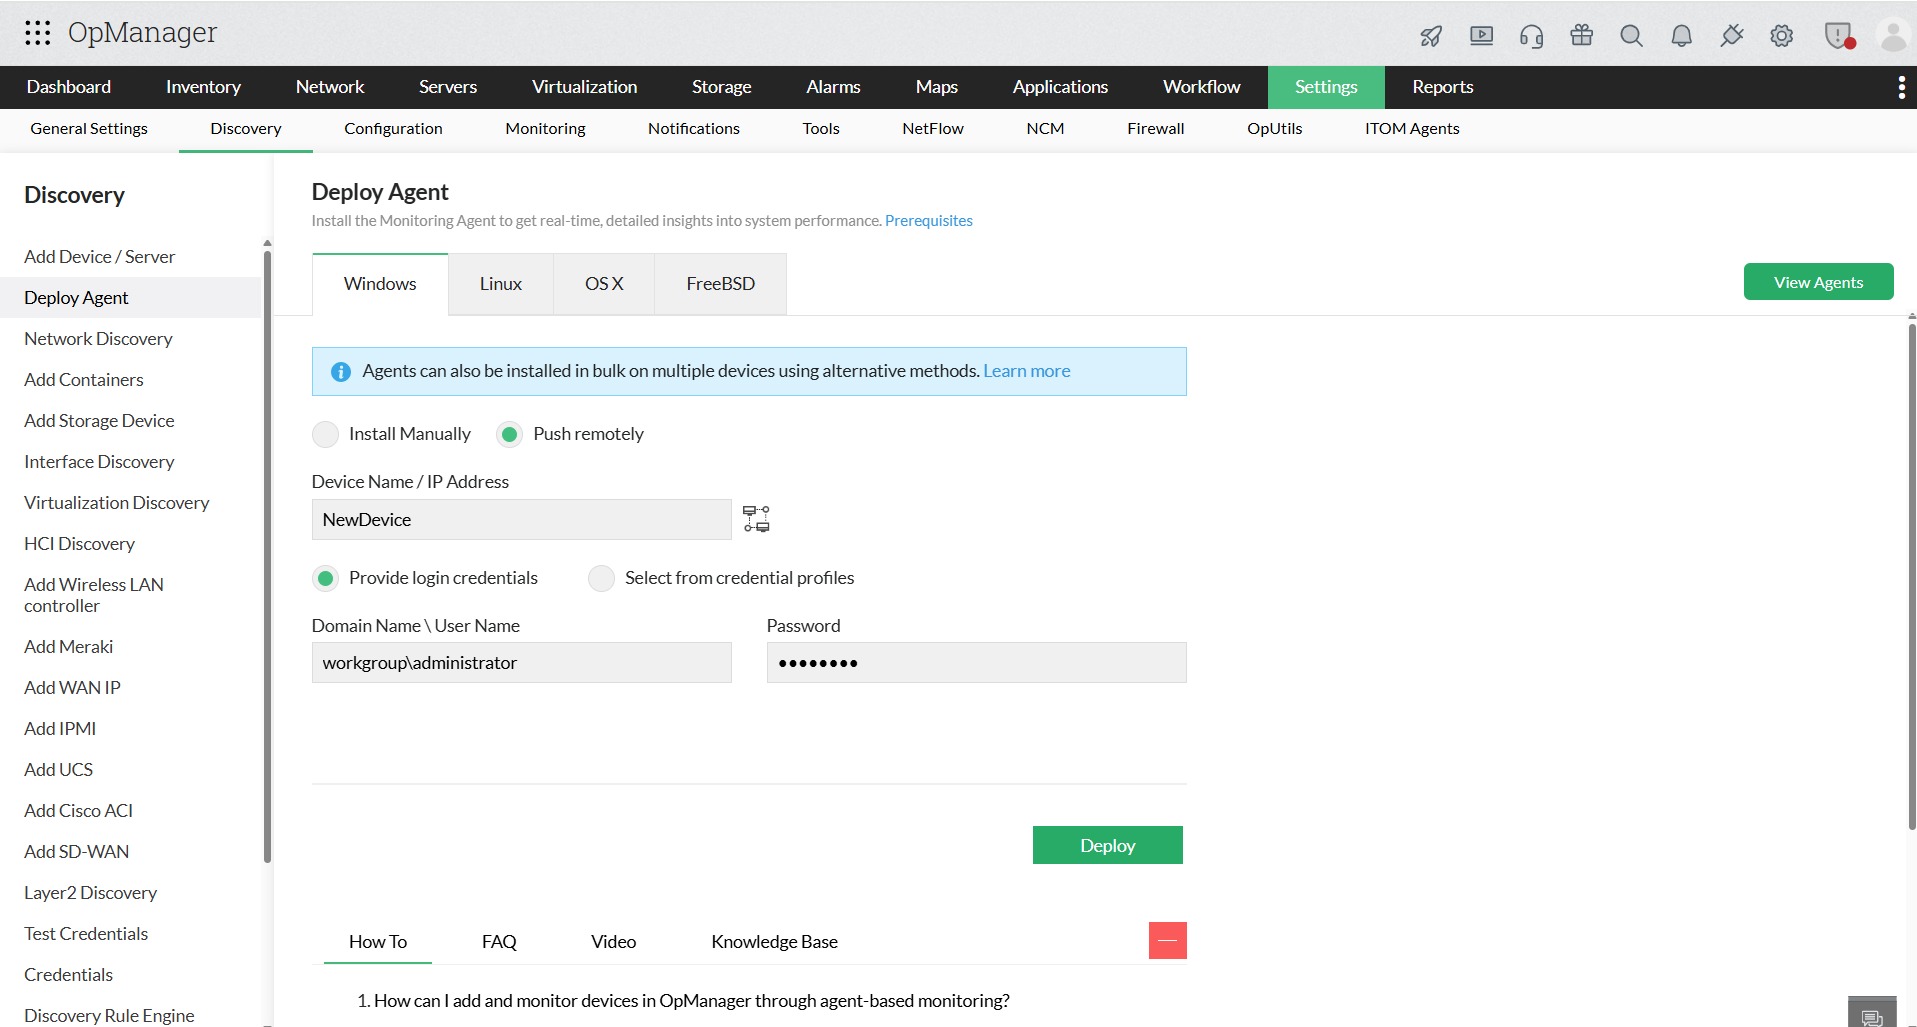
- Click "Deploy" to initiate the installation process. Once it's done, a success message will be displayed and the device will be available under the Inventory.
- You can also view all devices in which agents have been installed from the Agents page under Settings → ITOM Agents → Monitoring Agents
In case there are any errors displayed during the installation, visit this page to know more about possible error messages during agent deployment and how you can resolve them.
Note: It is mandatory to download a fresh copy of the OpManagerAgent.zip file and use the files within it for the installation process.
2. Manual installation:
You can manually download the Agent installation file from Settings → Discovery → Deploy Agent, and tapping the "Download" button on the top of the page. OpManager Agent zip file will then be downloaded. Extract the zip file and paste the extracted OpManagerAgent.msi and OPMServerInfo.json files under the local directory. This can be used to manually install the OpManager agent on any windows device.
Once installed, the agent automatically syncs the device details to OpManager, and the device is listed under the Inventory page.
Note: Place the extracted OpManagerAgent.msi and OPMServerInfo.json files under the same directory before initiating the installation of the agent.
3. Using Active Directory (bulk installation):
You can also push the agent to multiple devices in your network by using Windows GPO in your Active Directory server.
Installation using GPO can be done in two methods:
- Using GPO scheduler: Agent can be instantly pushed to devices in the domain. Fastest method of installation.
- Using GPO startup script: Agent will be installed during next refresh cycle.
Note: To switch from agentless monitoring to agent-based mode for an existing device, you can deploy the agent using any of the methods mentioned above and then follow the steps mentioned here.
Installation for Unix
1. Manual Installation
To manually install the Unix agent for your network, follow the steps provided.
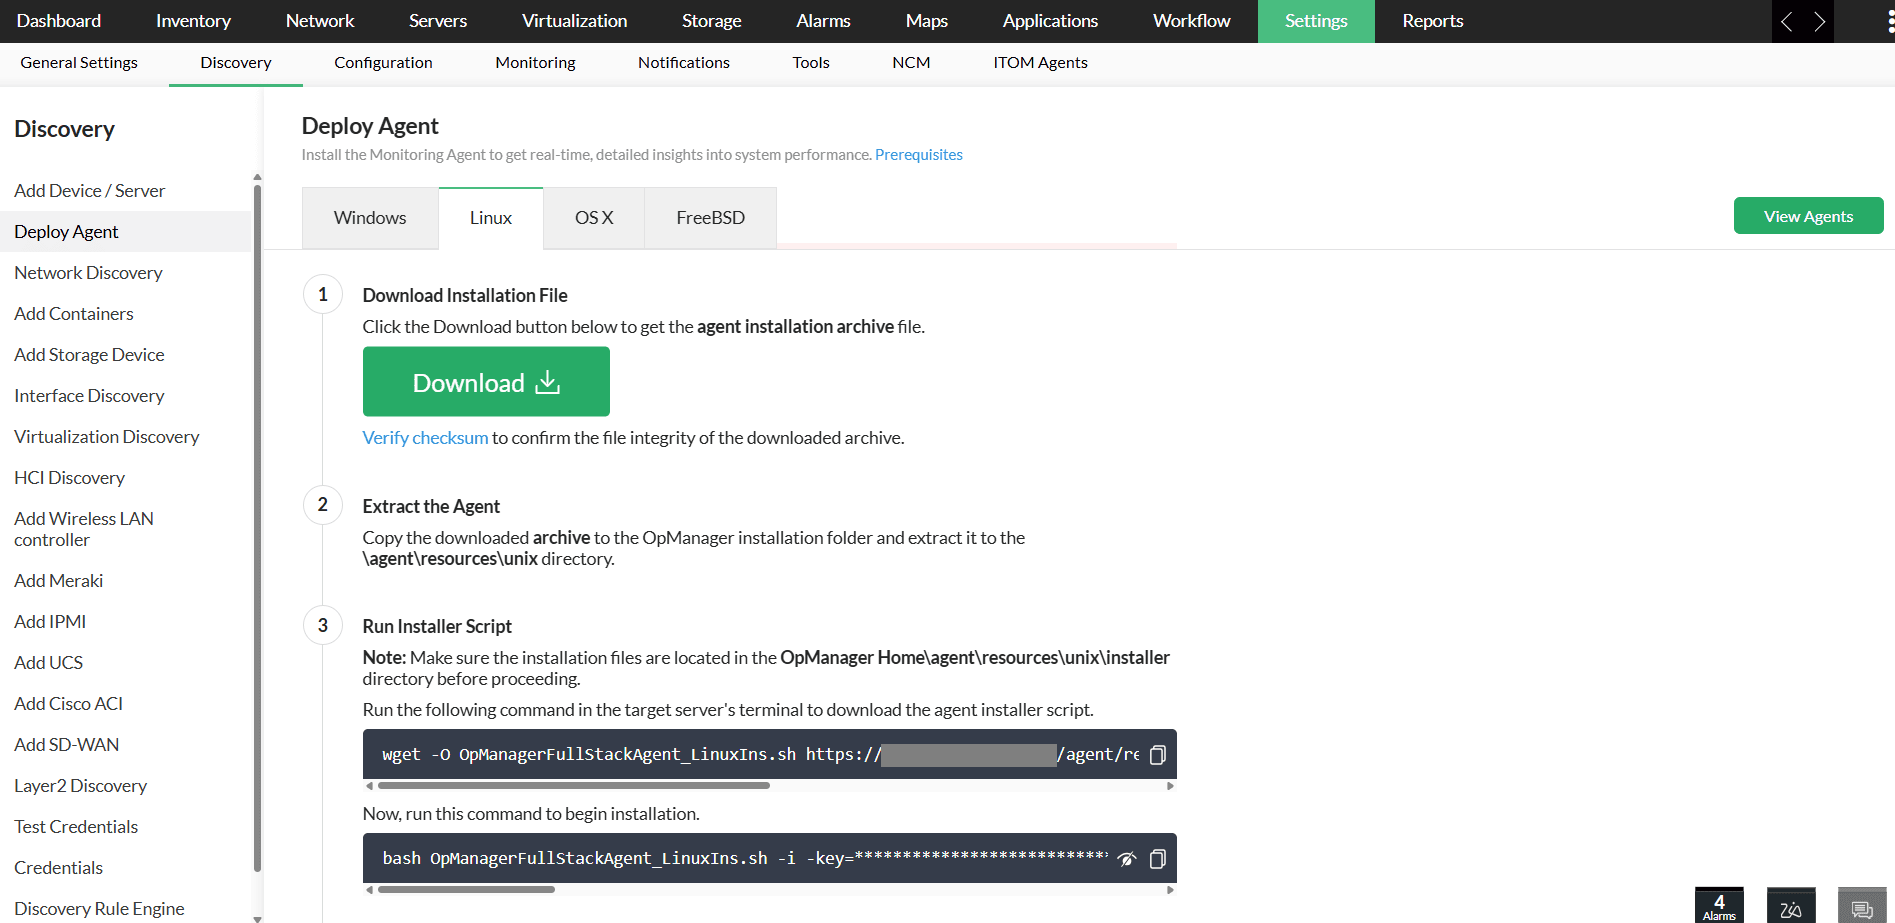
- Go to Settings -> Discovery -> Deploy Agent. Select the appropriate Unix system section.
- To download the Unix Monitoring Agent archive file, click on the Download button or access the appropriate version from the download page
- Follow the steps provided in the file integrity page to verify the integrity of the downloaded file.
- After successfully verifying the integrity, copy the downloaded Agent Archive file to the OpManager Application Installer Server and extract it to the OpManager Home\agent\resources\unix directory
- After extraction of the Archive file, verify that the listed folders and files are present and properly extracted.
- Folders
- \agent\resources\unix\installer\arm
- Files
- Under unix folder
- version.properties
- Under unix\installer folder
- OpManagerFullStackAgent_x86Linux.install
- OpManagerFullStackAgent_x64Linux.install
- OpManagerFullStackAgent_CrossPlatform.install
- OpManagerFullStackAgent_LinuxIns.sh
- Under unix\installer\arm folder
- OpManagerFullStackAgent_x64Linux.install
- Under unix folder
- Folders
- Reload the OpManager web client once to cross-verify that all files and their integrity are in the proper state.
- If it's in the proper state, you will see only two steps listed under the appropriate Unix flavor section.
- If the file is in an improper state, an error message like "file not found" or "file integrity failed" will appear. Resolve the issue using the provided details, then reload the OpManager web client to confirm that no error messages are shown under the Deploy Agent → Appropriate Unix Flavor section.
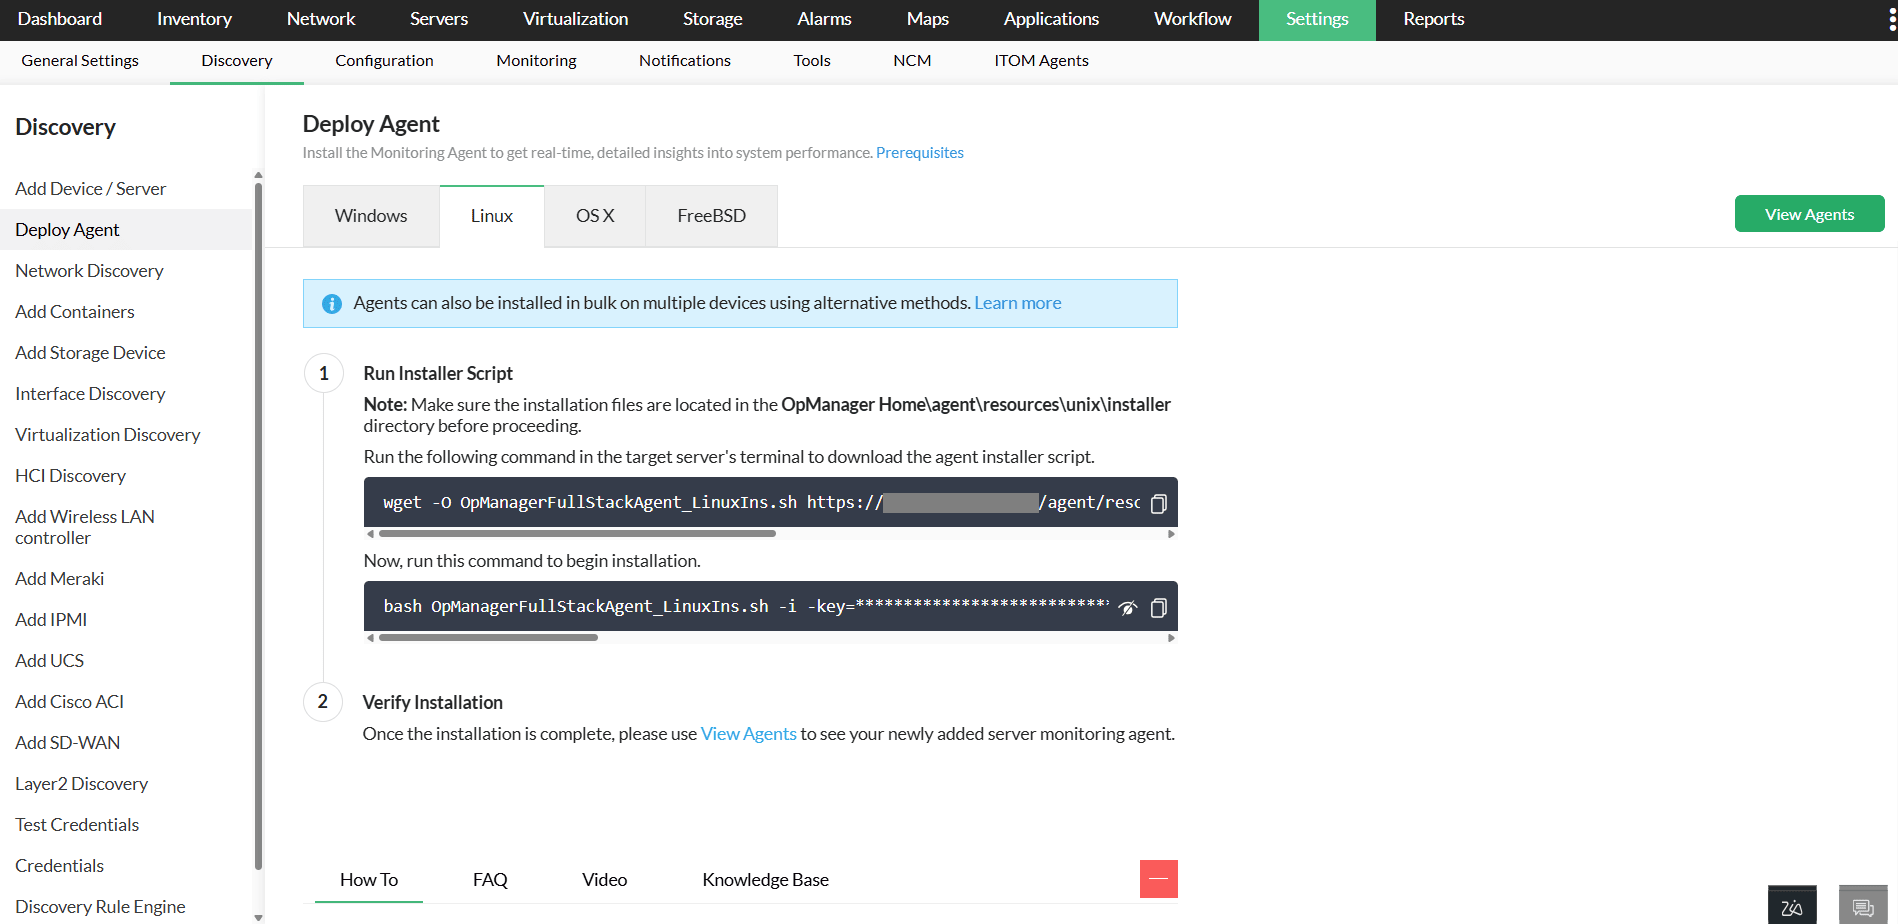
- Then, connect the target Monitoring server in the terminal for Agent Installation.
- Copy and run the download command in the terminal to transfer the Agent Installer script file OpManagerFullStackAgent_LinuxIns.sh to the target end server.
- Ensure that the installer script file OpManagerFullStackAgent_LinuxIns.sh has been fully downloaded without any interruptions.
- Copy and run the install command to begin Agent Installation.
- After successful installation, you will find the agent listed under
Settings → ITOM Agents → Monitoring Agents section - If the respective device is already being monitored using credentials in OpManager, you need to associate the agent with that device by clicking the Associate option available.
- If the device is not previously monitored and is being added for the first time, it will be auto-added and monitoring will begin automatically.


2. As a Non-Root User
- Append
-nr/-nr=<Custom Installation Path where to install>argument to the install command while performing the installation.
Example install command:
bash
OpManagerFullStackAgent_Linux.sh -i -nr=/home/test/ManageEngine/OpManager-agent_type=server .....
OR
bash
OpManagerFullStackAgent_Linux.sh -i -nr -agent_type=server .....
3. Using Organizational Proxy
- Add the proxy argument to the Install command as like below:
bash OpManagerFullStackAgent_LinuxIns.sh ..........
proxy=user:password@proxyhost:proxyport
OR
bash OpManagerFullStackAgent_LinuxIns.sh .......... -proxy=host:port