SSH Command Control Filtering
PAM360 enables users to initiate remote sessions using the SSH protocol to perform specific operations through command execution. With the SSH Command Control Filtering feature, administrators can define and enforce a set of pre-approved command lists by associating command groups with relevant accounts, resources, or resource groups. This feature ensures that users with access to SSH-enabled resources are restricted to executing only those commands explicitly permitted within the assigned command groups. This granular level of access control significantly enhances security by preventing unauthorized or unintended command executions during SSH sessions.
All actions involving commands and command groups, such as creation, modification, association, and execution, are fully audited and logged under the resource audit section, complete with operation types and user-provided reasons for traceability and compliance.
By the end of this document you will have learned the following topics relevant to SSH Command Control Filtering in PAM360:
- Roles and Permissions
- Managing the Commands
- Managing the Command Groups
- Configuring SSH Command Control
- Executing the Filtered Commands
- How Configuration Precedence Works in Real-Time?
1. Roles and Permissions
By default, users with roles such as Administrator, Privileged Administrator, Password Administrator, and Cloud Administrator are granted permissions to manage or use SSH Command Control in PAM360. Additionally, administrators can configure custom roles with the following privileges to manage and use SSH command control effectively:
- Manage Command Lists : Enabling this privilege allows users to create, edit, delete, and manage command lists and command groups. Users can also associate or dissociate commands within groups.
- Associate Command Groups : Enabling this privilege allows users to associate or dissociate command groups with accounts, resources, or resource groups. Users can also view available commands and command groups from the Manage Command Lists interface.
- Use Command Control : Enabling this privilege restricts users to executing only the predefined commands associated with SSH-based resources. Users without this privilege will be restricted from initiating SSH connections for accounts configured with SSH command control.
2. Managing the Commands
The Manage Commands section in PAM360 allows users to create, import, edit, delete, and export commands used in SSH command control. This helps enforce fine-grained access control by limiting users to a predefined set of commands during remote SSH sessions.
Caution
Before managing commands, users must have the Manage Command Lists and Associate Command Groups privileges. Additionally, ensure the following prerequisites are met to avoid execution errors in the SSH launch console:
- Commands added to PAM360 must have valid syntax and input.
- Check if the target system uses alias commands, and ensure these aliases are considered when adding commands in PAM360.
To begin, navigate to Admin >> Privilege Elevation >> Manage Commands. From the Commands tab in the Manage Commands window, you can perform the following operations:
2.1 Adding the Commands
You can add commands to PAM360 in two ways. Follow the below steps to add the commands manually
- In the Commands tab, click the Add button.
- In the window that appears, enter the following:
- Command Name: A name for the quick identification of the command.
- Command: The actual command to be executed.
- Description: A brief explanation of the command.
- Click Add to save the command or Add More to add additional commands. The newly added commands will appear in the Commands tab.
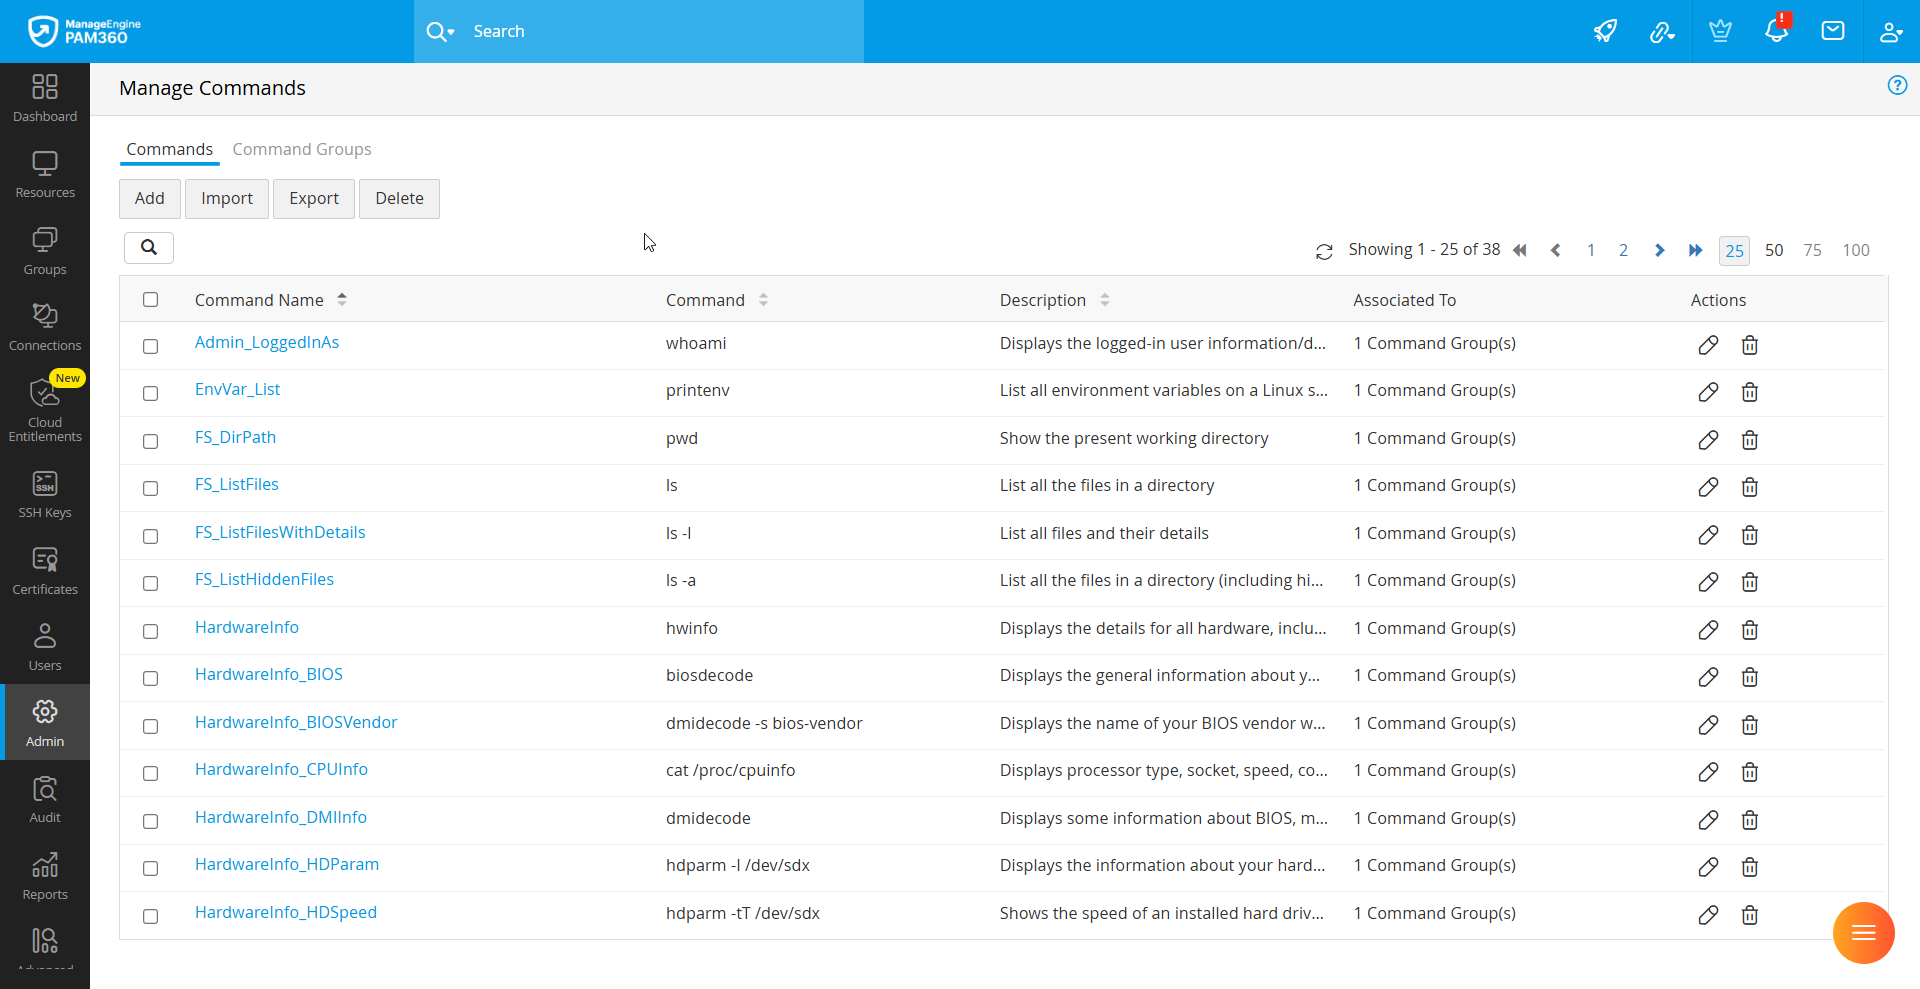
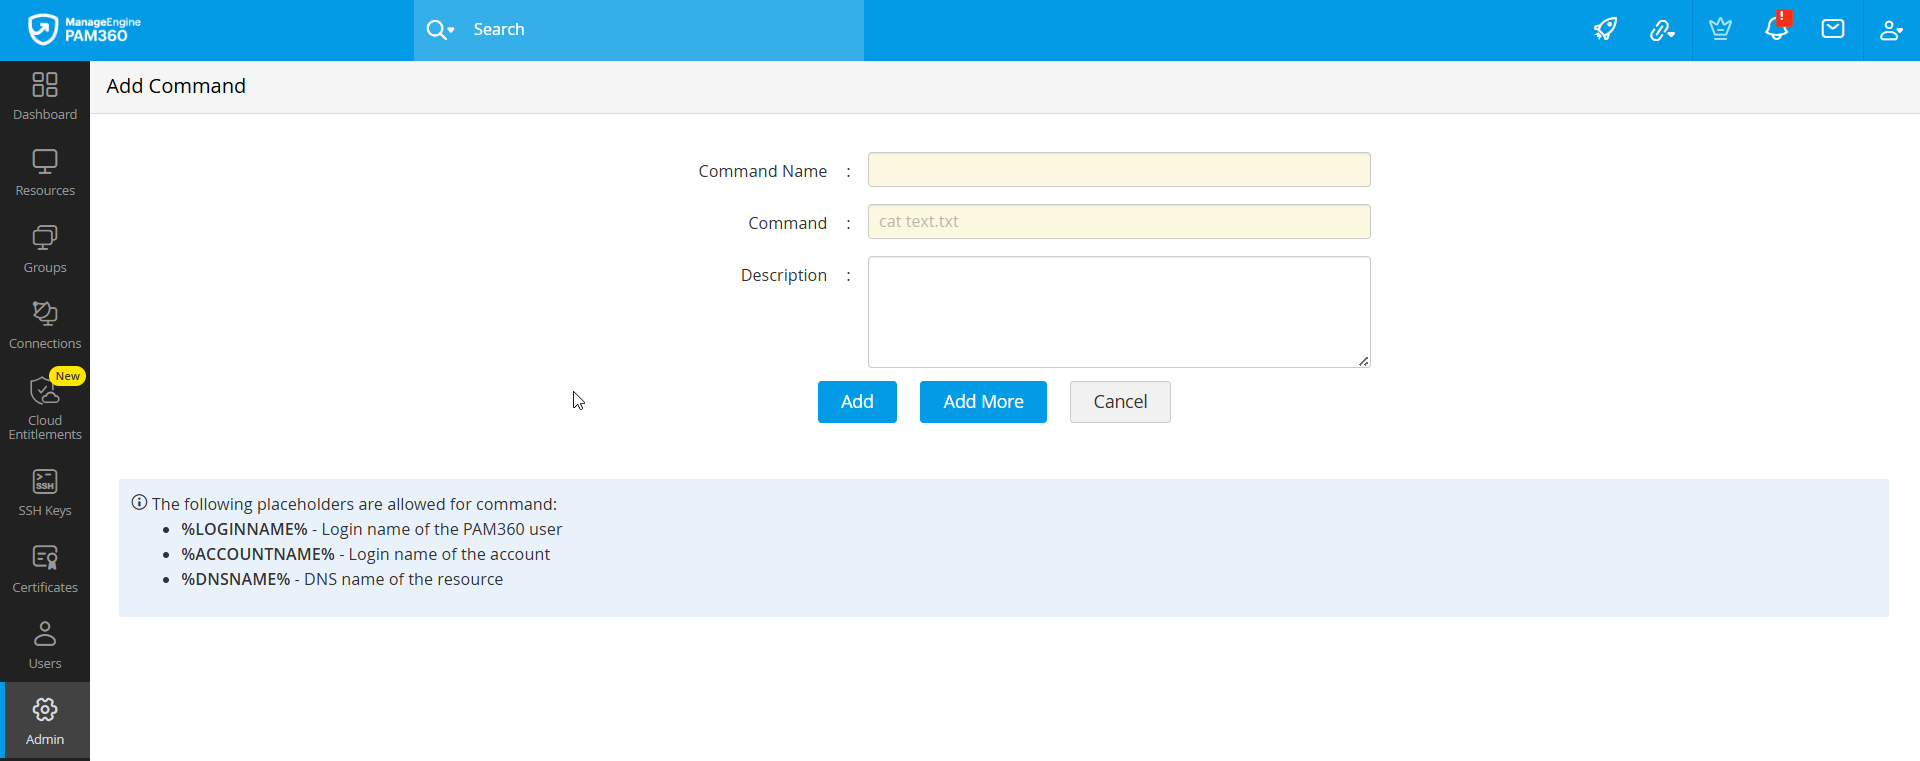
To import the commands via CSV, follow these steps:
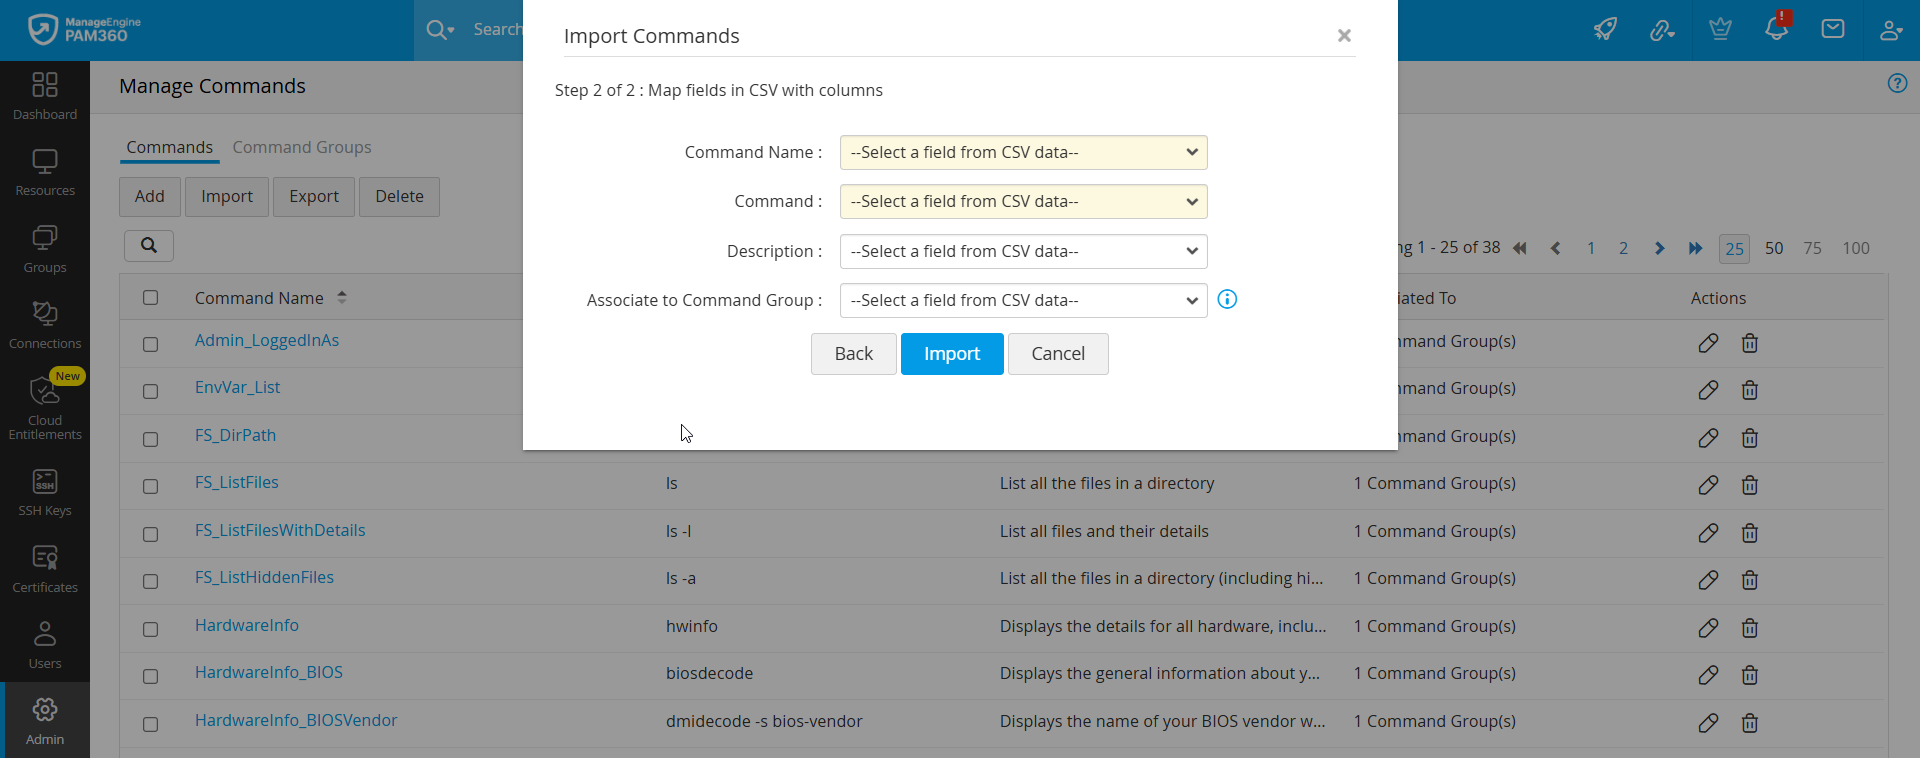
- In the Commands tab, click the Import button.
- In the pop-up, select the file type and attach the appropriate file using the Attach File field, click Next. If importing from a password-protected ZIP, provide the ZIP file name and password.
- Map the CSV columns to the required fields.
Additional Details
- Command Name and Command are mandatory.
- CSV fields can be in any order.
- You can also associate commands with command groups by mapping the Associate to Command Group field. If a command group mentioned in the CSV does not exist, it will be created automatically.
- If you select the file type as Password protected ZIP file, enter the file name in the zip file and the password to access the file in the zip.
- Click Import to complete the process. Imported commands will be listed in the Commands tab.
Additional Detail
To understand the correct CSV format, manually add a few sample commands and export them. Use the exported CSV as a template.
Click on the desired command from the command list. From the Command Details window that opens, you will get the command information, and you can also perform operations that include Edit and Delete.
2.2 Modifying the Commands
- In the Commands tab, click the Edit icon next to the command you want to modify, or open the command's detail view and click Edit.
- In the edit window, update the necessary fields.
- Optionally, associate the command with existing command groups using the Associate to Command Group field.
- Click Save to apply the changes.
2.3 Deleting the Commands
- In the Commands tab, click the Delete Command icon under Actions beside the desired command or the Delete button from the Command Details pop-up.
- In the pop-up that opens, click on the Delete button to delete the command from the command list.
- To delete the commands in bulk:
- Select the desired commands to be deleted.
- Click the Delete button on the top pane.
- Click Delete to delete the selected commands in bulk.
Caution
Deleting a command will permanently remove it from the command list and dissociate it from any associated command groups.
2.4 Exporting the Commands
You can export all commands listed in the Commands tab as a CSV file:
- Click the Export button in the Commands tab.
- A CSV file containing all available commands will be generated and downloaded to your browser’s default download directory.
3. Managing the Command Groups
Once you have created and configured the necessary commands, you can begin managing the command groups through the Command Groups tab in the Manage Commands window. This section outlines the key operations you can perform such as Add, Edit, Associate, Dissociate, and Delete, with step-by-step instructions for each.
3.1. Adding a Command Group
- Navigate to the Command Groups tab and click the Add button.
- In the pop-up window, enter the Command Group Name and Description, then click Add.
Additional Detail
Before confirming the addition, you can associate commands with this new command group by selecting them from the list displayed below. Once added, click on the desired command group in the Command Groups tab to open the Command Group Details window. Here, you can view the group’s information, its associated commands, and perform further actions such as Edit or Delete.

3.2 Modifying a Command Group
- In the Command Groups tab, locate the command group you want to modify.
- Click the Edit icon under the Actions column or click the Edit button in the Command Group Details pop-up.
- In the edit window, make the necessary updates and click Save to apply the changes.
3.3 Deleting the Command Groups
To delete an individual command group:
- In the Command Groups tab, click the Delete icon under Actions for the desired command group, or click the Delete button in the Command Group Details pop-up.
- Confirm the deletion in the prompt that appears.
To delete multiple command groups at once:
- Select the checkboxes next to the command groups you want to delete.
- Click the Delete button in the top toolbar.
- Confirm the deletion in the pop-up dialog.
Caution
Deleting a command group is a permanent action. However, the individual commands associated with it will remain intact and will not be deleted.
3.4 Associating or Dissociating the Commands in Command Groups
- In the Command Groups tab, click the Edit icon beside the desired command group or open the Command Group Details and click Edit.
- In the edit view, select or deselect the commands from the available list to associate or dissociate them with/from the command group.
- Click Save to confirm the changes.
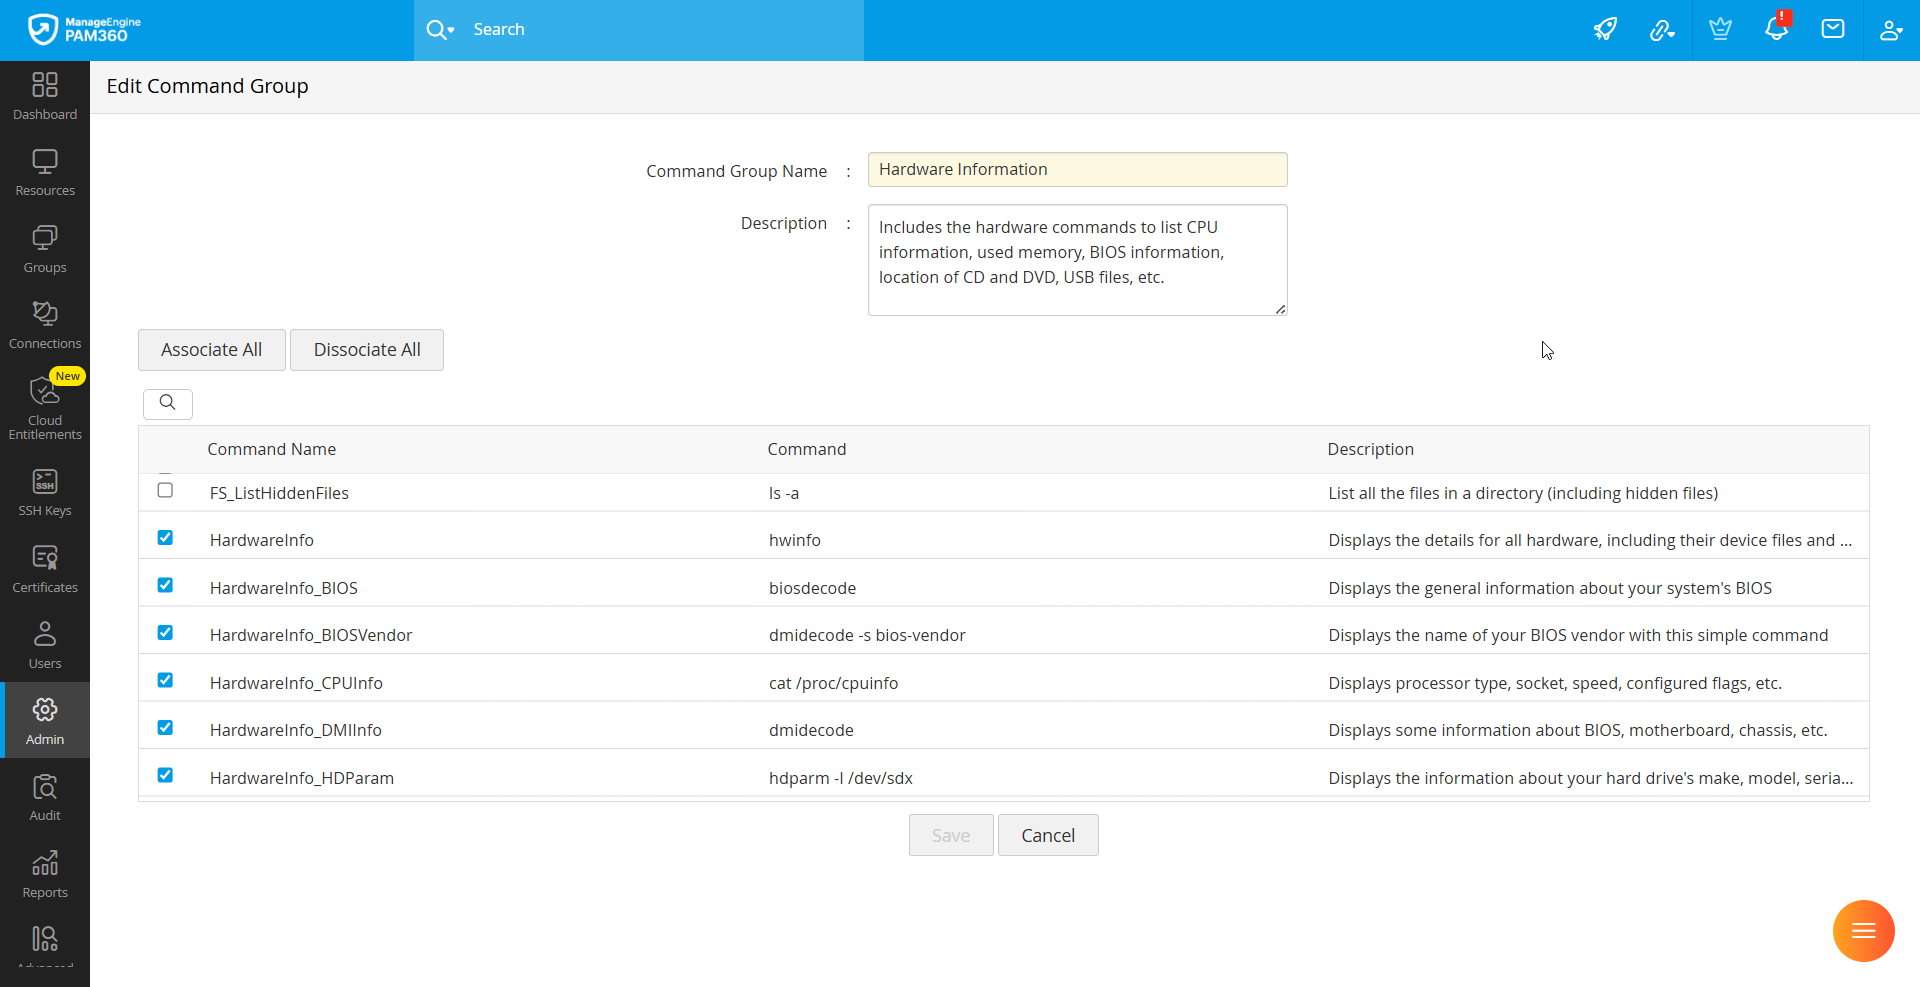
Additional Detail
You can also associate commands while creating a new command group by selecting them during the initial setup.
4. Configure SSH Command Control
Once the desired command groups are created, you can begin configuring SSH Command Control at the account, resource, and resource group levels. The following sub-sections outline the step-by-step process to configure SSH Command Control at each of these levels.
Best Practice
We strongly recommend using command control (filtering) in conjunction with access control. This ensures that users do not gain access to shared account passwords. If passwords are available in plain text, users could bypass command restrictions by connecting through third-party SSH clients.
4.1 Configuring SSH Command Control for Accounts
To configure SSH Command Control for an account, follow these steps:
- Navigate to Resources >> All My Passwords >> Resources, and click on the desired SSH resource. Alternatively, navigate to Resources >> All My Passwords >> Passwords.
- On the page that appears, click the Account Actions drop-down beside the desired account and select Configure SSH Command Control.
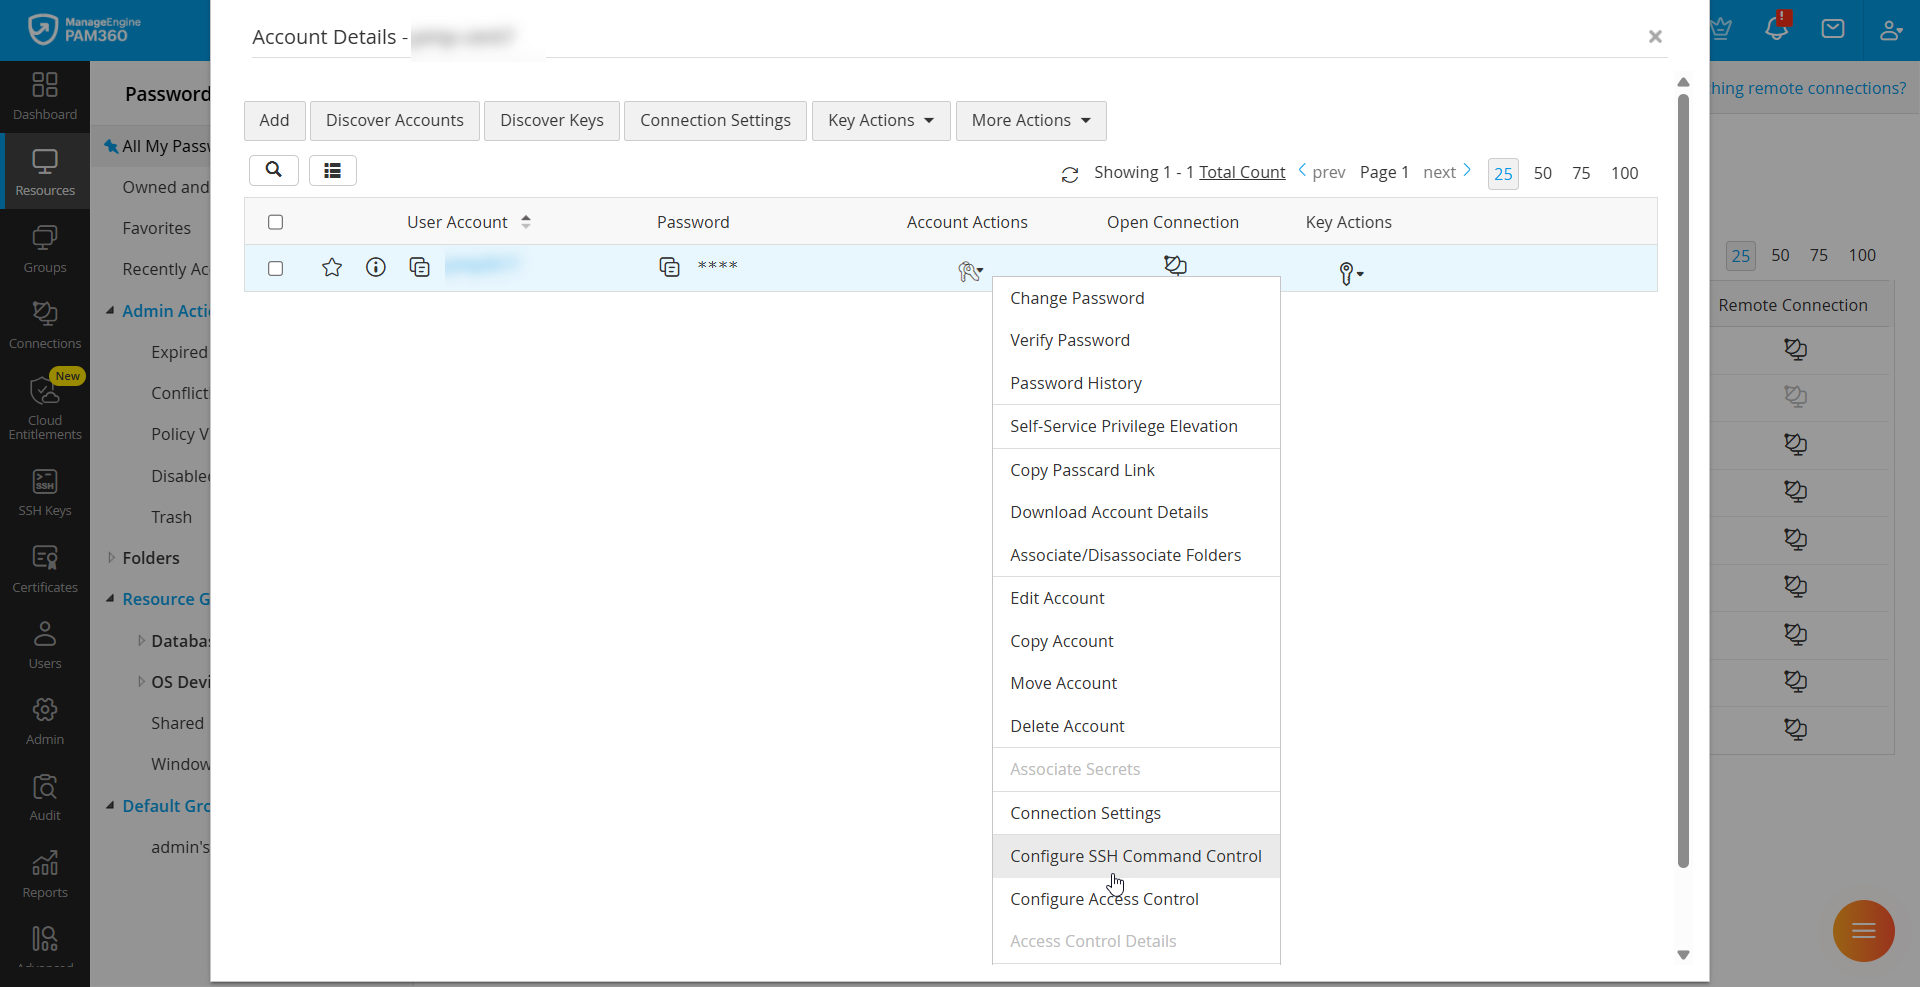
- In the pop-up window, select the required command groups to associate with the account and click Associate. The selected command groups will now be associated successfully, and SSH command control will be enabled for the account.
Additional Detail
To dissociate command groups, deselect the desired command groups or click Dissociate to remove command control from the account.
The same can be configured in bulk for accounts by selecting the desired accounts, clicking the More Actions drop-down, choosing Configure SSH Command Control, selecting the desired command groups in the pop-up window, and clicking Associate.
4.2 Configuring Command Control for Resources
To configure SSH Command Control for a resource, follow these steps:
- Navigate to Resources >> All My Passwords >> Resources.
- Click the Resource Actions drop-down beside the desired SSH resource and select Configure >> SSH Command Control.
- In the pop-up window, select the command groups to associate with the resource and click Associate.
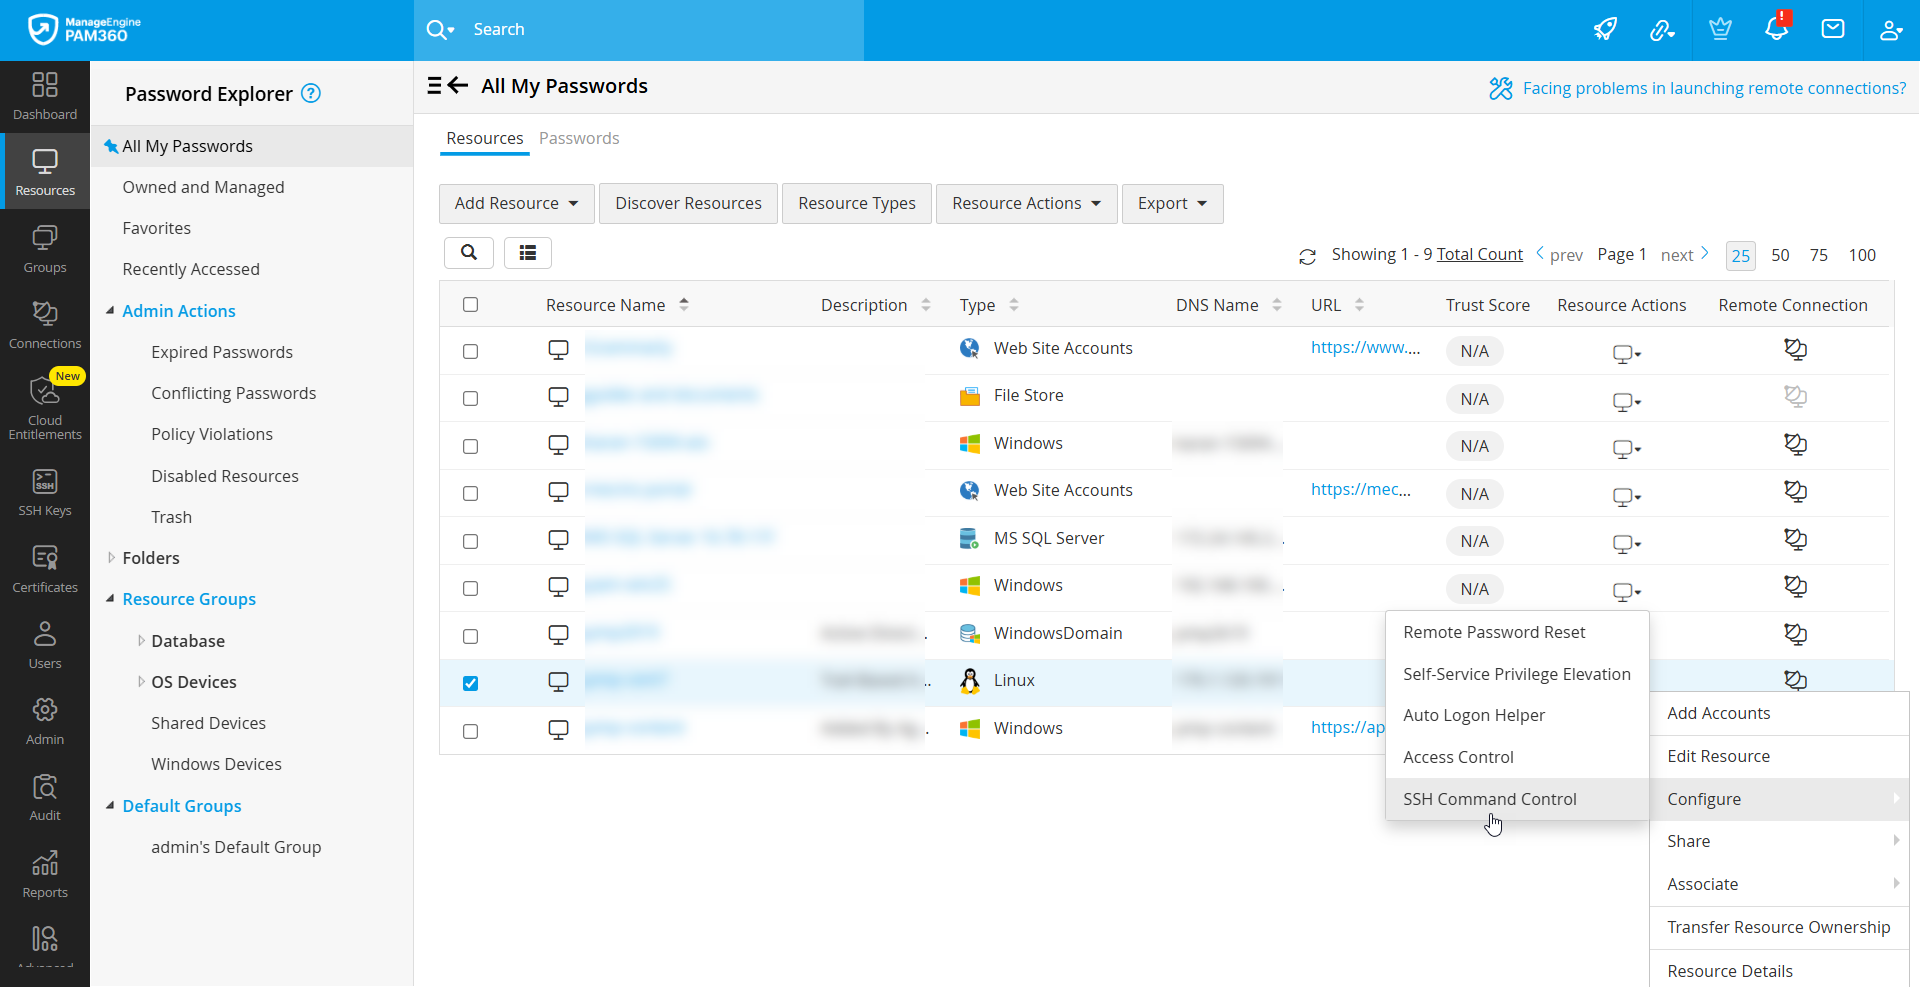
 The selected command groups will now be associated successfully, and SSH command control will be enabled for the resource.
Additional Detail
To dissociate command groups, deselect the desired command groups or click Dissociate to remove command control from the resource.
The same can be configured in bulk for resources by selecting the desired resources, clicking the Resource Actions drop-down, choosing Configure SSH Command Control, selecting the desired command groups in the pop-up window, and clicking Associate.
4.3 Configuring Command Control for Resource Groups
To configure SSH Command Control for a resource group, follow these steps:
- Navigate to the Groups tab.
- Click the Actions drop-down beside the desired resource group and select Configure SSH Command Control.
- In the pop-up that opens, select the required command groups to associate with the resource groups and click Associate. The selected command groups will now be associated successfully, and SSH command control will be enabled for the resource.
Additional Detail
To dissociate command groups, deselect the desired command groups or click Dissociate to remove command control from the resource groups.
The same can be configured in bulk for resources by selecting the desired resources, clicking the Bulk Configuration drop-down, choosing Configure >> SSH Command Control, selecting the desired command groups in the pop-up window, and clicking Associate.
5. Executing the Filtered Commands
Users assigned the Use Command Control role can only execute the commands defined in the associated command groups at the configured levels. To execute allowed commands:
- Launch a remote session for the desired account using the SSH protocol.
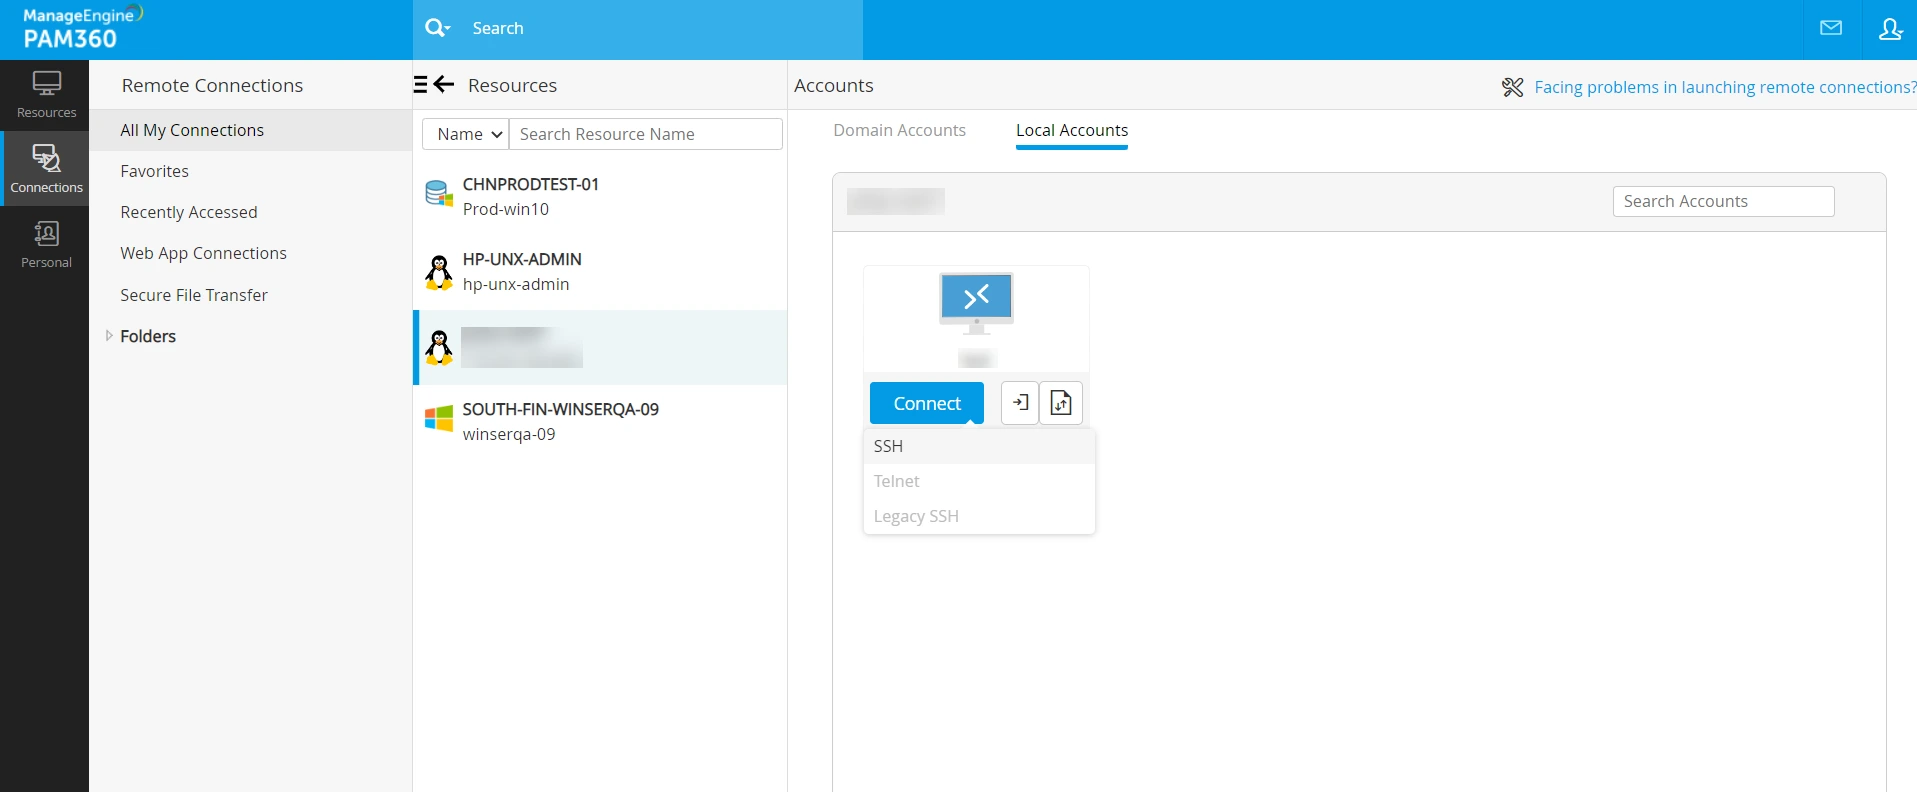
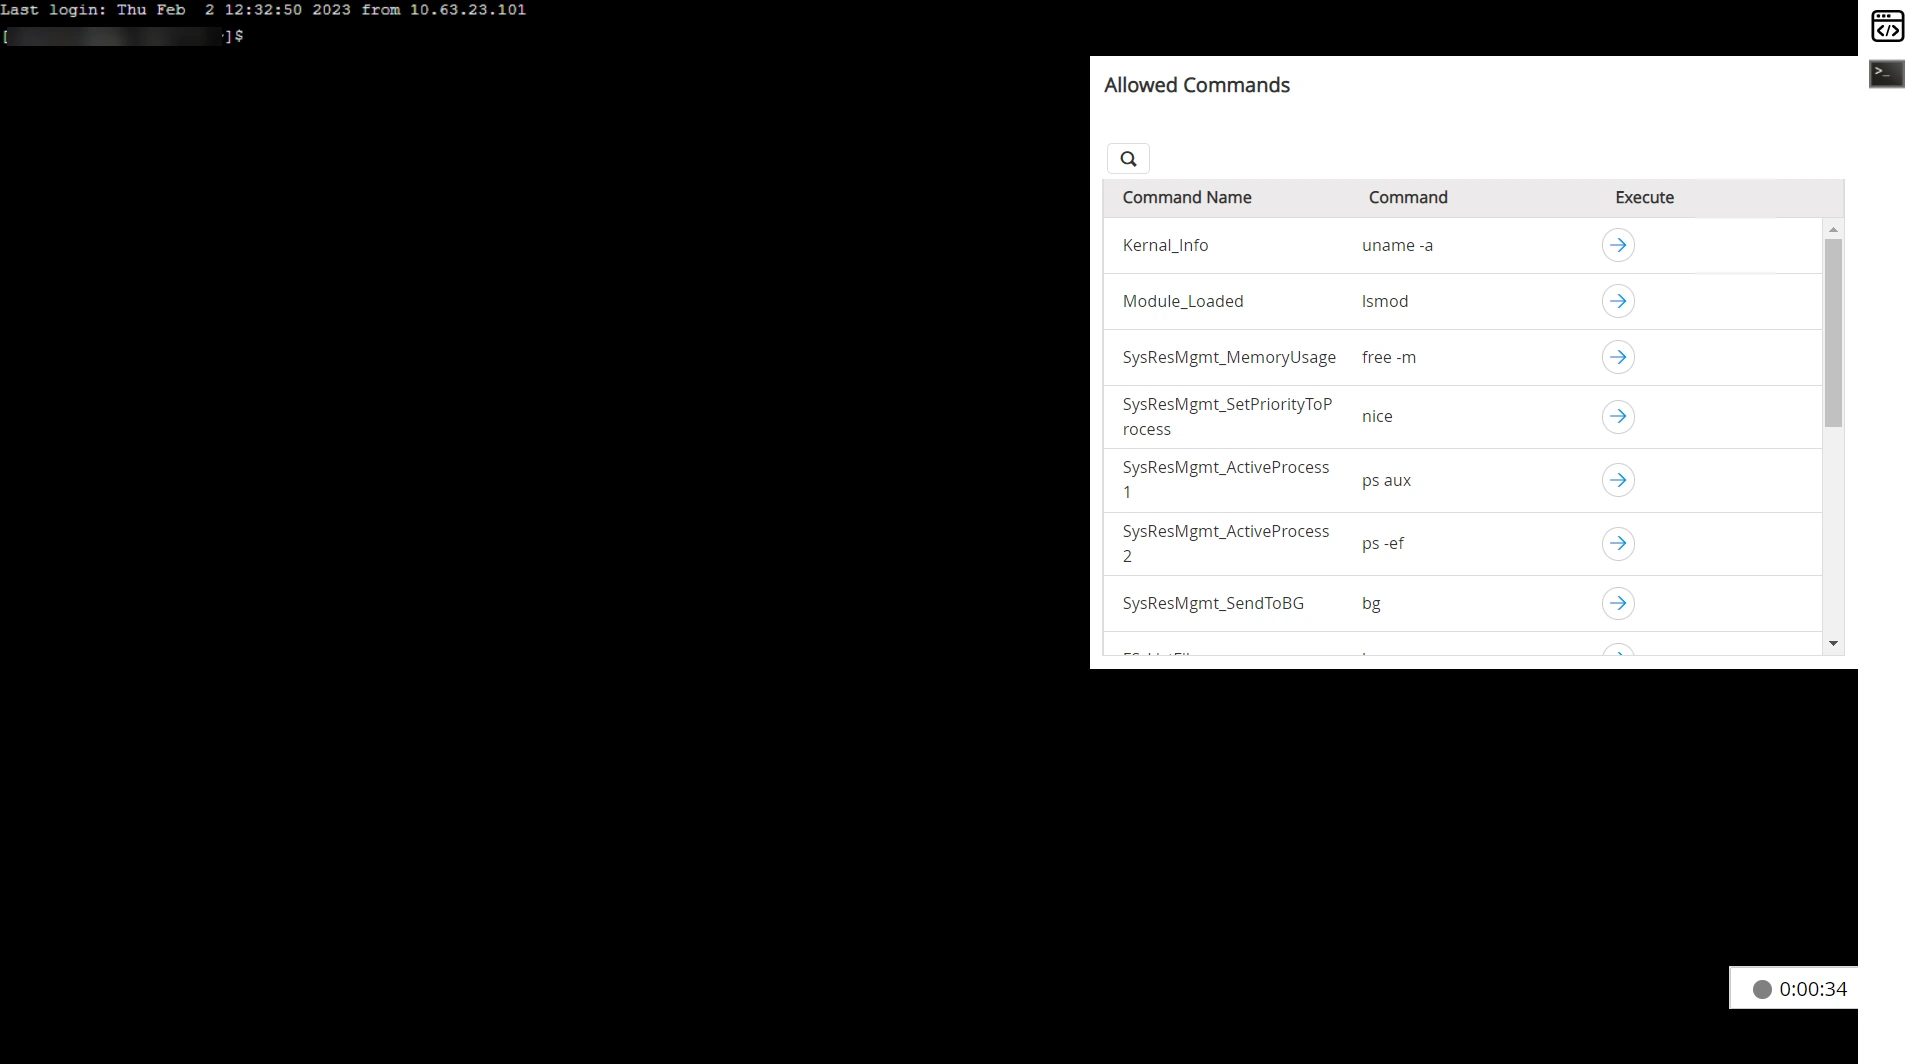
- In the opened session, a predefined list of allowed commands, associated with the logged-in SSH account, will appear in the right pane.
- Hover over the right pane and click the Execute icon next to the command to run it in the SSH console.
- Click the Preview icon to view execution logs for the selected command.
Caution
- SSH command control allows users to run only the predefined commands configured by the administrator at the account, resource or resource group level.
- Manual command execution is restricted in accounts configured with SSH command control.
- SSH remote sessions are restricted for users who do not possess the Use Command Control role.
6. How Configuration Precedence Works in Real-Time?
The following cases describe how command control configurations are prioritized when applied at multiple levels:
Case 1: Account + Resource + Resource Group - If an SSH session is governed by configurations at all three levels (account, resource, and resource group), account-level configurations take precedence.
Precedence Order: Account << Resource << Resource Group
Case 2: Resource + Resource Group - If configurations exist at both the resource and resource group levels, the resource-level configuration takes precedence.
Case 3: Multiple Resource Groups - If configurations are applied via multiple resource groups, the authorized SSH session will use the combined set of commands from all associated command groups.