- Related Products
- AD360
- Log360
- ADAudit Plus
- ADSelfService Plus
- EventLog Analyzer
- Exchange Reporter Plus

Help Document
Migrating from PostgreSQL/MySQL database to MS SQL
ADManager Plus's recent builds have PostgreSQL database bundled in it instead of MySQL. To move the database and/or data from PostgreSQL/MySQL to MS SQL, set-up the prerequisites first and then initiate the migration.
The following versions of MSSQL are supported:
- SQL server 2005
- SQL server 2008
- SQL server 2008 R2
- SQL server 2012
- SQL server 2014
- SQL server 2016
- SQL server 2017
- SQL Server 2019
- SQL Server 2022
- Configuring the MS SQL server
- Open the SQL Server Configuration Manager on the computer running the MS SQL instance (to which the DB and/or data is to be moved).
- In the left pane, click SQL Server Services → Ensure that the SQL Server Browser is running.
- In the left pane, click SQL Server Network Configuration → Select Protocols for the given instance → Enable TCP/IP.
- Note: The given instance refers to the MS SQL instance to which the DB and/or data is to be moved.
- In the left pane, click SQL Native Client Configuration → Select Client Protocols for the given instance → Enable TCP/IP.
- Restart the SQL Server Service.
- Providing permissions to the MS SQL instance
The user account associated with ADManager Plus must have access and appropriate permissions to the MS SQL instance (to which the DB and/or data is to be moved).
Note:If SQL Server Authentication is used to move the DB and/or data, access and permissions to the MS SQL instance are automatically provided. However, when Windows Authentication is used, access and permissions have to be granted, as explained below-
- To grant access- Login to Microsoft SQL Server Management Studio with an account that has been assigned the sysadmin role → Select the server instance to which you will be migrating → Security → Logins. Check whether the user running ADManager Plus is on the list-
- If the user is already listed, Proceed to 2(ii).
- If the user is not listed, right click on Logins → New Login → Create a new login → Proceed to 2(ii).
- To grant permissions- Right click on the user → Properties → Server Roles → Check whether the user has been assigned the sysadmin role-
- If yes, Proceed to 3.
- If not, Select sysadmin in the checkbox and click OK → Proceed to 3.
Note: To grant the user only the minimum permission required instead of sysadmin role, follow the two steps found below:- Right-click on the user → Properties → User Mapping → Select db_datareader, db_datawriter, db_ddladmin in the checkbox and click OK.
- Right-click on the database → Properties → Permissions → Provide 'Execute' permission for the user and click OK.
Also, execute the below query in the database: Right-click on the database → New Query → GRANT CONTROL ON CERTIFICATE::[ZOHO_CERT] TO [newly_created_user]
- To grant access- Login to Microsoft SQL Server Management Studio with an account that has been assigned the sysadmin role → Select the server instance to which you will be migrating → Security → Logins. Check whether the user running ADManager Plus is on the list-
- Enabling communication with the MS SQL server
If ADManager Plus and the MS SQL instance are running on different computers, download and install SQL Native Client, Command Line Utilities, and ODBC Driver on the computer on which ADManager Plus is running.
Note: Native client, command line utilities, and ODBC driver version has to be the same as the MS SQL version (to which the DB and/or data is to be moved).- Copy the following 2 files from the MS SQL server installation folder to the ADManager Plus bin folder-
- bcp.exe- <MSSQL Installation Dir>\Microsoft SQL Server\Client SDK\ODBC\<version>\Tools\Binn\bcp.exe
- bcp.rll- <MSSQL Installation Dir>\Microsoft SQL Server\Client SDK\ODBC\<version>\Tools\Binn\Resources\1033\bcp.rll
- Copy the following 2 files from the MS SQL server installation folder to the ADManager Plus bin folder-
- Opening UDP and TCP ports (applicable only if the firewall is enabled in the MS SQL Server computer)
- UDP port number is 1434.
- To find the TCP port number, open SQL Server Configuration Manager on the computer where the MS SQL instance to which the DB and/or data is to be moved, resides. → SQL Server Network Configuration → Protocols for . Right click on TCP/IP → Properties → IP Addresses → IPALL → TCP Port Number.
- Open the UDP and TCP ports under firewall settings.
- Move DB and/or data
- Stop ADManager Plus.
- Invoke (ADManager Plus Home)\bin\ChangeDB.bat in command prompt. Make sure that the user running the command prompt is the same as the one running ADManager Plus.
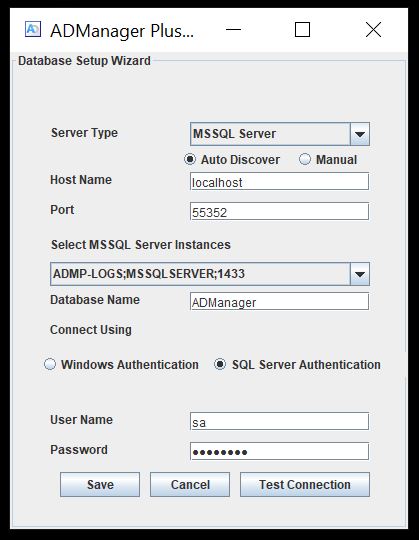
- DB Configuration wizard will pop-up → Select server type as MS SQL → Select the Host Name, Instance Name, and Database Name.
Note: The name of the MS SQL Server Instance has to be entered manually in case you have not chosen the Auto Discover option.Tip: To learn how to create an SSL certificate in MS SQL server, follow step 1 found in this link.
- Select the Authentication type. If you have selected Windows Authentication, the credentials are automatically taken. If you have selected SQL Server Authentication, enter the corresponding credentials.
Note: If SQL Server Authentication is used to move the DB and/or data, access and permissions to the MS SQL instance are automatically provided. However, when Windows Authentication is used, access and permissions have to be granted, as explained in point 2 under pre-requisites.
- Click Test Connection to check whether the credentials are correct.
- Click Save.
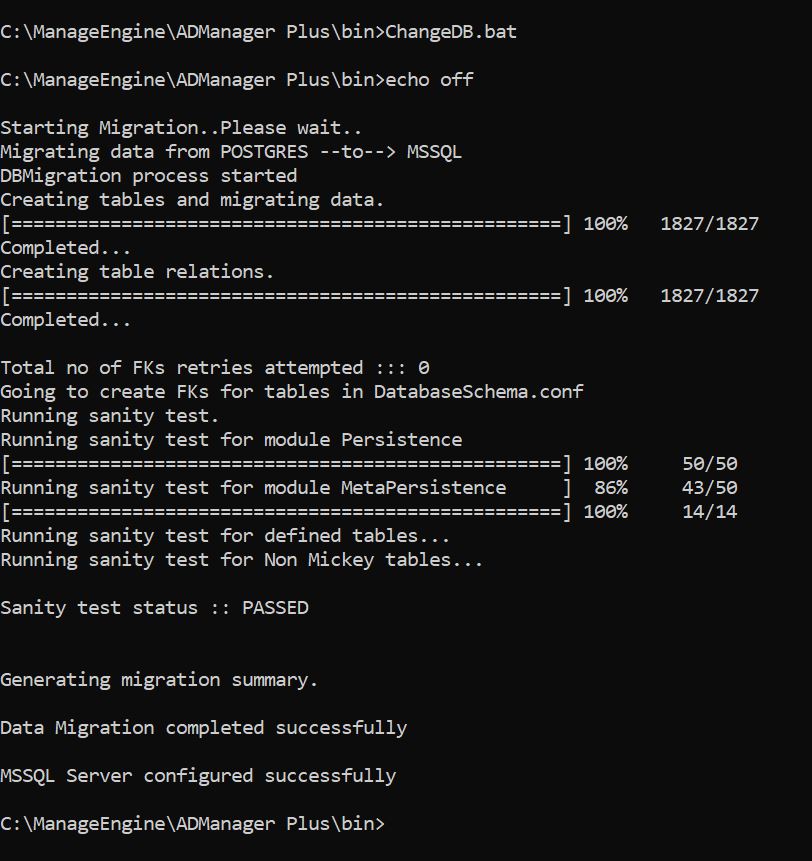
The migration procedure will start and it will take a few minutes to complete. Successful migration will end with the below screen-