Sensors
What are Sensors
Endpoint Central offers robust inventory management by collecting a wide range of device data, including hardware details, software information, certificates, and more. However, you may occasionally need to monitor specific device attributes to gain deeper insights into your environment.
Sensors are integrated as a resource in Workflows, enabling you to automate the process of fetching and utilizing required device attributes efficiently. This integration simplifies monitoring and ensures that critical data is always at your fingertips
Creating Sensors
To create a new sensor:
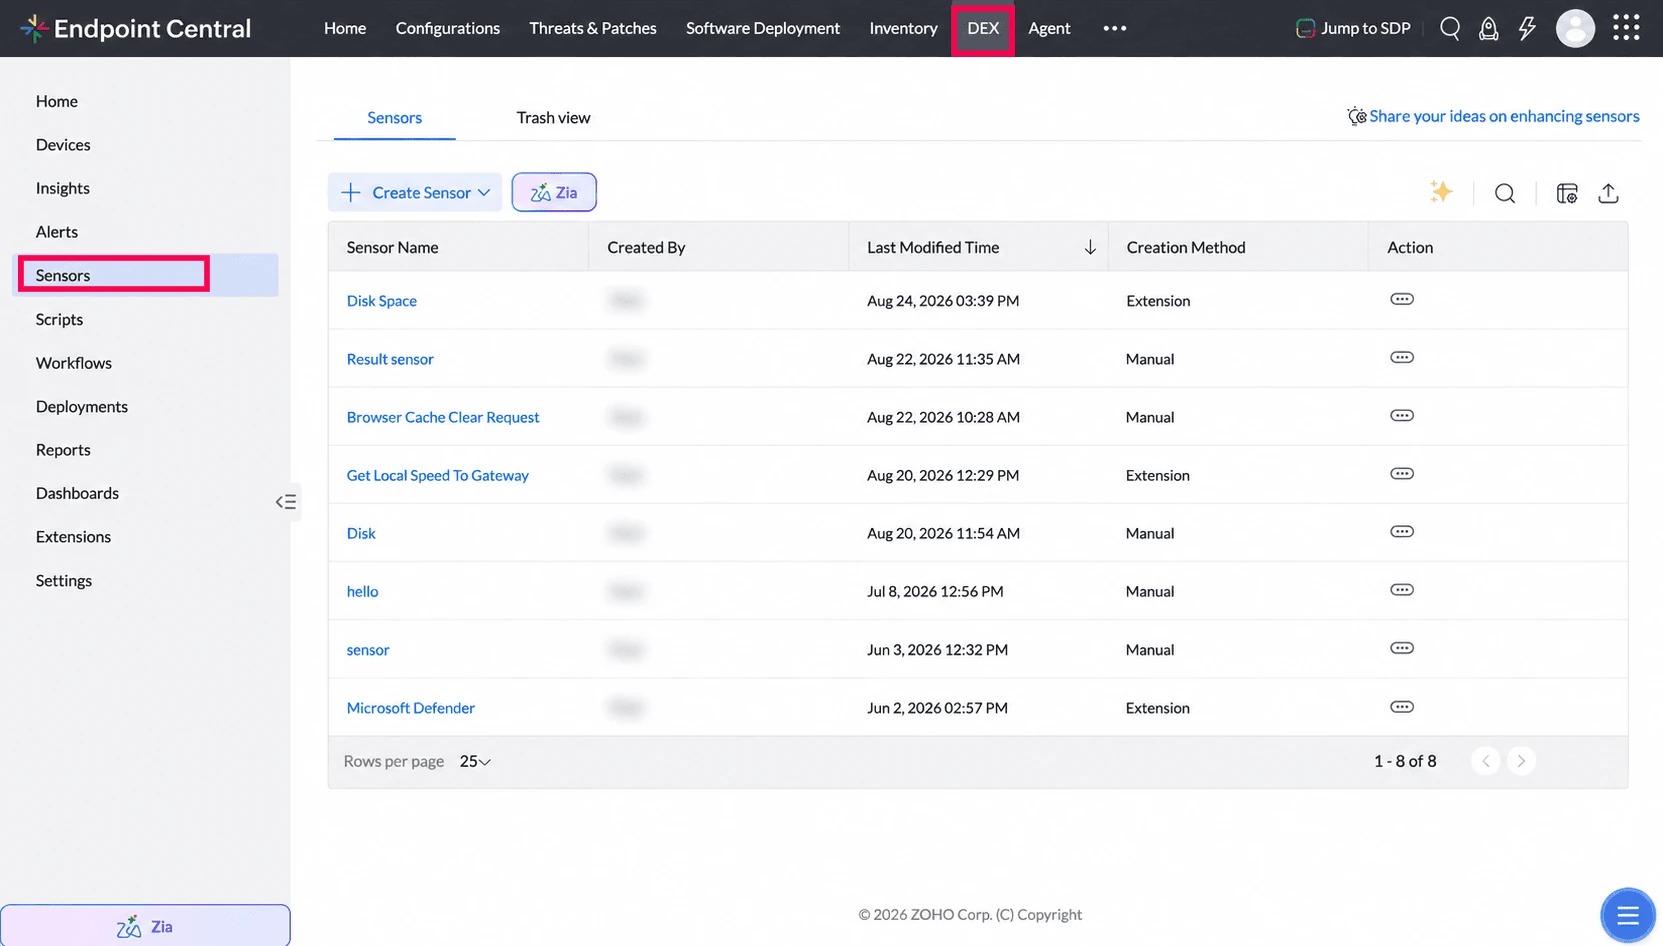
- Navigate to DEX and then select Sensors from the left navigation menu.
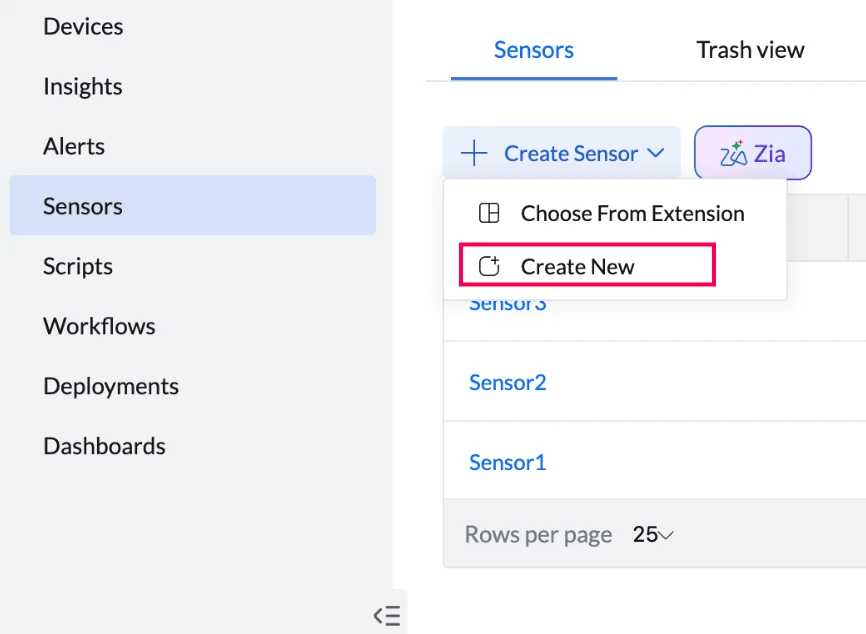
- Click on the Create Sensor button and choose Create New from the dropdown.
- Enter a descriptive Name and description for your sensor.

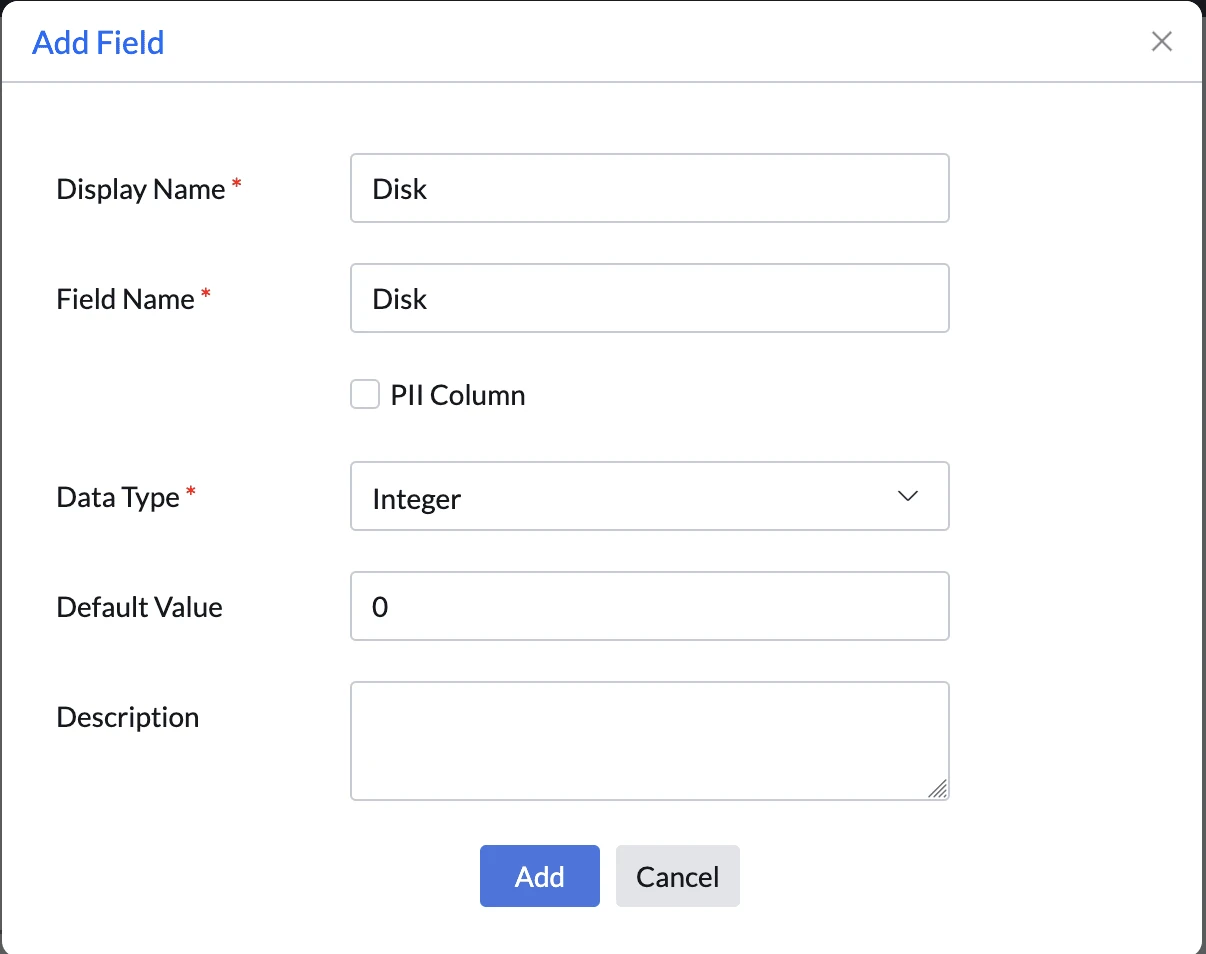
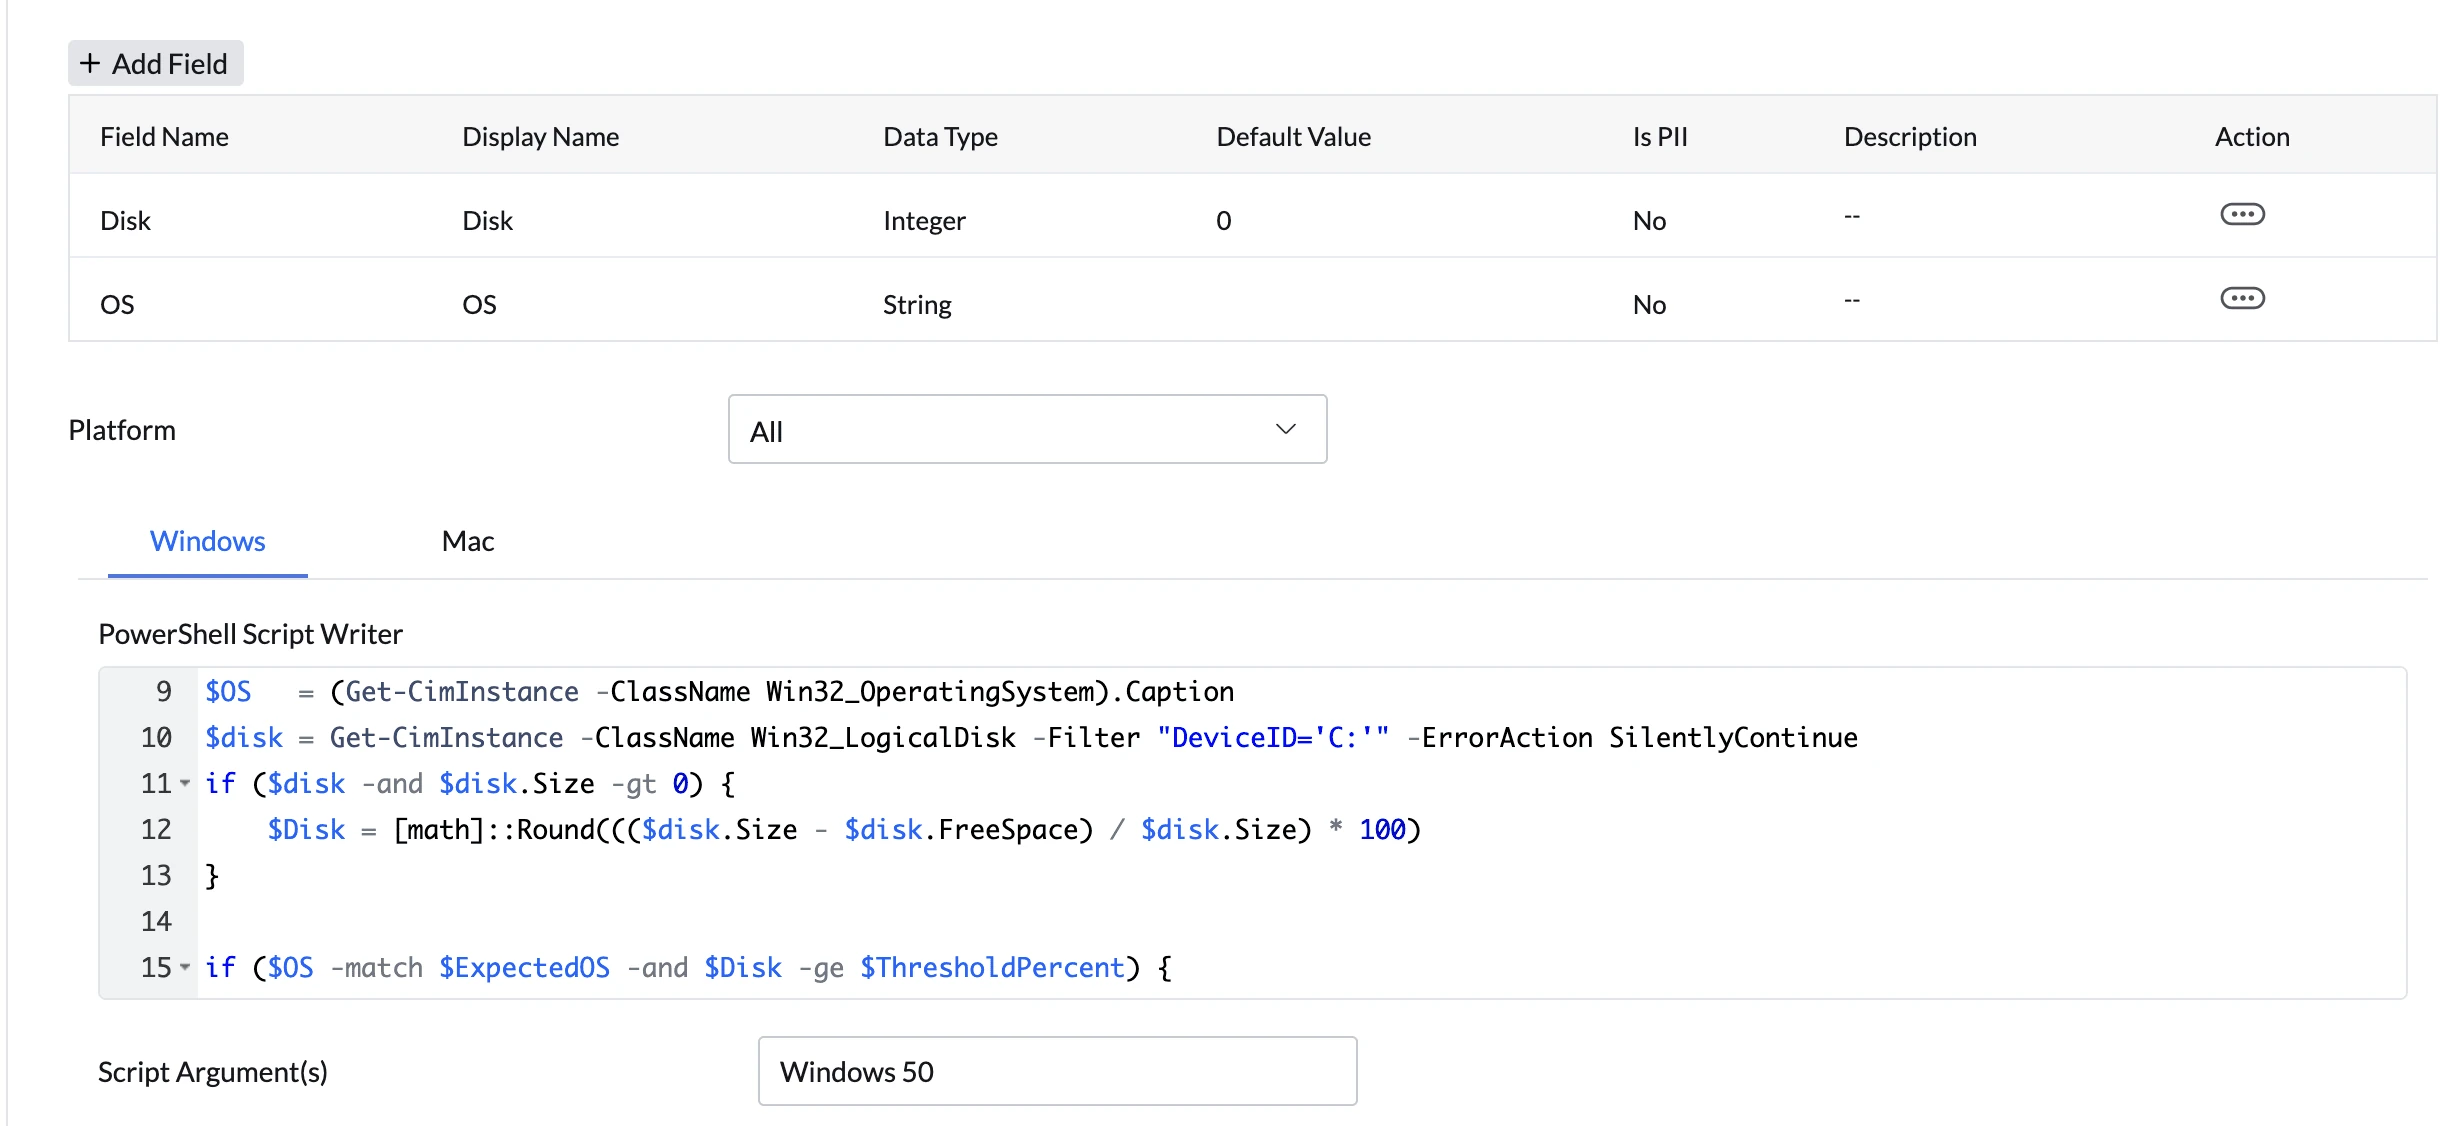
- Click Add Field to define the data that you want to collect from devices.
- Enter the display name that will be visible in the Endpoint Central console.
- Enter the field name that is used in the script.
- Specify whether the data contains Personally Identifiable Information (PII).
- Select the appropriate data type.
- Add a brief description of the field.
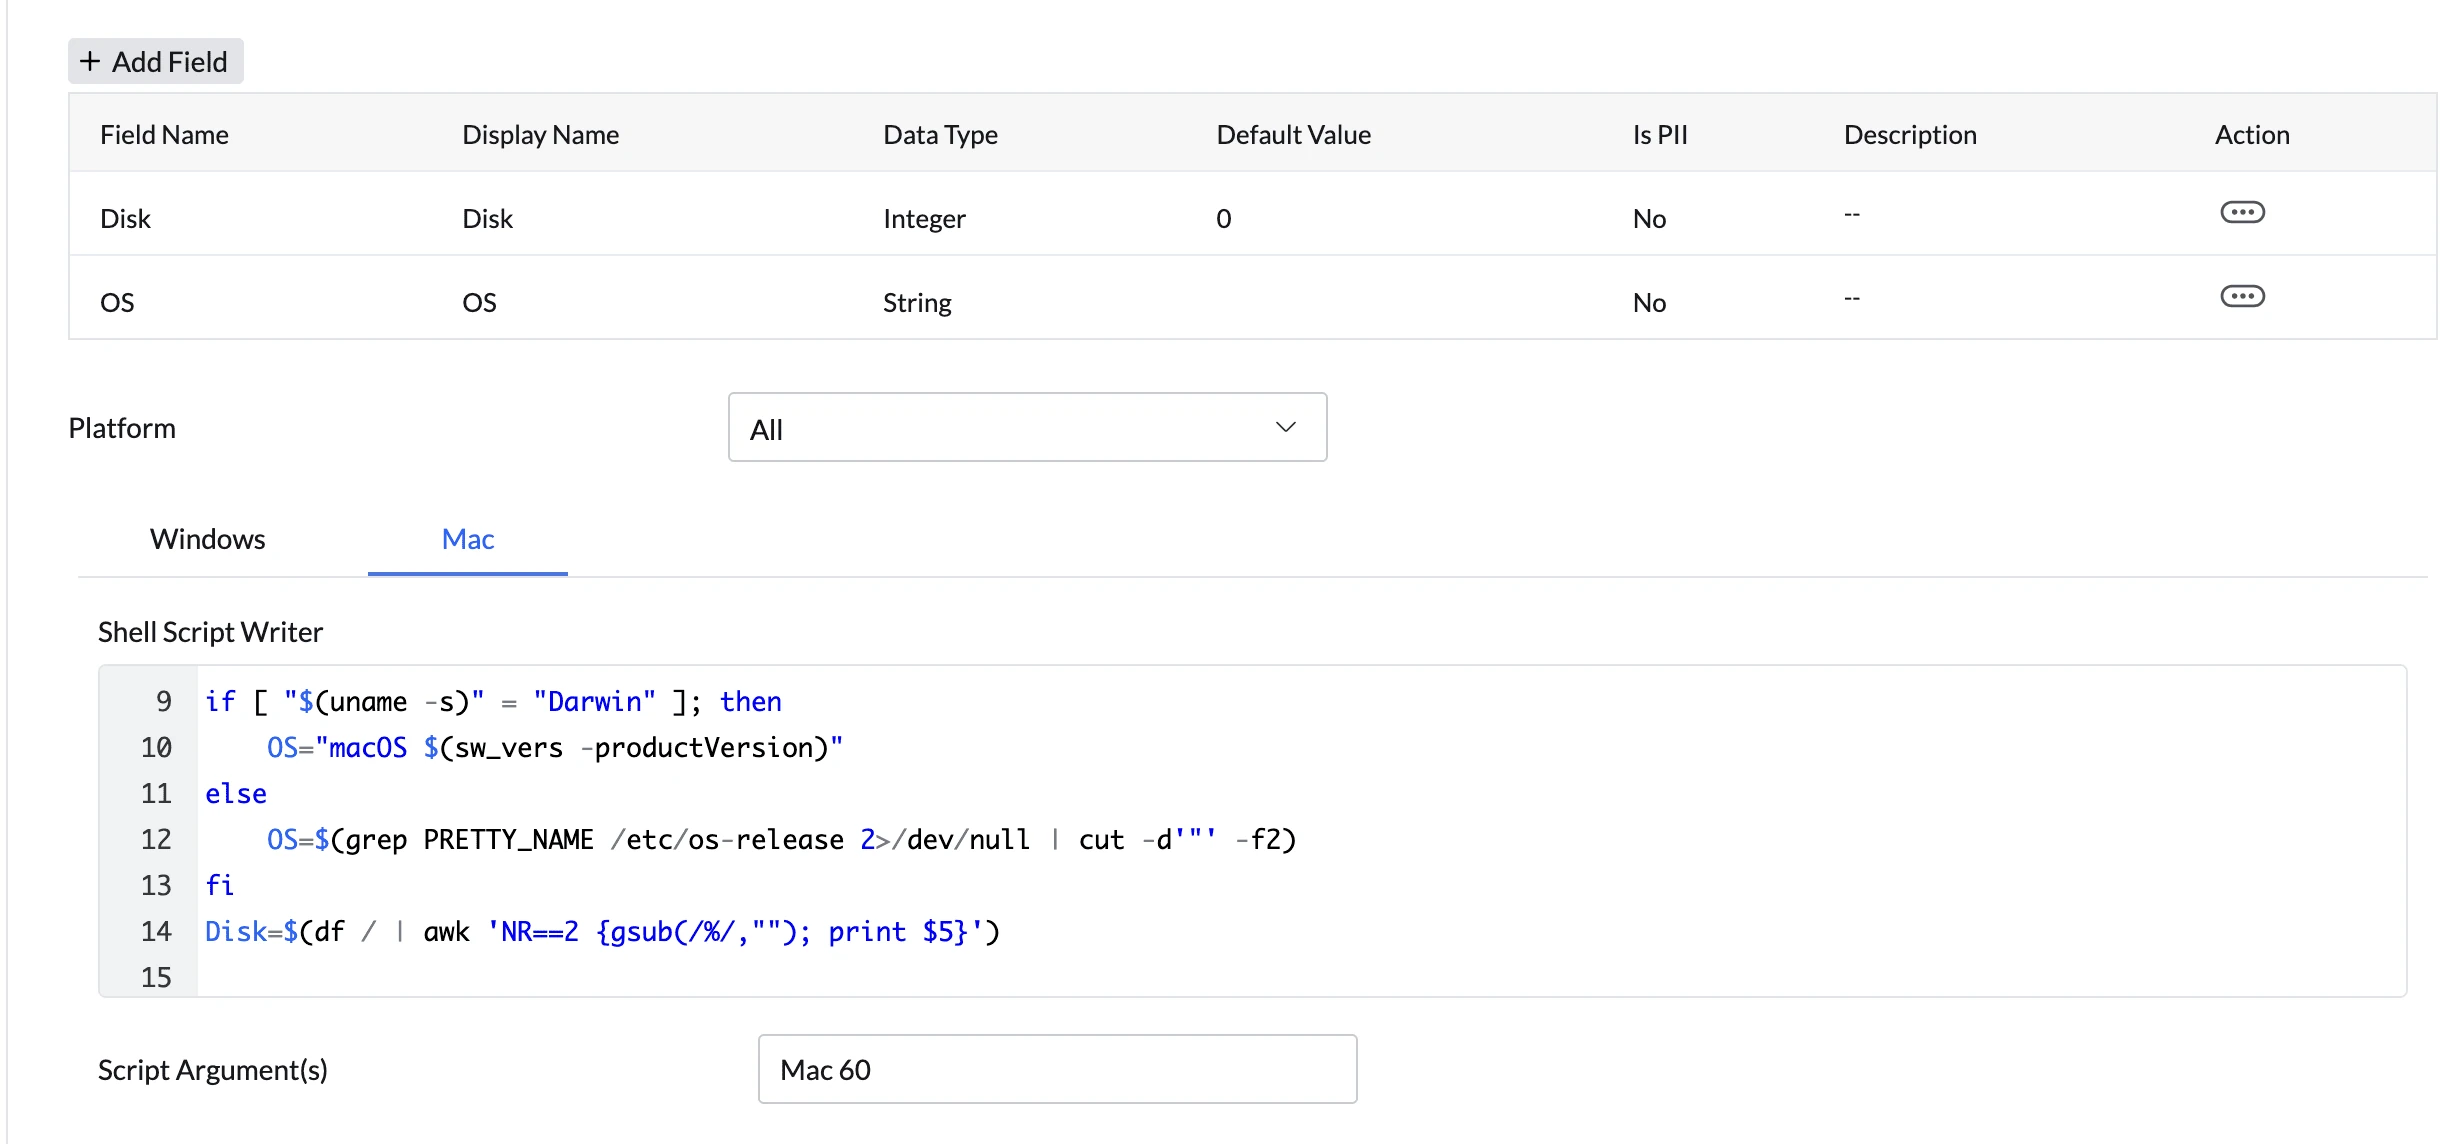
- Use the built-in Script Writer to compose your PowerShell or Shell script. When a sensor targets both Windows and Mac devices, the Script Writer lets you configure each platform separately. Fields defined above are available as variables. The script must output structured values that match the declared fields.
Windows
Mac
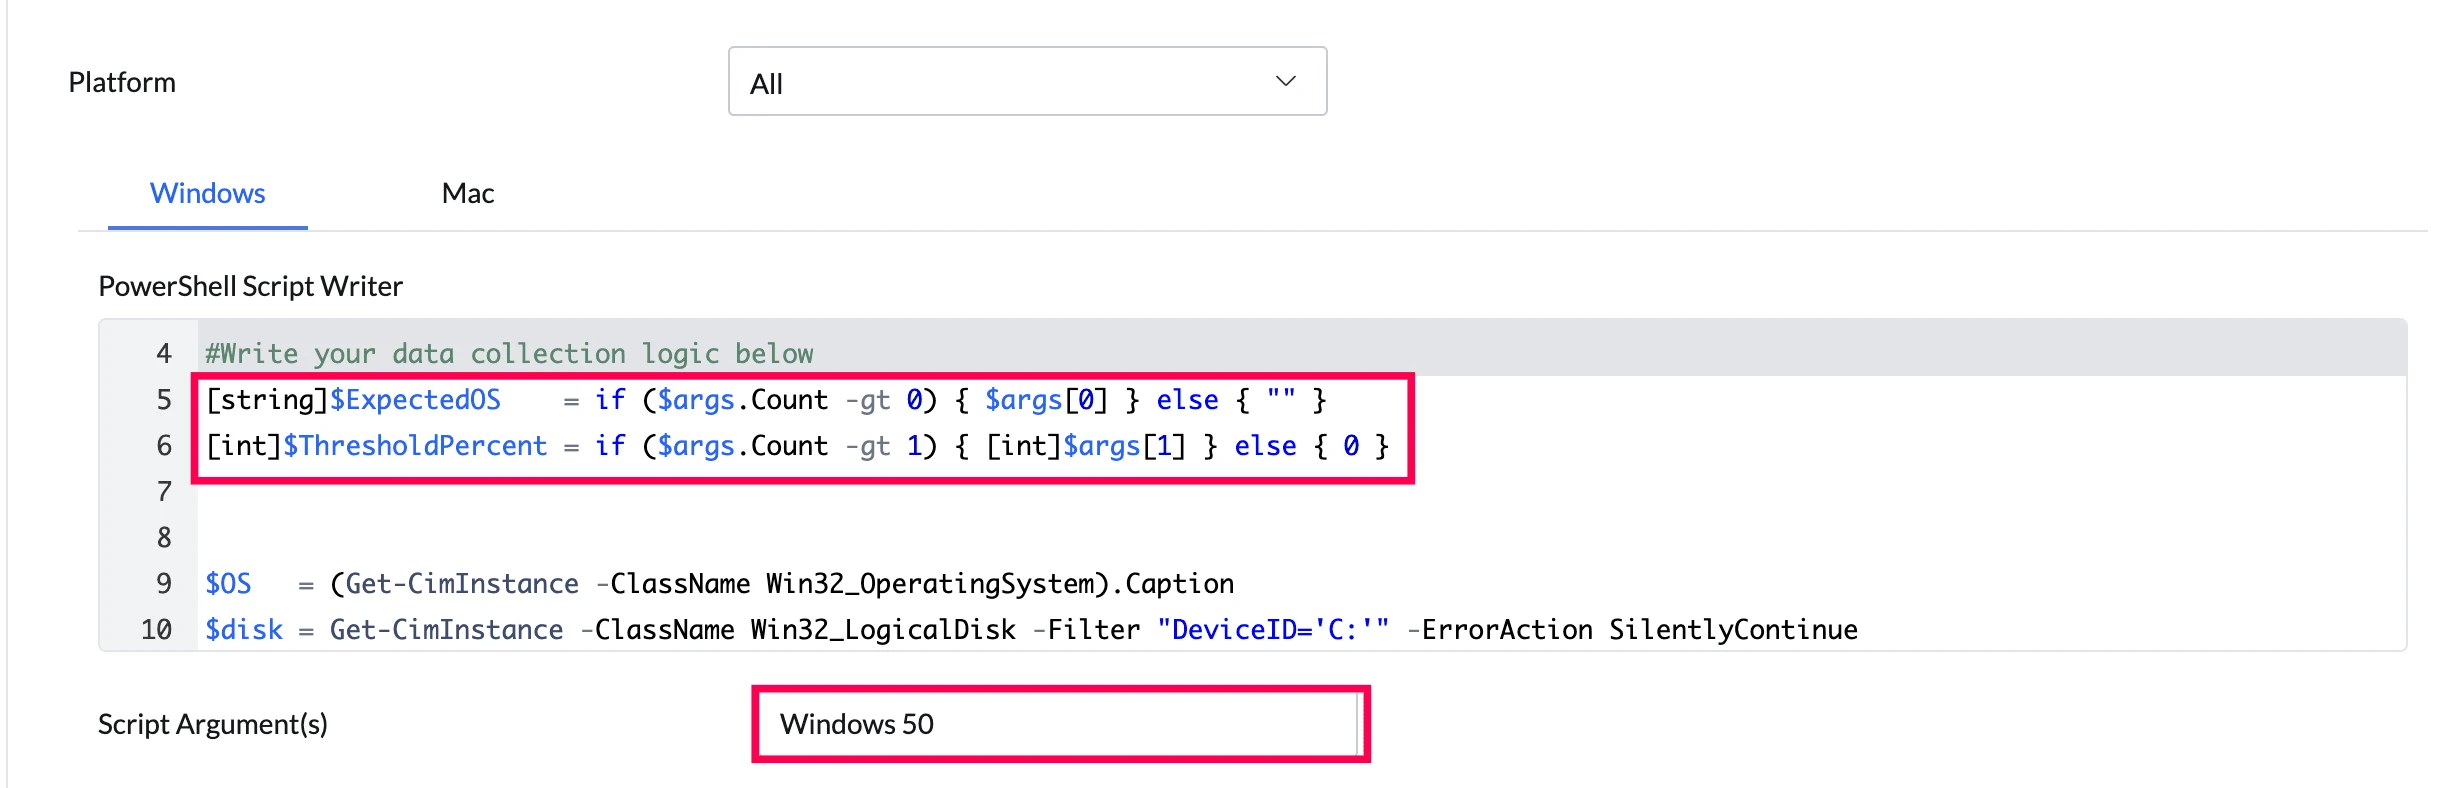
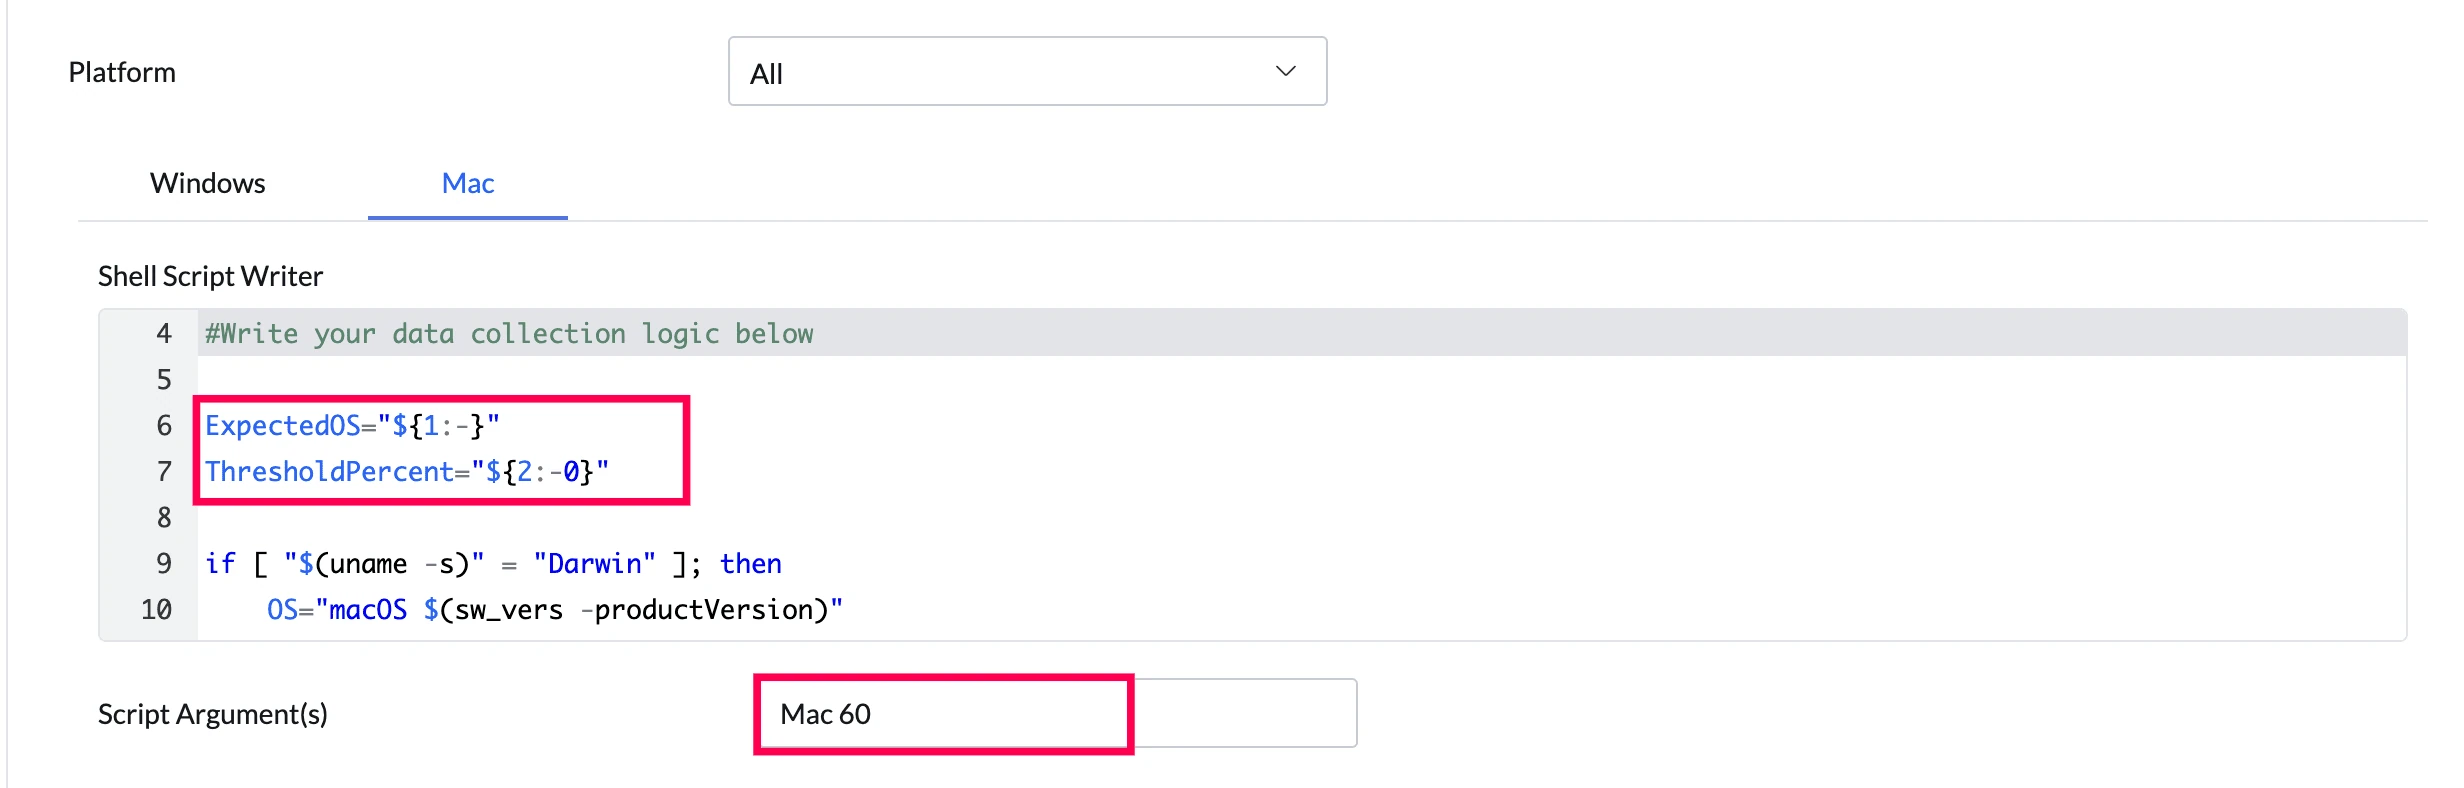
- Custom sensors support an optional Script Argument field that lets you pass runtime values to your script without modifying it. Arguments are provided as a space-separated string (for example: Wednesday 06:00 Custom true), and can be accessed within the script by position or by name, depending on how the script is written. When a sensor targets both Windows and Mac, each platform can have its own Script Argument value to accommodate platform-specific argument handling.
Windows
Mac
- Specify the number of sensor runs to retain. This ensures that only the configured number of runs are stored, helping to optimize performance and manage storage efficiently.
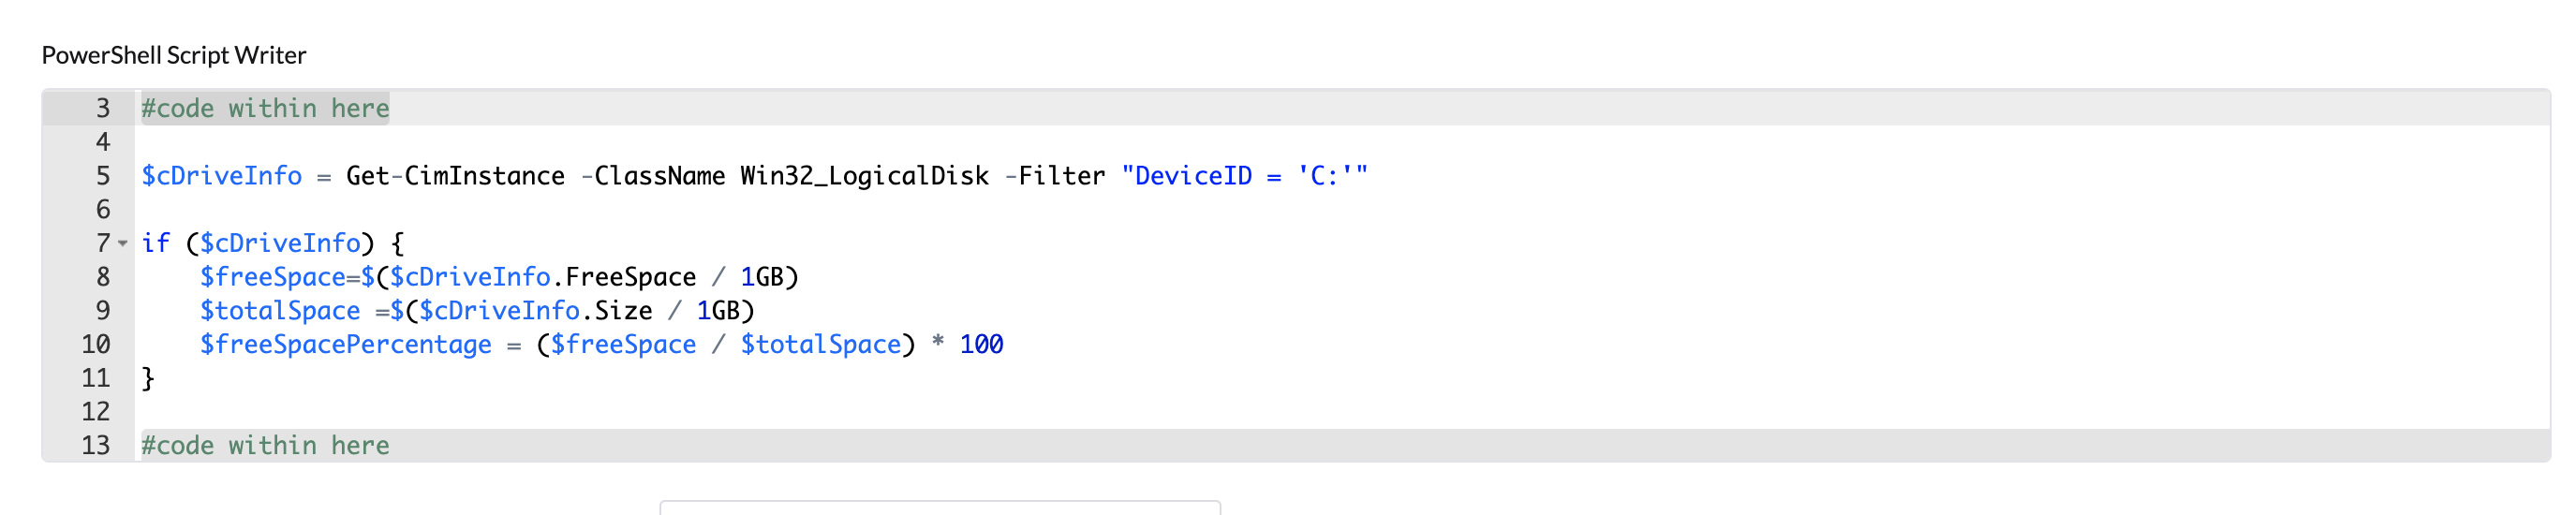
For example, to retrieve the percentage of free disk space on a drive, you can use the following PowerShell command:
Adding Sensor from Extensions
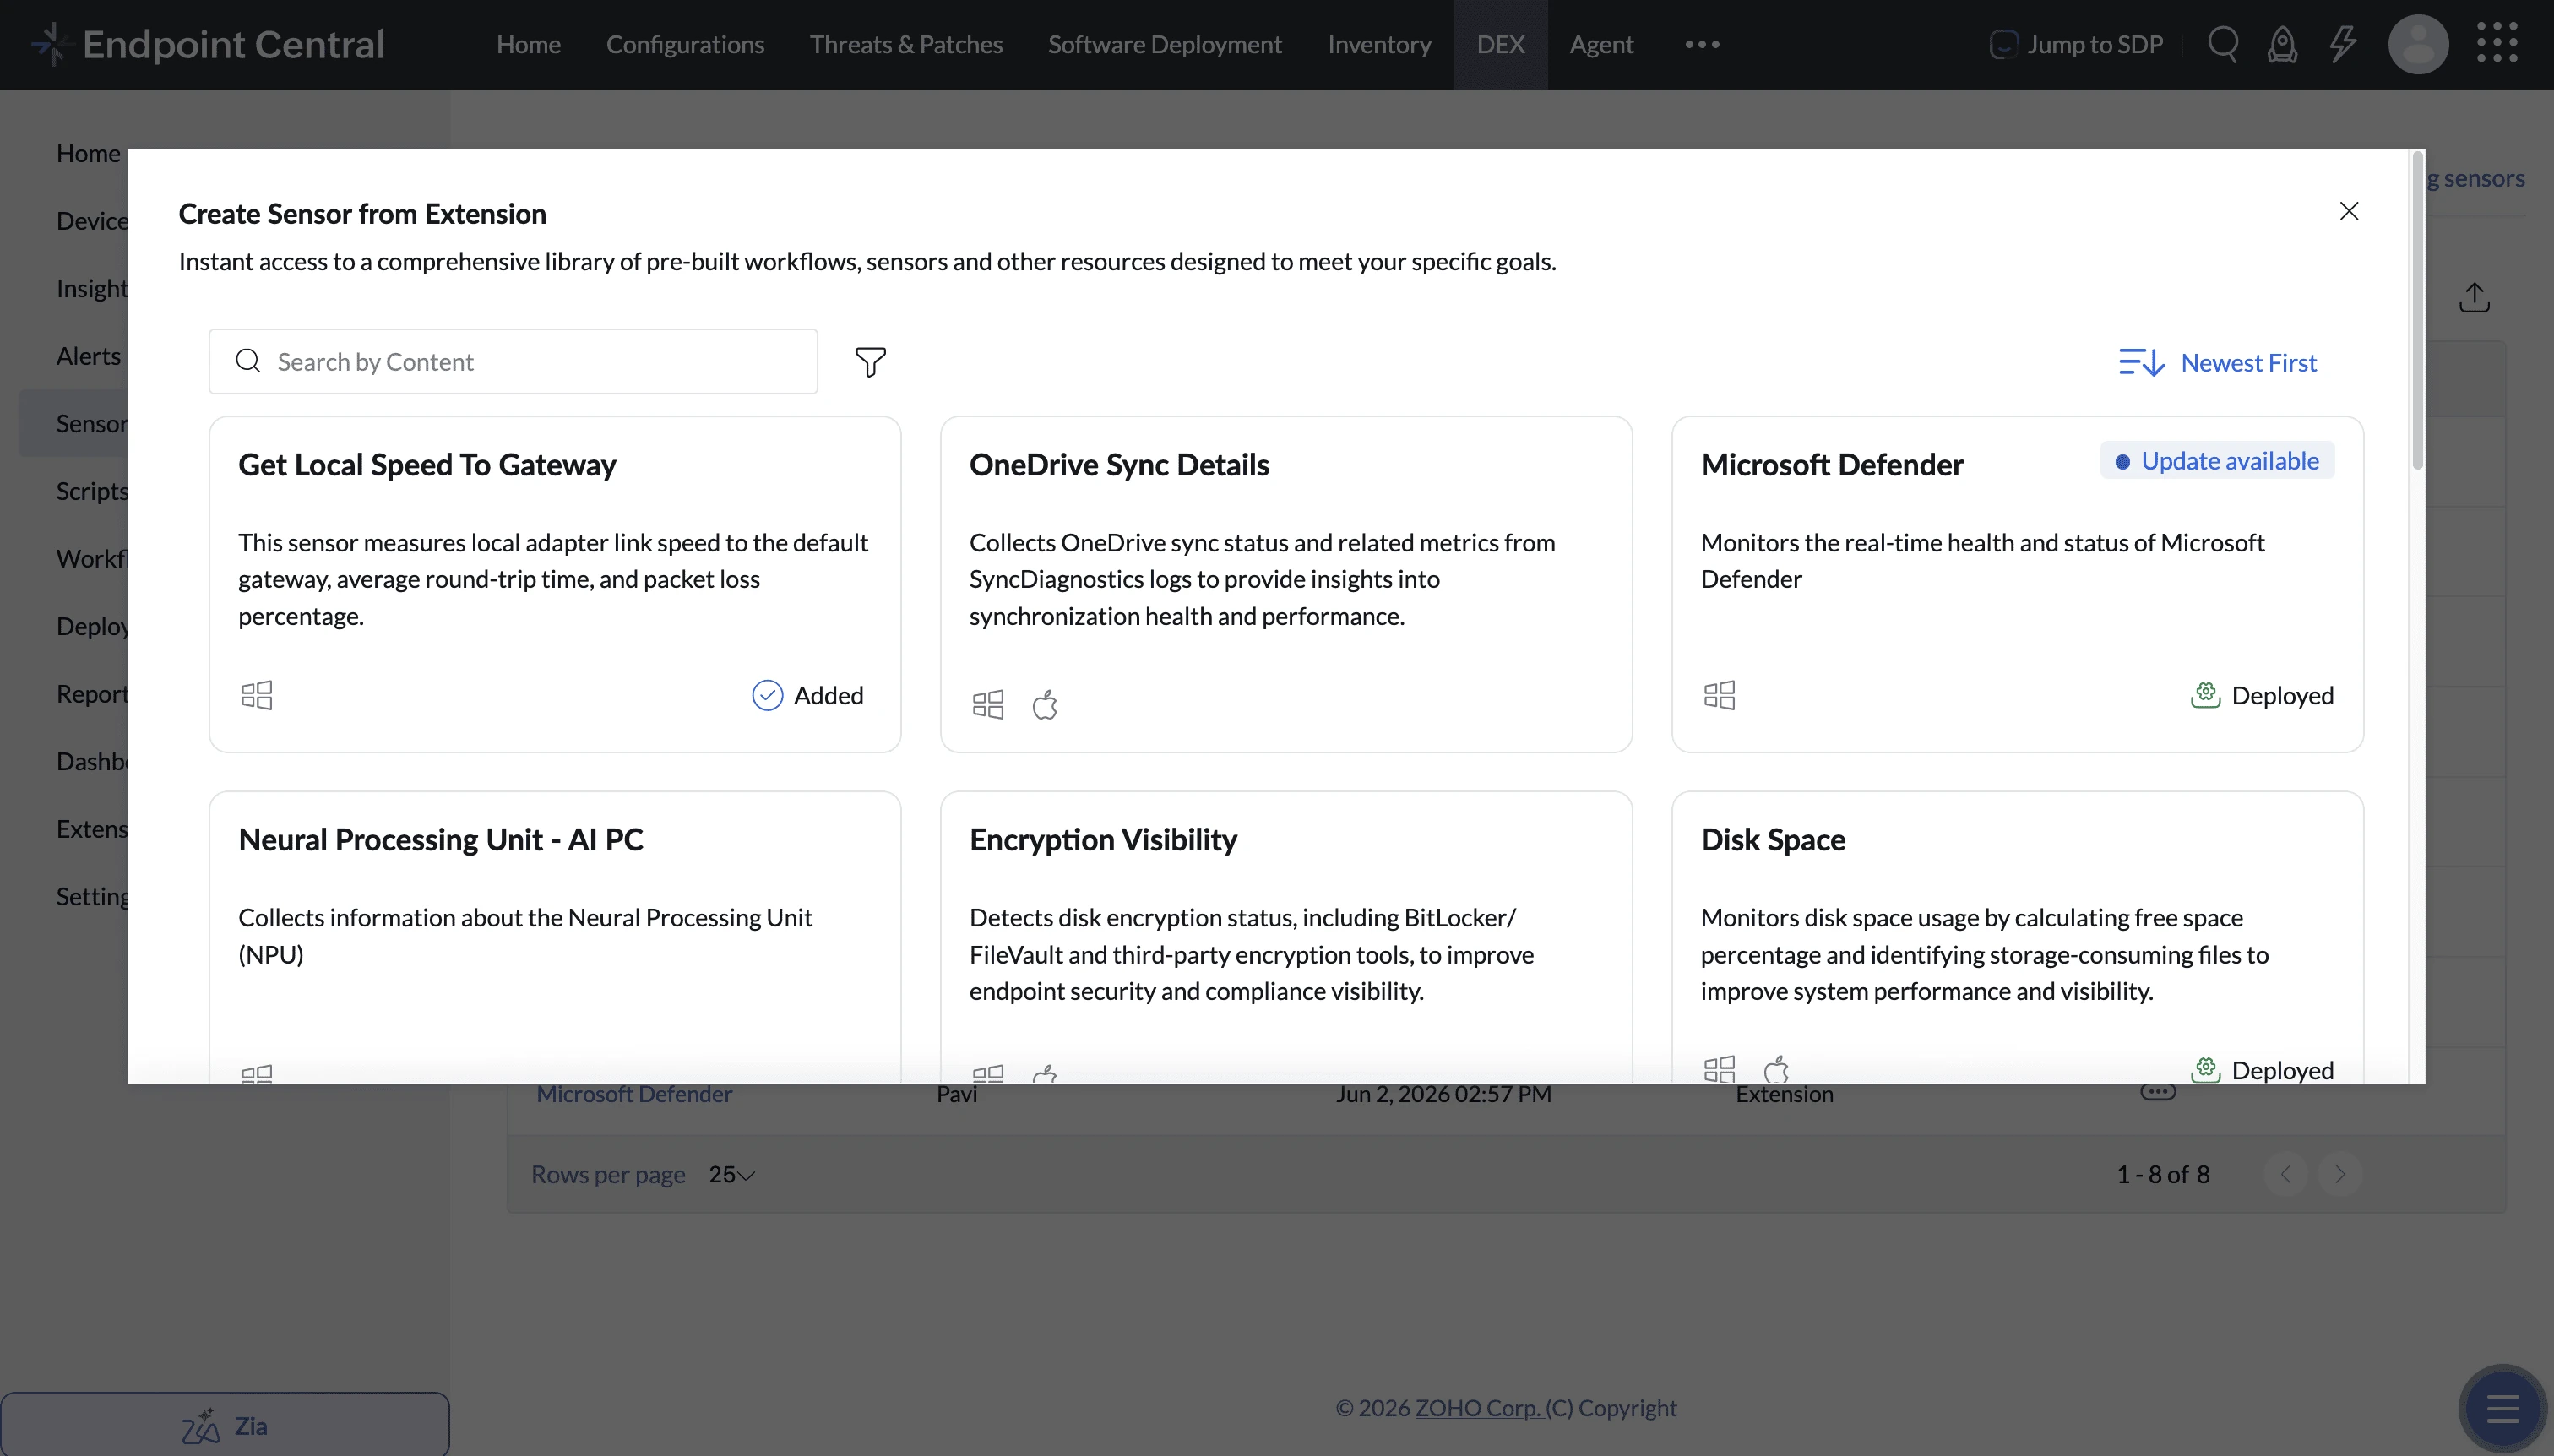
Sensors can be added from Extensions, which provide ready-made sensors designed to address common IT and endpoint management use cases. These pre-built solutions help you quickly monitor and manage specific use cases without having to create sensors from scratch.
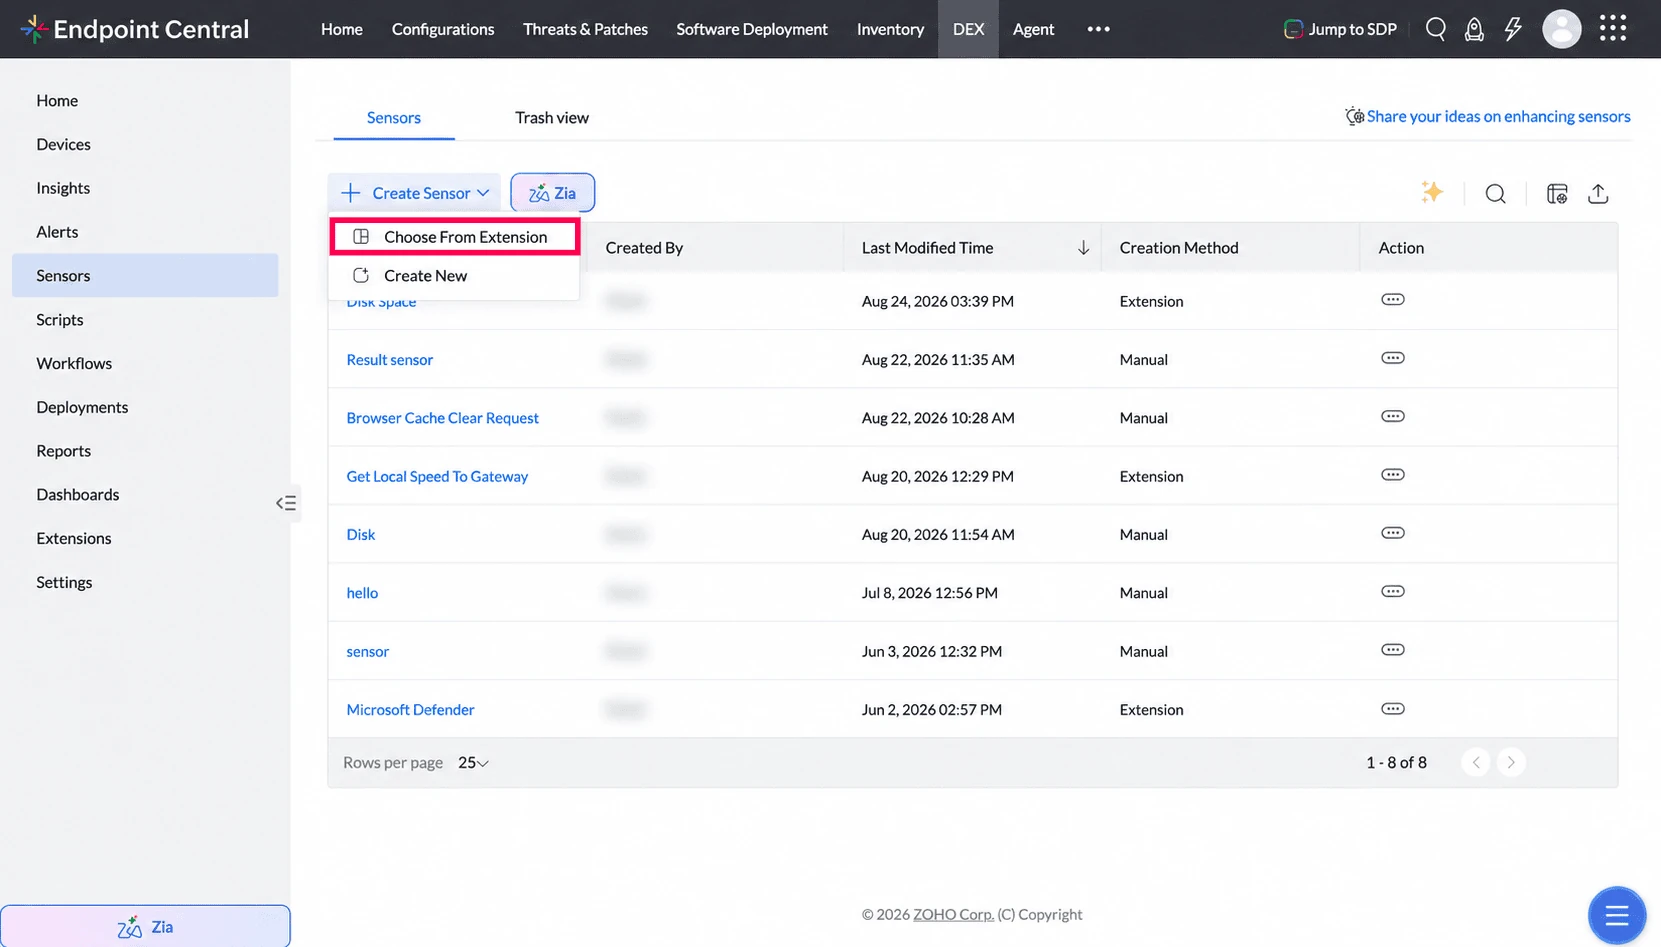
Click on the Create Sensor button and select Choose from Extension from the dropdown.
Available sensors will be listed. Select the sensor that matches your use case and add it to your environment.
Create Sensor by Zia
Endpoint Central lets administrators use Ask Zia to create sensors by describing the required monitoring logic in natural language.
This helps accelerate sensor creation and reduces the time spent preparing the initial script and field definitions manually.
Steps to Create a Sensor by Zia
Navigate to DEX > Sensors.
Click the Ask Zia button from the Sensors page or from the Create Sensor flow.
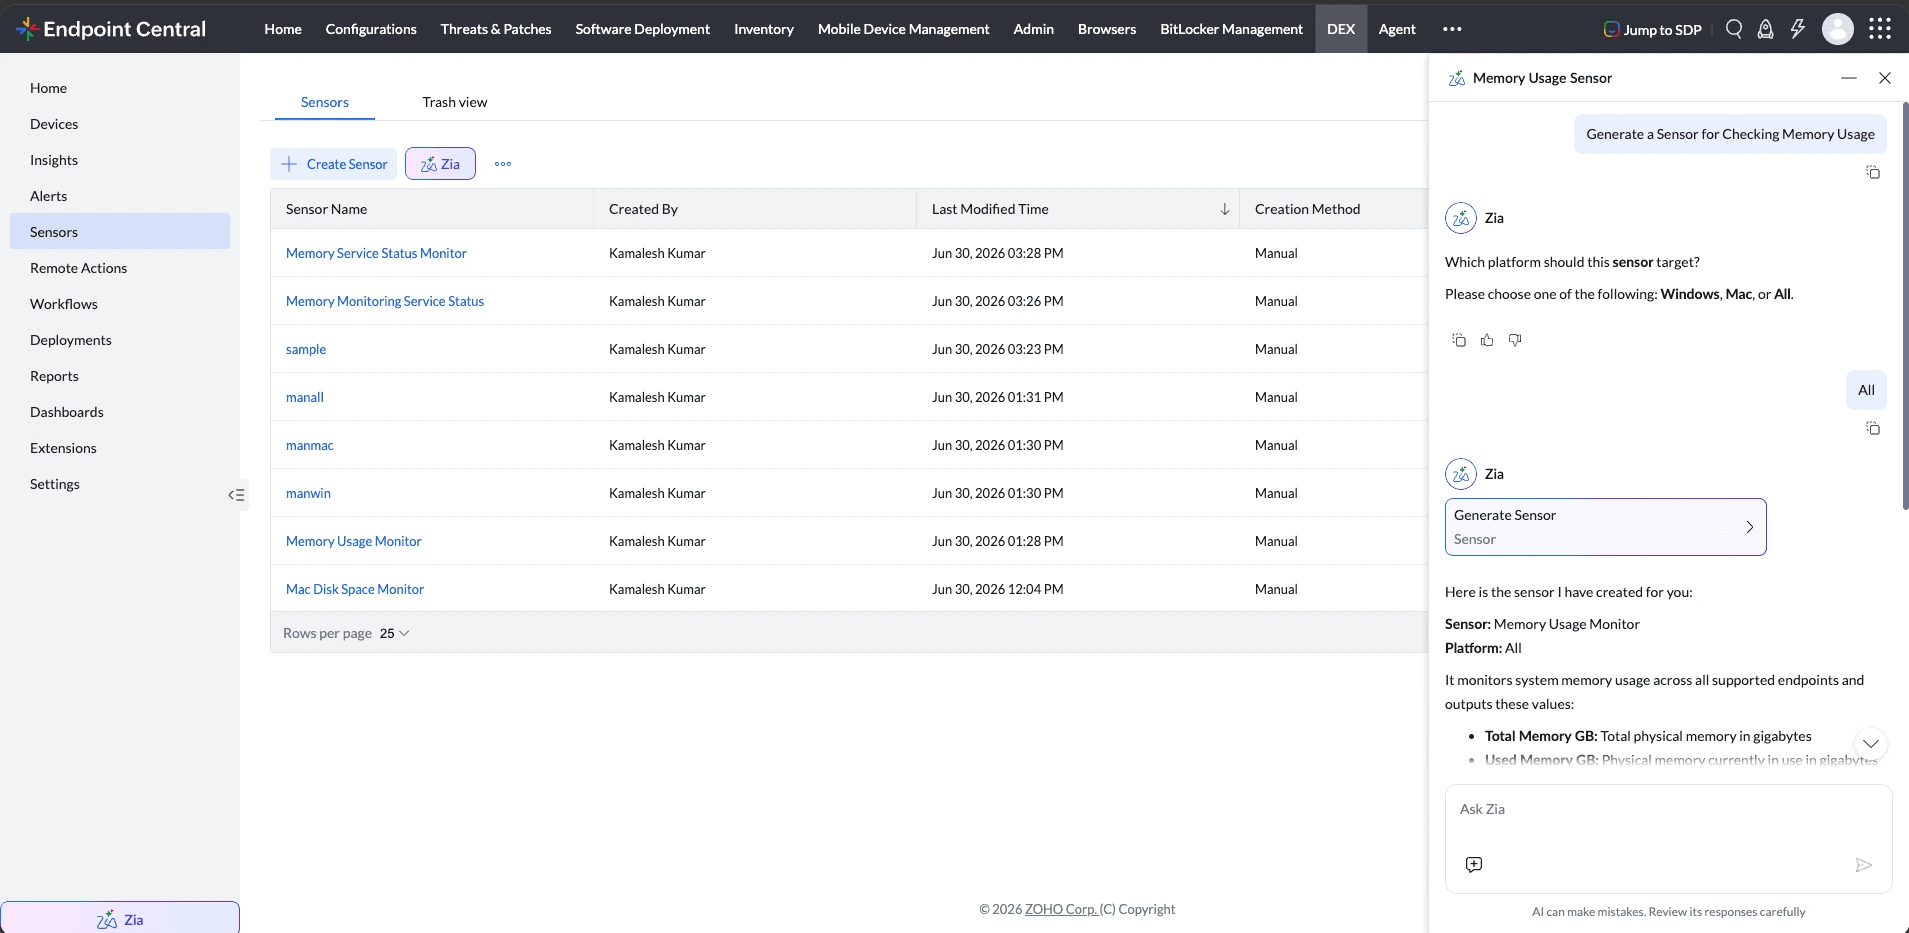
Enter the sensor requirement in natural language.
Ask Zia generates the sensor content directly in the Create Sensor flow.
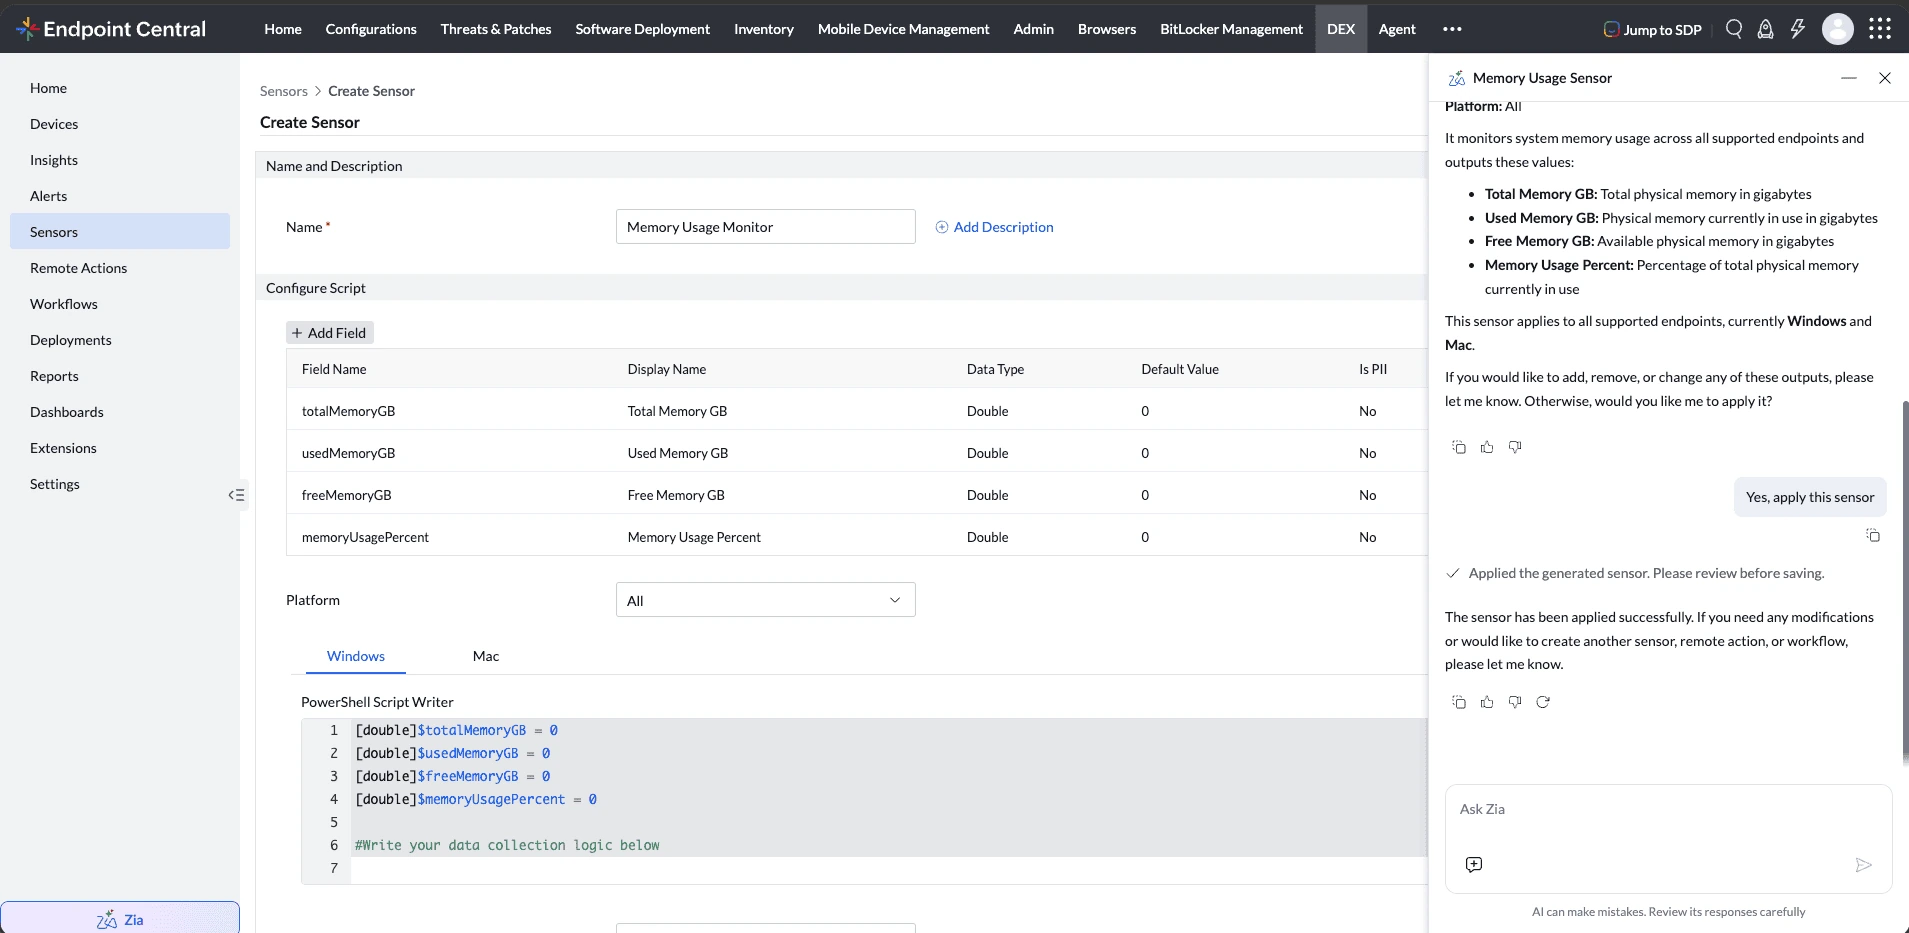
Review the generated content, make any required edits, and save the sensor.
Sample Prompts
Generate a sensor for monitoring disk space.Generate a sensor to verify whether Google Chrome is installed.Generate a sensor for monitoring memory usage.Generate a sensor to read a registry value.Generate a sensor to check if a service is running.Ask Zia must be enabled before use. Refer to the Ask Zia guide for the enablement flow.
Use of Sensors
- Custom Intelligence: Monitor any system state that matters to your organisation and gain better visibility.
- Data-Driven Automation: Deploy and retrieve custom data and use sensor outputs as dynamic triggers within workflows.
- Flexible Reporting: Track and export custom data through dashboards and reports.
- Scalable Management: Deploy and manage sensors across device groups with centralised control.
- Custom Report Filtering: Use sensor data as report fields or filters to create more targeted and actionable custom reports.
Deploying Sensors for Data Collection
After creating the sensors, they must be deployed to retrieve custom data from the computers. Follow the steps below:
- Navigate to DEX > Deployments from the left-hand pane. The Deployments tab displays a list of all active, scheduled, and completed deployments.
- Click Create Deployment to create new sensor deployment
- Enter Deployment Details - Deployment Name and Description (if Applicable)
- Select Sensor as Resource Type and choose required sensors for deployment
- Choose one or more Custom Groups to define the scope.
- Choose Deployment Type (Immediate or Schedule) based on need . Fill schedule frequency, trigger time,etc if schedule is chosen.
- Click Deploy to trigger deployment.
Using Sensors in Workflows
Sensors can be integrated as stages in Workflows to retrieve specific device properties. The sensor's output can then be used in the Switch stage to make data-driven decisions within workflow automation.For detailed steps on configuring sensors in workflows, refer to this document.
Permissions Required for Using Sensors
To grant user permissions for managing Sensors, follow these steps:
- Select Admin from the top menu bar.
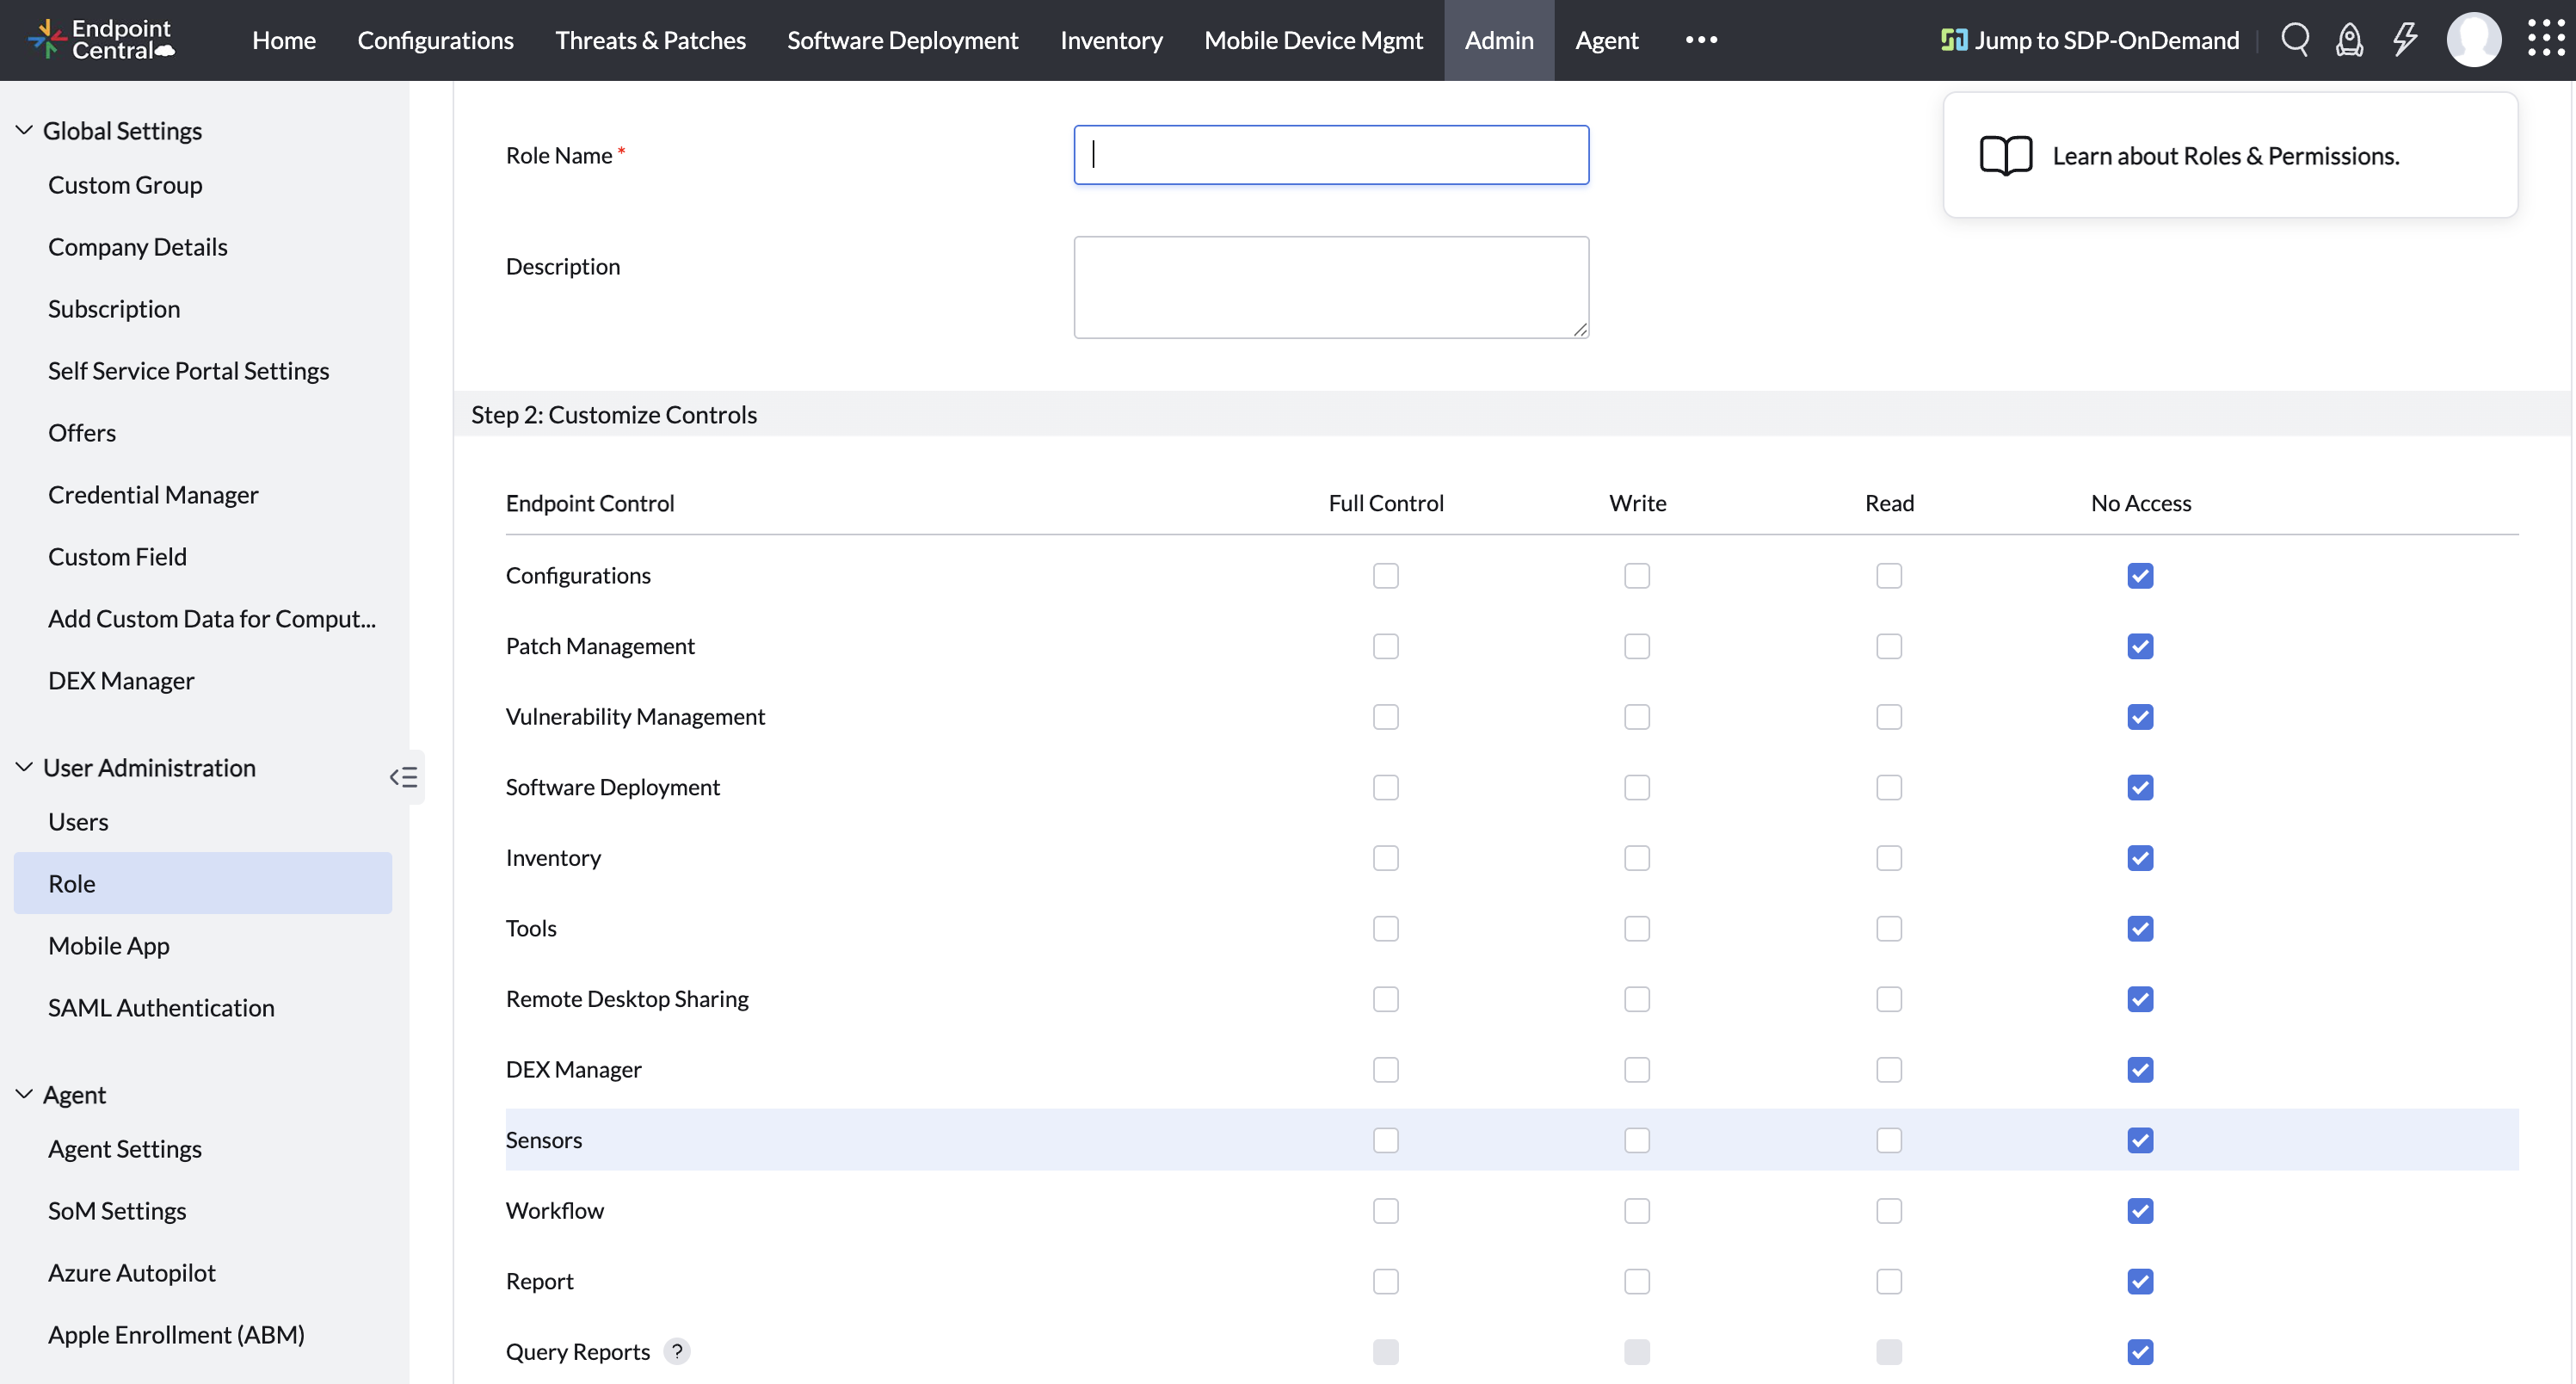
- Under User Administration, click Role
- Click on Add Role to create a new role or Modify existing role by clicking Modify from the action menu
- In the Endpoint Central section, scroll down to the Sensors section and enable the appropriate permissions for the role.
- Read: Allows view-only access.
- Write or Full Control: Allows add,modify and delete Sensors.
If you have any requirement for sensor's scripts, you can submit a request to our support team via this URL