Updating Windows cached credentials
When users in an AD environment log in to their Windows machines from within the organizational network, their credentials are saved in the local cache. This allows them to log in using their Windows password even when away from the corporate network, with authentication happening against the local cache rather than AD. However, if a user forgets their password or their cached password expires while off the network, they are locked out — they cannot log in, and even a remote admin-initiated password reset will not sync to the local cache until the machine reconnects to the network.
ADSelfService Plus solves this with cached credentials reset. When enabled, a Reset Password/Unlock Account link is added directly to the Windows login screen. Users click the link, verify their identity through an enforced MFA method — such as hardware or software tokens, biometric authentication, or push authentication — and then reset their AD domain password. The local cache is updated automatically as part of the process.
Cached credentials can be updated in two ways:
- Through a VPN client — recommended when VPN infrastructure is available.
- Without a VPN client — for organizations without a supported VPN provider.
| Note: The ADSelfService Plus Windows Login Agent must be installed on users' machines for this feature to work. See the installation guide for steps. Cached credentials update is supported on Windows only. Users must be enrolled in ADSelfService Plus to use self-service password reset and account unlock. |
|---|
Updating cached credentials through a VPN client
How it works
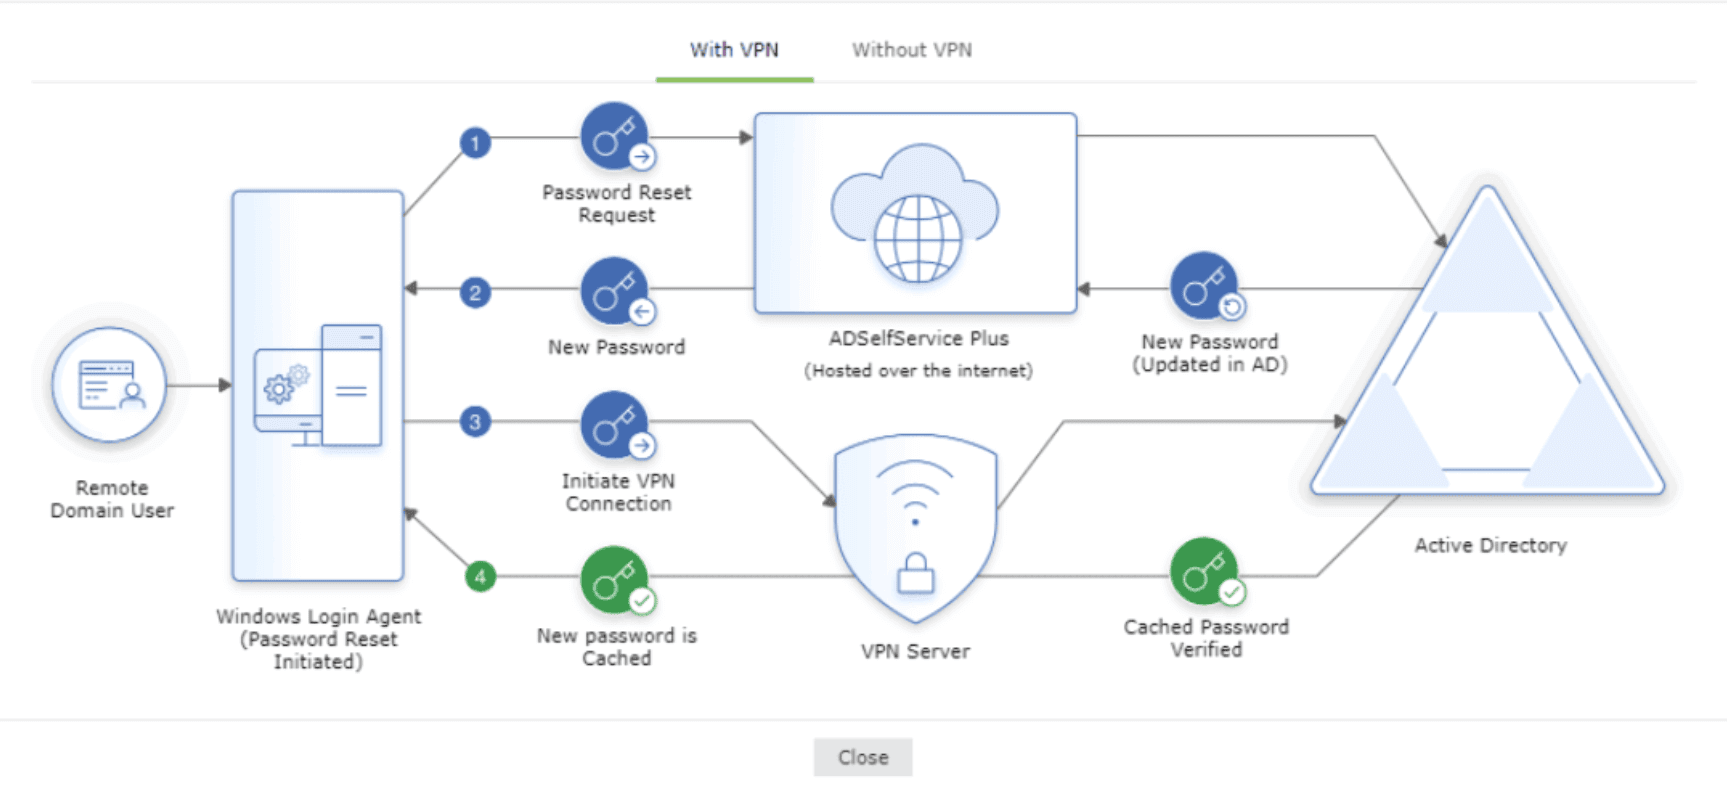
When Update cached credentials through a VPN client is enabled:
- The user's identity is verified through MFA and the password reset request is sent to ADSelfService Plus, which updates the new password in AD.
- The new password is sent to the Windows Login Agent on the user's machine.
- The login agent automatically establishes a secure connection with AD through the configured VPN CLI commands and initiates a request to update the local cached credentials.
- The request is approved by AD and the local cache is updated automatically.
The login agent uses a command-line interface (CLI) to initiate the VPN connection. Any VPN provider that supports a CLI with LocalSystem account privileges can be used.
Supported VPN clients
- Fortinet
- Cisco IPSec
- Cisco AnyConnect
- Windows Native VPN
- SonicWall NetExtender
- Check Point EndPoint Connect
- SonicWall Global VPN
- OpenVPN
- Custom VPN
Prerequisites
- A VPN client that supports a CLI with LocalSystem account privileges must be installed on every user's machine.
- A service account may be required if:
- Your organization has mandated MFA for end-user VPN connections, or
- A shared account is used for all VPN connections initiated by your organization's users.
| Note: By default, VPN connections for cache updates are initiated using the credentials of the end user who initiated the password reset. |
|---|
Configuring cached credential update through a VPN

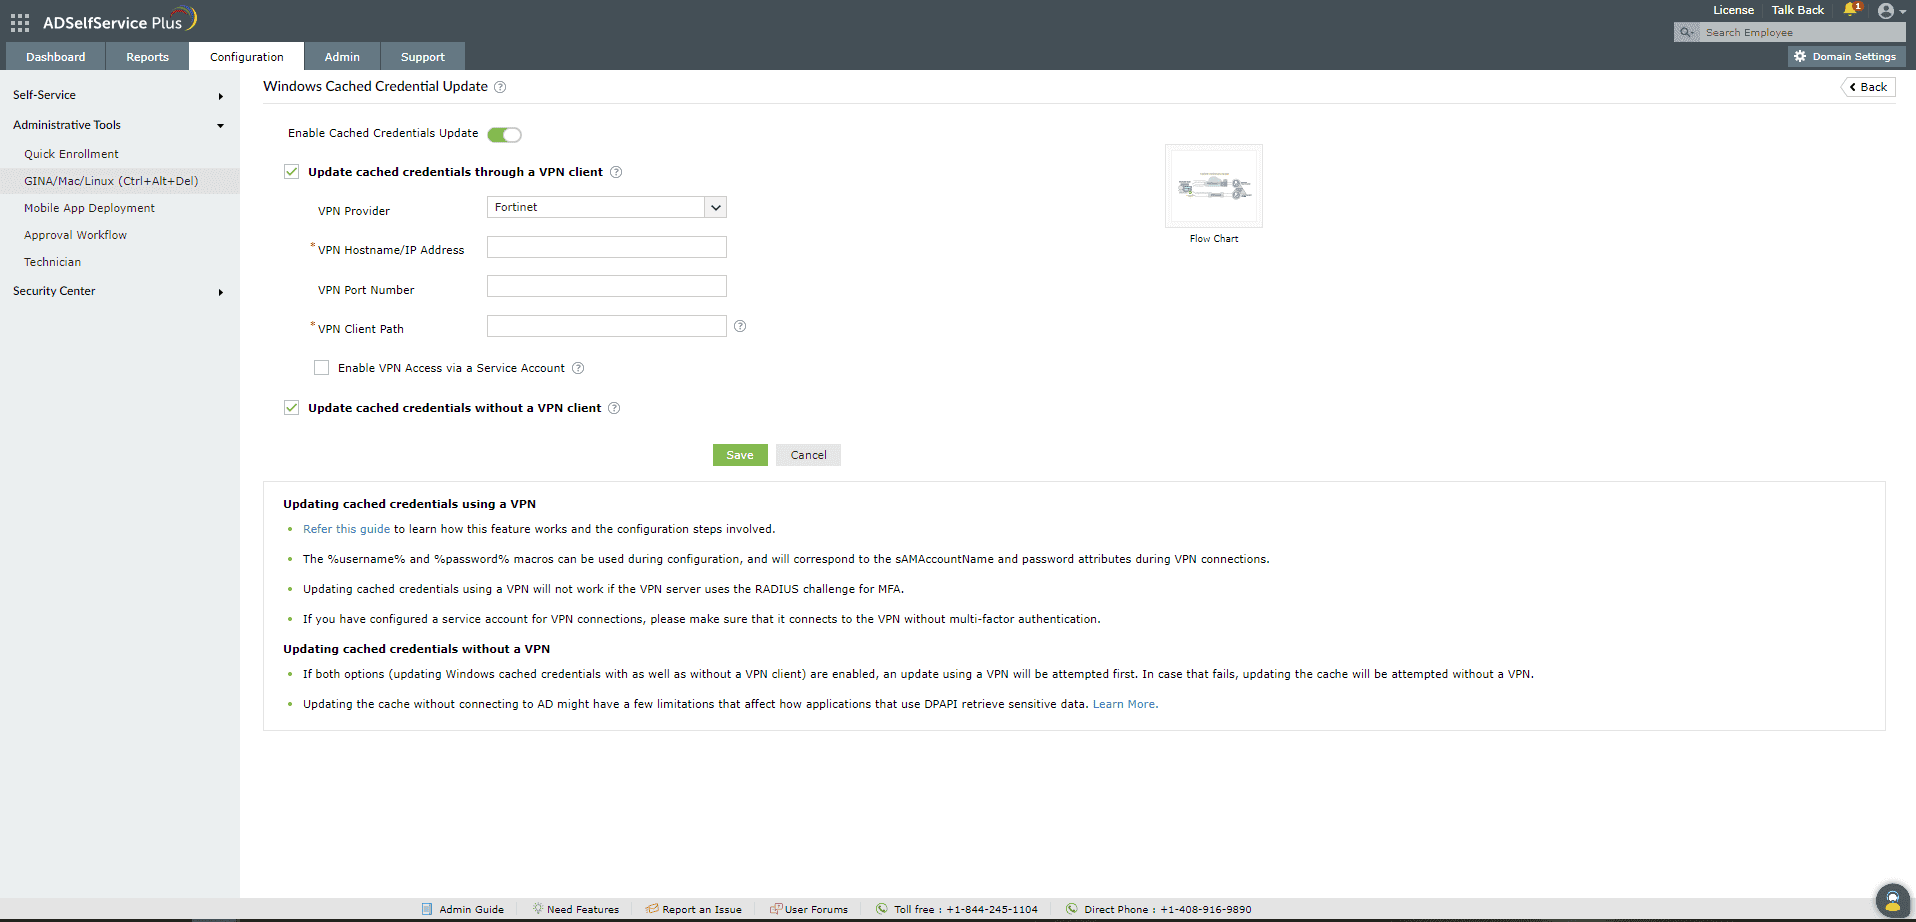
- Log in to the ADSelfService Plus admin portal and navigate to Active Directory > Configuration > Administrative Tools > GINA/Mac/Linux (Ctrl+Alt+Del).
- Click Windows Cached Credential Update.
- Set the toggle to Enable Cached Credential Update.
- Select Update cached credentials through a VPN client.
- From the VPN Provider drop-down, select your VPN provider.
- Enter the VPN Hostname/IP Address and VPN Port Number.
- In the VPN Client Path field, enter the full path to the VPN client executable on users' machines.
- The default client paths for supported VPN providers are:
- Cisco AnyConnect: C:\Program Files (x86)\Cisco\Cisco AnyConnect\vpncli.exe
- SonicWall Global VPN: C:\Program Files (x86)\SonicWall\SonicWall Global VPN\swgvc.exe
- Fortinet: The FortiSSLVPNClient.exe file must be downloaded from the Fortinet support portal and installed on users' machines. Log in to the portal and navigate to Firmware Downloads > FortiClient > select_your_VPN_version > FortinetClientTools.zip, then download and extract FortiSSLVPNClient.exe from the SSLVPNcmdline folder. Example path: C:\FortiClient\FortiSSLVPN\x86\FortiSSLVPNClient.exe
- Check Point VPN: C:\Program Files (x86)\CheckPoint\Endpoint Connect\trac.exe
- SonicWall NetExtender: C:\Program Files (x86)\Sonicwall\SSL-VPN\NetExtender\necli.exe
- OpenVPN: C:\Program Files (x86)\Sophos\Sophos ssl client\bin\openvpn.exe
- Cisco IPSec: C:\Program Files (x86)\Cisco\Cisco IPSec\vpnclient.exe
- The VPN client path must be consistent across all user machines. For custom VPN providers, contact your VPN provider's support team to identify the CLI client name and its location.
- If using a service account for VPN connections, select Enable VPN Access via a Service Account and enter the service account credentials.
- Click Save.
| Note: All sensitive information — including service account credentials and pre-shared keys — is stored in the ADSelfService Plus database as an encrypted string. It is sent to the Windows Login Agent dynamically when requested and can only be decrypted by a valid login agent. The VPN connection is automatically disconnected after the cache is updated. |
|---|
VPN provider-specific settings
Fortinet
- Protocol: L2TP (Layer 2 Tunneling Protocol). Other protocols are not currently supported.
- Supported macros: %user_name%, %password%, %servername%, %portno%
Cisco AnyConnect
- Unsupported features: The Accept Disclaimer banner is not supported.
- VPN Group Name: If the CLI prompts for a VPN Group Name as a number from a list (for example, 1 - VPN admins, 2 - VPN users), enter the corresponding number in the VPN Group Name field in ADSelfService Plus.
Windows Native VPN
- Supported protocol: L2TP (Layer 2 Tunneling Protocol). Other protocols are not currently supported.
- Pre-shared key: Enter the pre-shared key used for the L2TP connection.
OpenVPN
- Sample connect command:--config "<Full_path_to_the_.ovpn_file>" --auth-user-pass %tempFile%
- Replace <Full_path_to_the_.ovpn_file> with the full path to the .ovpn file on the machine. The user or service account credentials are written to a temporary file during the login process. The %tempFile% macro is replaced with this filename during the VPN connection. After the cache is updated, the VPN is disconnected and the temporary file is deleted automatically. See the OpenVPN reference manual for more details.
Custom VPN
- Sample connect command:-t vpn.selfservice.com -u john -i allow -U -P autologin -m other connect
- Supported macros: %user_name%, %password%, %servername%, %portno%
Available macros
| Macro | Replaced with |
|---|---|
| %user_name% | The user's sAMAccountName or the service account username |
| %password% | The user's password or the service account password |
| %servername% | The value entered in the VPN Hostname/IP field |
| %portno% | The value entered in the VPN Port Number field |
Updating cached credentials without a VPN client
Use this option if your organization does not have VPN infrastructure or uses a VPN provider not supported by ADSelfService Plus.
How it works

When Update cached credentials without a VPN client is enabled:
- The user's identity is verified through MFA and the password reset request is sent to ADSelfService Plus, which updates the new password in AD.
- The local cache on the user's machine is automatically updated with the new password.
Limitations
Updating the cache without a VPN connection to AD may affect how applications retrieve sensitive data using DPAPI. This includes:
- Passwords and form auto-completion data in browsers such as Internet Explorer and Google Chrome.
- Network passwords stored in Credential Manager.
- Private keys for Encrypting File System (EFS).
- SSL/TLS certificates in Internet Information Services (IIS).
For example, passwords saved in Chrome are stored and retrieved using DPAPI, which requires the client to have been connected to AD during the cache update. If the cache is updated without a VPN, Chrome will not retrieve stored user information until the machine next connects to AD.
This option is supported on Windows Server 2008 R2 and later, and Windows 7 and later.
Configuration steps
- Log in to the ADSelfService Plus admin portal and navigate to Configuration > Administrative Tools > GINA/Mac/Linux (Ctrl+Alt+Del).
- Click Windows Cached Credential Update.
- Set the toggle to Enable Cached Credential Update.
- Select Update cached credentials without a VPN client.
- Click Save.
| Note: If both options are enabled, ADSelfService Plus will attempt to update the cache via VPN first. If that fails, it will fall back to updating without a VPN. |
|---|