Overview
As an administrator, many a time you would have felt mundane routines spill over crucial attention-seeking jobs of your network. Vulnerability Manager Plus answers this concern through its User & Role Management module; delegating routine activities to chosen users with well-defined permission levels. You can easily administer the users, and define their scope to manage a specific set of computers.
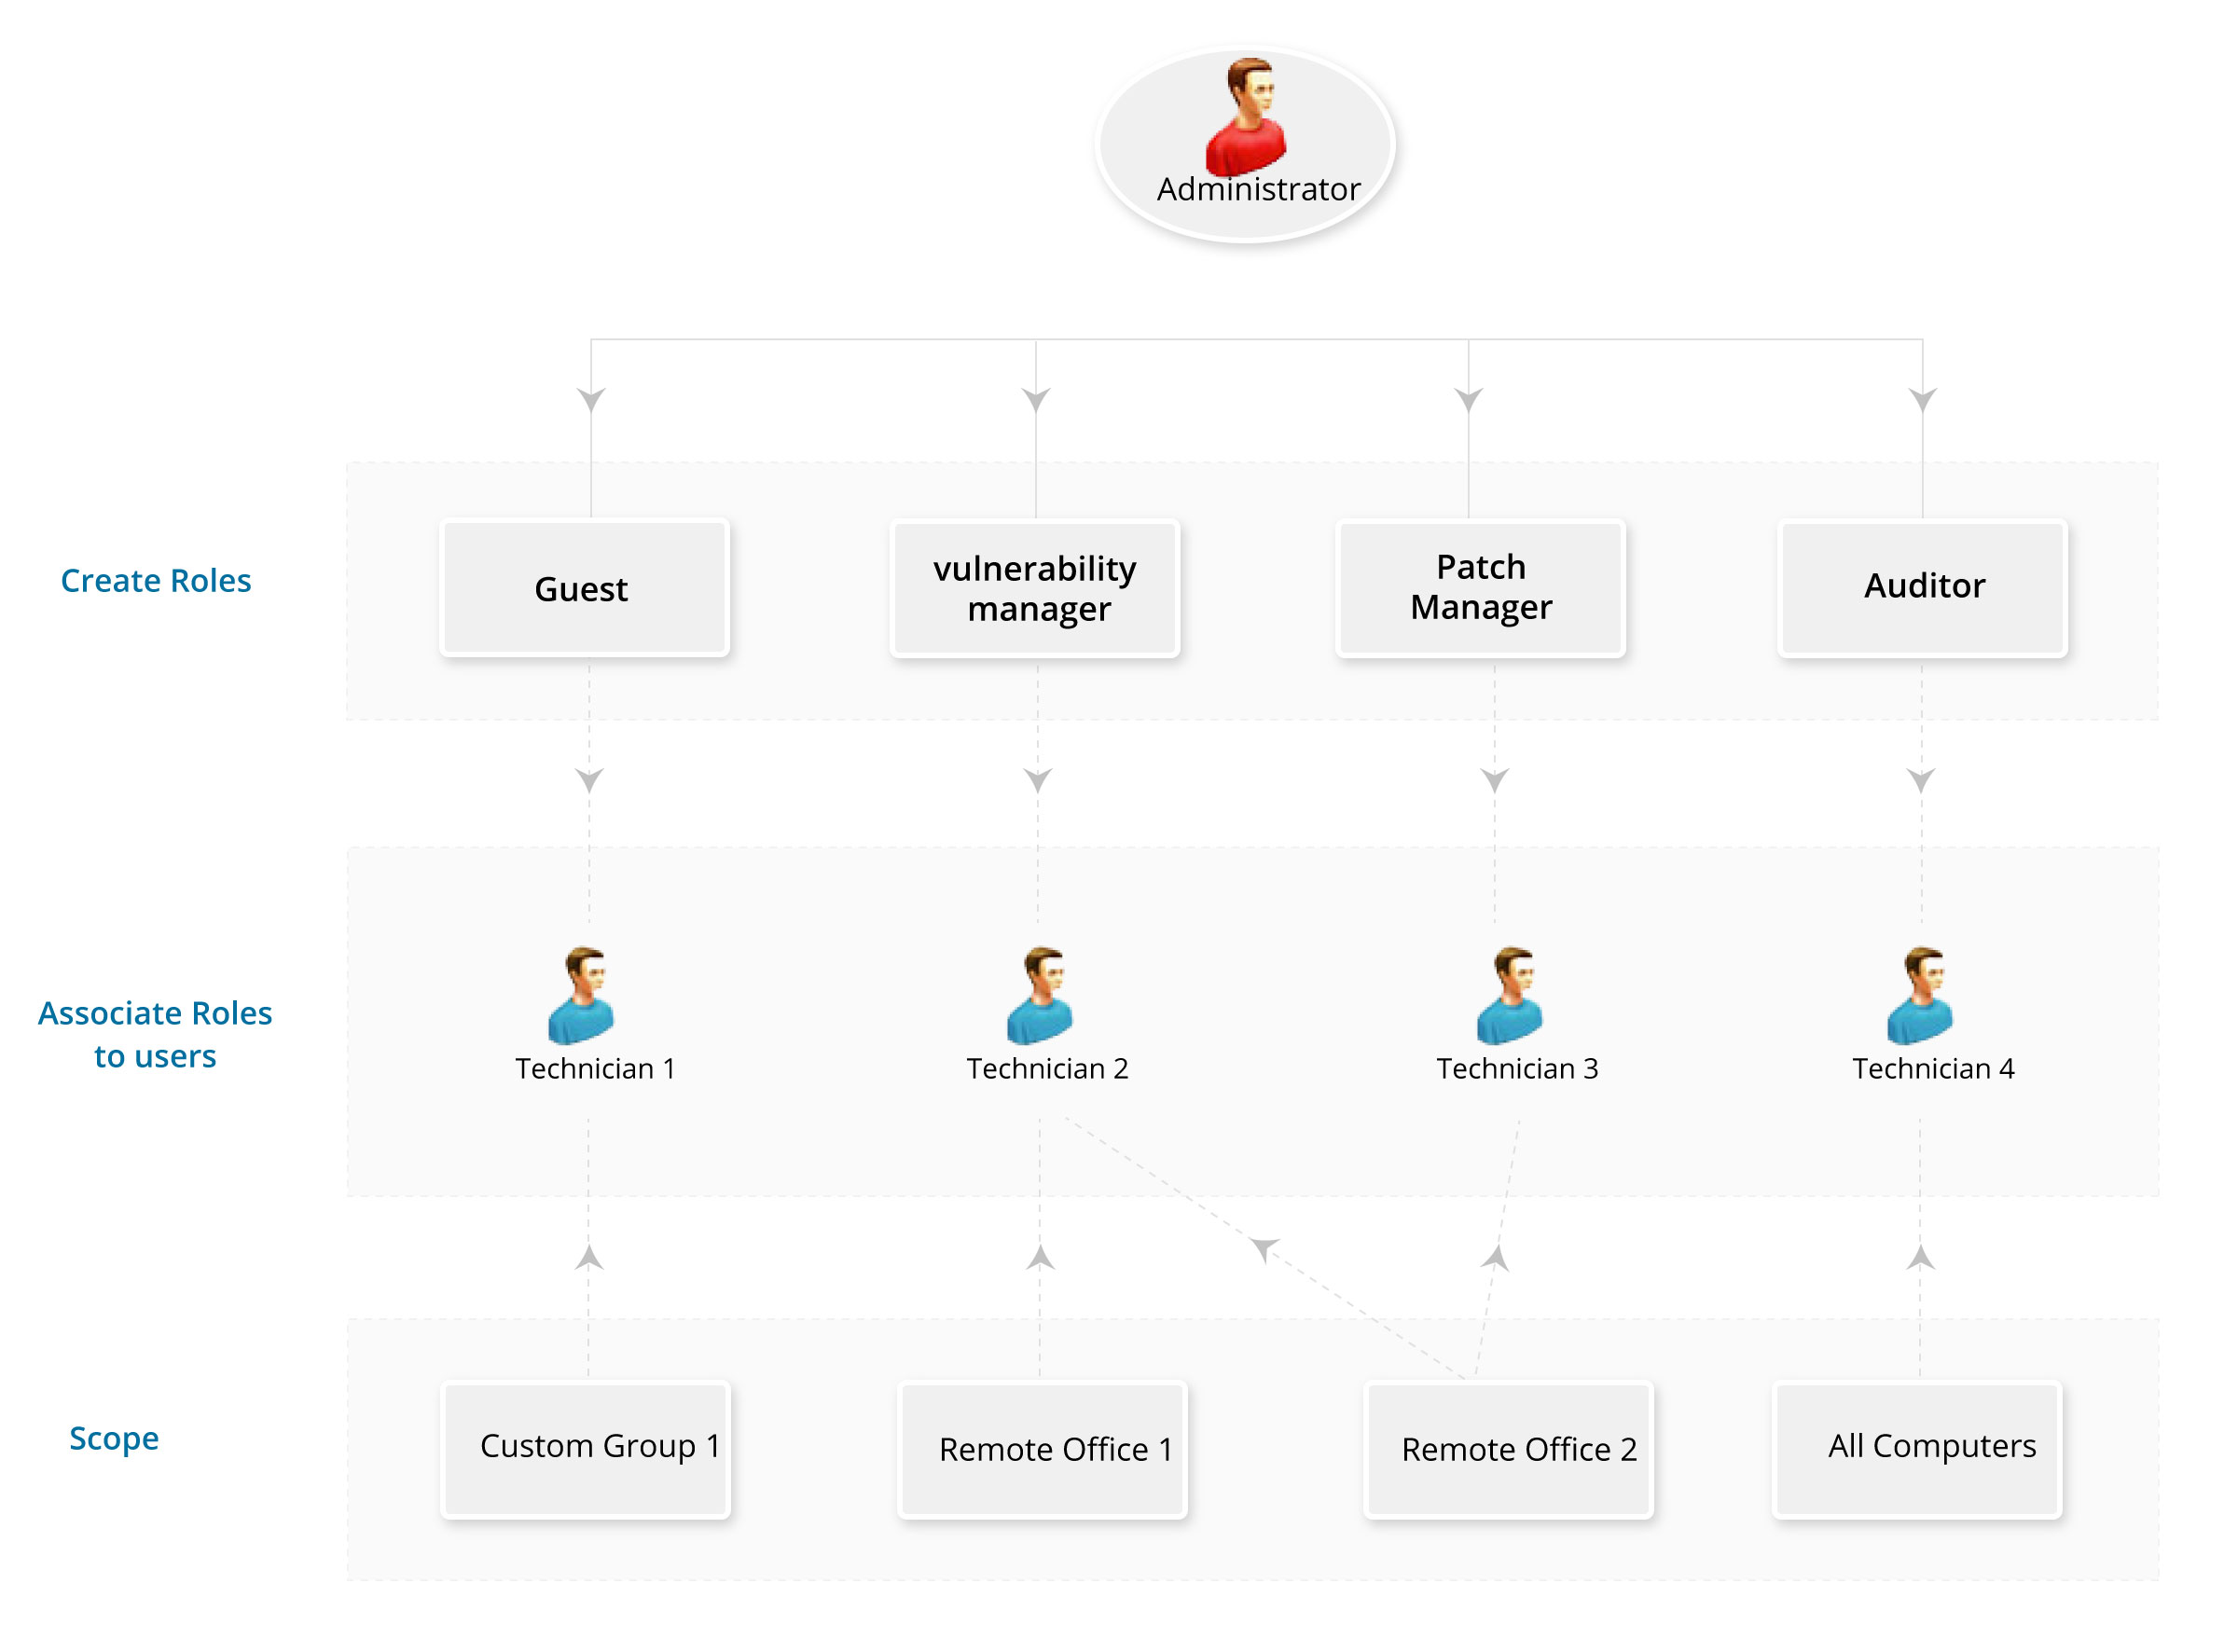
Role Management
Some of the most commonly used Roles are specified under Pre-defined Roles. However, you also have the flexibility to define roles that best suit your requirements under the User-defined Roles and grant appropriate permissions. Here's a brief on the Pre-defined and User-defined roles respectively:
User-defined Role
You can tailor-make any number of roles, using Vulnerability Manager Plus and give them permissions of your choice based on your personalized needs. These customized roles fall under the User-defined category. For a better understanding let us quickly see how to create a User-defined Role in the following section.
Follow the steps mentioned below to create a new User-defined role:
1. Select the Admin tab and click Users, under User Administration. This opens the Users page.
2. Select the Role tab and click the Add Role button.
3. Specify the Role Name and a small description about it.
4. You can define module-wise permission level for the Role in the Select Control Section. View the actions/operations that are associated with each module and which actions/operations are permitted based on the permission specified to each module while creating/modifying a role.
The permission levels are broadly classified into:
Full Control - To perform all operations like an administrator, for the specific module
Write - To perform all the operations, except few restrictions as explained below in the table
Read - To only view the details in that module
No Access - To hide the module from the User
5. Click Add button.
You have successfully created a new role. The role you have just created will now be available in the Roles list of the user creation module. Role deletion cannot be performed if that role is associated even with a single User. However you can modify the permission levels for all User-defined roles.
Pre-defined Roles
You will find the following roles in the Pre-defined category:
Administrator Role:The Administrator role provides full control across all the modules. Only administrators can create/delete users, create roles and map them to users, define scope to users. Administrators can assign administrator role to other users as well. All the operations listed under the Admin tab are available to users to whom the administrator role is mapped. Some of the important functions that an administrator can perform include:
-
- Defining or modifying Scope of Management
- Adding/ deleting Users
- Changing proxy settings
- Personalizing options like changing themes, setting session expiry, etc.
- Scheduling vulnerability database update
- Scheduling scan settings for Patch Management
- Viewing Actions Logs of Vulnerability Manager Plus
- Complete access to all vulnerability, compliance and patch management tasks
Guest Role:The Guest Role retains the read only permission to all modules. A user who is associated with the Guest Role will have the privilege to scan systems and view information such as vulnerabilities, misconfigurations, high-risk software, patches, and system details, etc., across different modules, although making changes is strictly prohibited.
Technician Role:The Technician Role has a well-defined set of permissions to do specific operations. Users under the Technician role are restricted from performing all the operations listed under the Admin tab. The operations that can be performed by users associated with the Technician Role include:
- Can define and deploy all patch configurations and tasks.
- Can view all the patch configurations/tasks, including those created by other users, reports, etc.
- Can view all the details under Threats tab.
- Can suspend, modify, or re-deploy the configurations/tasks defined by them.
- Can update the Vulnerability Database.
- Can perform Scan operations.
- Has write permission to perform patch management tasks.
- Has read permission to scope of management and reports
Auditor:The Auditor role is specially crafted for auditing purposes. This role will help you grant permissions to auditors to view details of reports. Users with "Auditor Role" is limited to read-only access to reports.
Patch Manager:The Patch Manager role gives complete access to the Patch Management module, that includes full control over the patches tab, patching related components and operations under systems and deployment tabs. Patch Manager can't view any details or perform any of the operations under the Threats tab. Patch Manager will also have the privilege to perform tasks like Wake On LAN, and ability to schedule Patch Reports.
Vulnerability Manager:The Vulnerability Manager role gives access to view all the details and perform all actions under Threats as well as compliance tab except for the "Install patch" action under Threats tab, since that action is associated with "Patch Management" module. However, you can modify the vulnerability manager role and permit access to "install patches" action by specifying write/full control permission to the patch management module. View the actions/operations that are associated with each module and which actions/operations are permitted based on the permission specified to each module while creating/modifying a role. The vulnerability manager role also allows access to vulnerability management related components and operations under systems and deployment tabs. Vulnerability Manager can't perform any of the operations under the Patches tab by default.
Note: The Vulnerability Manager role is newly introduced to manage threats and vulnerabilities exclusively. This role is only available in Vulnerability Manager Plus version 10.1.2119.3 and above. For versions below 10.1.2119.3, all the functionalities of the Vulnerability Manager role are included in the Patch Manager role itself.
Defining a Scope
Vulnerability Manager Plus provides you the privilege of defining a scope for the users, which means you can define the target computers, which can be mapped to every user. By limiting the user's permission to specific set of computers, you can feel assured that the user has enough permission to perform their roles and not excess permission to take unduly advantage.
The target that you define as the scope, can be one of the following:
All Computers
When the target is defined as 'All Computers', user will have permission to execute all the privileges defined in the role, to all the computers. Though the scope is all computers, the permission level is determined only by the role, to which the user is mapped.
Static Unique Groups
You can create specific custom groups for the management purposes and associate it to the users. The custom groups that you create should be Unique, so that no computers can belong to more than one custom group. These are computer based custom groups, which are created for the user management purpose, is defined as "scope" for the user. Refer to this to know more about Creating Custom Groups
Remote Office
You can create specific remote offices or use the existing remote offices to be defined as the scope for the users. More than one user can have manage the same remote offices. Similarly more than one remote office can be mapped to the same user, however you cannot have a combination of remote offices and unique groups as a part of the scope.
Sharing a Scope
More than one user can share the same scope. In such cases, configurations/tasks applied to the scope can be managed by more than one user. To know more, refer to this: Points to be noted
Modifying a Scope
When a scope of the user is modified, user will not be able to manage the configurations/tasks, which were created by him. He will have permission to clone the configurations without the target, so that he can re-use them for his current scope. Modifying the computers within the scope will not be considered as modifying the scope.
User Management
Effective user management is essential for maintaining system security and ensuring appropriate access control. This document outlines the complete lifecycle of user accounts, detailing their creation, management, and role-based access within the system. User accounts, which can be either local accounts or Active Directory accounts, are created within the Central Server to grant access to endpoints, custom groups, and remote offices. Roles define a set of permissions that determine what actions a user can perform within the system and outline the scope of which computers or devices the user will be allowed to manage. Each user is assigned a role, which dictates their level of access
Enabling Two Factor Authentication
Enabling Two Factor Authentication will secure the access to Vulnerability Manager Plus web console. Users will be prompted to enter the One Time Password (OTP) along with their default password. You can configure the settings to save the OTP for the specific browser. If this option is enabled, user will not be prompted for OTP for the number of days, specified here : Admin -> Users -> Secure Authentication. Here, you can choose the mode for two factor authentication, which could be via email or Google Authenticator.
One Time password will be sent to the each user via email. You can not enable Two Factor Authentication, if one or more users do not have email address mapped with Vulnerability Manager Plus server. You will have to ensure that email address of all the users are registered in Vulnerability Manager Plus server.
When two factor authentication is enabled, users will receive an email with the details of the OTP. Every OTP is valid for 15 minutes from the time of generation. OTP will be an auto-generated 6 digit number. You can also allow the users to save the OTP on their web browsers. You will have to specify the number of days allowed, for the OTP to be saved on the web browser. Users will not be prompted for OTP, if they choose to save the OTP on the browser. If you specify the number of days as 0, then users will not be allowed to save the OTP on the web browser. OTP will be generated every time the user tries to login into Vulnerability Manager Plus web console.
Google Authenticator
You can choose Google Authenticator, to generate OTP. You will have to install Google authenticator on your smart phone. Google authenticator can be downloaded based on the mobile device's operating system as mentioned below:
- iOS devices - App Store
- Android devices - Google Play
- Windows - Windows Store
Download and install the authenticator on the mobile device. When you can login to Vulnerability Manager Plus web console for the first time, a QR code will be displayed. You will have to open the Google authenticator app and scan the QR code to create an account for Vulnerability Manager Plus. You can see Vulnerability Manager Plus is now added to the Google authenticator app and OTP will be generated automatically.
You can use the OTP generated in the google authenticator as the secondary authentication and login to Vulnerability Manager Plus.
|
Points to be Noted
- A Unique Custom group can be managed by more than one user.
- A same computer cannot be a part of more than one Unique Custom Group
- Only Administrators will have permission to modify the scope for users
- Scope defined for a user cannot be a combination of custom groups and remote offices, it can only be all computers or specific unique group or remote office
- When the scope of the user is modified, the user will not be notified about the changes made to his scope
- Adding or removing computers from the unique custom groups would not affect the scope of the user
- Refer to the following scenarios and behaviors:
User A's scope : Static Unique Group 1
User B's scope : Static Unique Group 2
User C's scope : Static Unique 2 and Static Unique Group 3
User D's scope : Static Unique Group 1, Static Unique Group 2, Static Unique Group 3 and Static Unique Group 4
- User A creates and applies the configuration/task to Static Unique Group 1. This configuration will be visible to User A, and User D, since they share the same scope (Static Unique Group 1). This configuration can be modified by User A and User D. When user D modifies this configuration, the target of this configuration will list only the scope that is being shared by User A and User D.
- User D creates a configuration and applies it to Static Unique Group 2, then this configuration can be viewed by user User B, User C and User D. All the three users will be able to manage the configuration.
- User D creates a configuration and applies it to Static Unique Group 3, and Static Unique Group 4. In this case, User C and User D will be able to view this configuration. User C cannot make any changes to this configuration.
- User A creates a configuration and applies it to Static Unique Group 1 and later, user A's scope is modified, then this configuration can only be viewed by him, or cloned as a new configuration without the target.