# Integrate Amazon Web Services Account with CloudSpend
Integrating your AWS account with CloudSpend provides a comprehensive view of your cloud spending.
CloudSpend reads your AWS billing data and turns it into cost reports, budgets, anomaly alerts, and optimization recommendations. To do that, it needs two things from your AWS account:
1. **Read-only access** - an IAM role that CloudSpend can assume to read your billing objects.
2. **A billing data export** - a Cost and Usage Report delivered on a schedule to an Amazon S3 bucket.
The *Integrate Account* page is a step-by-step wizard with a toggle at the top offering two ways to set this up:
- [Automated integration](https://www.manageengine.com/cloudspend/help/aws-integrate.html#automated-integration): A CloudFormation stack creates the IAM role and, optionally, the data export for you.
- [Manual integration](https://www.manageengine.com/cloudspend/help/aws-integrate.html#manual-integration): You create the IAM role and the data export yourself in the AWS console.
This page documents each one end-to-end, so you only need to read the section for the path you choose.
New to CloudSpend? Start at [Get started with CloudSpend](https://www.manageengine.com/cloudspend/help/) for a product overview, then come back here.
## Before you begin
Have these ready before you open the wizard.
| What you need | Why | Where to get it |
|---|---|---|
| A CloudSpend account with permission to add integrations | The Integrate Account wizard is admin-only. | [User Management - Access Control](https://www.manageengine.com/cloudspend/help/rbac.html) |
| Sign-in to the correct AWS account | For an AWS Organization, sign in to the management (payer) account. For a standalone account, sign in to that account. | AWS Management Console |
| Permission to create IAM roles and policies in AWS | Both paths create a cross-account IAM role. | Your AWS administrator |
| Permission to create CloudFormation stacks | Required for Automated integration, and for the CloudFormation access type under Manual integration method. | Your AWS administrator |
| Permission to create Data Exports and S3 buckets | Required for Manual integration method. | AWS Billing and Cost Management |
| The month you want billing to start from | Sets how far back CloudSpend loads your past bills. | Your own reporting requirement. |
## How the integration works
1. AWS writes your billing data to an S3 bucket in your account, on a recurring schedule, as a Cost and Usage Report (CUR 2.0 or Legacy CUR).
2. CloudSpend assumes the cross-account IAM role you created. The role’s trust policy names CloudSpend’s AWS account and requires a unique External ID, so no one else can assume it.
3. CloudSpend reads the report from S3, it never touches your workloads, and parses it into cost, usage, and tag data.
4. CloudSpend builds your reports and evaluates your budgets, anomaly checks, and governance checks against the parsed data.
The *Choose Policy Options* section on the *Access & Credentials* page has three preselected options: *Default Permissions*, *IT Automations*, and *Recommendations*. These options grant permissions for executable actions, such as starting, stopping, and rebooting resources.
## Which integration should you choose?
At the top of the *Integrate Account* page there is a toggle with two options: **Automated** and **Manual**. Choose the method based on how you want to configure access and the AWS resources required for the integration.
| Integration aspect | Automated integration | Manual integration |
|---|---|---|
| How access is created | A CloudFormation stack creates the IAM role for you | You create the IAM role by hand in the IAM console, or run the CloudFormation stack yourself |
| How the export is created | The same stack can create the S3 bucket and the Cost and Usage Report. | You create the Data Export yourself in AWS Billing and Cost Management |
| Access types offered | Management Account, Delegated Admin | CloudFormation, IAM Role, IAM User (deprecated), Site24x7 Account |
| Choose this when | You can run CloudFormation in the account, and you want the fastest setup | Your organization restricts CloudFormation, you already publish a CUR to S3, or your security team requires the role to be reviewed before creation |
| Go to | [Automated integration](https://www.manageengine.com/cloudspend/help/aws-integrate.html#automated-integration) | [Manual integration](https://www.manageengine.com/cloudspend/help/aws-integrate.html#manual-integration) |
## Automated integration
The automated integration setup takes four steps:
1. [Step 1: Account basics](https://www.manageengine.com/cloudspend/help/aws-integrate.html#step-1-account-basics)
2. [Step 2: Access & credentials](https://www.manageengine.com/cloudspend/help/aws-integrate.html#step-2-access-credentials)
3. [Step 3: Processing date](https://www.manageengine.com/cloudspend/help/aws-integrate.html#step-3-processing-date)
4. [Step 4: Review & activate](https://www.manageengine.com/cloudspend/help/aws-integrate.html#step-4-review-activate)
With this integration method, CloudSpend generates an AWS CloudFormation template based on your account details. Run the template in the AWS console to create the required read only IAM role. You can also choose to let the CloudFormation stack create the S3 bucket and Cost and Usage Report for you.
After the stack is successfully created, it sends the IAM role ARN back to CloudSpend. The wizard then automatically populates the relevant fields, so you can continue with the remaining configuration.
Ensure that:
- You have permission to create CloudFormation stacks and IAM resources in the AWS account.
- You are signed in to either the management (payer) account or a delegated administrator account for AWS Billing and Cost Management.
### Step 1: Account basics
1. Sign in to the **CloudSpend** web console. If this is your first time in CloudSpend, you land on an onboarding carousel that introduces the product. Read it or skip it. Either way you end up on the same page.
2. Click **+ Integrate Account** in the top right corner.
3. At the top of the page, make sure the toggle is set to **Automated**.
4. Under *Identify this account*, enter a **Display Name**.
5. Under *Where does the spend live?*, select **AWS** as the *Provider*.
| Provider | Access method | View |
|---|---|---|
| AWS | CloudFormation or IAM role access | This page |
| Azure | App registration + exports | [Connect Azure Account](https://www.manageengine.com/cloudspend/help/azure-integrate.html) |
| GCP | BigQuery billing export | [Connect GCP Account](https://www.manageengine.com/cloudspend/help/gcp-integration.html) |
6. Select the **Environment**:
1. **Global**: Standard AWS commercial regions. Choose this unless you are certain otherwise.
2. **Gov Cloud (US):** See the AWS GovCloud (US) accounts before you continue, because the account you sign in to is not the GovCloud account.
7. Click **Next**.
### Step 2: Access & credentials
Choose your access type.
| Access type | Choose this when |
|---|---|
| **Management Account**: Automated, from the management account | You are signed in to the management (payer) account of your AWS Organization, or to a standalone AWS account. Most common choice. |
| **Delegated Admin**: Automated, from a delegated admin
**Delegated Admin prerequisite**: The account must already be registered as a delegated administrator for AWS Billing and Cost Management in your Organization. If it is not, the stack will fail with a permissions error. Register it from the management account, or use Management Account instead. | Billing administration has been delegated to a member account and you are signed in to that account. |
#### Run the automated setup
The panel shows a three stage progress bar. Stage 2 is where CloudSpend waits for the CloudFormation stack to complete.
| Stage | What is happening | Where it happens |
|---|---|---|
| Step 1: CloudFormation Stack Creation | CloudSpend generates a CloudFormation template for your account and hands you a link to it | CloudSpend |
| Step 2: Waiting for RoleARN | You create the stack in AWS; the stack creates the IAM role and calls back to CloudSpend with the role’s ARN | AWS, then back to CloudSpend |
| Step 3: Integrate Role ARN | CloudSpend stores the ARN and fills in the remaining fields for you | CloudSpend |
##### Configure the template
1. **AWS region in which CloudFormation stack needs to be created**: Select a region. This is only where the stack runs. It does not limit which regions CloudSpend reports on. Cost data for every region in the account is included regardless. Use the recommended region unless a policy in your organization requires otherwise.
2. Set the *Cost And Usage Report Creation option needed option* to **Yes** or **No** as required.
1. **Yes**: The stack also creates an S3 bucket and a Cost and Usage Report for you. After the stack finishes, the Report and S3 Bucket fields are filled in automatically.
2. **No**: The stack creates only the IAM role. Choose this if you already publish a CUR to S3 and do not want a duplicate report. You will need to enter the export name yourself; see the [If you chose No](https://www.manageengine.com/cloudspend/help/aws-integrate.html#if-you-chose-no) section for report creation.
3. **Choose Policy Options**: Select which permission sets to include in the generated policy. The default selection covers standard cost and usage reporting.
4. Click **Create CloudFormation Template**. CloudSpend opens the AWS CloudFormation console in a new tab with the template URL and parameters prefilled. Keep the CloudSpend tab open and do not refresh it, as this can restart the process.
5. In the AWS console, review the pre filled parameters. You can edit **IAMRoleName**, **CURReportName**, and **S3BucketName** if required.
6. Select the acknowledgement check boxes at the bottom of the *Capabilities* section and click **Create stack**. The IAM role template will be created via the stack after CloudSpend receives the Lambda API call.
7. After creating the IAM role, the CloudFormation stack sends the role ARN to CloudSpend via the Lambda function. If the *Cost and Usage Report creation needed* option is set to **Yes** then CloudSpend creates S3 Bucket and CUR Report in AWS via Lambda function. As a result, the report and S3 Bucket details are also fetched along with the role ARN details and the **Role ARN**, **Report**, and **S3 Bucket** fields will be displayed and auto-filled.
8. Click **Next**.
**If you chose No for report creation**
If the Cost and Usage Report creation needed option is set to **No** then, CloudSpend creates only the role ARN via Lambda function. Once the role ARN details are fetched, the *Role ARN* field is auto-filled. You will have to enter the report name in the *Report* field manually.
### Step 3: Processing date
1. **Processing window**
- **Start Date for Bill Processing**: Choose the month from which CloudSpend begins processing your bills. It controls how far back CloudSpend loads your past bills, which affects both what you can compare against and what you are charged. The wizard notes that all historical bills from this date forward will be processed and charged. See [Pricing Details](https://www.manageengine.com/cloudspend/help/billing.html) before choosing a distant start date.
2. **Notify Alerts Via**: Choose how CloudSpend should [send notifications](https://www.manageengine.com/cloudspend/help/notification-profiles.html). Select **Users** to notify one or more individual CloudSpend users, or **User Group** to notify all members of a selected user group. Using user groups simplifies notification management because any changes to the group membership are automatically reflected in the notification profile.
3. **Contacts**: Select the users or user groups that should receive notifications when an associated check is breached.
4. **Add Label:** Optionally attach key value Labels to this integration. Enter a *Label Key* and *Label Value*, then click the **+** icon to add another pair, or the delete icon to remove one. Labels are CloudSpend side metadata, useful for filtering and grouping accounts in reports, independent of AWS tags. See [Labels](https://www.manageengine.com/cloudspend/help/labels.html).
5. Click **Next**.
### Step 4: Review & activate
The final step summarizes everything you have configured. Each card has an *Edit* link that takes you back to that step with your values intact.
| Card | Fields shown |
|---|---|
| Account basics | Display Name, Provider, Environment |
| Access & credentials | Choose Onboarding Type (Automated), Access type, Status, Account scope, Existing export, Report |
| Processing date | Bill processing month, Notify Alerts Via, Contacts, Add Label |
Click **Submit** once you have verified all the details.
If you encounter any issues, see [Troubleshooting](https://www.manageengine.com/cloudspend/help/aws-integrate.html#troubleshooting) for possible causes and solutions.
## Manual integration
The manual integration method has five steps:
1. [Step 1: Account basics](https://www.manageengine.com/cloudspend/help/aws-integrate.html#step-1-account-basics-1)
2. [Step 2: Access & credentials](https://www.manageengine.com/cloudspend/help/aws-integrate.html#step-2-access-credentials-1)
3. [Step 3: Billing data](https://www.manageengine.com/cloudspend/help/aws-integrate.html#step-3-billing-data)
4. [Step 4: Processing date](https://www.manageengine.com/cloudspend/help/aws-integrate.html#step-4-processing-date)
5. [Step 5: Review & activate](https://www.manageengine.com/cloudspend/help/aws-integrate.html#step-5-review-activate)
In this method you do the AWS side work yourself. The extra Billing data step is where you create the Cost and Usage Report export, optionally enable AWS Cost Optimization Recommendations, and tell CloudSpend whether you are reporting on a whole organization or a single linked account.
### Step 1: Account basics
1. Sign in to the **CloudSpend** web console. If this is your first time in CloudSpend, you land on an onboarding carousel that introduces the product. Read it or skip it. Either way you end up on the same page.
2. Click **+ Integrate Account** in the top right corner.
3. At the top of the page, make sure the toggle is set to **Manual**.
4. Under *Identify this account*, enter a **Display Name**.
5. Under *Where does the spend live?*, select **AWS** as the *Provider*.
| Provider | Access method | View |
|---|---|---|
| AWS | CloudFormation or IAM role access | This page |
| Azure | App registration + exports | [Connect Azure Account](https://www.manageengine.com/cloudspend/help/azure-integrate.html) |
| GCP | BigQuery billing export | [Connect GCP Account](https://www.manageengine.com/cloudspend/help/gcp-integration.html) |
6. Select the **Environment**:
1. **Global**: Standard AWS commercial regions. Choose this unless you are certain otherwise.
2. **Gov Cloud (US):** See the AWS GovCloud (US) accounts before you continue, because the account you sign in to is not the GovCloud account.
7. Click **Next**.
### Step 2: Access & credentials
Choose your access type. The manual method offers four ways to give CloudSpend access.
| Access type | Description | Choose this when |
|---|---|---|
| CloudFormation | Recommended, approximately 3 minutes | You can run CloudFormation and want the role created for you |
| IAM Role | Create the role manually | You want to create the role by hand, or CloudFormation is restricted in your organization. |
| IAM User | Use an IAM user’s access keys | Deprecated. Only for existing setups that already rely on access keys. |
| Site24x7 Account | Reuse an existing connection | You already monitor this AWS account on Site24x7 and want to reuse that connection instead of creating new credentials. |
The steps you need to complete depend on the access type you select. Complete the required setup for your selected option, then click **Next** to continue to [Step 3: Billing data](https://www.manageengine.com/cloudspend/help/aws-integrate.html#step-3-billing-data).
#### CloudFormation access type
The Create the CloudFormation stack panel is the same as on the Automated path. It has the same three stage progress bar, region and report creation controls, and *Create CloudFormation Template* button.
Follow [Run the automated setup](https://www.manageengine.com/cloudspend/help/aws-integrate.html#run-the-automated-setup) mentioned in the [Automated integration](https://www.manageengine.com/cloudspend/help/aws-integrate.html#automated-integration) method, then return here and click **Next** to continue to [Step 3: Billing data](https://www.manageengine.com/cloudspend/help/aws-integrate.html#step-3-billing-data).
#### IAM Role access type
Selecting **IAM Role** opens the *Create the IAM* role panel, which displays the full procedure inline with a screenshot carousel beside each stage. Delegate access to your AWS resources through the IAM role by following the steps and screenshots in the panel. Make sure you have the required policies for CloudSpend. If not, create your own policy before creating the IAM role.
The IAM Role access type is recommended as there is no sharing of security credentials. Also when you delegate permissions using Roles, you can designate the AWS accounts that are allowed to assume the role, thereby safeguarding your account from unauthorized access.
**Note:**
We've deprecated the IAM user-based access to new users. So if you're existing users, you can switch to IAM role based access.
**Why an IAM role rather than access keys?**
A role is assumed temporarily and there are no long lived credentials to store, rotate, or leak. The trust policy names exactly one AWS account, CloudSpend’s, and requires a matching External ID, so the role cannot be assumed by anyone else.
The following section will walk you through the IAM Role creation process.
#### Create a custom policy
1. Sign in to the organization’s master AWS account. For an AWS Organization using consolidated billing, sign in to the management (payer) account. That is where the consolidated bill lives. For standalone accounts, sign in to the account you want to integrate.
2. Select **Access Management** > **Policies** from the left navigation pane.
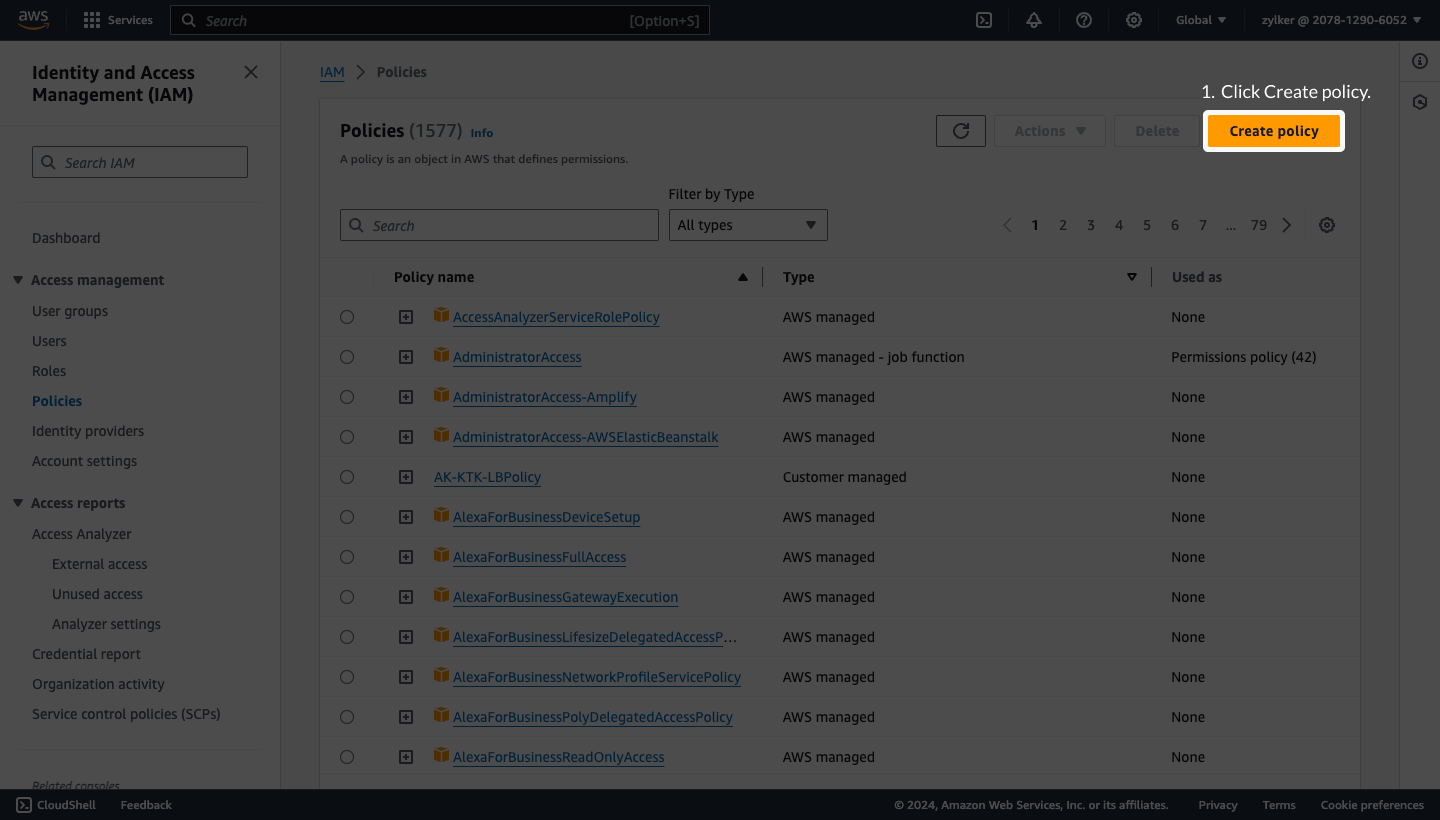
3. Click **Create policy**.
4. Choose the **JSON** tab and delete the existing JSON policy snippet.
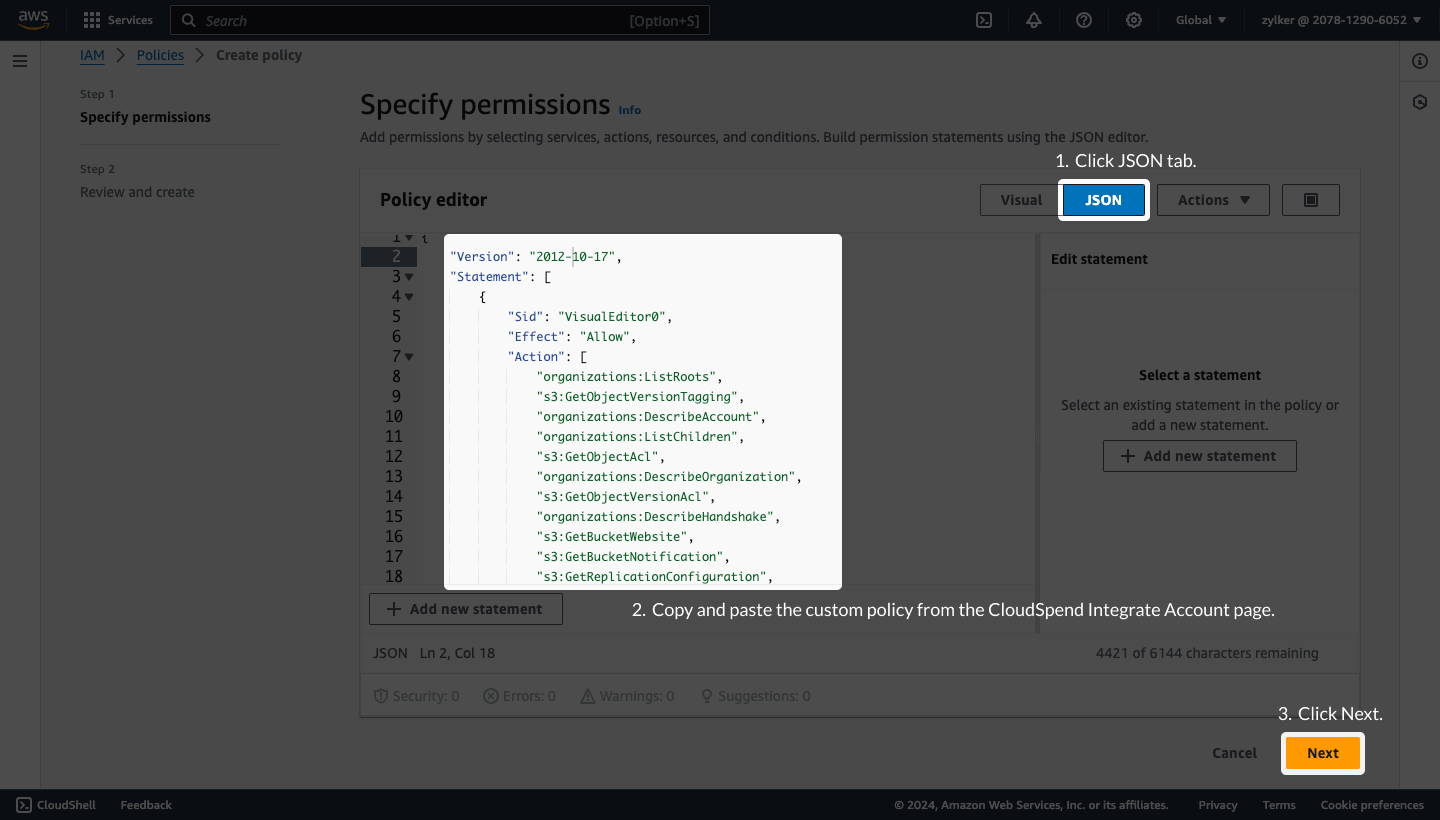
5. Click **Copy Policy** in the CloudSpend wizard, then paste the custom cost policy into the **JSON** tab. Alternatively, you can copy the JSON policy given below.
```json
{
"Version": "2012-10-17",
"Statement": [
{
"Sid": "VisualEditor0",
"Effect": "Allow",
"Action": [
"organizations:ListRoots",
"s3:GetObjectVersionTagging",
"organizations:DescribeAccount",
"organizations:ListChildren",
"s3:GetObjectAcl",
"organizations:DescribeOrganization",
"s3:GetObjectVersionAcl",
"organizations:DescribeHandshake",
"s3:GetBucketWebsite",
"s3:GetBucketNotification",
"s3:GetReplicationConfiguration",
"s3:ListMultipartUploadParts",
"organizations:ListAccountsForParent",
"organizations:ListHandshakesForAccount",
"s3:GetObject",
"iam:GetUserPolicy",
"s3:GetAnalyticsConfiguration",
"organizations:ListOrganizationalUnitsForParent",
"s3:GetObjectVersionForReplication",
"cur:DescribeReportDefinitions",
"s3:GetLifecycleConfiguration",
"s3:GetBucketTagging",
"s3:GetInventoryConfiguration",
"s3:ListBucketVersions",
"s3:GetBucketLogging",
"s3:ListBucket",
"s3:GetAccelerateConfiguration",
"s3:GetBucketPolicy",
"organizations:DescribePolicy",
"s3:GetObjectVersionTorrent",
"s3:GetEncryptionConfiguration",
"organizations:ListCreateAccountStatus",
"s3:GetBucketRequestPayment",
"organizations:DescribeOrganizationalUnit",
"s3:GetObjectTagging",
"s3:GetMetricsConfiguration",
"organizations:DescribeCreateAccountStatus",
"organizations:ListPoliciesForTarget",
"s3:ListBucketMultipartUploads",
"organizations:ListTargetsForPolicy",
"s3:GetBucketVersioning",
"organizations:ListAWSServiceAccessForOrganization",
"s3:GetBucketAcl",
"organizations:ListPolicies",
"organizations:ListHandshakesForOrganization",
"organizations:ListAccounts",
"s3:GetObjectTorrent",
"s3:ListAllMyBuckets",
"s3:GetBucketCORS",
"organizations:ListParents",
"iam:GetUser",
"s3:GetBucketLocation",
"s3:GetObjectVersion",
"bcm-data-exports:ListExports",
"bcm-data-exports:GetExport"
],
"Resource": "*"
}
]
}
```
6. Click **Next**.
7. On the **Review and create** page, enter the **Policy name** and **Description**.
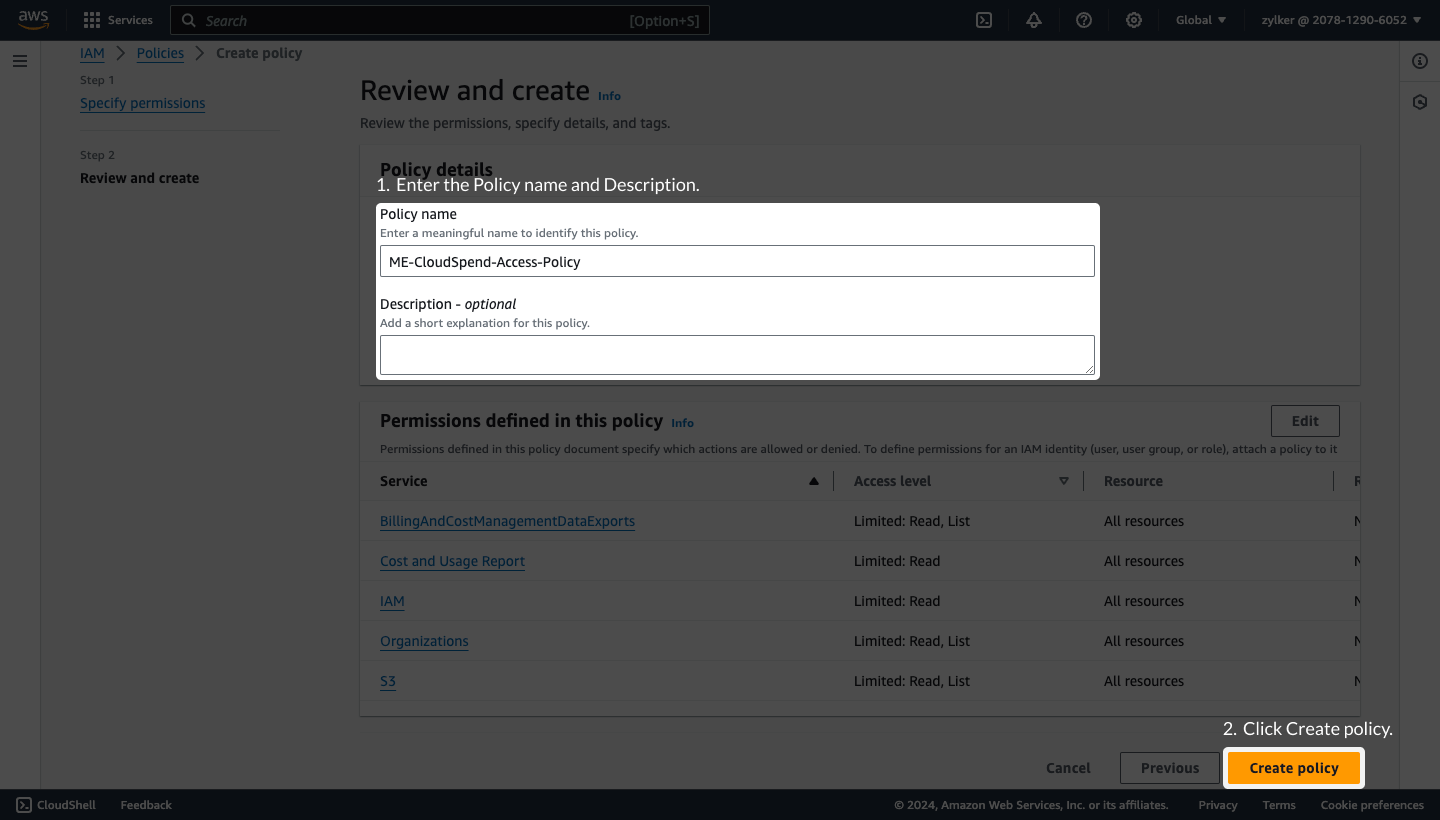
8. Click **Create policy**.
Follow the steps mentioned in the [Select trusted entity](https://www.manageengine.com/cloudspend/help/aws-integrate.html#select-trusted-entity), [Add permissions](https://www.manageengine.com/cloudspend/help/aws-integrate.html#add-permissions), and [Name, review, and create](https://www.manageengine.com/cloudspend/help/aws-integrate.html#name-review-and-create) sections below for creating a cross-account IAM role.
#### Select trusted entity
1. Sign in to the organization’s master AWS account.
2. Search for **IAM** in the search bar and select IAM from the search results.
3. Select **Access Management** > **Roles** from the left navigation pane and click **Create Role**.
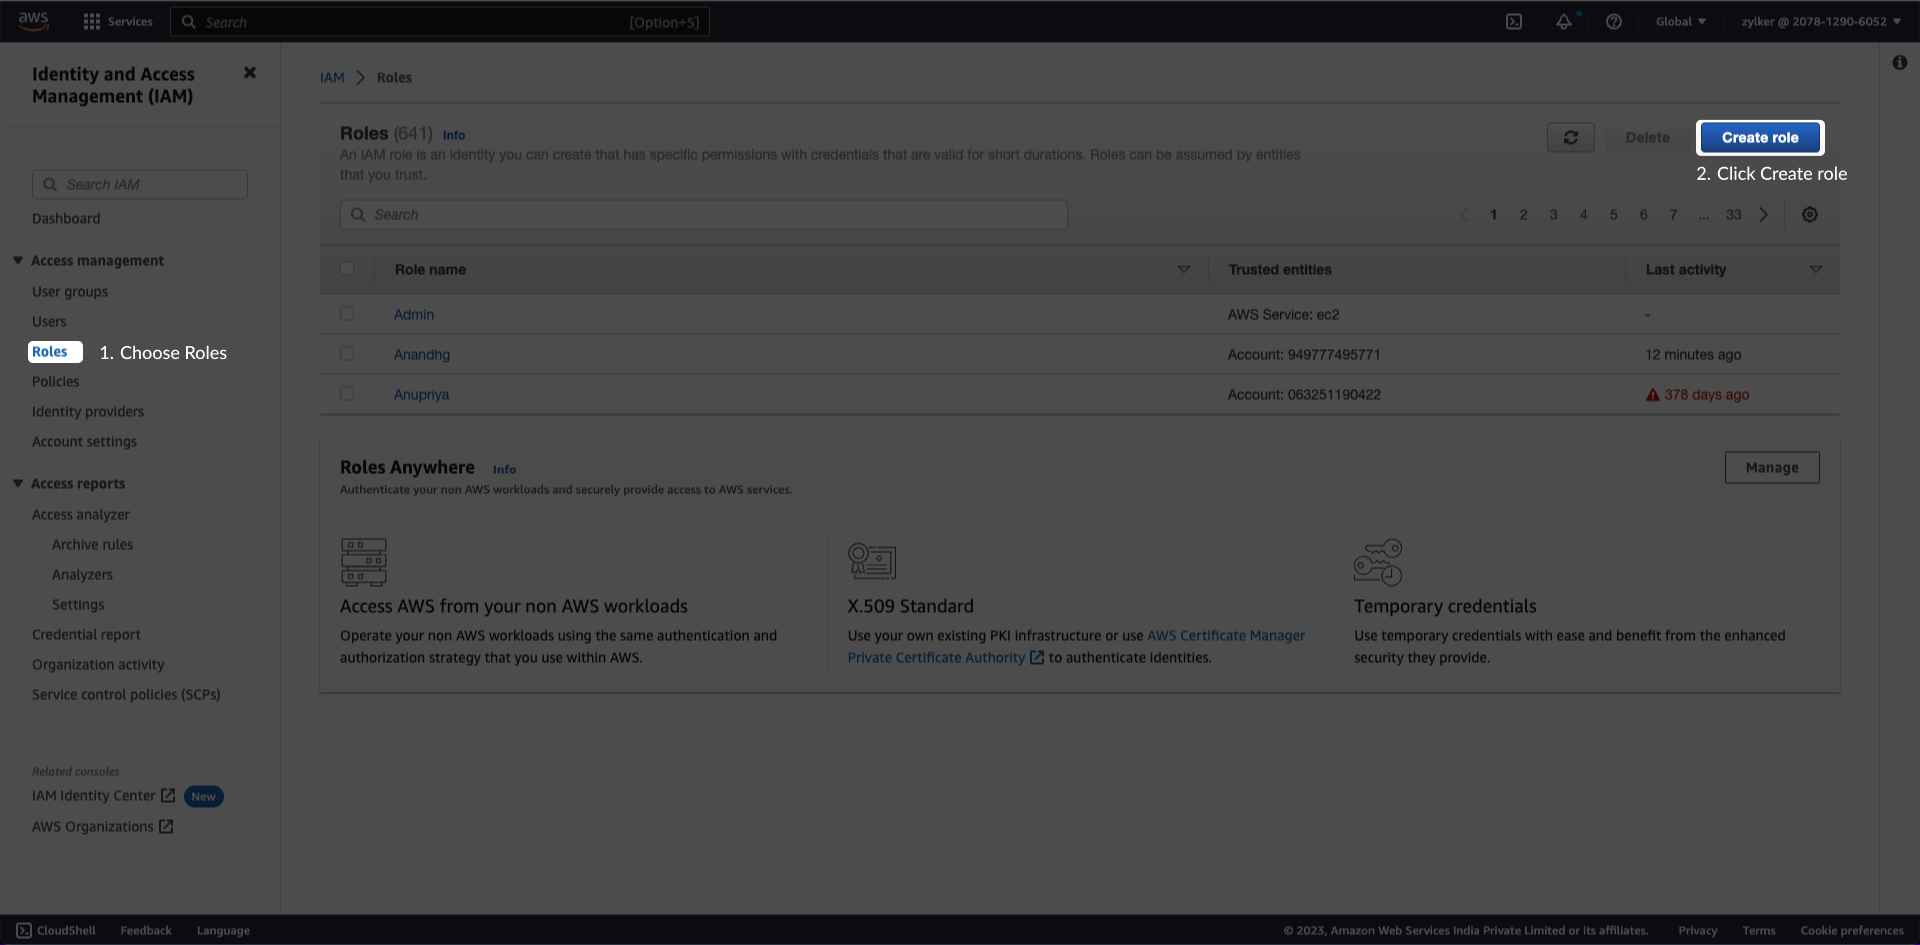
4. Select **AWS Account** from the *Trusted entity type* options.
5. Select **Another AWS Account** to register CloudSpend with your AWS account.
6. Enter **Site24x7's AWS account ID** in the *Account ID* field displayed in the *Integrate AWS Account* page.
7. Check the **Require external ID** box. Ensure that the box next to *Require MFA* is unchecked.
8. Enter the unique **External ID** displayed in the Integrate *AWS Account* page.
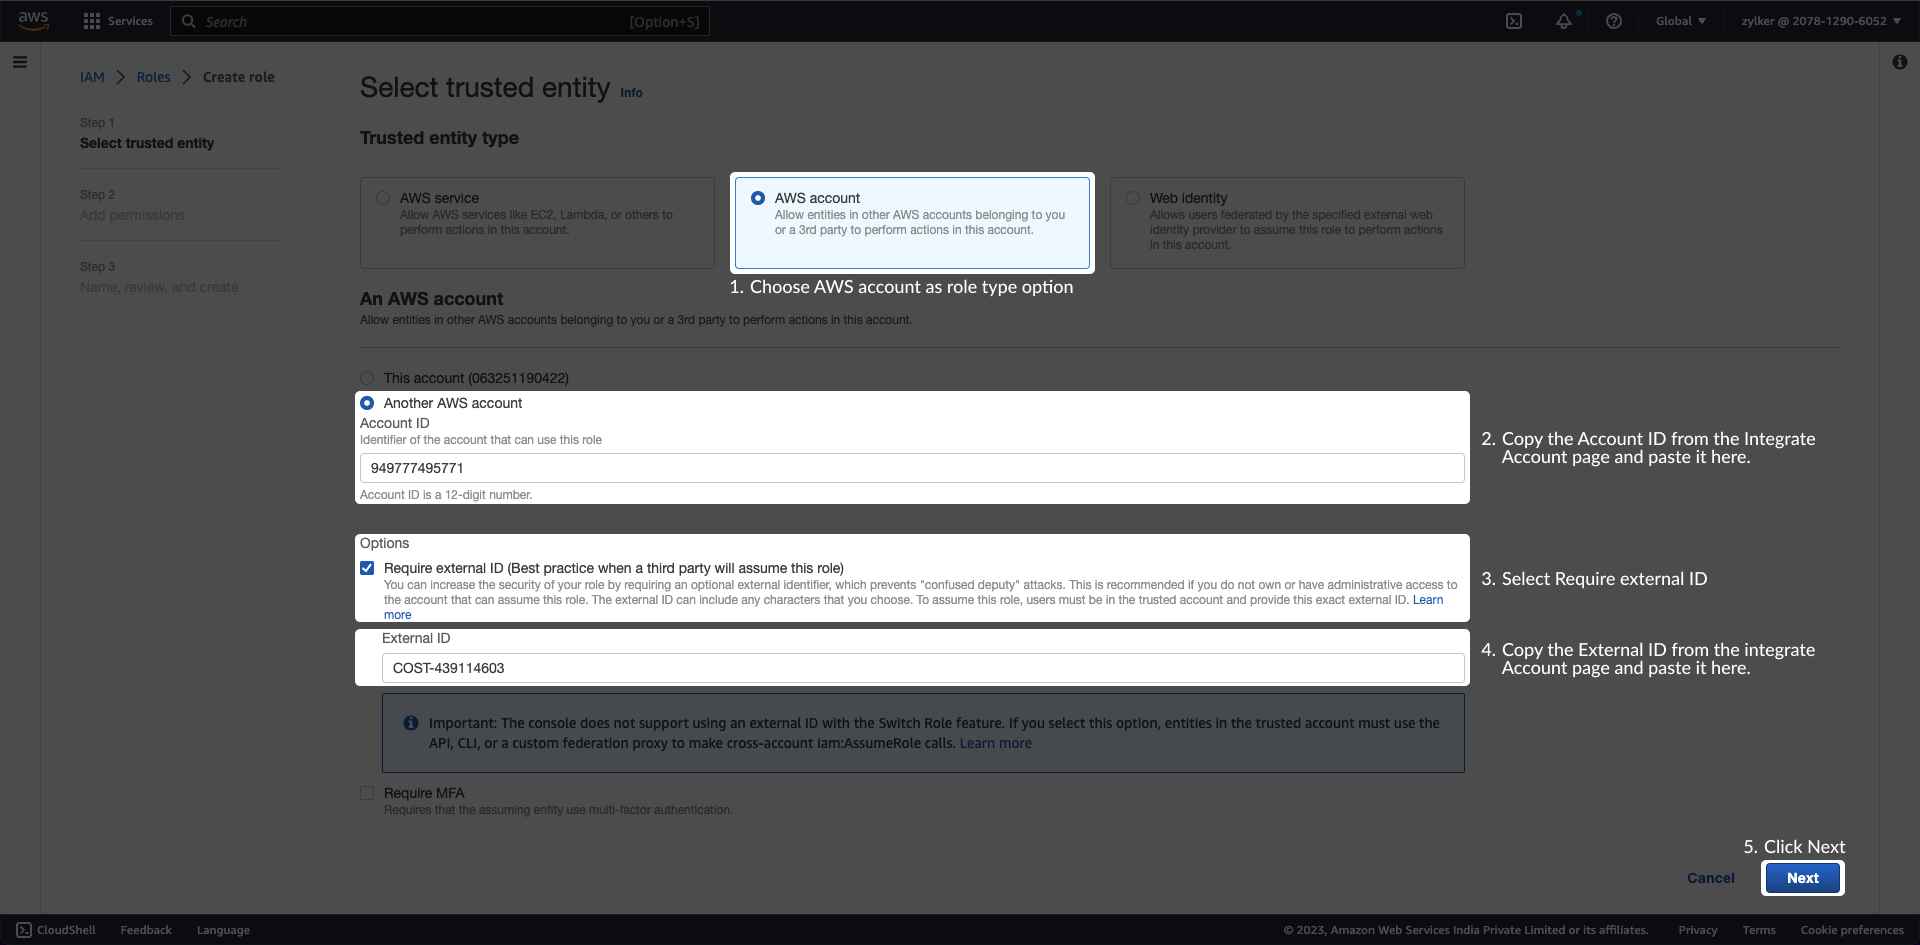
9. Click **Next**.
The *External ID* is regenerated every time the page reloads. It is an alphanumeric key unique to your integration. If you refresh the *Integrate Account* page, navigate away and back, or leave the tab idle long enough to re-render, you will get a new *External ID* and the one you already pasted into AWS becomes invalid.
Always copy it immediately before you create the role, and do not refresh the CloudSpend tab until the role exists.
**Add permissions**
Site24x7 requires ReadOnly access to your AWS services and resources.
1. In the *Add permissions* page, search and select the policy you created above. You can also search for and select **ReadOnlyAccess** which is the AWS managed - job function policy as required.
**Note**: If you wish to monitor the usage metrics of your Kinesis Video Streams, ensure that you also select **AmazonKinesisVideoStreamsReadOnlyAccess**.
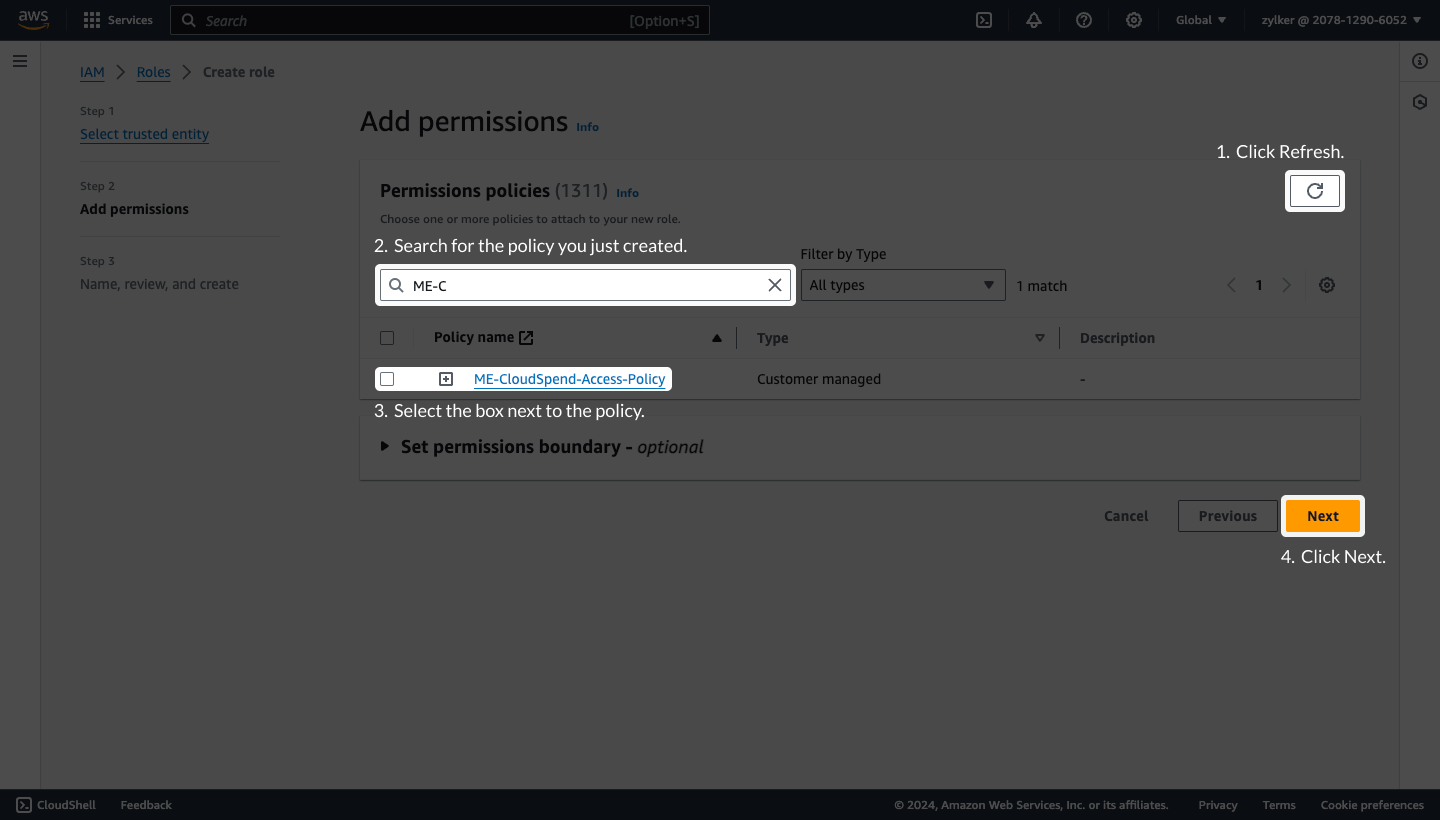
2. Click **Next**.
**Name, review, and create**
1. Enter the **Role name** and **Description**.
2. Review the details configured in [Select trusted entity](https://www.manageengine.com/cloudspend/help/aws-integrate.html#select-trusted-entity) and [Add permissions](https://www.manageengine.com/cloudspend/help/aws-integrate.html#add-permissions) sections.
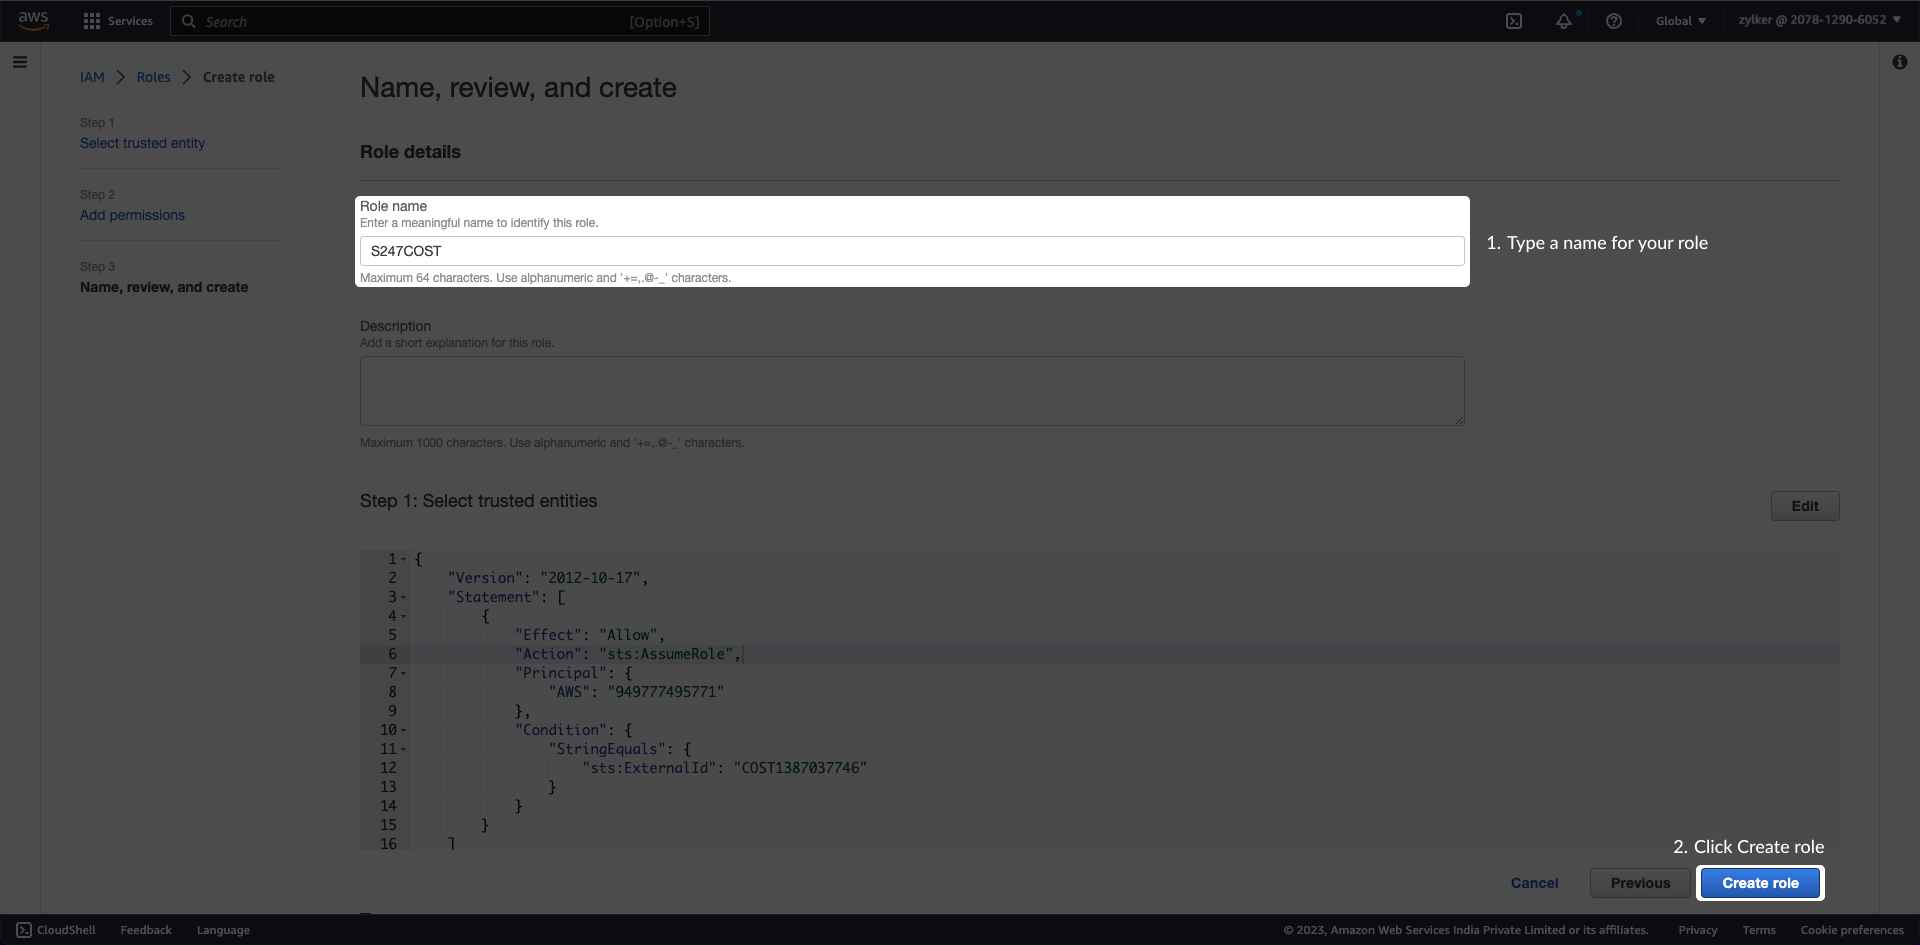
3. Click **Create Role**. Once done, an ARN role will be created for the IAM role you created.
**Copy Role ARN**
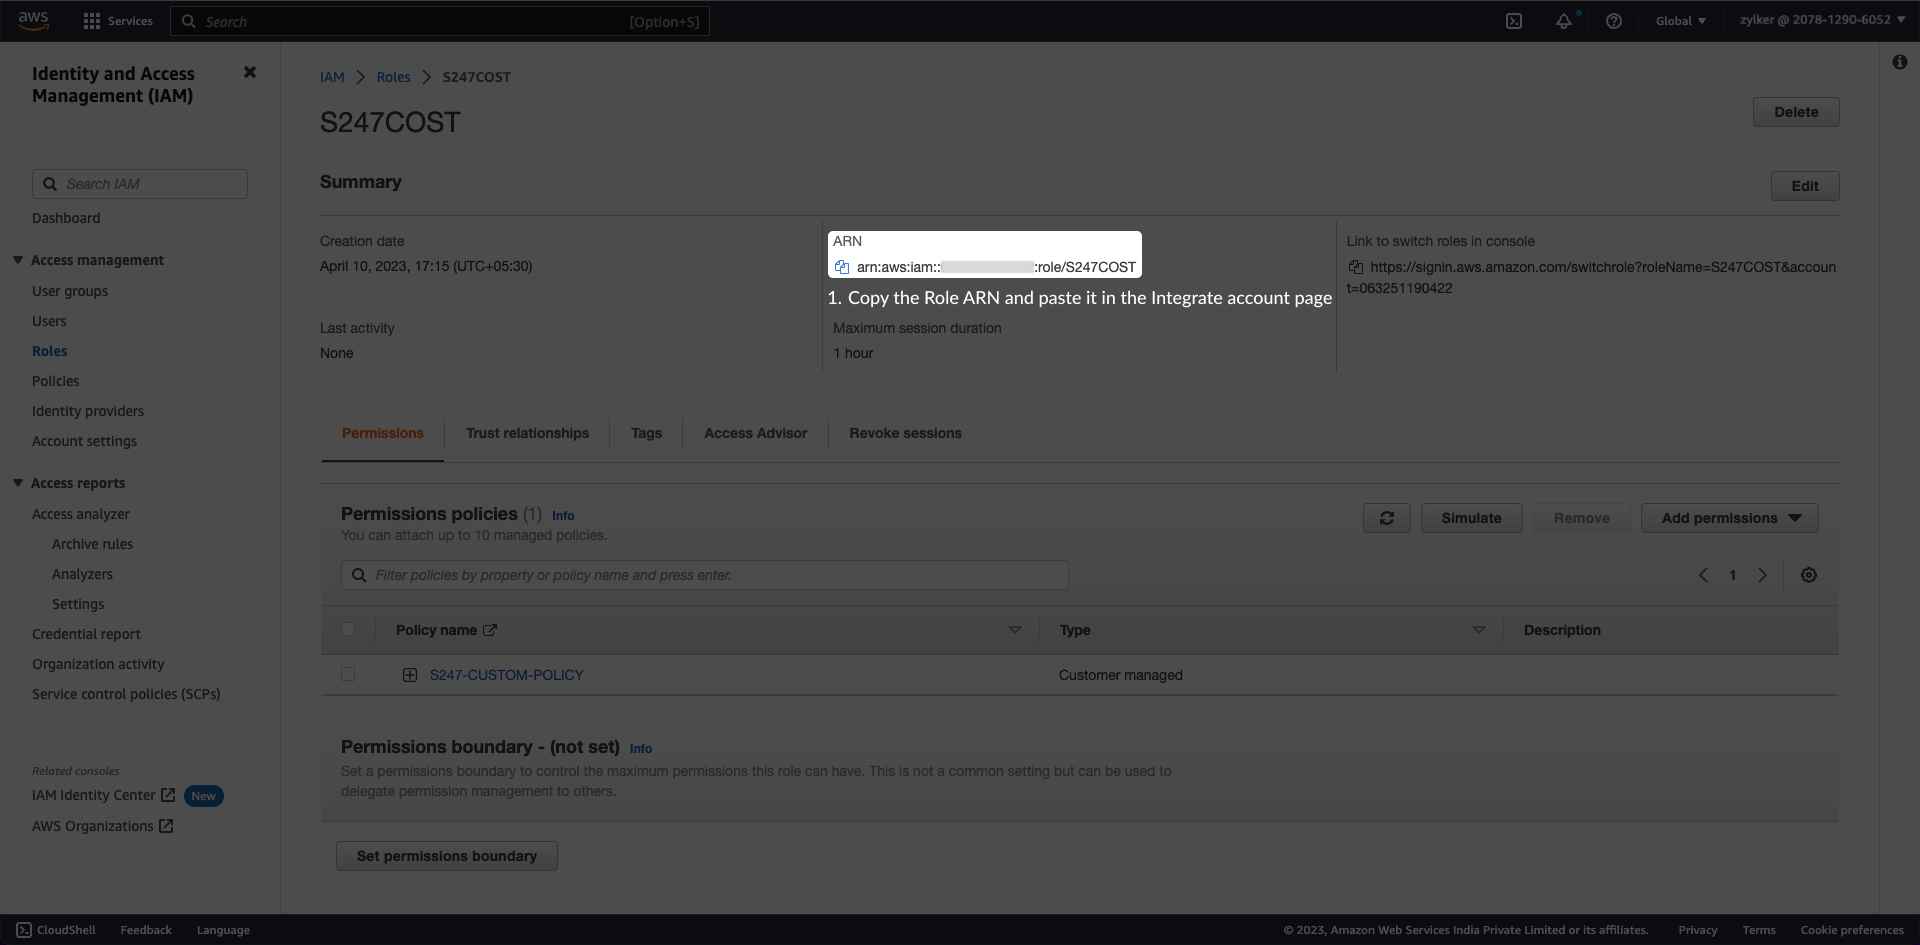
1. Go to **IAM** > **Roles** page.
2. Click the **refresh** button.
3. Search the role name that you created and click the **role name** hyperlink.
4. Copy the **ARN details** from the *Summary* section and paste it in the **CloudSpend** > **Integrate Account** > **Role ARN** field.
#### IAM User based access type (deprecated)
The following section will walk you through the AWS IAM user creation process.
**Select Access Type**
1. Sign in to the **AWS Management Console** and open the **IAM console**.
**Note**: If you're using the consolidated billing feature in AWS Organizations to bring multiple member accounts under a master account then sign in to the AWS management console of the master account. If you're running multiple standalone accounts (choose to have each account receive a bill) then login to the AWS account you want to integrate with CloudSpend.
2. In the navigation pane, click **Users** and then click **Add user**.
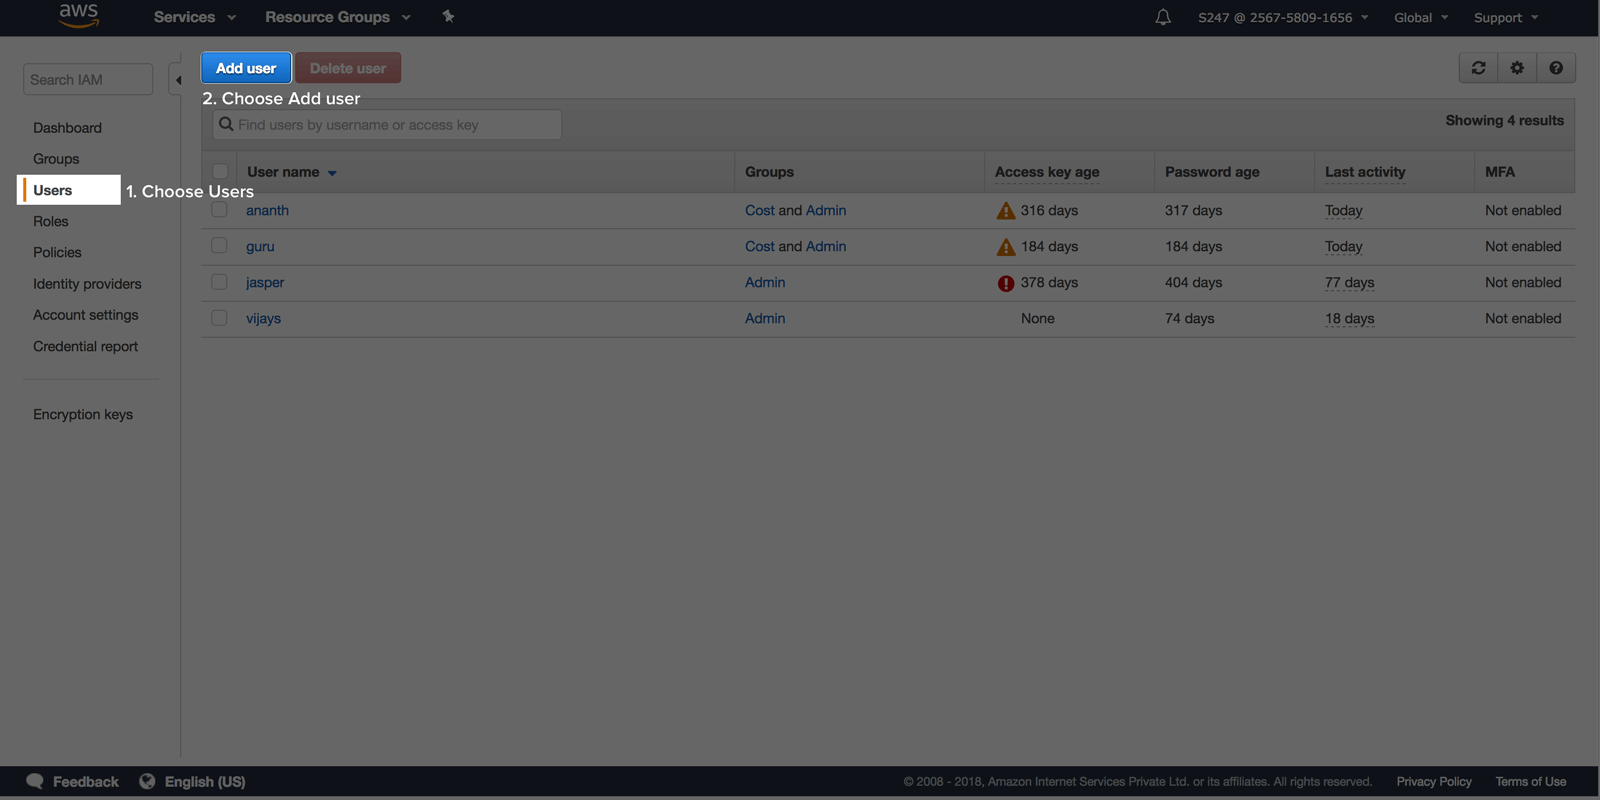
3. For user name, type a meaningful name.
4. Select **Programmatic access** as the type of access.
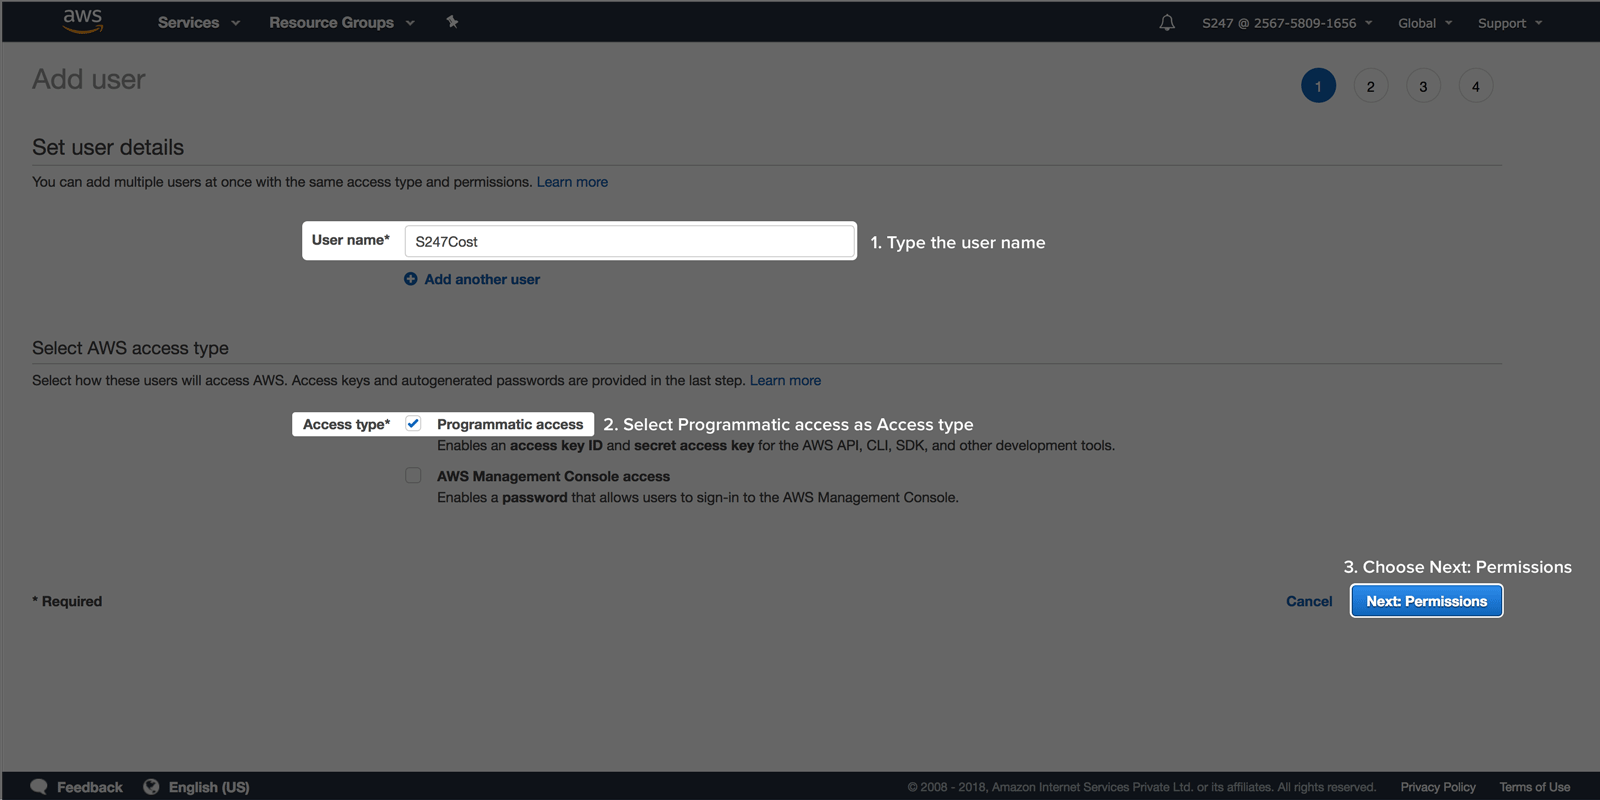
5. Click **Next: Permissions**.
**Assign permissions**
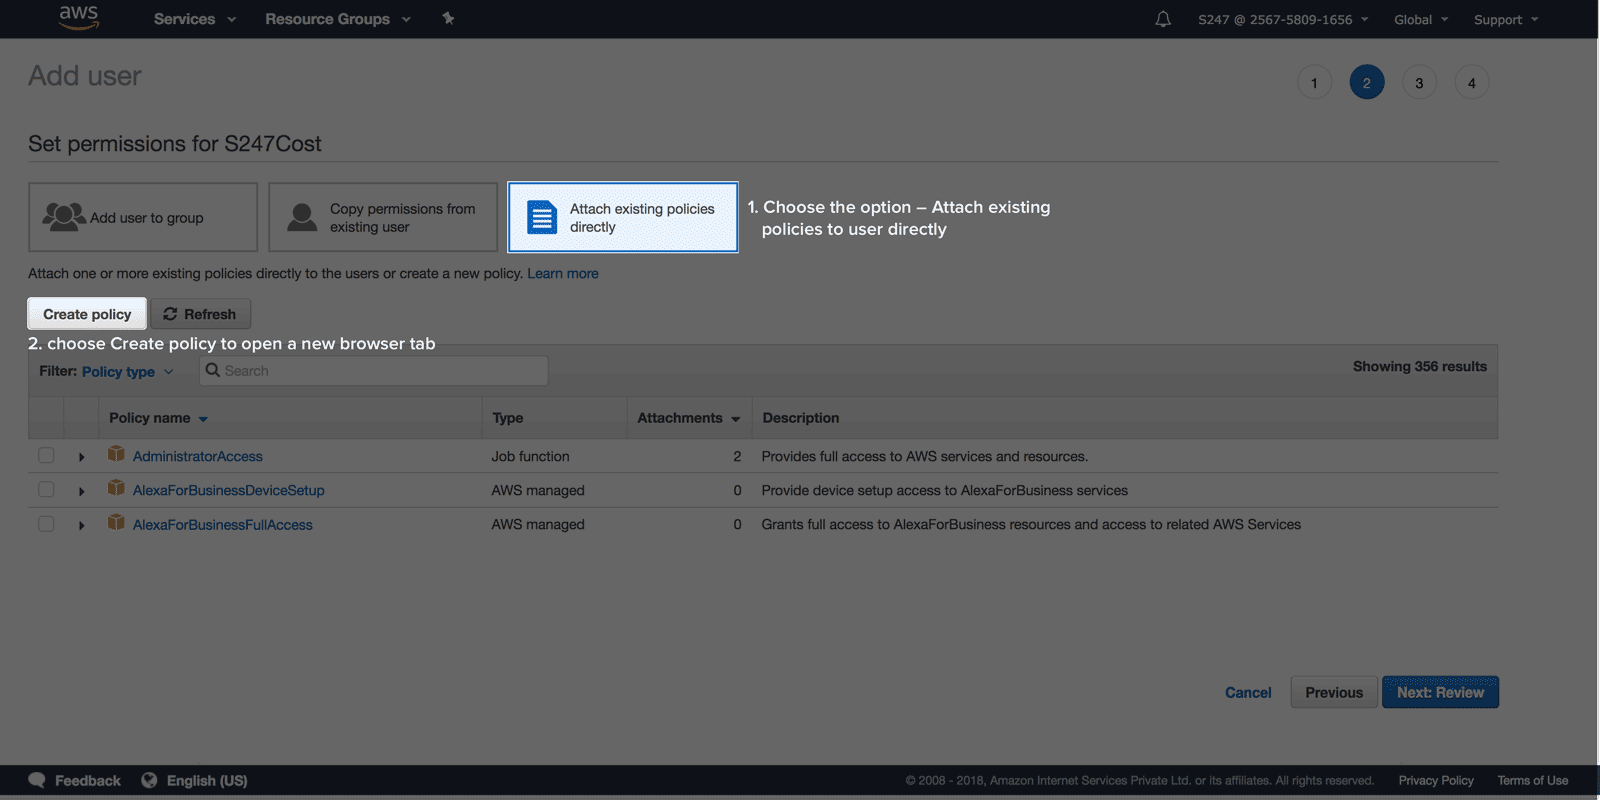
1. In the *Set permissions* window, choose the option **Attach existing policies to user directly** and click **Create policy** to open a new browser tab.
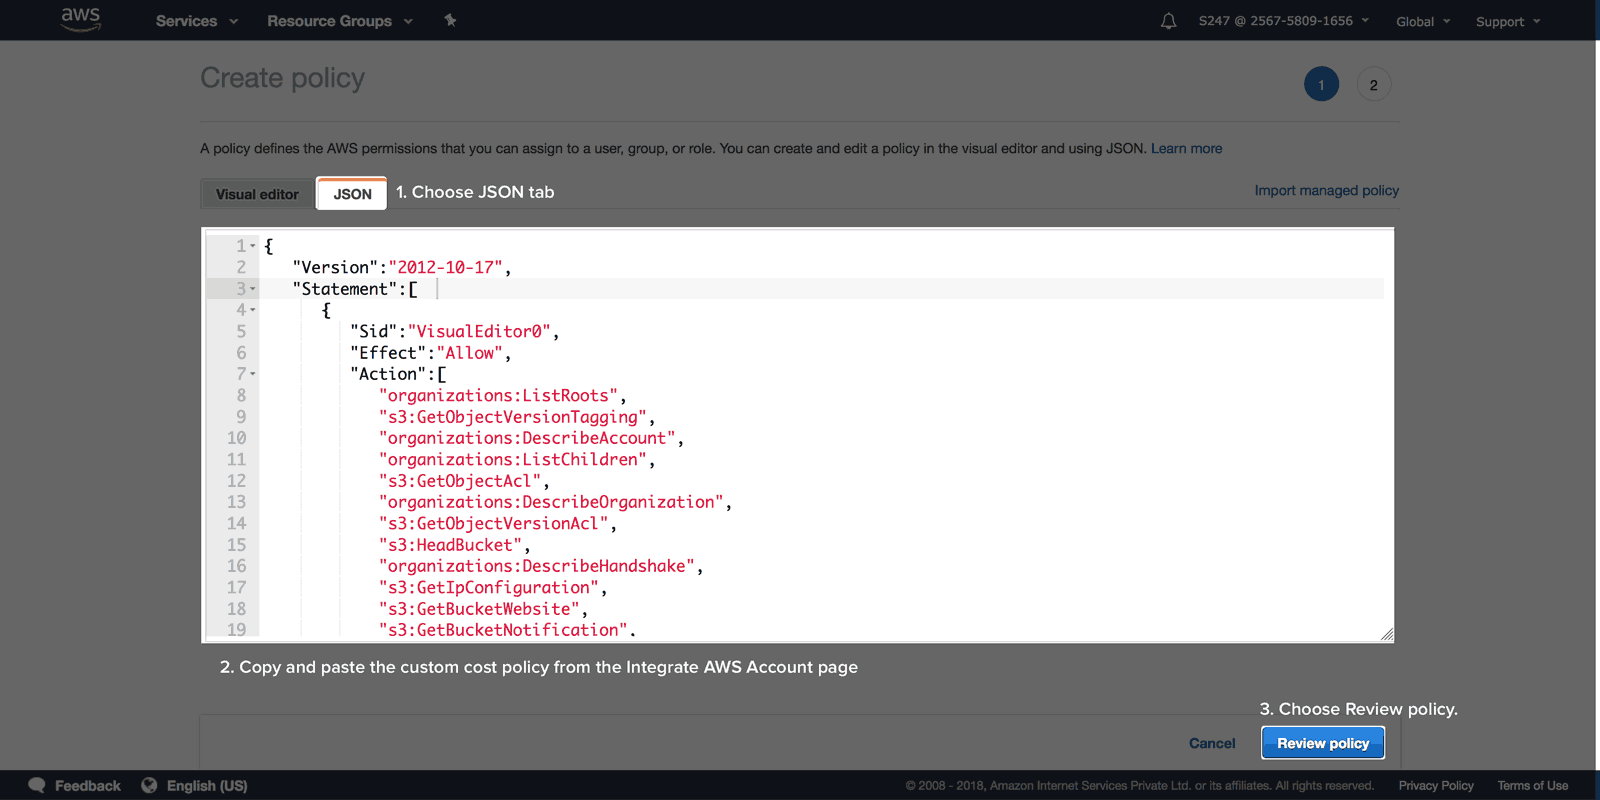
2. Choose the **JSON** tab. Click **Copy Policy** in the wizard, then paste the custom cost policy into the **JSON** tab. Alternatively, copy the custom policy shown below and paste it in the editor.
```json
{
"Version": "2012-10-17",
"Statement": [
{
"Sid": "VisualEditor0",
"Effect": "Allow",
"Action": [
"organizations:ListRoots",
"s3:GetObjectVersionTagging",
"organizations:DescribeAccount",
"organizations:ListChildren",
"s3:GetObjectAcl",
"organizations:DescribeOrganization",
"s3:GetObjectVersionAcl",
"organizations:DescribeHandshake",
"s3:GetBucketWebsite",
"s3:GetBucketNotification",
"s3:GetReplicationConfiguration",
"s3:ListMultipartUploadParts",
"organizations:ListAccountsForParent",
"organizations:ListHandshakesForAccount",
"s3:GetObject",
"iam:GetUserPolicy",
"s3:GetAnalyticsConfiguration",
"organizations:ListOrganizationalUnitsForParent",
"s3:GetObjectVersionForReplication",
"cur:DescribeReportDefinitions",
"s3:GetLifecycleConfiguration",
"s3:GetBucketTagging",
"s3:GetInventoryConfiguration",
"s3:ListBucketVersions",
"s3:GetBucketLogging",
"s3:ListBucket",
"s3:GetAccelerateConfiguration",
"s3:GetBucketPolicy",
"organizations:DescribePolicy",
"s3:GetObjectVersionTorrent",
"s3:GetEncryptionConfiguration",
"organizations:ListCreateAccountStatus",
"s3:GetBucketRequestPayment",
"organizations:DescribeOrganizationalUnit",
"s3:GetObjectTagging",
"s3:GetMetricsConfiguration",
"organizations:DescribeCreateAccountStatus",
"organizations:ListPoliciesForTarget",
"s3:ListBucketMultipartUploads",
"organizations:ListTargetsForPolicy",
"s3:GetBucketVersioning",
"organizations:ListAWSServiceAccessForOrganization",
"s3:GetBucketAcl",
"organizations:ListPolicies",
"organizations:ListHandshakesForOrganization",
"organizations:ListAccounts",
"s3:GetObjectTorrent",
"s3:ListAllMyBuckets",
"s3:GetBucketCORS",
"organizations:ListParents",
"iam:GetUser",
"s3:GetBucketLocation",
"s3:GetObjectVersion",
"bcm-data-exports:ListExports",
"bcm-data-exports:GetExport"
],
"Resource": "*"
}
]
}
```
3. Click **Review policy**.
4. On the review page, type a name and a description for the policy you're creating. Evaluate the permissions granted, if everything looks satisfying click **Create policy**.
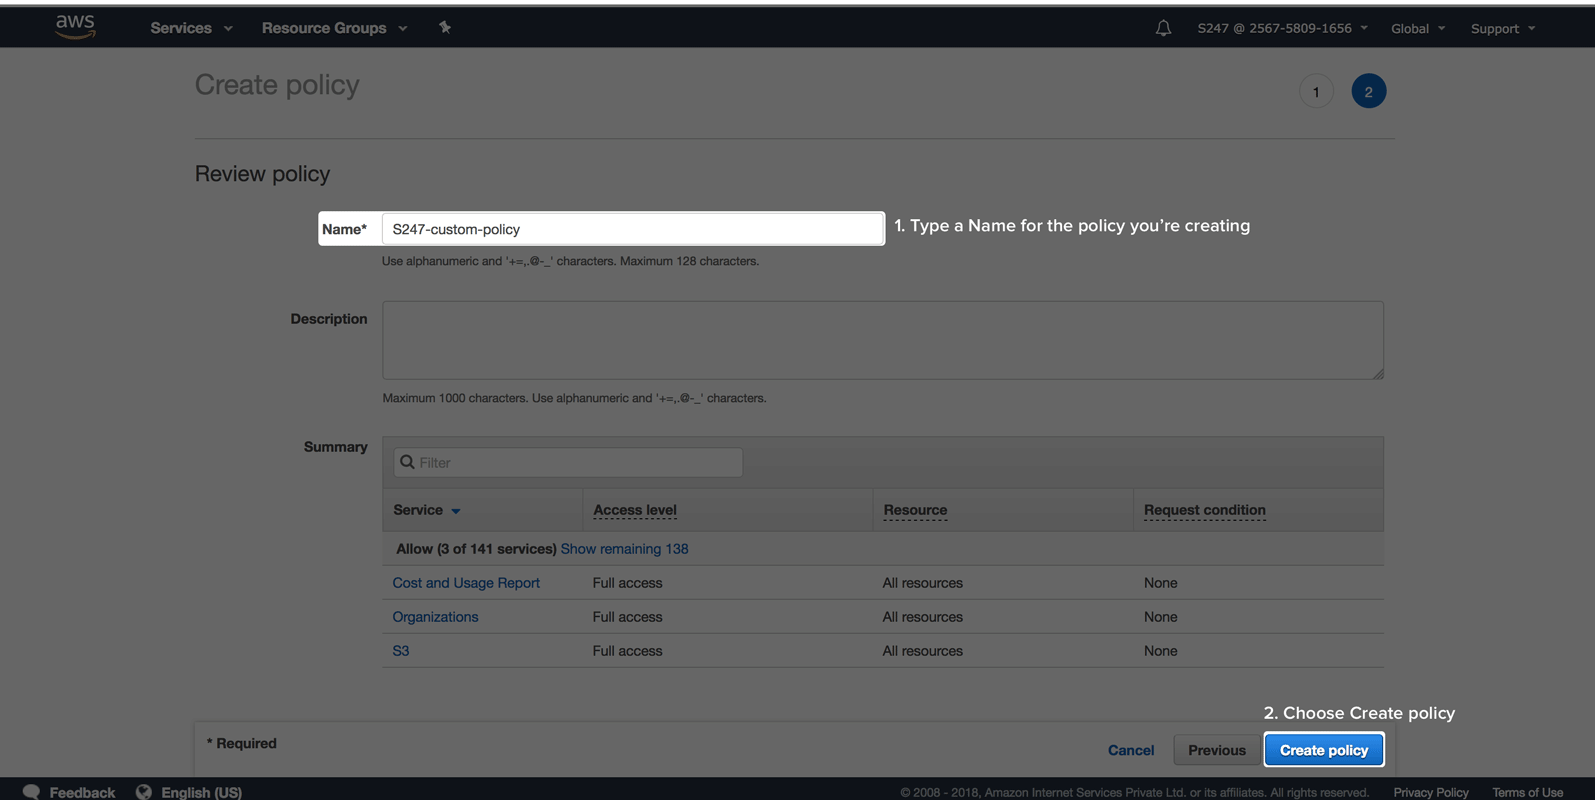
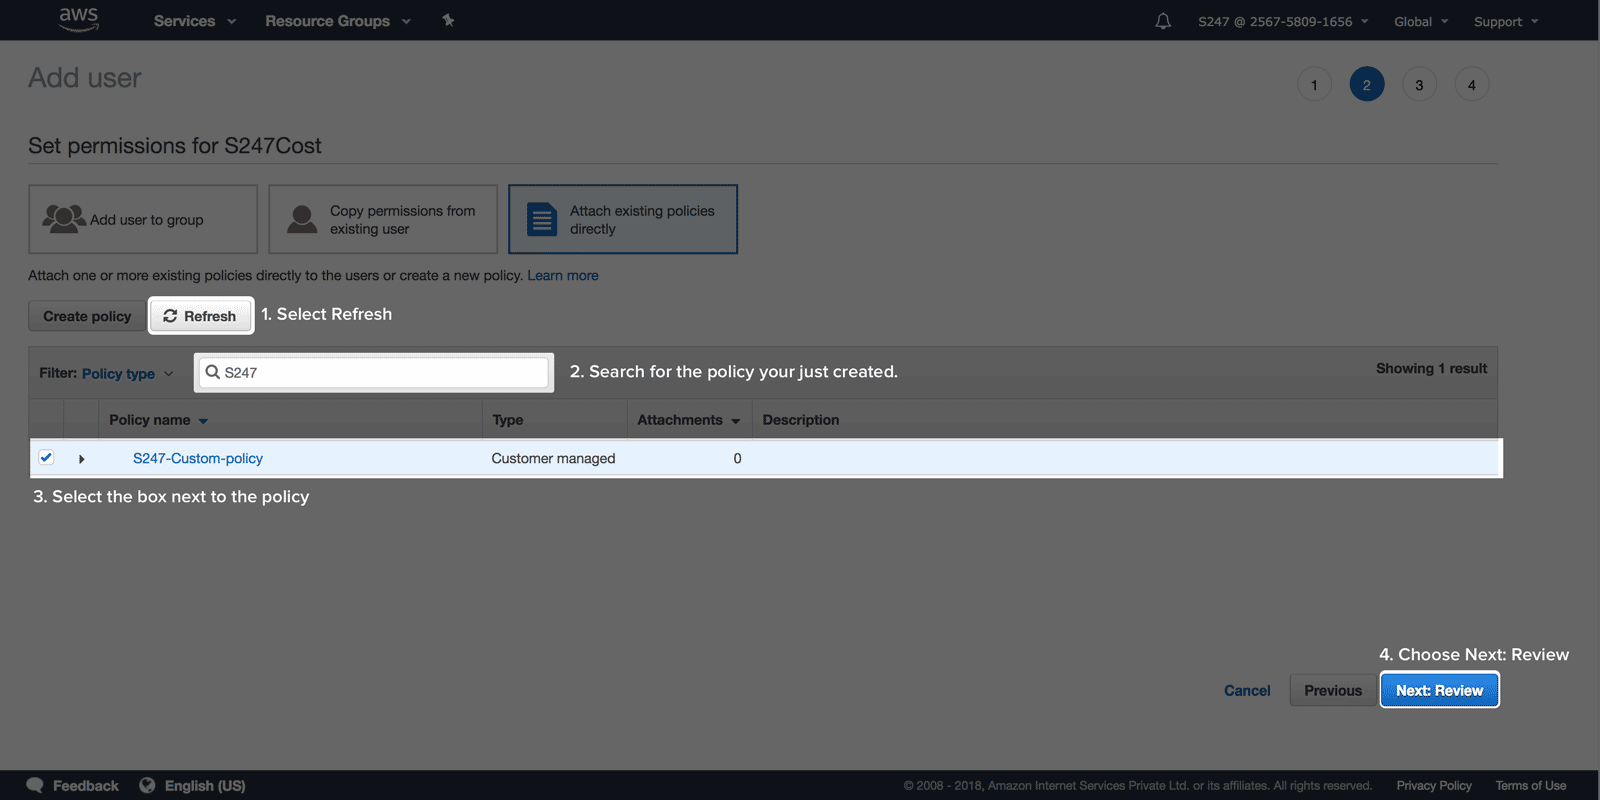
5. Back in the *Set permissions* page, select **Refresh**, type the name of the policy you just created in the search box to filter the list.
6. Select the check box next to the name of the policy. Click **Next: Review**.
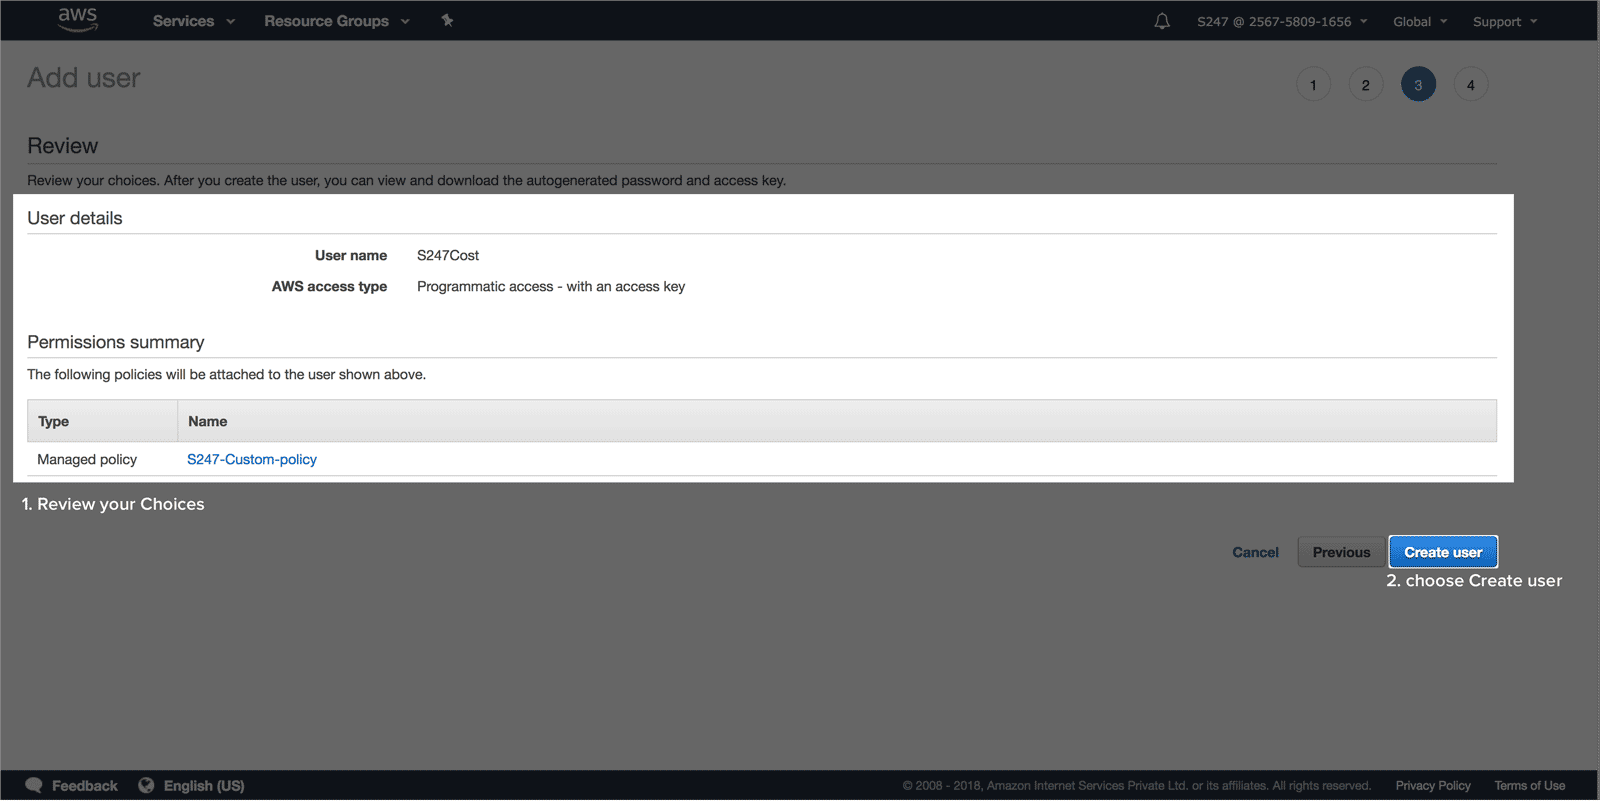
**Download credentials**
1. Review user details and permissions. If everything is in order click **Create user**.
2. Choose **Download.csv** and save the file in a secure location. (This is the only opportunity you will get to view or save the security credentials.)
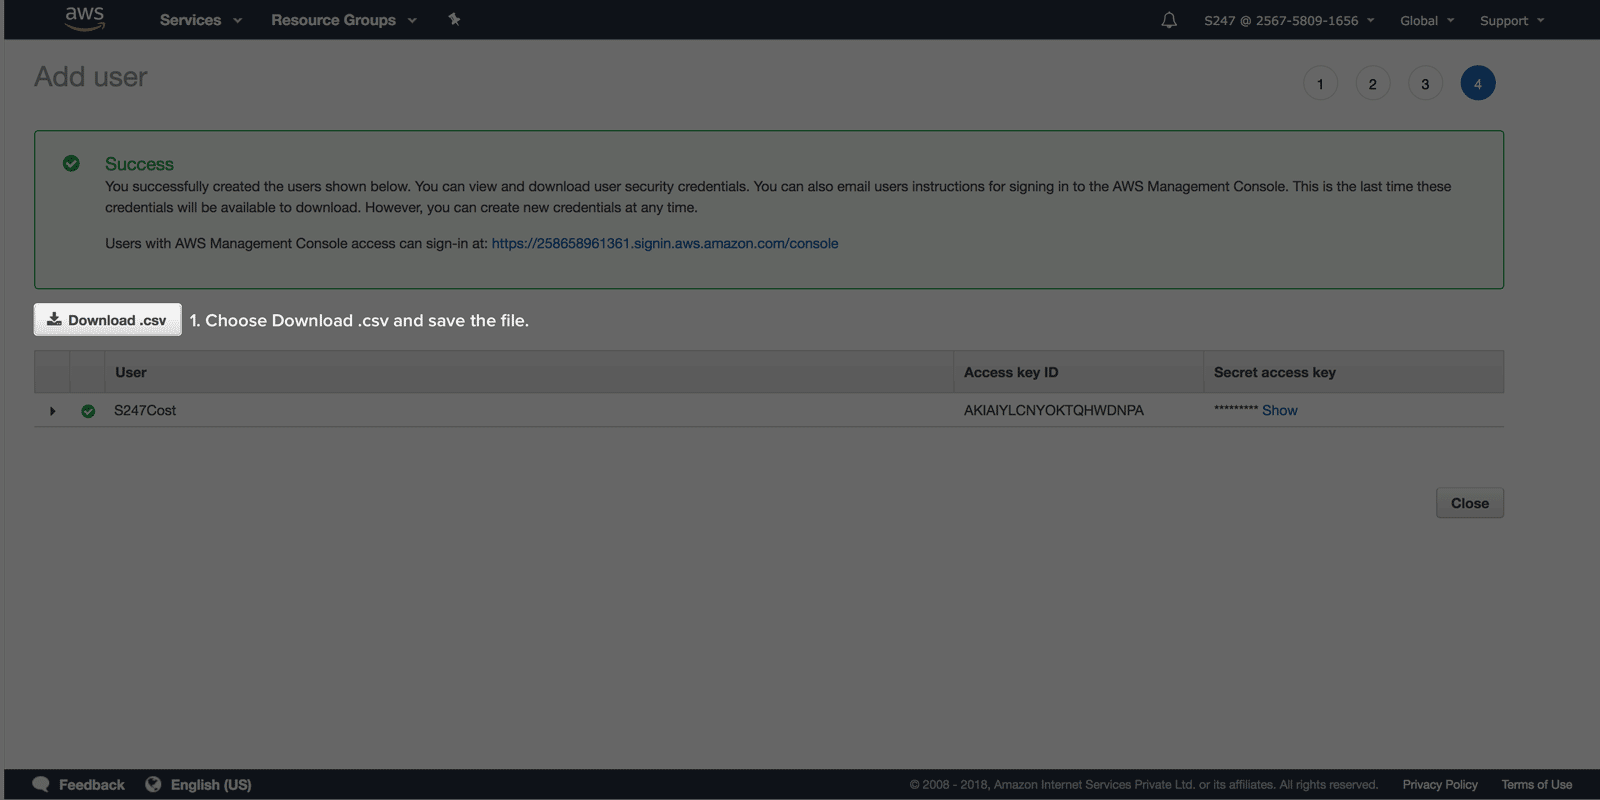
3. Open the file, copy the secret access key and access key ID, and paste them into the **Access Key ID** and **Secret Access Key** fields in the *CloudSpend Integrate AWS Account* page.
4. Click **Next**.
After you enter the **Access Key ID** and **Secret Access Key** and click **Next**, proceed to [Step 3: Billing data](https://www.manageengine.com/cloudspend/help/aws-integrate.html#step-3-billing-data).
#### Site24x7 Account access type
Choose this if you already monitor this AWS account in Site24x7. CloudSpend reuses the IAM role or user that connection already has. You only need to attach a cost policy to it.
**Link your Site24x7 account**
Under *Link your Site24x7 account*, select the account to integrate from the **Choose Site24x7 Account** drop-down menu. The drop-down lists the AWS accounts already connected to your Site24x7 account.
**Attach new cost policy**
The *Attach new cost policy* panel explains how to delegate access to your AWS resources through a Site24x7 account.
**Create policy**
1. Create a new cost policy.
2. Select the **JSON** tab. Click **Copy Policy** in the wizard, then paste the custom cost policy.
3. Provide a name for your cost policy, and click **Create policy**.
**Attach cost policy**
Whether your Site24x7 account has an IAM role or an IAM user associated with it, follow the respective set of instructions to delegate access.
**If your Site24x7 account uses an IAM Role:**
1. Select the IAM role associated with your Site24x7 account.
2. Select **Attach policies** to attach your cost policy with the IAM role.
3. Select the cost policy to attach, and click **Attach policy**.
**If your Site24x7 account uses an IAM User:**
1. Select the user name associated with your Site24x7 account.
2. Select **Add permissions**.
3. Select the **Attach existing policies directly** tab to grant permission, select the cost policies, and click **Next: Review**.
4. Select **Add permissions** to attach the policy to the user.
After you select the Site24x7 account and attach the required cost policy, click **Next** to proceed to [Step 3: Billing data](https://www.manageengine.com/cloudspend/help/aws-integrate.html#step-3-billing-data).
**MSP accounts:** If you are working in a Site24x7 MSP account, choose the MSP customer first, then pick the AWS account associated with that customer. See [Connecting an MSP account](https://www.manageengine.com/cloudspend/help/aws-integrate.html#connecting-an-msp-account).
### Step 3: Billing data
This step has three parts: the billing data export, the cost optimization recommendations export, and the account scope.
The *Billing data* panel asks whether you already deliver AWS cost data to an S3 bucket. Select **Yes** or **No**.
- **Yes**: Enter the name of your existing export in the *Export Name* field.
- **No**: Follow the steps below to create a new export.
AWS Data Exports enables you to create exports of the Cost and Usage Report (CUR) 2.0 or Legacy Cost and Usage Reports.
CloudSpend supports master and linked accounts. If you're using the consolidated billing feature in AWS Organizations, then create the data export at master account level. However, if you wish to view the cost and usage details at the linked account level, you have to create the data export for the respective linked account.
Exports are delivered on a recurring basis to an Amazon S3 bucket. To deliver the exports to an existing or new S3 bucket, follow the steps mentioned below.
#### Creating a Data export
To create an AWS data export in an S3 bucket, follow the steps below to get started.
1. Sign in to the AWS console.
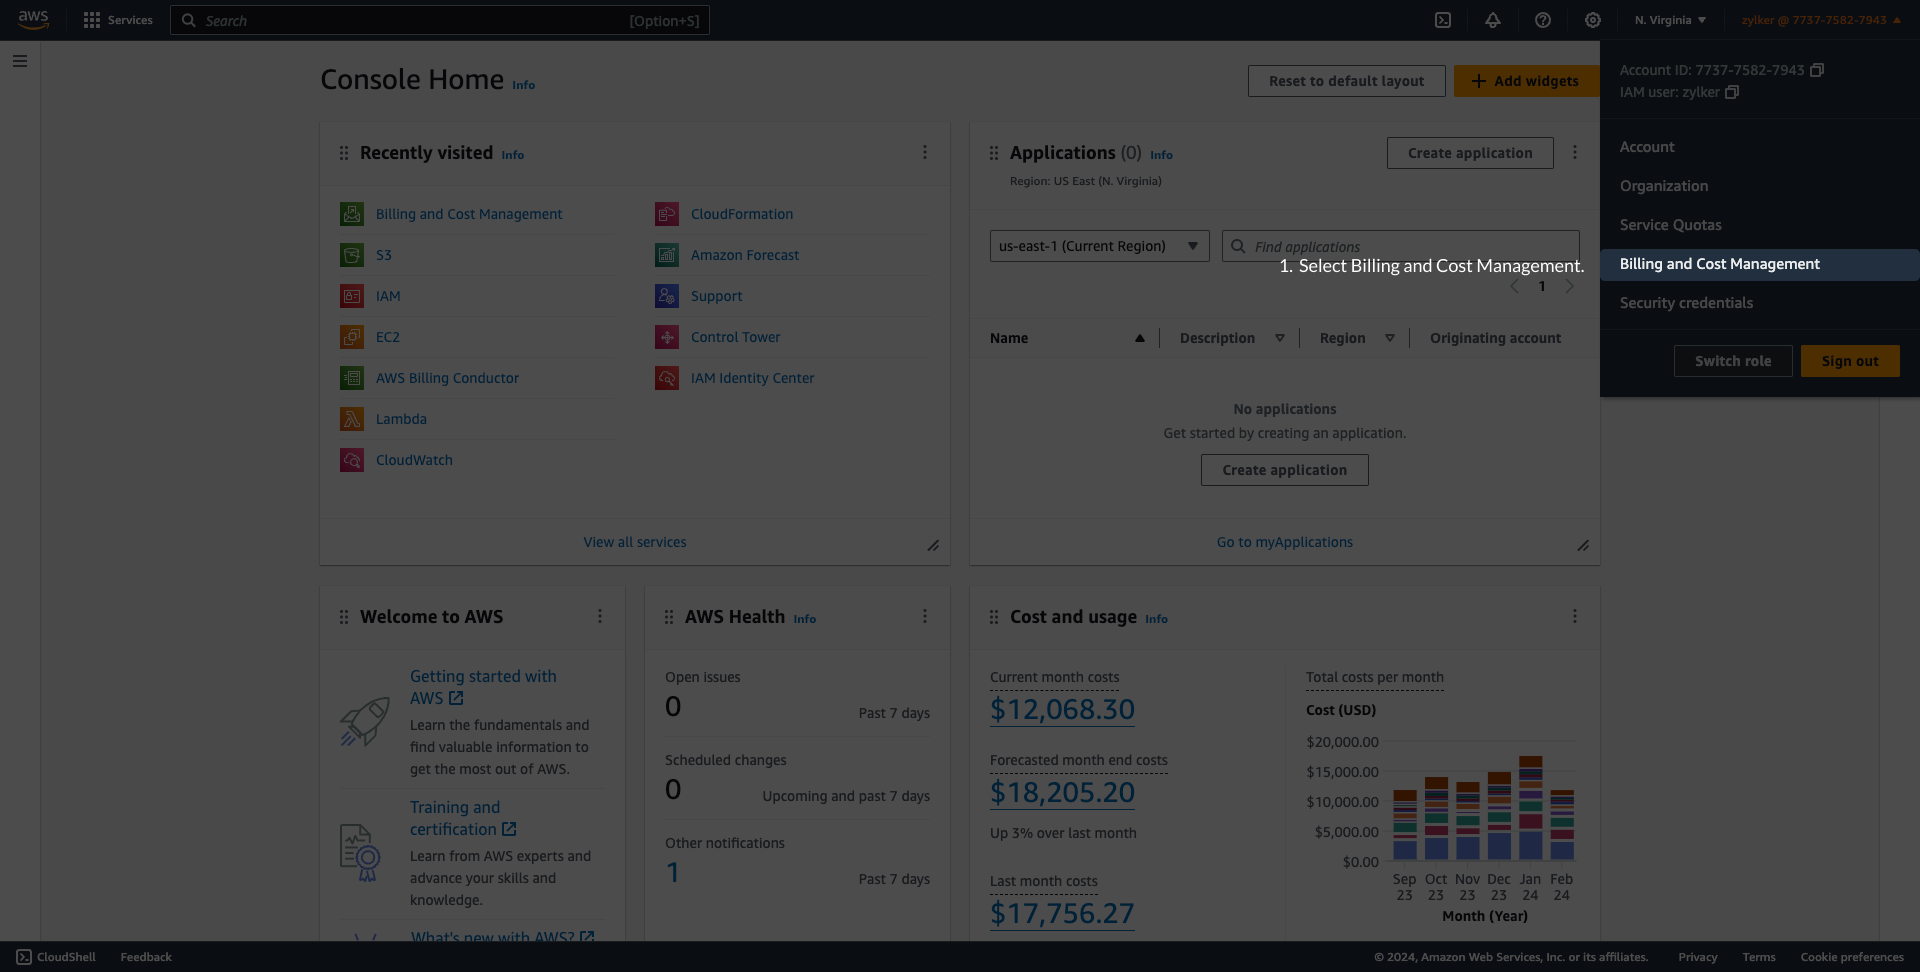
2. Select **Billing and Cost Management**.
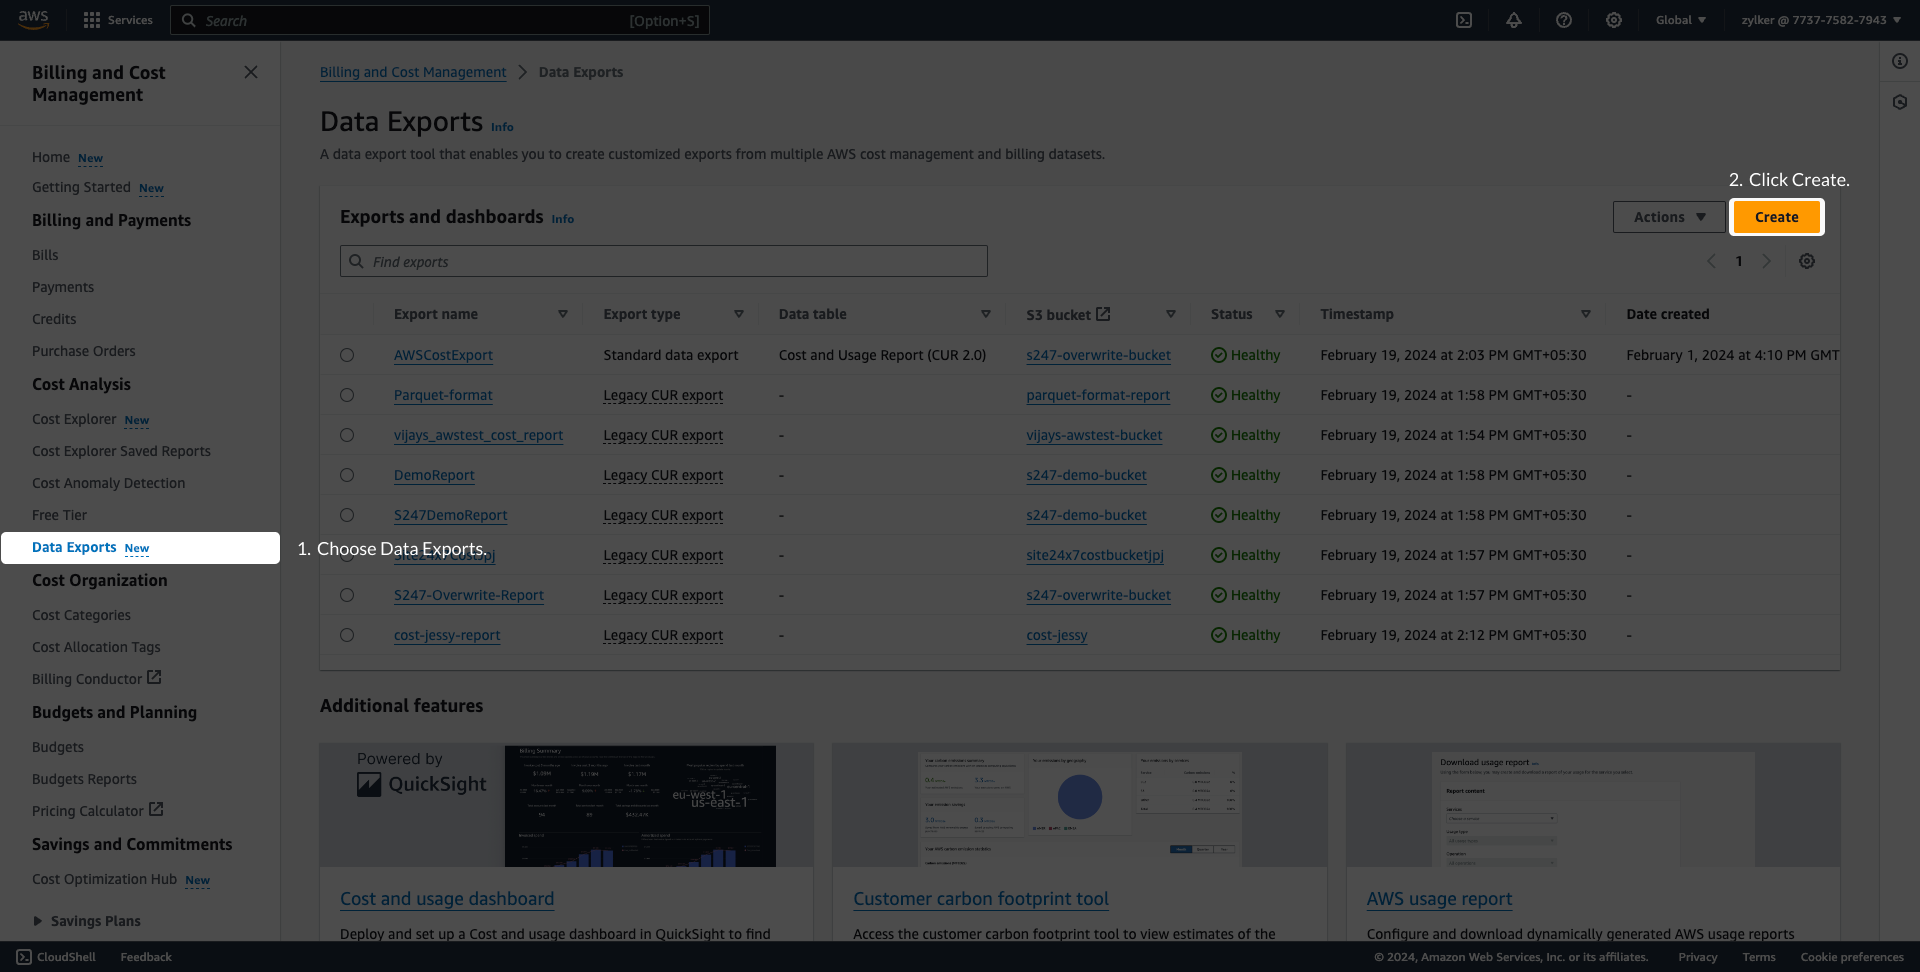
3. Select **Data Exports** in the left navigation pane and click **Create**.
4. On the *Create* page, under *Export type*, choose **Standard data export** or **Legacy CUR export**.
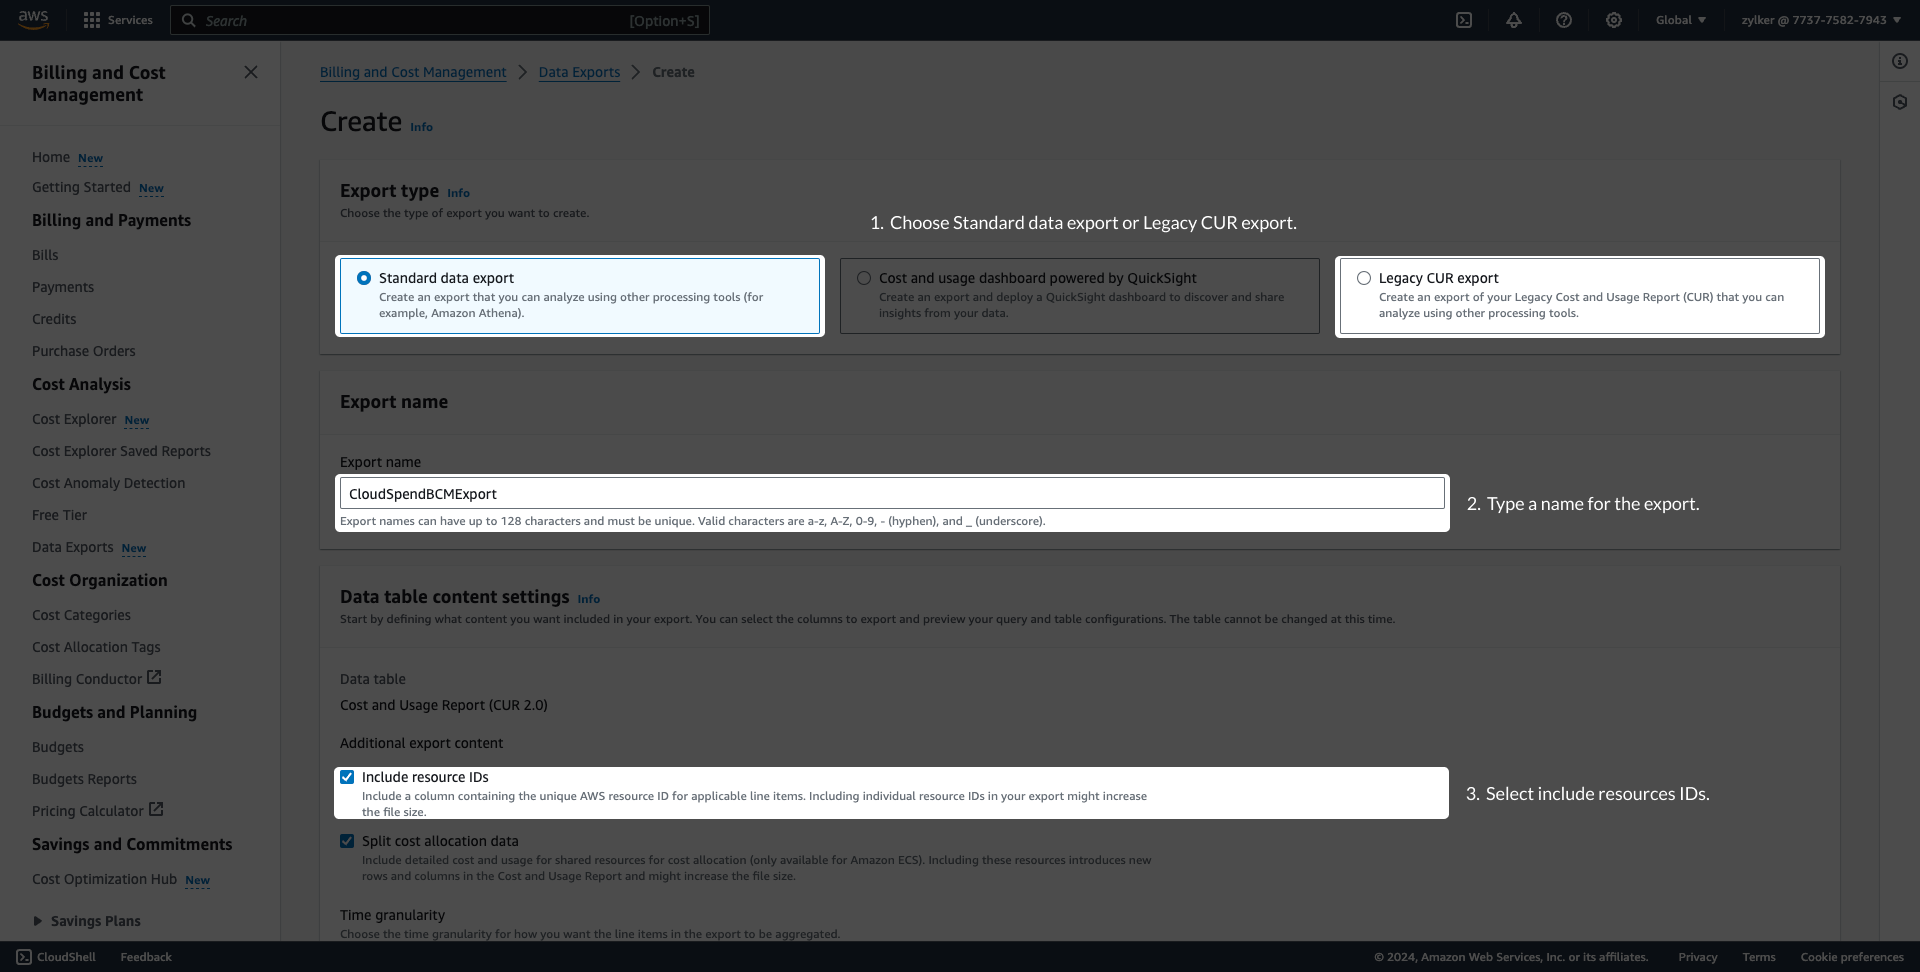
5. Enter a name for your export name in the *Export name* field and save this name for later use.
6. Select the **Include resource IDs** checkbox under *Additional export content*.
1. For Standard data export, set the *Time granularity* as **Hourly** and keep the *Column selection* list at default. Under *Data export delivery* options, select **Compression type** and file format as **gzip - text/csv**. Choose the *File versioning* as **Overwrite existing data export file**.
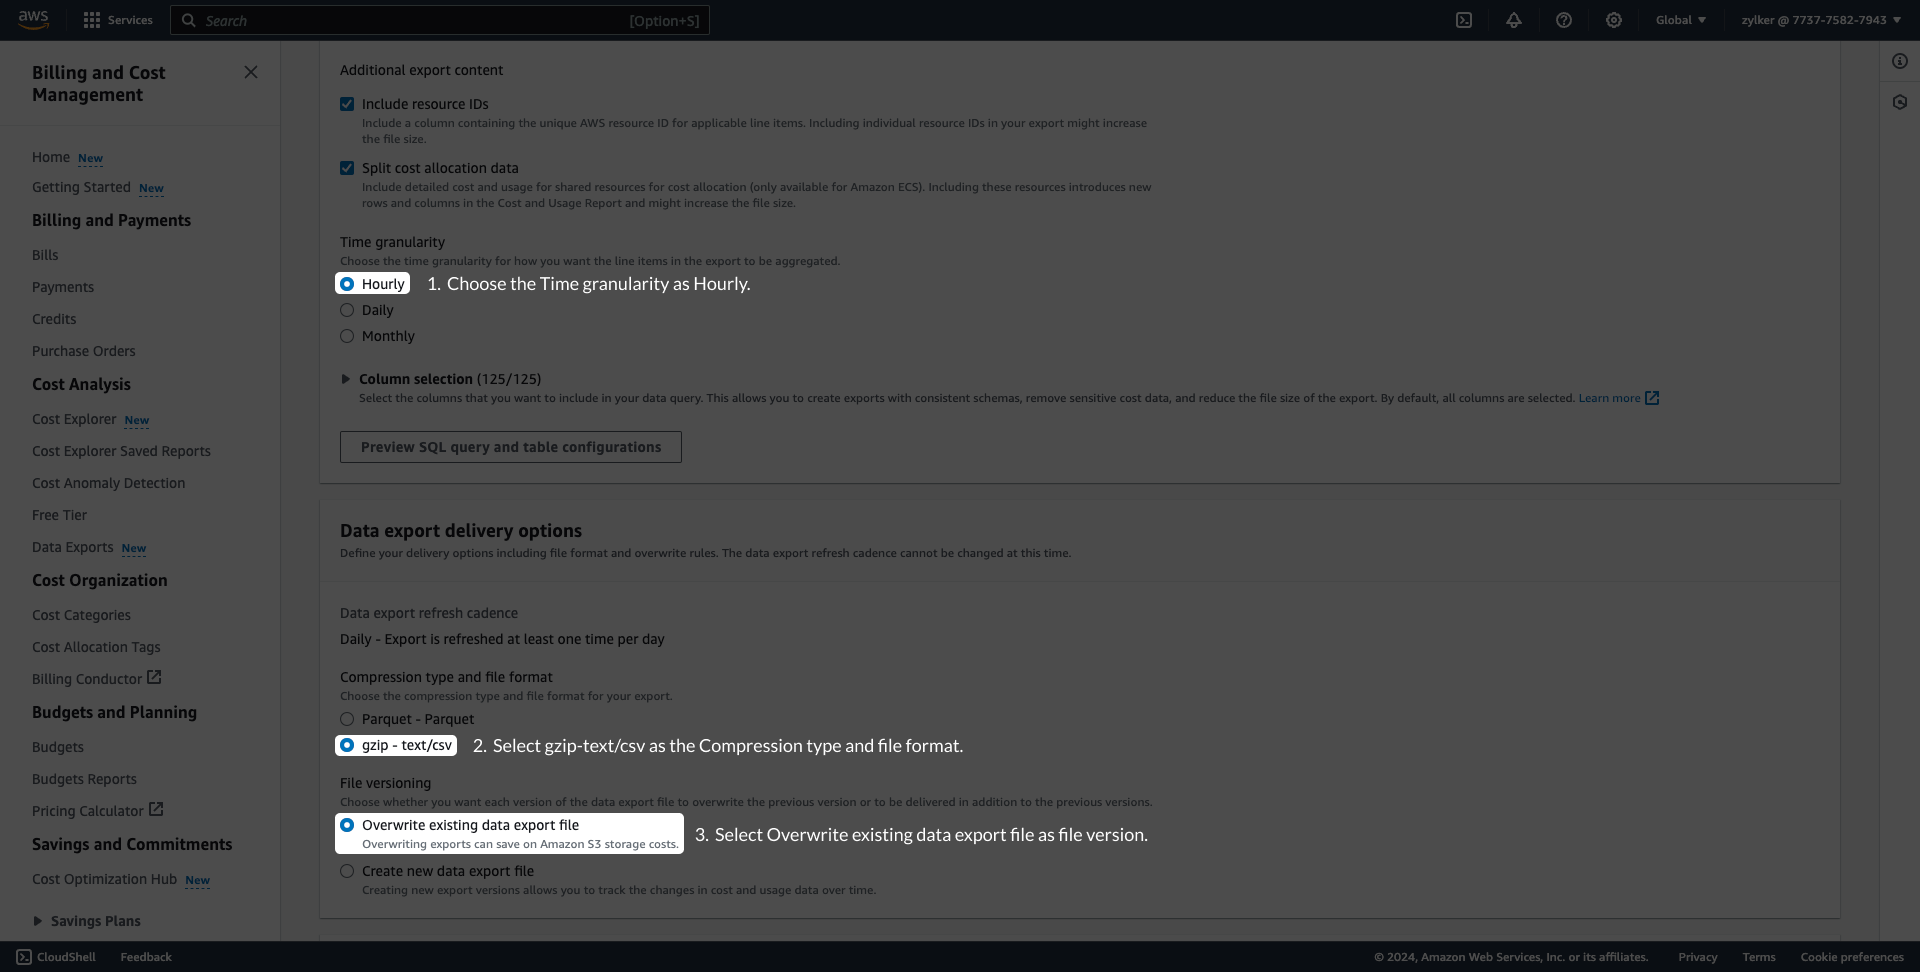
2. For Legacy CUR export, set the *Report data time granularity* as **Hourly** and select the *Overwrite existing report* option for **Report versioning**. Select **gzip** as *Compression type*.
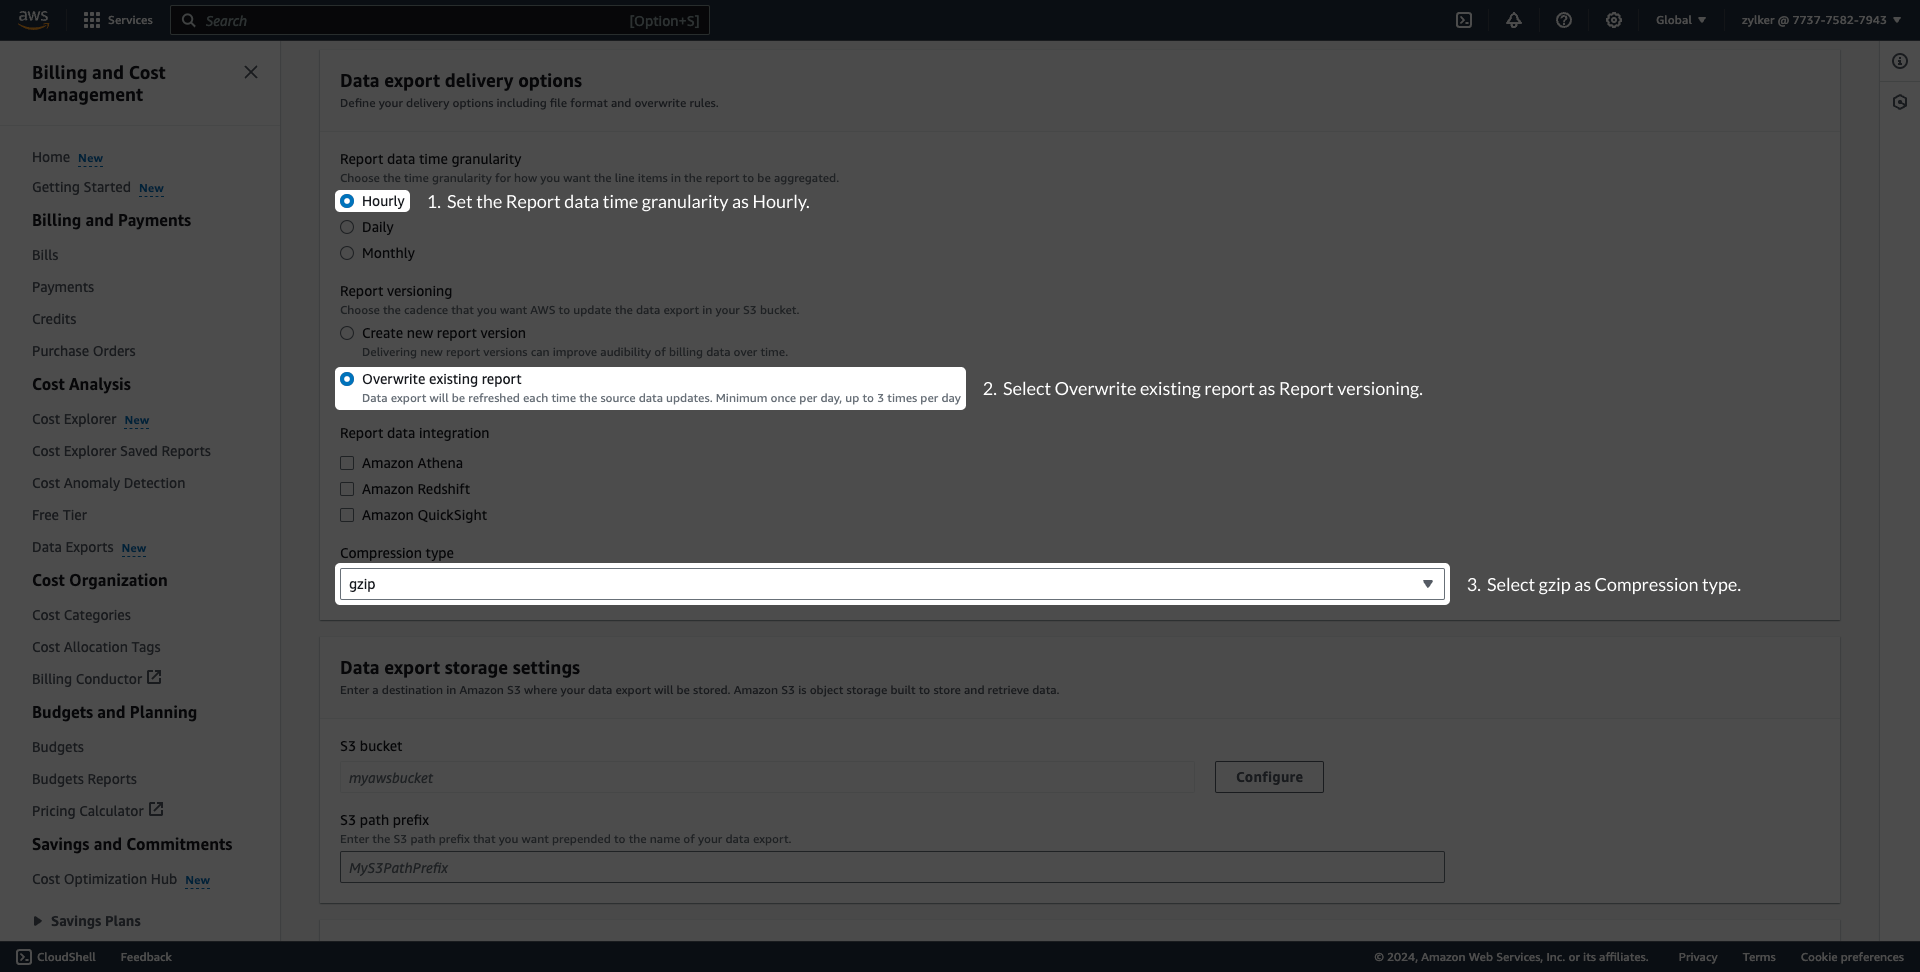
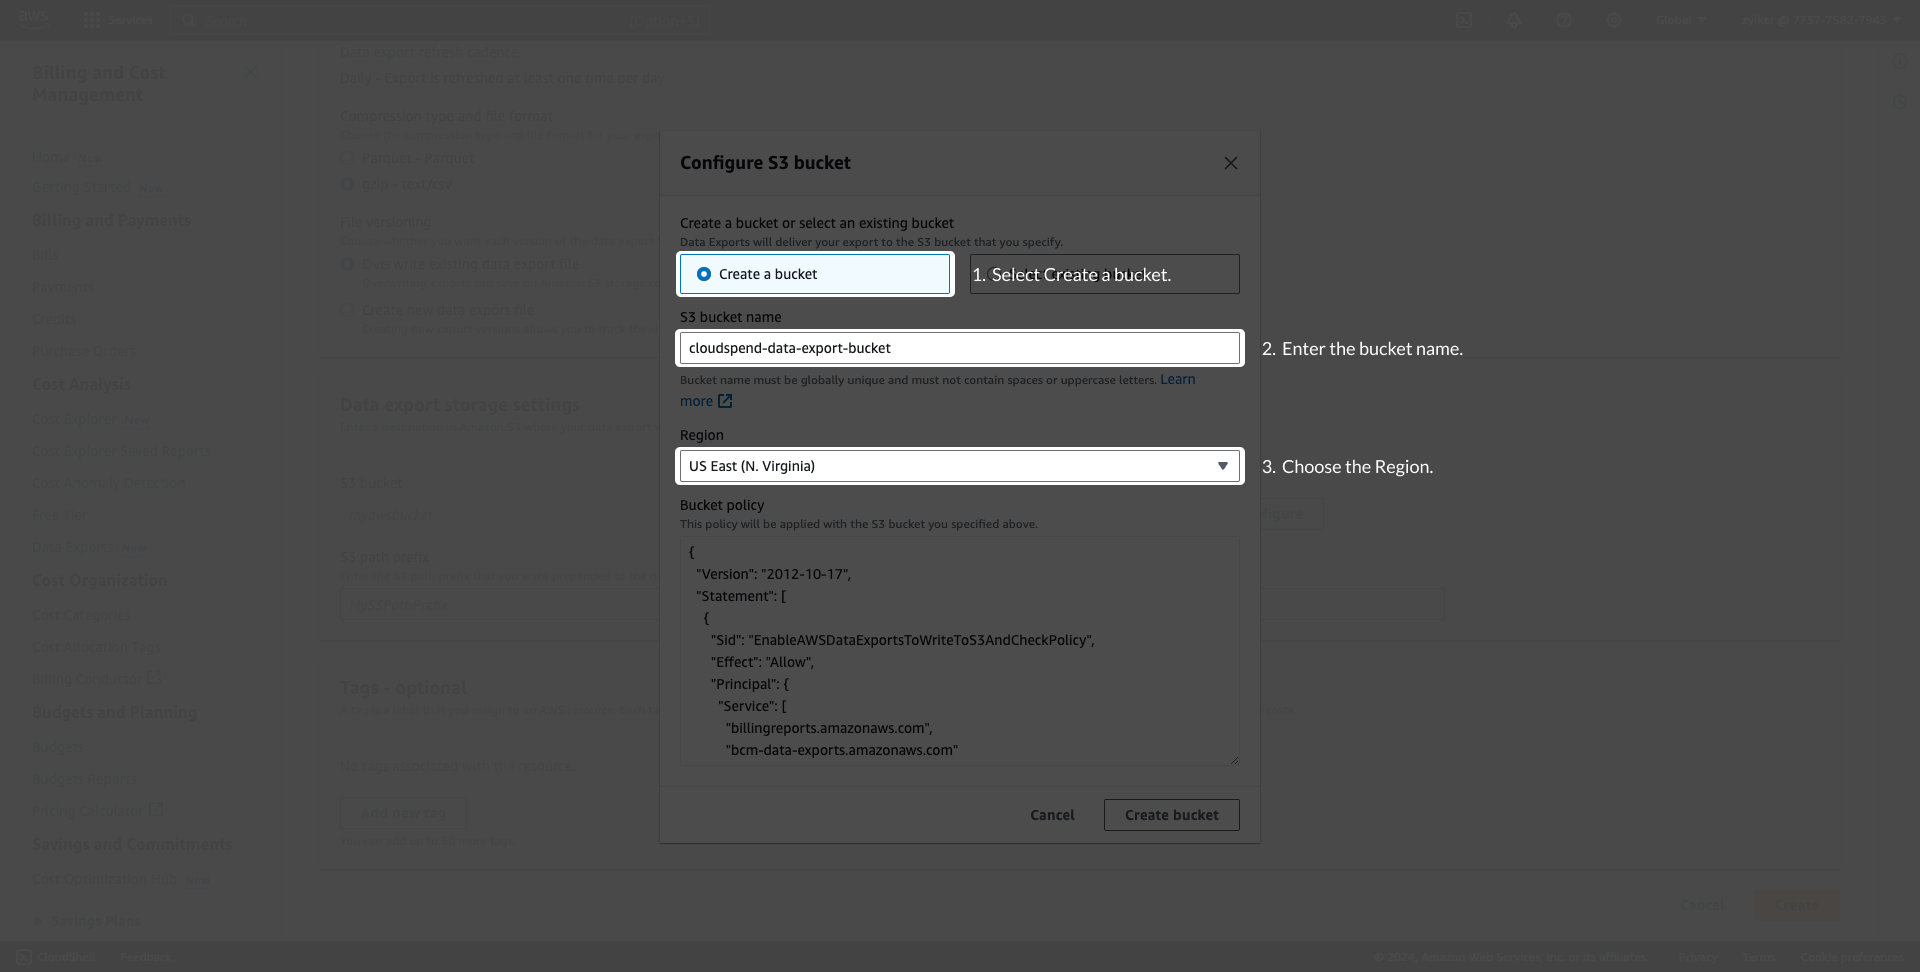
7. To configure the S3 bucket, click **Configure under Data export storage settings**. You can either create a S3 bucket or configure an existing S3 bucket.
1. Choose **Create a bucket** to create a new S3 bucket. Provide a **S3 bucket name**, choose the **Region**, and click **Create bucket**.
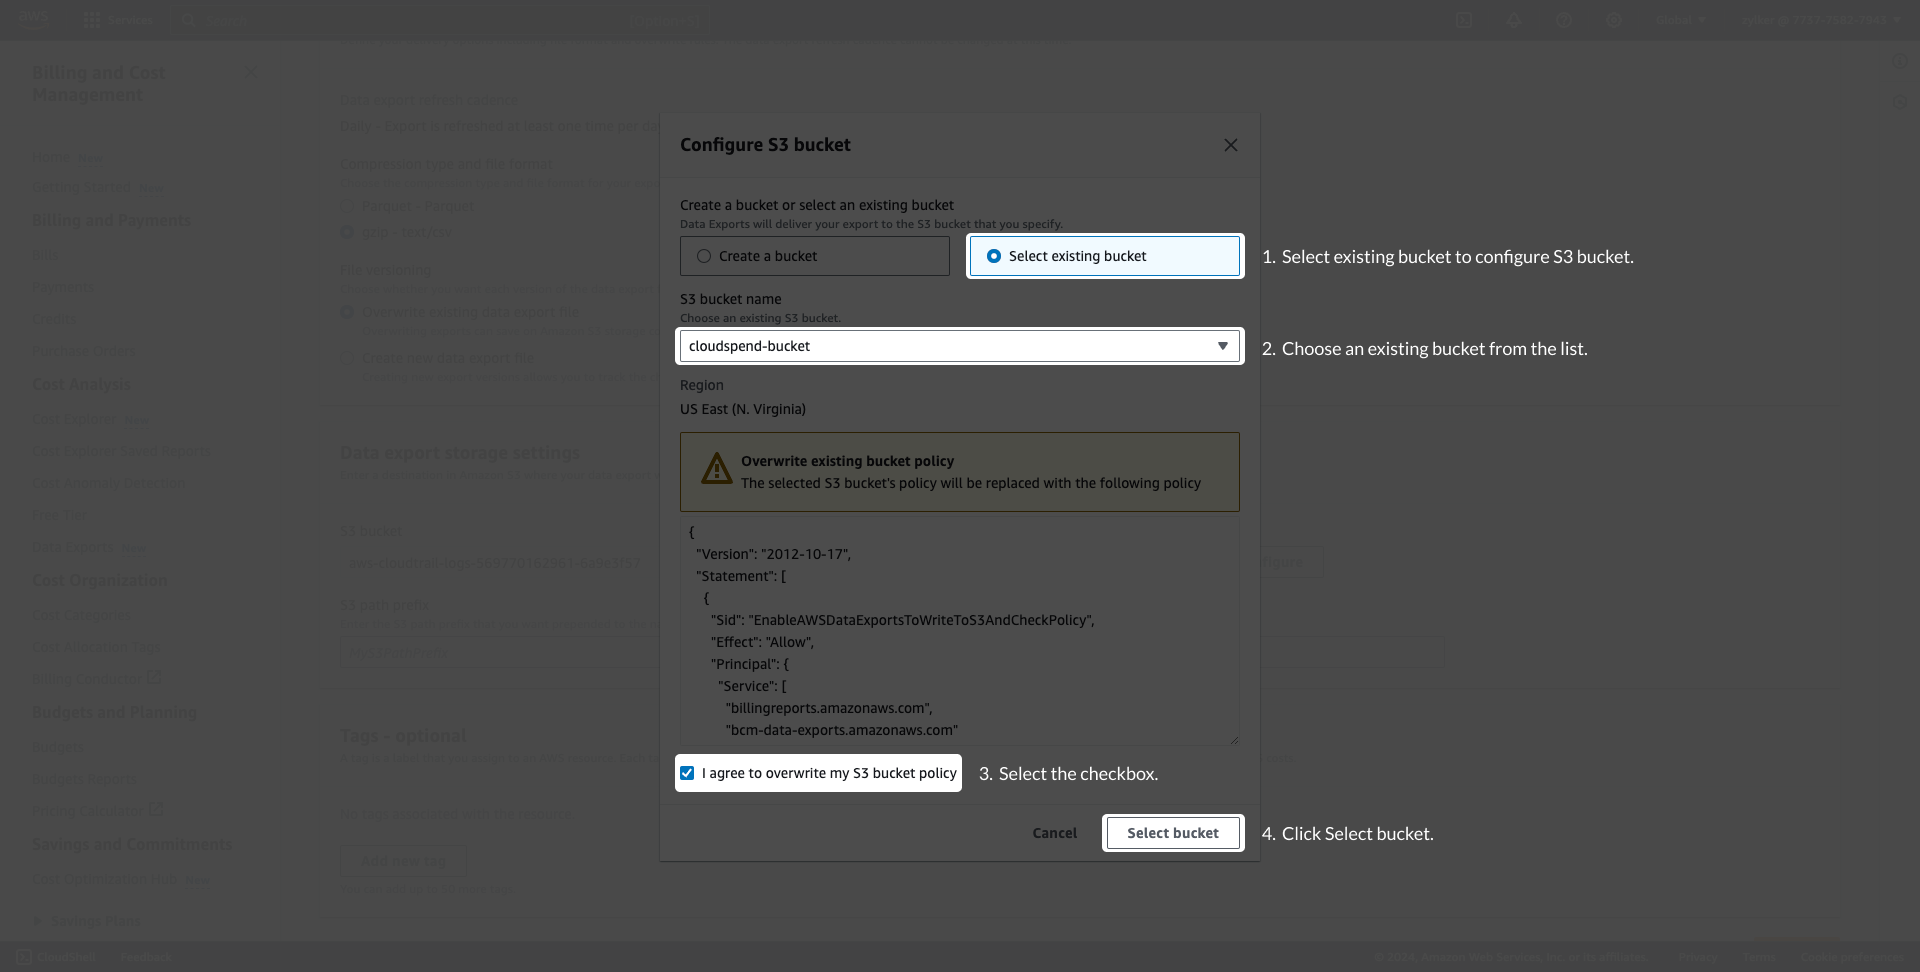
2. Choose **Select existing bucket** to configure an existing S3 bucket, and select the required S3 bucket from the *S3 bucket name* list. Select the **I agree to overwrite my S3 bucket policy** checkbox and click **Select bucket**.
8. Enter the **S3 path prefix**. Save the **S3 bucket name** and **S3 path prefix** for later use.
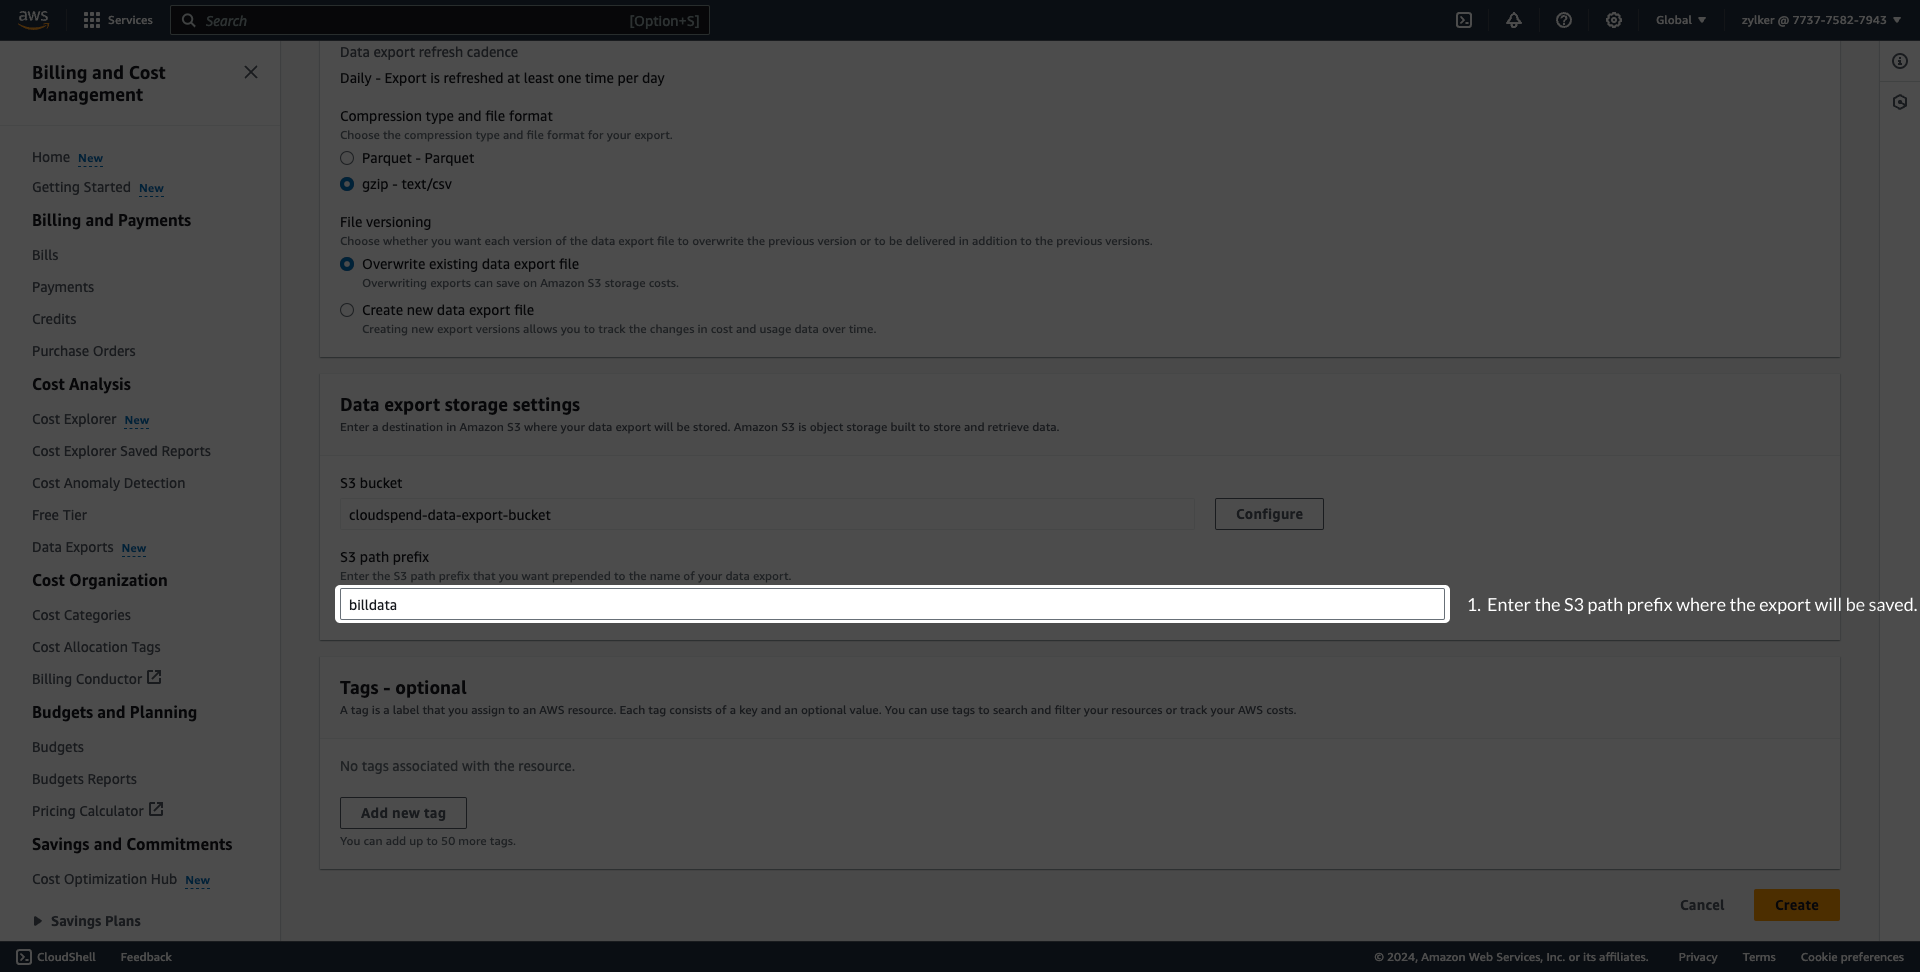
9. Click **Create**.
#### Enable AWS Cost Optimization Recommendations
This optional export powers AWS native rightsizing and savings guidance inside CloudSpend, including the AWS Recommendations report and the AWS entries in Native Recommendations. Your cost reporting works without it.
The panel asks whether you already have the required export. Select **Yes** or **No**.
- **Yes**: Select this if you already have the Cost Optimization Recommendations export.
- **No**: Select this if you do not have the required export and follow the steps below to create one.
#### Create the recommendations export in AWS
To create the recommendation export in AWS:
1. Sign in to the AWS Management Console and select **Billing and Cost Management**.
2. In the left navigation pane, select **Data Exports**, then select **Create**.
3. On the *Create export* page, under **Export type**, select **Standard data export**.
4. Enter **CostRecommendationsReports** as the *Export name*. CloudSpend looks for this exact string. Any other name, including a different capitalization, will prevent the recommendations from being picked up.
5. Under **Data table/export settings**, select the **Cost optimization recommendations** table, and configure the export to retain the applicable recommendation based on the configured export behavior.
6. Under **Data export delivery options**, set the following:
1. **Compression type:** gzip
2. **File format:** text/csv
3. **File versioning:** Overwrite existing data export file
7. Under **Data export storage settings**, select the same **Amazon S3 bucket** used for your billing data export.
8. Enter **recommendations** as the *S3 path prefix.* This value must match exactly.
9. Click **Create**.
Note: The IAM role CloudSpend uses for this account also needs:
- cost-optimization-hub:ListRecommendations
- cost-optimization-hub:GetRecommendation
#### Set the account scope
1. Under Account scope, choose the **Account Type**.
| Account type | What it means | What you must provide |
|---|---|---|
| Organization | The export covers an AWS Organization’s consolidated bill. The default. | Export Name |
| Linked Account | The export covers a single member account within an Organization | Export Name, S3 bucket name and S3 path prefix you saved earlier |
2. **Export Name**: Copy and paste the export name you created in the [Creating a Data export](https://www.manageengine.com/cloudspend/help/aws-integrate.html#creating-a-data-export) section above.
3. Click **Next**.
### Step 4: Processing date
This step has four sections: **Observability**, **Processing window**, **Notifications**, and **Labels**. Only the processing window is required.
#### Observability: Integrate with Site24x7
In the *Observability* section, select the Site24x7 account you wish to link to this CloudSpend account, from the **Choose Site24x7 Account** drop-down menu. You can select multiple Site24x7 accounts.
Linking the accounts allows you to view CloudSpend account details in the *Cloud* tab, view budget related alarms raised by CloudSpend in the *Alarms* tab, and let Site24x7 users acknowledge alarms and assign technicians.
This Site24x7 link is separate from the Site24x7 Account access type in [Step 2](https://www.manageengine.com/cloudspend/help/aws-integrate.html#step-2-access-credentials-1). The access type is used to provide CloudSpend with AWS access, while this setting determines where CloudSpend alerts are shown.
Leave this field empty if you do not use Site24x7 or do not want to link the CloudSpend account to Site24x7.
#### Processing window
Under **Start Date for Bill Processing**, select the month from which CloudSpend should begin processing your bills.
All historical bills from the selected date will be processed and charged. See [Pricing Details](https://www.manageengine.com/cloudspend/help/billing.html) before selecting an earlier date.
On an evaluation account, you can view two months of data regardless of the start date selected.
#### Notifications
Choose how CloudSpend should [send notifications](https://www.manageengine.com/cloudspend/help/notification-profiles.html).
1. From the *Notify via* option, select **Users** to notify one or more individual CloudSpend users, or **User Group** to notify all members of a selected user group. Using user groups simplifies notification management because any changes to the group membership are automatically reflected in the notification profile.
2. **Contacts**: Select the users or user groups that should receive notifications when an associated check is breached.
#### Labels
1. **Add Label:** Optionally attach key value Labels to this integration. Enter a *Label Key* and *Label Value*, then click the **+** icon to add another pair, or the delete icon to remove one. Labels are CloudSpend side metadata, useful for filtering and grouping accounts in reports, independent of AWS tags. See [Labels](https://www.manageengine.com/cloudspend/help/labels.html).
2. Click **Next**.
### Step 5: Review & activate
The final step displays the details you entered in the previous steps. Review the details you entered in the previous steps before submitting the integration. Use **Edit** to return to any step and make changes.
1. Check that all required fields are completed, especially the *Role ARN*, *Export Name*, and, for Linked Account integrations, the *S3 Bucket* and *Path Prefix*.
2. If you linked a Site24x7 account in [Step 4](https://www.manageengine.com/cloudspend/help/aws-integrate.html#step-4-processing-date), verify that the correct account is selected.
3. Once you have reviewed the details, click **Submit**.
## After you activate
What happens next:
1. CloudSpend validates the role and confirms that it can read the export from S3.
2. CloudSpend begins processing bills from the start date you selected. The first run takes the longest. For a large organization with several months of history, processing can take a few hours.
3. As data becomes available, your reports are populated and any configured budgets or anomaly checks begin evaluating.
## Connecting a Site24x7 account
If you already monitor the AWS account in Site24x7, you can reuse that connection instead of creating new credentials. CloudSpend uses the IAM role or user associated with the Site24x7 connection. You only need to attach the required cost policy.
This is an access type within the **Manual** path:
1. In **Step 1: Account basics**, enter a Display Name and select **AWS** as the Provider.
2. In **Step 2: Access & credentials**, select **Site24x7 Account: Reuse an existing connection**.
3. Follow the steps in **Site24x7 Account access type** section to select the account and attach the cost policy.
4. Complete **Step 3: Billing data**, **Step 4: Processing date**, and **Step 5: Review & activate** as usual.
If your account does not appear in the dropdown, it is not connected to your Site24x7 account yet. Connect it in Site24x7 first, or use IAM Role access type instead.
## Connecting an MSP account
For Site24x7 MSP accounts, the flow is the same, with one additional selection:
1. In **Step 1: Account basics**, enter a **Display Name** and select **AWS** as the Provider.
2. In **Step 2: Access & credentials**, select **Site24x7 Account**.
3. Select the MSP customer first, then select the Site24x7 AWS account associated with that customer.
4. Attach the cost policy as described in **Site24x7 Account access type** section.
5. Complete the remaining steps as usual.
See [Customer Portal Overview](https://www.manageengine.com/cloudspend/help/customer-portal.html) and [Managing Customer Portals](https://www.manageengine.com/cloudspend/help/manage-customer-portal.html) for information about how MSP integrated accounts map to portals.
## Support for Parquet format
The CloudSpend AWS cost supports Parquet and GZIP file formats. For cost accounts parsed from the Parquet format report, the user-defined tags with camel case, colon, and hyphen will be replaced with an underscore and follow lower casing.
| Tag name in GZIP | Tag name in Parquet |
|---|---|
| autoscaling:groupName | autoscaling_group_name |
| cloudformation:id | cloudformation_id |
| CreatedBy | created_by |
| Environment type | environment_type |
The system-generated tags will not have any changes.
## Recommended next steps
- **Set up cost centers**: Split shared spend by team, project, or customer. See [Cost Centers Overview](https://www.manageengine.com/cloudspend/help/cost-centers-overview.html).
- **Create a budget with alerts**: Get notified before you overspend. See [Single-step Budget](https://www.manageengine.com/cloudspend/help/budget.html) and [Multi-step Budget](https://www.manageengine.com/cloudspend/help/multi-step-budget.html).
- **Turn on anomaly detection**: Detect cost spikes within a day. See [Anomaly](https://www.manageengine.com/cloudspend/help/anomaly-checks.html).
- **Configure tag profiles**: Make your AWS tags usable for cost allocation. See [Tag Profiles](https://www.manageengine.com/cloudspend/help/tag-profile.html).
- **Set up governance checks:** Monitor your cloud environment for compliance issues and track resources that do not meet your defined governance requirements. See [Governance](https://www.manageengine.com/cloudspend/help/governance-checks.html).
- **Review recommendations**: Act on the optimization recommendations from the export you enabled. See [AWS Recommendations](https://www.manageengine.com/cloudspend/help/native-recommendations.html).
- **Review cost reports:** Analyze your cloud spending through detailed cost reports and identify spending patterns, trends, and allocation opportunities. See [Reports](https://www.manageengine.com/cloudspend/help/reports.html).
- **Schedule a monthly report**: Automatically share spend information with stakeholders. See [Schedule Reports](https://www.manageengine.com/cloudspend/help/schedule-report.html).
- **Explore AI-powered features**: Use CloudSpend's AI capabilities to analyze spending, identify anomalies, and gain insights from your cloud cost data. See [Zia Agent Studio](https://www.manageengine.com/cloudspend/help/zia-agent-studio.html).
- **Connect MCP**: Integrate CloudSpend with MCP to access and work with your cloud cost data through supported AI tools and workflows. See [MCP Integration](https://www.manageengine.com/cloudspend/help/mcp-integration.html).
## Troubleshooting
**Configuration Error Accounts**
You can now easily view the errors in configuring your CloudSpend account, like Invalid report name or Expired roles in the *Configuration Error Account(s)* section. Choose to either edit or delete the configuration error and rectify the errors for all accounts from a single view.
**Common issues**
| Issue | Likely cause | Fix |
|---|---|---|
| Report Name is required on activation | The *Export Name* field is empty, usually because Cost And Usage Report Creation needed was set to **No** and the field was not filled in. | Click **Edit** on the relevant card and enter the export name exactly as it appears in AWS. |
| Invalid report name after activation | The export name does not match, usually because of a typo or capitalization difference. | Compare it with **Billing and Cost Management** > **Data Exports** in AWS and correct it under *Accounts*. |
| Role assumption fails / Expired role | The *External ID* changed after the role was created, the trust policy names the wrong account, *Require MFA* is enabled, or the role was deleted. | Reopen the wizard, copy the current External ID, and update the role's trust policy. Verify the trusted account ID and MFA is not required. |
| CloudFormation stack never calls back / stuck on Waiting for RoleARN | The *CloudSpend* tab was closed or refreshed, or the stack failed. | Check the stack's Events tab in AWS for the failure. If the tab was lost, delete the stack and restart the Access & credentials step. |
| Stack fails with a permissions error | The signed in AWS identity cannot create IAM resources, or the account is not a registered delegated administrator. | Use an identity with IAM permissions, or switch to the *Management Account* access type. |
| Integration activates but reports are empty | AWS has not written the first export yet. | Wait up to 24 hours after creating the export. Confirm that objects exist under the S3 path prefix. |
| Costs appear but no resource level detail | Include resource IDs was not selected on the export. | Edit the export in AWS to include resource IDs. New data will carry them; historical data will not. |
| Anomaly detection or hourly trends unavailable | Export granularity is *Daily* rather than *Hourly*. | Change the granularity in AWS. Data written before the change stays daily. |
| Recommendations reports are empty | The recommendations export is missing, misnamed, or the cost optimization hub permissions were not added. | Verify that the export is named *CostRecommendationsReports* with the recommendations prefix, and add the required permissions. |
| Tag based cost centers match nothing | Parquet tag name normalization. | Use the normalized name described in Parquet and GZIP tag naming. |
| Only two months of data visible | The account is on an evaluation plan. | Two months is the evaluation limit regardless of the start date. See [Pricing Details](https://www.manageengine.com/cloudspend/help/billing.html). |
If you are still stuck, email cloudspend-support@site24x7.com or ask in the [community forum](https://pitstop.manageengine.com/portal/en/community/cloudspend).