Adding Linux DNS-DHCP Servers
Process 1. Pre-Discovery
Process 2. The Discovery Process
Process 3. Post-Discovery
Process 1.A: Before Discovery (Prepare BIND for DDI Central)
Why these steps are needed
DDI Central discovers and manages BIND (named) servers on Linux.
To let DDI Central:
- Read your named.conf and zone files safely during discovery, and
- Then hand control over to a dedicated non-root user (ddi) for ongoing management,
You need to:
- Prepare BIND and its systemd service before discovery (root-owned, standard paths).
- Harden and reconfigure BIND after discovery (run as ddi, restricted permissions, custom paths/capabilities).
These steps assume:
- BIND config directory: /etc/bind
- systemd service file: /lib/systemd/system/named.service
- Service name: named
Step 1: Set safe file permissions on /etc/bind
What it does
- Sets files to readable by everyone, writable only by owner (rw-r--r--).
- Ensures DDI Central (and BIND) can read configs during discovery.
Step 2: Set ownership to root:bind
What it does
- Makes root the owner of /etc/bind and bind the group.
- Ensures the BIND process (which normally runs as user/group bind) can read config files.
Step 3: Restart the named service
What it does
- Reloads the named daemon with the current config and permissions.
Step 4: Verify that named is running
What to look for
- Active: active (running)
- No obvious error messages about config or permissions.
Step 5: Replace /lib/systemd/system/named.service with the “Before” unit file
You paste in this content:
[Unit]
Description=Berkeley Internet Name Domain (DNS)
Wants=nss-lookup.target
Wants=named-setup-rndc.service
Before=nss-lookup.target
After=network.target
After=named-setup-rndc.service
[Service]
Type=forking
#User=ddi
#Group=ddi
Environment=NAMEDCONF=/etc/bind/named.conf
Environment=LD_LIBRARY_PATH=${dir1}/sharedlib:$LD_LIBRARY_PATH
ExecStartPre=/bin/bash -c 'if [ ! "$DISABLE_ZONE_CHECKING" == "yes" ]; then /usr/bin/named-checkconf "$NAMEDCONF"; else echo "Checking of zone files is disabled"; fi'
ExecStart=/usr/sbin/named -c ${NAMEDCONF} $OPTIONS
ExecReload=/bin/sh -c '/usr/sbin/rndc reload > /dev/null 2>&1 || /bin/kill -HUP $MAINPID'
ExecStop=/bin/sh -c '/usr/sbin/rndc stop > /dev/null 2>&1 || /bin/kill -TERM $MAINPID'
TimeoutStartSec=30s
PrivateTmp=true
ProtectSystem=strict
ProtectHome=true
ReadWritePaths=/var/cache/bind
AmbientCapabilities=CAP_NET_BIND_SERVICE
CapabilityBoundingSet=CAP_NET_BIND_SERVICE
NoNewPrivileges=true
[Install]
WantedBy=multi-user.target
What this does
- Runs named as root (note User/Group are commented out).
- Uses /etc/bind/named.conf as the main config.
- Uses /usr/bin/named-checkconf to validate config before starting.
- Grants the capability to bind low ports (53) via CAP_NET_BIND_SERVICE.
Why before discovery
Running as root with standard paths keeps the environment simple so DDI Central can:
- Read all zone and view definitions.
- Discover the DNS topology without being blocked by permissions or custom paths.
After you save this unit file, you would normally run:
systemctl daemon-reload
systemctl restart named
systemctl status named
(Even though not listed explicitly here, daemon-reload is required after editing a unit.)
At this point, you perform the DNS server discovery from DDI Central.
Process 1.B: Update Permissions on DHCP Configuration and Zone Files
BIND9 → DDI Central discovery: Secure transition with lower privileges
Before onboarding and discovering a BIND9-based DNS server into DDI Central, you must reconfigure it to run under a dedicated, low-privilege user (ddi) and grant only the minimum required capabilities. This is because running named as root is risky—it gives the DNS process unnecessary system-level privileges. In order to harden security, transitioning the ddi user ensures the DNS server operates with just enough permission to function, significantly reducing the attack surface.
For DDI Central to read, discover, and ingest your BIND9 configuration and zone files, they must be owned and accessible by the ddi user. Changing ownership (chown) and permissions (chmod) ensures proper access without exposing files to the wrong users.
Ensure the `ddi` user owns the necessary files and directories:
chown -R ddi:ddi /etc/named*or
chown -R ddi:ddi /etc/bind/This makes sure the ddi user—and only that user—owns all of the BIND configuration and zone files.
chmod -R 2770 /etc/named*or
chmod -R 2770 /etc/bind/Now that ddi owns them, only ddi (read/write) and the root or members of the file’s group (read/write) can touch those files. Everyone else is denied access.
Grant required capabilities to BIND binaries
Linux privileges normally require you to run as root to open ports below 1024. To enable the `ddi` user to bind to privileged ports (TCP/UDP 53, 853, 443) without full root privileges, apply the following capabilities:
/usr/sbin/setcap 'cap_net_bind_service=+ep' /usr/sbin/named/usr/sbin/setcap 'cap_net_bind_service=+ep' /usr/sbin/rndcIt grants just the CAP_NET_BIND_SERVICE capability to those two binaries, so they can open low ports.
Verify with:
getcap /usr/sbin/namedgetcap /usr/sbin/rndcBoth commands should show that cap_net_bind_service=ep is set. By using Linux’s cap_net_bind_service, the DNS server can still bind to critical ports (53 for DNS, 853 for DoT, 443 for DoH) without needing root. This is essential for secure environments where full root execution is discouraged or prohibited.
- /etc/systemd/system/bind9.service or
- /etc/systemd/system/named.service
- -u ddi tells named to switch to the ddi user after startup.
- ProtectSystem, ProtectHome, and NoNewPrivileges lock down the filesystem and prevent privilege escalation.
- AmbientCapabilities and CapabilityBoundingSet ensure only the bind-to-port capability is retained.
Step 3: Configure systemd to drop root and run `named` as `ddi` user
-Open and edit your BIND systemd service file—depending on your OS it’ll be named either:Depending on your OS and setup, open:
Then under [Service] section make these changes:
[Service]
ExecStart=/usr/sbin/named -u ddi -c ${NAMEDCONF} $OPTIONS
TimeoutStartSec=30s
PrivateTmp=true
ProtectSystem=strict
ProtectHome=true
ReadWritePaths=/usr/local/bind9/var
AmbientCapabilities=CAP_NET_BIND_SERVICE
CapabilityBoundingSet=CAP_NET_BIND_SERVICE
NoNewPrivileges=true
Here,
After saving the changes, reload systemd:
Discover your newly hardened BIND9 in DDI Central
Once the above steps are complete and `named` is running as the `ddi` user with the proper security context, proceed to:
- Open the DDICentral UI.
- Go to Settings-> Add Server. Navigate to the Discovery section.
- Kick off a new discovery job targeting your BIND9 server’s IP or hostname.
- Confirm in DDI Central that your zone files and named configurations have been imported correctly—your server should now appear as an onboarded DNS instance, running under the secure, low-privilege ddi account.
Process 2.A: Server Onboarding & Discovery
Once the cluster is created, you'll be immediately directed to the Servers page to add your DNS and DHCP servers. If not, you can add servers by selecting the Settings menu from the menu bar along the left side of the screen. From the submenus that appear in parallel, choose Servers.
- On the Servers page, click the Add Server button on the top left corner.
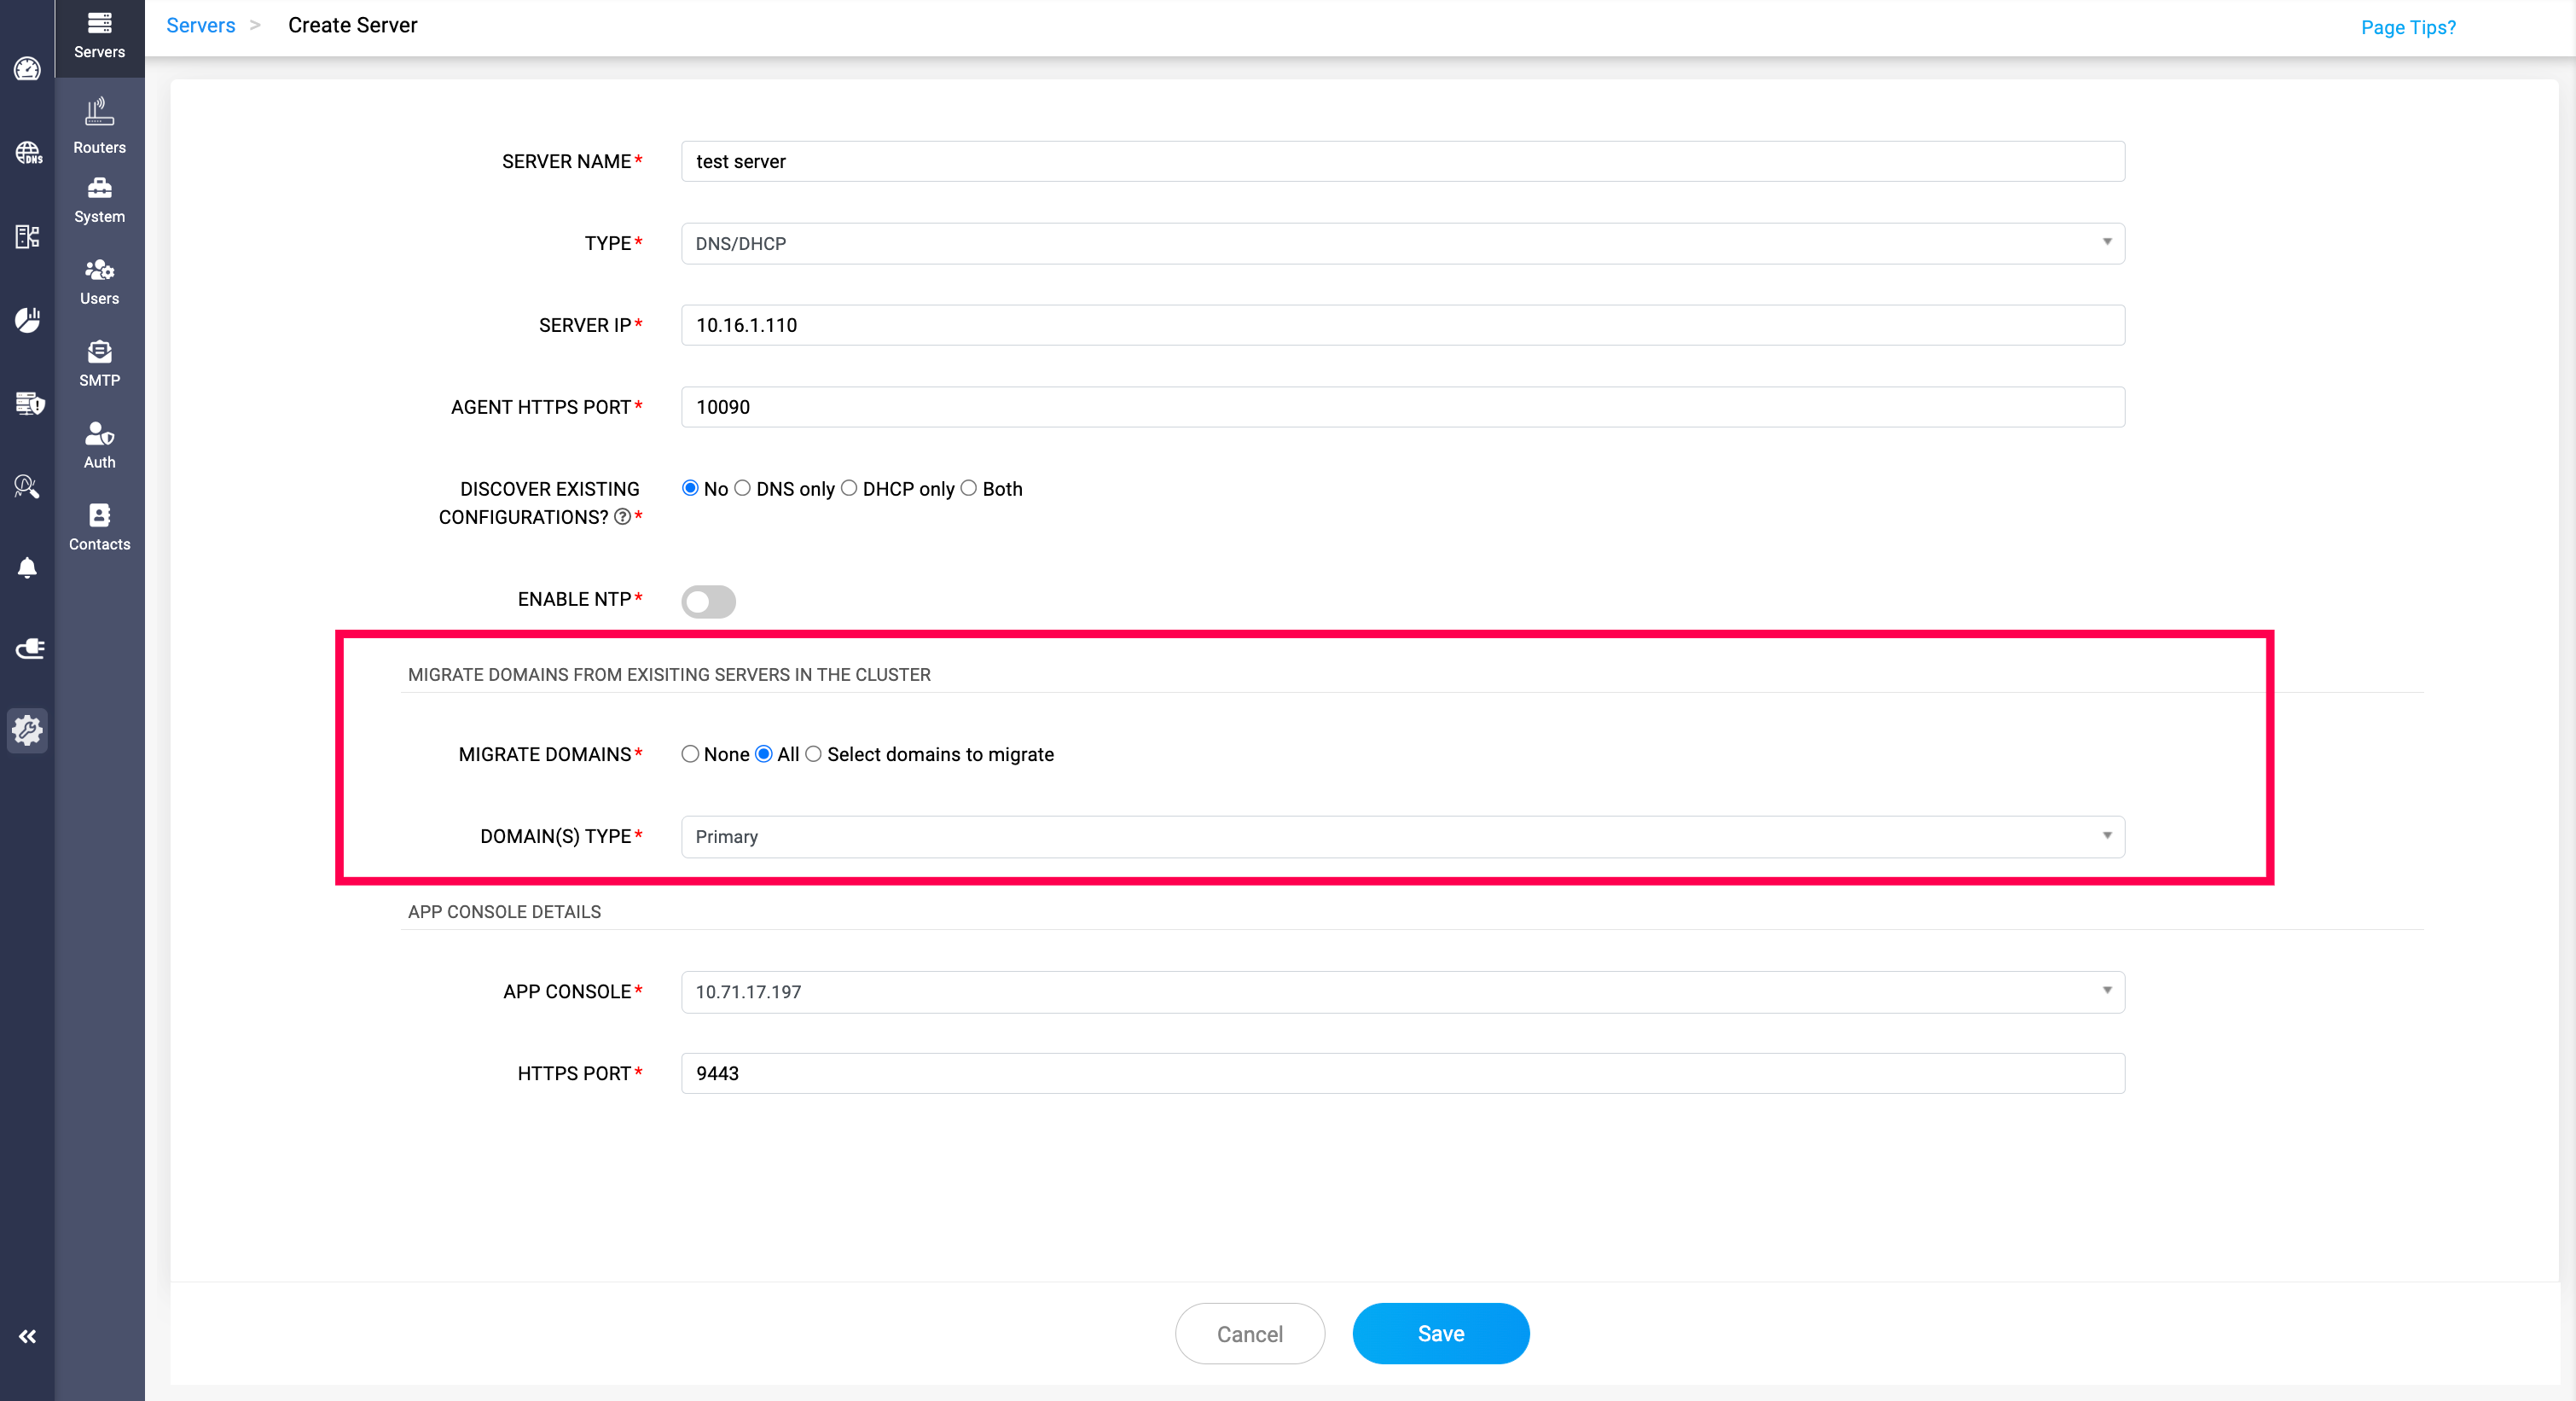
- The Create Server page appears on the screen. Here, you can add your DNS-DHCP servers either by discovering existing server configurations or by simply adding the server to the DDI Central console and configure it using the DDI Central user interface at later stages.
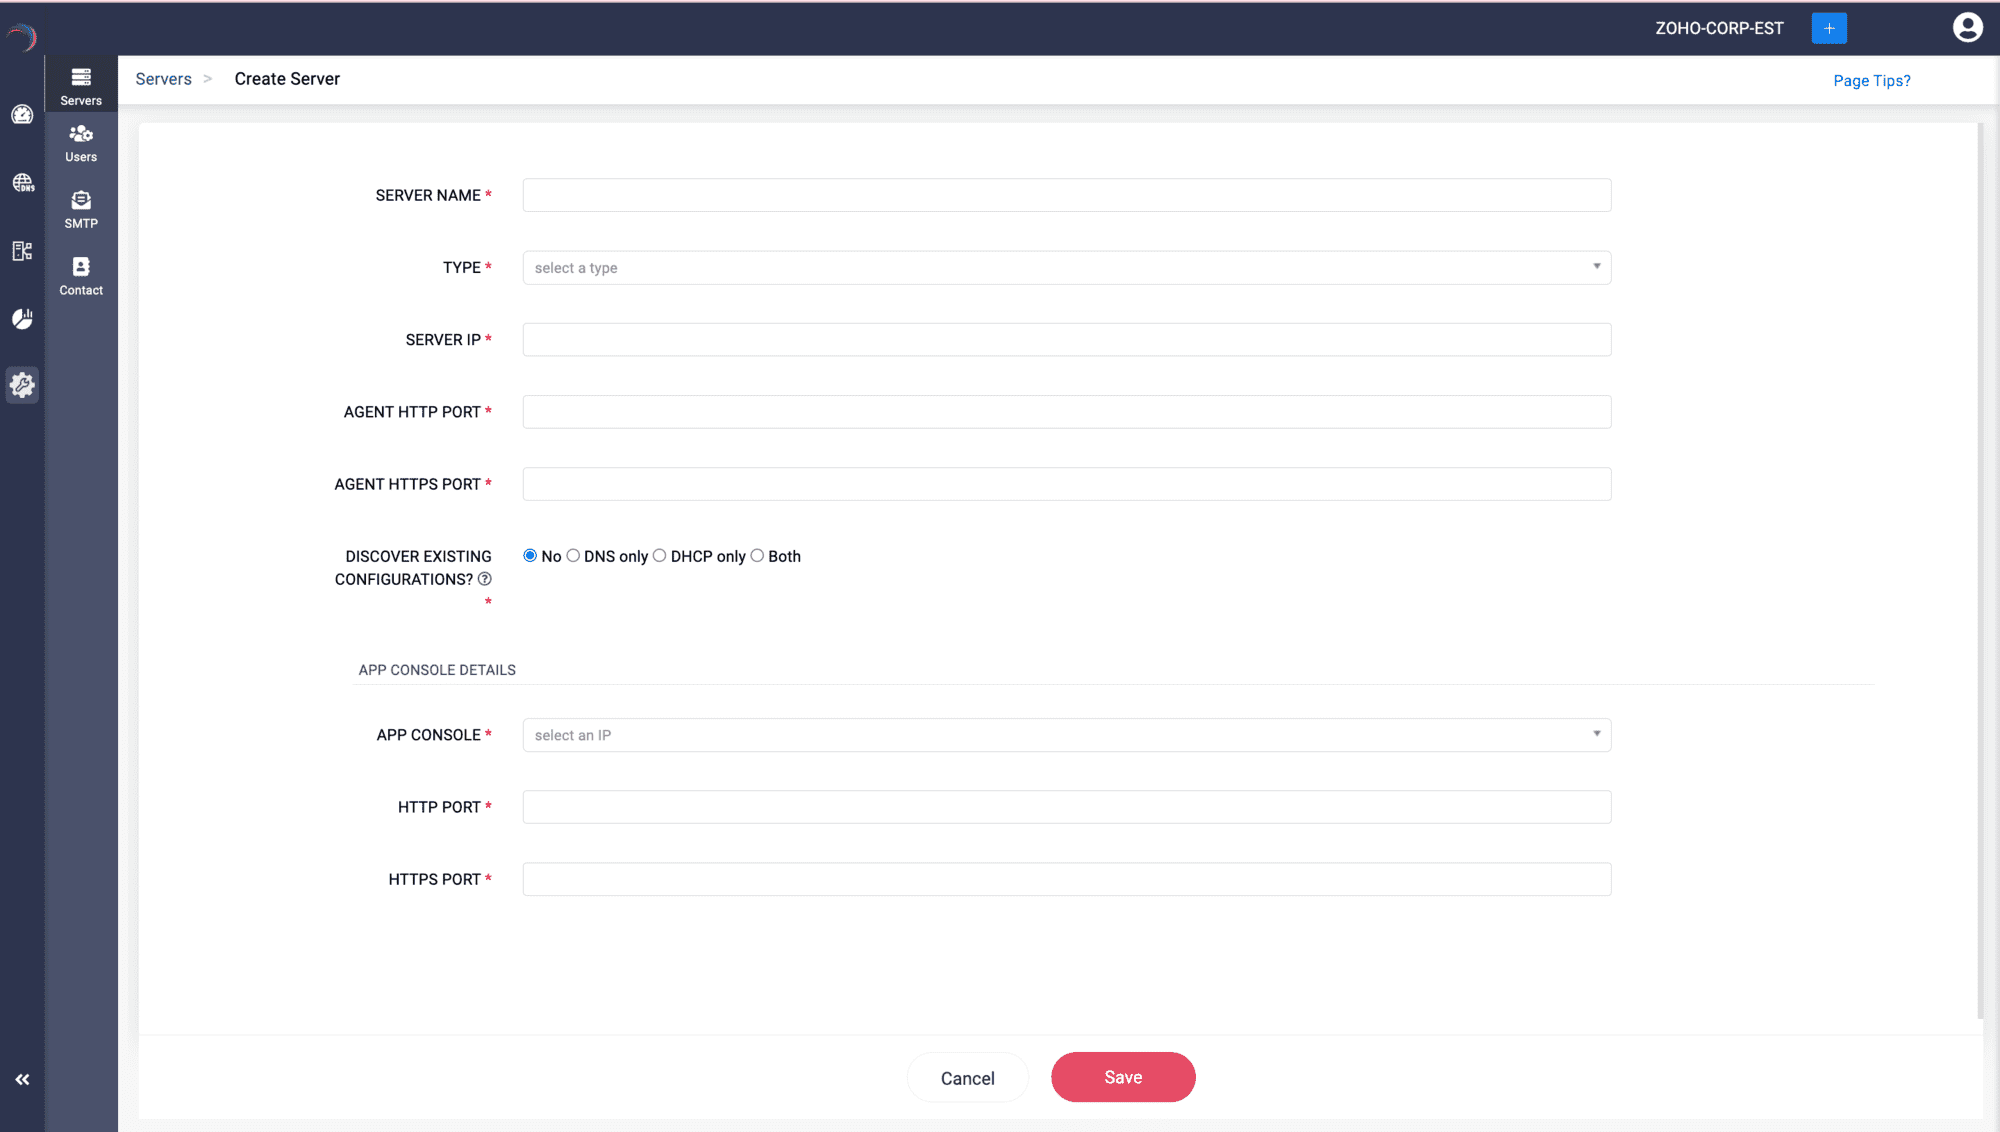
Enter the server details below:
Follow the steps below to onboard the target DNS/DHCP servers into DDI Central, either through Discovery or by bypassing Discovery.
Step 1 -> SERVER NAME: A required field where you assign a unique name to the server being configured or added for identification.
Note: No two servers in the same or different clusters can have the same name.- Step 2 -> TYPE: Select the type of server being set up, such as DNS, DHCP, or both (server that is configured for both DNS and DHCP services).
- Step 3 -> SERVER IP: Specify the IP address of the server being added.
- Step 4 -> AGENT HTTP PORT: Specify the port number used by the DDI Node Agent installed in the server for HTTP connections.
- Step 5 -> AGENT HTTPS PORT: Specify the port number used by the DDI Node Agent installed in the server for HTTPS connections.Note: Admins can select and update the network port used by the Node Agent to enhance flexibility and ensure compliance with both internal networking policies and external regulations. It is important to update the Node agent port number modified via the command window in the DDI Central Console UI immediately to avoid downtime. Failure to do so can lead to communication disruptions between the App Console and the specific server.

Step 6 -> DISCOVER EXISTING CONFIGURATIONS?: You have two choices to make here; opt for Step 7 or Step 8 depending on your requirement.
Step 7 -> Adding and configuring servers using DDI Central without discovery
Specify No if you just want to add and onboard a new server from the scratch. You can setup the required DNS, DHCP or IP address configurations to your server through the user-friendly DDI Central user interface later.
This enables you any Linux server to DDI console and enable DDI Central to transform the ordinary Linux servers into DNS and DHCP servers.
This is because DDI Central has DNS and DHCP software services bundled with the product and it gets deployed on your Linux servers while installing the product. Then you can start implementing, configuring, and managing DNS, DHCP and IPAM from scratch.
For this, you'll have to choose No for Discover Existing Configurations? option.
Step 8 -> Advanced DNS-DHCP-IP address discovery
Choosing the path of discovering the existing configurations from the server.
Choose any one of the three options: DNS, DHCP, Both, for the Discover Existing Configurations?.
Choosing the option Bothdiscovers all the advanced configurations of DNS-DHCP services, all the DNS objects including the IP automated DNS zones controlled by DHCP events, the whole IP address plan and policies managed under the DHCP service and the whole IP address inventory
Note: Selecting either DNS or DHCP will result in the discovery of only the DNS or DHCP configurations, respectively, from the server. When discovering a DNS server with DDNS-enabled domains, ensure that both DNS and DHCP servers are discovered at the same time for DDI Central to capture the combined configurations. Similarly, while discovering DHCP servers that provision IP addresses for dynamic domains, it is essential to discover the corresponding DNS servers as well.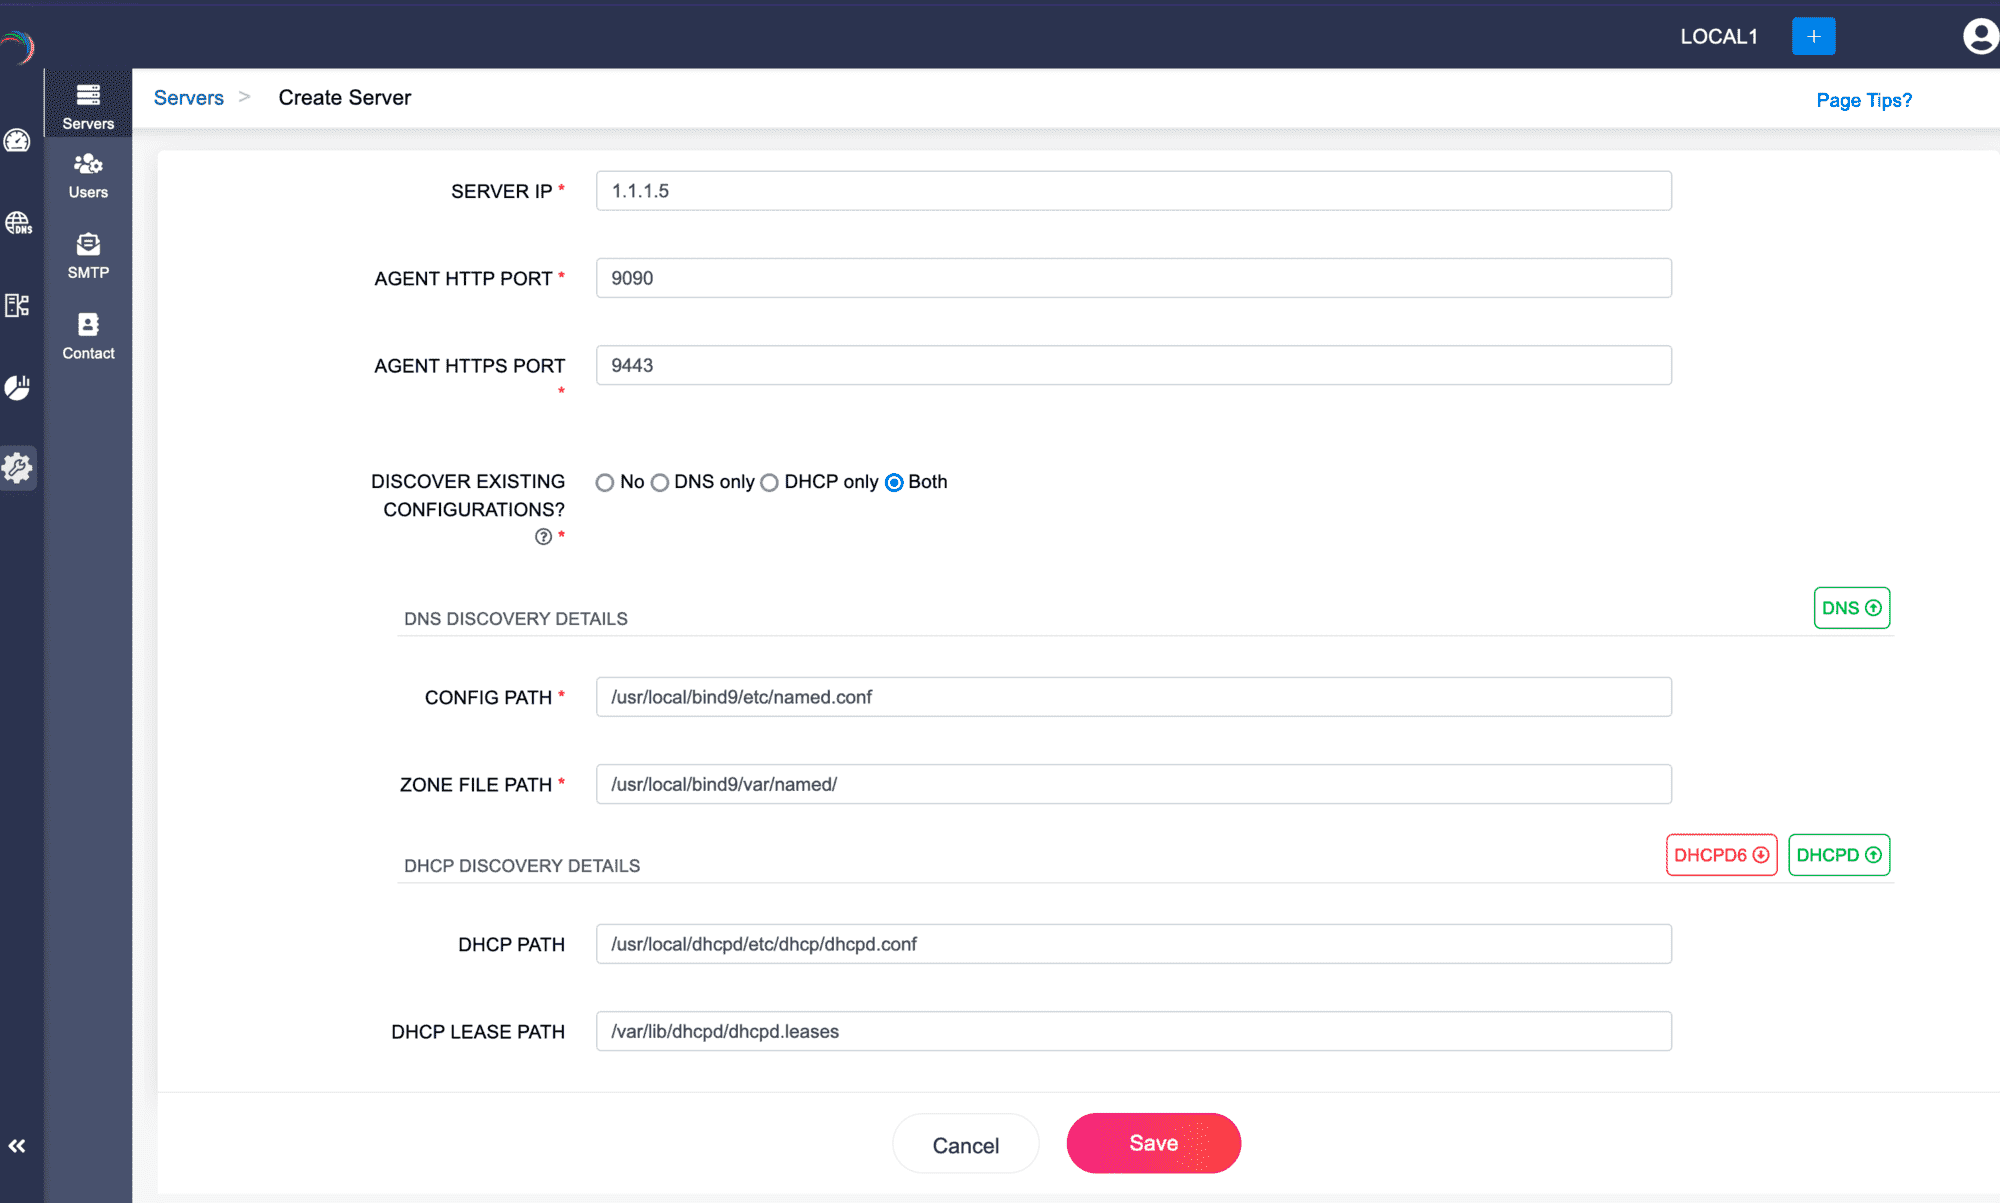
Provide the essential Config Path and the Zone File path (for the DNS service running in the server), while providing the Lease Path and the DHCP server path (for the DHCP service running in the server).
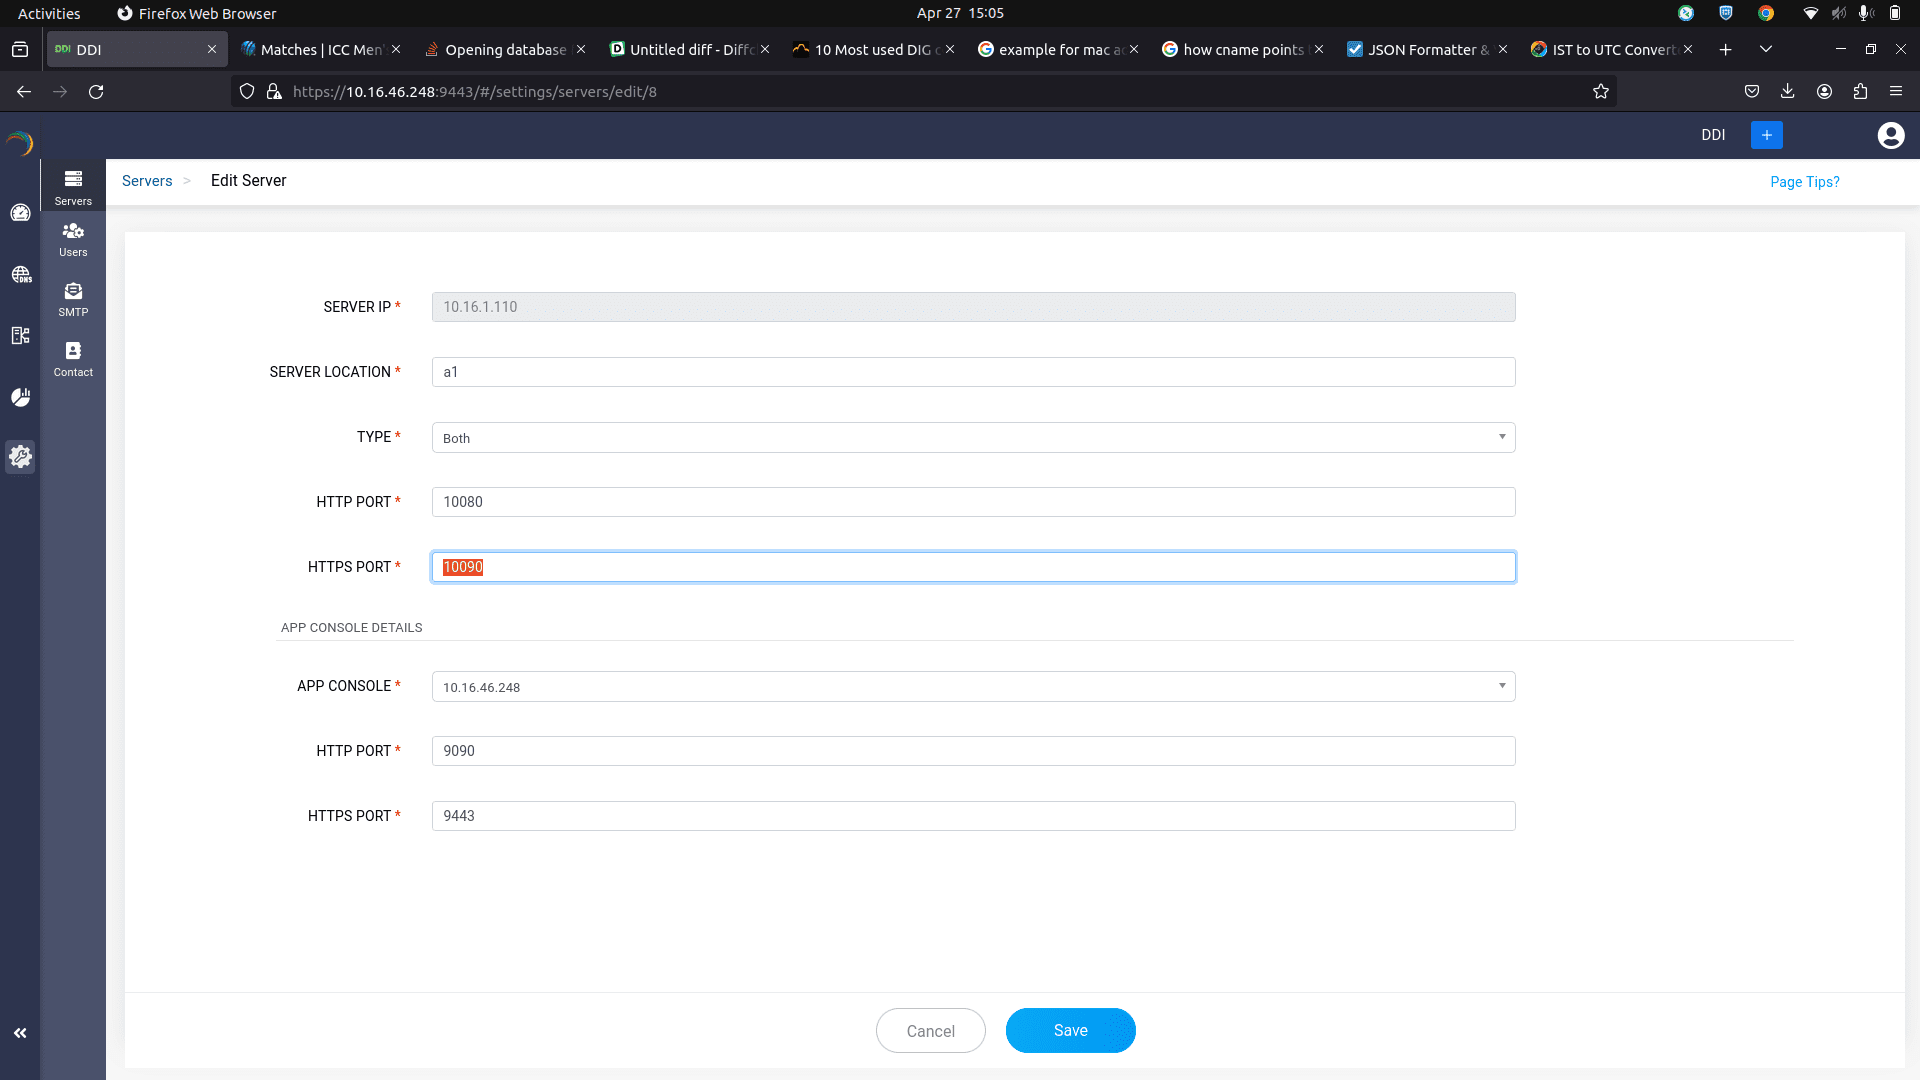
Step 9 -> App Console Details
Enter the essential details of the main server running the Management UI Console. This step is mandatory, as it helps establish the connection between the to be onboarded DNS/DHCP server and the Main Console server.
APP CONSOLE: Enter the static IP address of the central server that hosts the DDI Central Management UI console.
Note: It is crucial that this IP address remains constant to maintain consistent connection between the central DDI console server and the Node Agents installed in all your DNS and DHCP servers.- HTTP PORT: Specify the port number of the central DDI application console server for HTTP connections.
- HTTPS PORT: Specify the port number of the central DDI application console server for HTTPS connections.
Step 10 -> Click Save to add the server into the ME DDI console.
If you have chosen the discovery option as outlined in Step 7, ManageEngine DDI Central will begin to discover configurations from the designated paths for each service.
Note: The discovery process takes a considerable amount of time depending on the volume of configurations in the servers. Wait until the whole process completes.After the discovery, once your servers are added into the DDI Central console you can further proceed modifying the discovered DNS-DHCP-IPAM configurations or quickly start setting up the DNS-DHCP-IPAM configurations for the new server through the user-friendly DDI Central user interface.
- Step 11 -> You can access the added servers with all the configurations in place, listed under the Setting->Servers Page. Here you can perform general actions like editing the server configurations, deleting the server, monitoring the server(s) health stats.
Process 2.B: Discovering from Root Jail
What is root jail?
A root jail in Linux DNS refers to a security mechanism used to limit the access of the BIND process to a specific portion of the file system. This is done by just changing the root directory to a subdirectory creating a "chroot jail" (change root jail), which confines the BIND service to a designated directory tree. For example, '/var/named/chroot'becomes the root directory '/ '.
How root jail works:
- Chroot Environment: When BIND is run inside a chroot jail, it is restricted to operating within a specific directory (for example, /var/named/chroot). From BIND's perspective, this directory becomes the root (/) directory, meaning it cannot access files or directories outside of this jail.
- In a root jail, you are effectively "jailed" within the directory structure, as you cannot move higher than the root (/). This means you cannot access directories that are higher in the system's hierarchy (such as /usr, /var, /lib, etc.). Your view of the file system is limited to the specific directory that has been set as the root in the chroot environment.
- For a root jail to function correctly, all necessary paths and library directories must be accessible within the jailed environment. For example, since libraries are typically located in /usr/lib, and if you are jailed in /home, you won't have access to /usr/lib. Therefore, you must recreate the directory structure within the jail, such as /home/usr/lib, which appears to the jailed process as /usr/lib.
- Additionally, any files, directories, and configuration files required by the application must be placed in the correct locations within the jail. While setting up a chroot jail is straightforward, building a functional jail that meets all the application's dependencies is more complex, as it involves ensuring that all necessary libraries and files are available within the confined environment, tailored to the specific requirements of each daemon.
- Enhanced security : This isolation enhances security because even if the BIND service is compromised, the attacker would only have access to the files within the chroot environment and not the entire file system of the server. This minimizes the potential damage an attacker can cause.
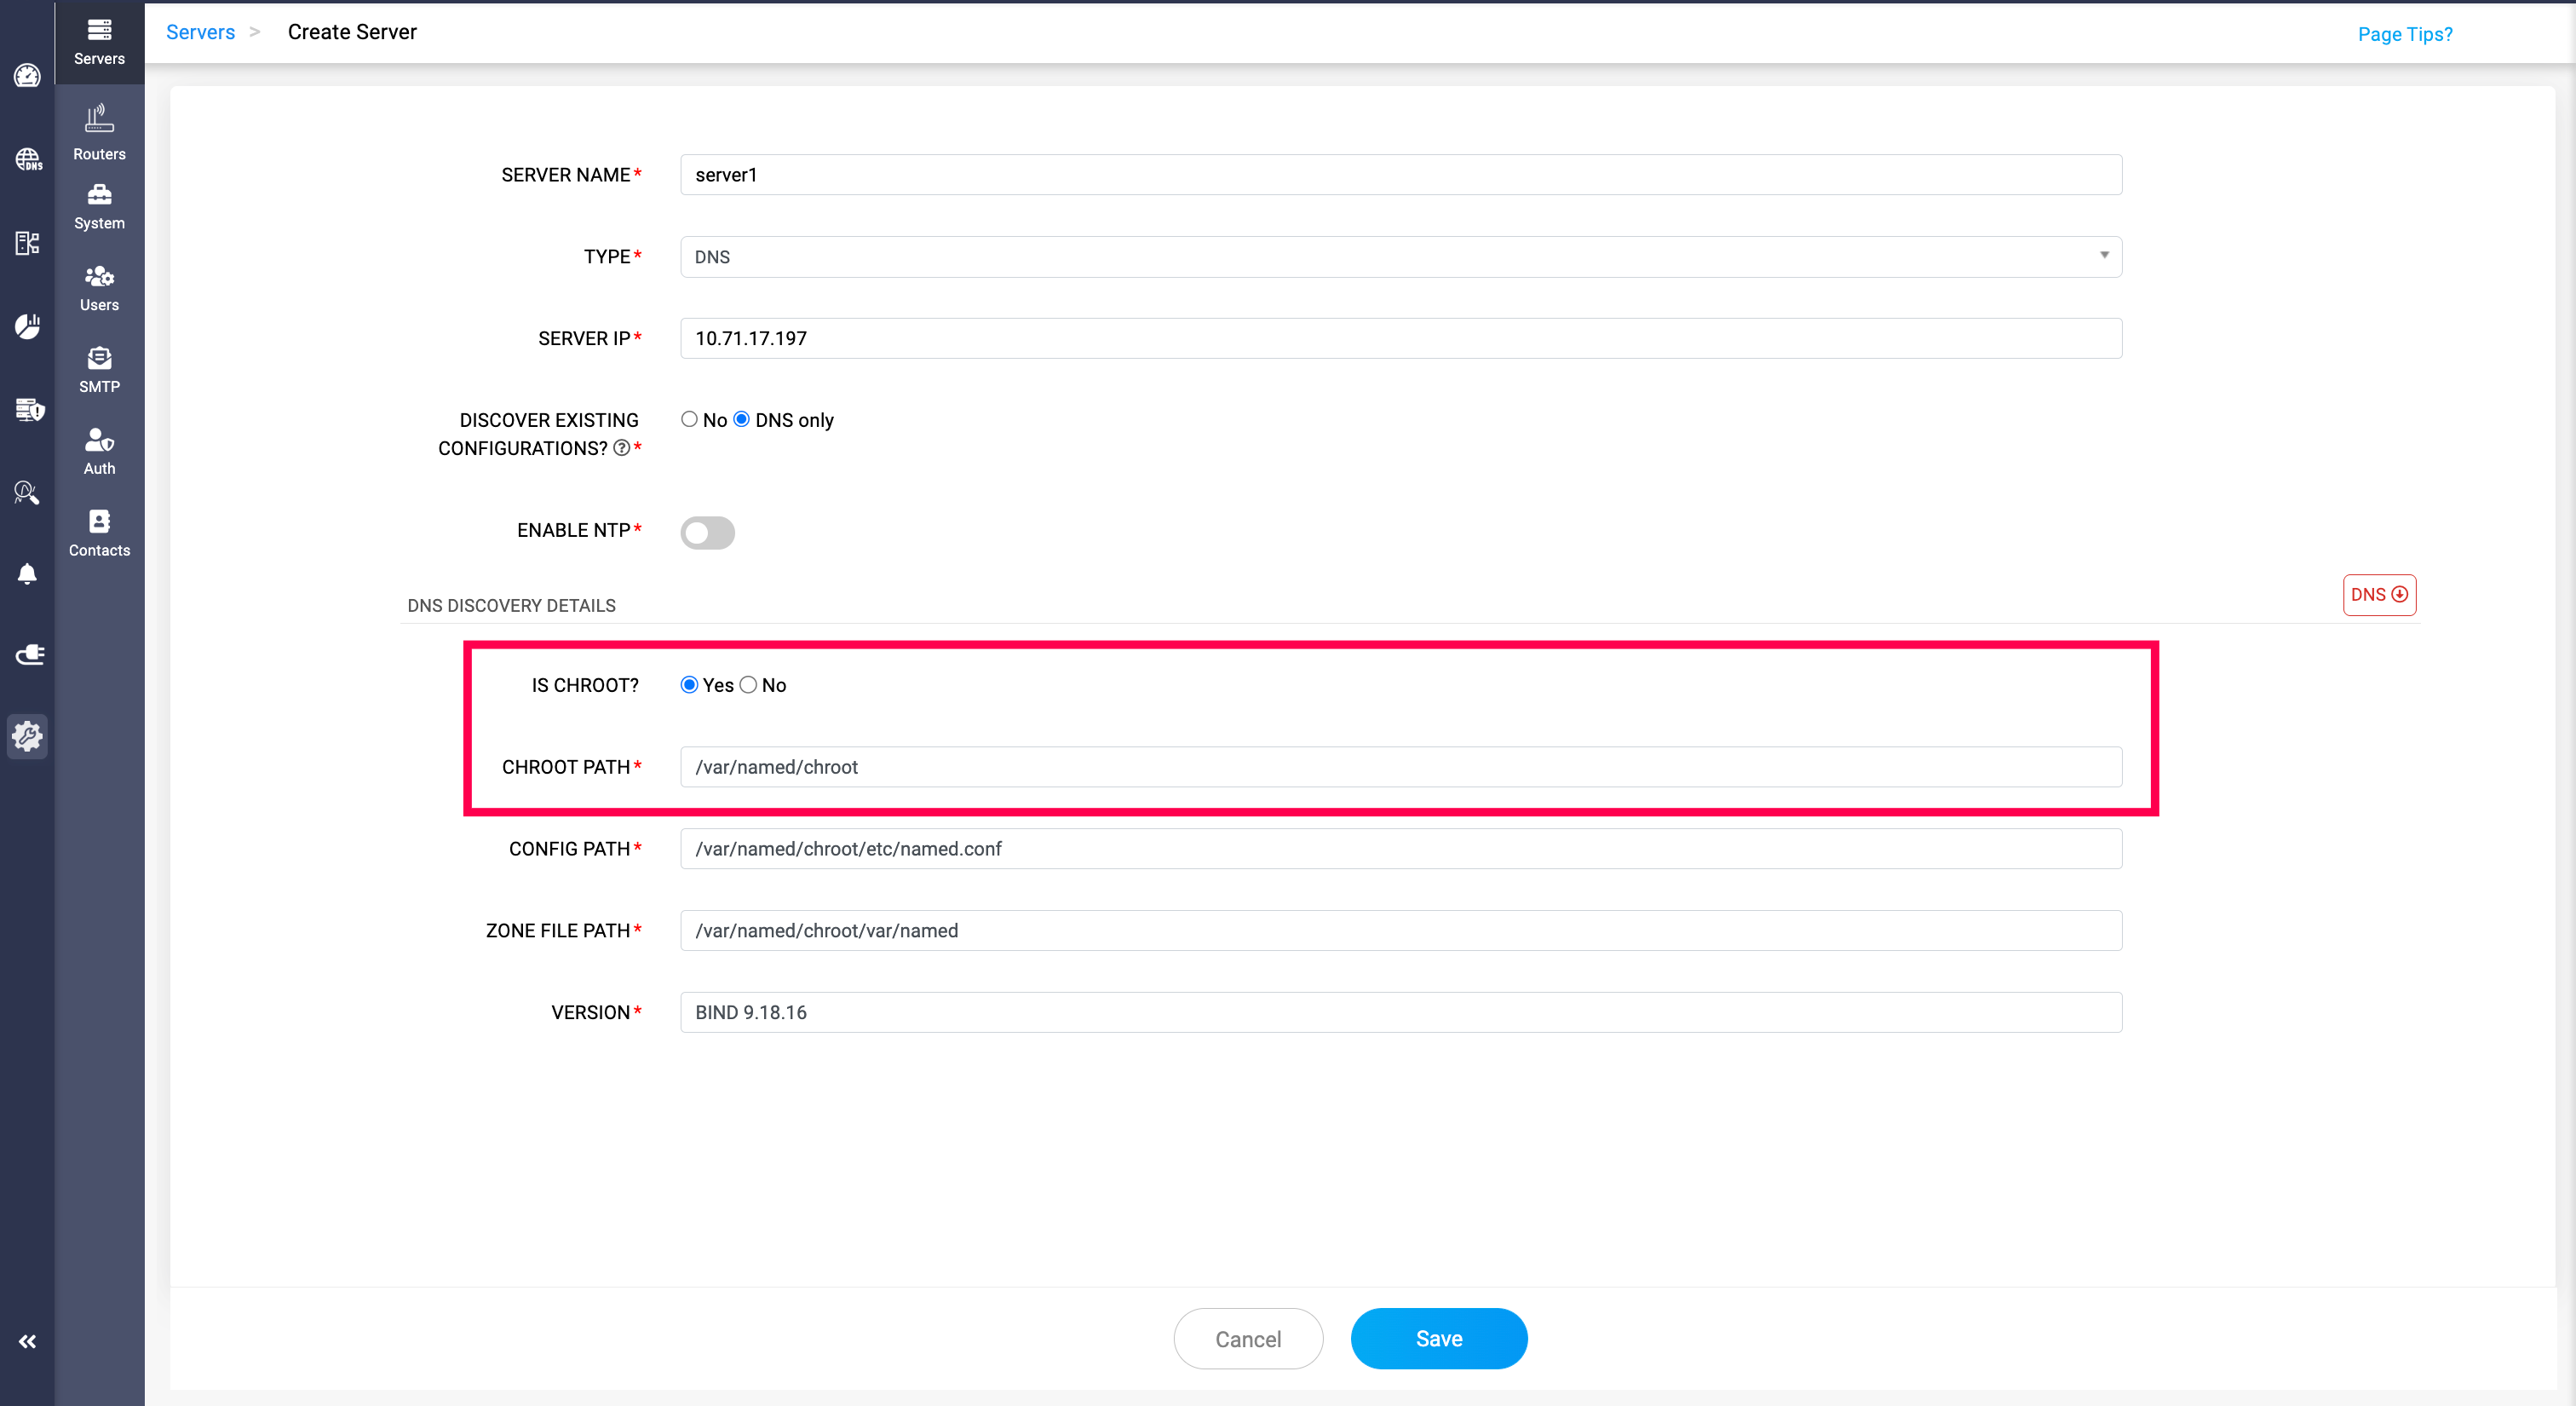
Discovering chroot jail while adding servers in DDI Central
To successfully integrate all the contents in the chroot directory into the DDI Central UI, all you have to do is inform DDI Central whether you want to discover the chroot directory or not by selecting
Choosing Yes, DDI Central prompts you to enter the relative path of the CHROOT directory. Enter all the other essential details for the discovery and click Save.
After successful discovery of DNS configurations
Once DDI Central has completed discovering all the necessary configuration files, zone files, and libraries within the chroot directory, it converts all relative paths within the service directory to absolute paths. Therefore a DDI Central admin, should ensure the following steps are followed:
- Remove the root directory from the service file.
- Deploy the following command: systemctl daemon-reload
- Restart the BIND service.
Process 2.C: DNS domain migrations when onboarding a new server (No Discovery)
When you onboard a new DNS server using No Discovery (i.e., you select No for Discover Existing Configurations), DDI Central can optionally show a special step called DNS Domain Migrations.
This option appears only when you are adding the server into a cluster/site that already contains one or more DNS servers with active domains/zones managed under that same cluster/site.
The goal of DNS Domain Migrations is to help you build redundancy cleanly while onboarding the new server—so domains already served in the cluster can be extended to this new server as either an additional Primary (multi-primary) or as a Secondary (multi-secondary), depending on the role you want the new server to play.
During this step, you choose how the to-be onboarded server should participate for the existing cluster domains:
- Primary — The new server is added as an additional Primary for the selected zones (supporting Primary—Primary redundancy within the cluster/site).
- Secondary — The new server is added as a Secondary for zones that already have a Primary server in the cluster/site (supporting Primary—Secondary redundancy).
You can migrate all domains from the incumbent DNS servers in the cluster/site, or select only specific domains to extend to the new server. If you choose None, the server will be onboarded into the cluster/site without adding any domains, and you can configure zones and domain participation later.
Once you finalize the role (Primary or Secondary) and domain selection, click Save to begin the migration. Migration may take some time depending on the number of domains/zones, so wait for on-screen status updates before proceeding further.
Process 3.A: Harden & Handover management to DDI Central
Once DDI Central has successfully discovered and imported the DNS server, you tighten security and let BIND run as a dedicated, limited user (ddi).
Step 1: Restrict directory permissions for /etc/bind
What it does
Sets rwxrws--- on folders/files:
- Owner + group: full access
- Others: no access
- The 2 (setgid bit) ensures new files inherit the directory’s group.
Why
- Only the ddi user (and its group) should see/edit DNS configs now.
- Prevents other local users from peeking into DNS config and zone files.
Step 2: Change ownership to ddi:ddi
What it does
- Gives the ddi user full ownership of /etc/bind.
- BIND will now run as ddi, and DDI Central can manage these files through that user.
Step 3: Replace /lib/systemd/system/named.service with the “After” unit file
[Unit]
Description=Berkeley Internet Name Domain (DNS)
Wants=nss-lookup.target
Wants=named-setup-rndc.service
Before=nss-lookup.target
After=network.target
After=named-setup-rndc.service
[Service]
Type=forking
User=ddi
Group=ddi
Environment=NAMEDCONF=/etc/bind/named.conf
Environment=LD_LIBRARY_PATH=${dir1}/sharedlib:$LD_LIBRARY_PATH
ExecStartPre=/bin/bash -c 'if [ ! "$DISABLE_ZONE_CHECKING" == "yes" ]; then /usr/local/bind9/bin/named-checkconf "$NAMEDCONF"; else echo "Checking of zone files is disabled"; fi'
ExecStart=/usr/sbin/named -u ddi -c ${NAMEDCONF} $OPTIONS
ExecReload=/bin/sh -c '/usr/sbin/rndc reload > /dev/null 2>&1 || /bin/kill -HUP $MAINPID'
ExecStop=/bin/sh -c '/usr/sbin/rndc stop > /dev/null 2>&1 || /bin/kill -TERM $MAINPID'
TimeoutStartSec=30s
PrivateTmp=true
ProtectSystem=strict
ProtectHome=true
ReadWritePaths=/usr/local/bind9/var
AmbientCapabilities=CAP_NET_BIND_SERVICE
CapabilityBoundingSet=CAP_NET_BIND_SERVICE
NoNewPrivileges=true
[Install]
WantedBy=multi-user.target
Key Changes
- User=ddi / Group=ddi: named now runs as non-root.
- Pre-check uses /usr/local/bind9/bin/named-checkconf (custom BIND build).
- ExecStart=/usr/sbin/named -u ddi -c ...: explicitly tells BIND to drop privileges to ddi.
- ReadWritePaths=/usr/local/bind9/var: writable path is now under /usr/local/bind9/var, not /var/cache/bind.
Why
This is the hardened, production mode:
- If named is compromised, the attacker only gets ddi’s rights, not root.
- Write access is limited to the BIND data directory DDI Central expects.
Step 4: Reload systemd daemon
What it does
- Tells systemd to re-read all unit files (including the new named.service).
Step 5 & 6: Grant capabilities to named and rndc
What they do
- Give named and rndc the ability to bind to privileged ports (like 53) without being root.
- This is why it’s safe to run them as ddi.
Step 7: Check AppArmor status
What it does
- Shows if AppArmor (Linux MAC framework) is active and enforcing profiles.
Step 8 & 9: Disable and tear down AppArmor
systemctl disable apparmor
aa-teardown
What they do
- disable stops AppArmor from starting on boot.
- aa-teardown unloads current profiles from memory.
Why
In some environments, the default AppArmor profile for BIND conflicts with:
- custom paths (/usr/local/bind9),
- running as ddi,
- or DDI Central’s way of managing files.
Disabling removes that restriction.
Obviously, from a security perspective, you’d do this only if AppArmor is actually blocking named, and you don’t have a tailored profile. But this is what the given runbook specifies.
Step 10 & 11: Restart and verify named
What to confirm
- Active: active (running)
- Main PID running as ddi:
You should see named owned by ddi, not root.
Process 3.C: Server Operations
Once the servers running Linux DNS-DHCP services are onboarded, DDI Central enables you to perform the following actions:
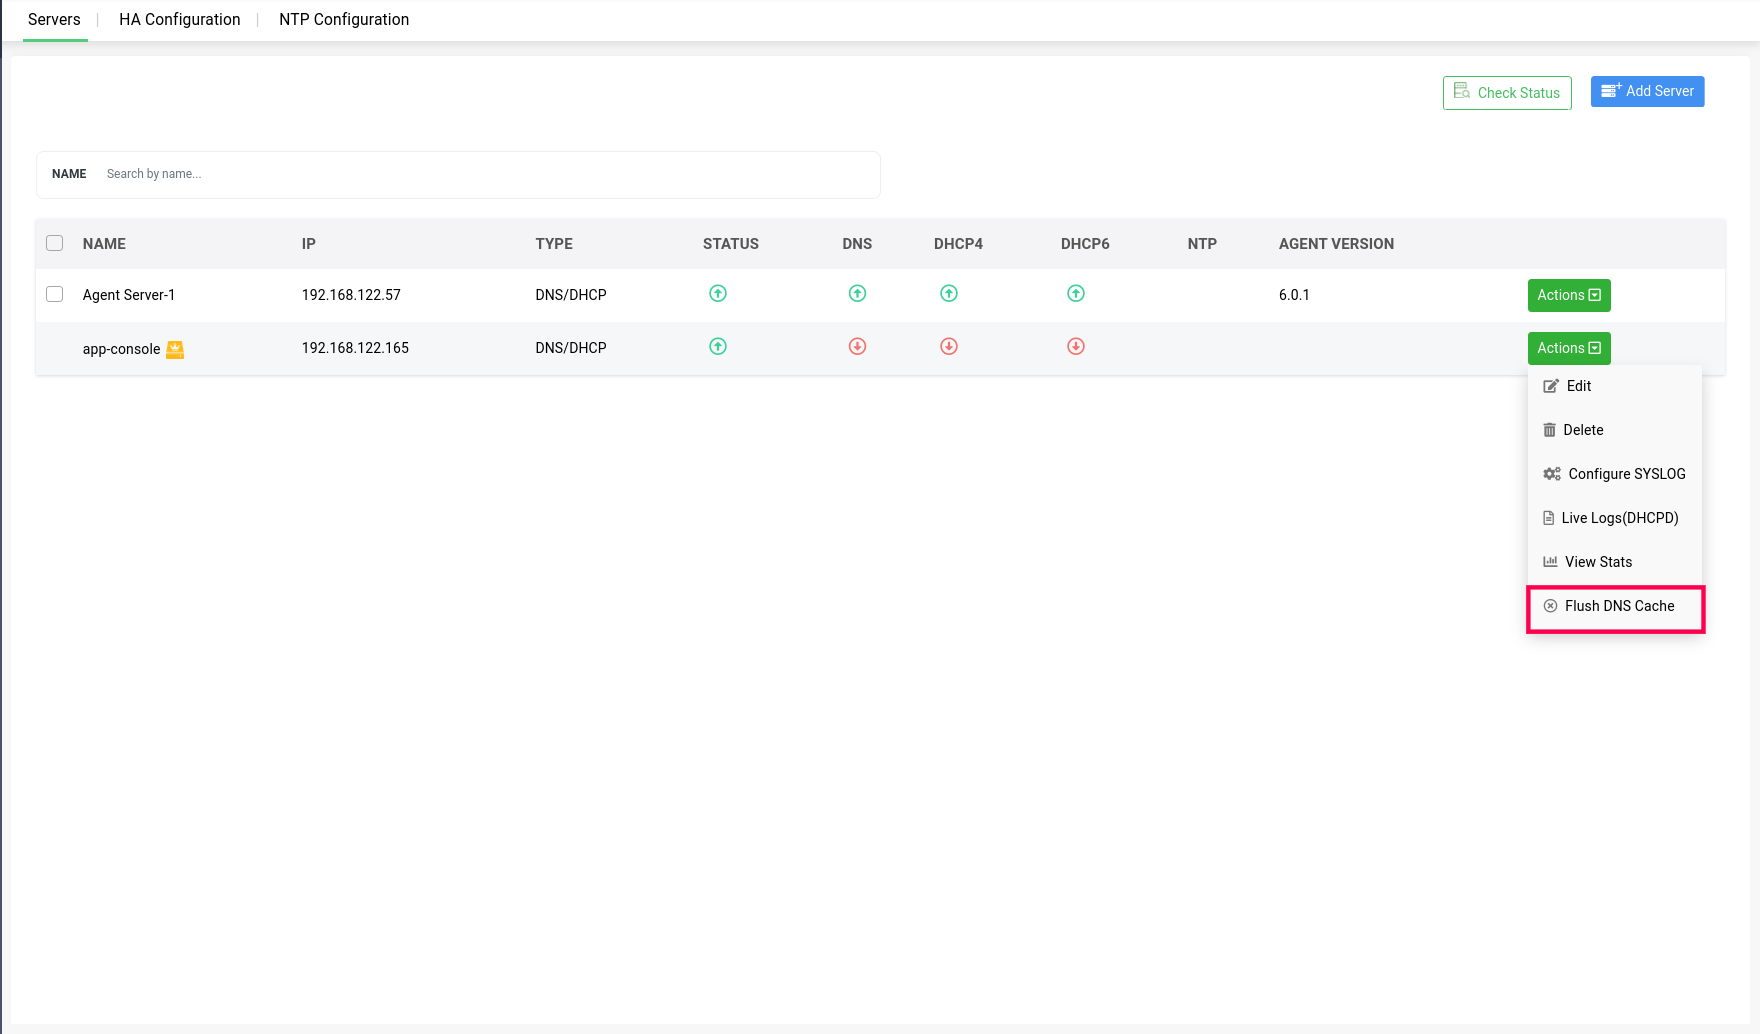
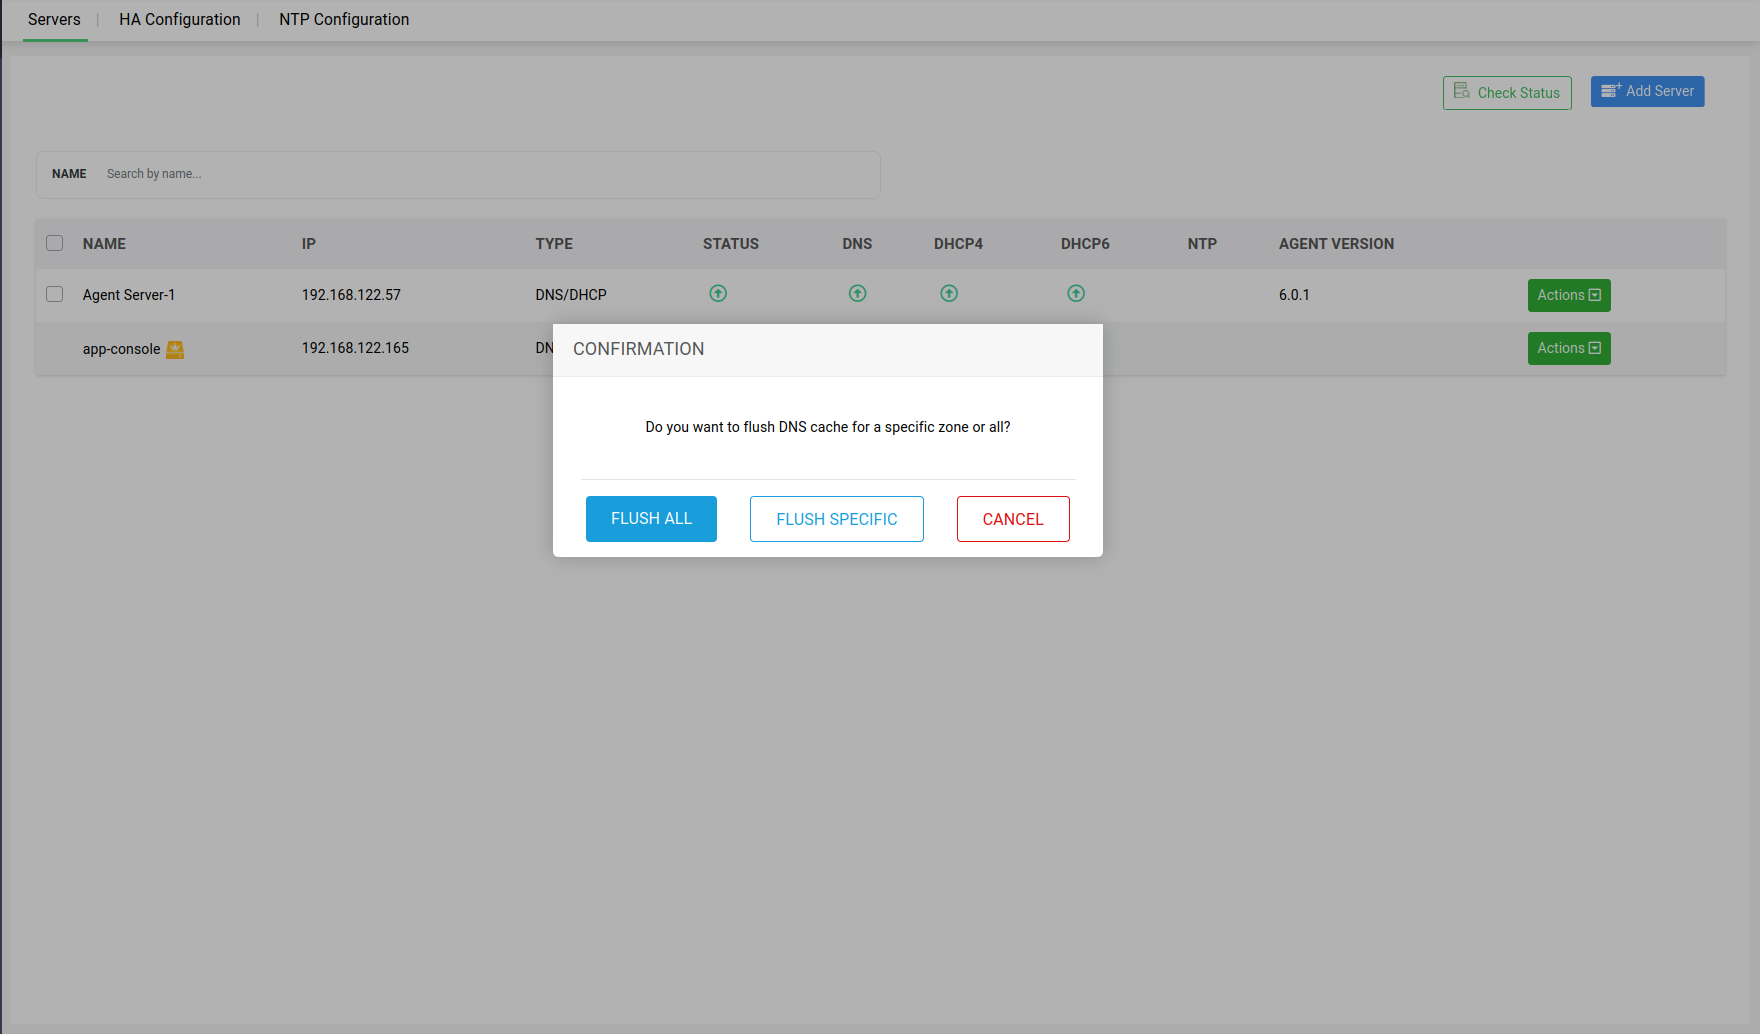
Action 1 -> Flush DNS Cache: Hit the button "Flush DNS Cache" to refresh the DNS cache of the selected server to ensure that the DNS information hosted on the server is up-to-date.
A dialog box appears prompting you to specify the scope of the cache flush. If you want to flush the cache of all the zones on the server, click Flush All or if you just want to flush the cache of a specific zone on the server, click Flush Specific.
Subsequently, specify the zone name and click Flush Cache.
Note: Flush DNS Cache action is crucial for maintaining the reliability and speed of DNS resolutions of within your network.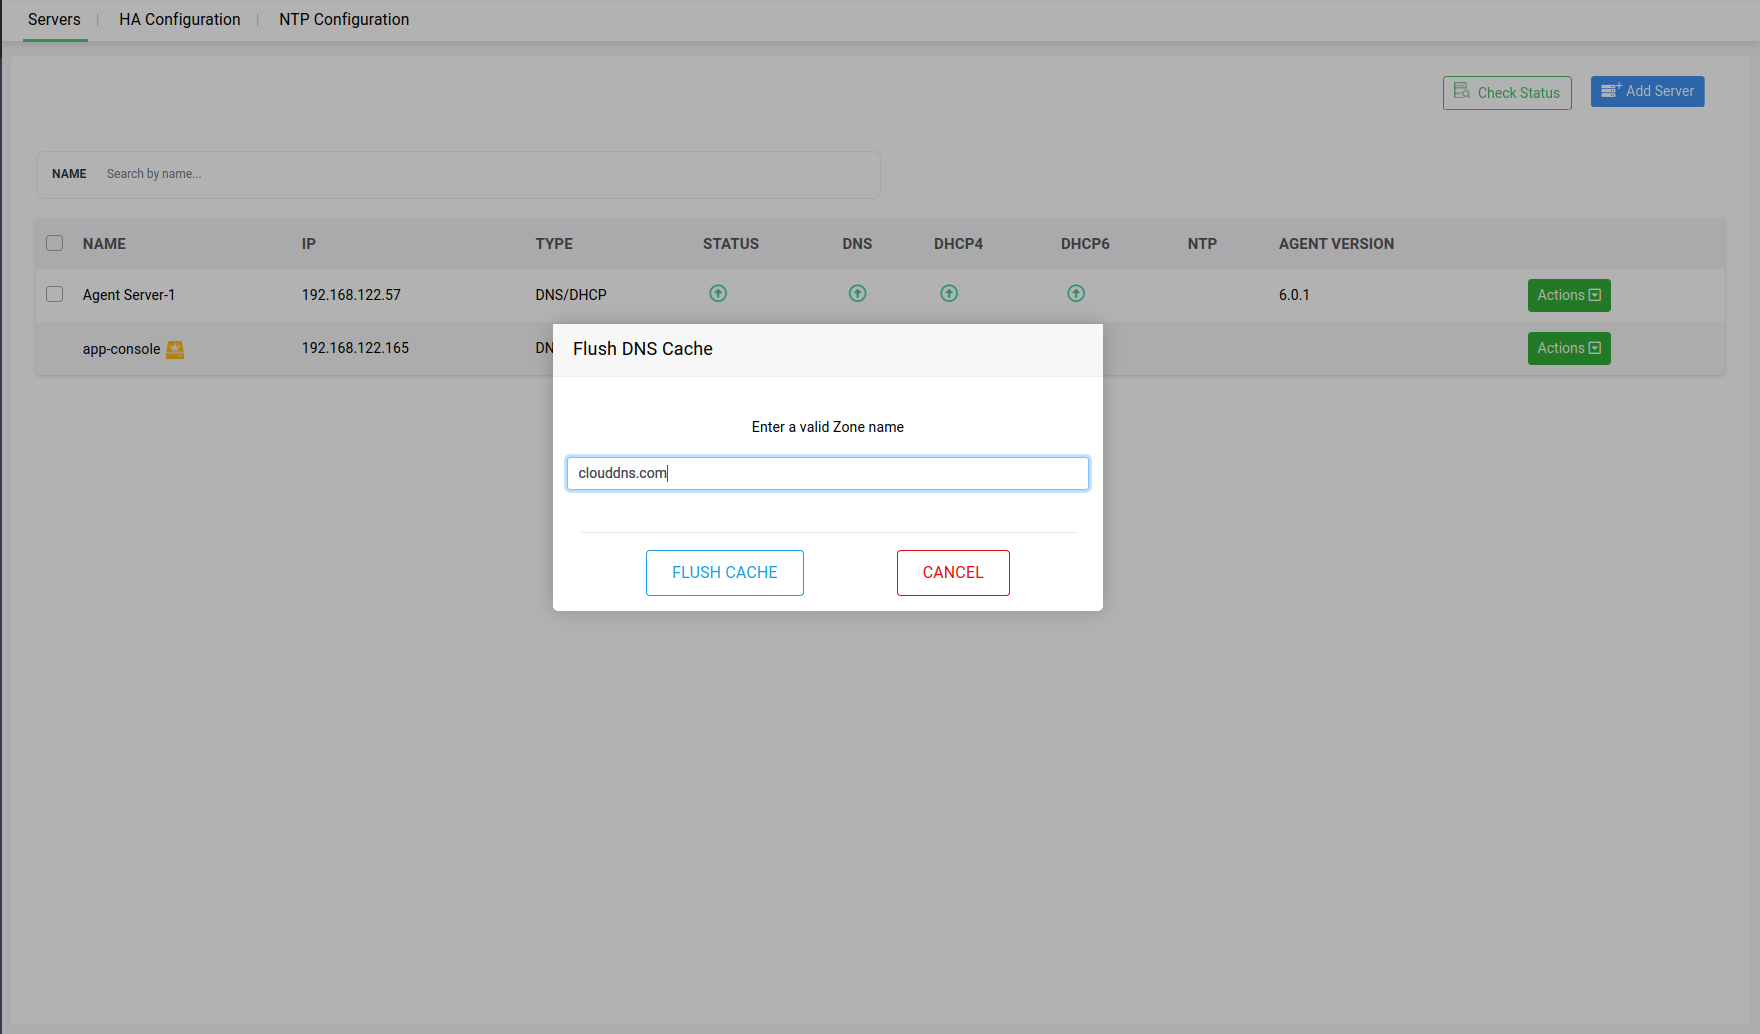
Action 2 -> Reset Password: Enables network admins to improve security with enhanced controls over DDI Central's Node Agent authentication. This option allows admins to reset passwords to ensure secure transactions between DDI Central's Node Agent and DDI Central's App Console.
Note:The Node Agent, installed on all DNS and DHCP servers in your network, securely communicates with the DDI Central App Console using encrypted authentication. Previously, in DDI Central password resets were automatic and did not require admin involvement. Now, admins can reset the Node Agent password to enhance security, especially if they suspect it has been intercepted or compromised.
Action 3 -> Suspend Operations: Both DNS and DHCP servers within a cluster can be suspended from providing further updates to the app console UI, by going to Servers>Actions, and clicking on Suspend option in the dropdown menu.
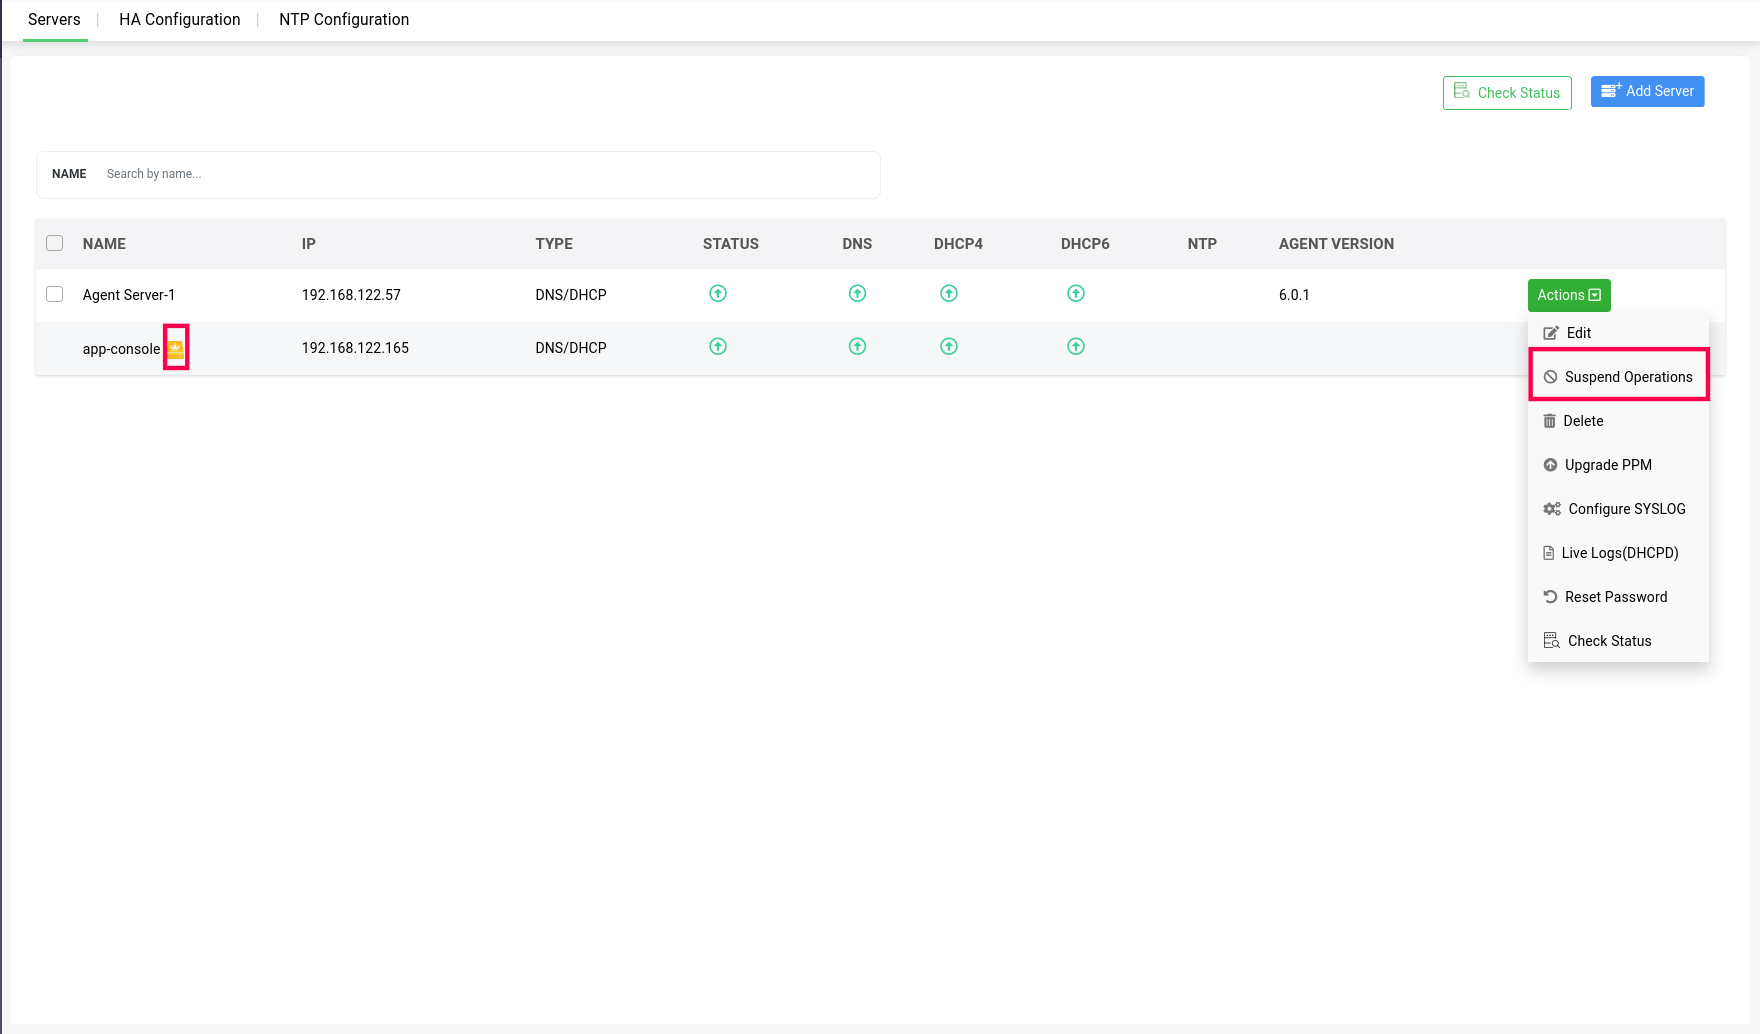 Note: The server on which the appconsole is running can't be suspended, and that server will be marked with a yellow crown icon.
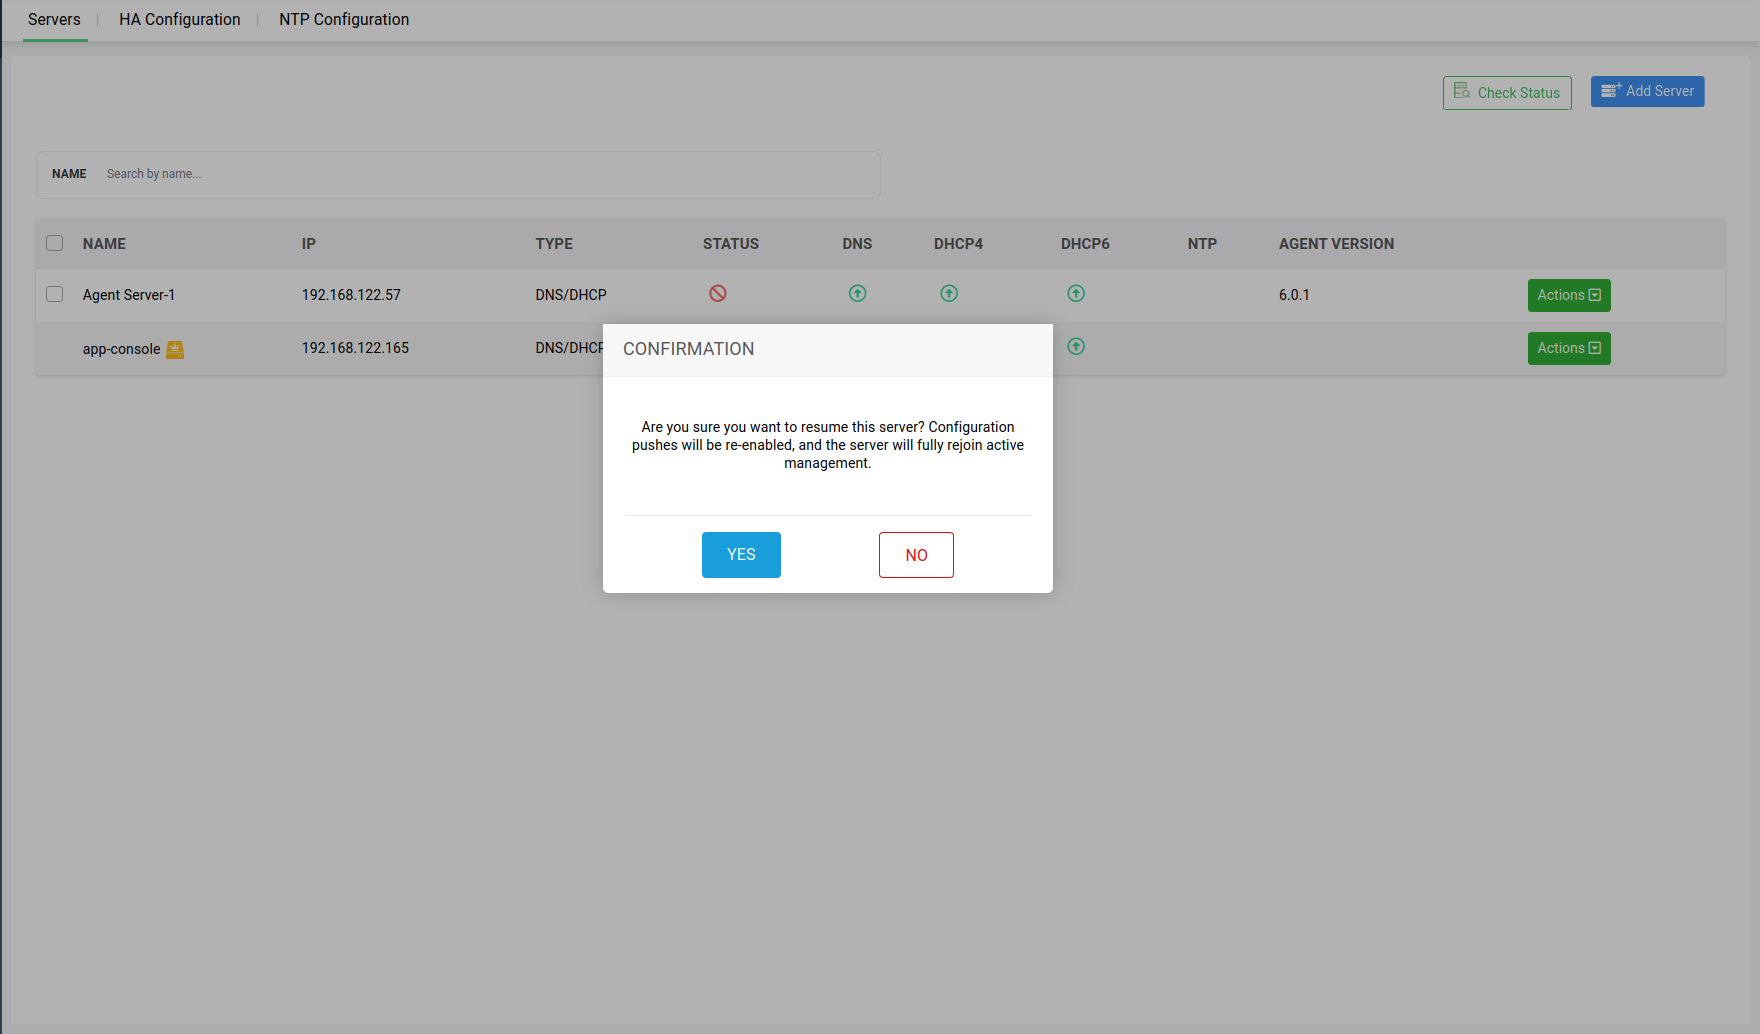
After selecting yes to suspend the selected server, the server will be marked Unmanaged in the status section.
When the admin wants to change the state back to Manage, the suspended servers can also be resumed to reflect their updates in app console UI, by clicking on the Resume Operations option.

Action 4 -> Upgrade PPM:
(UI-based PPM upgrade for Linux Discovery Node Agent): The Upgrade PPM option is available starting DDI Central v6.1. When you click Upgrade PPM, DDI Central triggers an in-app upgrade of the onboarded Linux Discovery Node Agent to the latest supported build—so you don’t have to update the agent manually on the Linux server.
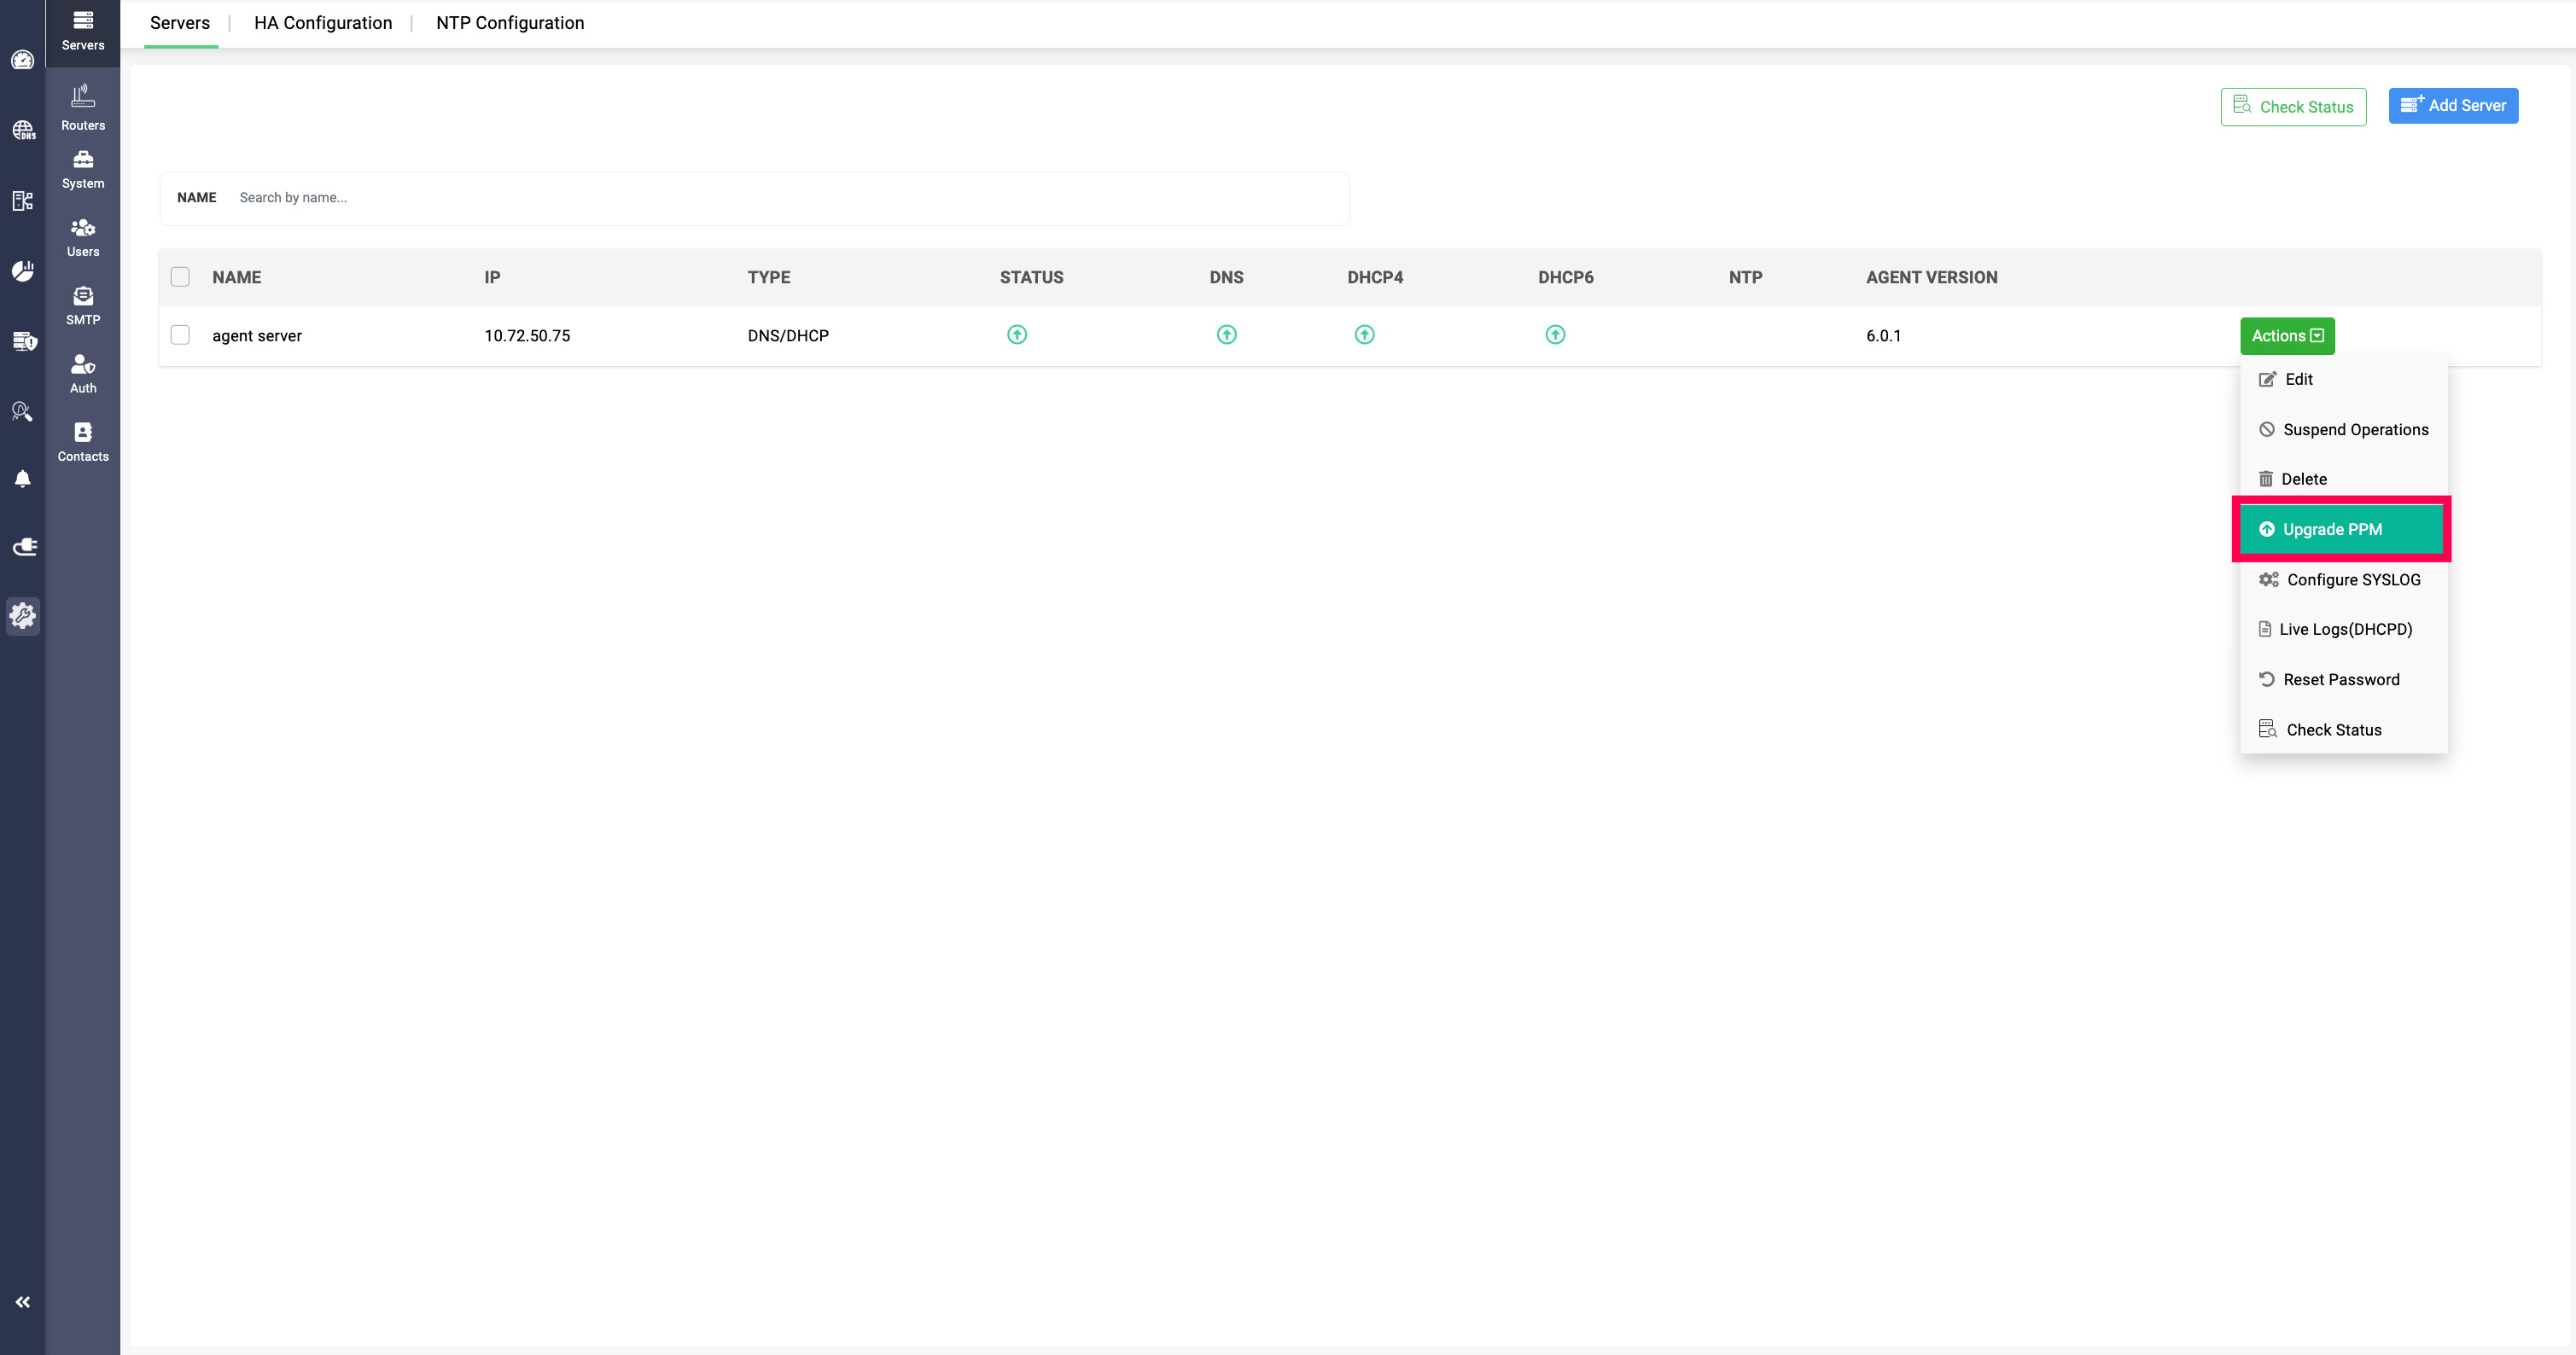
Prerequisites:
- Management UI Console must be v6.1 (upgrade the console first to use this action).
- Discovery Node Agent build must be v5.6.0 or later.
- If you are on older versions, follow the sequential upgrade path using the Service Pack table after checking your current build number.
Action 5 -> Agent Version:You can now view the node agent version installed on each server under the Agent Version column in the table.
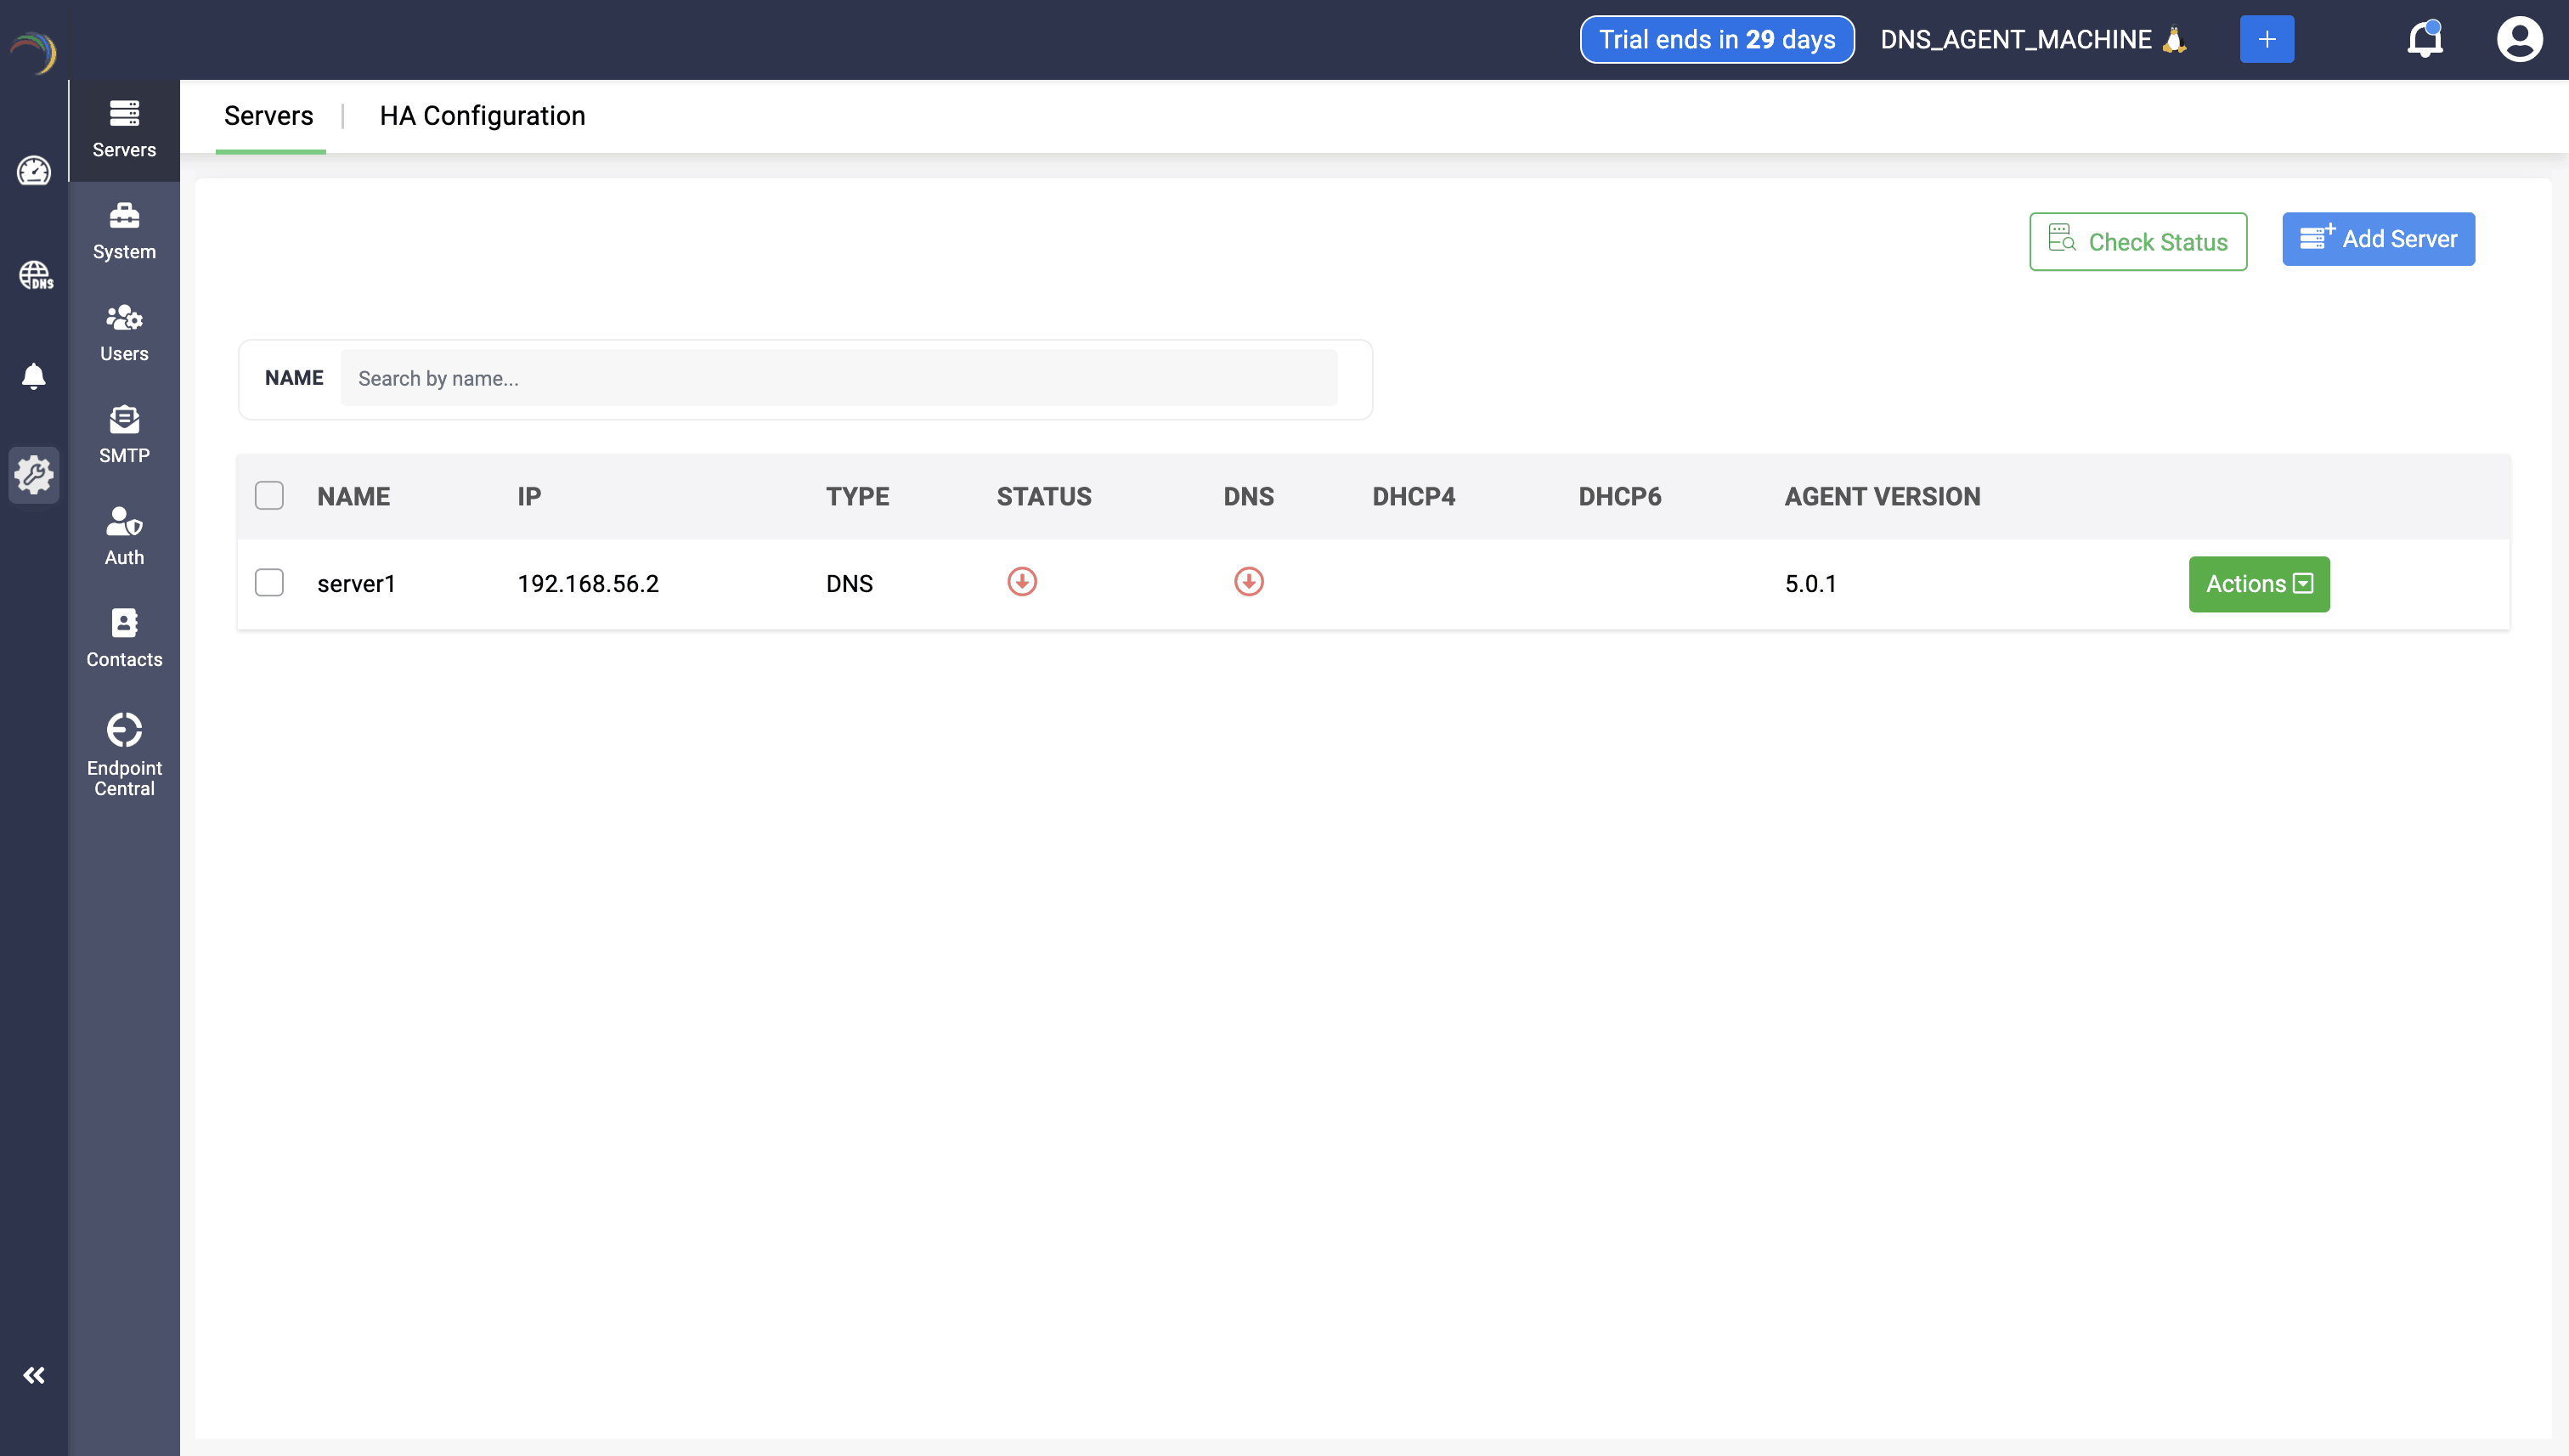
Action 6 -> Check Status: DDI Central enables users to update the status of their servers and associated services by clicking the Check Status button after selecting the desired server. This action refreshes and displays the current status of both the server and the services it hosts. Users can select one or multiple servers to update their status simultaneously.
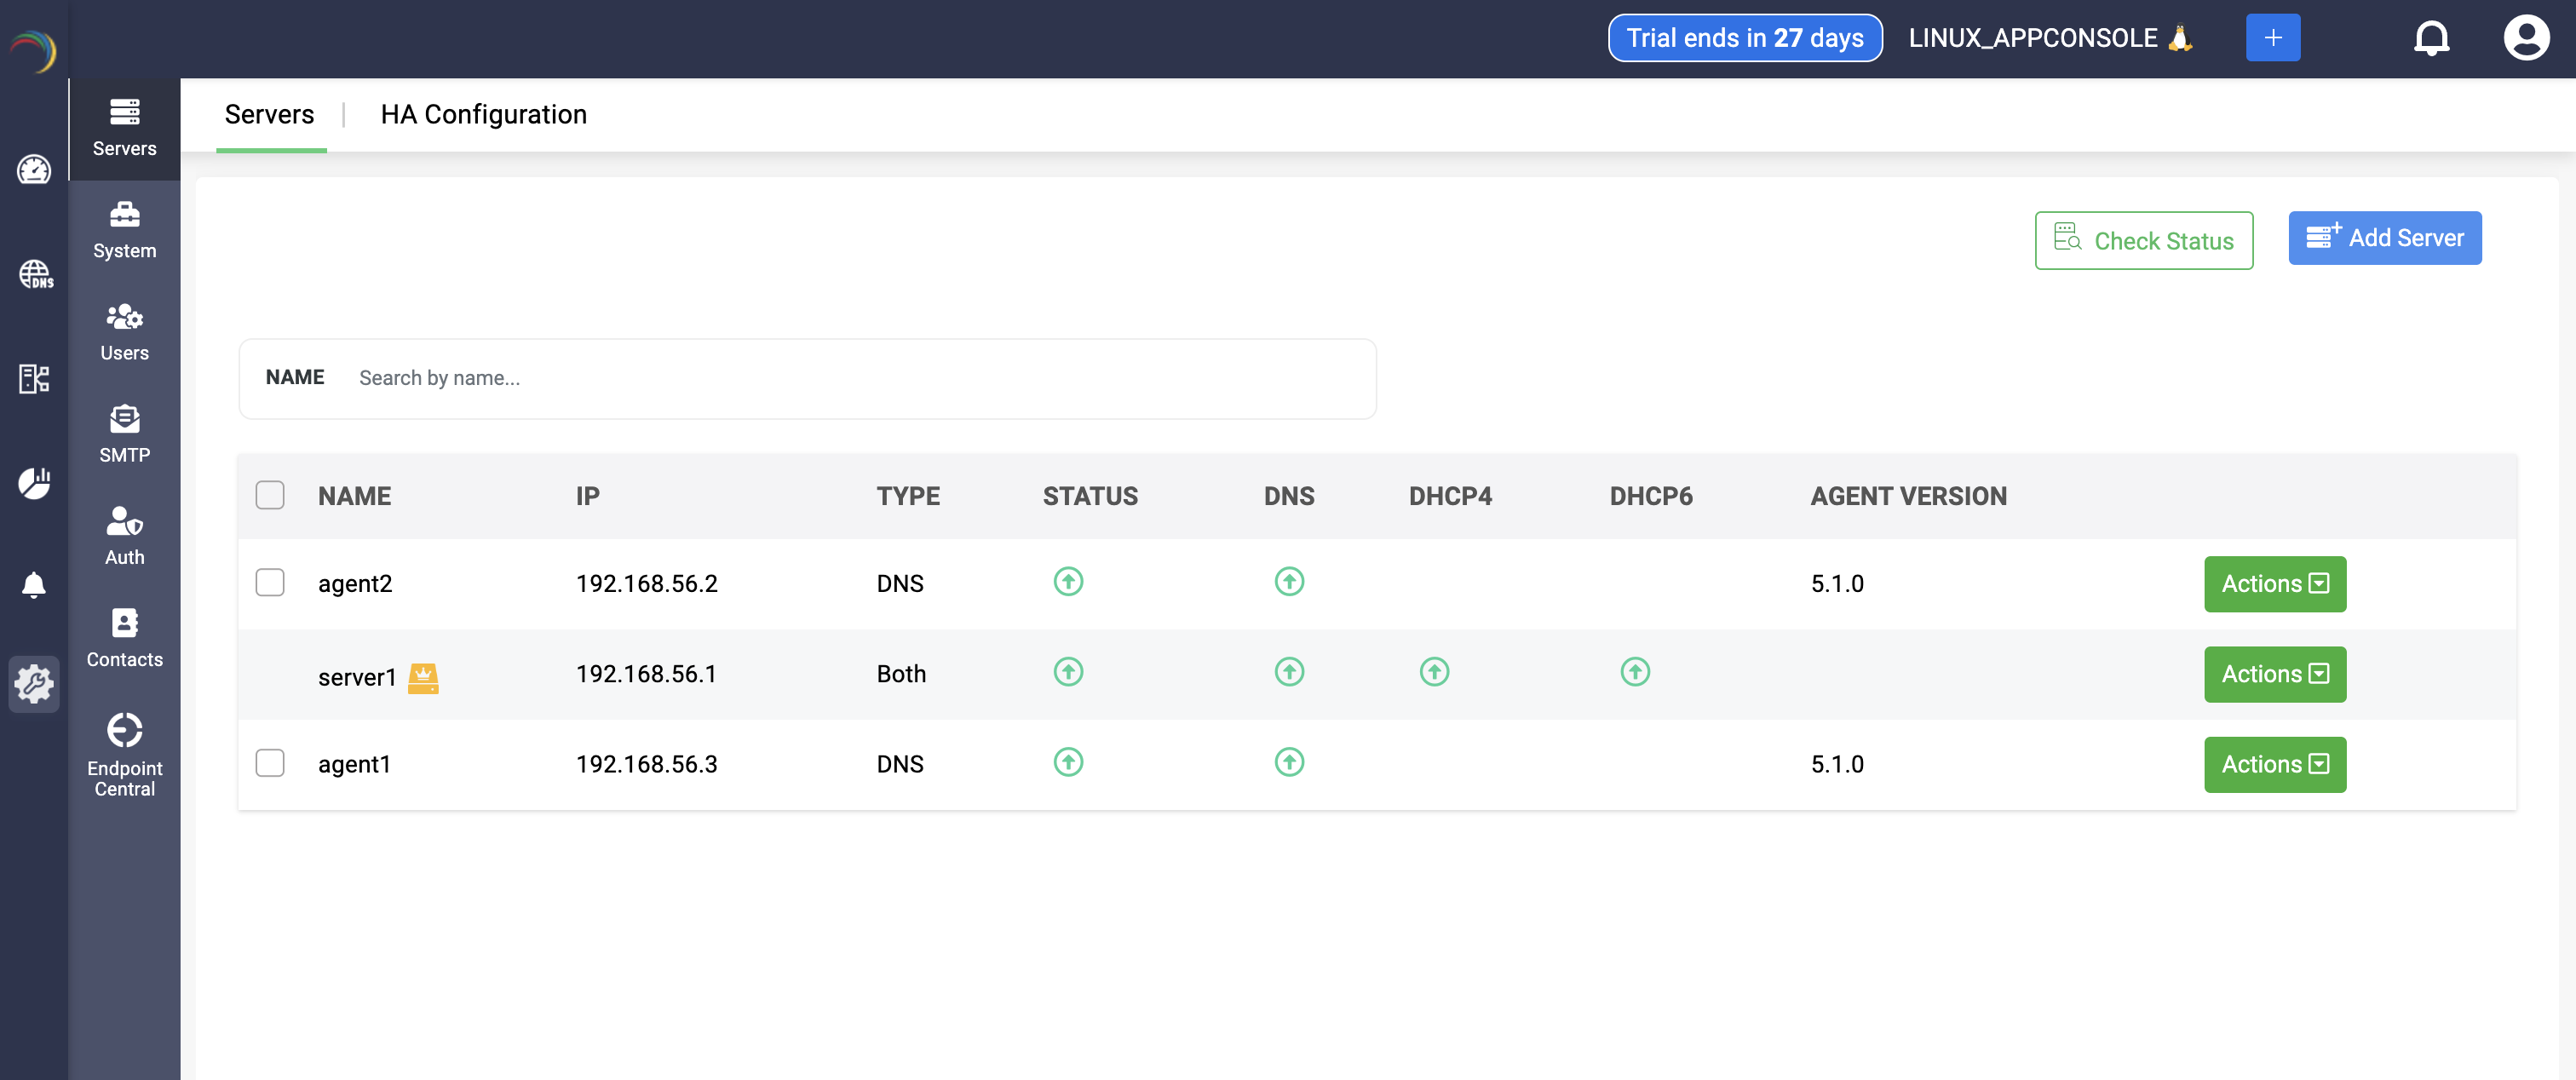
Action 7 -> Identifying the Main App Console Server
Note: The server running the DDI Central application aka the Management UI Console.bin, identified by a yellow icon, cannot be selected when using the Check Status option.