Cisco Meraki monitoring
OpManager's Cisco network monitoring feature empowers users to discover and monitor Cisco Meraki controllers comprehensively, ensuring its availability, health, efficiency, and performance. By enabling Cisco Meraki network monitoring, users can swiftly identify any anomalies or faults within devices connected to a Cisco Meraki controller. This help document outlines the functionalities available in OpManager for managing Cisco Meraki devices effectively.
- Enable API access in Meraki dashboard
- Add Meraki
- Advanced Monitoring
- Update Meraki API key
- How to view WAN links?
1. How to enable API access in Meraki dashboard?
To enable API access,
- Login to your Meraki console dashboard.
- Go to Organization > Settings > Dashboard API Access > Enable access to Cisco Meraki Dashboard API.
- Once done, go to 'My Profile' and regenerate the API key.
- Use the generated API Key to discover your Meraki Organization in OpManager.
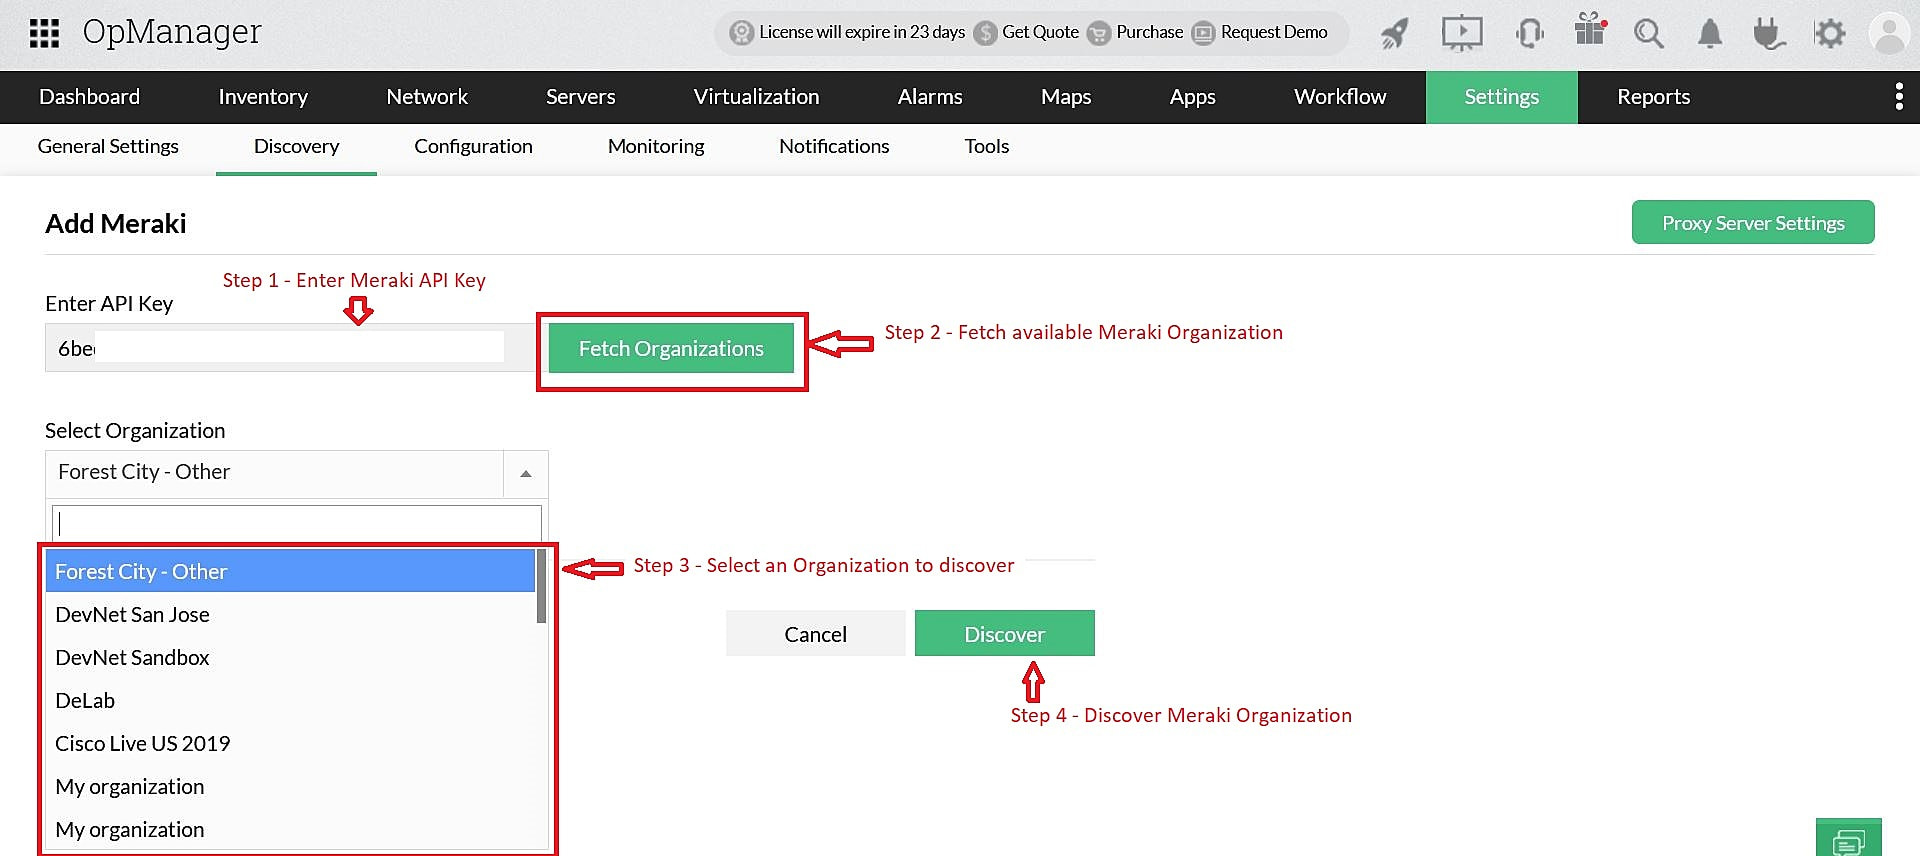
2. How to add Meraki organization in OpManager?
To add a Meraki controller in OpManager,
- Go to Settings > Discovery > Add Meraki.
- Enter the API Key and click on Fetch Organizations. OpManager will now fetch all Organizations associated with the respective API key.
- Select the Organization to be added and click on Discover. The selected Organization will now be discovered and categorized as Meraki Controller.
Note: Do ensure that the API access is enabled in your Meraki Dashboard.
3. What is advanced monitoring of associated entities?
When a Meraki organization is discovered, OpManager also checks for the availability of all associated entities such as switches, firewalls, cellular gateways, radios, and Vision devices that are a part of the discovered Meraki controller. By default, all these entities are monitored for availability via the controller.
On enabling advanced monitoring, you will be able to monitor certain additional performance metrics of all associated entities such as client details (for radio devices), port status (for switches), etc and these entities will be directly discovered in OpManager and treated as a separate device. This helps network administrators identify and troubleshoot all related entities of your Meraki controller. Further, other functionalities such as interface discovery, monitoring the interface availability and bandwidth, associating notification profiles (email, SMS, trap profile, and more) can also be performed for all these individual entities, including switches, firewalls, radios, Vision devices, and gateways.
To enable advanced monitoring,
- Go to the Meraki controller's device snapshot page and find the required entity under the respective tab.
- Select the device(s) and click on the Start option under the 'Advanced Monitoring' column. This will enable advanced monitoring for the selected device.
- Similarly, to stop advanced monitoring, select the required devices and click on the Stop option available under the 'Advanced Monitoring' column of that device. This will remove the entity from advanced monitoring.
Note:
- Advanced monitoring is a licensed feature. You will need to purchase a separate license based on the device count you need in order to enable advanced monitoring.
- The Meraki Controller, Meraki Security and Meraki Switch comes under device licensing and the Meraki Radio, Meraki Vision, Meraki Cellular Gateway is packed under Access Point licensing. Reach out to our support team at support-opmanager@manageengine.com for further queries.
- OpManager will automatically associate the Meraki device template for Meraki controllers that are already discovered in OpManager.
4. How to update the Meraki API key in OpManager?
If the Meraki API is regenerated or modified, you can update the Meraki RESTAPI credentials via Meraki controller's device snapshot page.
- Go to the Meraki controller's device snapshot page (Inventory -> Devices) and scroll down through the Device Summary section. Click on the option 'Click here to change'.
- Enter the updated API key in the given section and click on the Test Credential option to check it. Once done, click on OK.
- The given API key will be updated if it is valid.
5. How to discover and view the WAN links?
WAN uplinks are automatically detected during device discovery and rediscovery, so no additional discovery configuration is required. The corresponding WAN links and their IP addresses are displayed in a dedicated widget on the Meraki MX Snapshot page. To view this, go to the Meraki Controller Snapshot page, navigate to the All Devices tab, and select Meraki Security (MX).
WAN Link widget: The WAN Link widget provides essential details such as:
- Interface – Identifies the WAN interface used for connectivity.
- State – Displays the operational status of the link.
- IP Address – Shows the IP address assigned to the WAN interface.
- Gateway – Identifies the default gateway used for outbound traffic.
- Public IP – Displays the public-facing IP address of the link.
- Availability – Indicates the uptime or reachability of the WAN link.
- Packet Loss – Shows the percentage of packets lost during transmission.
- Response Time – Displays the latency measured on the WAN link.
- Sent Traffic – Indicates the amount of outbound traffic transmitted through the link.
- Received Traffic – Indicates the amount of inbound traffic received through the link.
Using the Edit option in the Actions column, thresholds for packet loss, latency, and traffic can be configured to proactively monitor WAN link performance.
More about Cisco Meraki monitoring: