Help desk roles
A help desk role is a defined set of Active Directory (AD) tasks and permissions that can be assigned to help desk technicians to authorize them to perform specific actions within the product. The product offers a few predefined help desk roles, such as Super Admin, Create Users, Modify Computers, and Unlock users, and also allows administrators to create custom roles tailored to their organization's requirements.
By creating customized roles and assigning them to the appropriate technicians, administrators can delegate AD tasks within clearly defined administrative boundaries without granting native AD privileges to the technicians.
How help desk roles work
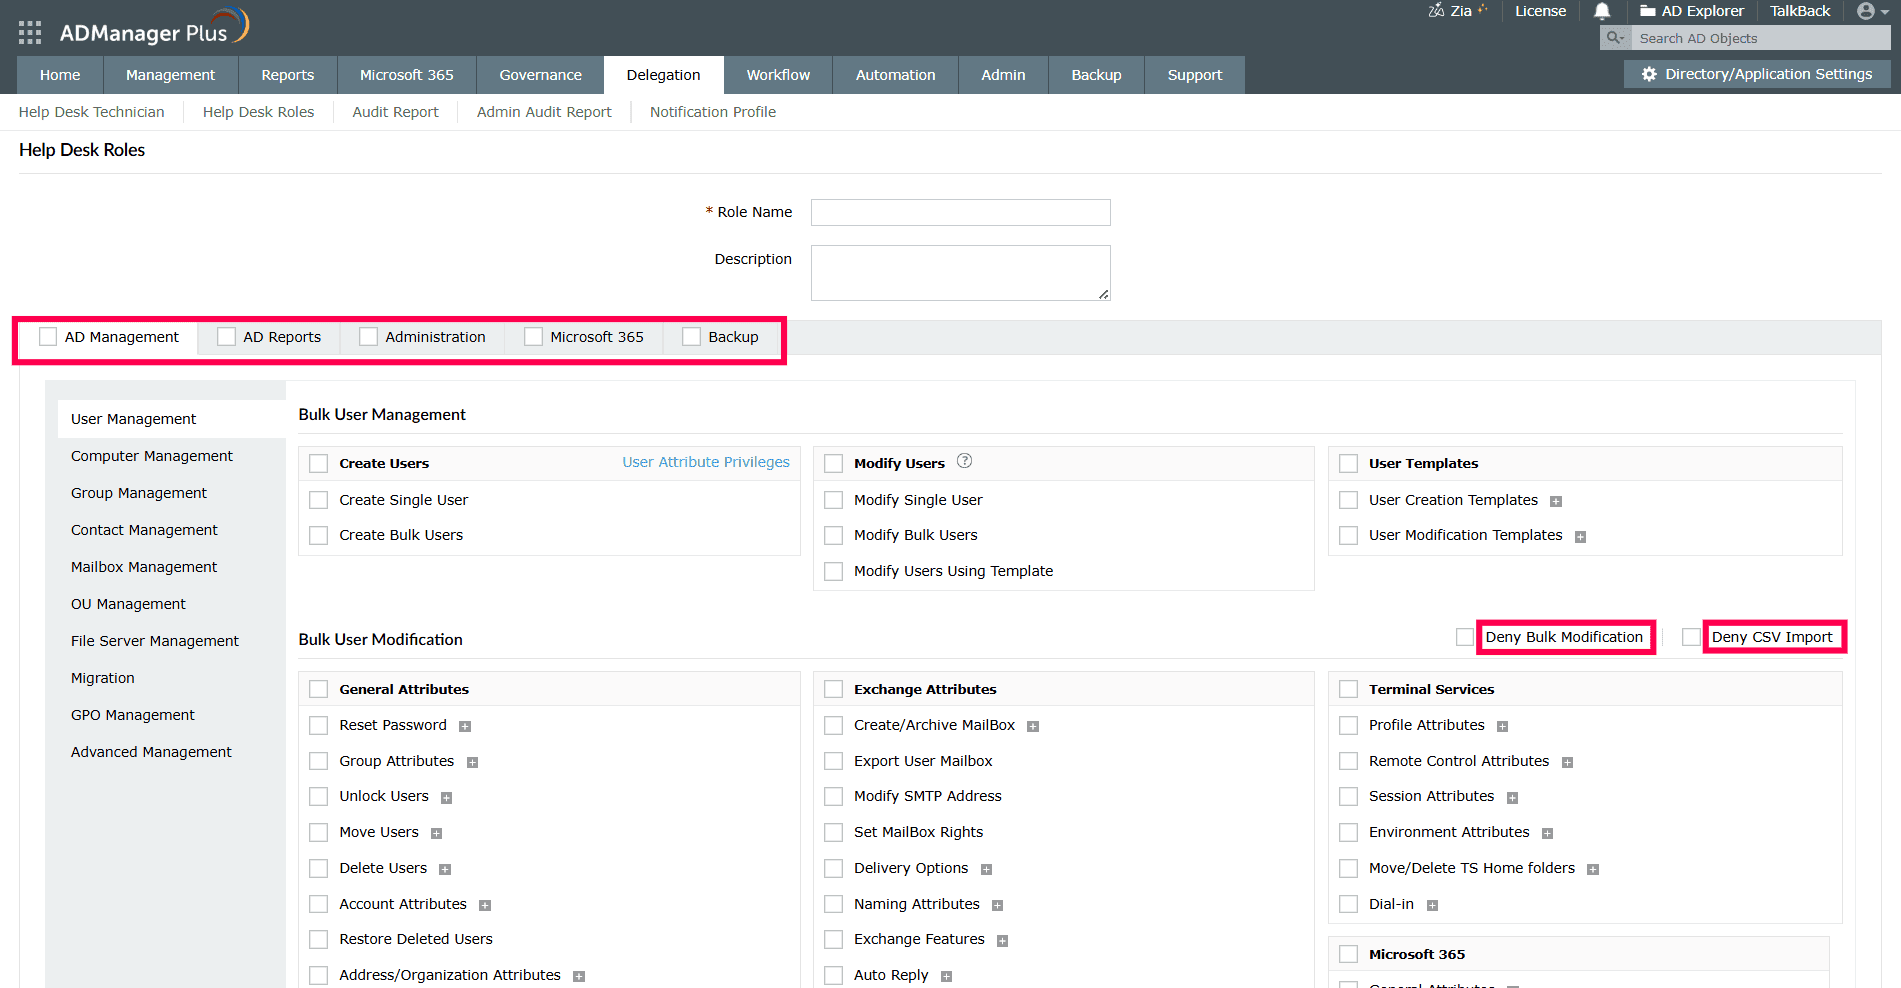
A help desk role works as a task-based permission set that determines the actions a technician can perform. While creating a role, administrators choose the required action categories, such as AD Management, AD Reports, Administration, and Backup, and then select the specific tasks within those categories. These permissions can be further refined to match the technician's responsibilities. For example, administrators can restrict bulk modifications, prevent CSV-based imports, define attribute-level access, configure granular authorization for selected tasks, and limit report visibility.
Granular authorization provides more control over individual actions within a task. Instead of granting full access to every option under a selected task, administrators can allow only the required sub-actions or attributes. Similarly, report restrictions can be used to hide entire report categories or specific reports that are not relevant to the technician's role.
When the role is saved and assigned to a technician, the product applies these permissions in the technician interface. The technician can access only the tasks, attributes, and reports included in the assigned role.
Note The Super Admin role is a mandatory predefined role in the product and cannot be modified or deleted. Any technician assigned the Super Admin role will have full control over the product.
Steps to create a new help desk role
- Log in to the product.
- Navigate to Delegation > Help Desk Delegation > Help Desk Roles.
- Click
 Create New Role to create a new help desk role from scratch. New roles can also be created by copying an existing role.
 - In the Help Desk Roles page, enter an appropriate Role Name and Description for the new role.
- From the list of tasks categorized under AD Management, AD Reports, Administration, and Backup, select the tasks that you want to include in this role.
- To prevent users from making bulk modifications or importing CSV files, select the Deny Bulk Modification or Deny CSV Import check boxes, respectively.
- While creating users, to restrict technicians' access to only specific attributes, use the User Attribute Privileges option located in the Create Users section, and select the desired attributes. Similarly, for computers, groups, contacts, mailboxes and organizational units (OUs), use the Computer Attribute Privileges, Group Attribute Privileges, Contact Attribute Privileges, Attribute Privileges, and OU Attribute Privileges options, respectively.
- To allow technicians to modify objects, select the attributes they are permitted to modify from the Bulk Object Modification section.
Note When delegating object modification permissions, only the attributes selected can be modified by the technicians. If no attributes are selected, technicians will not be able to modify any attributes. Similarly, to make a more granular selection of the attributes that can be modified and the tasks to include in the role, click the + icon located beside each action or task.
- Click Save to create the new role.
To prevent technicians from viewing reports outside their scope:
- While creating or editing the role, navigate to the AD Reports tab.
- Click each report category to view the individual reports and select only the reports the technician should be able to view.
- Save the role.
Technicians with the role will see only the selected reports under the Reports tab when they log in.
Manage existing help desk roles
To edit, copy, or delete an existing help desk role:
- Log in to the product.
- Navigate to Delegation > Help Desk Delegation > Help Desk Roles.
- Locate the role you want to manage and click the corresponding icon under the Action column:
- Edit icon to modify the role. Update the role name, description, selected tasks, or attribute privileges as needed, and click Update. Changes apply immediately to all technicians currently assigned to the role.
- Copy icon to create a new role based on the existing one. Enter a new role name and click Copy. This is useful when you want to create a role that closely resembles an existing one, with only minor differences.
- Delete icon to remove the role. Confirm the deletion in the prompt that appears.
Note Roles that are currently assigned to one or more help desk technicians cannot be deleted. To delete such a role, first unassign it from all associated technicians via Help Desk Technicians, and then retry deletion.
Tips
- For organizations with regional or departmental help desk teams, create roles aligned with specific job functions, such as Password Reset Technician, Group Membership Manager, or Onboarding Specialist, and combine them with tightly scoped OUs to enforce least-privilege access.
- When several roles need to share most of the same permissions, start by copying the closest existing role and refining it rather than building from scratch. This reduces misconfiguration risk and saves time.
- Periodically audit the Associated Technicians column on the Help Desk Roles page to ensure roles are not unnecessarily assigned to inactive or transferred users.