User Management Settings - Firewall Analyzer


    Users

    Add Users

    Click the User Management > Users link to create and manage the different users who are allowed to access the Firewall Analyzer server.

    The different types of users and their respective privileges are described in the table below:

    User Description
    Administrator This user can do all operations including configuring Syslog serverssetting up file archiving, adding additional users, and more
    Operator This user can do all operations except configuring the Intranet settings, and user management

    By default, an Administrator user with username as admin and password as admin.

    Note: We highly recommend that you change the password upon logging in for the first time.

    If you have logged in as an Administrator user, the User Management page lists all the users created so far.

    Viewing Login Details

    If you have logged in as an Administrator user, click the User Audit View link against a user to view the corresponding user audits. The User Audit page shows the remote host IP address from which the user logged on, the timestamp of the login, and the duration of the session.

    The description the user details available in the user list table are explained below:

    Delete 

    Select all users check box if you want to delete all the users and individual user(s) check boxes to delete the selected users. There is a check box against each user below the all user check box. Click Delete button to delete all the or selected user(s) from the list of users accessing Firewall Analyzer.

    Adding a New User

    • Click the Add User link to add another user to access Firewall Analyzer.
    • Configure User Details screen opens up.
    • In the User Details section of the screen, select the role of the user from the Role drop box: Administrator or Operator
    • Select the role of the user type from the User Type drop box: Local Authentication or RADIUS Authentication
    • Enter e-mail address of the user in the Email ID text box
    • Select the photo of the user to add
    • Enter phone number of the user in the Phone Number text box
    • Enter mobile number of the user in the Mobile Number text box
    • Enter the user's password in the Password text box. The password should be of 5 to 20 characters long.
    • Re-enter the user's password in the Re-type Password text box.
    • Select time zone for NetFlow reports from the Time Zone drop box
    • Click Next and go to the Scope section of the screen
    •  Select the firewall devices to which the user will have access and push them from Available devices to Selected devices
    • Click Save to add this user to the list of users accessing Firewall Analyzer. Click Cancel to cancel the adding user operation. Click Back to go to the User Details section.

    Note to reset password:

    • The Forgot Password option in the login page can be used to reset the password.
    • Make sure the Mail Server Settings is configured and User's email ID is configured above. The auto generated password will be sent to the email ID entered as the User's email ID.

    Editing User Details

    If you have logged in as an Administrator user, the User Management page lists all the users created so far.

    • Click the Edit link to edit the user details. You can change the access level, password, and optionally, the default e-mail address for this user.
    • You can edit the host groups associated with the user. Select the host group to which the user will be having access. All the available host groups are listed in the Available HostGroup(s) list. Select the host groups and click right arrow. The selected host groups are displayed in the Selected HostGroup(s) list. If you want to remove any host group from the Selected HostGroup(s) list, select the host groups and click left arrow. The removed host groups will be listed back in the Available HostGroup(s) list.
    • Once you are done, click OK to save the new changes. Click Cancel to cancel editing the user operation.

    OR

    If you have logged in as an Operator or Guest user, click on the Account Settings link to change your password and default e-mail address.

    Once you are done, click OK to save the new changes. Click Cancel to cancel editing the user operation.

    How to reset Firewall Analyzer user password?

    Firewall Analyzer User Privileges 

    Types of User Privileges in Firewall Analyzer

    • Administrator - Can perform Add/Edit/Delete operations of all product configurations and Firewalls.
    • Operator - Can perform Add/Edit/Delete operations of the Firewalls assigned to him and product configurations except Intranet Settings and User Management.

    Comparison of Feature Access to the Users

    Sl No
     
    Feature Name
     
    Administrator
     
    Operator
     
    1
     
    User Management

    Create/Modify/Delete users
    Yes No
    2
     
    Predefined Reports and ReportProfiles The user can view all predefined reports of all the firewalls.

    The user can perform Add/Edit/Delete operation of Report profiles created by all users.
    The user can view all predefined reports of Firewalls assigned to him.

    The user can perform Add/Edit/Delete operation of Report profiles created by himself.
    3
     
    Alert Profiles and Alert Administration The user can perform Add/Edit/Delete operation of Alert profiles created by all users.

    Administration of Alerts created by All Alert Profiles
    The user can perform Add/Edit/Delete operation of Alert profiles created by himself.

    Administration of Alerts created by his own Alert Profiles
    4
     
    Edit/Delete Device All Firewalls Only for Firewalls assigned to him.
    5
     
    Dashboard View Customization For all Firewalls Only for Firewalls assigned to him.
    6
     
    Advanced Search Yes Yes
    7
     
    Intranet Settings

    Configuring Firewall based LAN settings
    Yes No
    8
     
    Bookmark The user can view only his bookmarks. The user can view only his bookmarks.
    9
     
    Configuration Settings listed in the Settings tab.
    • Adding Syslog Server
    • Check Point Firewall Settings
    • Alert Profiles view
    • Import Log files view
    • Schedule Listing page
    • Working Hour configuration
    • Customize Report Tree
    • Mail Server Settings
    • Database Console
    Yes
     
    Yes
     
    10
     
    Configuration views present in the Settings Tab.
    • Device Details
    • Archived Files
    • Protocol Groups
    • Server Diagnostics
    • Account Settings
    Yes
     
    Yes
     
    11
     
    User Assistance
    • Tell a Friend
    • Upgrade License
    • Help
    • Feedback
    • About
    Yes
     
    No


    User Roles

    There are three types of User Roles in Firewall Analyzer:

    1. Administrator User
    2. Operator User
    3. Custom User Roles

    1. Administrator User

    Administrator Users have unrestricted access to perform read/ write operations in OpManager. They add/remove devices, troubleshoot issues, change configurations and more without any limitations i.e they have complete access.

    2. Operator User

    Operator Users have read-only/ restricted access in OpManager. They can be granted further access by the Administrator User.

    3. Custom User Roles

    The level of access for users across different modules and add-ons in OpManager can be customized individually through Custom User Roles. The different levels of access that can be provided in OpManager for users through custom roles include: Read/Write, Read and No Access.


    RADIUS Server Settings


    Firewall Analyzer provides one more external authentication apart from the local authentication. It is Remote Authentication Dial-in User Service (RADIUS) authentication. If you add a RADIUS server details, you will find the Log on to field below the Password field in the Firewall Analyzer Client UI Login screen. The Log on to field will list the following options:

    • Local Authentication - If the user details are available in local Firewall Analyzer server user database
    • Radius Authentication - If the user details are available in RADIUS server and dummy user entry should be available in local Firewall Analyzer server user database
    • Domain Name(s) - If the details of the user of a domain is imported from Active Directory into the local Firewall Analyzer server user database

    Enter the User Name and Password. Select one of the two options in Log on to (Local Authentication or Radius Authentication). Click Login button to log in to Firewall Analyzer Client UI.

    RADIUS Server Configuration Settings

    You can also leverage the RADIUS authentication for user access bypassing the local authentication provided by Firewall Analyzer. In the RADIUS server authentication the users credentials are sent to the RADIUS server. The server checks for the user credentials and sends the authentication successful message to Firewall Analyzer server. 

    Note:

    If the user has only RADIUS server authentication, create the user in Firewall Analyzer with dummy password. On user logging in with RADIUS server authentication, the dummy password in the local server is ignored and the user credentials are sent to RADIUS server for authentication. Refer the procedure given in the Adding Users document to add a new user with dummy password.

    You can make Firewall Analyzer work with RADIUS server in your environment. This section explains the configurations involved in integrating RADIUS server with Firewall Analyzer.

    Procedure to configure RADIUS server settings

    To configure RADIUS server in Firewall Analyzer, provide the following basic details about RADIUS server and credentials to establish connection:

    Click the RADIUS Server Settings link under the Settings > User Management tab to configure the RADIUS server configuration. On clicking the RADIUS Server Settings  tab, the configuration fields are displayed. In that page, you will find the following fields:

    RADIUS Server Settings

    Description

    Server IP

    The IP Address of the machine in which the RADIUS server is running. Enter the IP address of the host where RADIUS server is running
    Authentication Port The port used by the RADIUS server for authenticating users. Enter the port used for RADIUS server authentication. By default, RADIUS has been assigned the UDP port 1812 for RADIUS Authentication.
    Server Secret  The secret string used for connecting RADIUS client (Firewall Analyzer) with the server. Enter the RADIUS secret used by the server for authentication
    Protocol

    The protocol used by the RADIUS server for authenticating users.

    Select the protocol that is used to authenticate users. Choose from four protocols:

    • PAP - Password Authentication Protocol
    • CHAP - Challenge-Handshake Authentication Protocol
    • MSCHAP - Microsoft Challenge-Handshake Authentication Protocol
    • MSCHAP2 - Version 2 of Microsoft Challenge-Handshake Authentication Protocol
    Authentication Retries The number of retries the RADIUS server to permit for authenticating users. Select the number of times you wish to retry authentication in the event of an authentication failure


    Active Directory Configuration Settings

    Procedure to configure AD settings

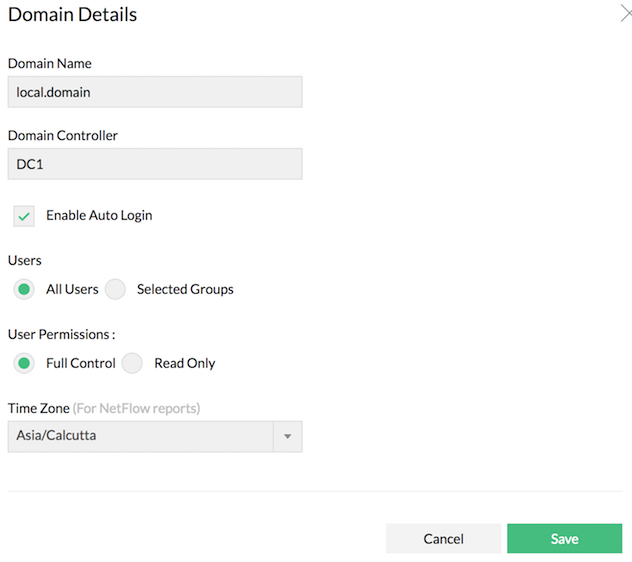
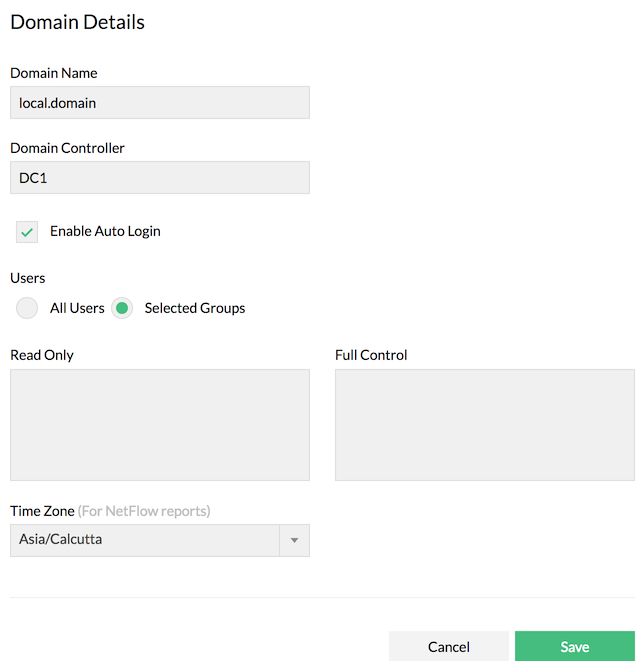
    Add an AD Domain

    To add a domain:

    1. Go to Settings > User Management > AD Authentication > Add.
    2. Enter the Domain Name.
    3. Enter the Domain Controller name.
    4. Select Enable Auto Login.
    5. Select either All Users or Selected Groups.
      • All Users: The auto login will be enabled to all the users. Select the permissions that you want to assign - Read Only (Operator User) or Full Control (Administrator User). Select User Permissions either Read Only or Full Control.
      • Selected Groups: The auto login will be enabled to the groups you specify. Enter the name of the groups in Read Only and Full Control columns. The access to groups will be enabled accordingly. Note: Configure one Group Name per line. The names are case-sensitive and should be configured as given in your AD.


    1. Click Save.

    A new domain has been successfully added.

    Pass-through Settings

    Pass-through authentication (Single Sign-on) provides the ability to authenticate yourself automatically in Firewall Analyzer using your currently logged in windows system username and password. You would not need to manually enter your windows credential to log-in to Firewall Analyzer web client.

    Prerequisites

    Configuring Active Directory authentication

    Active directory authentication must have been configured in Firewall Analyzer for the domain you want enable Pass-through Authentication. Click here to know how to add a domain under Active Directory authentication in Firewall Analyzer.

    Creating necessary user accounts in Firewall Analyzer

    User accounts to whom you want to enable pass-through must have been already available in Firewall Analyzer. Click here to know how you can add new users.

    Note: Pass-through authentication will work only for the active directory users already been added to Firewall Analyzer. If you do not want to manually create user account for all the users in your domain, enable auto-login for the domain (Admin → User Manager → Windows Domains). Once auto-login is enabled, you have to manually enter username and password of your account only during the first login and an user account in Firewall Analyzer will be created automatically. From there on, you can simply work without manually entering.

    Creating Computer Account

    A computer account must be created in the Domain Controller for accessing the NETLOGON service in a domain by Firewall Analyzer. Click here to know how you can create a new computer account.

    Note: After version 124085, new computer accounts can be created from the Passthrough configuration window itself, if the Firewall Analyzer service is running under a user who has administrative privileges. Also, if the Firewall Analyzer server has been started from Command Prompt, make sure it is being run as a administrator.

    Configuring Firewall Analyzer as a trusted site in your browser(s)

    Firewall Analyzer webserver must be added as a trusted site in all browsers you are going to use to access the Firewall Analyzer webclient, to prevent the browsers from opening unnecessary popups for providing your credentials.

    To configure trusted sites, follow these steps:

    • Internet Explorer (applicable to Chrome as well):
      Open Control Panel → Network and Internet → Internet Options → Security → Local Intranet → Sites → Advanced. Enter Firewall Analyzer server URL, click Add.
    • Firefox:
      In URL box enter about:config. Click the button "I'll be careful. I promise", if warning page is displayed. In the resulting page, search for ntlm. Double click the option network.automatic-ntlm-auth.trusted-uris. Enter Firewall Analyzer server URL in the text box and click OK. (Multiple site entries can be entered separated by comma.)

    Configuring Passthrough Authentication in Firewall Analyzer:

    After all the prerequisites have been ensured, follow the steps below to auto-configure Passthrough Authentication in Firewall Analyzer:

    • Go to Settings > User management > 'Pass-through' tab.
    • Click on the 'Enable' button, and select the required domain from the dropdown list.
    • Click on 'Fetch' to get all the necessary credentials from the domain controller such as Bind string, DNS server IPs and DNS site.

    Note: If there are any issues in fetching the necessary details, or if you're in a version of Firewall Analyzer earlier than 124085, you will have to configure these settings manually.

    • Also, enter the Computer account and password of the Domain Controller (computer account name must be less than or equal to 15 characters). If you provide the wrong credentials, an error message will be displayed which indicates whether the account name or the password is wrong, or if the account doesn't exist.
    • After version 124085, if the Firewall Analyzer service runs under a user who has administrator privileges, an account will be created with the provided account name even if it doesn't exist already.
    • Also, if you want to update your password, just select the 'Override existing computer account password' checkbox, and the existing password for the computer account will be overridden with the value that you have provided in the 'Password' field.
    • To verify if the provided details are right, click on 'Save & Test'. If all the details are provided correctly, a success message will be displayed on your screen. If not, a message displaying the possible errors in the parameters passed will be displayed. Rectify those errors and then click 'Save'.
    • Else if you are confident with the credentials that you provided, you can directly click 'Save'.


    Configuring Passthrough Authentication manually

    To manually configure Passthrough authentication, you'll need the following details:

    1. Domain Name: NETBIOS name of your domain. Example: OPMANHV (How can I find it?)
    2. Bind String: DNS Name of your domain. Example: opmanhv.com (How can I find it?)
    3. DNS Server IP: Primary IP Address of the DNS Server. (Separated by commas if there are multiple DNS server IPs) (How can I find it?)
    4. DNS Site: Site under which the Domain Controller is listed. (How can I find it?)
    5. Computer Account: Account name of the computer account created.
      Example: mytestacc$@OPMANHV.COM
      (For versions of Firewall Analyzer before 124085, it is mandatory to append $@domain_dns_name with the account name.)
      Note that the computer account name must be less than or equal to 15 characters.
    6. Password: Password of the computer account

    1 & 2 - Getting Domain DNS Name and NETBIOS Name:

    In the Domain Controller device, open Start → Administrative Tools → Active Directory Users and Computers.


    3 - Getting DNS Server IP:

    Open Command Prompt in Firewall Analyzer server. Run the command "ipconfig /all". The first IP Address mentioned in the DNS Servers field is the primary DNS Server IP Address.


    4 - Getting DNS Site:

    In Domain Controller device, open Start → Administrative Tools → Active Directory Sites and Services. The Site under which your Domain Controller device name listed is your site name. You can leave the DNS Site field empty in Pass-through configuration form in Firewall Analyzer, if there is only one site present in your Domain Controller.


    Creating a new computer account:

    To create a new computer account, follow the steps below:

    • Run the script NewComputerAccount.vbs present under Firewall Analyzer_Home\conf\OpManager\application\scripts to create a new computer account.

    cscript NewComputerAccount.vbs account_name /p password /d domain_name

    • To reset the password for an existing computer account, run the script SetComputerPass.vbs present under Firewall Analyzer_Home\conf\OpManager\application\scripts to create a new computer account.

    cscript SetComputerPass.vbs account_name /p password /d domain_name

    • Ensure that the password you give is compliant to the password policy for that domain. Do not use the New Computer Account option present in AD native client which will not allow you to choose password. If you face problem running this script from Firewall Analyzer server, copy the script to the domain controller machine itself and try running it.

    Note: The length of the computer account name must be less than or equal to 15 characters.

    Design Limitation:

    Pass-through authentication can be enabled for only one domain, preferably the domain in which Firewall Analyzer server resides. If pass-through has been configured for a domain other than the one in which Firewall Analyzer server resides, ensure the other domain will provide logged in user information to a website from different domain.

    Disable Pass-through Authentication:

    In Firewall Analyzer web client, click on Settings → Basic Settings → User Management → Pass-through. Use the radio buttons to Enable/ Disable Passthrough Authentication.

    Log File:

    If you face any issue with Pass-through Authentication, contact support with a ZIP file of the logs present under Firewall Analyzer_Home\logs folder.


    Password Policy

    A password policy is a set of rules designed to enhance security by encouraging users to employ strong passwords. Another possible defense against password-guessing attacks is enabling an account-lockout, which means the account will be locked after a specified number of invalid or failed login attempts.

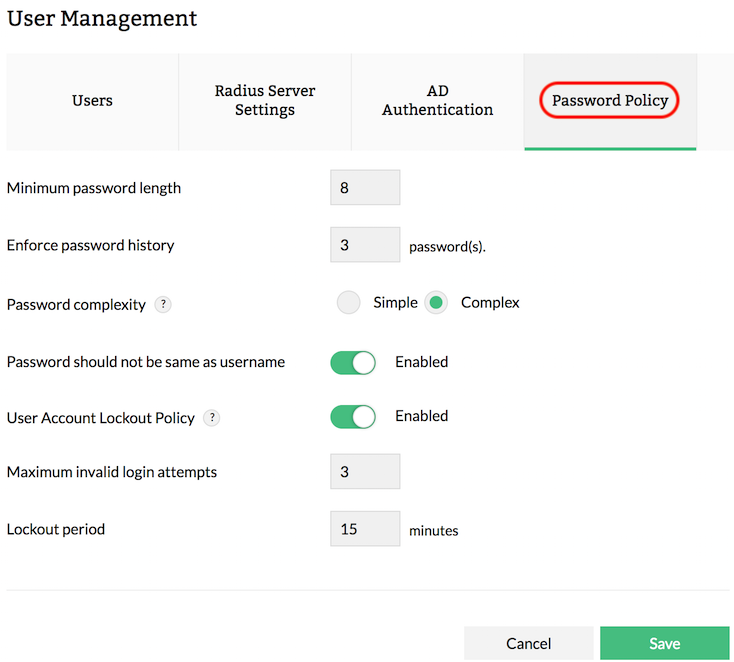
    To configure a password policy in Firewall Analyzer, go to Settings > Basic Settings > User Management > Password Policy.

    Minimum password length: Specify the minimum number of characters required in a password. It should be within 5-25 characters.

    Enforce password history: Number of unique passwords that must be associated with a user account before re-using an old password.

    Password complexity: Level of complexity to be associated with a password.

    Simple
    1. Minimum characters as specified above
    2. Maximum 25 characters

    Complex 
    1. Minimum characters as specified above
    2. Maximum 25 characters
    3. Minimum 1 uppercase, 1 lowercase and 1 special character (! ~ @ # $ % ^ & + = _ *).

    Password should not be same as username: Enable this to option to prevent duplication of a username in the password. 

    User Account Lockout Policy: The User Account Lockout setting allows the administrator to lockout accounts after a specified number of invalid login attempts. A locked out account cannot be used until reset by an administrator or until the account lockout duration has expired. For instance, if invalid credentials have been provided for over 5 times, the account will be locked out for 2 mins. This lockout interval and the number of bad login attempts can be configured.

    Maximum invalid login attempts: Specify the maximum invalid login attempts before an account gets locked out.

    Lockout period: Specify the lockout duration in minutes.