How to Create PXE Bootable Media Using ManageEngine OS Deployer
Overview
Preboot Execution Environment, or PXE, allows computers to boot from a network server instead of using local storage devices such as a hard disk, CD, or USB drive. In OS Deployer, PXE boot is used to start client machines over the network and prepare them for operating system deployment.
This method is useful when administrators need to deploy operating systems to multiple computers across a LAN without manually booting each machine using physical media.
Prerequisites
Before configuring PXE boot, ensure that the following components are available:
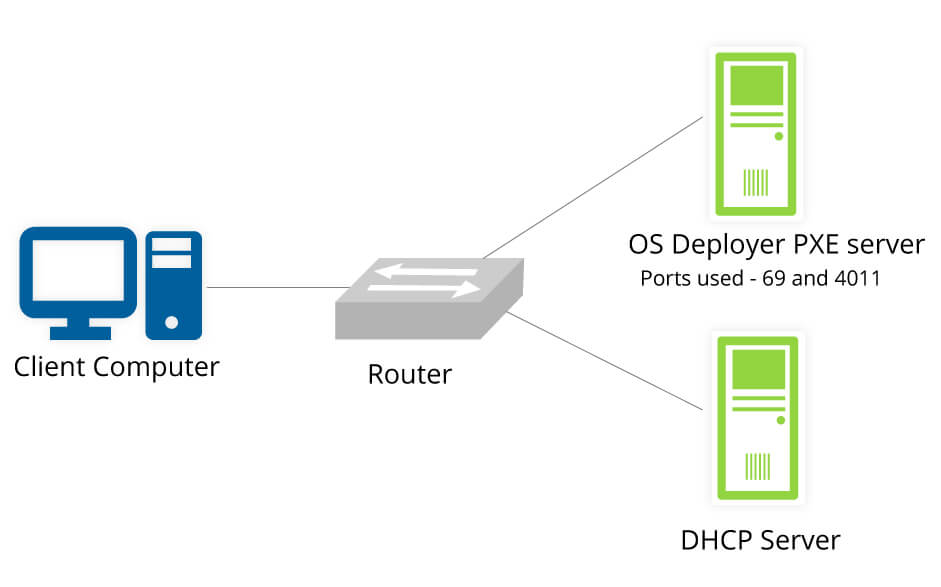
- DHCP server
- OS Deployer server
- PXE server
- PXE bootable media
- WinPE tool
- Required network and storage drivers
- Network connectivity between the client computer and the deployment server
- Required firewall exclusions for PXE-related file transfers
The PXE server is automatically installed with OS Deployer and runs as a separate Windows service named ManageEngine OS Deployer PXE Server.
Configure DHCP for PXE Boot
Before a client computer can boot using PXE, the DHCP server must provide the required boot information.
Configure the following DHCP options:
- Option 66: Specify the IP address of the OS Deployer server or PXE boot server.
- Option 67: Specify the boot file name.
The boot file may vary depending on whether the target system uses Legacy BIOS or UEFI. Make sure the correct boot file is configured based on the system type.
PXE Boot Process
The PXE boot process works as follows:
- The client computer sends a DHCP discovery request over the network.
- The DHCP server responds with network configuration details such as IP address and subnet mask.
- The DHCP server provides the PXE server address and boot filename using Options 66 and 67.
- The client contacts the PXE server and requests the required boot files.
- The PXE server transfers the boot files to the client using TFTP.
- The client loads the boot environment and proceeds with OS deployment.
Create PXE Bootable Media in OS Deployer
Follow these steps to create PXE bootable media:
- Open the OS Deployer console.
- Navigate to Deployment > Create Bootable Media.
- Click Create Bootable Media.
- Select PXE as the bootable media type.

- Enter the required details, including:
- Media name
- WinPE tool installed location
- Required drivers
- Click Create Bootable Media.

- After the process is complete, the PXE bootable media will be created and ready for use.

Watch the video below for detailed steps to create a PXE bootable media:
Boot Client Computers Using PXE
After creating the PXE bootable media, configure the target computer to boot from the network.
- Connect the target computer to the LAN.
- Open the BIOS or UEFI boot settings on the target computer.
- Enable network boot or PXE boot.
- Select the appropriate network boot option.
- Start the computer using PXE boot.
- The client computer should contact the PXE server and load the boot files over the network.