User Groups
Users can be grouped in Password Manager Pro for easier management. User grouping helps to carry out operations in bulk for all the resources of the group. The resources added to Password Manager Pro can be quickly assigned to a user group instead of choosing each user individually.
- Adding User Groups
- User Group Privileges
- Managing User Groups
2.1 Exporting Passwords for Offline Access
1. Adding User Groups
To create a new user group and add users to it, follow the below steps:
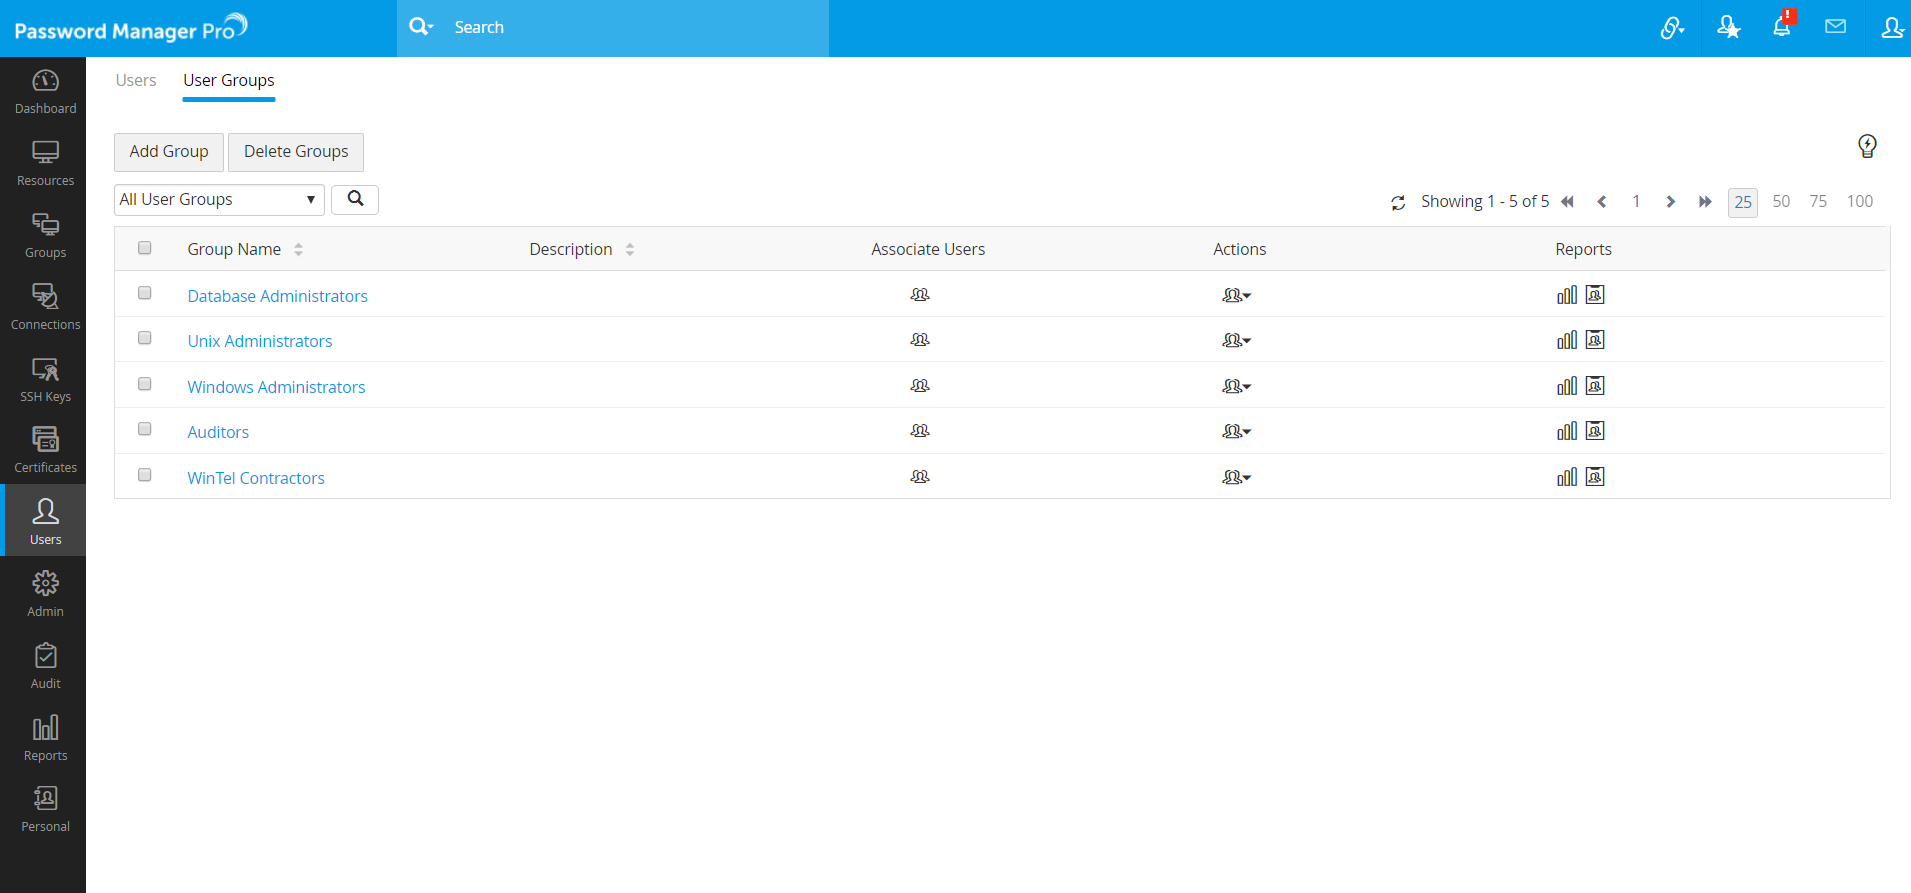
- Navigate to Users >> User groups and click Add Group.
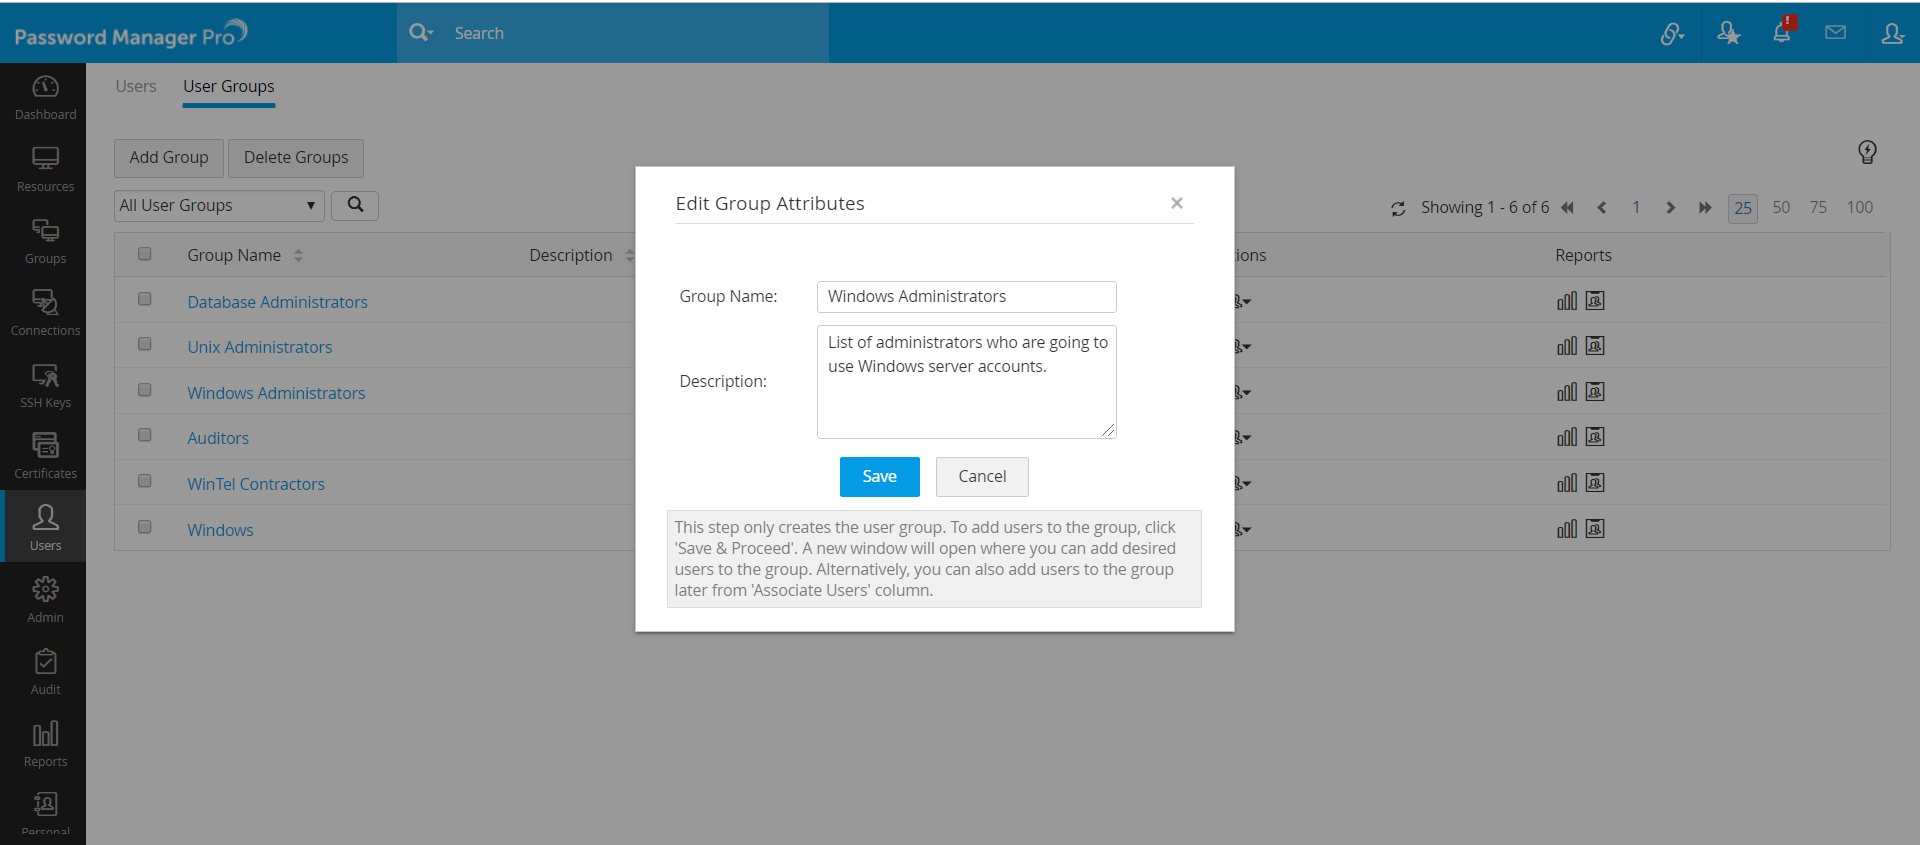
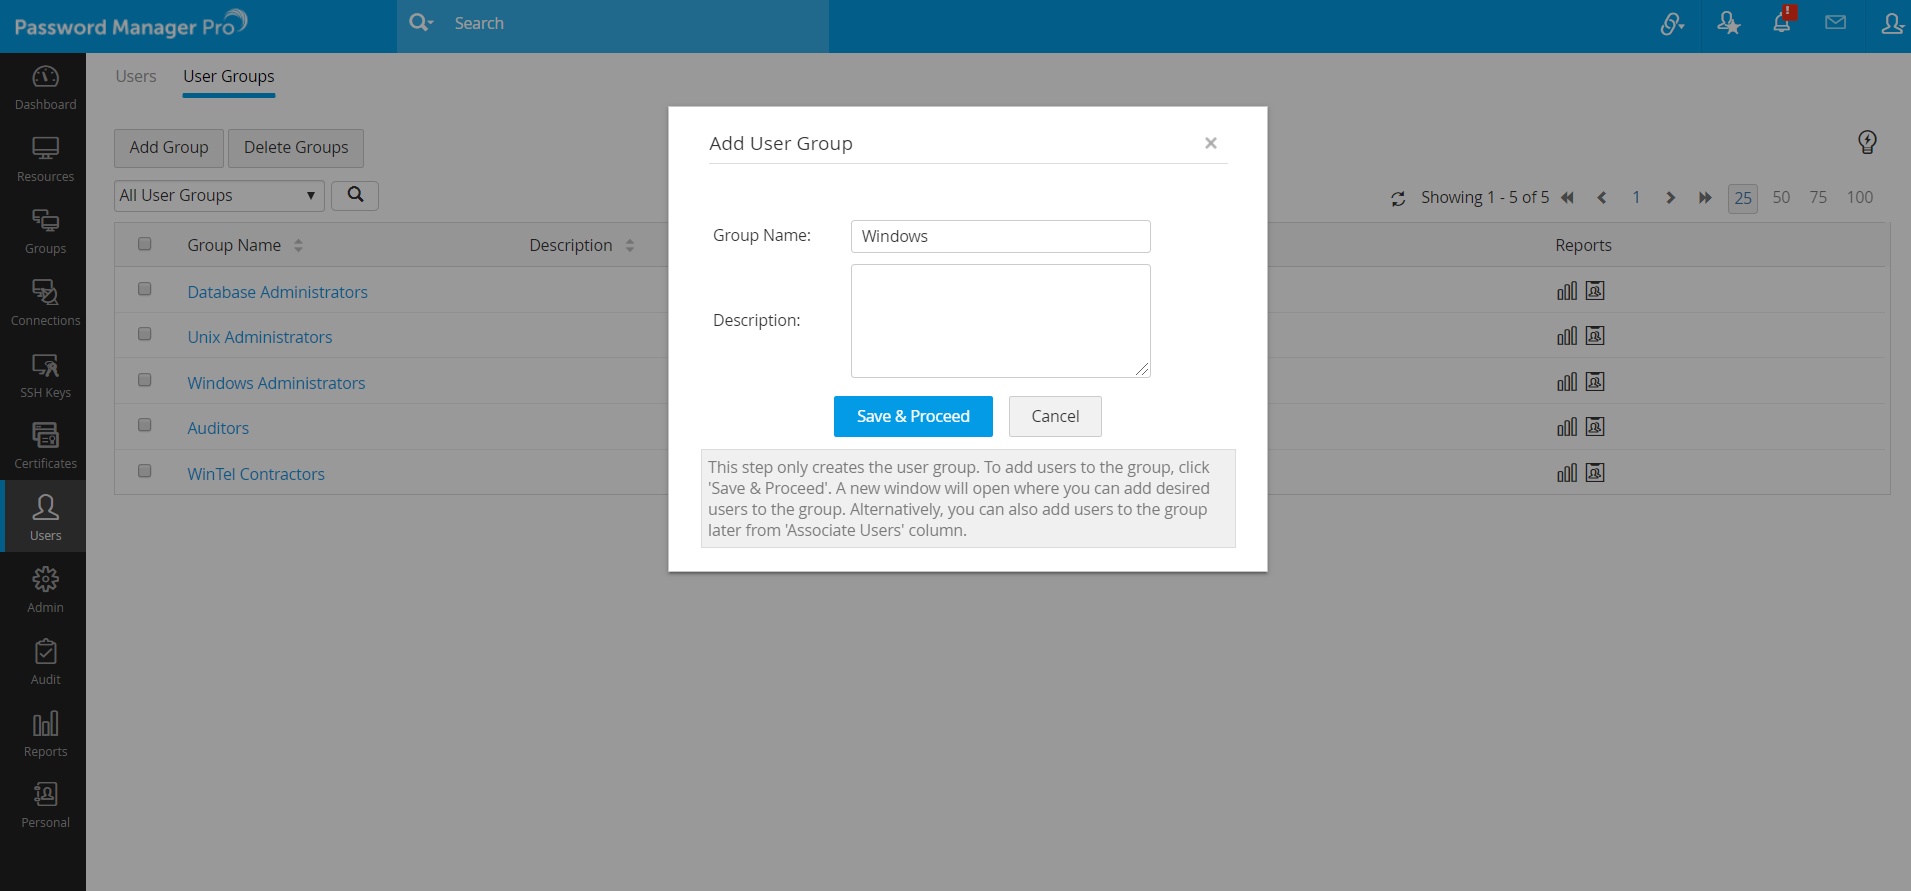
- In the pop-up form that appears, enter a name and description for the user group.
- Click Save & Proceed.
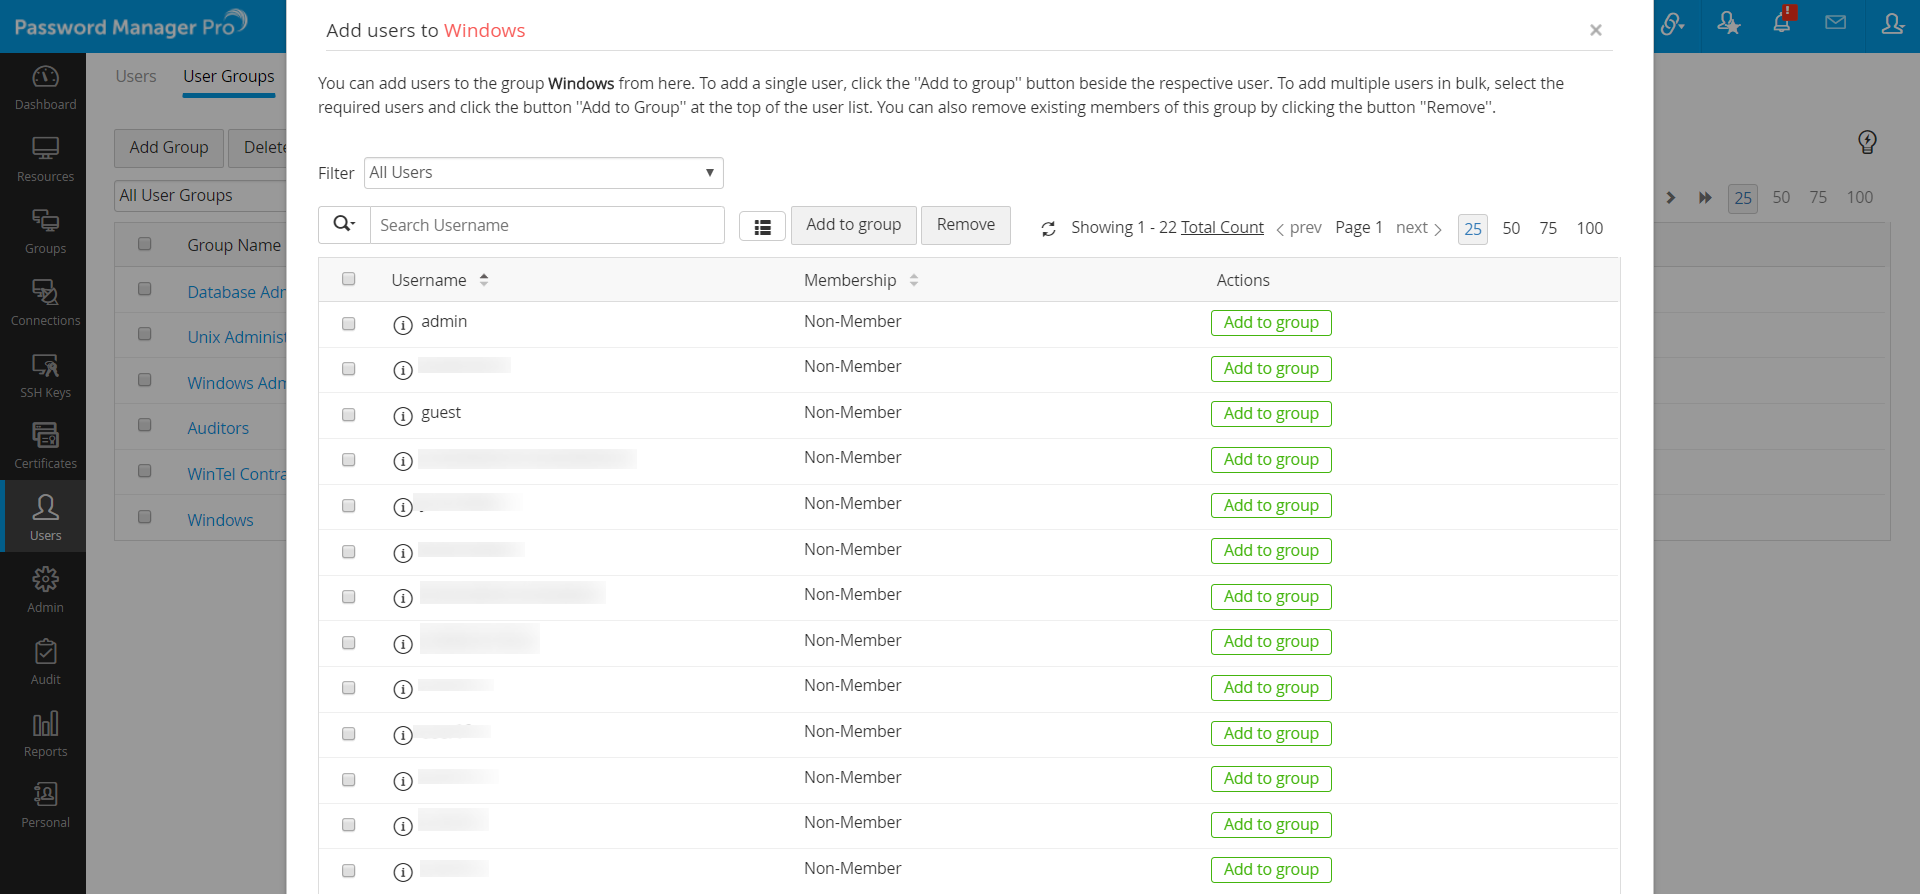
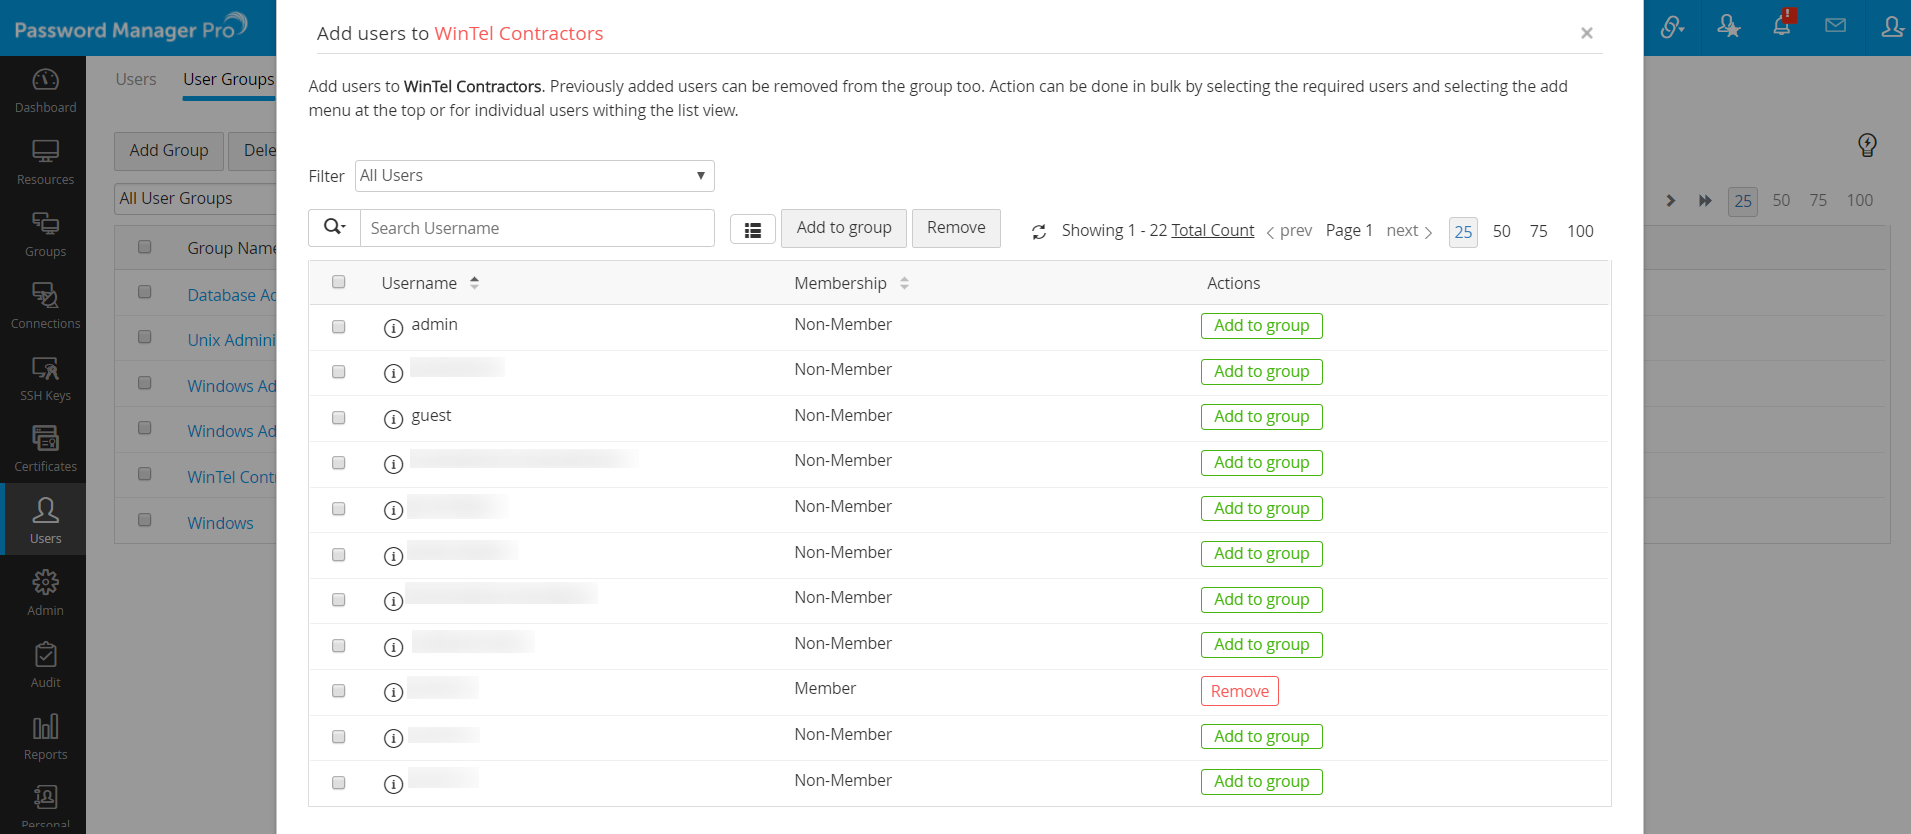
- Once the user group is added, Add Users window will open up. Here, click Add to Group beside the required users. The changes will take effect as and when you add users.
1.1 Importing User Groups from Active Directory (AD)
- You can import specific user groups and organizational units (OUs) from AD and retain the same user group structure in Password Manager Pro. Click here for more about importing users from AD.
- You can choose to synchronize the user group structure in Password Manager Pro with that of AD's at periodic intervals. Click here for more about AD synchronization schedules.
2. User Group Privileges
Configure user group privileges for groups by following the below steps:
- Navigate to Users >> User Groups.
- Click the Actions icon beside the required user group and click User Group Privileges.
Note: The setting changes made in the User Group Privileges window is applicable only for the users who are part of the selected user group.
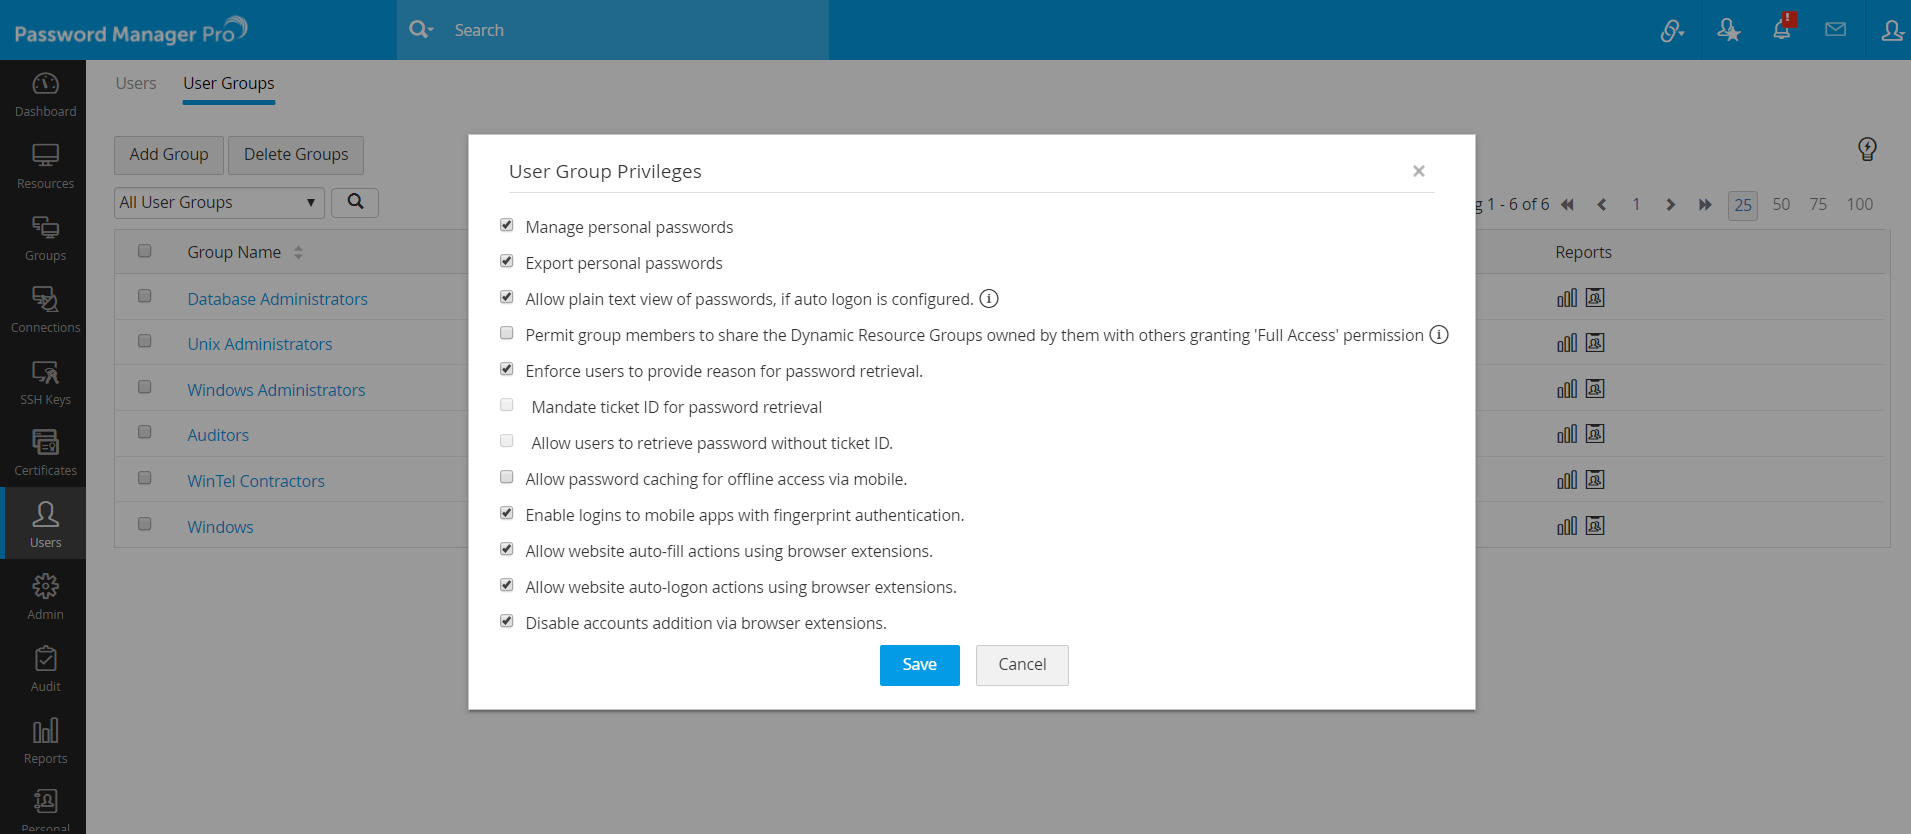
- The User Group Privileges in Password Manager Pro are as explained below:
- Manage personal passwords: Individual users can manage their personal passwords such as credit card PIN numbers, bank accounts credentials etc in the Personal tab. Unselect this option if you do not wish to allow personal password management for a selected group of Password Manager Pro users. Once disabled, the Personal tab will no longer appear in the Password Manager Pro interface for all the members of selected group.
- Export personal passwords: Enable this option to allow users of the group to export the personal passwords that they store in the Personal tab. Unselect this option if you do not wish to allow password export for a particular user group.
- Allow plain text view of passwords, if auto logon is configured: Enable this option to allow the user group members to view the passwords of shared resources in plain text when auto logon is configured. If this option is disabled, user group members cannot retrieve the password, however they can still launch remote sessions through auto logon. This restriction applies only to Password Users, Password Auditors and custom user type roles with the same privileges as Password Users and Auditors.
- Enforce users to provide reason for password retrieval: Enable this option to prompt users to provide a reason while retrieving a password. This restriction applies only to Password Users, Password Auditors and custom user type roles with the same privileges as Password Users and Auditors.
- Allow users to retrieve password without ticket ID: Enable this option to allow users to retrieve a password by clicking the 'password' field without the need to raise a ticket request for the same. This restriction applies only to Password Users, Password Auditors and custom user type roles with the same privileges as Password Users and Auditors. This option is applicable only if ticketing system integration is done in your environment.
To disable options c, d and e for a selection of users, follow the below steps:
- Create a new user group.
- Add the selection of users to it.
- Enable or disable the settings for that group alone.
Notes:
1. For the options c, d, and e to be enforced for a user group, the settings must be enabled both locally i.e., at a user group level (as explained above) and globally i.e., in the General Settings.
Case 1: If options are enabled globally under General Settings, then the settings will be applied to all user groups by default. However, you can disable the settings for a particular group via the User Group Privileges window.
Case 2: If the options are disabled globally under General Settings, then the settings will not be applied to the user groups even if they are enabled locally under User Group Privileges for a particular user group.
2. These conditions apply only to Password Users, Password Auditors and custom user type roles with the same privileges as Password Users and Auditors.
- Mandate ticket ID for password retrieval: Enable this option to prompt users to provide a valid ticket ID to retrieve a password. This option is applicable only if ticketing system integration is done in your environment.
- Permit group members to share the Dynamic Resource Groups owned by them with others granting Full Access permission: By default, permission to grant Full Access for dynamic resource groups will be disabled in the User Group Settings window.
Why is the setting disabled by default?
- The option is disabled by default for security reasons as there is a possibility that Administrators can use this setting to gain access to resources that are not owned by them.
- If a user is granted access to a dynamic resource group with Full Access permission, then that user will get Full Access to all the resources currently under the group and also any resources that are added in the future based on matching the specified criteria (for example, conditions such as "Resource name contains").
- It is recommended that you create a user group containing only Administrators/Password Administrators/Privileged Administrators who require the authorization to grant Full Access permission for their dynamic resource groups with other users.
- After creating the group, enable the option Permit group members to share the Dynamic Resource Groups owned by them with others granting Full Access permission under User Group Privileges.
- Allow password caching for offline access via mobile: Enable this option to allow saving password cache in the Password Manager Pro mobile application so that users can access the passwords offline.
- Enable login to mobile apps with fingerprint authentication: Enable this option to allow users to login to their Password Manager Pro mobile applications using their device's fingerprint authentication.
- Allow website auto-fill actions using browser extensions: Enable this option to allow auto filling of login credentials for saved website accounts through the Password Manager Pro browser extensions.
- Allow website auto-logon actions using browser extensions: Enable this option to allow users to connect to a remote resource through the auto logon feature using the Password Manager Pro browser extensions.
- Disable accounts addition via browser extensions: Disable this option to prevent users from adding accounts to resources through the Password Manager Pro browser extensions. The option to add accounts through browser extension is available only for the Chrome browser. Click here for more on Password Manager Pro browser extensions.
2.1 Exporting Passwords for Offline Access
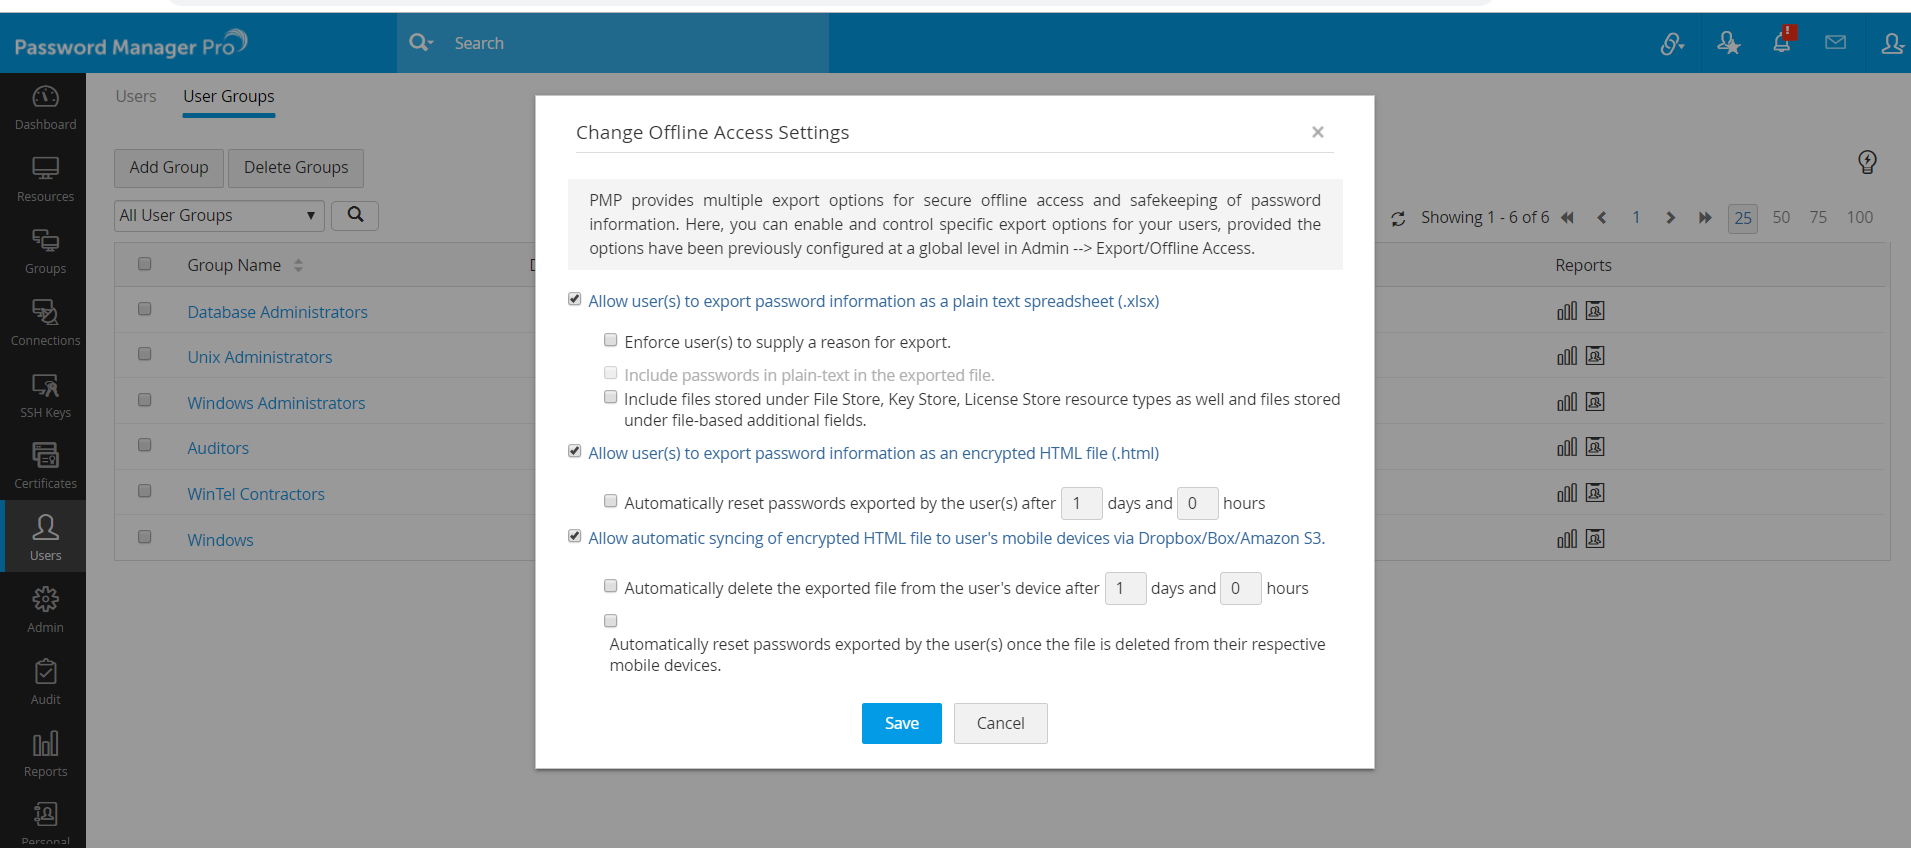
When a user exports Password Manager Pro resources to a CSV file, by default, password of the accounts are included in plain text. You can disable password export for members of a specific user group by following the below steps:
- Navigate to Users >>Groups tab.
- Click the Actions icon beside the required group and click Change Offline Access Settings from the drop down.
- In the pop-up form that appears, unselect the option Include passwords in plain text in the exported file.
- Click Save.
3. Managing User Groups
3.1 Editing a User Group
Follow the below steps to edit an existing user group to add more users or to remove existing users.
- Navigate to User Groups tab.
- Click the Actions icon beside the required group and click Edit Group Attributes.
- In the pop-up form that opens, you can change the group name and description.
3.2 Adding Users to an Existing User Group
- To add new users to the group or remove previously added users from the group, click Associate Users icon beside the required group.
- Click Add to Group to add a non-member to the group.
- Click Remove to remove previously added users from the group.
- The changes will take effect as and when you make them.
3.3 Deleting a User Group
When a user group is deleted, the group level settings done for that group will no longer apply for the users who were members of that group. Deleting a user group will not affect the resources stored in Password Manager Pro. However, the resources shared to the group will no longer apply. Follow the below steps to delete an existing user group in Password Manager Pro:
- Navigate to User Groups tab and select the required user group.
- Click the Delete Groups button at the top.
- In the pop-up form that appears, click OK to confirm.
