RSA SecurID
RSA SecurID is a two-factor authentication (2FA) system from RSA Security LLC that enables users to securely connect to network resources. Users can securely access ADSelfService Plus using security codes from the RSA SecurID mobile application, physical tokens, or passcodes sent through email or SMS.
Setting up RSA SecurID authentication
You can set up RSA SecurID as an authenticator in ADSelfService Plus in two steps:
- Include the ADSelfService Plus server in the SecurID SECURITY CONSOLE as an authentication agent.
- Configure ADSelfService Plus for RSA SecurID.
Prerequisites
- Ensure that you have installed a supported version of RSA Authentication Manager.
- For SDK integration: RSA Authentication Manager 8.0 or higher
- For REST API integration: RSA Authentication Manager 8.2 SP1 or higher
Including ADSelfService Plus as an authentication agent in the RSA SecurID SECURITY CONSOLE
- Log in to your RSA admin console (e.g., https://adssp-rsa.mydomain.com/sc).
- Navigate to Access > Authentication Agents. Click Add New.
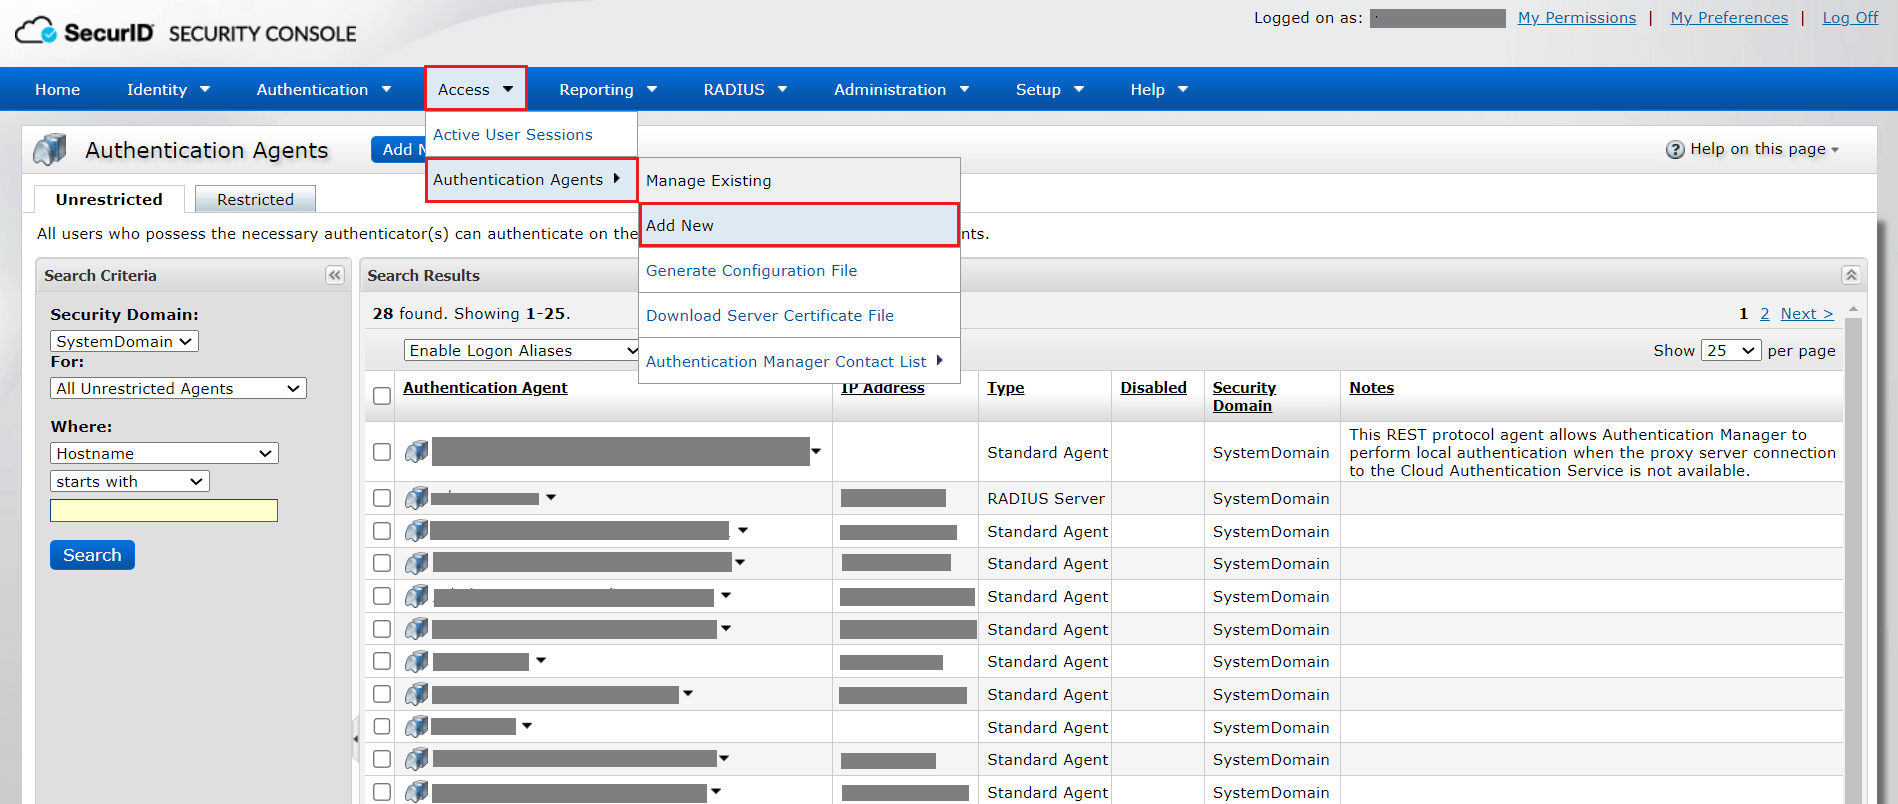
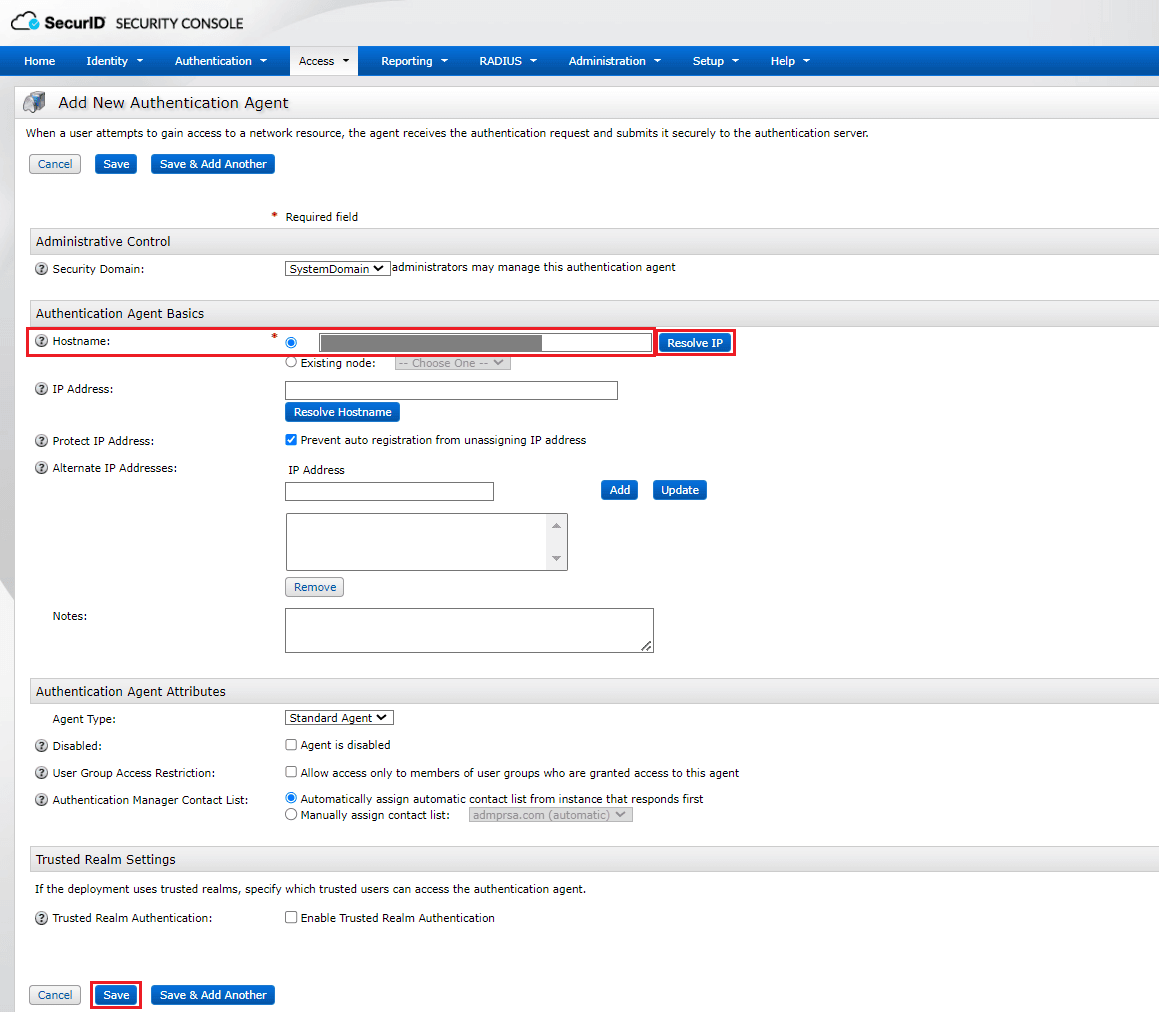
- Enter the hostname of the ADSelfService Plus server in the Hostname field and click Resolve IP to establish a connection between the SecurID SECURITY CONSOLE and the ADSelfService Plus server.
- Click Save to add the ADSelfService Plus server as an authentication agent.
Configuring ADSelfService Plus for RSA SecurID
RSA SecurID configuration can be done using either of these methods:
Steps to configure RSA SecurID with REST API integration
- Log into the RSA admin console and navigate to Setup > System Settings.
- Under Authentication Settings, click RSA SecurID Authentication API.
- Copy the Access ID, Access Key, and Communication Port details.
- Log into the ADSelfService Plus admin console and navigate to Admin > Configuration > Self-Service > Multi-factor Authentication > RSA SecurID.
- From the Choose the Policy drop-down, select a policy.
Note: ADSelfService Plus allows you to create OU and group-based policies. To create a policy, go to Configuration > Self-Service > Policy Configuration > Add New Policy. Click Select OUs/Groups, and make the selection based on your requirements. You need to select at least one self-service feature. Finally, click Save Policy.
- Click RSA SecurID.
- For Integration Type, select REST API.
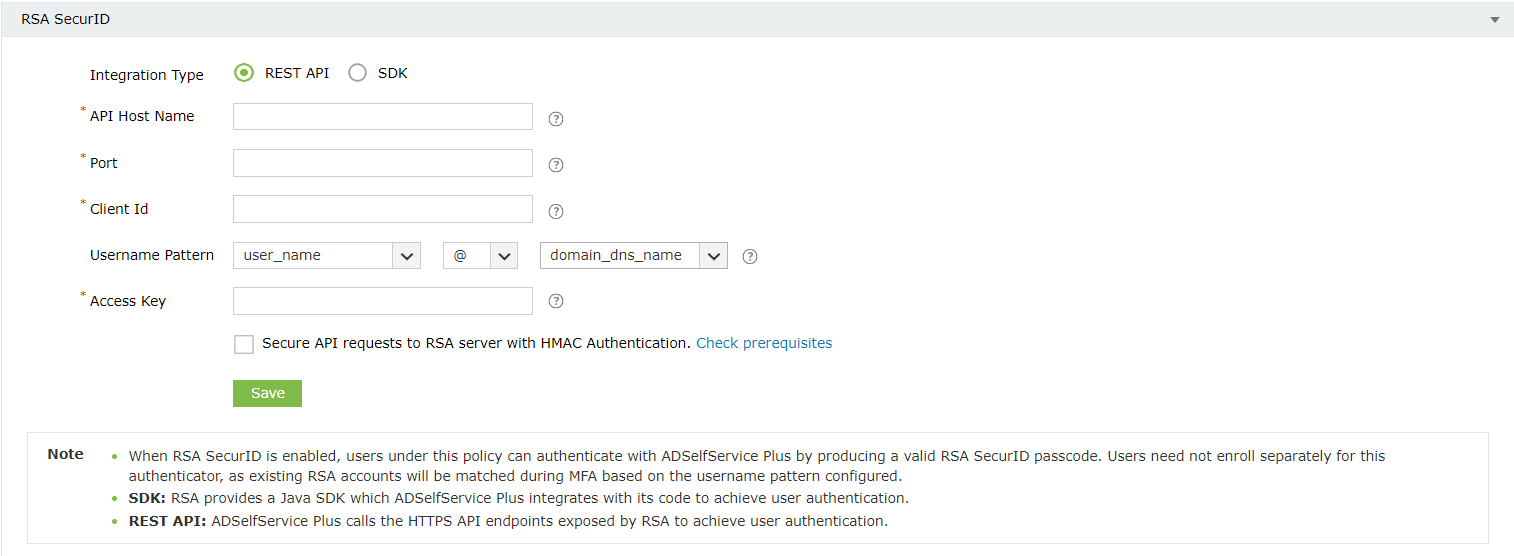
- Enter the hostname of RSA Authentication Manager in the API Host Name field.
- Paste the port number and access key obtained in Step 3 in the Port and Access Key fields, respectively.
- Enter the authentication agent's name (i.e., the hostname or access URL of the ADSelfService Plus server) in the Client Id field.
- Check the Secure API requests to RSA server with HMAC Authentication box to verify the integrity of the authentication requests. Please follow the steps mentioned under HMAC prerequisites before enabling HMAC authentication.
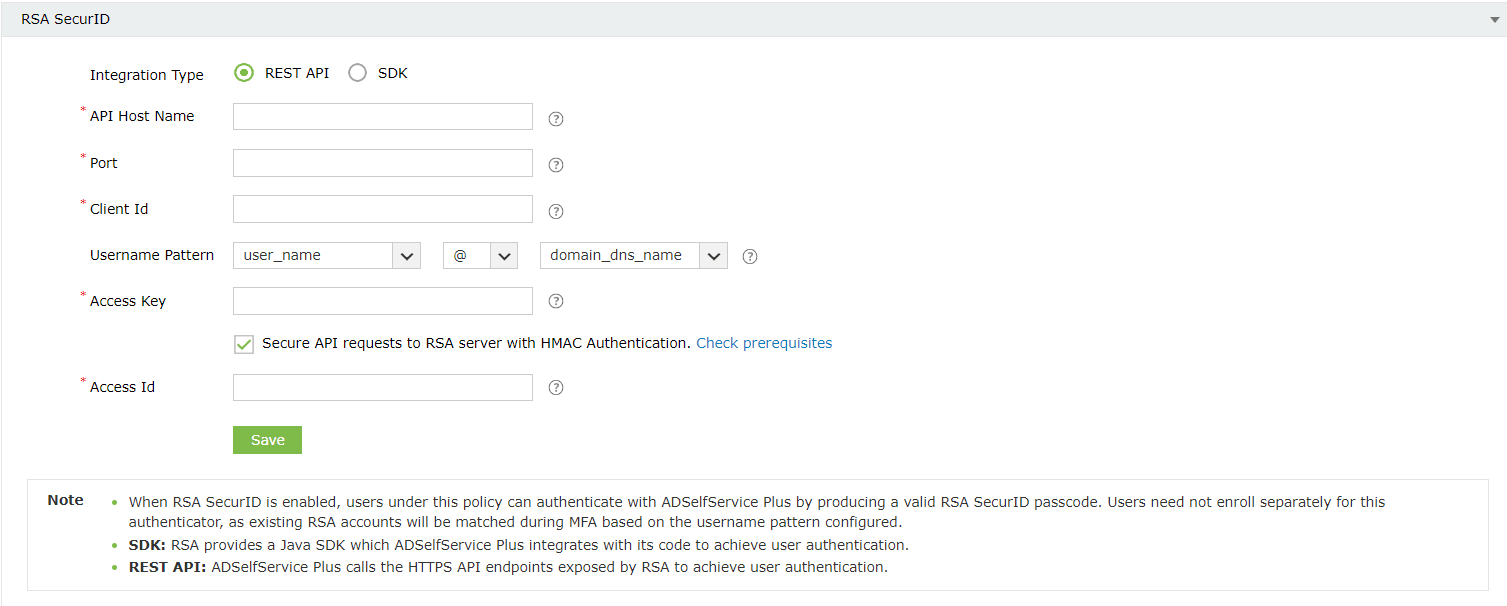
- Enter the access ID copied in Step 3, in the Access Id field.
- Select a Username Pattern that matches the User Account Format in the RSA admin console.
Note: Users across different domains can have the same username, causing ambiguity during RSA mapping. To ensure secure authentication, we strongly recommend using a username pattern that includes the domain. This Username Pattern needs to match the RSA User Account Format in the RSA admin console, to accurately map domain user accounts to RSA user accounts.
- Click Test Connection and Save.
Steps to configure RSA SecurID with SDK integration
- Ensure that the required JAR files listed below are present in the <ADSelfService_Plus_install_directory>/lib folder.
- authapi-8.6.jar
- log4j-1.2.12rsa-1.jar
- cryptojcommon-6.1.3.3.jar
- jcmFIPS-6.1.3.3.jar
- cryptojce-6.1.3.3.jar
Note: These JAR files pertain to the latest version of Authentication Agent SDK for Java (version 8.6). If they are not present in the <ADSelfService_Plus_install_directory>/lib folder, please download them from RSA Community. - In the RSA admin console, navigate to Access > Authentication Agents > Generate Configuration File.
- Click Generate Config File to download the AM_Config.zip file.
- Extract the sdconf.rec file from the ZIP file.
- Log into the ADSelfService Plus admin portal and navigate to Admin > Configuration > Self-Service > Multi-factor Authentication > Authenticators Setup > RSA SecurID.
- From the Choose the Policy drop-down, select a policy.
Note: ADSelfService Plus allows you to create OU and group-based policies. To create a policy, go to Configuration > Self-Service > Policy Configuration > Add New Policy. Click Select OUs/Groups, and make the selection based on your requirements. You need to select at least one self-service feature. Finally, click Save Policy.
- Click RSA SecurID.
- For Integration Type, select SDK.

- Click Browse and select the sdconf.rec file downloaded from the SecurID SECURITY CONSOLE.
- Select a Username Pattern that matches the User Account Format in the RSA admin console.
Note: Users across different domains can have the same username, causing ambiguity while matching RSA accounts to ADSelfService Plus user accounts during MFA. To ensure secure authentication, we strongly recommend using a Username Pattern that includes the domain name (domain_dns_name) or email (email_id) to accurately map domain user accounts to RSA User Accounts, which need to be in the same format. Utilizing only the username (user_name) in the Username Pattern is discouraged for security reasons.
- Click Save.
Once enabled, users belonging to the policy for which RSA authentication has been enabled will be asked to verify their identity with their SecurID tokens while logging in.
If you experience problems while authenticating via RSA, log in to your RSA admin console and go to the Reporting tab. Under Real-time Activity Monitors, go to Authentication Activity Monitor > Start Monitor to troubleshoot.
HMAC prerequisites
Hash-based message authentication code (HMAC) is used to validate the authentication requests that are exchanged between authentication agents and the RSA SecurID Authentication API.
- Log on to the appliance with the Secure Shell client or access the appliance on a virtual machine with the VMware vSphere Client, Hyper-V Virtual Machine Manager, or Hyper-V Manager.
- To verify authentication requests by implementing HMAC, type the following:
- ./rsautil store –a update_config
- auth_manager.rest_service.authorization.mode 1 GLOBAL 501
- To use only the RSA SecurID Authentication API's access key for authentication, type the following:
- ./rsautil store –a update_config
- auth_manager.rest_service.authorization.mode 0 GLOBAL 501
Different methods of logging into ADSelfService Plus using RSA SecurID
Method 1: User or system-generated PIN
The RSA passcode authentication can consist of a PIN combined with a tokencode, just a tokencode, or solely a password. This is based on the configuration settings in the RSA Authentication Manager. If the settings in RSA Security Console demands that the users create a PIN on their own or use a system generated PIN, the following options would be shown to the users once the user enters a valid passcode.
Option 1: User-Generated PIN
- Users can create their own PIN.
- Subsequently, they will be prompted to use this self-generated PIN along with the RSA tokencode for authentication.
Option 2: System-Generated PIN
- Here, the RSA Authentication Manager automatically generates a random PIN.
- Users are required to make a note of this system-generated PIN and utilize both this PIN and the RSA tokencode for authentication.
Method 2: Next Tokencode
- Should a user enter incorrect passcodes consecutively, the RSA Authentication Manager might request them to enter the next tokencode.
- Users will need to wait for a new tokencode to be displayed on the RSA device to continue with the authentication process.
Method 3: Tokencode
Users must use both the pin and the RSA passcode for authentication.