Integrating Active Directory
Network Configuration Manager provides the option to integrate with Active Directory in your environment and import users from there. Users who have logged into the Windows system using their domain account can be allowed to login to NCM directly (without separate NCM login).
Add an AD Domain
To add a domain:
1. Go to Settings → Authentication → AD Authentication → Add Domain.

2. Enter the Domain Name and the Domain Controller name in the respective fields.
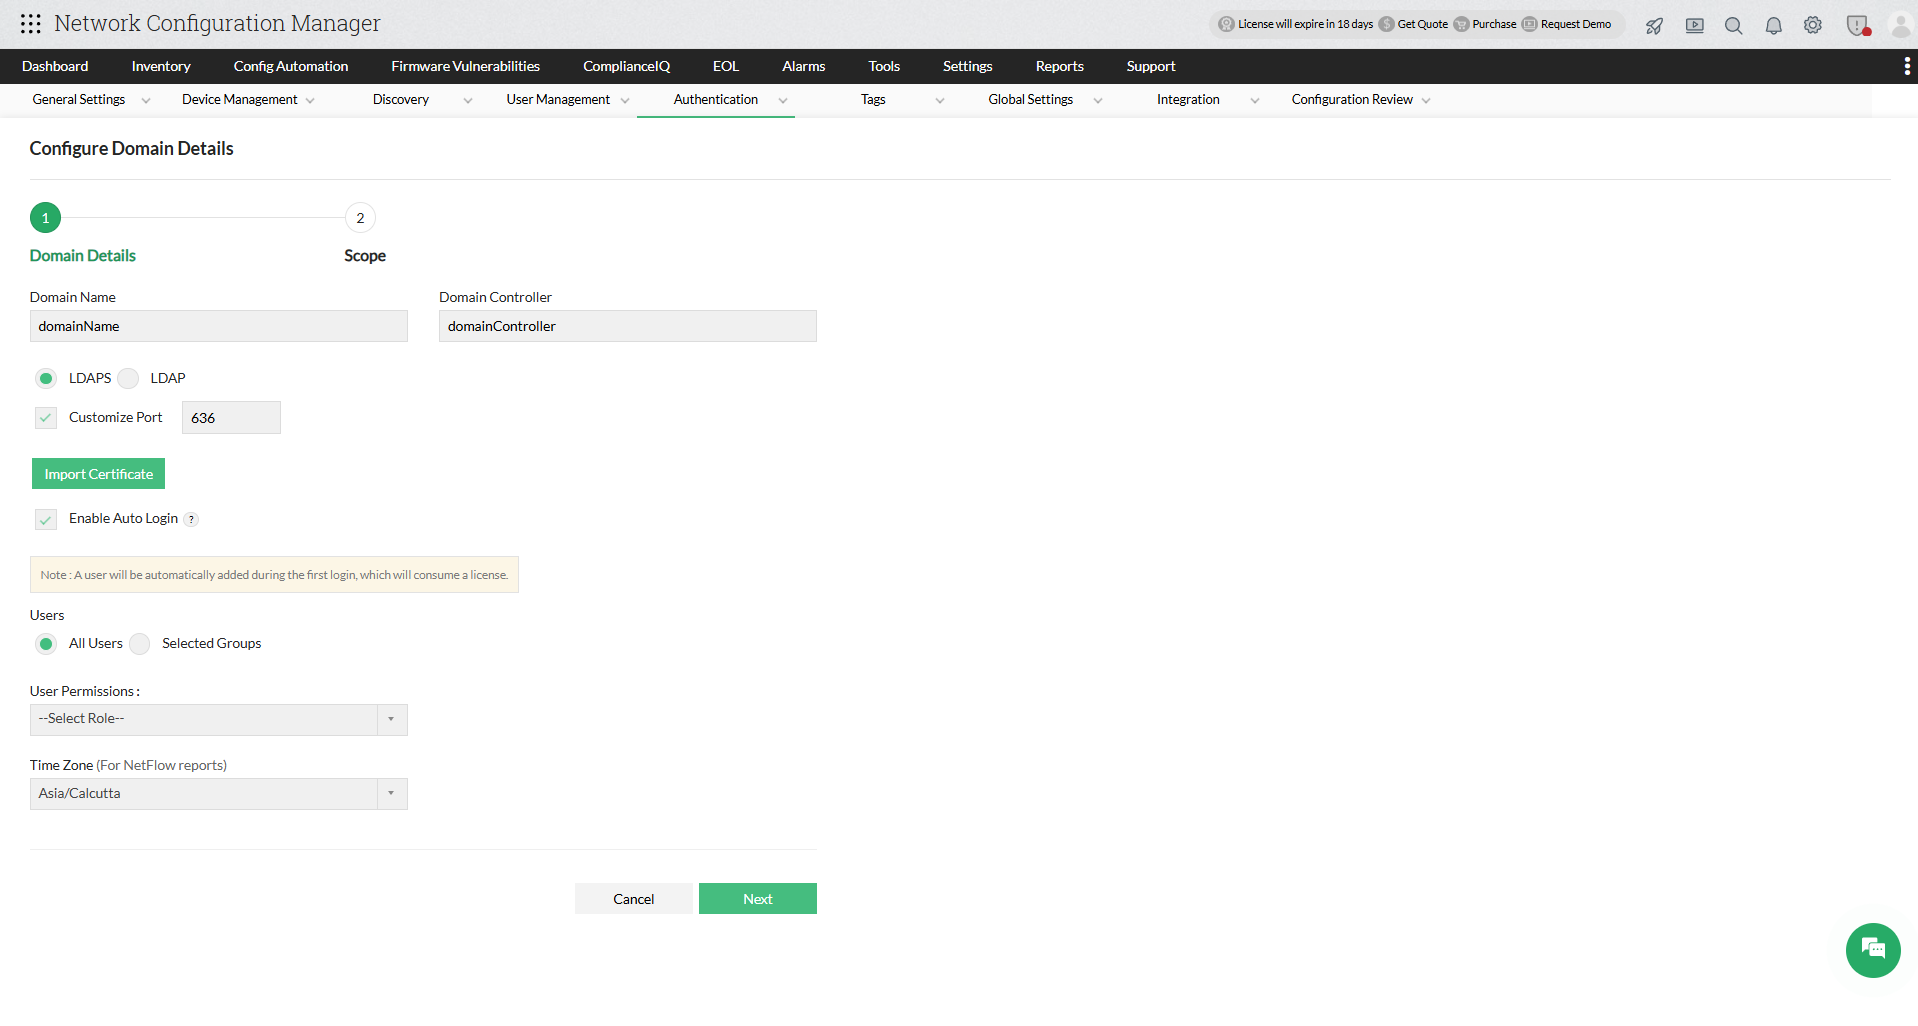
3. LDAPS is supported from version 125111, to ensure secure communication with the domain controllers. Simply click on the 'Import Certificate' button and select your domain controller's certificate to add it to Network Configuration Manager.
To know more on how to export a certificate from your domain controller, check out these articles:
1. Exporting the LDAPS Certificate and Importing for use with AD DS
2. LDAP over SSL (LDAPS) Certificate
Note: When you upgrade from a lower version of Network Configuration Manager to 125111 or above, LDAPS is mandatory only for the domains that you will be adding after the upgrade. For domains that are already present in Network Configuration Manager, it is optional. You can just click on the 'Edit' button to import certificates for your existing domains.
4. Auto Login* is disabled by default.
5. Save the Settings.
6. Once the domain is added, you can manually add users in the Users tab.
Configure Auto-login
The auto-login feature allows you to add all/individual users or selected AD groups to any domain, and assign user permissions to them.
1.Select Add/Edit under Actions for the domain you want to configure.

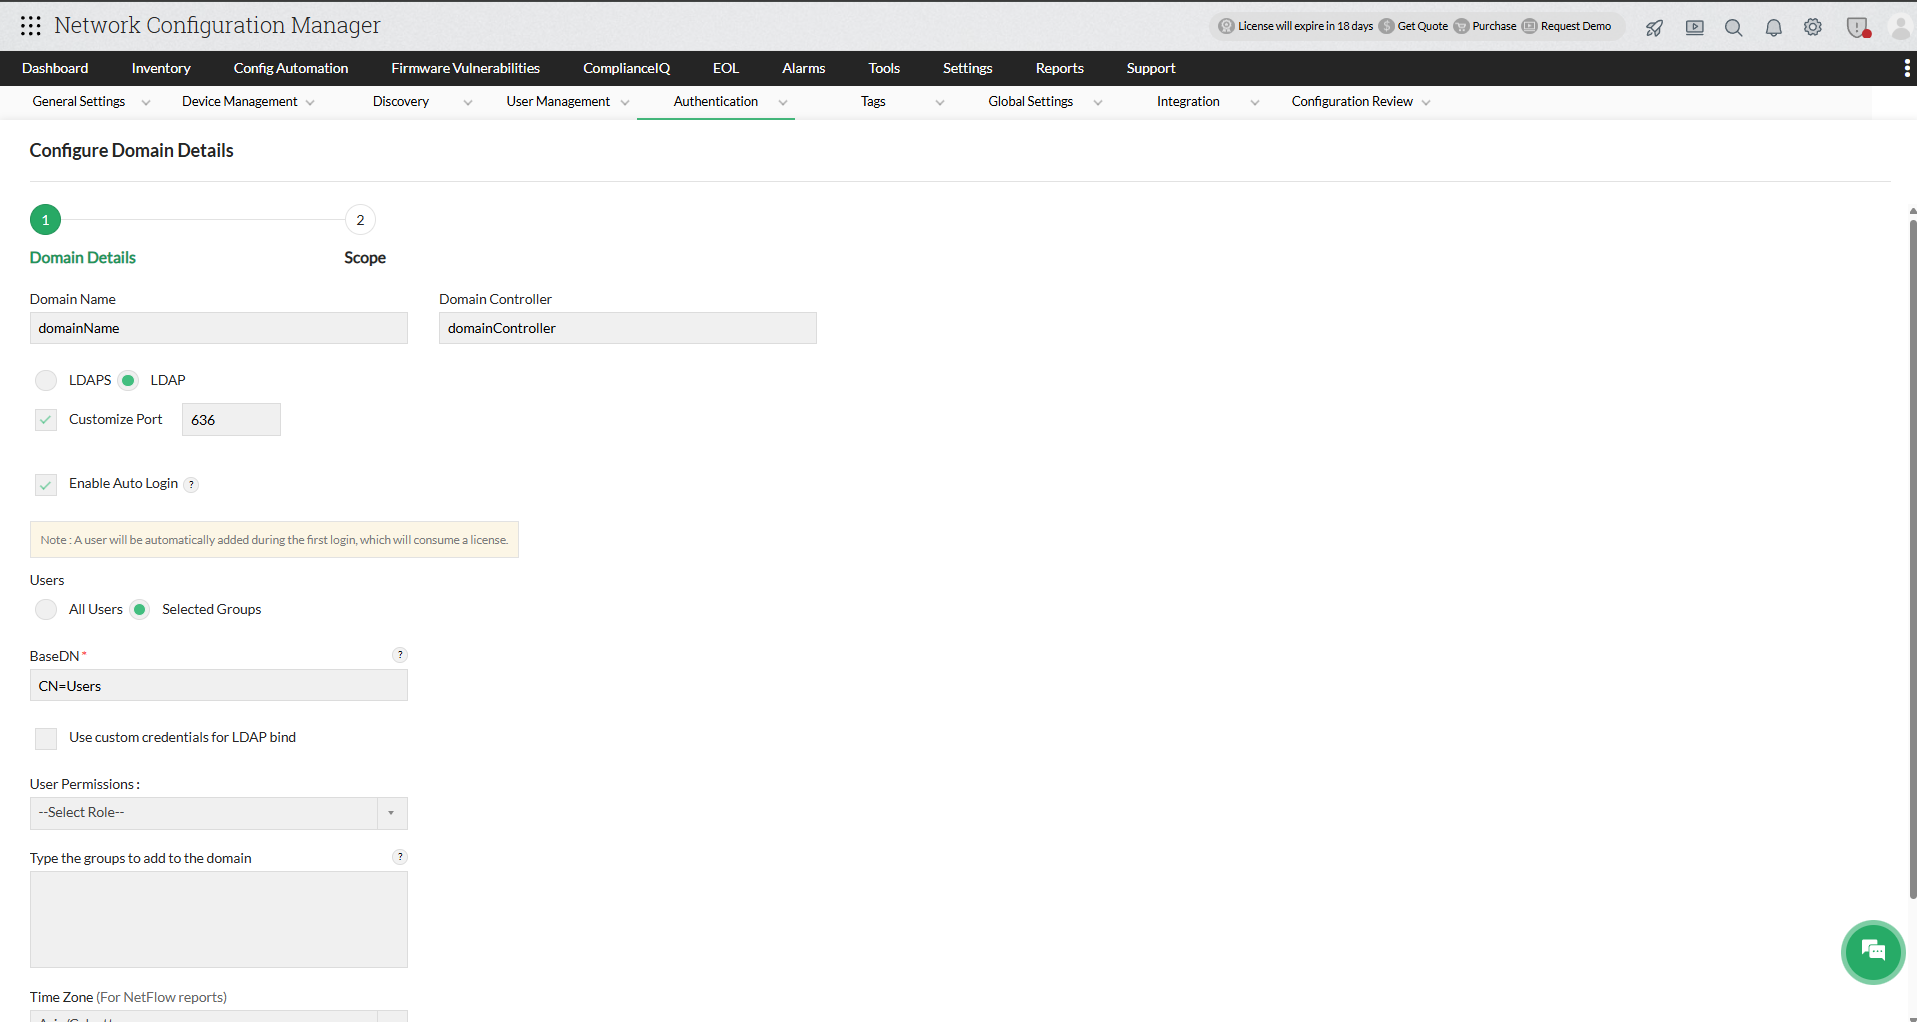
2. Select the Enable Auto Login check box.
By enabling auto-login, the scope defined for the selected domain will be auto-assigned to users logging-in for the first time. If Auto-login is not enabled, then the users must be added manually.
3. Configuring Auto-login for
- All users
To enable Auto-login for all users, select All Users under Users. The auto login will be enabled to all the users logging into that domain. - Selected AD groups
To enable Auto-login for selected AD groups, select Selected groups under Users and type the names of the AD groups. The auto login will be enabled to the AD groups you specify. - During autologin, the selected modules and scope can be assigned for the AD user.
Note: Multiple AD Group names can be mentioned as comma seperated values. If a new group with a different scope to be added, make use of the '+' icon.
If you choose to configure Auto-login for Selected AD groups, follow the steps below:
- Under BaseDN enter the path where Users are present in the Active Directory.
Sample query to get baseDN (Container path) for user:
- If LDAP access is not available for all users in your domain, you can configure custom credentials with the 'Use custom credentials for LDAP bind' option. These credentials will be used to execute LDAP queries.

- Enter the user account (with the required permissions) in the active directory to execute LDAP Queries in the domain, under 'Bind User Name' and the corresponding 'Bind Password'.
Note: The credential provided should have LDAP Query permission and permission to read the 'memberOf' property.
4. Once you enable Auto-login, select the Users and User Permissions for the domain, edit the Time zone if required, and click Next. During autologin, the selected modules and scope can be assigned for the AD user.
5. To configure Scope, You can provide this user with access to specific devices/device groups or all the device groups. If All Devices are selected, the user will have access to all the devices in Network Configuration Manager. If specific devices are selected, the user will be able to view and manage only those devices.
6. Save the settings.
Edit Domain Settings
Once you create a domain and assign users, you can edit the configurations as required any time. You can add or delete AD users/groups, edit the user permissions, and also edit the scope settings.
To add AD groups:
Click on the 'Plus' icon next to the domain of your choice to add new AD groups to it.
To edit timezone:
Select Edit under Actions for the domain you want to edit, change the timezone as per your requirement, and click 'Save'.
To Edit/Delete AD groups:
1. Click on the arrow mark next to the name of your domain to display all AD groups under it.
2. Click on the 'Edit' icon next to the group you wish to edit, select the Users and User Permissions for the domain, and click Next.
3. To edit a particular user/group in a domain, select Edit under Actions for the domain you want to edit.
4. User Permissions for the AD groups can be edited by selecting either Read Only (Operator User), Full Control (Administrator User) or selecting a Custom User Role with the chosen level of access.
5. To configure Scope, You can provide this user with access to specific devices/device groups or all the device groups. If All Devices are selected, the user will have access to all the devices in Network Configuration Manager. If specific devices are selected, the user will be able to view and manage only those devices.
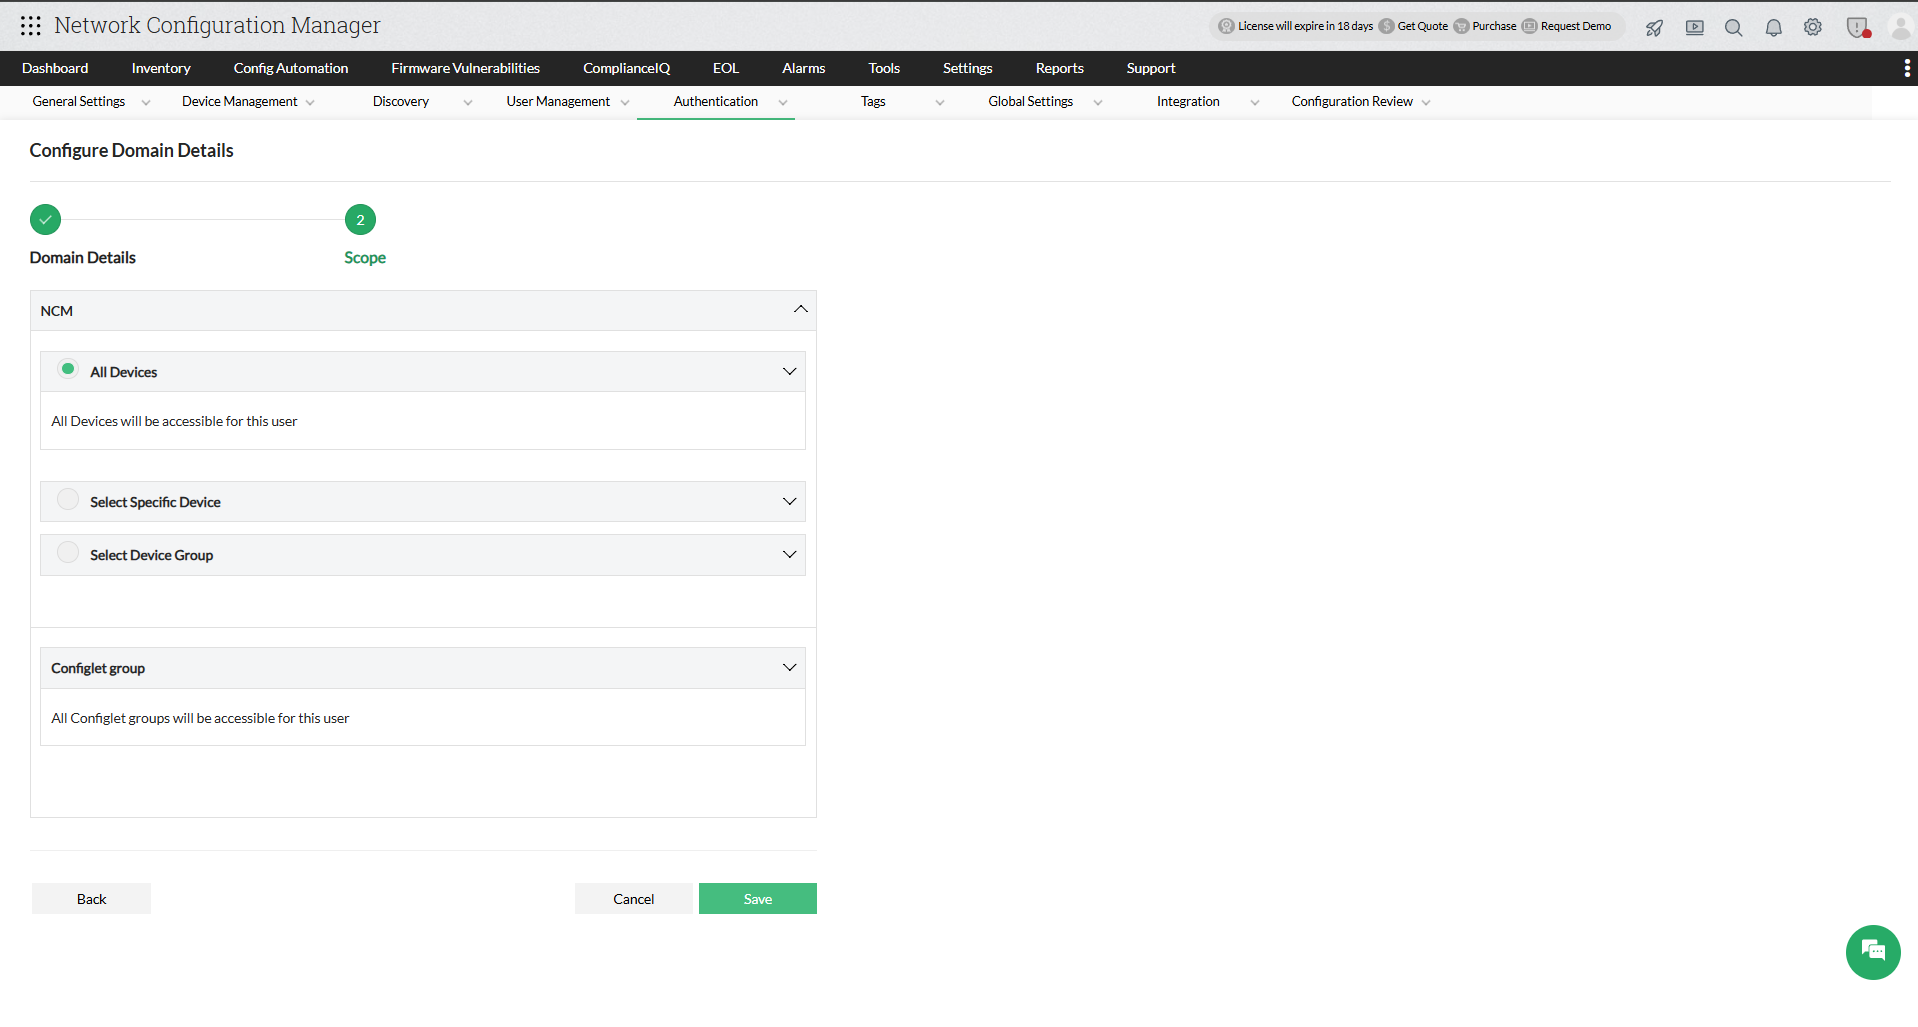
6. Save the settings.
7. To delete a group, just click on the 'Delete' icon next to it.
Note: For AD Authentication, we support on-premise AD with LDAP query access to the domain controller in the network.