
Configuring Technicians
The IT help desk team comprises the help desk team manager, help desk agent, and technicians who will be handling the requests posted / raised by various requesters from different accounts. You can add, edit, or remove the technicians in the application and also provide them with various access privileges that suit their role and need. You can also view the list of technicians in a particular account and/or site by selecting the account from the Accounts combo box and site from Technicians for combo box.
To open the technician configuration page,
-
Log in to the ServiceDesk Plus - MSP application using the user name and password of a ServiceDesk Plus - MSP administrator.
-
Click the Admin tab in the header pane.
-
In the MSP Details block, click the Technicians icon
 . This opens the technicians list view page. Here you can add, edit, or delete technicians.
|
|
Note: The Account Admin and Site Admin can add and view the technicians of the site to which he/she is associated by selecting the site from the Technicians for combo box. The Technicians for combo box will appear if the sites are configured. The sites can be configured in Admin- Sites. |

To add a technician and associate a role with him/her,
-
Click the Add New Technician link available in the top right corner of the Technician List page. This opens the Add Technician form.
-
Enter the Full Name and Employee ID of the technician in the Personal Details block. The name is a mandatory field.
-
In the contact information block, enter a valid e-mail ID and SMS Mail ID of the technicain. If the technician has a phone and a mobile number, you can enter the same in the space provided for entering these values.
-
Enter the cost details of the technician in the Cost per hour field.
-
You can associate multiple accounts and sites to a technician. Select the accounts to which you want to associate the technician from the list of Available Accounts and move it to Associated Accounts by clicking >> button. Once accounts are associated, the sites corresponding to selected accounts get populated in the Available Sites list. Select the sites you want to associate this technician to and move them to Associated sites in the same way as described above for accounts. Similarly you can also dissociate the Accounts and sites. You can also associate/dissociate sites from the technicians in the Technicians list page.
Note: For technicians who are not SDAdmin or SDAccountAdmin, sites have to be associated. If only accounts are associated, the technician will not be given access to the account. If you want to give access to all sites of an account, select an account and move it to associated accounts and select all sites under that account and move them to associated sites. -
You can also assign Groups to the technician. Select the groups from the list of Available Groups and move it Associated Group by clicking >> button.
-
If you have defined any additional fields, then they will be listed as Additional Technician Details. Enter the relevant information for the same.
-
To provide login access to the technician with specific access privileges or enable administrative privileges for the technician, enable the check box beside Enable Login for this technician. This displays the Login Details block.
-
Enter the Login Name and Password. Enter the password again in the Re-type Password field. All these fields are mandatory if login is enabled. Also note that the login name needs to be unique.
-
Now you need to assign a role to the technician, which will define his access privileges to various modules in the application.
-
If you want the technician to have complete administrator access then select the radio button, Enable Administrator Privileges. This option will not be available when a Site Admin logs in to the application using his login credentials.
-
If you want the technician to have complete administrator access to all accounts selected, then select the radio button, Enable Administrator Privileges for the accounts selected above.
-
If you want the technician to have complete administrator access for the above selected sites then select the radio button, Enable Administrator Privileges for the sites selected above.
-
Else, Enable Custom Privileges radio button and choose the roles from the list of Available Roles and move it to Assigned Roles by clicking >> button. If you want to remove any of the roles assigned, then select the role from the Assigned Role list and click << button. The selected roles will be removed.
-
-
Click Save. If you want to add more than one technician then, click Save and add new button.
If you decide to give the login access for the technician at a later time, you can save the technician details without the login details. For this, you need to stop with the step 5 and click Save. Later you can add the login details by editing the technician details.
At any point, if you decide not to add the new technician, then click Cancel to get back to the technician list. Clicking the View List link on the top right corner of the add technician form will also take you to the technician list view.
To import technicians from a CSV (Comma separated value) file,
-
Click on the Import from CSV available in the top right corner of the Technician List page. This will open a pop-up screen for importing technicians through CSV.
-
Locate the CSV file on your system using the 'Browse' button and click the 'Next' button.
-
Select and map fields from the CSV file to the fields for the technician (like Name, Job Title, EMail, Mobile, Phone, SMS Id and Cost per hour). Name is a mandatory field and it must be unique.
-
Click Next and then the 'Import Now' button to import technicians. The final screen on the pop-up shows the summary of records imported.
Note: Technicians who are imported will not be associated with accounts or sites. This has to be done manually. To view the technicians imported through CSV, select 'All Accounts' in the Accounts combo box and 'All Sites' in the 'Technicians association for' combo box.
If you have added a technician without giving the login details, then you can enable the same by editing the technician's details. To edit a technician information,
-
Select the site of the technician which you wish to delete from the Technicians for combo box. By default, the list of all the technicians is displayed. Click the edit icon
 beside the technician's full name that you wish to edit. If you have not enabled the login permissions, the edit technician form opens with a view similar to the add technician form. Enable the login permissions as mentioned in the add technician form (starting from step 6 onwards).
 -
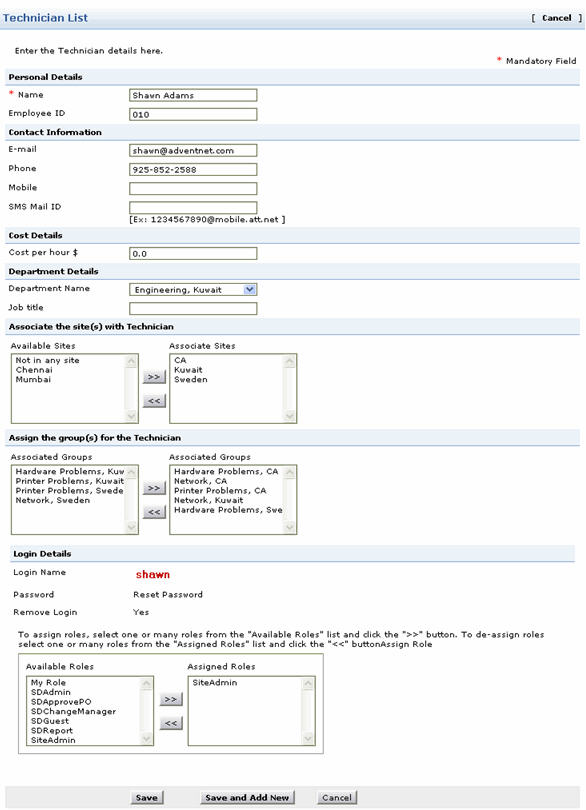
If the login permissions have been added while adding the technician itself, then the edit technician form will look as shown below,
-
In the above form, you can modify all the fields displayed and also change the roles assigned, by adding or removing roles. (To add new roles, refer to the Configuring Roles section.)
-
Click Save to save the changes performed. At any point, if you wish to cancel the operation that you are performing, click Cancel.
Even while editing a technician, if you wish to add a new technician, then click Save and add new button after making the changes. The Add Technician form opens after displaying a message that the changes have been updated successfully.
When technicians forget their password, you can send a password reset link to them.
To send a password reset link to a technician,
- Go to the technician's details page.
- Click the Actions menu on the details page and select Send Password Reset Link.

An email with the password link will be sent to the technician. The link will be valid for 15 minutes.

Incase if the outgoing mail server is not configured, or if the technician doesn't have a primary email ID, or if the technician doesn't have a unique email ID, then the email will not be sent. In such cases, a popup with the password reset link will be displayed to the administrator, who can share the link with the technician.
While editing the technician details, you can also choose to remove his/her login permissions.
-
In the Edit Technician form, below the password field, click the Yes link beside the Remove Login field. A confirmation window appears.
-
Click Ok to proceed. A message is displayed informing the removal of the login permissions and the technician edit form is displayed without the login details. If you do not wish to remove the login permission, click Cancel.
-
Click Save.
Associate Technicians to Sites
You can associate bulk technicians to sites using this option. If you have added the technician without associating the sites then the same can be done from the technicians list view page.
-
From the technicians list view page, enable the check box adjacent to the technician for whom you want to associate site.
-
Click Actions button --> Associate to Site option. The Associate Technician(s) to site pop up window appears.
-
Select the Account and Site to which you want to associate the technician from the combo box.
-
Click Associate button. The technician gets associated to the site.
Dissociate Technicians from Sites
You can dissociate bulk technicians from sites using this option. The added sites can also be dissociated from the technician from the technicians list view page.
-
From the technicians list view page, enable the check box adjacent to the technician for whom you want to associate/dissociate site.
-
Click Actions button --> Dissociate from Site option. The Dissociate Techncian(s) from site pop up window appears.
-
Select the Account and Site from which you want to dissociate the technician from the combo box.
-
Click Dissociate button. A pop up window confirming the operation appears. Click Ok to proceed. The technician gets dissociated from the site.
|
|
Note: Dissociating the technicians from a site will remove all their traces from SLA, Business Rules and Groups associated to that site. |
Changing Technicians as Requesters
To change technician as requester,
-
In the Technician List view, select the check box beside the technicians to change as requesters.
-
Click Actions drop down button.
-
Select Change as Requester option. A dialog box confirming the operation appears.
-
Click OK to proceed. The selected technicians are changes as requesters and listed in the Requester List view.
-
Enable the check box beside the technician which you wish to delete from the Technician List page. Click the delete button. A confirmation dialog is opened.
-
Click OK to proceed with the deletion. If you do not want to delete the technician, then click Cancel.
|
|
Note: Delete icon will not be available beside the name of the technician who has currently logged in to the application. To delete that technician, you need to log out and log in as a different technician and then delete the details. Also, the administrator technician details can be deleted only by another technician with administrative privileges. |