Two-factor Authentication
To strengthen user logon security, AD360 supports two-factor authentication. Once enabled, AD360 will require users to authenticate using one of the authentication mechanisms below in addition to the Active Directory credentials whenever they log in.
Setting up 2-factor authentication
- Log in to AD360 as an administrator.
- Navigate to Admin → Administration → Logon Settings.
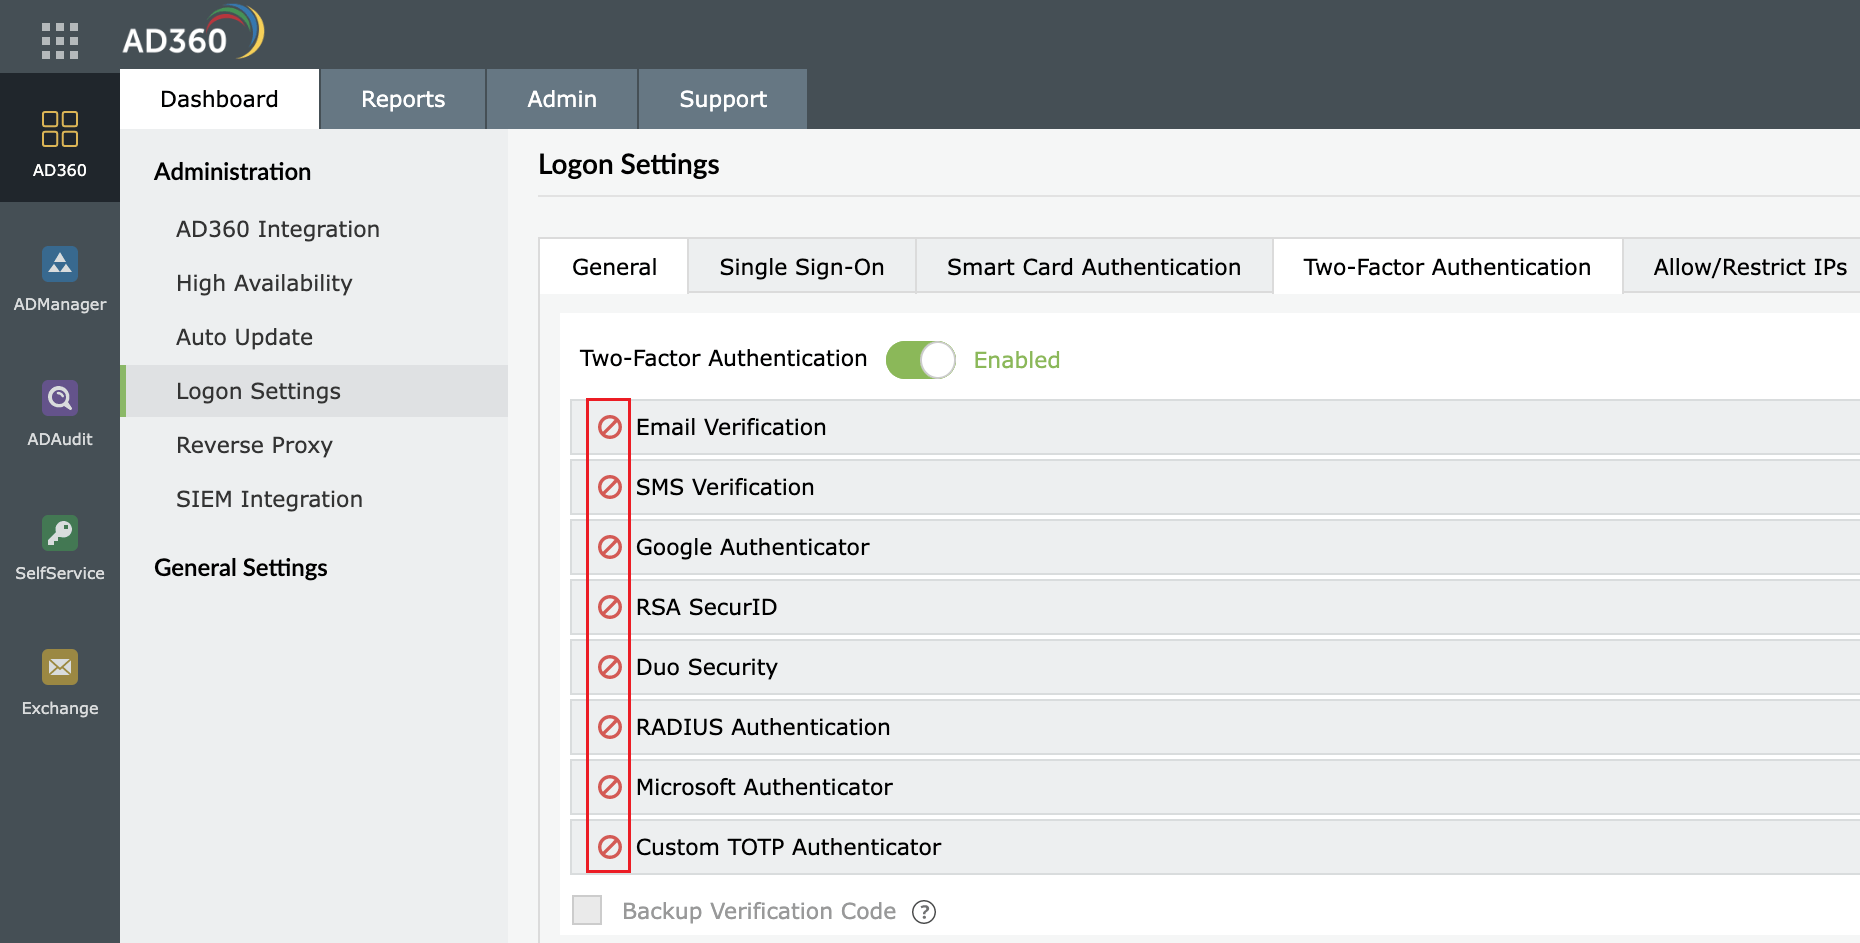
- Click the Two-factor Authentication tab.
- Toggle the Two-factor Authentication switch to the ON position.
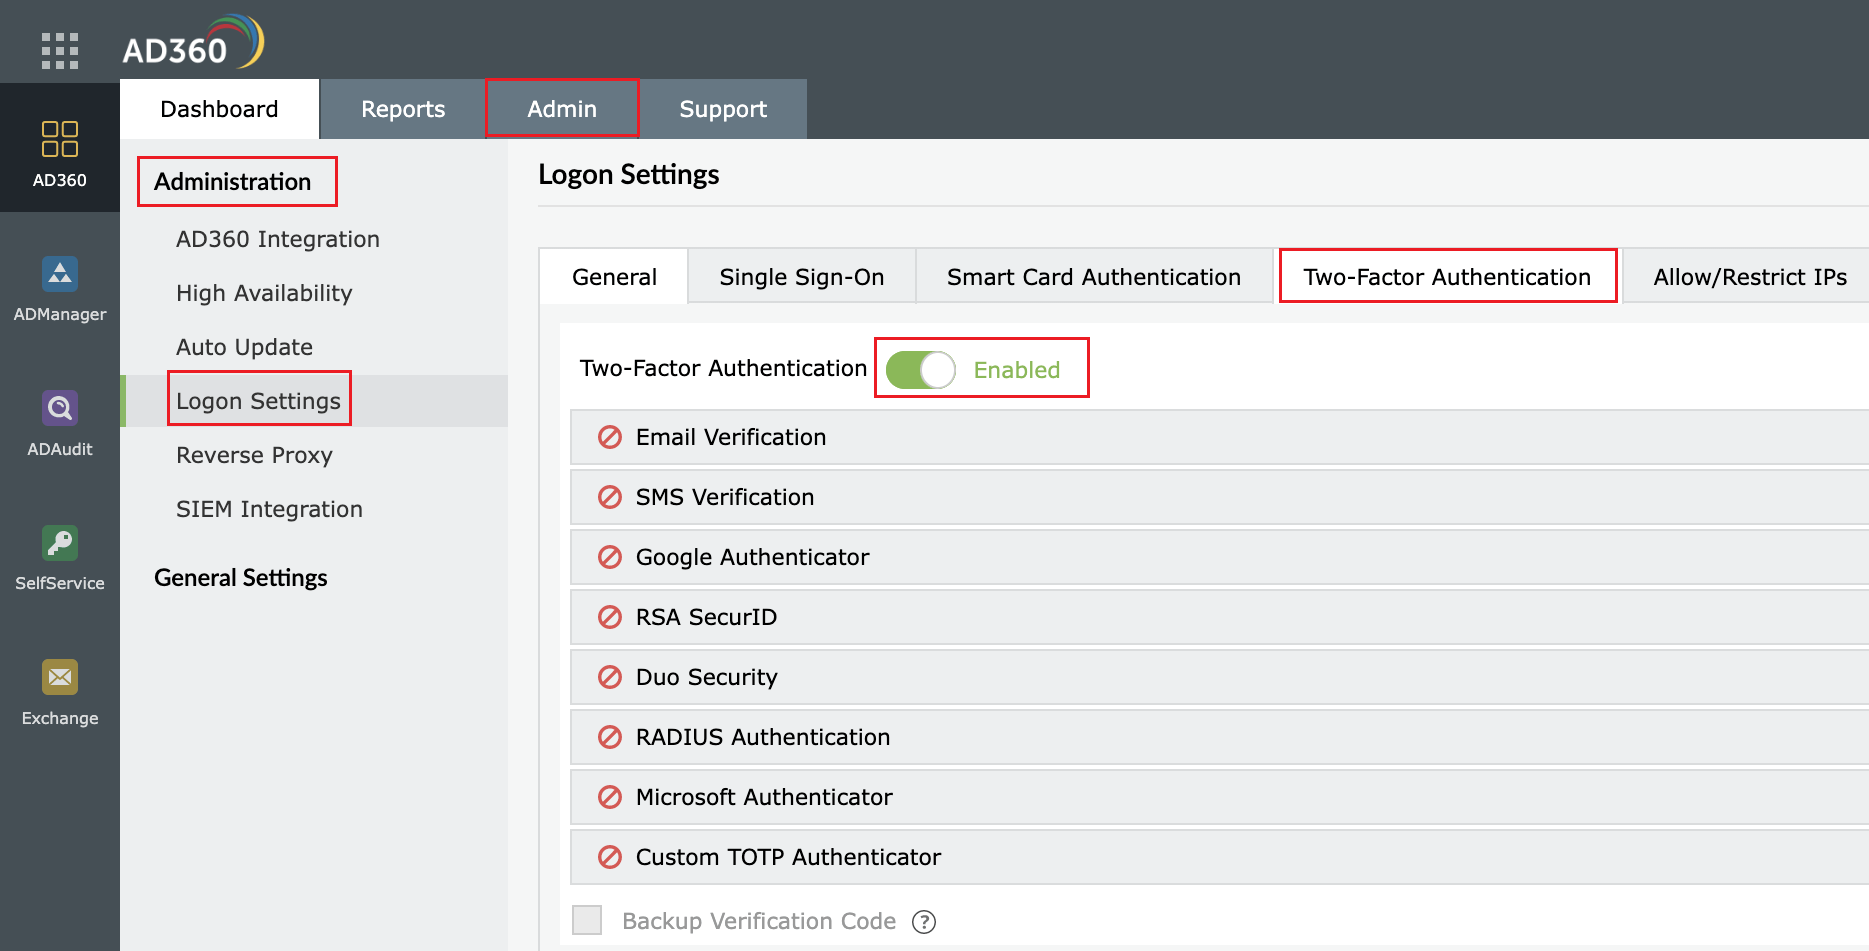
- Select the authentication methods of your choice from the list provided.
Note:
- If multiple authentication options are enabled, then the user will be asked to choose one at the time of logging in.
- Make sure you configure the authentication option you’ve chosen by entering all the required details. Click here for the steps.
- Click Save Settings.
Email Verification
When this option is selected, AD360 sends a verification code via email to the user’s email address. The user has to enter the verification code to successfully login.
Configuration steps
- Configure mail server settings if not done already.
- Enter a Subject for the email.
- Enter the Message in the box provided.
- Set the priority as per your requirement.
- Click Macros link at the bottom to insert them in the email message.
- Once you are done, click Save Settings.
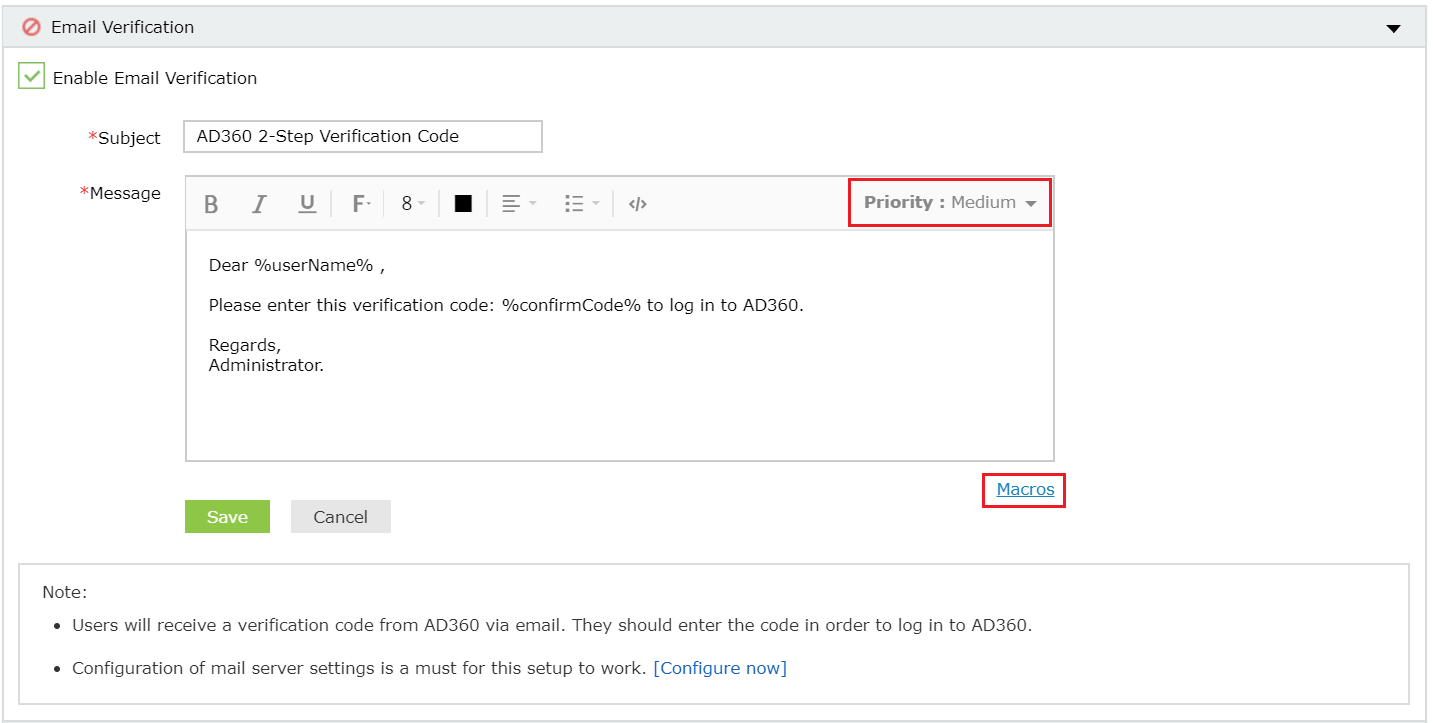
Once enabled, users will be asked to enroll for two-factor authentication by entering their email address during login.
SMS Verification
When this option is selected, AD360 sends a verification code via SMS to the user’s mobile number. The user has to enter the verification code to successfully login.
Configuration steps
- Configure SMS server settings if not done already.
- Enter the Message in the box provided.
- Click Macros link at the bottom to insert them in the SMS.
- Once you are done, click Save Settings.
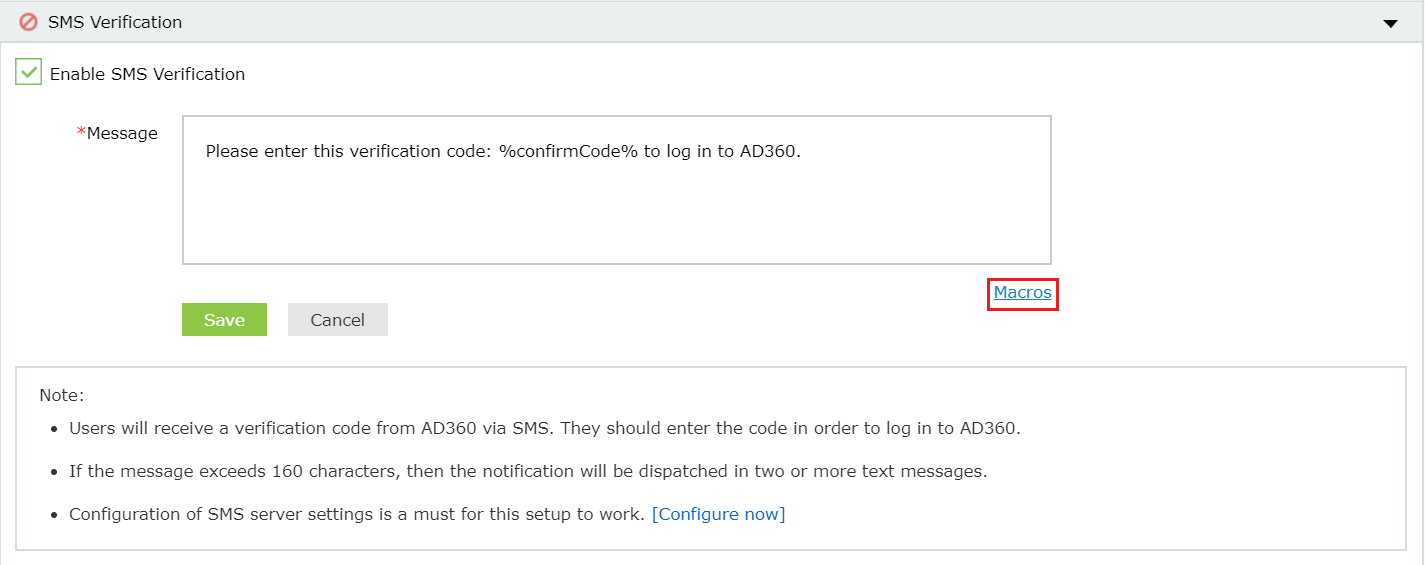
Once enabled, users will be asked to enroll for two-factor authentication by entering their mobile number during login.
Google Authenticator
Google Authenticator adds an extra layer of protection to verify users' identity when they attempt to log into the product. Users will be required to enter a six-digit security code generated by the Google Authenticator app to verify their identity.
Configuration Steps:
- Click Enable Google Authenticator.
- Click Save Settings.
Once enabled, users can enroll themselves for two-factor authentication using the Google Authenticator app when they log into the application.
RSA SecurID
RSA SecurID is a 2FA mechanism developed by RSA Security LLC to allow users to securely access network resources. Users can use the security codes generated by the RSA SecurID mobile app, hardware tokens, or passcodes received via email or SMS to log on to AD360.
RSA SecurID has deprecated authentication via an SDK for Java, so it is advised to adopt authentication via a REST API.
Prerequisites
- Ensure that you have installed a supported version of RSA Authentication Manager.
- For SDK integration: RSA Authentication Manager 8.0 or higher
- For REST API integration: RSA Authentication Manager 8.2 SP1 or higher
- Please follow these steps to add the AD360 server as an authentication agent before configuring RSA SecurID in AD360.
Steps to configure RSA SecurID for SDK integration
- Ensure that the required JAR files listed below are present in the <AD360_install_directory>/lib folder.
- authapi-8.6.jar
- log4j-1.2.12rsa-1.jar
- cryptojcommon-6.1.3.3.jar
- jcmFIPS-6.1.3.3.jar
- cryptojce-6.1.3.3.jar
Note: These JAR files pertain to the latest version of Authentication Agent SDK for Java (version 8.6).
If the files are not present, obtain the latest JAR files from RSA SecurID and add them to the <AD360_install_directory>/lib folder.
- In the RSA admin console, navigate to Access > Authentication Agents > Generate Configuration File.
- Click Generate Config File to download the AM_Config.zip file.
- Extract the sdconf.rec file from the ZIP file.
- In AD360, navigate to Admin > Logon Settings > Two-Factor Authentication > RSA SecurID.
- Check the Enable RSA SecurID box.
- For Integration Type, select SDK.
- Click Browse and select the sdconf.rec file.
- Click Save.

Once enabled, users will be asked to verify their identity with their SecurID token's passcodes for logon.
Steps to configure RSA SecurID for REST API integration
- In the RSA admin console, navigate to Setup > System Settings.
- Under Authentication Settings, click RSA SecurID Authentication API.
- Copy the Access ID, Access Key, and Communication Port details.
- In AD360, navigate to Admin > Logon Settings > Two-Factor Authentication > RSA SecurID.
- Check the Enable RSA SecurID box.
- For Integration Type, select REST API.
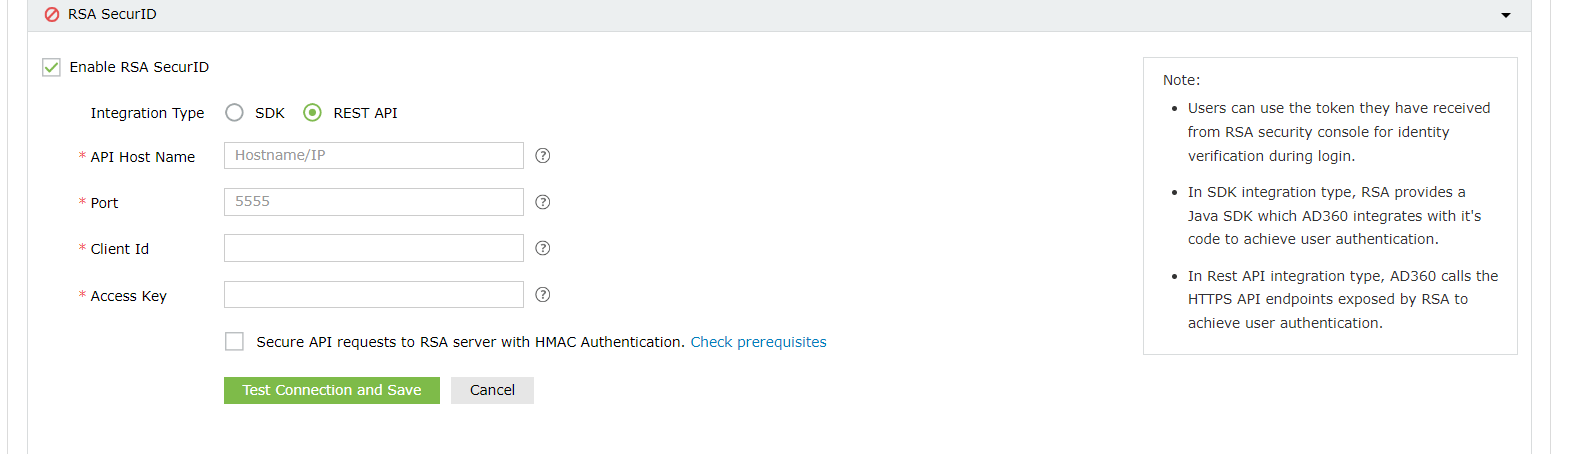
- Enter the hostname of RSA Authentication Manager in the API Host Name field.
- Paste the port number and access key obtained in Step 3 in the Port and Access Key fields, respectively.
- Enter the authentication agent's name (i.e., the hostname of the AD360 server) in the Client Id field.
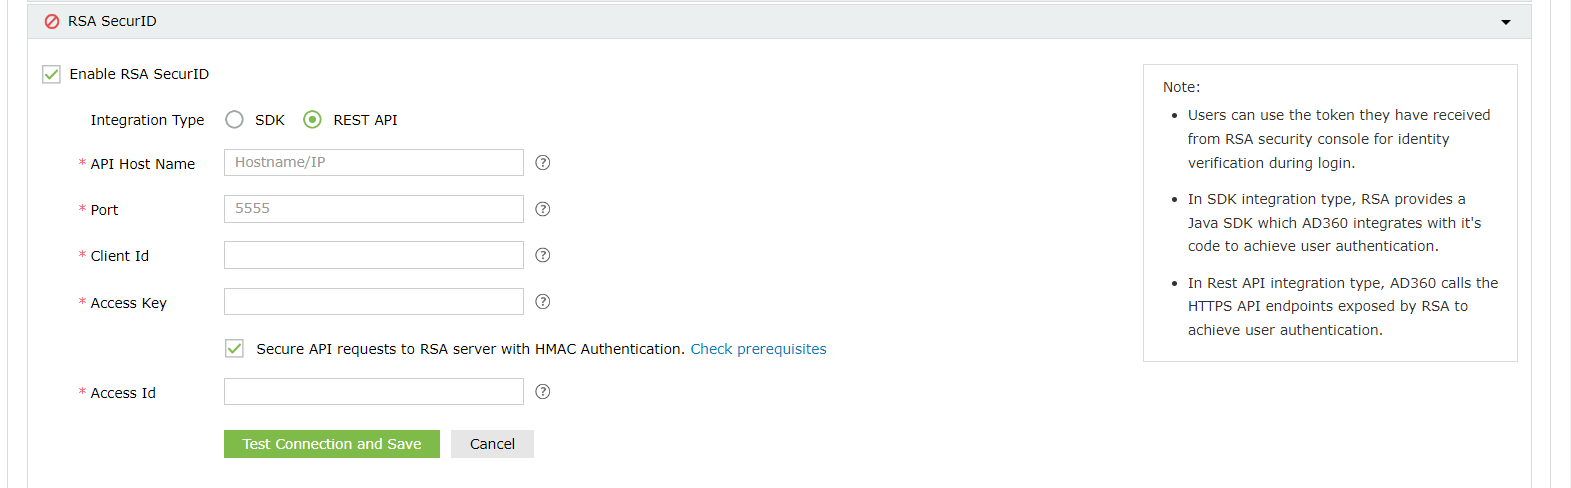
- Check the Secure API requests to RSA server with HMAC Authentication box to verify the integrity of the authentication requests. Please follow the steps mentioned under "HMAC prerequisites" before enabling HMAC authentication.
- Enter the access ID copied in Step 3 in the Access Id field.
- Click Test Connection and Save.
Note: Please ensure that all the users are associated with the configured authentication agent (the AD360 server) and have enrolled in RSA Authentication Manager with the same username and SecurID tokens assigned to them.
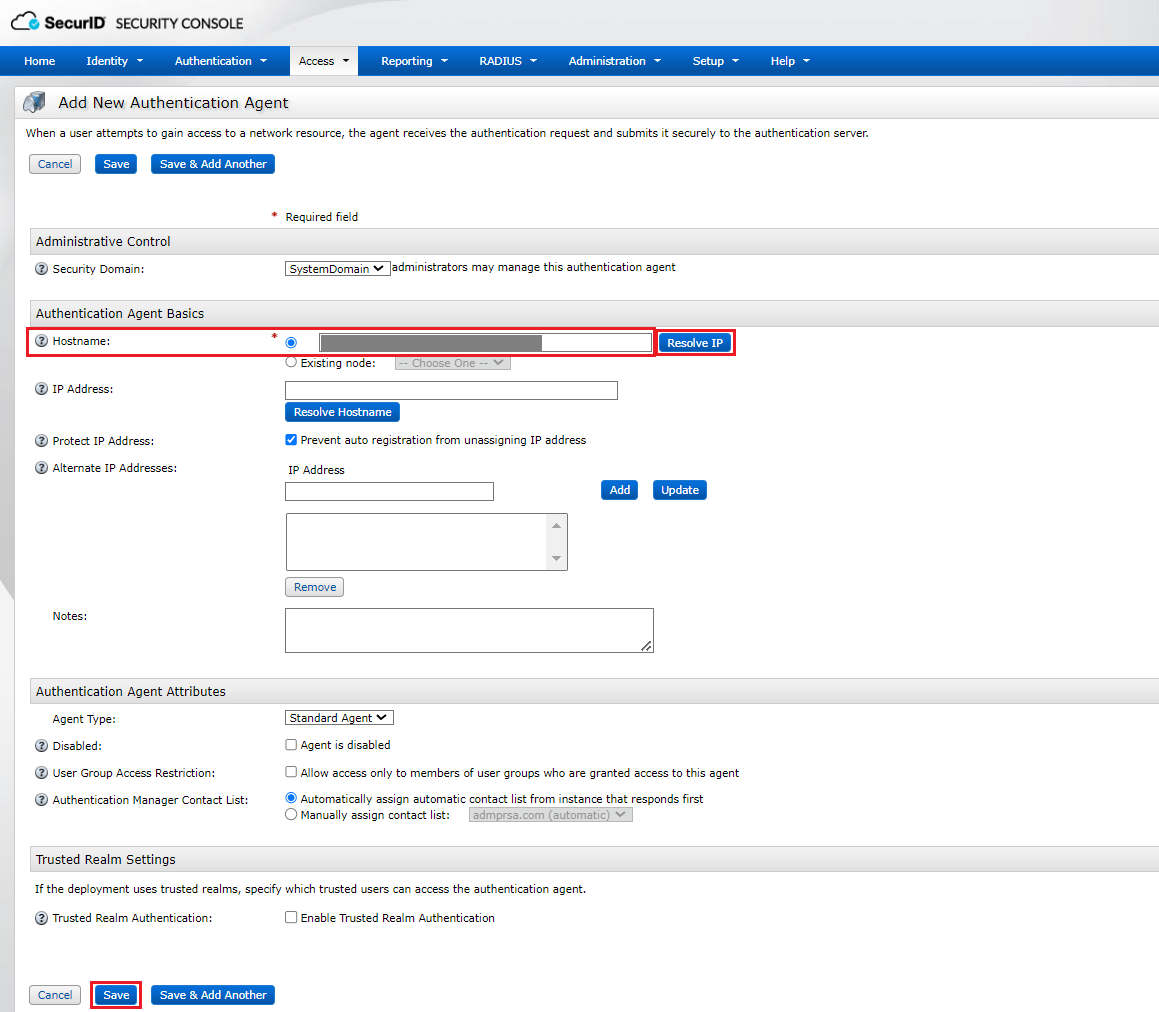
Steps to configure the AD360 server as an authentication agent
- Log on to your RSA admin console (e.g., https://ad360-rsa.testdomain.com/sc).
- Navigate to Access > Authentication Agents > Add New.
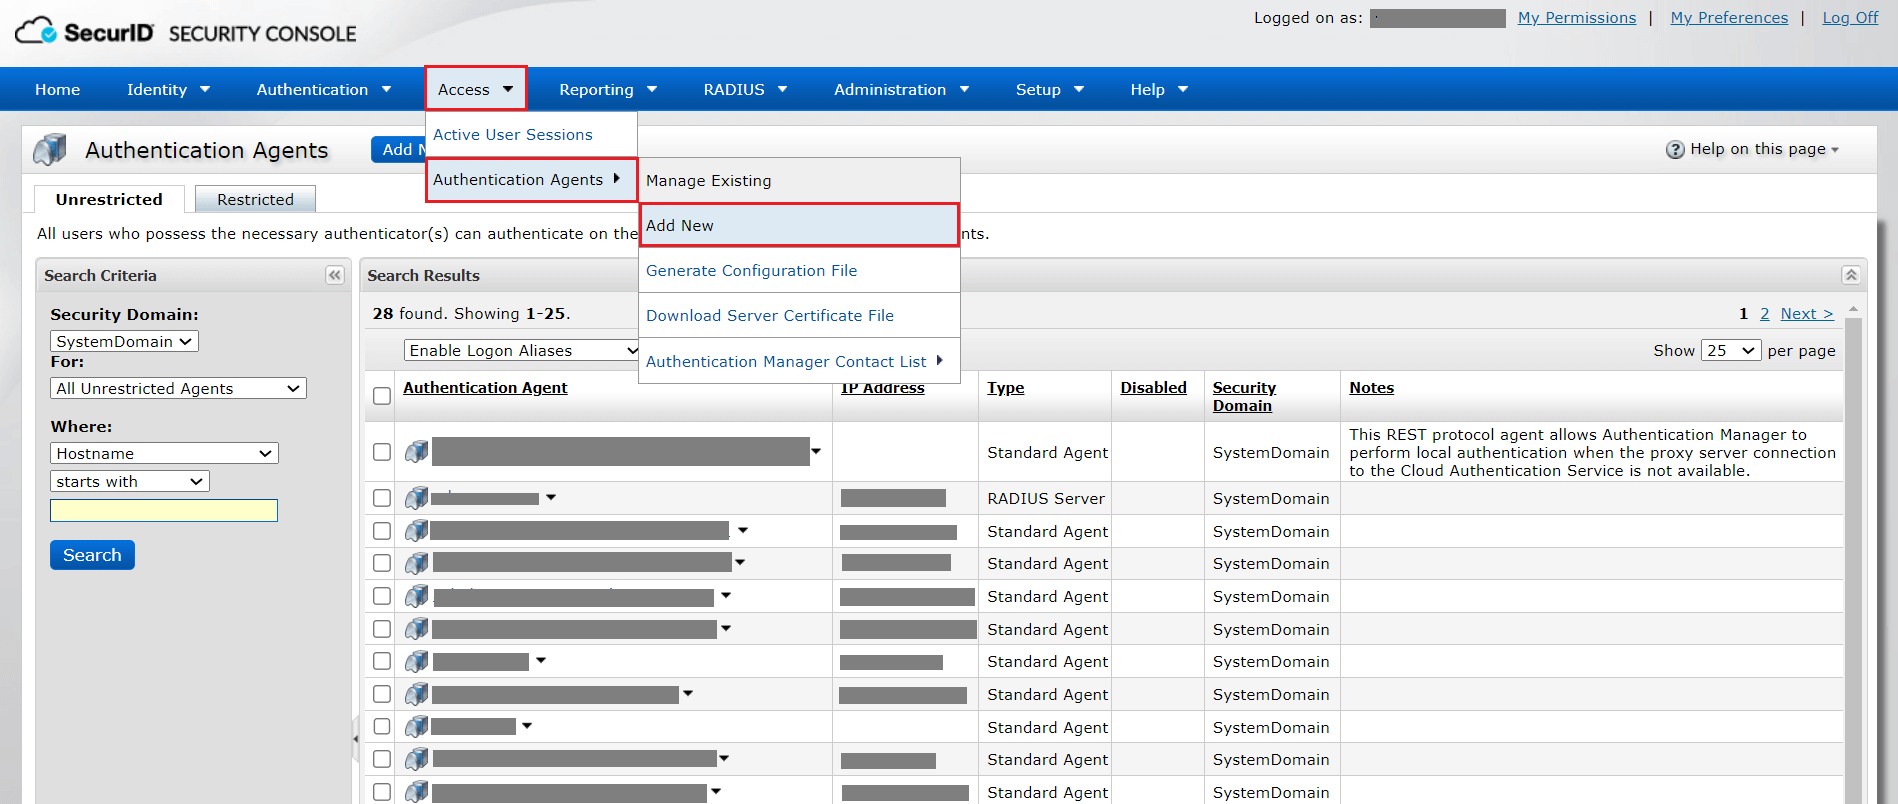
- Enter the hostname of the AD360 server in the Hostname field and click Resolve IP to establish a connection between the SecurID SECURITY CONSOLE and the AD360 server.
- Click Save to add the AD360 server as an authentication agent.
HMAC prerequisites
Hash-based message authentication code (HMAC) is used to validate the authentication requests that are exchanged between authentication agents and the RSA SecurID Authentication API.
- Log on to the appliance with the Secure Shell client or access the appliance on a virtual machine with the VMware vSphere Client, Hyper-V Virtual Machine Manager, or Hyper-V Manager.
- To verify authentication requests by implementing HMAC, type the following:
./rsautil store –a update_config
auth_manager.rest_service.authorization.mode 1 GLOBAL 501
- To use only the RSA SecurID Authentication API's access key for authentication, type the following:
./rsautil store –a update_config
auth_manager.rest_service.authorization.mode 0 GLOBAL 501
Duo Security
If your organization uses Duo Security for two-factor authentication, it can be integrated with AD360 to secure logins. Users can approve or deny the AD360 login requests using a push notification or by entering the six-digit security code generated by the Duo mobile app. Authentication via Duo Security can be configured in two ways in AD360: Web v2 SDK and Web v4 SDK.
Web v2 SDK uses a traditional Duo prompt which will be displayed in an iframe in AD360, whereas Web v4 SDK uses Duo's OIDC-based universal prompt with a redesigned UI that redirects users to Duo for authentication.
Duo Security has phased out Web v2 SDK, so it is recommended to switch to Web v4 SDK, which features the new Universal Prompt.
Prerequisites
- Add the API hostname and admin console (e.g., https://admin-325d33c0.duosecurity.com) as a trusted site or intranet site in the users' machine if they are using older versions of Internet Explorer.
- Please follow these steps in the Duo Admin Panel to migrate from Web v2 SDK, which uses the traditional prompt, to Web v4 SDK, which employs the new Universal Prompt.
Web v4 SDK configuration steps
Note: It is required to have a secure connection to set up the Web v4 SDK authentication. Please make sure that you have enabled HTTPS connection.
- Log in to your Duo Security account (e.g., https://admin-325d33c0.duosecurity.com) or sign up for a new account and log in.
- Go to Applications and click Protect an Application.
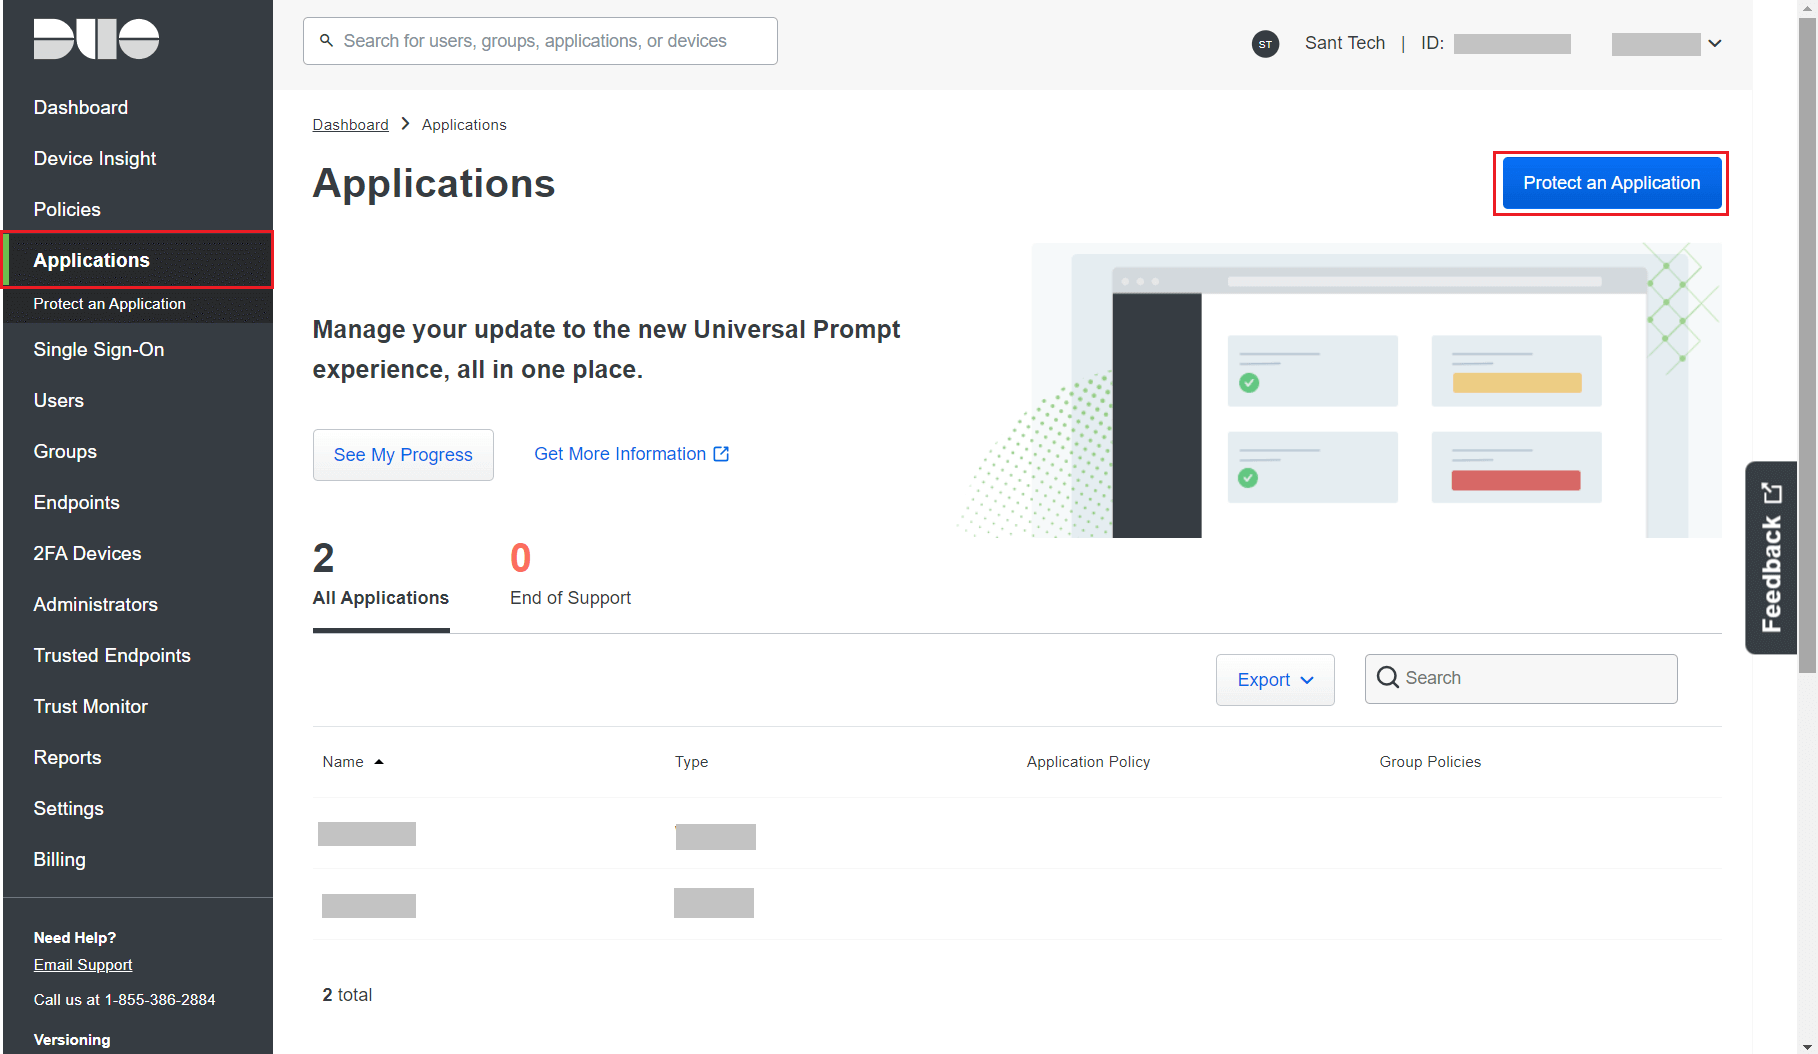
- Search for Web SDK and click Protect.

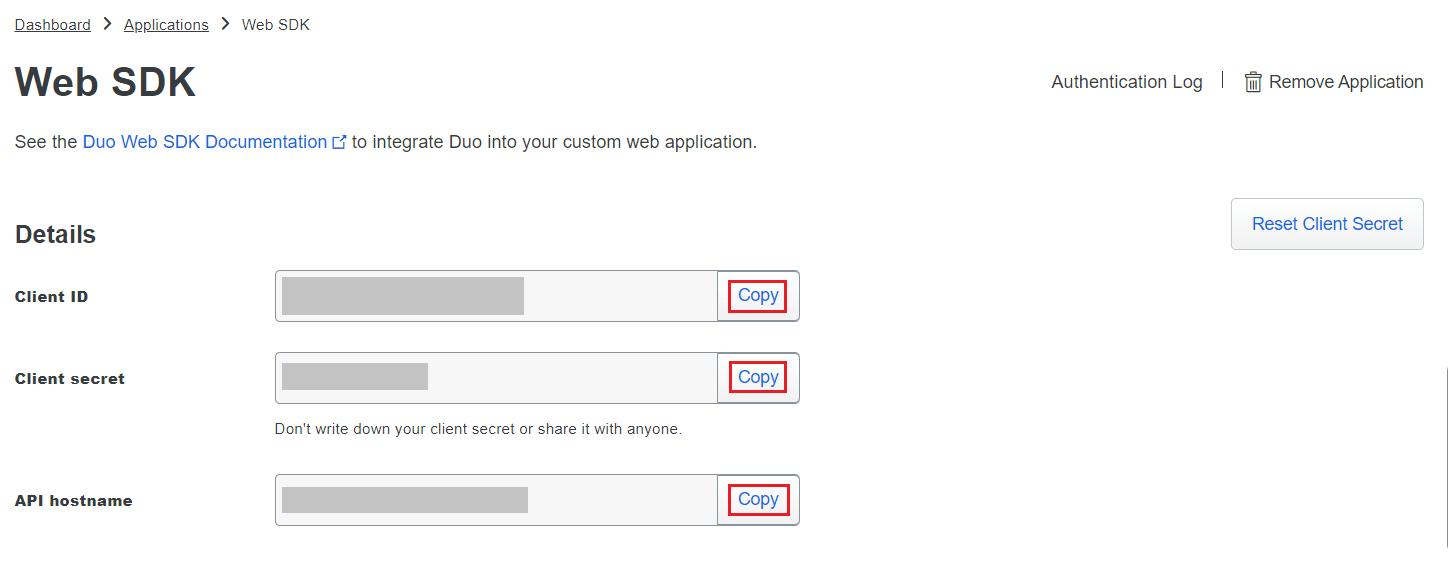
- Copy the Client ID, Client secret, and API hostname values.
- In AD360, navigate to Admin > Logon Settings > Two-Factor Authentication > Duo Security.
- Check the Enable Duo Security box and select Web v4 SDK for Integration Type.
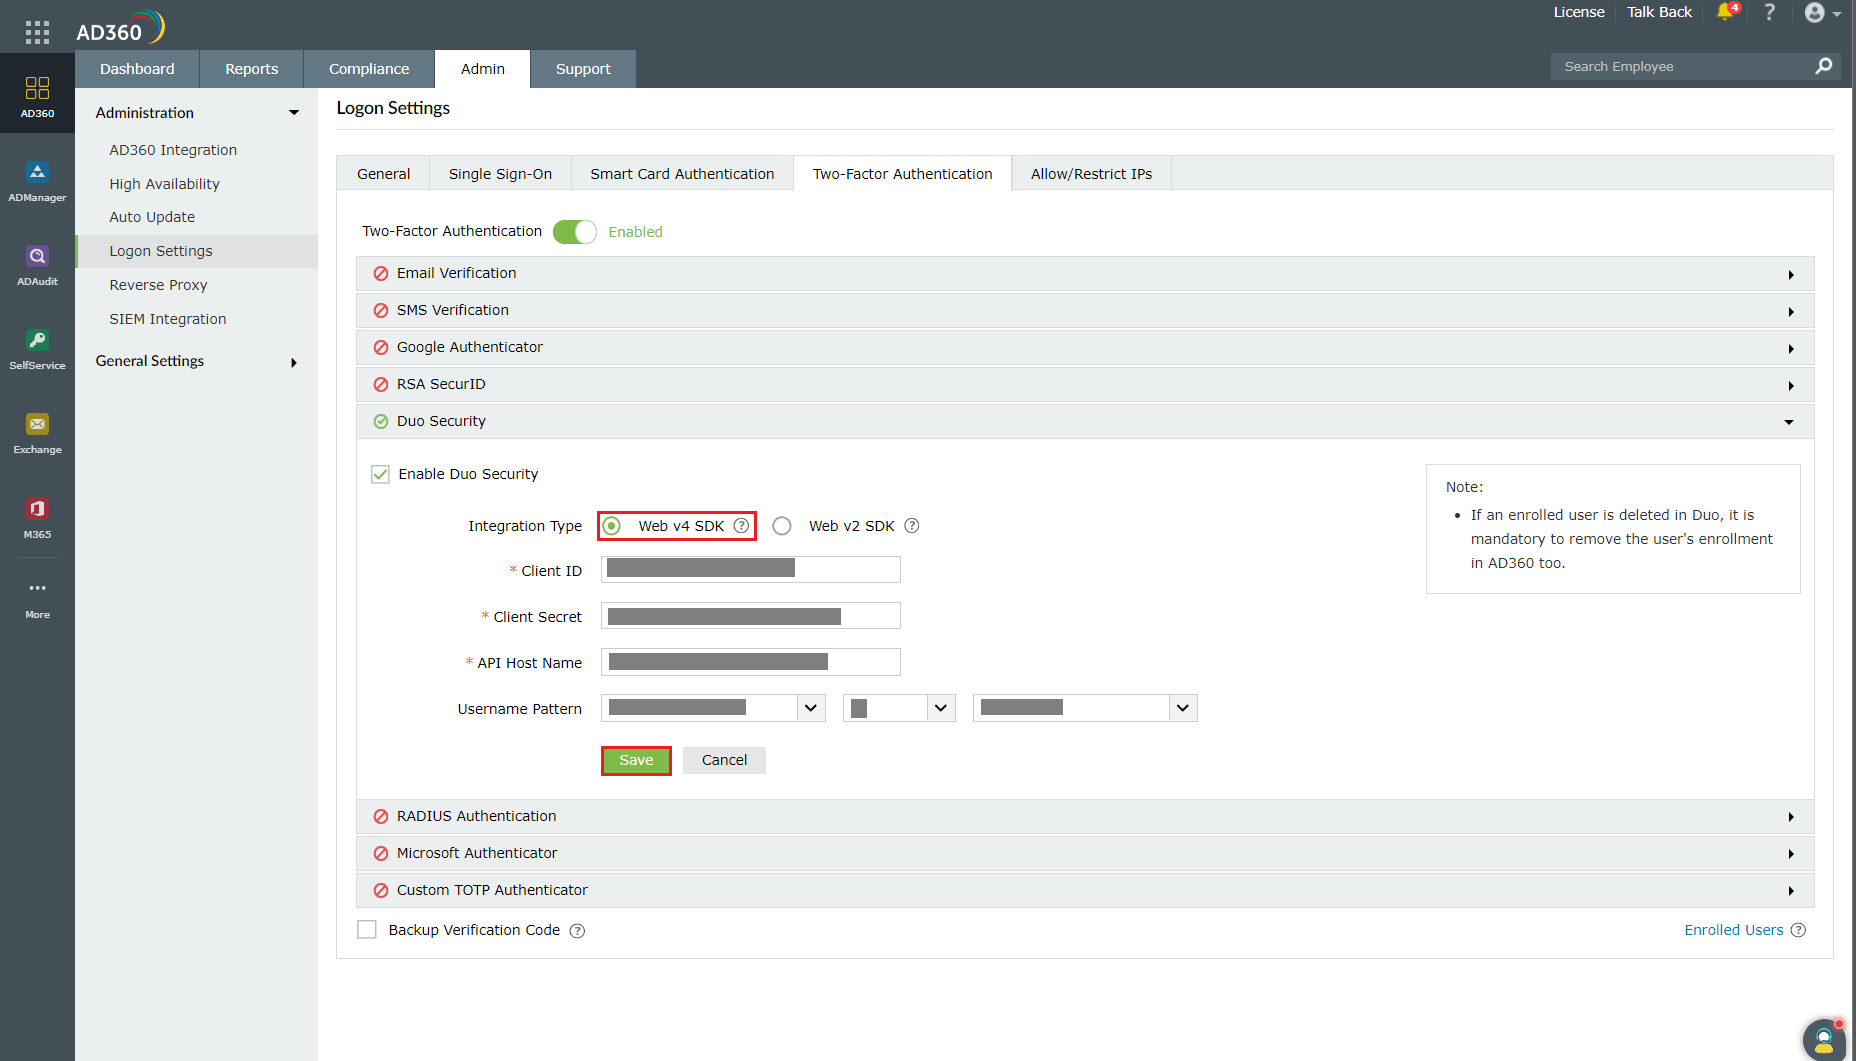
- Paste the Client ID, Client secret, and API hostname obtained from the Duo Admin Panel in the respective fields.
- Enter the same username pattern used in Duo Security in the Username Pattern field.
- Click Save.
Web v2 SDK configuration steps
- Log in to your Duo Security account (e.g., https://admin-325d33c0.duosecurity.com) or sign up for a new account and log in.
- Go to Applications and click Protect an Application.

- Search for Web SDK and click Protect.
- Copy the Integration key, Secret key, and API hostname values.
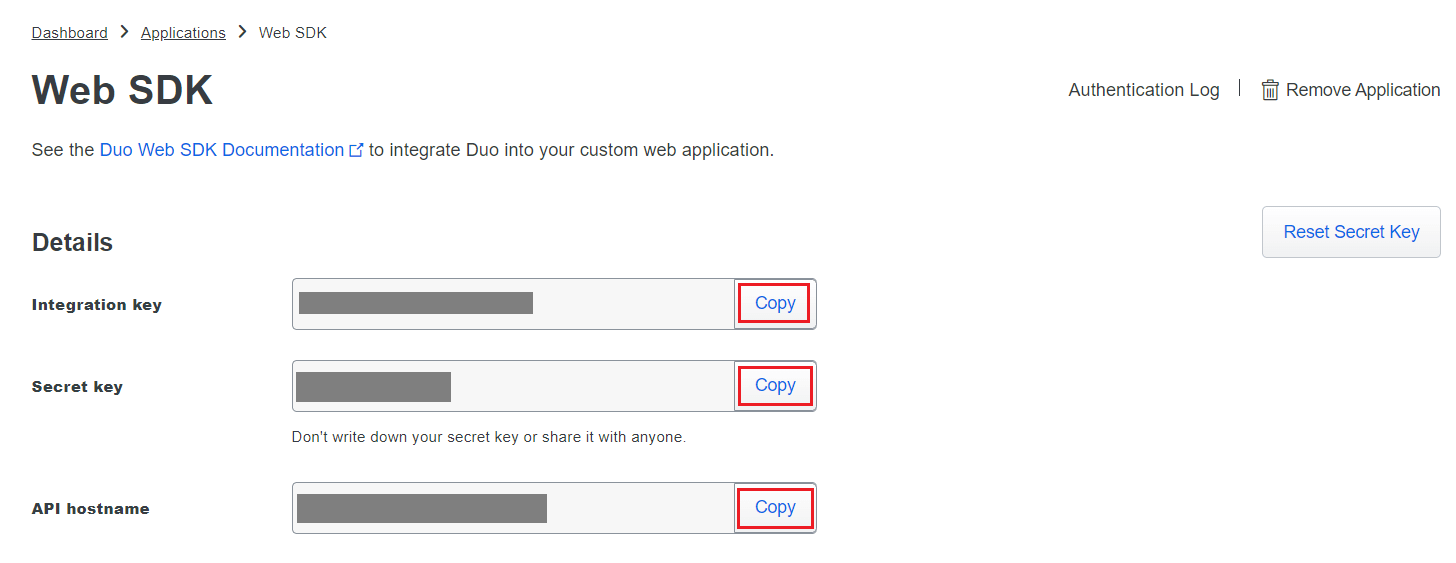
- In AD360, navigate to Admin > Logon Settings > Two-Factor Authentication > Duo Security.
- Check the Enable Duo Security box and select Web v2 SDK for Integration Type.

- Paste the Integration key, Secret key, and API hostname obtained from the Duo Admin Panel in the respective fields.
- Enter the same username pattern used in Duo Security in the Username Pattern field.
- Click Save.
Steps to migrate to the new Universal Prompt
- In the Duo Admin Panel, select the Web SDK application, which was previously configured for AD360, and copy the Integration key, Secret key and API hostname values.
- Scroll down to the Universal Prompt section. The App Update Ready message will be displayed, indicating that Universal Prompt can now be activated for AD360.

- In AD360, navigate to Admin > Logon Settings > Two-Factor Authentication > Duo Security.
- Click Web v4 SDK and paste the Integration key, Secret key, and API hostname values in the Client ID, Client Secret, and API Host name fields respectively.
- Once the Web v4 SDK is configured in AD360 and a user authenticates through the frameless Duo v4 SDK, the App Update Ready message in Duo Admin Panel will be updated and the New Prompt Ready message will be displayed.
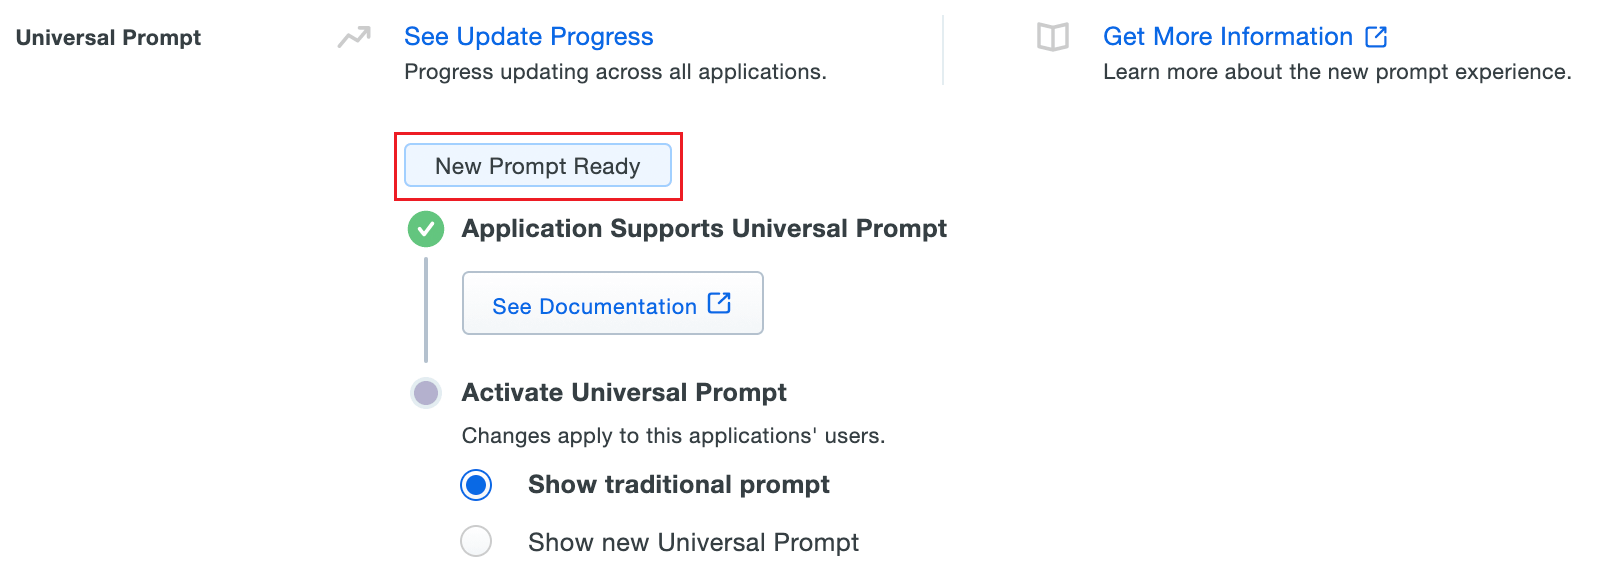
- Select Show new Universal Prompt to activate the universal prompt for AD360.
RADIUS Authentication
Remote Authentication Dial-In User Service (RADIUS) is an industry standard client/server authentication protocol that enhances security by protecting networks from unauthorized access.
RADIUS based two-factor authentication for AD360 can be configured in just two simple steps.
Configuration steps
Step 1: Integrate RADIUS with AD360
- Log in to RADIUS server.
- Navigate to clients.conf file.(/etc/raddb/clients.conf).
- Add the following snippet in the clients.conf file.
client AD360ServerName
{
ipaddr = xxx.xx.x.xxx
secret = <secretCode>
nastype = other
}
- Restart RADIUS server.
Step 2: Configure AD360 for RADIUS
- Select RADIUS Authentication option.
- Enter the IP address or the name of the RADIUS server.
- Enter the port number for RADIUS authentication.
- Select the protocol used for RADIUS authentication from the drop-down list.
- Provide the security key that was added to the clients.conf file in RADIUS server.
- Set the RADIUS user name pattern.
- Set a duration for authentication request time-out duration.
- Click Save Settings.
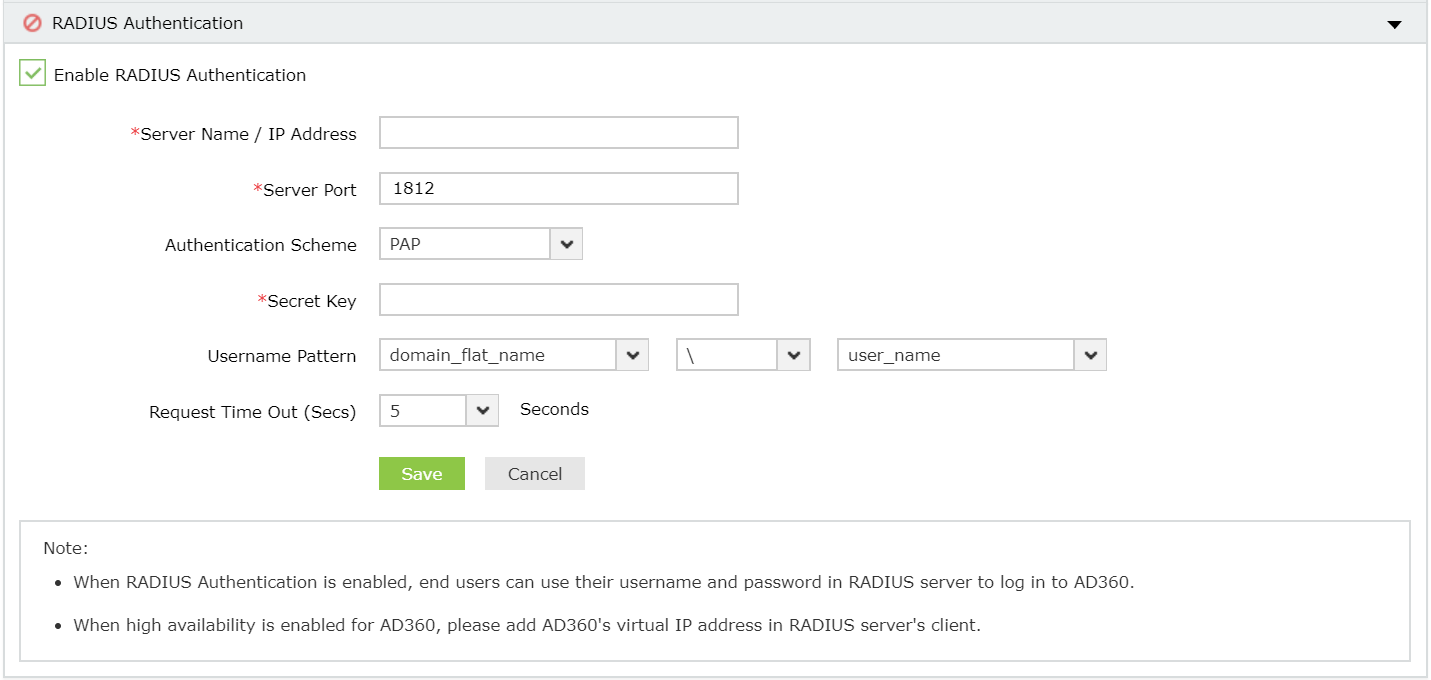
Note: Username Pattern is case sensitive. Please make sure you select the exact pattern (uppercase or lowercase) you use in your RADIUS server.
Microsoft Authenticator
Administrators can add Microsoft authenticator as an additional factor for verifying identities during login.
Configuration steps
- Click Enable Microsoft Authenticator.
- Click Save Settings.
Once enabled, users can enroll themselves for two-factor authentication using the Microsoft Authenticator app when they log in to the application.
Custom TOTP Authenticator
In addition to the authenticators mentioned above, you can also add a custom TOTP authenticator as a means of verifying identities, provided the application satisfies the following criteria:
- The application can provide passcodes of varying lengths (6, 7, or 8 characters).
- The application supports any password hashing algorithm that AD360 utilizes (SHA1, SHA256, and SHA512).
Configuration steps
- Select Enable Custom TOTP Authenticator.
- Enter the name of the authenticator application.
- Select the Passcode Length and the Passcode Expiration Time from the available options.
- Select the Password Hashing Algorithm of the TOTP authenticator.
- Provide the format in which the username will be displayed in the authenticator.
- Select the logo of the authenticator. The supported formats for the image are PNG, JPG, JPEG, BMP, and GIF. Please ensure the dimensions of the logo does not exceed 45x45 pixels and the size is less than 2MB.
- Click Save.
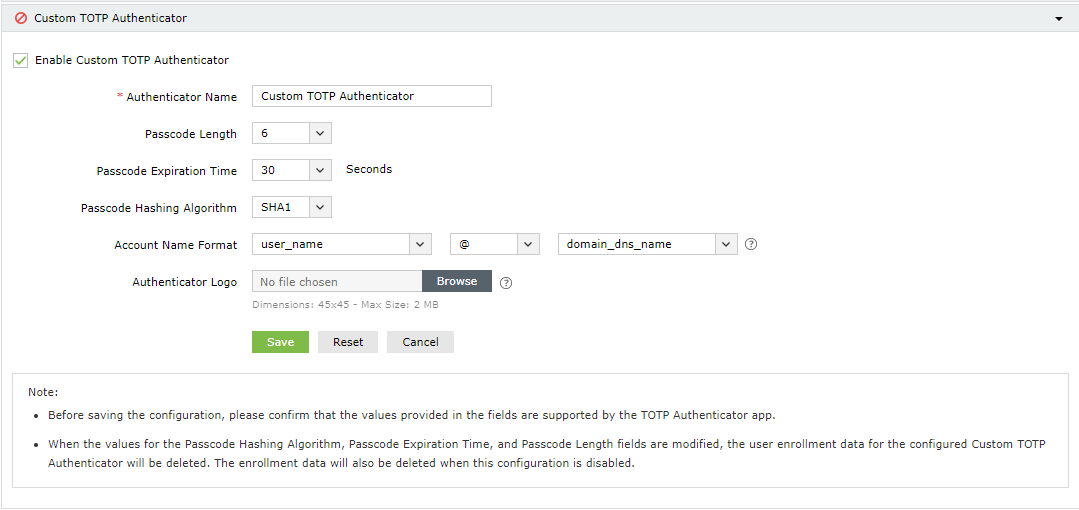
Note: If the values for the passcode hashing algorithm, passcode expiration time, or the passcode length fields are modified, the user enrollment data for the configured Custom TOTP Authenticator will be deleted. The enrollment data will also be deleted when this configuration is disabled.
Once enabled, users can enroll themselves for two-factor authentication using the Custom TOTP Authenticator when they next log in to AD360.
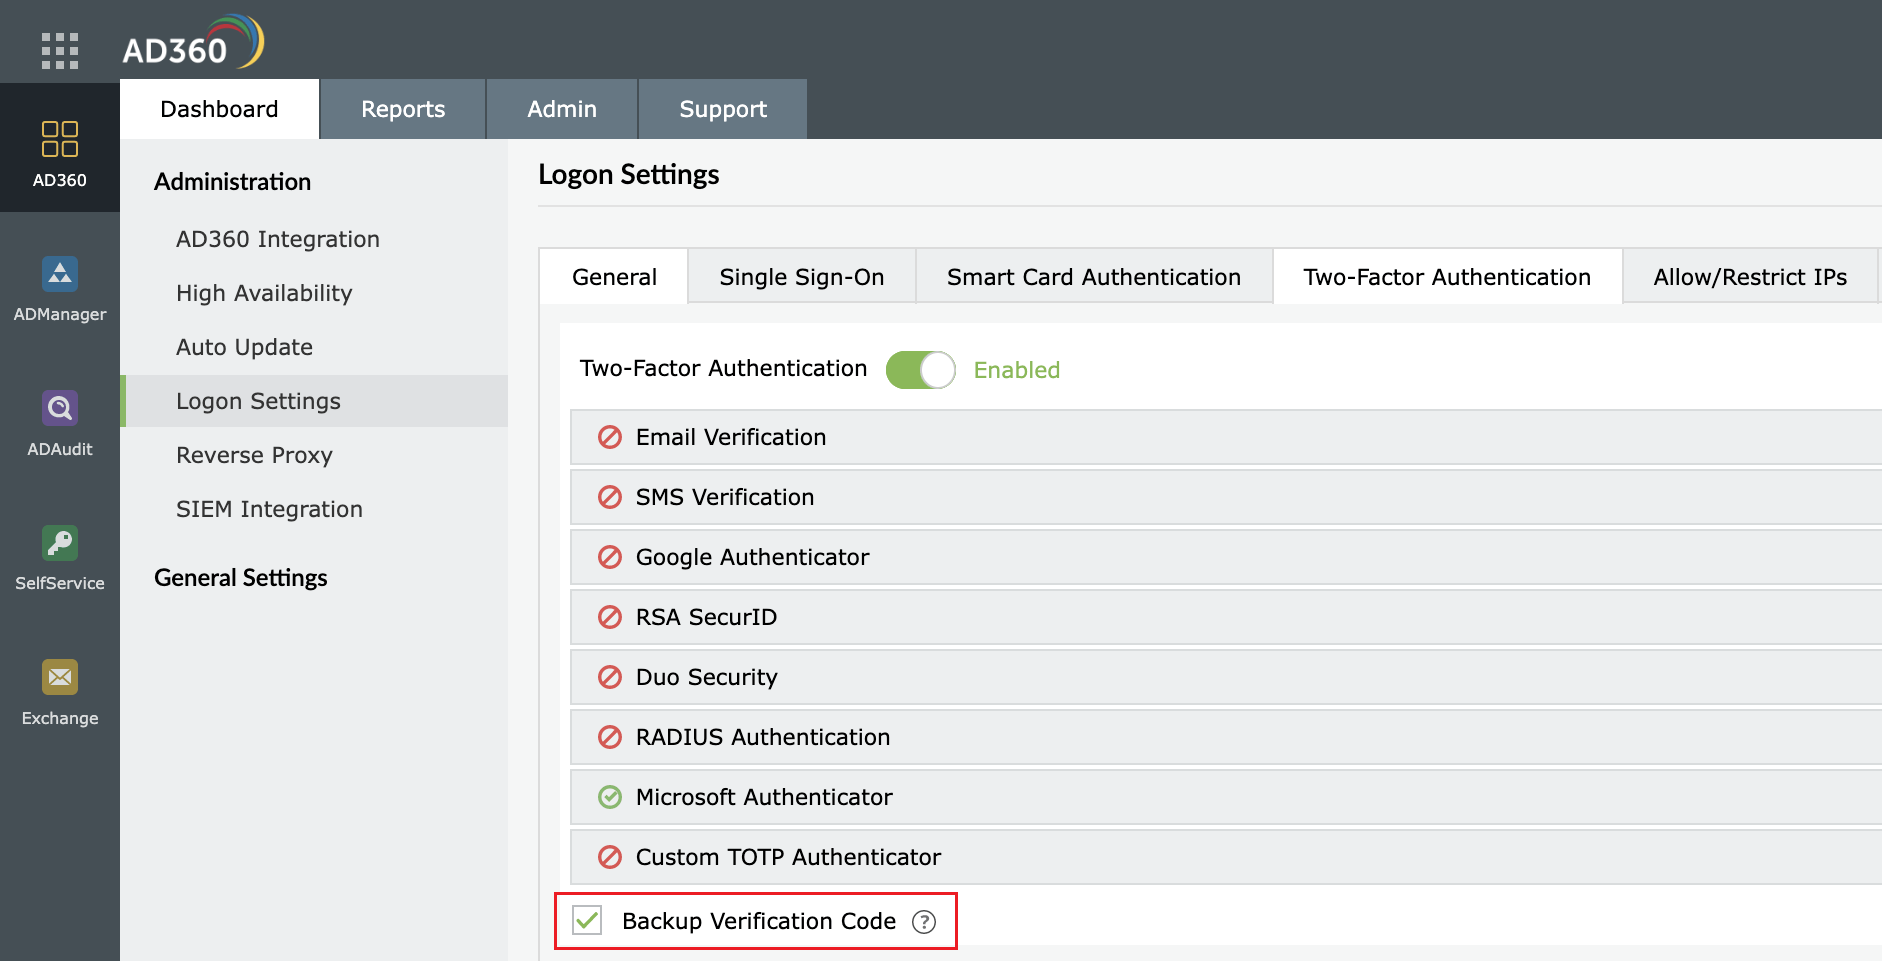
Backup Verification Codes
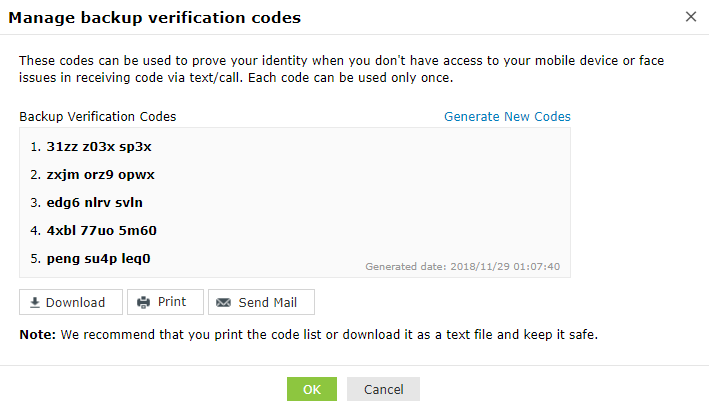
Backup verification codes allow users to log in when they don’t have access to their phone or face issues with one of the second-factor authentication method. When enabled, a total of five codes will be generated. A code once used will become obsolete and cannot be used again. Users also have the option to generate new codes.
Enabling backup verification code
- To enable backup verification code, put a check against the Backup Verification Code box.
Registering for backup verification code
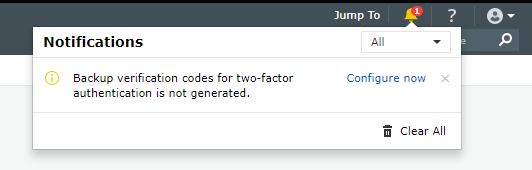
- Once enabled, users will be notified to configure their codes when they log in to AD360. On clicking Configure Now, they will be taken to the two-factor authentication settings page.
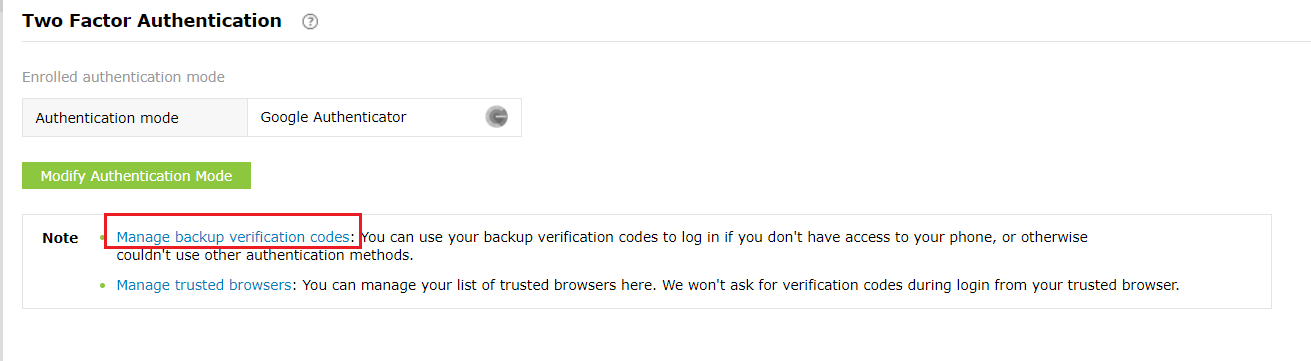
- Users need to click the Manage Backup Verification Codes link to view the codes.
- Users can also download the codes as a text file, print them, get it delivered to their personal email address, or generate new codes.
Using the backup verification code to login
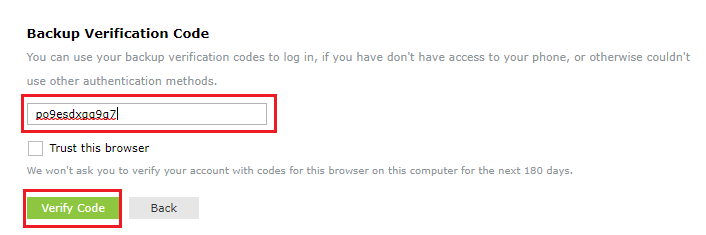
- To use backup verification codes during login, users need to click the Use backup verification codes link in the second-factor authentication page.
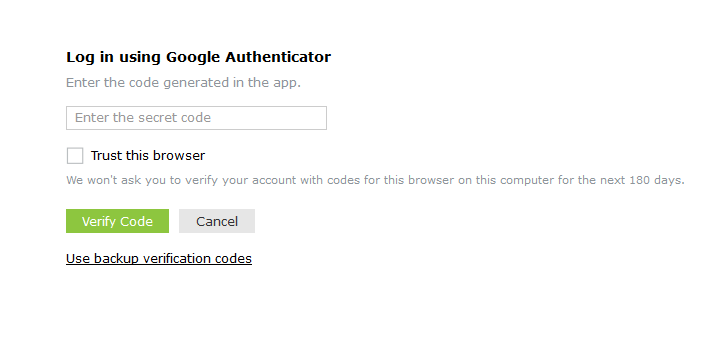
- In the backup verification code page, they need to enter one of their backup verification codes and click Verify Code to login.
Managing users for two-factor authentication
As an admin, you can view which authentication method users have enrolled for and remove users’ enrollment for two-factor authentication using the Manage Users option.
To do so, follow the steps below:
- Under the Two-factor Authentication tab, click Enrolled Users.
- In the TFA Enrolled Users pop up, you can view the list of users enrolled for two-factor authentication and the authentication method they have chosen.
- To remove a user, select the user and click the Delete icon.
To personalize two-factor authentication method for users
The users enrolled for two-factor authentication can modify their preferred authentication method and manage trusted browsers by following the steps below:
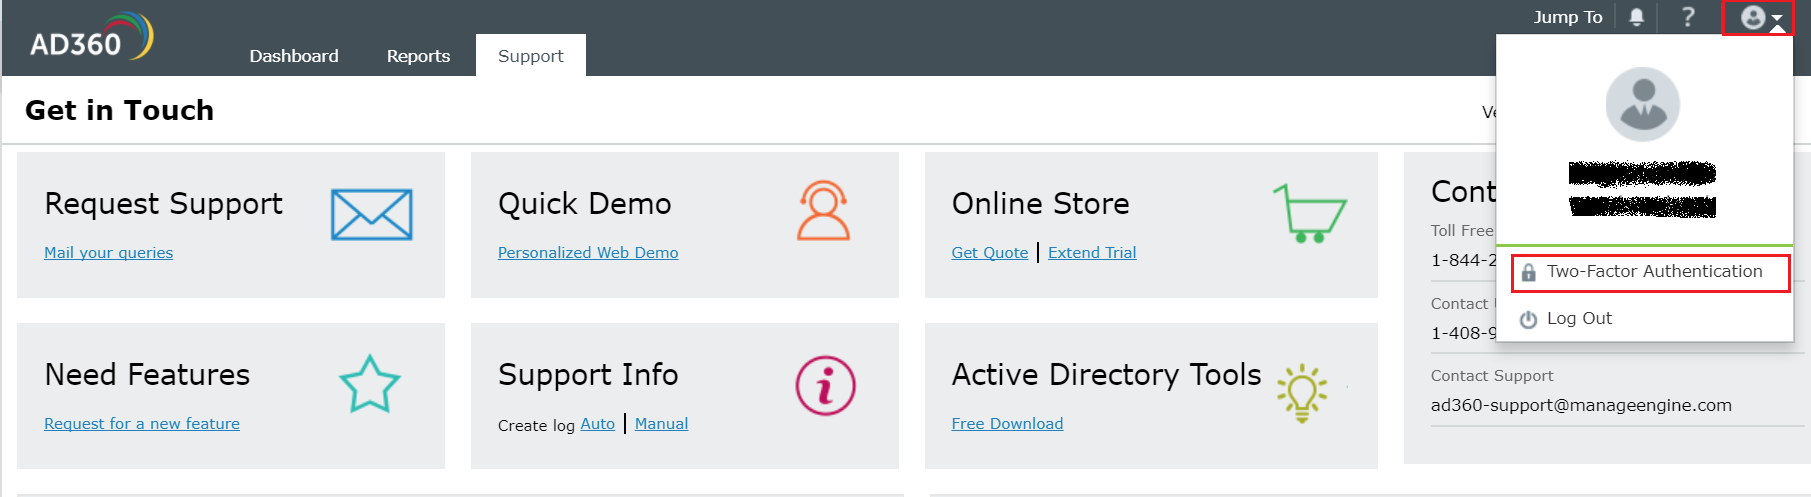
- Go to the My Account profile icon in the top left corner.
- Select the Two Factor Authentication option.
- To modify authentication mode, click Modify Authentication mode.
- To manage trusted browser, click Manage Trusted Browsers.
Don't see what you're looking for?
-
Visit our community
Post your questions in the forum.
-
Request additional resources
Send us your requirements.
-
Need implementation assistance?
Try onboarding
 ADManager Plus
 ADAudit Plus
 ADSelfService Plus
 AD360
AD360