Understand image field
- When accessed via your iOS devices' browsers, you can upload images and attach image URLs but you cannot capture them via the image field. This is because media objects are not supported by iOS.
- When accessed via Safari browser, you can upload images and attach image URLs but you cannot capture them via the image field. This is because media objects are not completely supported in Safari.
The image field enables your users to submit an image through your form. They can either take a photo or upload one. The following is how an image field looks on a form:
When a user accesses from a web browser:

When a user accesses from a phone or tablet:

Size limits
- When a user accesses from a web browser and uploads an image from the device's local storage, the image field can accept an image up to 10 MB
- When a user accesses from an iPhone or iPad device and uploads an image from the device's local storage, the image field can accept an image up to 5 MB
- When a user accesses from an Android device and uploads an image from the device's local storage, the image field can accept an image up to 5 MB
The images that your users submit through your form are stored in your account and are counted towards your account’s total storage limit. Visit your account's usage details page to view its current storage details.
Uploaded image's name
When your users upload an image to this field, the image's name is set in the following format:
- The image's name is prepended by an underscore (_) and a system-generated number that uniquely identifies that image in your account
- The image's name will automatically be trimmed when it exceeds 150 characters
- Whitespaces and other special characters, excepting hyphens (-), will be replaced by an underscore (_).
On accessing from a web browser
The following is an example of how an image field looks when a user accesses from a web browser.
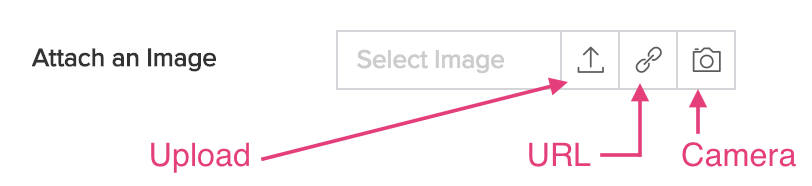
Subject to the browse options you enable for your field, your users can upload an image:
To upload an image from local storage
- Click the Upload icon in the image field. This will launch the device's file explorer.
- Select the required image.
- Alternatively, you can drag and drop the required image onto the field.
To upload an image in cloud storage, by entering its link
- Click the URL icon in the image field.
- Enter the required image's URL.
- If the image options have been enabled for the image field, enter a Link Name and Title for the image URL you entered.
Take a photo using the device's camera
- Click the Camera icon in the image field.
- If it is the first time your user is accessing the image or video field, they will be prompted to grant permission to use the device's camera:
- They can either Allow or Block
- If they select Block, they will be prompted with the message Allow access to media. They won't be able to take a photo till they Allow access to the camera.
- Click Allow. This will launch the image recorder in a pop-up window.
- Click the Camera icon at the bottom of the pop-up, to take a photo.
- Click Done to use the photo, or click Retake to retake the photo and then click Done.
- The photo you took will appear in the image field.
On accessing from a phone or tablet
When your users access your form from a phone or tablet and tap on the image field, they can add an image in two ways:
- Take a photo
- Choose a photo from their device's photo gallery. This option becomes available when you Enable photo gallery field property.
Additionally, users of iOS13 and later can scan multiple images and upload them as a PDF to the file upload field.
Take a photo
- Tap on the image field. This will launch the device's primary or secondary camera, depending on what value the Default Camera field property is set with.
- If the Enable photo gallery field property is enabled, tap Take Photo. This will launch the device's camera.
- If the Allow to Switch Camera field property is enabled, you will be able to switch between the device's cameras.
- Take a photo by tapping the Shutter button. You will get to preview the image you took.
- Tap Use Photo at the bottom-right corner of the screen, or tap Retake at the bottom-left corner to retake the image.
- If the Annotation (for mobile) field property is enabled, you will get to add annotations to the image.
- Click Done at the top-right corner of the screen. The photo you took will appear in the image field.
Choose a photo from device's photo gallery
- Tap on the image field, then tap Choose Photo. This will launch the device's photo gallery.
- Select the required image.
- If the Annotation (for mobile) field property is enabled, you will get to add annotations to the image.
- Tap Done at the top-right corner of the screen. The photo you selected will appear in the image field.
Field properties
You can also perform the following customizations for the user experience of the image field on your form:
- Define the mobile properties using which you can customize your end user's mobile experience.
- Set the aspect ratio that will resize the photo your user takes or selects, as per the value set for this field property.
- Define the browse options — the sources from where your users will be able to select the image.
- Select the required image options that lets you specify a title and link name for the image added in the image field in your form.
- Customize the field name and field link name of this field
- Make it mandatory for your users to add an image in this field
- Show this field only to the app’s admin (and hide it from other users)
- Set field size
- Enable displaying a tooltip message when your users hover their mouse over this field
Downloading images
- URL format to download an image — one at a time
URL to download an image
An image stored in the image field can be downloaded using the following URL:
where,
- domain will be DC specific—for example, you'll need to use appcreatorexport.manageengine.com if your account is in ManageEngine's US data center, and appcreatorexport.manageengine.eu if in the EU data center.
- account_owner_name contains the user name of the AppCreator application's account owner and the link name of the application.
- reportLinkName is the link name of the report where the corresponding image field is displayed. (To know the report link name, click on Report Settings ->Summary from the edit mode of the report to get the reportLinkName).
- fieldLinkName is the link name of the corresponding image field.
- imageName is the corresponding image's name. Learn more
For example, imagine that you've built an application named Zylker Automobile Service. In this application, you have created a form named Emergency service request, where users can capture the picture of their damaged vehicle, add a description for the image and submit the form. When you access the Emergency service request report, you may want to download the images. To do this, you can configure a custom action in your report, such that when you click the button Download image, the image gets downloaded. This custom action has the above URL format constructed as follows:
where,
- tempFileName is a variable that stores the filename of each image stored in the image field
- getsuffix() returns all the characters which follow the first occurrence of searchString in the string. Learn more
- getprefix() returns all the characters which precede the first occurrence of searchString in the string. Learn more
- zoho.appuri returns the application details in the format:
/<account_user_name>/<application_link_name> - The openUrl Deluge task is used to redirect the user to the specified URL. This URL can be opened in the same window, new window, parent window, popup window, or iframe
Now, when you access the Emergency service request report, you can see the View image button:
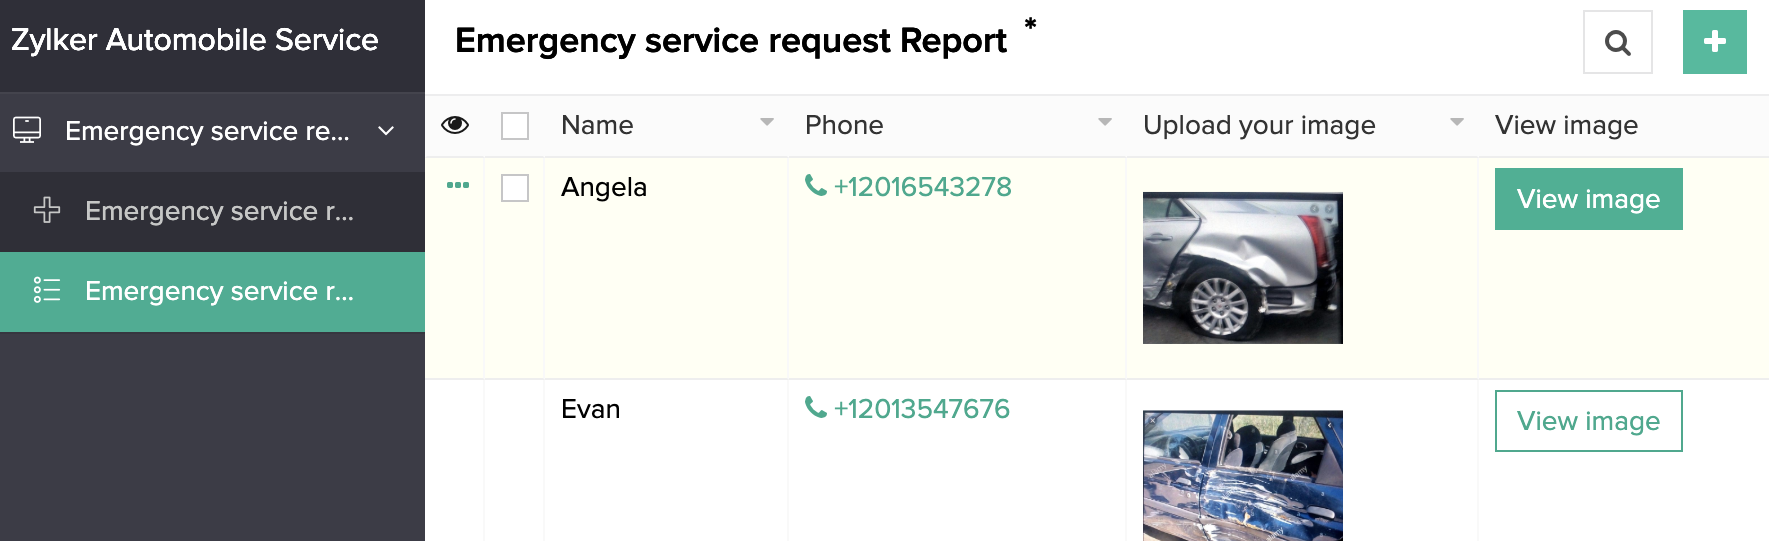
In the above image, Megan is the <account_user_name> and zylker-automobile-service is the <application_link_name>