- What is chrome kiosk mode?
- Best use cases for chrome kiosk mode
- Kiosk mode vs. Fullscreen mode: Key differences
- Before you setup chrome kiosk mode: Preflight checklist
- How to set up chrome kiosk mode
- How to set up chrome kiosk mode with ManageEngine MDM Plus
- How to exit Chrome kiosk mode
- Security hardening checklist for Chrome kiosk devices
- Manual setup vs. ManageEngine MDM Plus: Which should you use?
Share this article




Summary
Chrome kiosk mode lets you run Google Chrome in a full-screen, single-purpose browsing experience. End users see nothing except the page you want them to see. There is no way to open the address bar, tabs, navigation buttons, and settings or reach the underlying operating system through the browser itself. It can be launched with the --kiosk command-line flag or deployed centrally via Group Policy, Google Admin Console, or an MDM solution.
What is chrome kiosk mode?
Chrome kiosk mode is a Google Chrome feature that locks the browser into a single, full-screen view. It hides all browser elements like the address bar, tabs, navigation buttons, settings and prevents users from navigating away from the intended screen. Unlike pressing F11, kiosk mode changes how Chrome talks to the operating system, which makes it much harder to escape without admin credentials.
It's the right tool for self-service kiosks, digital signage, check-in screens, POS terminals, exam devices, and anything else where users should stay on one an approved webpage/web app and nothing else.
The best way to setup Chrome kiosk mode depends on your situation:
- For one Windows, macOS, or Linux device: Launch Chrome with --kiosk in the command line.
- For managed Chromebooks and Chromeboxes: Use the Google Admin console
- Android tablets or shared mobile devices: Use a mobile device management solution to create a kiosk profile
- Enterprise fleets: Use a mobile device management solution to enforce policies, monitor health, and recover devices remotely.
Best use cases for chrome kiosk mode
| Use case | Recommended setup |
|---|---|
| Digital signage | ChromeOS kiosk mode or Windows/Linux Chrome --kiosk with auto-restart |
| Visitor check-in | Android or ChromeOS kiosk with camera, form, and session reset |
| Retail product lookup | Android tablet kiosk or ChromeOS web app kiosk |
| POS terminal | Managed Android or Windows kiosk with strong OS restrictions |
| Decide how admins will exit kiosk mode | Public users shouldn't be able to get out, but IT needs a tested way out. |
| Configure power, sleep, and network behavior | A kiosk that goes to sleep or drops Wi-Fi becomes a support burden. |
| Plan app and OS updates | Kiosk devices should stay patched without interrupting business hours. |
| Prefer PWAs or web apps for new ChromeOS kiosk deployment | Chrome Apps are being phased out, so new deployments should avoid relying on legacy Chrome Apps. |
Kiosk mode vs. Fullscreen mode: Key differences
A common misconception is that pressing F11 (fullscreen) is the same as enabling kiosk mode. They are fundamentally different, treating them as equivalent creates real security gaps.
| Feature | Fullscreen | Kiosk mode |
|---|---|---|
| Hides browser UI | Partially | Yes. Everything |
| User can exit | Yes, press F11/Esc | No. Restricted |
| Disables tab shortcuts | No | Yes |
| Prevents new URLs | No | Yes |
| OS still accessible | Yes | No. Restricted |
| Suitable for public devices | No | Yes |
Before you setup chrome kiosk mode: Preflight checklist
Use this checklist before deploying a Chrome kiosk in production:
| Check | Why it matters |
|---|---|
| Pick the kiosk URL or web app | The kiosk should open directly to the task users need to complete. |
| Avoid URL redirects | Permission handling works best when the kiosk URL doesn't redirect to a different origin. |
| Decide whether users need sign-in | Signed-in sessions usually need idle reset, cookie clearing, or scheduled logout. |
| Test your hardware | Cameras, printers, scanners, and payment terminals tend to surface setup problems after deployment, not before. |
| Warehouse scanner | Android kiosk with allowed work apps and Chrome web portal |
| Exam or assessment device | ChromeOS kiosk mode with managed policies |
| Patient intake | MDM kiosk with privacy controls, cookie clearing, and idle reset |
| Employee self-service portal | Multi-app kiosk or managed guest session depending on access needs |
How to set up chrome kiosk mode
1. Setup Chrome kiosk mode on Windows
The fastest way to enable kiosk mode on a single Windows machine. No software installation required, you create a modified Chrome shortcut.
1. Create a desktop shortcut
Right-click the desktop → New → Shortcut. Browse to Chrome's executable, typically at:
Important: The flag must be placed outside the closing quote mark, not inside it.
2. Append the kiosk flag
Right-click the new shortcut → Properties. In the Target field, add the --kiosk flag and your URL after the closing quote:
3. Close all chrome windows first
Close all Chrome windows first. If Chrome is already running in the background, kiosk mode won't launch. For best results, check that no chrome.exe processes are running before testing the kiosk shortcut.
4. Launch and verify
Double-click the shortcut. Chrome should open in full-screen with no address bar, tabs, or navigation controls visible. The URL bar and all toolbars will be hidden.
5: Auto-launch chrome kiosk mode on login.
To start Chrome kiosk mode whenever the Windows kiosk account signs in:
- Press Windows + R.
- Enter shell:startup.
- Move the Chrome kiosk shortcut into the Startup folder.
- Restart and sign in with the kiosk account to test auto-launch behavior.
2: Setup Chrome kiosk mode on macOS
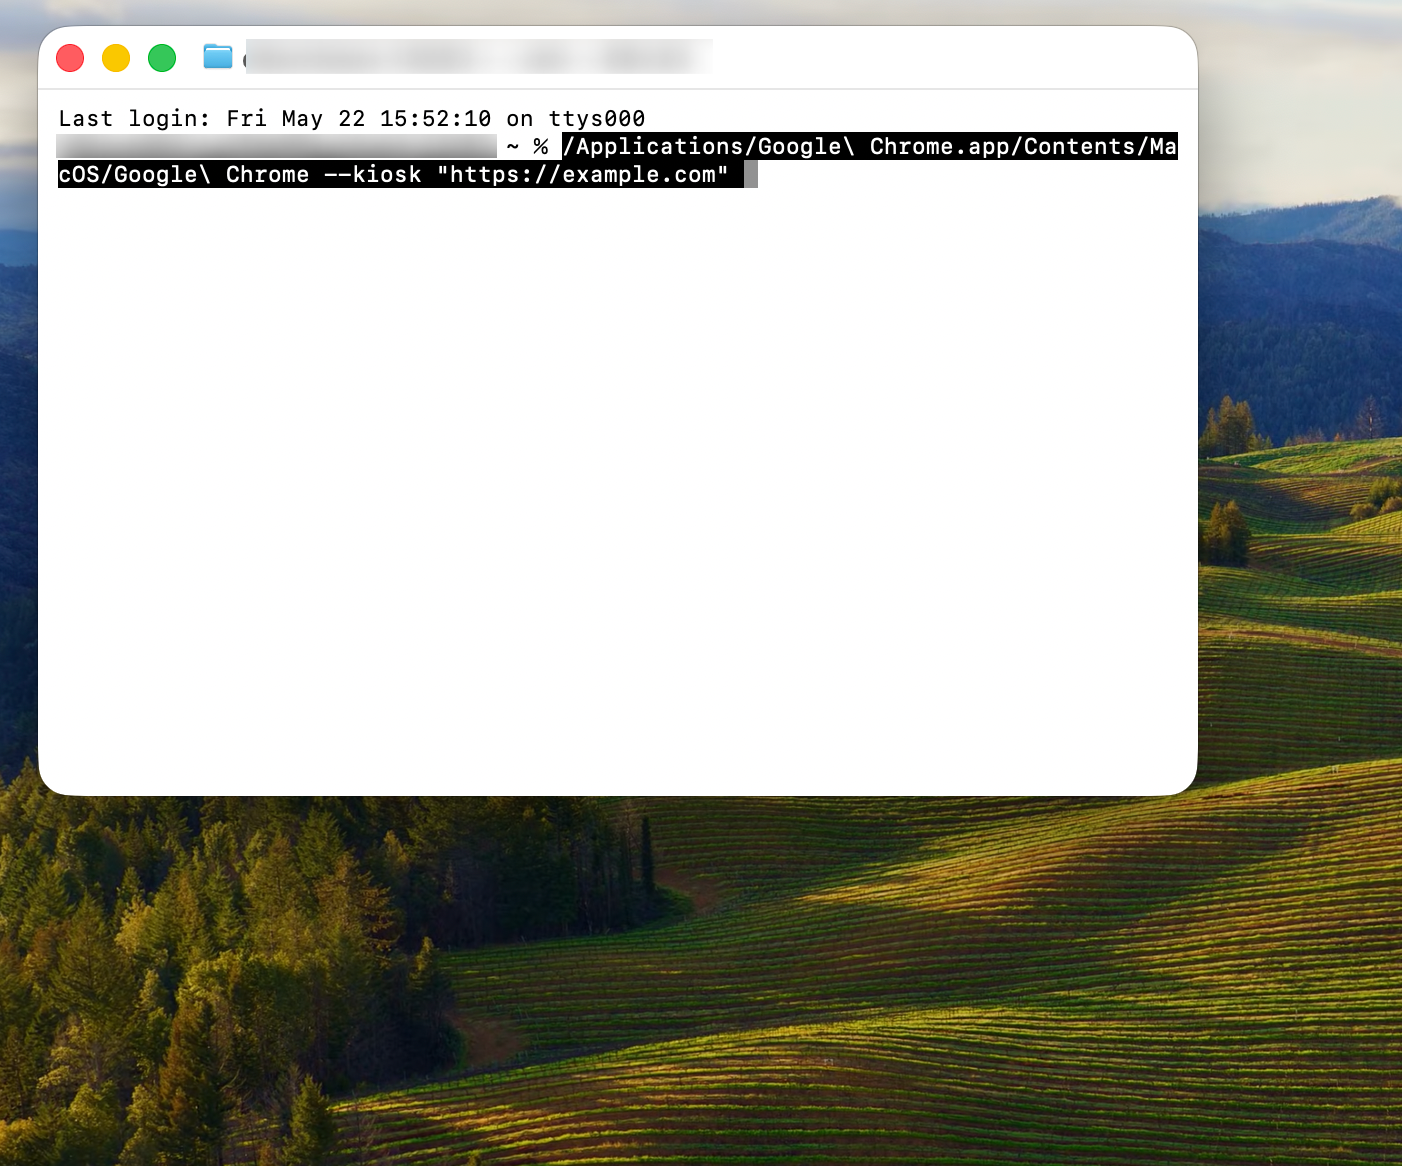
On macOS, open Terminal and run:
To exit during testing, press:
As with Windows, this launches Chrome in kiosk mode but does not fully lock down macOS. For public deployments, combine Chrome kiosk mode with device restrictions, a managed account, login items, and MDM policies.
3: Setup Chrome Kiosk Mode on Linux
On Linux, use:
For Chromium-based installations:
Linux kiosks should also be configured with automatic login, session startup rules, power management settings, update controls, and a restricted user account.
4. Setup Chrome kiosk mode on Android
Android doesn't provide a built-in Chrome kiosk flag equivalent. The reliable path is an MDM tool, specifically an Android Enterprise partner.
1. Enroll device as Android work device
Enroll the Android device in your MDM platform using QR code, zero-touch enrollment, or Android Enterprise enrollment token.
2. Create a Kiosk Profile
In the MDM dashboard, create an Android device profile with Kiosk mode enabled. Set Chrome as the kiosk app and configure the URL to lock to.
3. Deploy Chrome with managed configurations
Push Chrome as a managed app with URL allowlist/blocklist configurations. Set the homepage URL, disable omnibox editing and restrict downloads.
5. Setup Chrome kiosk mode on ChromeOS
- Sign in to the Google Admin console.
- Go to Devices > Chrome > Apps & extensions > Kiosks.
- Select the organizational unit containing your kiosk devices.
- Add the kiosk app, website, or PWA. For a website or PWA, paste the URL directly. Make sure it doesn't redirect to a different origin.
- Set the app to auto-launch if the kiosk should start immediately after boot.
- Configure device settings: network prompt, screen rotation, health monitoring, log upload.
- Save and assign to the correct organizational unit.
6: Use Group Policy for multiple devices
For Windows environments where Chrome is managed across multiple machines, you can enforce kiosk-like behavior using Chrome Browser Cloud Management (CBCM) or Group Policy Objects (GPO).
1. Download Chrome ADMX templates
Download the Chrome policy templates from Google's Enterprise download page. Copy the ADMX/ADML files to your Group Policy Central Store.
2. Configure startup URL and URLBlocklist
In the Group Policy Editor (gpedit.msc), navigate to Computer Configuration → Administrative Templates → Google → Google Chrome.
Set:
- HomepageURL - your kiosk URL
- URLBlocklist - set to * to block all URLs
- URLAllowlist - whitelist only your kiosk URL
- StartupPages - your kiosk URL
3. Disable extensions and dev tools
Set ExtensionInstallBlocklist = * and DeveloperToolsDisabled = true to prevent users from circumventing restrictions via extensions or the DevTools console.
4. Deploy and verify
Run gpupdate /force on target machines. Browse to chrome://policy on any managed machine to verify all policies are active.
How to set up chrome kiosk mode with ManageEngine MDM Plus
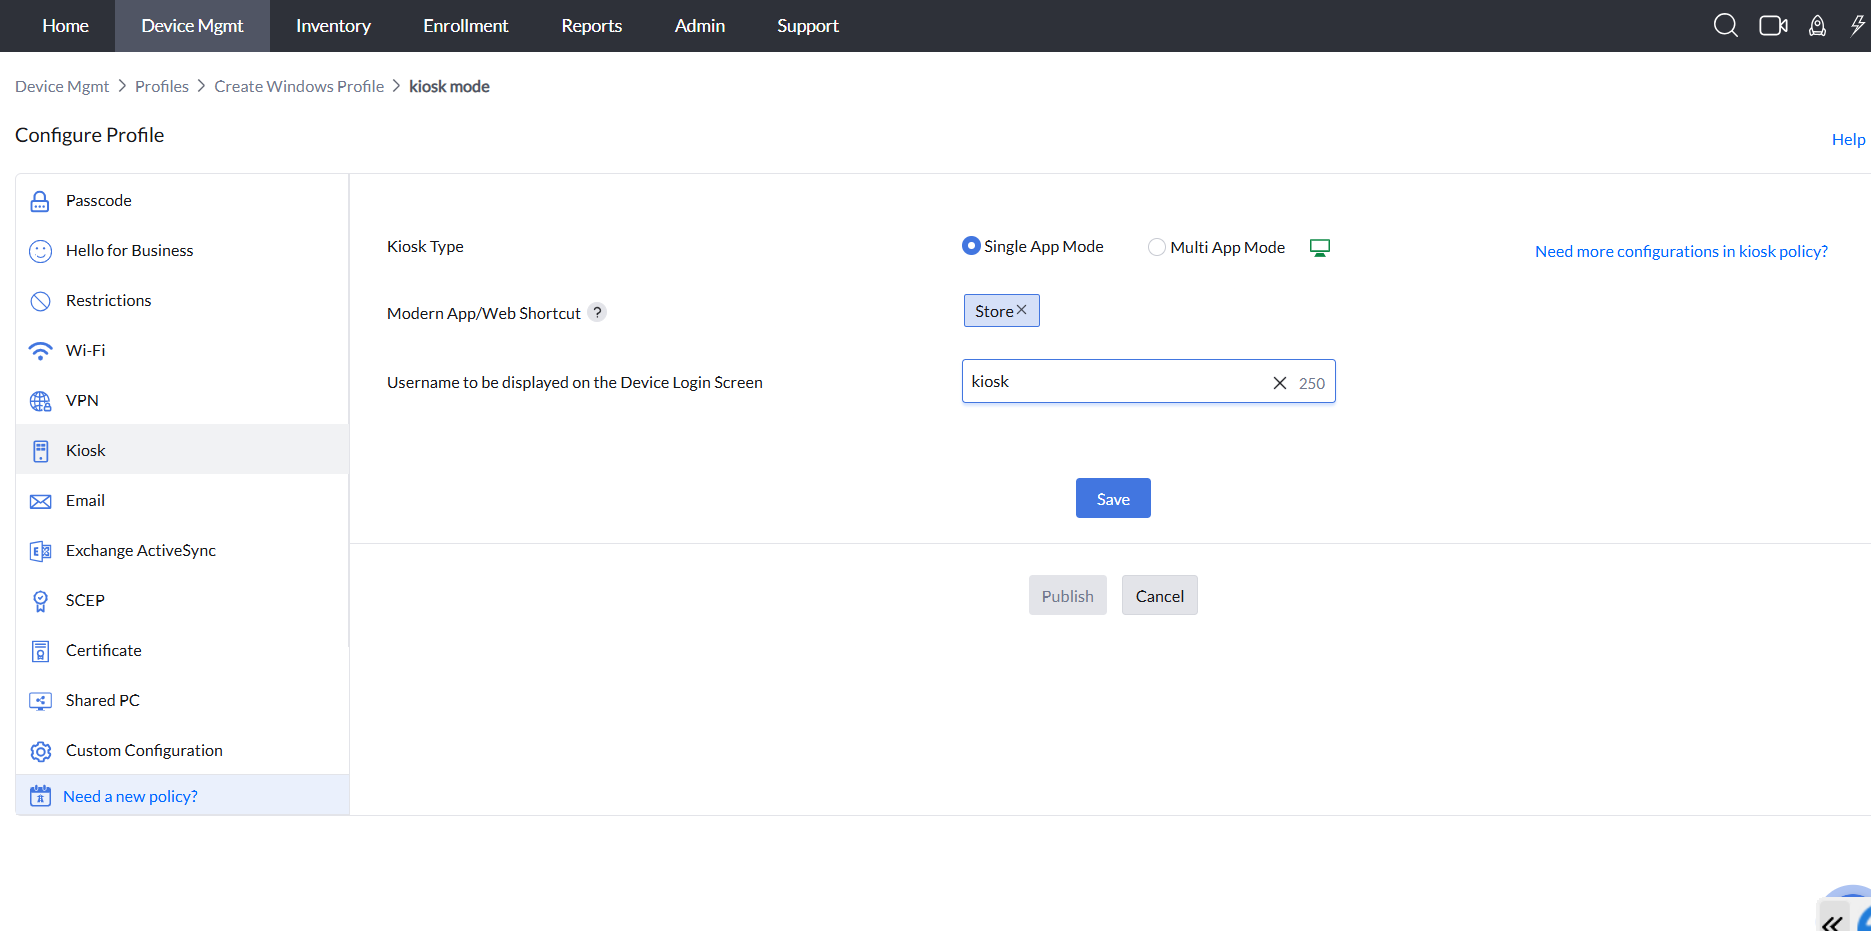
If you are configuring one device for a temporary display, the Chrome --kiosk command may be enough. But if you're managing 50, 500, or 5,000 kiosks across Windows, Android, macOS, and ChromeOS, you'll need a better approach.
ManageEngine Mobile Device Manager Plus lets you configure, deploy, monitor, and remotely update kiosk settings from a single console, without physically touching devices. It is also an official Android Enterprise Recommended - Gold partner.
You can:
- Configure single-app and multi-app kiosk modes across supported platforms.
- Lock Android devices to Chrome, web apps, approved apps, or web shortcuts.
- Configure Chromebook kiosk profiles with single-app or multi-app access.
- Push required apps and web shortcuts to managed devices.
- Restrict access to device settings, status bar, task manager, notifications, and non-business apps.
- Set web kiosk behavior such as idle refresh, clearing cookies, and clearing cache where supported.
- Configure pause or exit kiosk passwords for IT recovery.
- Resume kiosk mode after maintenance or troubleshooting.
- Apply Wi-Fi, VPN, passcode, certificate, app, and OS policies alongside kiosk settings.
- Monitor kiosk availability, device health, and offline status for managed deployments.
Try the MDM lock feature for free.

A note on audit evidence: Having MDM lock in place is half the answer. The other half is the audit trail. Regulators particularly under GDPR and HIPAA want to see when a wipe was triggered, who authorized it, and whether the command was confirmed as executed. ManageEngine MDM Plus generates tamper-proof audit logs for every remote action taken on every device. In the middle of a regulatory inquiry, that log is often the difference between demonstrating due diligence and trying to reconstruct events from email threads.
How to exit Chrome kiosk mode
Exiting kiosk mode varies by platform and how strictly the kiosk was configured. Here's a comprehensive reference:
| Platform | Primary exit method | Fallback |
|---|---|---|
| Windows | Alt+F4 or Ctrl+Alt+Del | Restart → log in as admin → remove shortcut from Startup folder |
| macOS | Command+Q | Restart → hold Shift during boot to skip Login Items |
| Android | Release kiosk lock from MDM console remotely | Factory reset or remote wipe and re-enroll |
| ChromeOS | Reboot + Ctrl+Alt+S during kiosk load | Hard reset (Esc+Refresh+Power) → re-enroll; or remove kiosk app from Admin console |
Security hardening checklist for Chrome kiosk devices
| Control | Recommended setting |
|---|---|
| Browser UI | Hide address bar, tabs, bookmarks, and menus with kiosk mode |
| User account | Use a dedicated standard kiosk account |
| Website scope | Signed-in sessions usually need idle reset, cookie clearing, or scheduled logout. |
| Exit path | Keep admin-only exit, pause, or recovery credentials |
| Keyboard access | Block or physically restrict public keyboard shortcuts where needed |
| OS access | Restrict Settings, File Explorer, Task Manager, app switching, and command tools |
| Session reset | Refresh the kiosk URL after idle time; clear cookies/cache for shared use |
| Network | Preconfigure Wi-Fi, proxy, VPN, and certificates |
| Updates | Schedule OS, browser, and app updates outside business-critical hours |
| Monitoring | Track online status, kiosk health, battery, storage, and app crashes |
| Recovery | Document reboot, exit, network repair, and remote support procedures |
Manual setup vs. ManageEngine MDM Plus: Which should you use?
The right approach depends on how many devices you're managing and how much ongoing control you need. Here's a direct comparison:
| Capability | Manual setup | ManageEngine MDM Plus |
|---|---|---|
| Single device setup | ✔ | ✔ |
| Multi-device deployment | ✘ Manual per device | ✔ Single-click bulk configuration |
| Multi-OS support | ✘ | ✔ Unified console |
| Remote URL updates | ✘ Physical access needed | ✔ Over-the-air |
| Real-time device health monitoring | ✘ | ✔ Dashboard alerts |
| OS-level lockdown (not just browser) | ✘ | ✔ Policy-enforced |
| Auto-recovery from crashes | ✘ | ✔ Auto-reboot policies |
| Compliance & audit reporting | ✘ | ✔ Built-in reports |
| Zero-touch device provisioning | ✘ | ✔ |
| Time & cost at scale (100+ devices) | High manual effort | Pre-configured |
Start a fully functional 30-day free trial. No commitment required.

 About the author
