Individual User Invite Enrollment
The Single User Invite Enrollment method is designed for admins to send enrollment invitations to individual users, particularly useful for contract employees, staff not in the directory service, or BYOD (Bring Your Own Device) scenarios.
Step-by-step guide to Single User Invite Enrollment
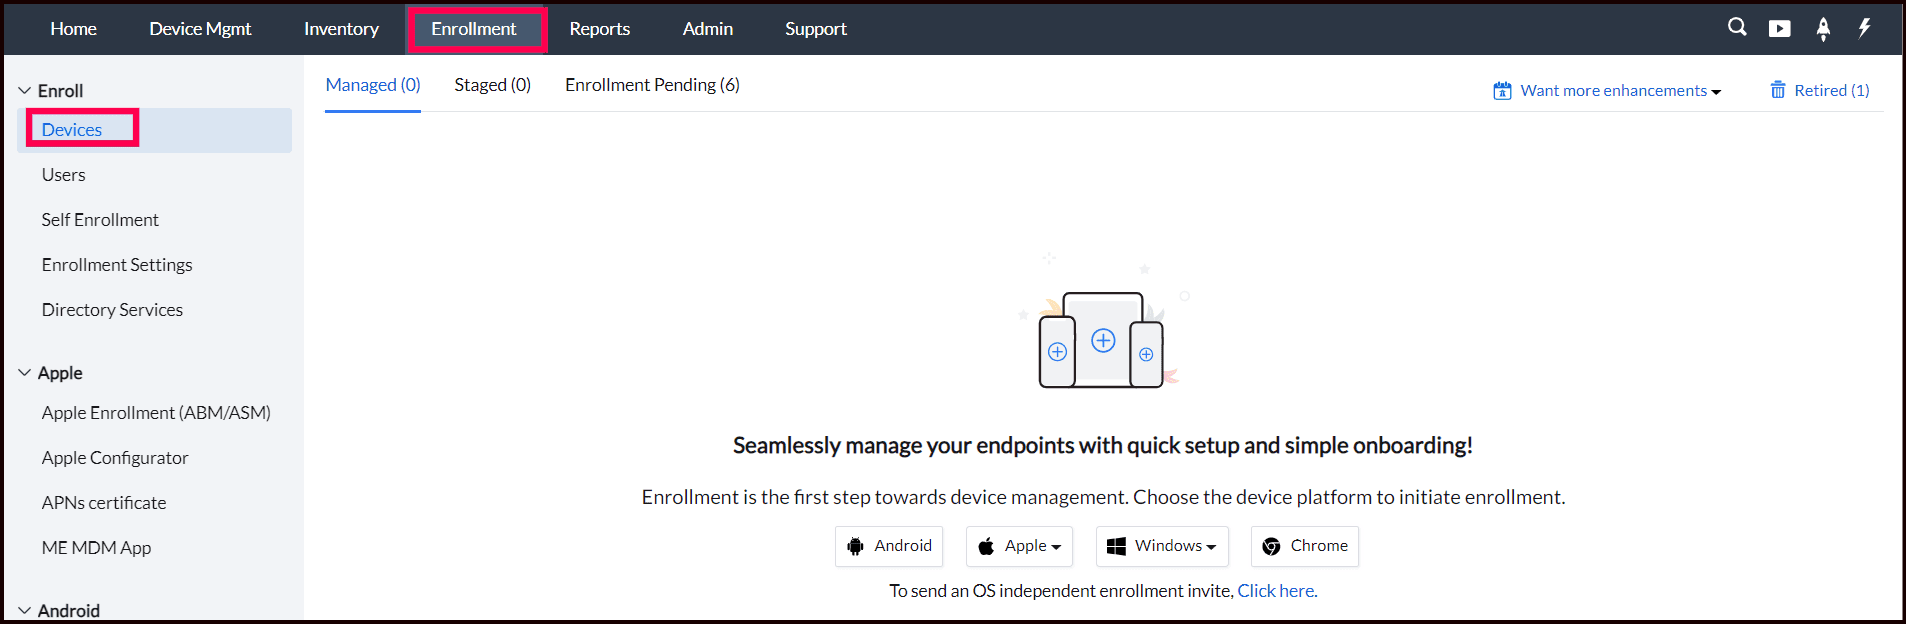
- Navigate to the Enrollment tab and select "Devices." Choose the appropriate OS platform (iOS, Android, macOS, or Windows) to proceed with the enrollment process. For additional information and detailed guidance, please refer to our First iOS Device Enrollment and First Android Device Enrollment Guide.
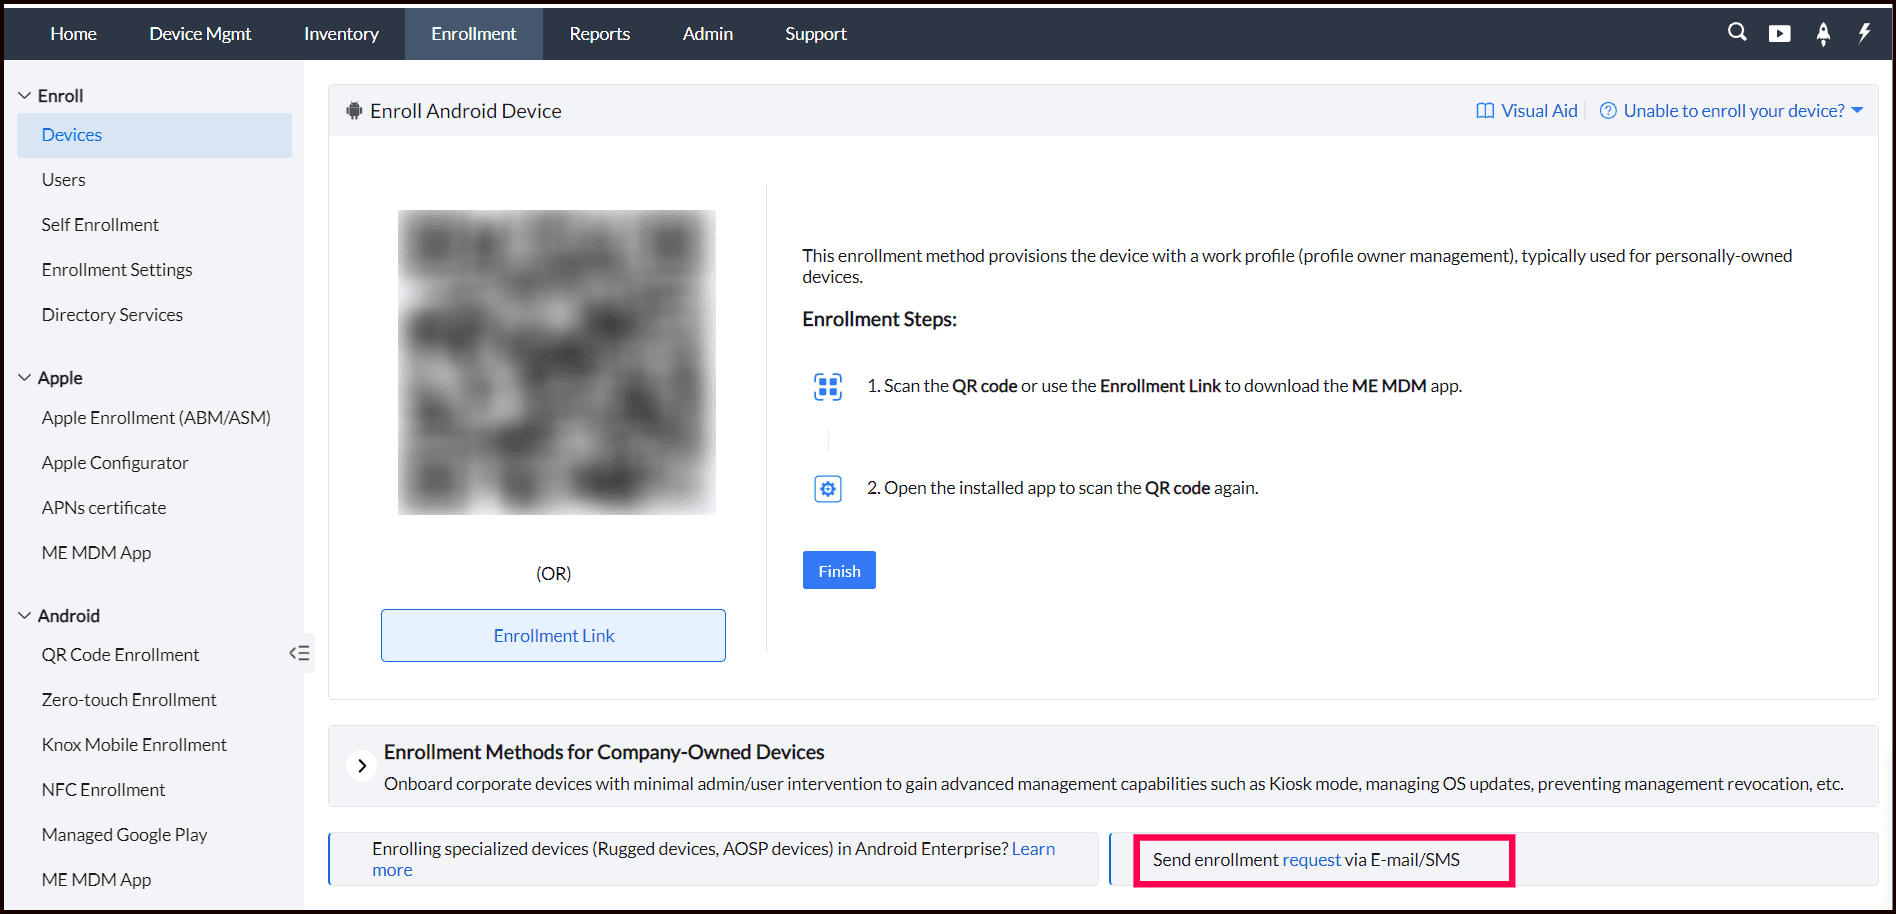
- If the first device was not enrolled, select the appropriate operating system platform for the device you wish to enroll (Android, iOS, iPadOS, macOS, or Windows). Click on the "Request" hyperlink available in the "Send enrollment request via E-mail/SMS" section to initiate the enrollment process.
- If the first device was enrolled, Click on "+Enroll Devices" in the Managed section and select the appropriate operating system platform for the device you want to enroll, and then proceed with the subsequent steps outlined for invite enrollment.

- For Creating Common Invite when not sure about the OS, Click on "+Enroll Devices" in the Managed section. Next, click on the "Create Common Invite" hyperlink located next to "Unsure about the OS?" The Create Common Invite feature allows you to enroll any device, regardless of its operating system—be it Android, iOS, iPadOS, macOS, or Windows.
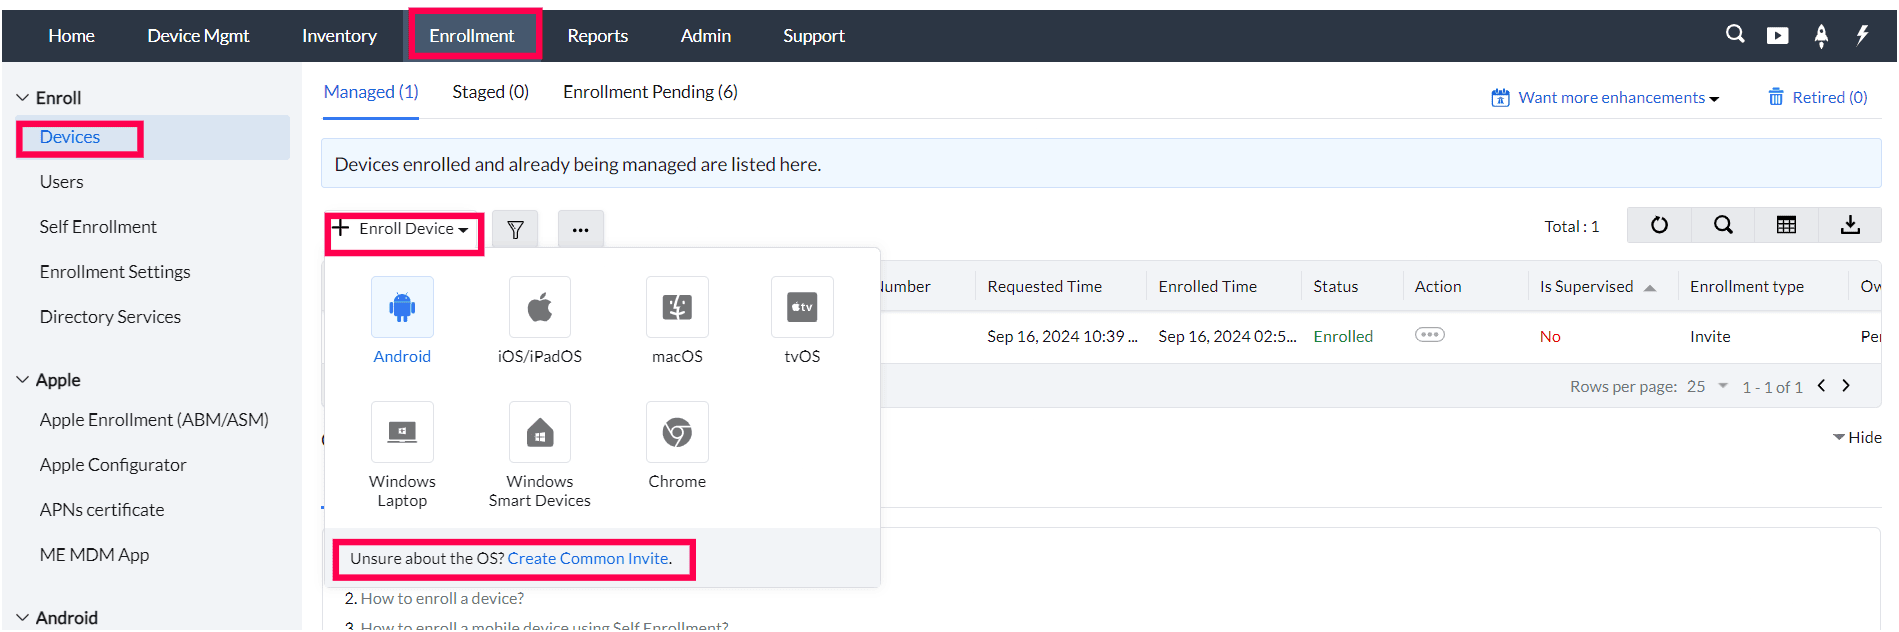
Note: Two factor authentication is supported by OS independent enrollment (Common Invite).
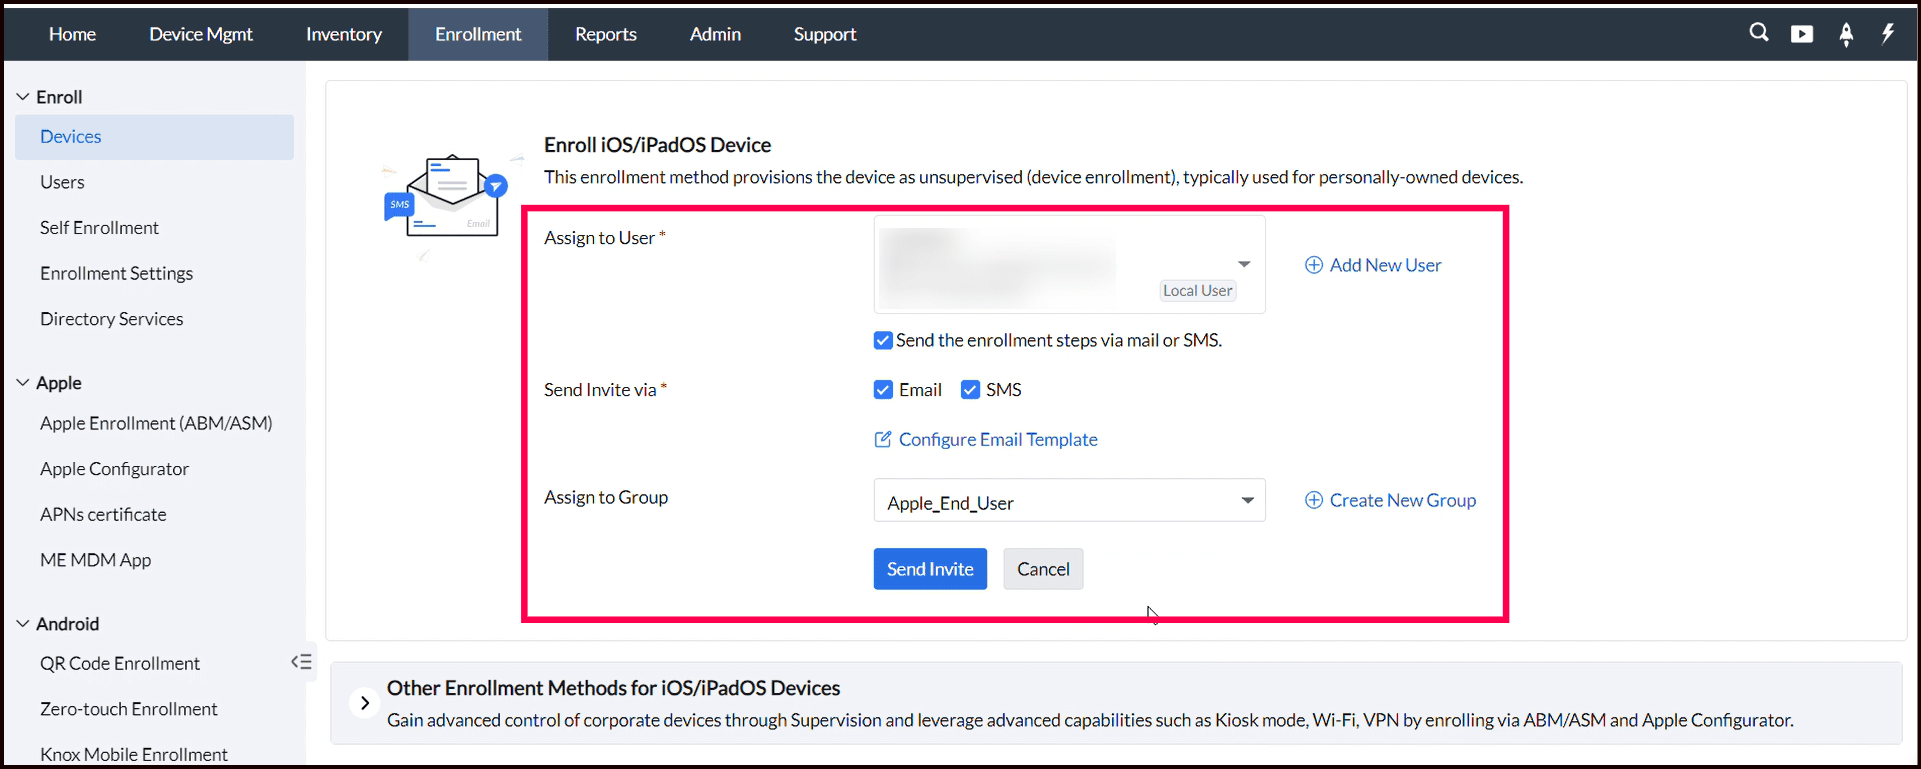
- To send an enrollment invite, provide the user details to whom the invitation will be sent. For an Email Invite, enter the user’s email address; for an SMS Invite, input the user’s phone number.
- If your organization utilizes directory services, the user information will sync automatically. Otherwise, you can manually add the user details in the Users section under Enrollment. After adding the details, select the user from the drop-down list and check the box for "Send the enrollment steps via mail or SMS" to ensure the user receives the necessary instructions to complete the enrollment process.
- Check the "Send the enrollment steps via mail or SMS" checkbox and choose the method for sending the enrollment invite with the necessary steps to complete their device enrollment.:
- Email Invite sends an email containing detailed enrollment instructions and a link.
- SMS Invite sends a text message with the same enrollment instructions and link.
- Click on "Configure Email Template" to customize the enrollment email template. Admins can personalize the enrollment email by modifying the Enrollment Mail Template in the MDM console. This feature enables you to tailor the message, include specific instructions, and add corporate branding as needed, ensuring that the communication aligns with your organization’s identity and provides clear guidance for users.
- Choose the Device group from the dropdown to assign the device to a specific device group, which helps organize it for easier management post-enrollment. You can select an existing group from the drop-down menu or create a new group by clicking the "+Create New Group" option.
- Click on Send Invite. The invitation will be sent to the user either as an email or SMS or both.
Bulk User Invite Enrollment
Step-by-step guide to Bulk User Invite Enrollment
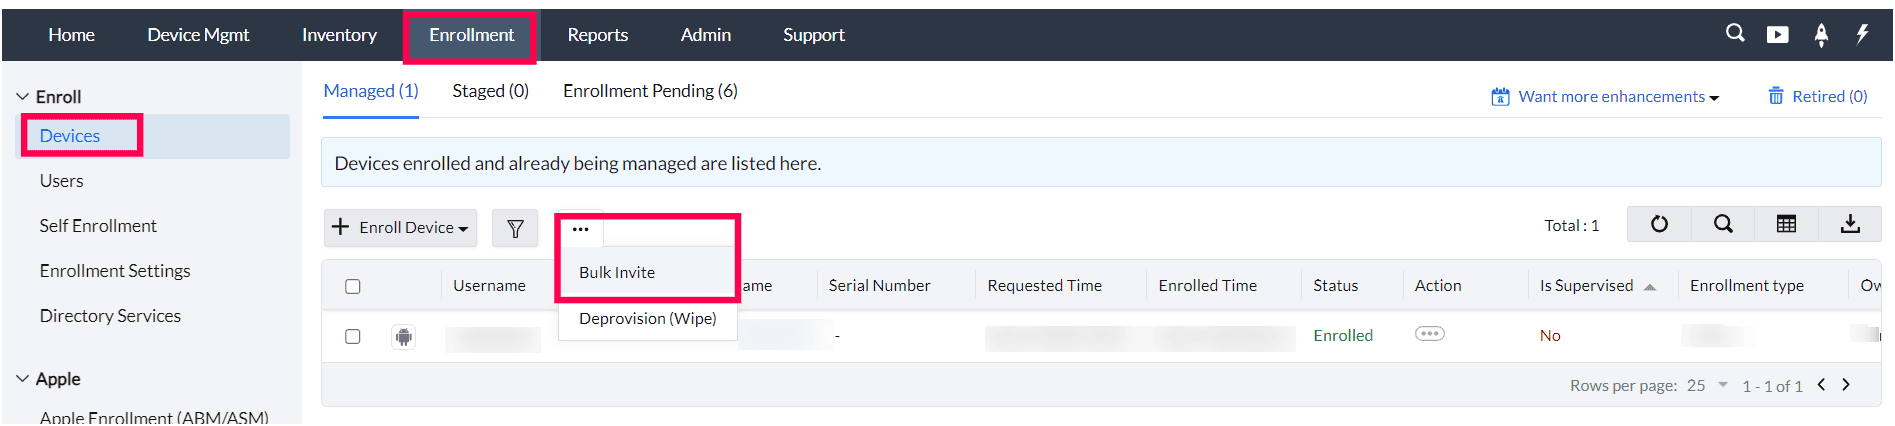
- Navigate to the Enrollment tab->Devices->Managed
- Click on the ellipse icon (more options) and choose "Bulk invite" from the drop-down menu.
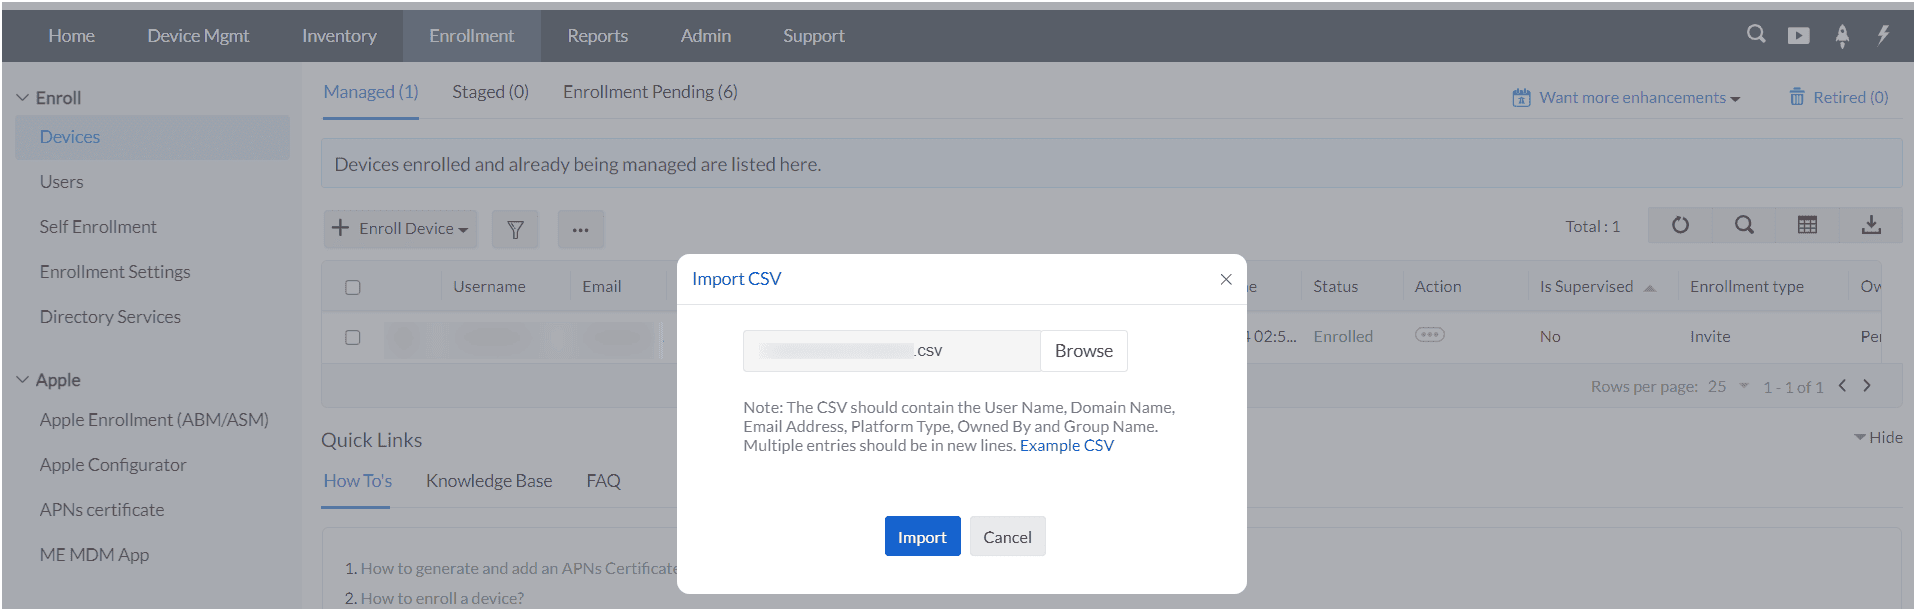
- Create a CSV file containing the details of the users to be enrolled. Ensure the file follows the correct format:
- USER_NAME: User's name
- DOMAIN_NAME: Domain name (if applicable)
- EMAIL_ADDRESS: User's email address
- OWNED_BY: Owner category (e.g., Corporate, Personal)
- GROUP_NAME: Device group name (if applicable)
- PLATFORM_TYPE: Platform type (e.g., iOS, Android, Windows, Neutral)
- PHONE_NUMBER: User's phone number (for SMS invite)
- Sample CSV Format:
USER_NAME,DOMAIN_NAME,EMAIL_ADDRESS,OWNED_BY,GROUP_NAME,PLATFORM_TYPE,PHONE_NUMBER
ANDREW, andrew@mobiledevicemanagerplus.com, Personal, iOS_Group, iOS, +1-111
- In the Bulk Enrollment section, click on "Browse". Select the prepared CSV file from your local system and click "Import".
This bulk enrollment method streamlines the process of enrolling multiple devices, making it easier to manage large-scale deployments efficiently.
Guidelines when creating the CSV file to avoid errors:
- Mandatory Fields: The fields User Name, Email Address, and Platform Type are required. Platform types include iOS, Android, Windows, and Neutral.
- Optional Fields: Additional fields like Owned By, Domain Name, and Group Name are optional. By default, the Owned By field will be set to "Corporate," while other optional fields will remain unassigned if not specified.
- Column Headers: Ensure all column headers are written in BLOCK LETTERS.
- First Row: The first row should contain the column headers, but the order of the columns is flexible.
- Blank Values: Separate the blank values with commas.
- Comma in Data: If any column value contains a comma, enclose the value in quotes.
Note:
- The Bulk Invite enrollment method using a CSV file allows the enrollment of multiple devices for multiple users simultaneously.
- If your organization utilizes a directory service like Zoho Directory, you can take advantage of Self Enrollment for seamless device integration. Self Enrollment allows devices to be enrolled automatically using directory service credentials, streamlining the process and ensuring that devices are promptly added to your management system. For more details on configuring Self Enrollment with directory services, please refer to our Self Enrollment Guide.
What's Next?
Enrolling Your Device:
For step-by-step instructions on enrolling your device using the email or SMS invite, check out our Invite Enrollment Process guide.
Manage Enrollment Invites:
To learn how to manage enrollment invites in the MDM console, including tracking status and resending invitations, visit our Manage Enrollment Invite guide.