Custom Integrations in OpManager
Apart from supported standalone integrations in OpManager, you can also use our custom integrations feature to integrate OpManager with your desired third party application, that supports incoming webhooks, and REST APIs. This helps you relay the alarms from OpManager to the relevant tool at the earliest, helping you troubleshoot and rectify issues at the earliest. This in turn ensures high uptime, and optimum performance.
To configure new custom integration, go to Settings -> Third party integrations page and click on the "New Custom Integration" button at the top right corner of the page.
NOTE: The custom integrations feature is available from OpManager versions 128100 and above.
- Configuring Custom Integrations in OpManager
- For Incident and Event Management
- For Chat
- Associating a notification profile
1. Configuring Custom Integrations in OpManager
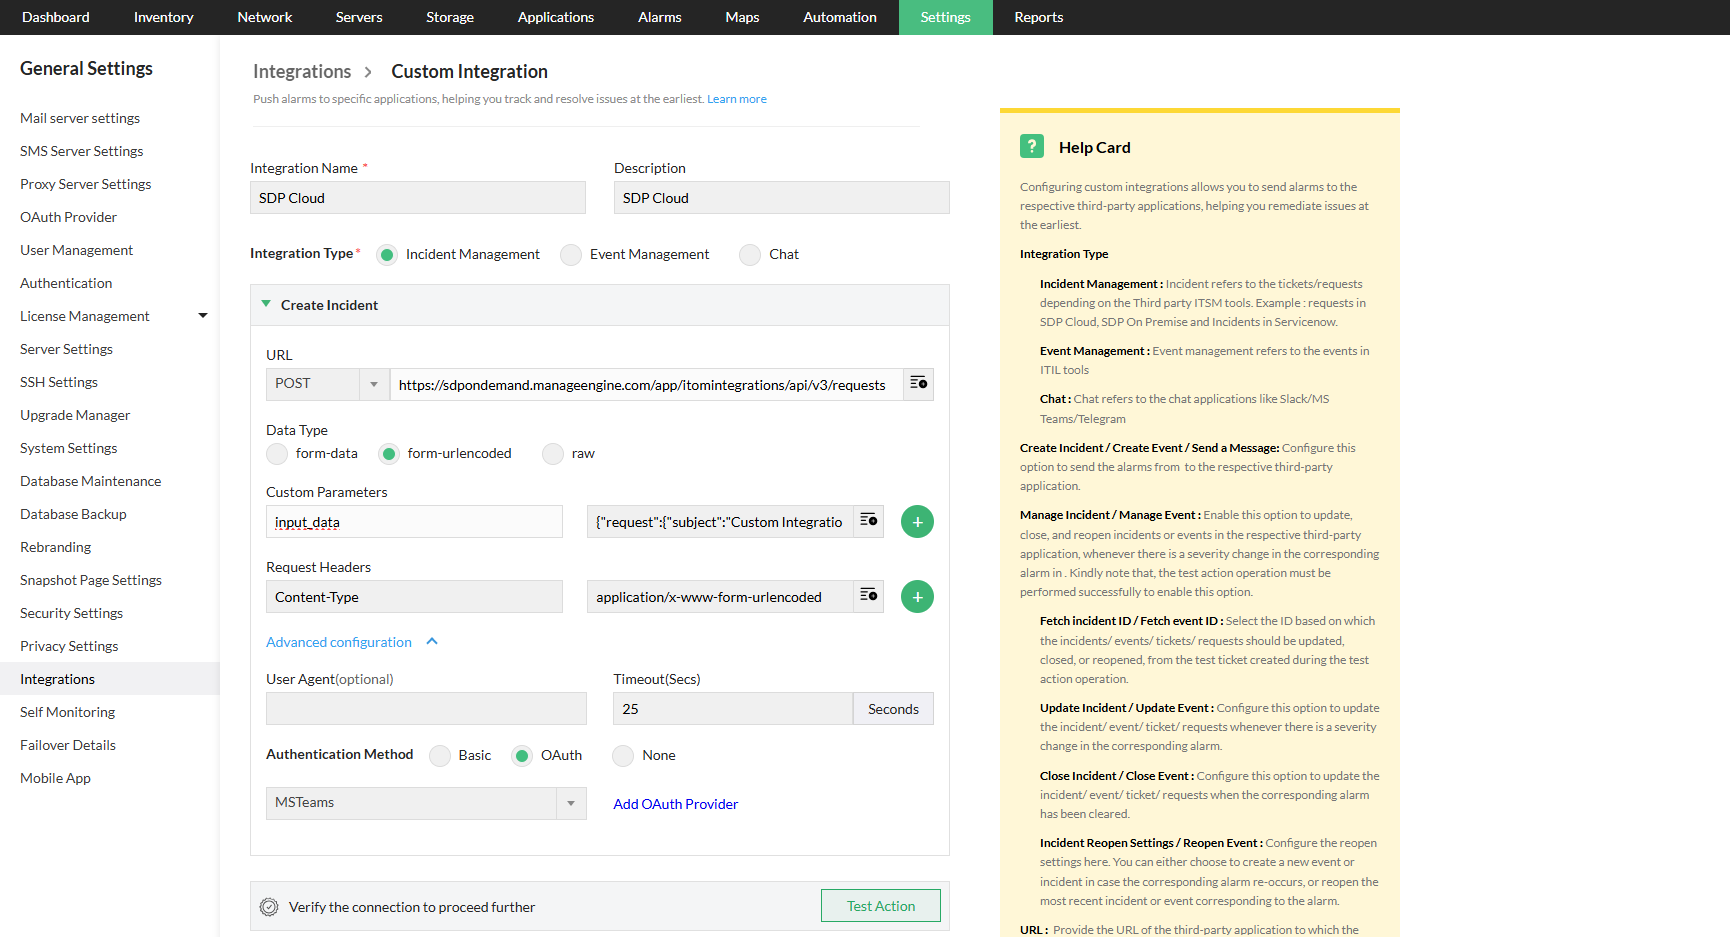
Once you have performed the above action, you will be directed to the custom integration configuration page. Here, mention the following details:
- Integration name & Description: Provide a name and description for the integration.
- Integration Type: Select the type of the integration, from the three options.
- Incident Management eg: Requests for ManageEngine ServiceDesk Plus On Premise/ ManageEngine ServiceDesk Plus Cloud, Incidents in ServiceNow
- Event Management eg: Events in ServiceNow, MoogSoft, BigPanda
- Chat eg: Slack, Telegram
a. For Incident and event management
Configure the following values.
- Create Incident/ Create Event:
- Click here to know about how to configure the HTTP request parameters.
- Advanced Configuration
- User Agent: Provide the details of the device or the agent, from which the request is originating from. KIndly note that configuring the user agent details is entirely optional, and not mandatory.
- Timeout: Mention the timeout in seconds for the request duration.
- Authentication Method: Choose the preferred mode of authentication.
- Basic: Choose this option if the URL of the third-party application is authenticated using the username and password.
- OAuth: Choose this option if the URL of the third-party application is authenticated using OAuth. Select the OAuth provider settings. Click on the "Add New OAuth" button, to configure OAuth provider settings.Learn More
- None: Select this option if the URL of the third-party application is not authenticated, or authenticated only with the Header/ URL Token/ Body content.
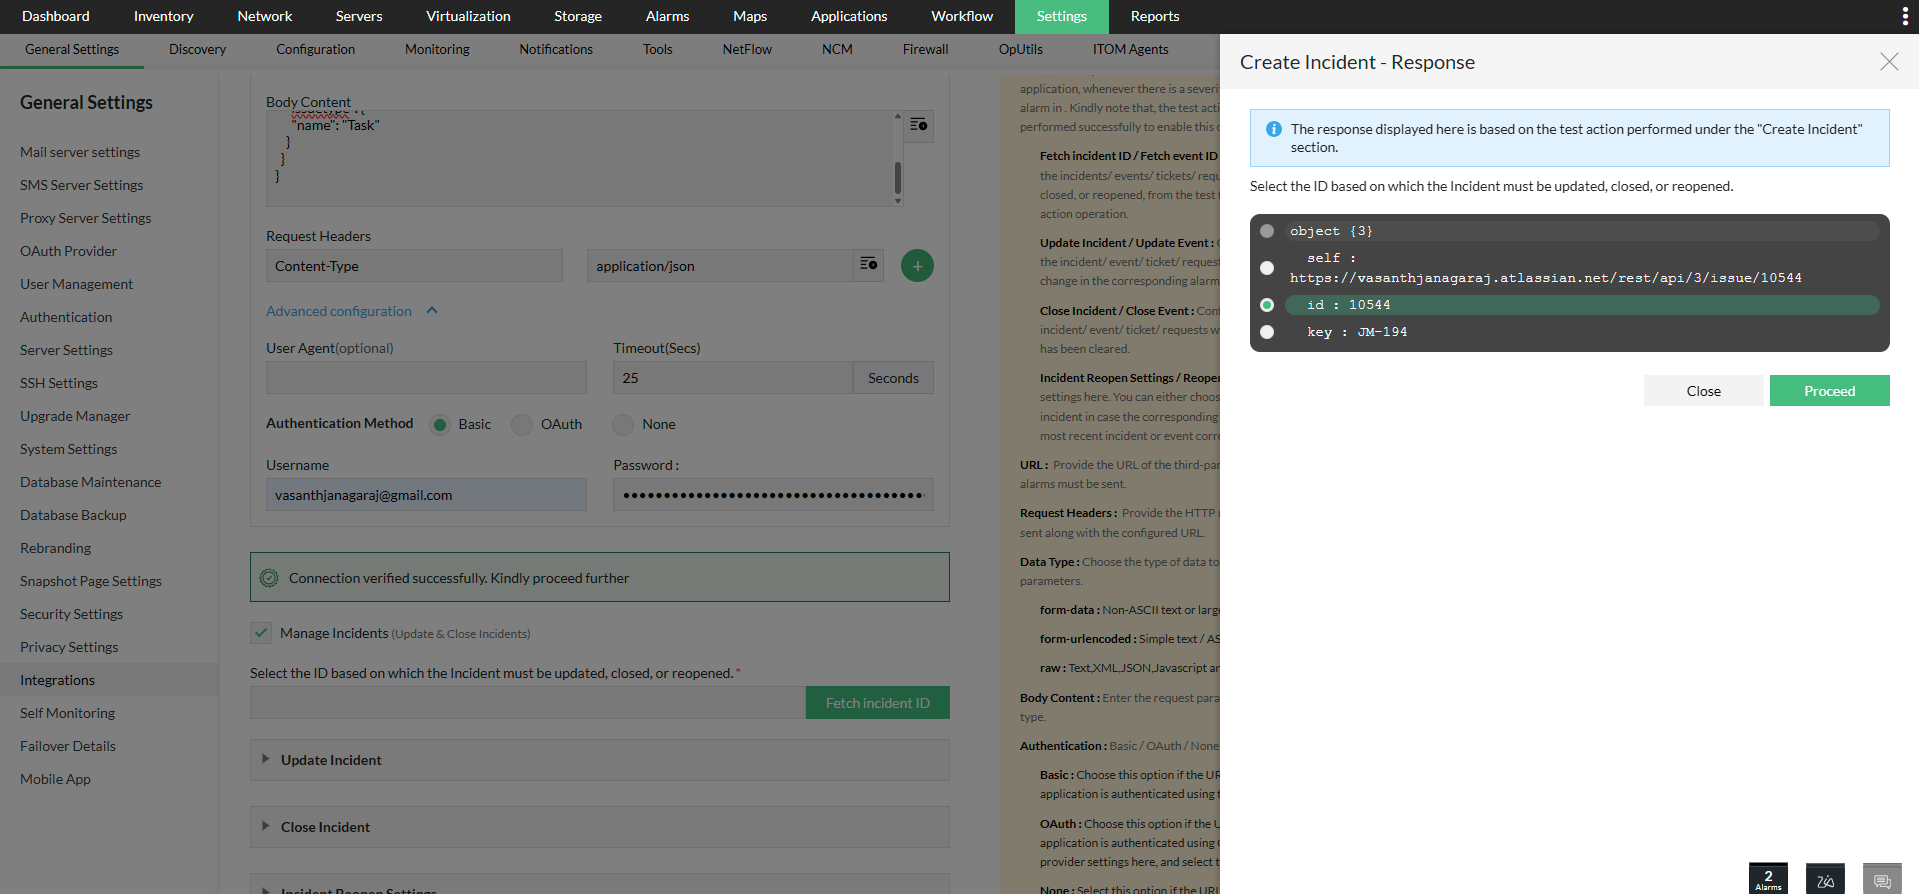
- Manage Incidents/ Manage Events: Select this option to update, close or reopen incidents/ events. The test action must be verified successfully to manage incidents.
- Fetch Incident ID/ Fetch Event ID: From the response of the test ticket or event created during the test action operation, select the ID based on which the incidents/ events must be managed i.e. updated, closed, or reopened. The test action operation can be carried out by using the "Test Action" button provided.
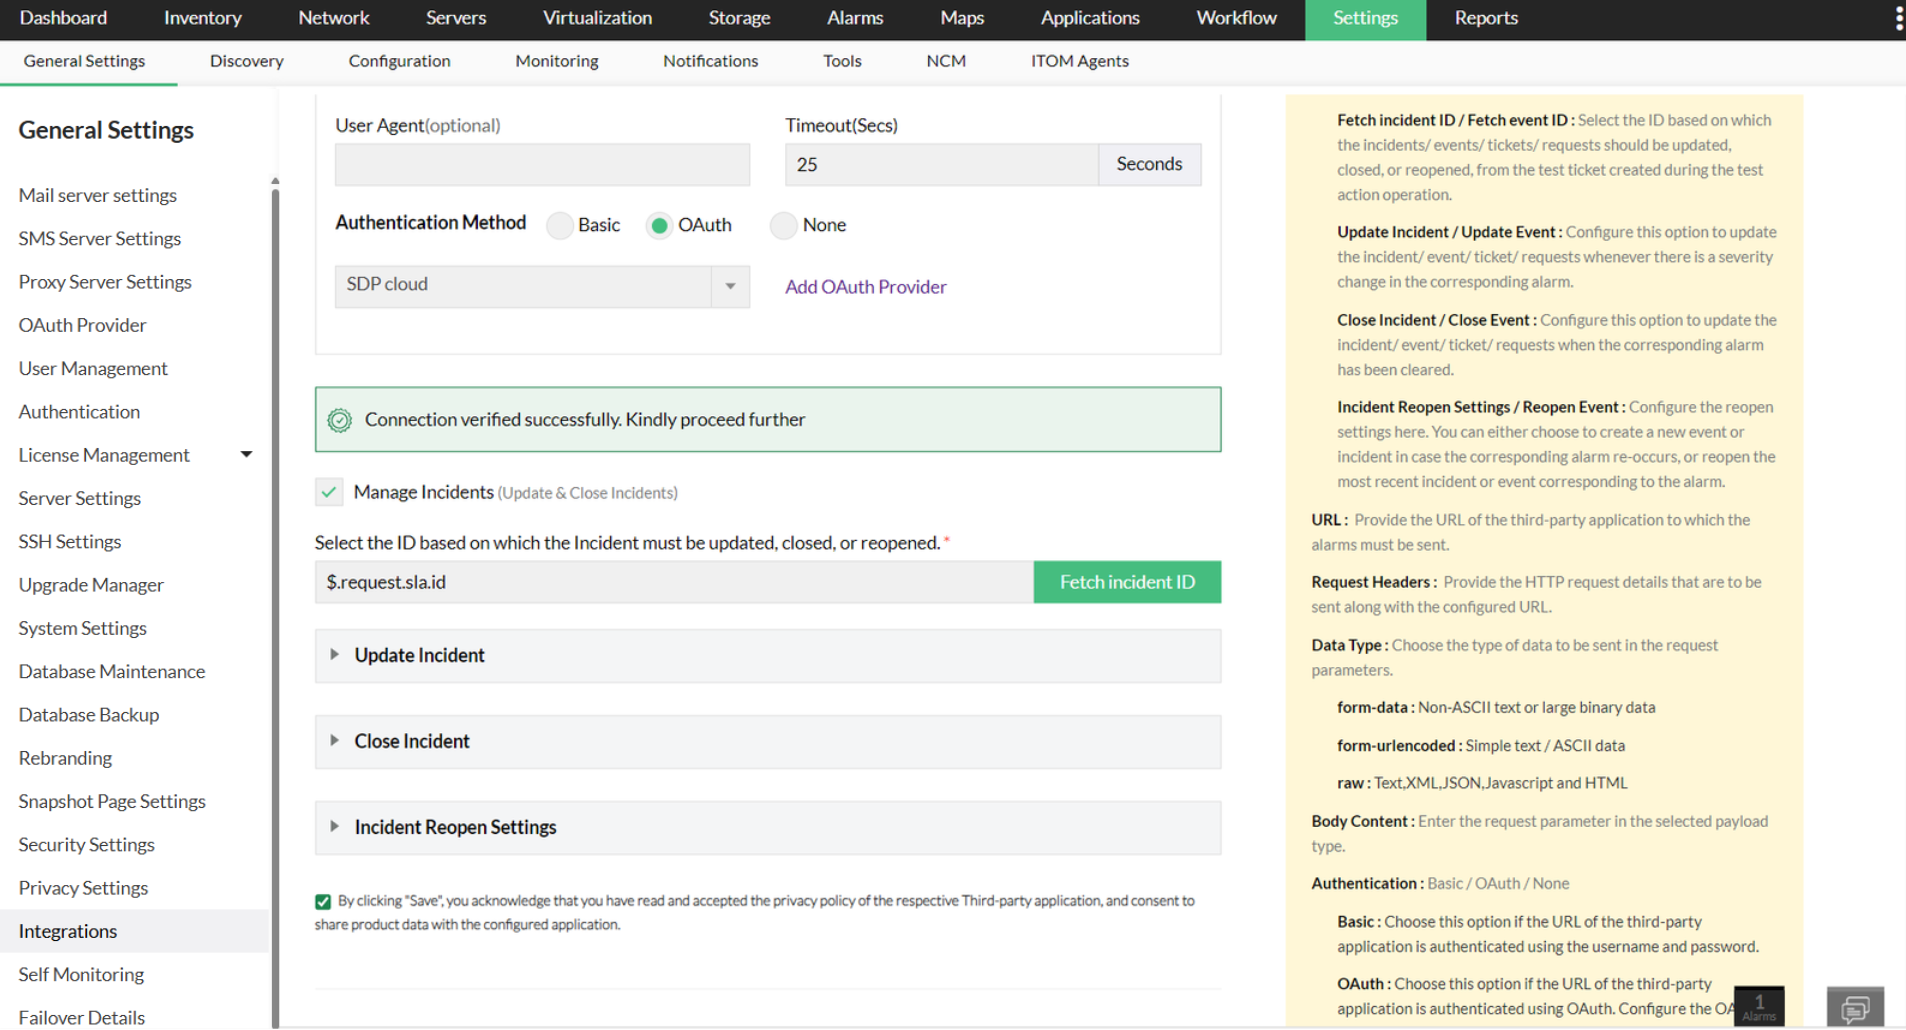
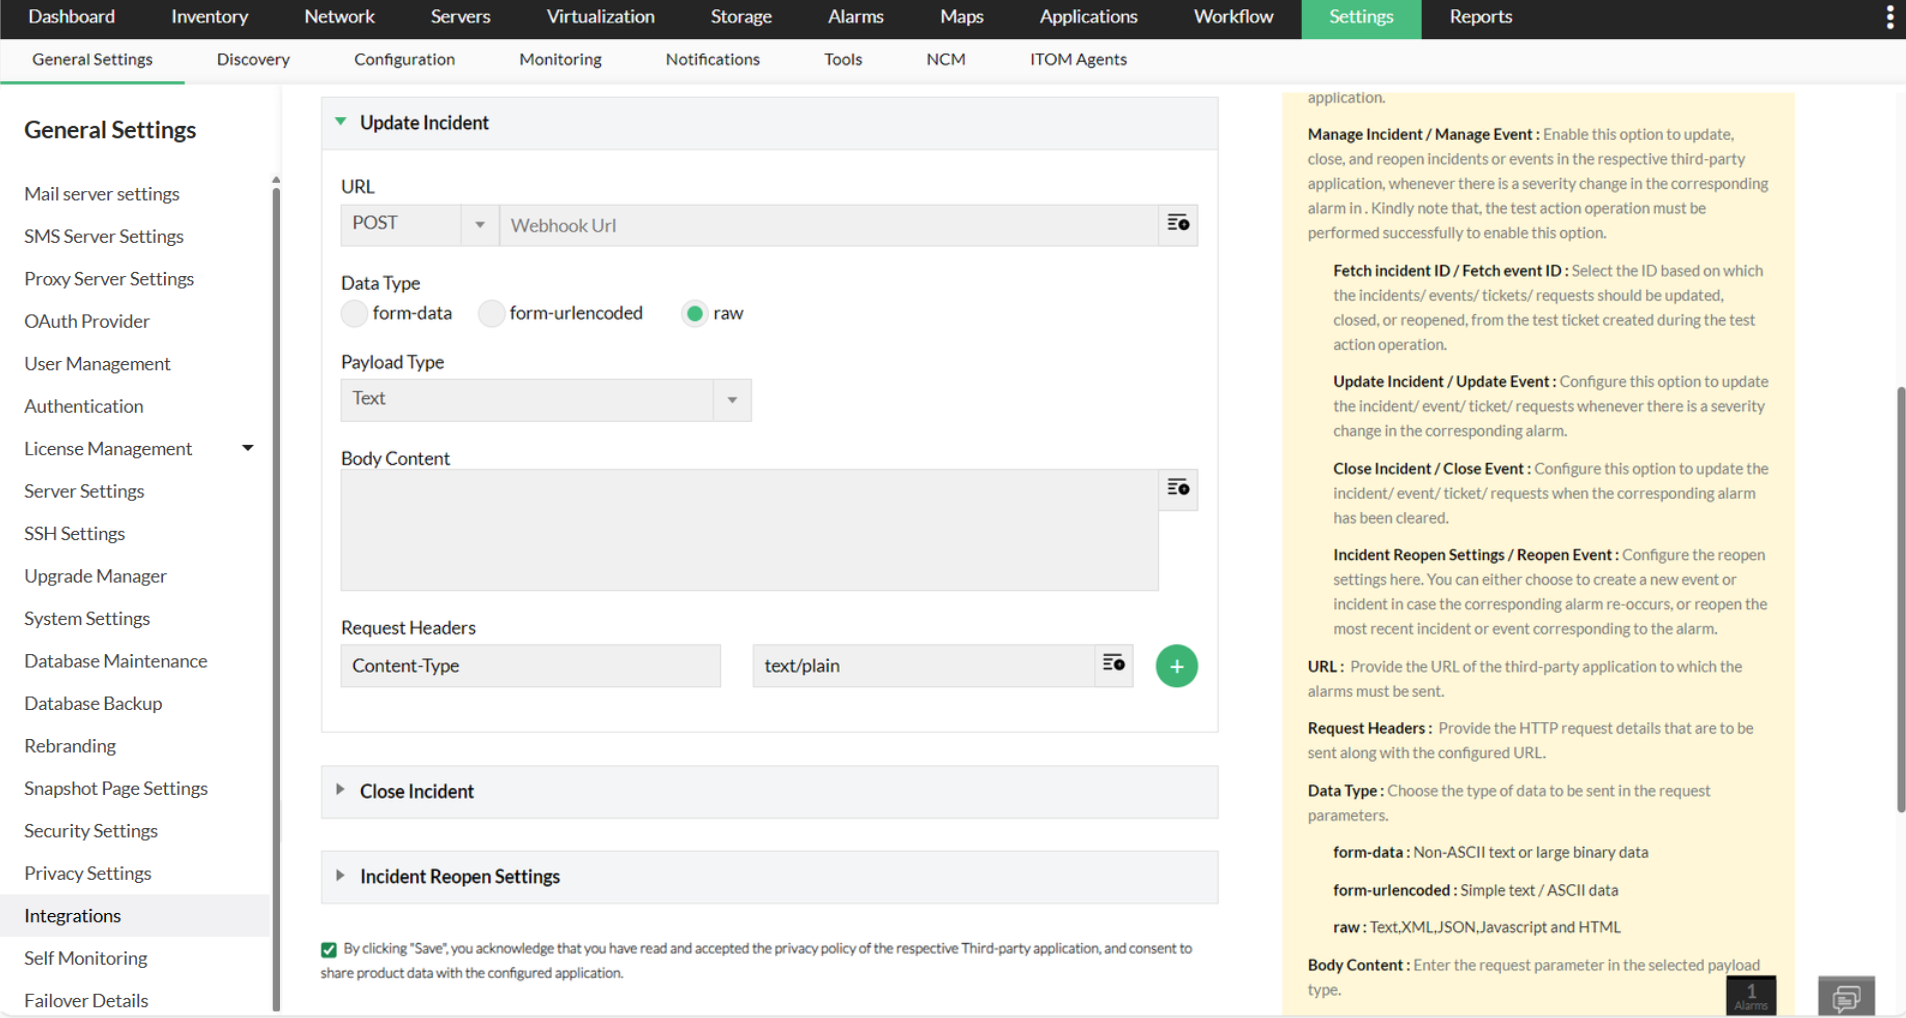
- Update Incident/ Update Event: Configure this option to update the incident or event, whenever there is a severity change in the corresponding OpManager alarm. Now, configure the HTTP request parameters.
- Close Incident/ Close Event: Configure this option to close the incidents or events, when the corresponding OpManager alarm has been cleared. Now, configure the HTTP request parameters.
- Incident Reopen settings/ Event Reopen settings: Configure the reopen settings using either one of the following options.
- Create a new incident/ Create a new event: Creates a new incident or event in case the corresponding OpManager alarm re-occurs.
- Within __days, reopen the most recent incident/ event corresponding to the alarm: Reopens the most recent incident/ event corresponding to the OpManager alarm, if the alarm has reoccurred within the configured no. of days. Configure the HTTP request parameters.
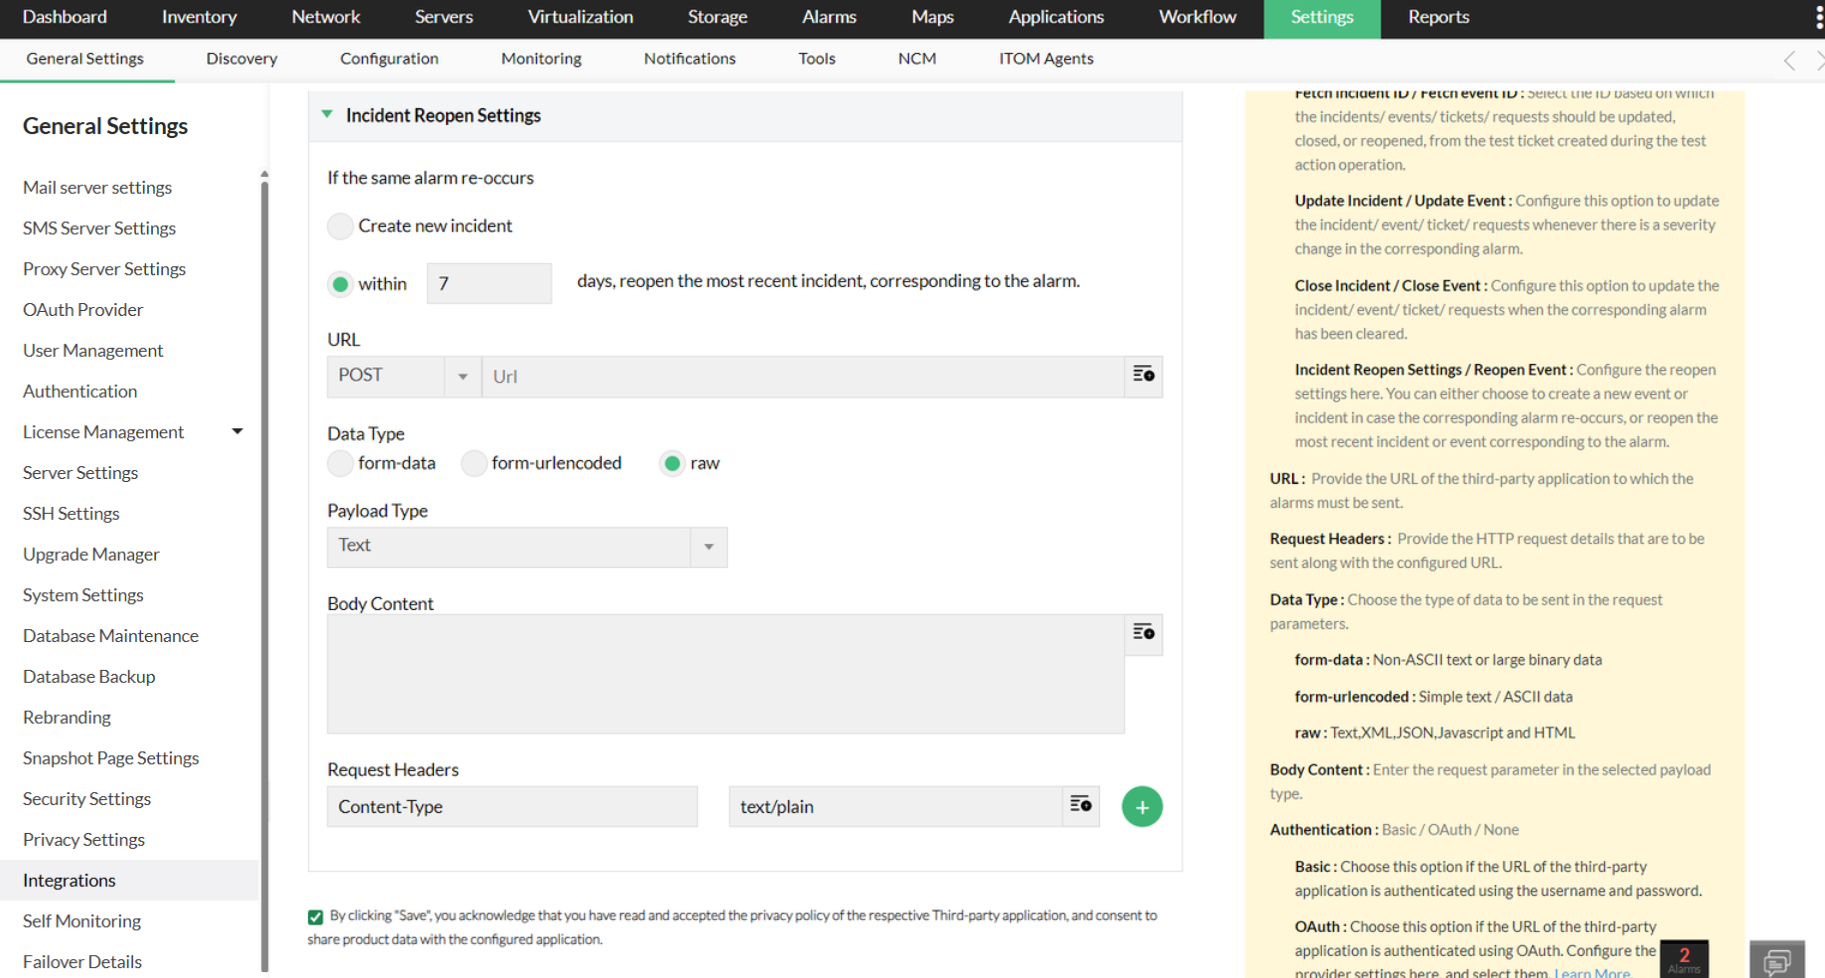
- Click on "Save".
b. For chat
- Send a message: Configure the following values to send OpManager alarms as messages to the respective third-party application. Click here to know about how to configure the HTTP request parameters.
- Advanced Configuration
- User Agent: Provide the details of the device or the agent, from which the request is originating from.
- Timeout: Mention the timeout in seconds for the request duration.
- Authentication Method: Choose the preferred mode of authentication.
- Basic: Choose this option if the URL of the third-party application is authenticated using the username and password.
- OAuth: Choose this option if the URL of the third-party application is authenticated using OAuth. Click on the "Add New OAuth" button, to configure OAuth provider settings.
- None: Select this option if the URL of the third-party application is not authenticated or authenticated only with the Header/ URL Token/ Body content.
- Click on "Save".
Configuring HTTPS parameters
Configure the following HTTP request parameters.
- URL: Provide the URL to which OpManager alarms must be sent.
- Request headers: Provide the HTTP request details that are to be sent along with the configured URL.
- Data Type: Choose the data format in which the data will be transmitted. For the respective data types, configure the following values.
- For form-data and form url-encoded types
- Custom Parameters: Mention the parameters that has to be sent.
- For raw data type
- Payload type: Choose the payload type of the data which will be sent in the body content. (Only for raw data type)
- Body Content: Mention the additional body content that has to be included in the body of the HTTP request. (Only for raw data type)
Now a pop-up appears, asking you to configure notification profiles to push OpManager alarms to the respective third-party applications. You can either choose to skip this step by clicking on the "Skip" button, or else you can add notification profiles by clicking on the "Configure Now" option. Refer the below section to know about configuring notification profiles for custom integrations in OpManager.
NOTE: You can only configure a maximum of 25 custom integrations. Delete existing ones, to create new ones.
Once the integration is configured, you can find them under the third party integrations page. You can edit them from there. You can also delete the integration, by opening the corresponding custom integration and clicking on Actions -> Delete integration. Kindly note that deleting a custom integration will also delete the associated notification profiles.
2. Associating a notification profile
You have to associate a notification profile to the custom integrations, to receive the OpManager alarms via the respective third-party application.
- Go to Settings -> Notification -> Add Profile.
- Select "Custom Integration".
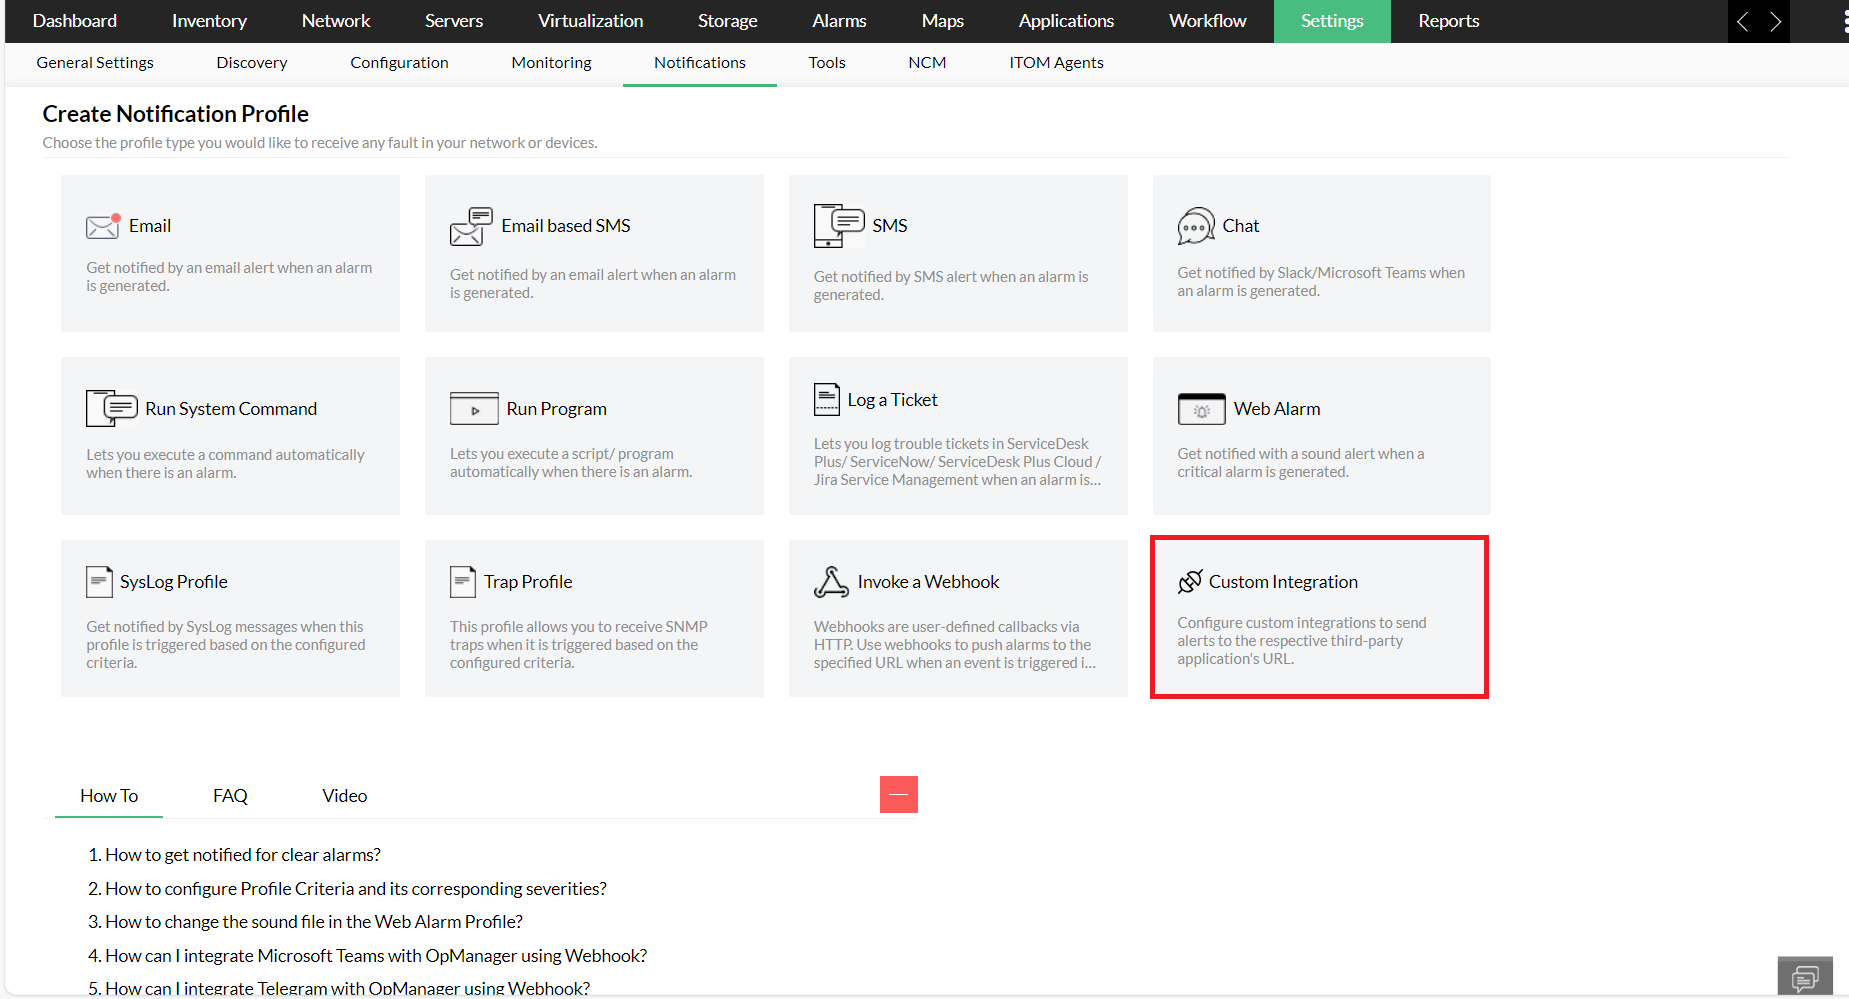
- Now, select the respective custom integration that you have already configured, and follow the steps mentioned here.

NOTE: Once a custom integration template has been chosen from the notification profiles page, the same cannot be edited. To do so, you have to delete the existing notification profile, and create a new one with the required custom integration template and associate it. You can also configure multiple notification profiles for the same custom integration.
Now that the integration settings have already been configured, and the notification profiles have been associated, you will be able to receive the alarms from OpManager to your desired third-party application.
Thank you for your feedback!