Pricing  Get Quote


Service Pack

 
close-but
  • How do I find my Build number?
    • Based on the build you are using, the update path to the latest build may vary. So, first identify your current build number using the steps given below:
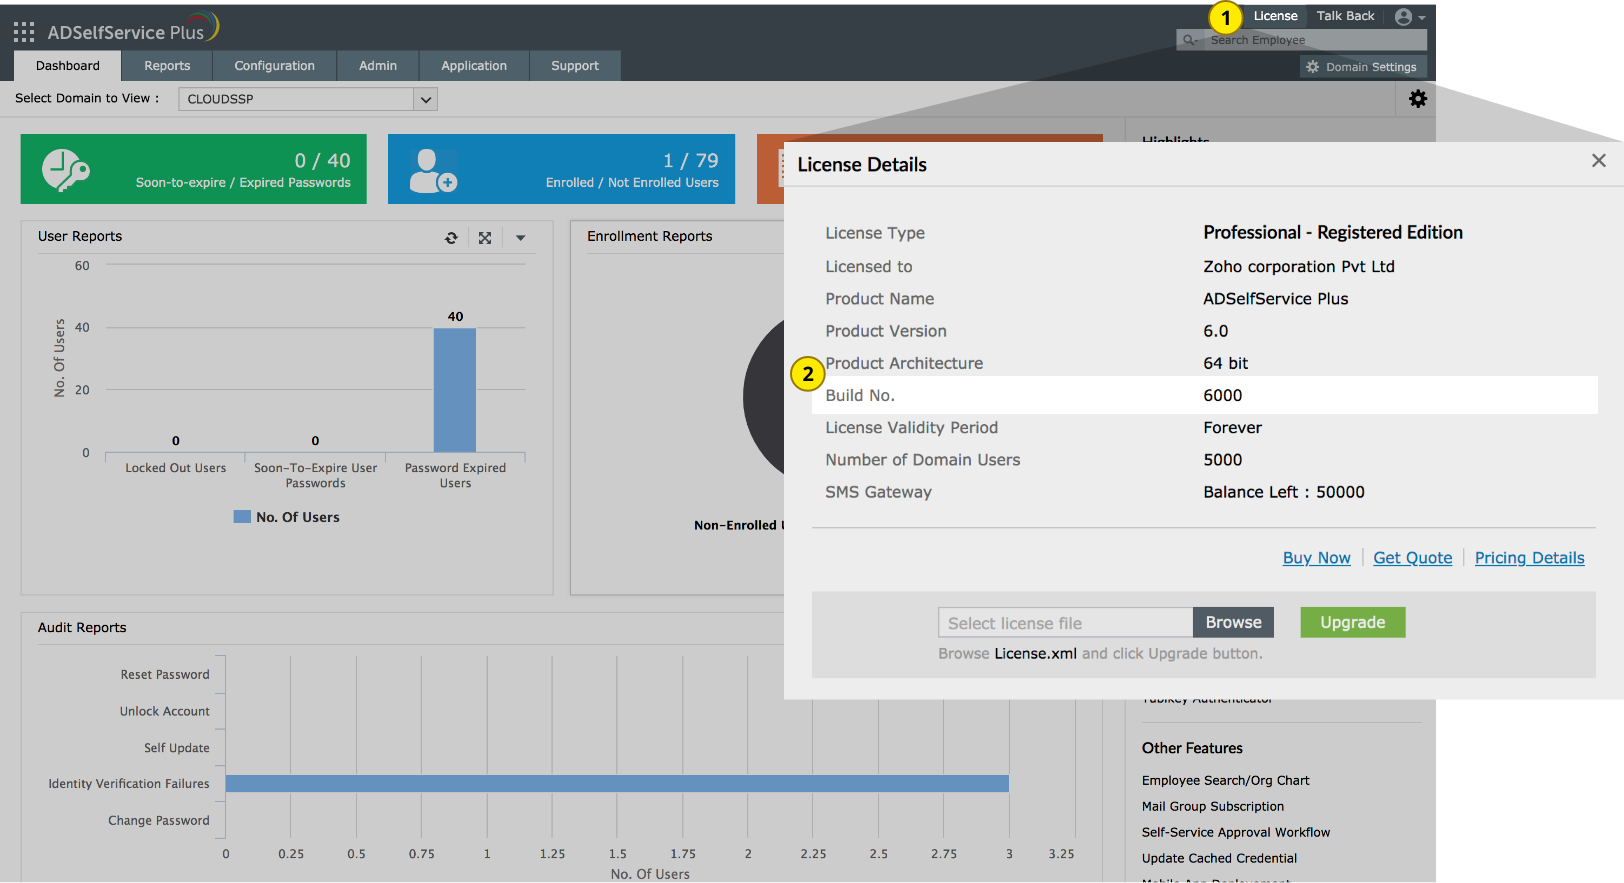
      • Log in to the ADSelfService Plus web client.
      • Click License in the top pane.
      • You'll find the current build number in the License Details popup that appears.
    • In the Update Path Finder section, enter the current build number to find the service pack path to the latest build.
    • Download and apply the appropriate service packs in the same order as suggested by the Update Path Finder.
    how-do-find-build-number

ADSelfService Plus Service Pack

     
If your build number is Update to build number
6500 to 6502

Download and update to 6503

6400 to 6410

Download and update to 6500

6300 to 6310

Download and update to 6400

6200 to 6221

Download and update to 6300

6100 to 6123

Download and update to 6200

6000 to 6013

Download and update to 6100

5800 to 5817

Download and update to 6000

5700 to 5710

Download and update to 5800

5600 to 5607

Download and update to 5700

5500 to 5521

Download and update to 5600

5400

Download and update to 5500

5300 to 5330

Download and update to 5400

5200 to 5208

Download and update to 5300

5100 to 5116

Download and update to 5200

5000 to 5041

Download and update to 5100

spack-arrow
Prerequisites: We strongly recommend you to make backups before applying the service pack. This helps you prevent accidental loss of data.

Based on the build you are using, the update path to the latest build may vary. So, first identify your current build number. How do I find my build number?

  • If your build number isUpdate to build numberSHA256 checksum hash value
  • 6500 to 6502Download and update to 65037832cd853c922a9e9522347ba4fdd9085e6221f7ec3a749826c9550693fa2b6b
  • 6400 to 6410Download and update to 650033776a34f760f7ab8b88d505ed467a9cdad5201503687d12fec91f76715db0de
  • 6300 to 6310Download and update to 6400fa9e3e99e581e2bc3ce73f571022db780631a7c352c16b31f8dcdbb39e5ebdb2
  • 6200 to 6221Download and update to 6300729a8852934fa927ad0278bbd38a94a758b7e11d45d7fb69cca0c92a552e85fd
  • 6100 to 6123Download and update to 620066dee66ba463ecf5ae9cd8430a9b35db9f7e26051161708f9d4bc7eb59effbdc
  • 6000 to 6013Download and update to 61005a4b9b41a97abc45f5e725309b009f9d8cae78356d8a4057b63c886ed9be42bf
  • 5800 to 5817Download and update to 6000a1290bf3041a59a290bb0c5f9e48c42e967f3fa8788bf67c280ac91066b19178
  • 5700 to 5710Download and update to 58001b52e075547e2c807260e3fece697ba291abc92c9fc9c75bc8aaf37e1999486a
  • 5600 to 5607Download and update to 57003cd66add624796a585a947164b64567b8b5786a9fd328da9c22cae8dc6f48658
  • 5500 to 5521Download and update to 5600bb49ab27b848054e623aef245be504e50795b8938994f1ac51f60472a14df73f
  • 5400Download and update to 5500f17af5f6dbfef8f540cbf2ec883a45265253f744f442da21c7452d4bca2911eb
  • 5300 to 5330Download and update to 5400181d8cee846946c76b1274325f8a109785eae845a26ba836f0d0e8002c3fa19c
  • 5200 to 5208Download and update to 5300b3c818b1d1c482d61694d8fcdeb22d597b7e9b853efe1d2fe058360de26234db
  • 5100 to 5116Download and update to 52000a4647145c12f95d12f37cebb303fdbf7092ae86f535f47c1714b7832c2ba889
  • 5000 to 5041Download and update to 51008faea24f8435a564add2639c64b0cfcbe8c2d53754e580a697626efc736f2204

Service Pack Installation Steps:

  • 2 If you are using the built-in PostgreSQL database, execute the stopDB.bat file under the <installation_directory>\bin (by default: C:\Program Files\ManageEngine\ADSelfService Plus\bin) to stop the database.
  • 4 Run the UpdateManager.bat file located in <installation_directory>\bin (by default: C:\Program Files\ManageEngine\ADSelfService Plus\bin) from the Command Prompt using the privileges of a domain or local admin account (refer to the requirements for running the initPgsql.bat file mentioned above).
  • 5 Click Browse and select the service pack file.
    (ManageEngine_ADSelfService_Plus_x_x_SP-x_x_x.ppm) that you have downloaded.
  • 6 Click Install. Depending on the amount of data to be migrated, the installation procedure may take a few minutes. Please do not terminate this process prematurely.
    Having problems? Troubleshoot here.
  • 7 Once the service pack is installed, click Close and then Exit to quit the Update Manager.

Troubleshooting the ADSelfService Plus installation.

You might encounter the following messages during installation:

Applying a service pack when

  1. 1. Shut down both the primary and standby servers.
  2. 2. Follow steps 3 through 7 given above and apply the service pack, first in the primary server and then in the standby server.
    Note: To identify the primary server, open the fos.conf located in <installation directory>\conf and locate the ha.servertype=MASTER entry.
  3. 3. Start the primary server first and then the standby server.
  1. 1. Shut down both the primary and secondary nodes.
  2. 2. Follow steps 3 through 8 given above and apply the service pack, first in the primary node and then in the secondary nodes.
    Note: To identify the primary node, open the product_detail.conf file located in <installation_directory>\conf and locate the IS_CLUSTER_PRIMARY=true entry.
  3. 3. Start the primary node first and then the secondary nodes.

Need help?

You can contact ADSelfService Plus Support at any time for assistance in updating ADSelfService Plus to the latest version.

ADSelfService Plus trusted by

A single pane of glass for complete self service password management