Dock Settings
Dock configuration allows IT administrators to customize the appearance and behavior of the Dock on the Mac devices. Using Endpoint Central's Dock configuration, admins can standardize the user experience of the endpoints by pinning essential applications, removing unnecessary items, and controlling the layout preferences in the Dock. This helps ensure consistency across all endpoints.
Table of contents
Steps to Configure Dock Settings Configuration
Follow the below steps to configure the Dock Configuration:
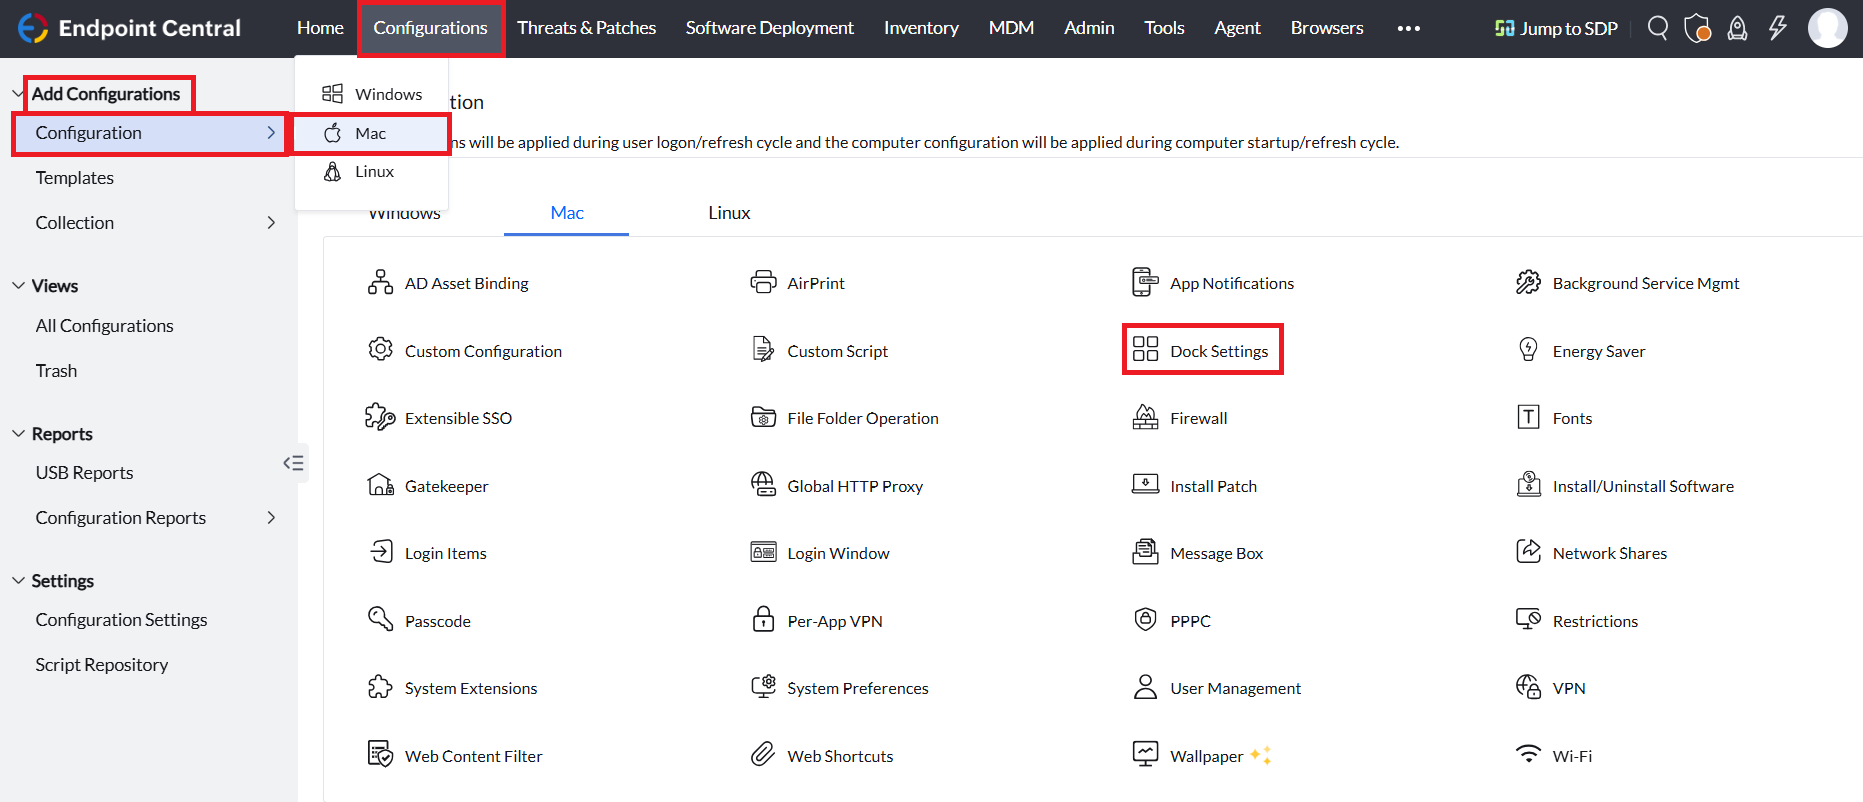
In the Endpoint Central console, navigate to the Configuration tab > Add Configurations > Configuration > Mac > Dock Settings.
Name the Configuration

Provide a Name and Description for the configuration.
Defining the Configuration
Adding Dock items
To add a Dock item, follow the steps given below:
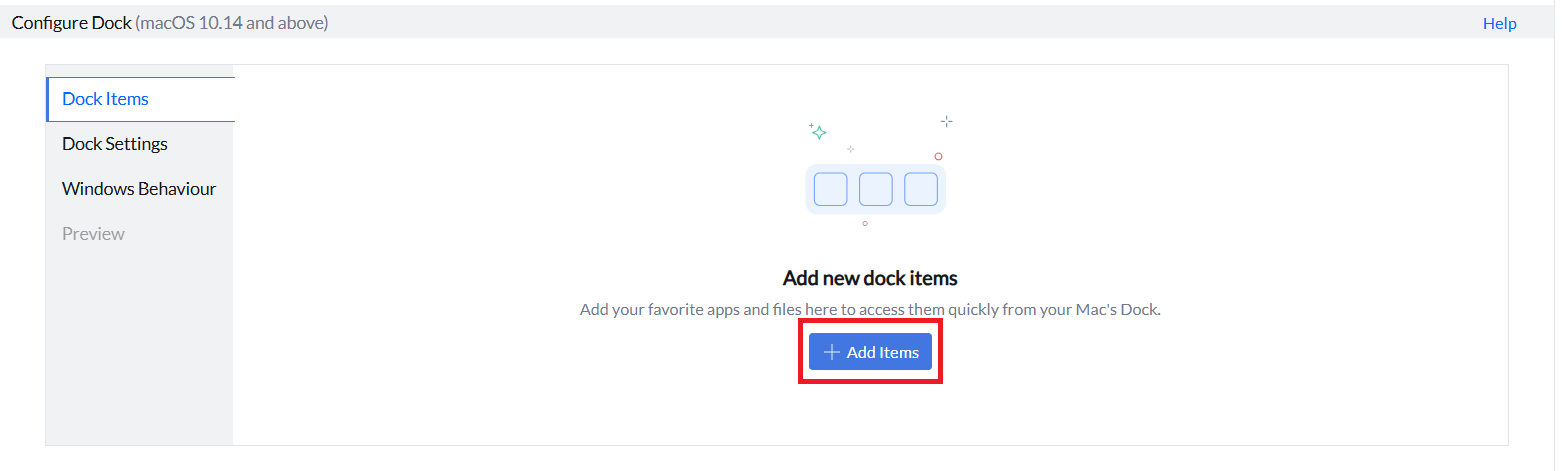
- To add Dock items, click on Add Items.You can add applications, files, folders, and web shortcuts to the Dock.

- In the Type field, choose the Dock item you want to add by selecting from the drop-down menu based on your requirement as App, File, Folder, Web Shortcut
In the Path field, provide the path of the Dock item you want to add:
For files, applications, and web shortcuts, specify their absolute path (starting from the root directory).
Example:/Applications/Safari.app
For folders, specify either a relative path (from the home directory) or an absolute path.
Example:~/Documents/Project
NOTE: Provide the path for the web shortcuts in the .webloc format. Example: /Documents/ManageEngine.webloc
- Provide the label for the Dock item in the Dock Label field.
- You can allow or restrict the end-user to remove the dock item. To allow the end user to remove the configured Dock item,in the Dock Removal field, select the Allow option. If you want to restrict the end-user to remove the configured Dock item, select the Restrict option.
- Click on Save to add the Dock item.
- Click on Save and New to save the configured Dock item and proceed to add another item.
- Click on Cancel to discard the current Dock item configuration.
Reordering Dock Items
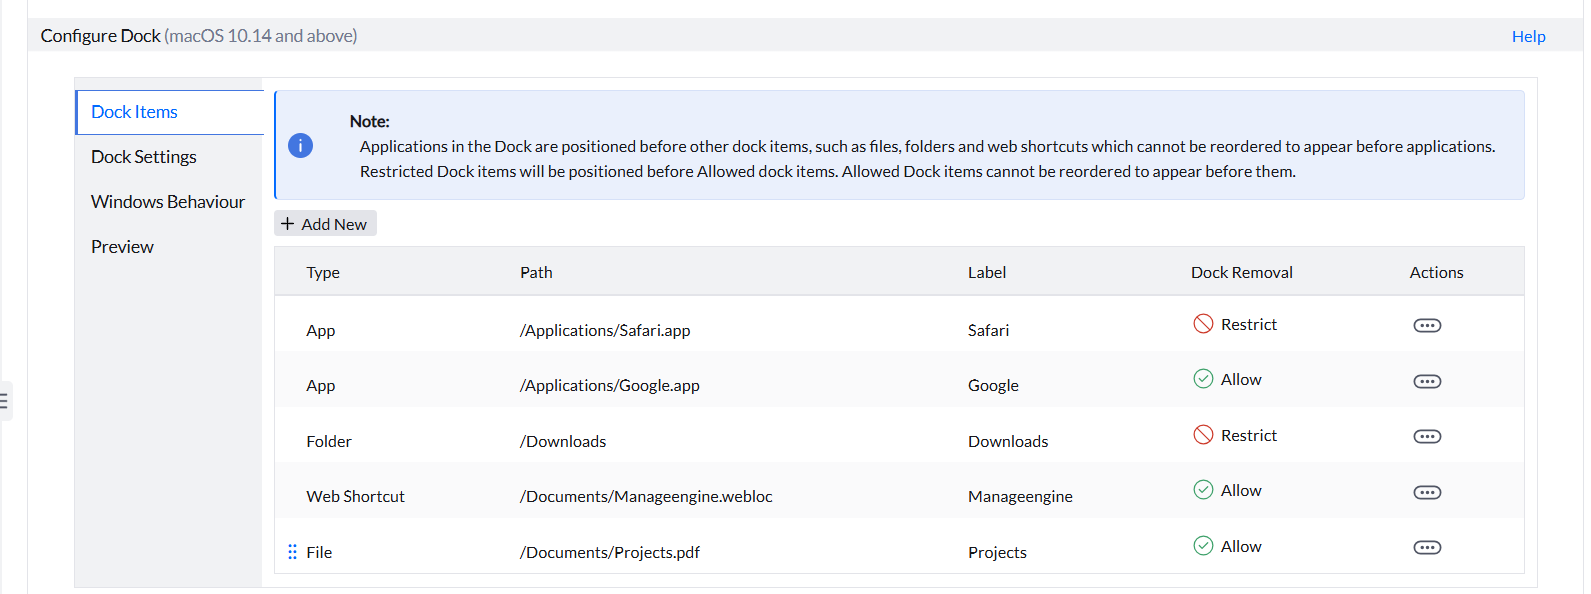
The configured Dock items can be reordered based on your requirement to appear in the Dock. Once the Dock items are added, you can reorder them by dragging the Dock items given in the table based on your requirement.
The Applications in the Dock are positioned before other dock items such as Files, Folders & Web Shortcuts. Thus other dock items cannot be reordered to appear in the Dock before Applications.
Restricted Dock items are positioned before Allowed Dock items, therefore Allowed Dock items cannot be reordered to be positioned before Restricted Dock items. Reordering is allowed within Restricted & Allowed Dock items.
Modifying Dock Items
To modify the added Dock item, follow the steps given below:
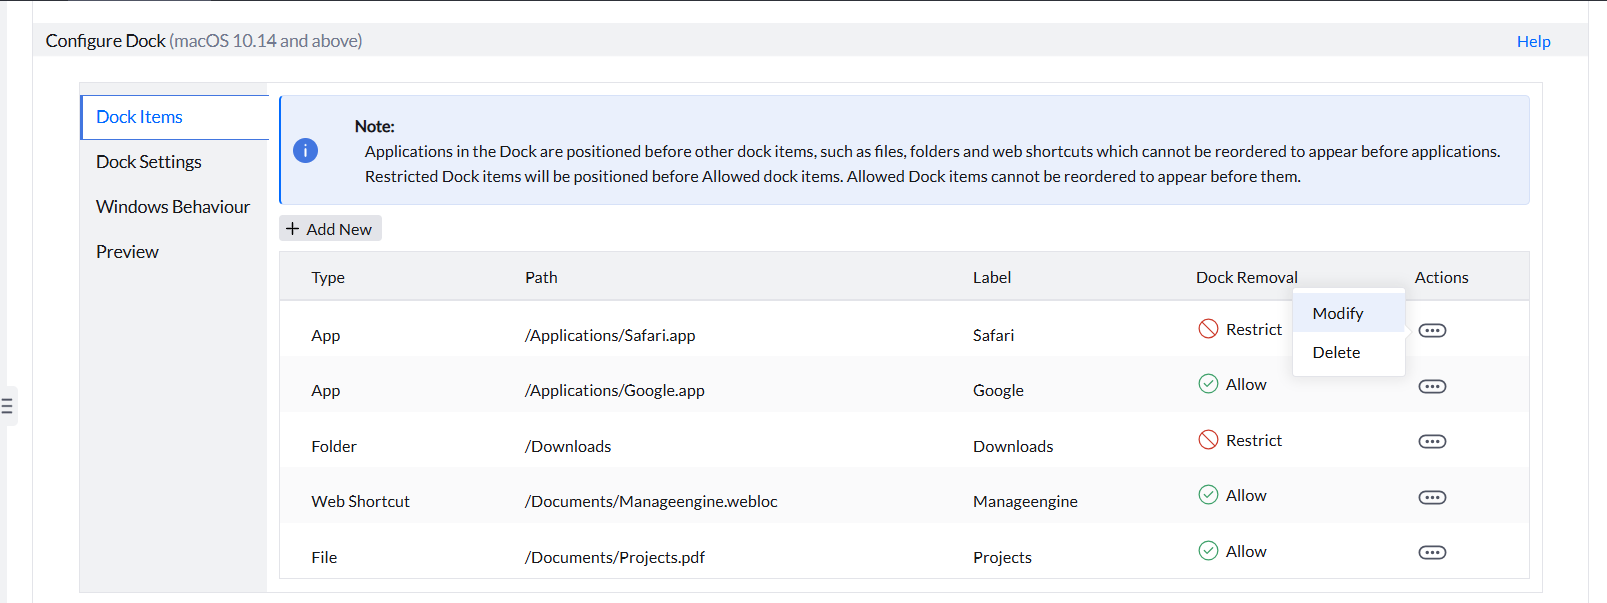
- Click on the three dots icon in the Actions column of the Dock item and select Modify.
- After making the necessary changes:
- Click on Save to save the Dock item.
- Click on Save and New to save the Dock item and proceed to create a new one.
Deleting Dock Items
To delete the added Dock item, follow the steps given below:
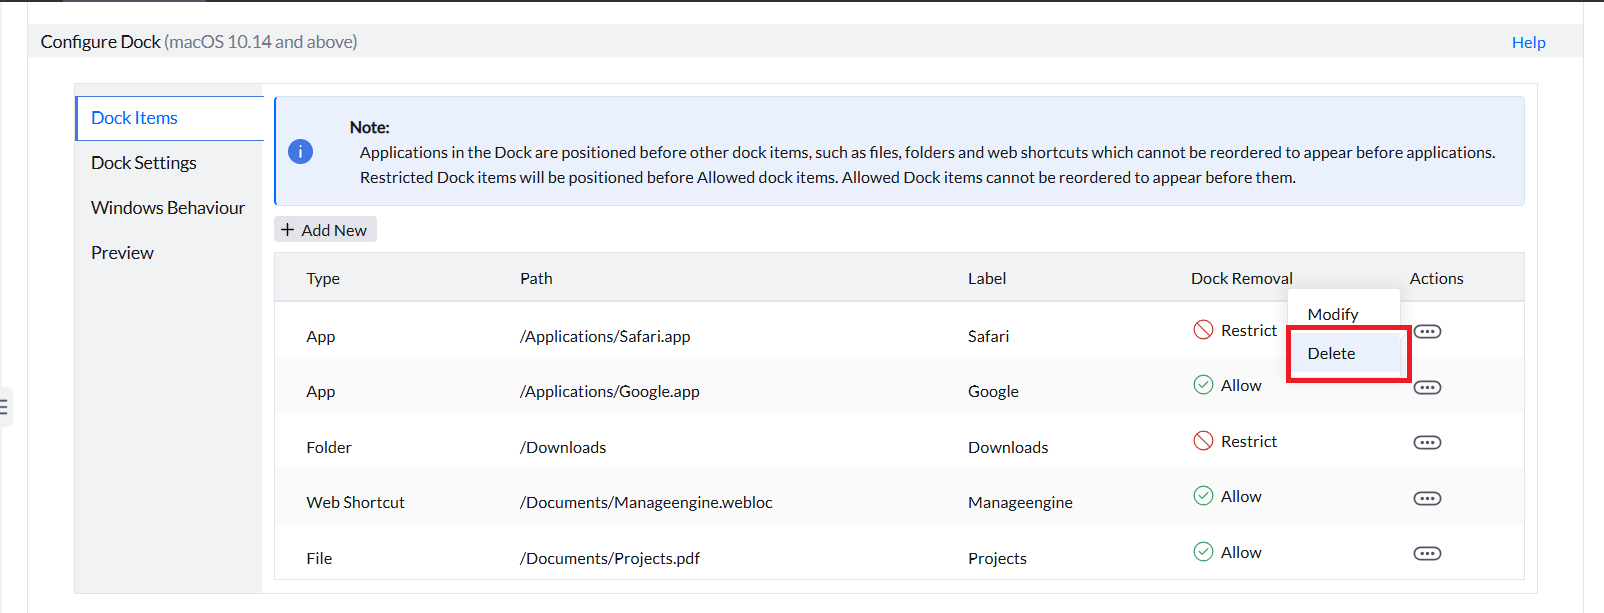
- Click on the three dots icon in the Actions column of the Dock item you want to delete and select Delete.
- A confirmation pop-up will appear before the deletion of the Dock item. Click Yes to proceed with the deletion of the Dock item.Click No if you do not want to delete the Dock item.
Configuring Dock Settings
To customize the Dock, follow the steps given below:
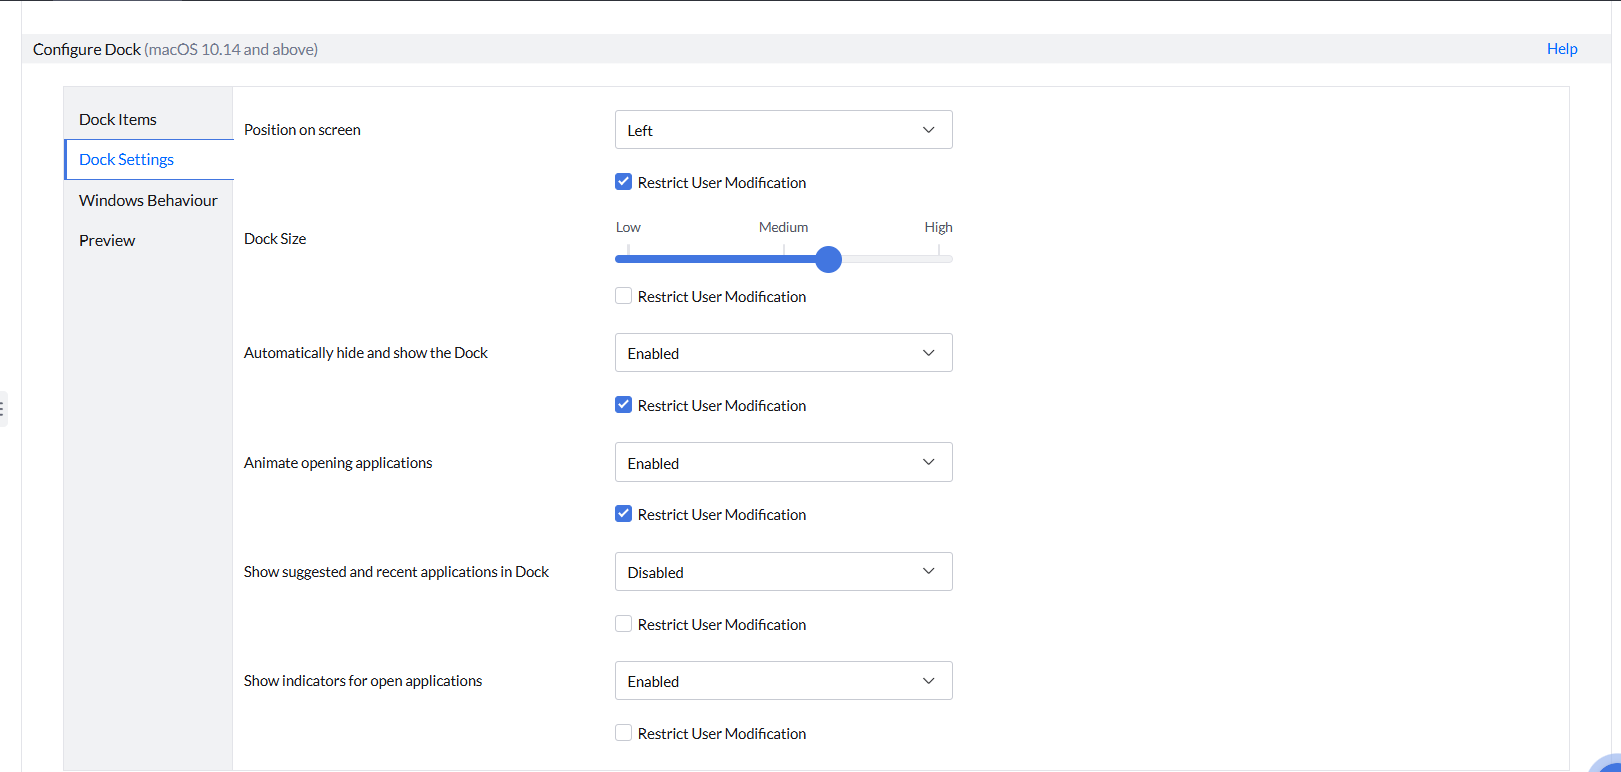
- To customize the positioning of the Dock on the screen, select from the drop-down menu as Bottom, Left or Right in the Position on screen field. If you want to restrict the end-user from modifying the Dock position, check the Restrict User Modification check box.
- To customize the size of the Dock, use the slider in the Dock Size field to adjust the Dock based on your requirement. If you want to restrict the end-user from modifying the Dock size, check the Restrict User Modification check box.
- You can enable or disable the Dock to stay hidden on the screen while not in use and show it when you are using it. In the Automatically hide and show the Dock field, select Enable or Disable options from the drop-down menu based on your requirement. If you want to restrict the end-user from modifying the Dock to hide automatically and show on the screen, select the Restrict User Modification check box.
- You can enable or disable to animate the opening of applications from the Dock. In the Animate opening applications field, select Enable or Disable options from the drop-down menu based on your requirement. If you want to restrict the end-user from modifying the animation to open the application from the Dock, select the Restrict User Modification check box.
- You can enable or disable to show the suggested and recently used applications in the Dock. In the Show suggested and recent applications in Dock field, select Enable or Disable from the drop-down menu based on your requirement. If you want to restrict the end-user from modifying the animation to open the application from the Dock, select the Restrict User Modification check box.
- You can enable or disable indicators for the open applications in the Dock. In the Show indicators for open applications field, select Enable or Disable options from the drop-down menu based on your requirement. If you want to restrict the end-user from modifying the indicators for the open applications in the Dock, select the Restrict User Modification check box.
Configuring Windows Behaviour
To customize the window's behaviour, follow the steps below:
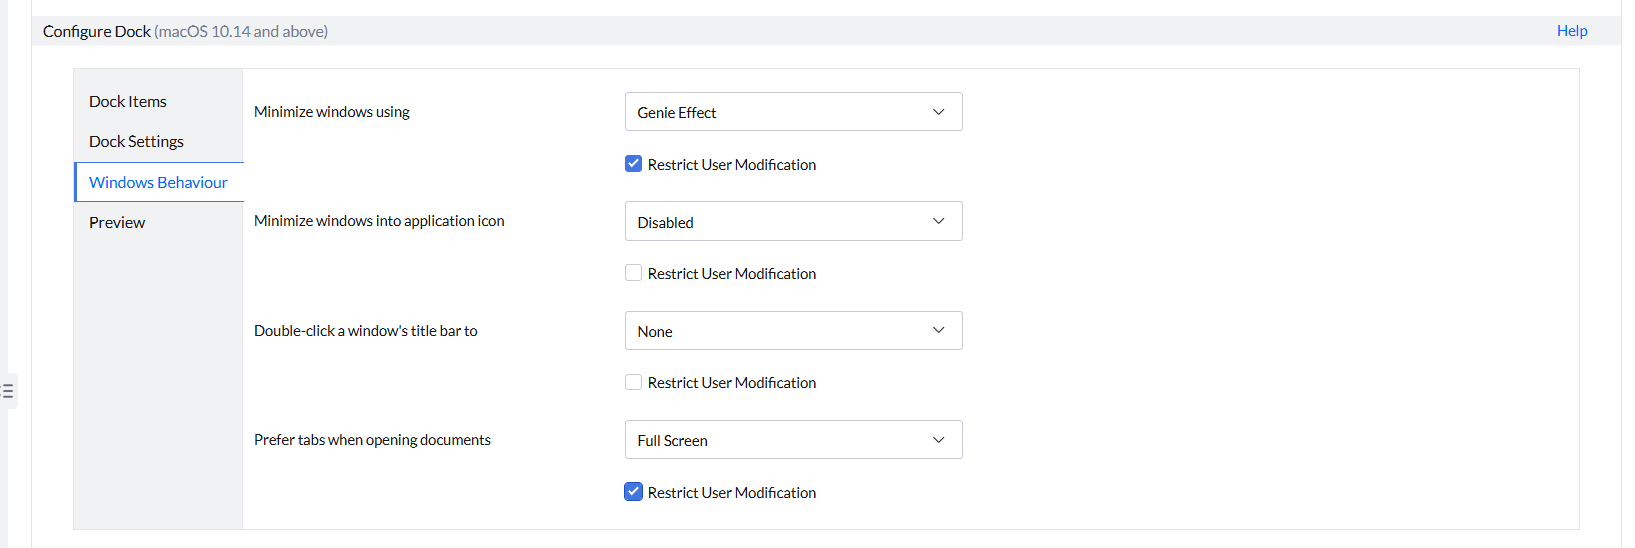
- You can customize the visual effects used when you minimize a window. In the Minimize windows using field, select Genie Effect from the drop-down menu if you want to apply the Genie effect when you minimize a window. Select Scale Effect from the drop-down menu if you want to apply the Scale effect when you minimize a window. If you want to restrict the end-user from modifying the visual effects used while minimizing a window, select the Restrict User Modification check box.
- You can enable or disable the application windows to be minimized into the application icon. In the Minimize into application icon field, select Enable or Disable options from the drop-down menu based on your requirement. If you want to restrict the end-user from modifying the application window to be minimized into the application icon, select the Restrict User Modification check box.
- You can customize the action that needs to happen when you double-click a window's title bar. In the Double-click a window's title bar to field, select Minimize from the drop-down menu to let an app's window minimize to the Dock when you double-click on the window's title bar. Select Zoom from the drop-down menu to zoom a window when you double-click on the window's title bar. If you don't want any action to happen when you double-click on the window's title bar, select None from the drop-down menu. If you want to restrict the end-user from modifying the action that needs to happen when you double-click a window's title bar, select the Restrict User Modification check box.
- You can prefer to open documents in the next tab instead of opening in a new window. This customization is applicable only while viewing documents using Preview, the default PDF viewer in macOS. In the Prefer tabs when opening documents field, select the Full Screen option to open the document in full screen in a new tab. Select the Always option from the drop-down to open a document in a new tab always. If you don't want the document to open in a new tab, select the Never option from the drop-down menu.
Previewing the Dock Configuration
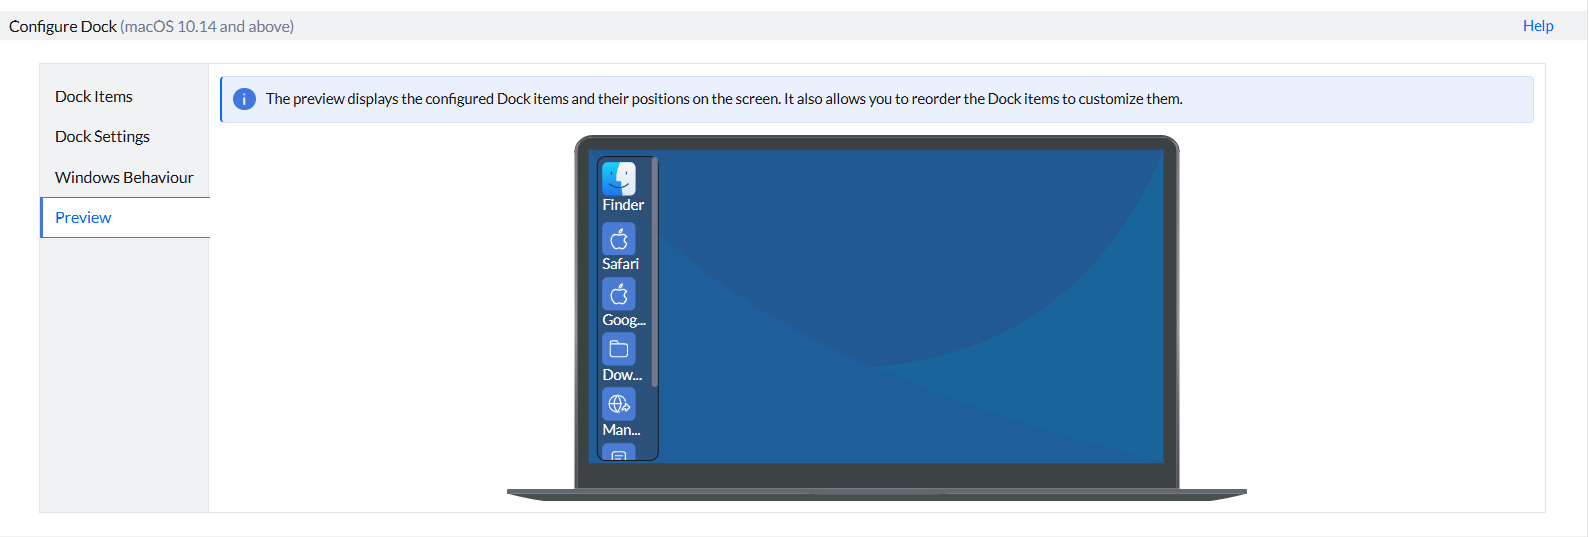
In the Preview section, you can preview the configured Dock items and their position on screen. You can also drag and reorder the dock items in the Dock to customize it based on your requirement.

Execution Settings
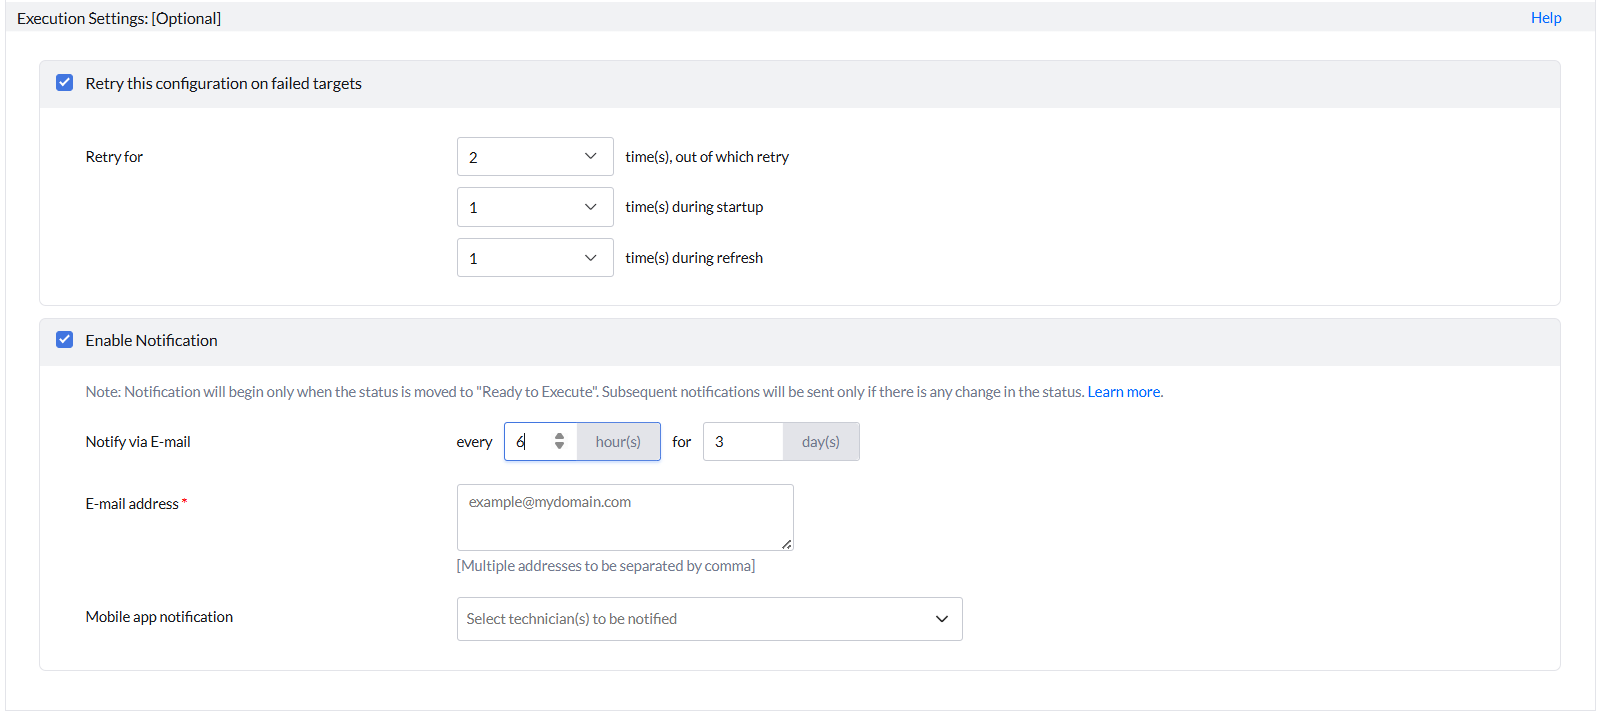
Configuring the Execution Settings is optional, thus, based on your requirement, configure them. The Execution settings include:
- Retrying the Configuration on failed targets
- Enable Notification
To learn more about the Execution Settings, refer to this link
Deploying the Configuration
Select Deploy to deploy the Dock Settings configuration during the 90-minute Refresh Cycle or System Start-up.
Select Deploy Immediately to deploy the Dock Settings configuration to the target computers immediately.
Saving the Configuration
The created Dock Settings configuration can be saved as,
- Draft:The created Dock Settings can be saved as a draft, which can be utilized later based on your requirement.
- User Defined Templates:The created Dock Settings configuration can be saved as a template, which can be re-utilised instead of creating a new configuration while deploying certain enterprise software to the newly added computers or users in the organization. Refer to this link to learn more about User-Defined Templates.
Modifying the Configuration
The created Dock Settings configuration can be modified based on your requirement.
Follow the steps below to modify the configuration:
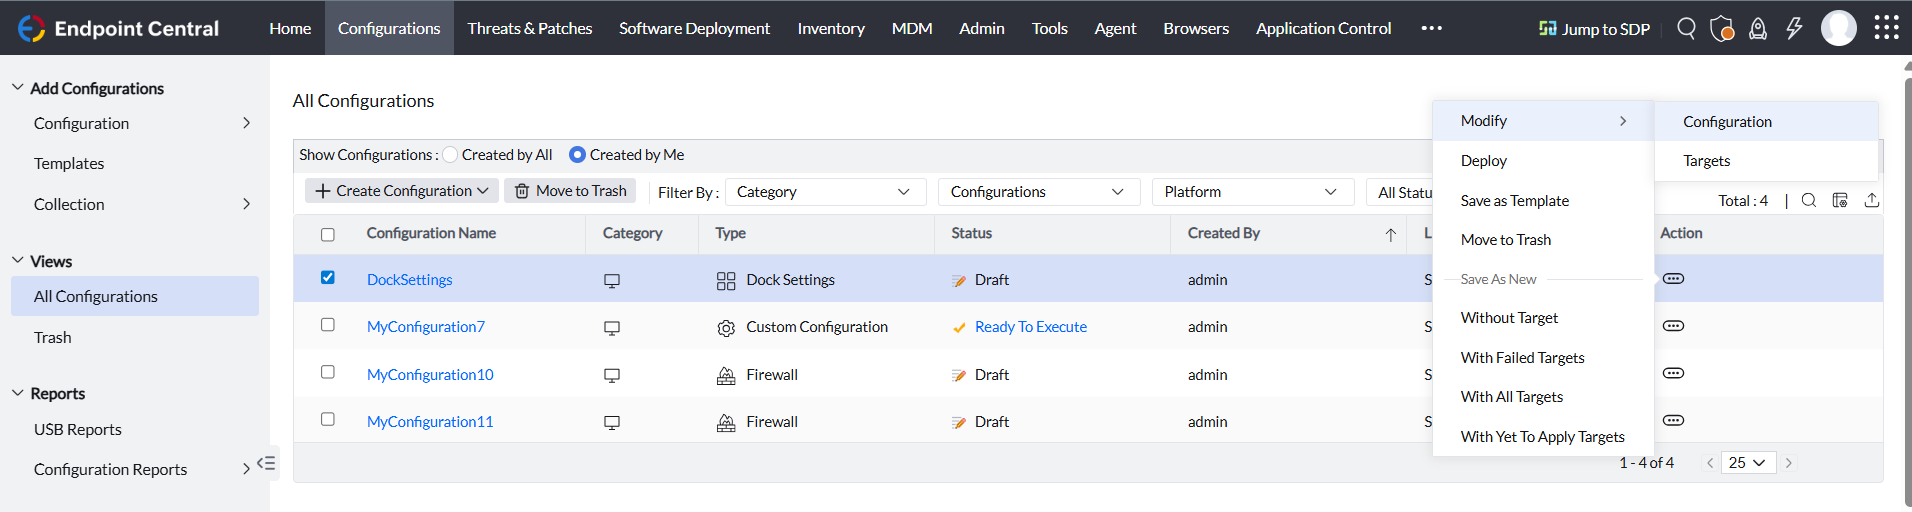
- In the Endpoint Central console, navigate to the Configurations > Views > All Configurations
- Select the configuration you want to modify.
- Under the Action column, select the three dots icon and select Modify > Configuration.
Moving Configuration to Trash
The created Dock Settings configuration can be moved to trash when the configuration is no longer required or you require to revert the configuration in the macOS devices. The configuration will be reverted once it is moved to the trash as the Dock Settings configuration is an MDM Profile Supported configuration.
To move the configuration to trash, follow the steps below:
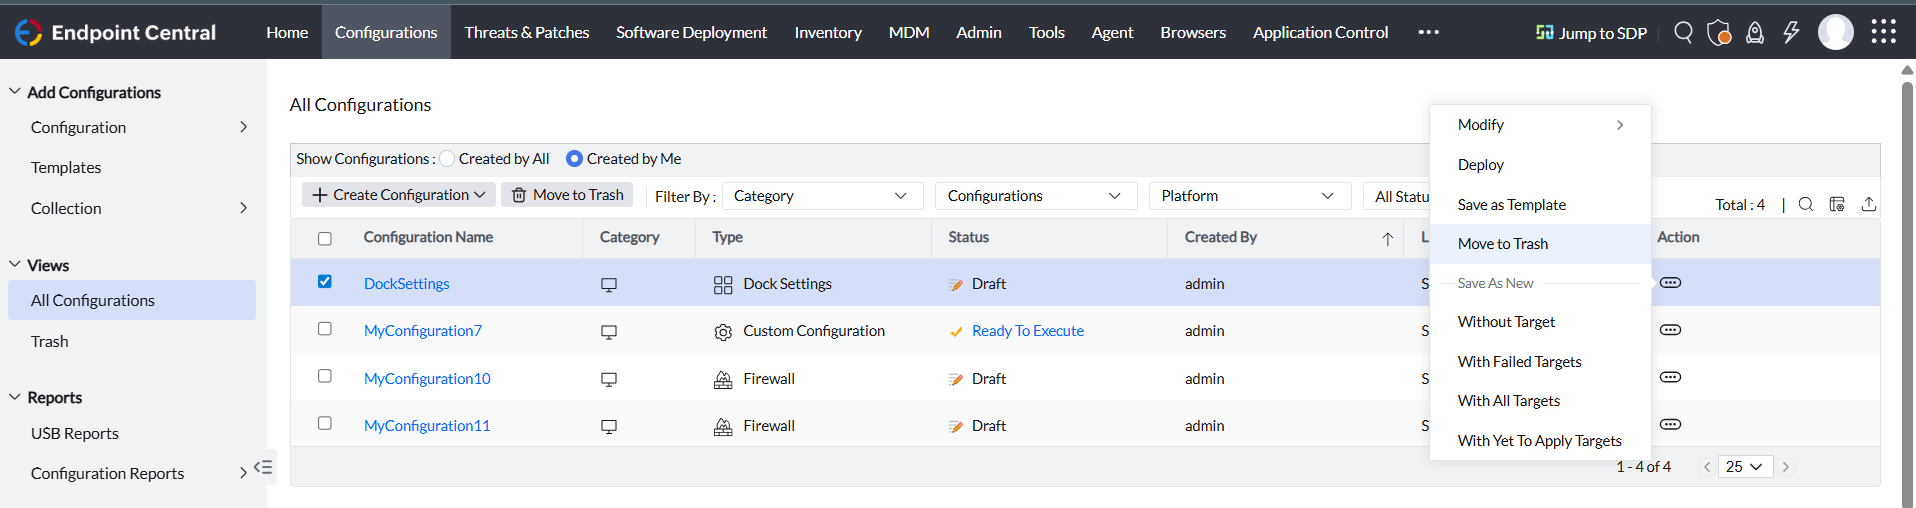
- In the Endpoint Central console, navigate to the Configurations > Views > All Configurations
- Select the Dock Settings configuration you want to move to trash.
- Under the Action column, select the three dots icon and select Move to Trash.
Suspending and Resuming the Configuration
The created Dock Settings configuration for certain reasons needs to be stopped from being deployed to the target computers, then those configurations can be suspended.
To suspend the configuration, follow the steps below:
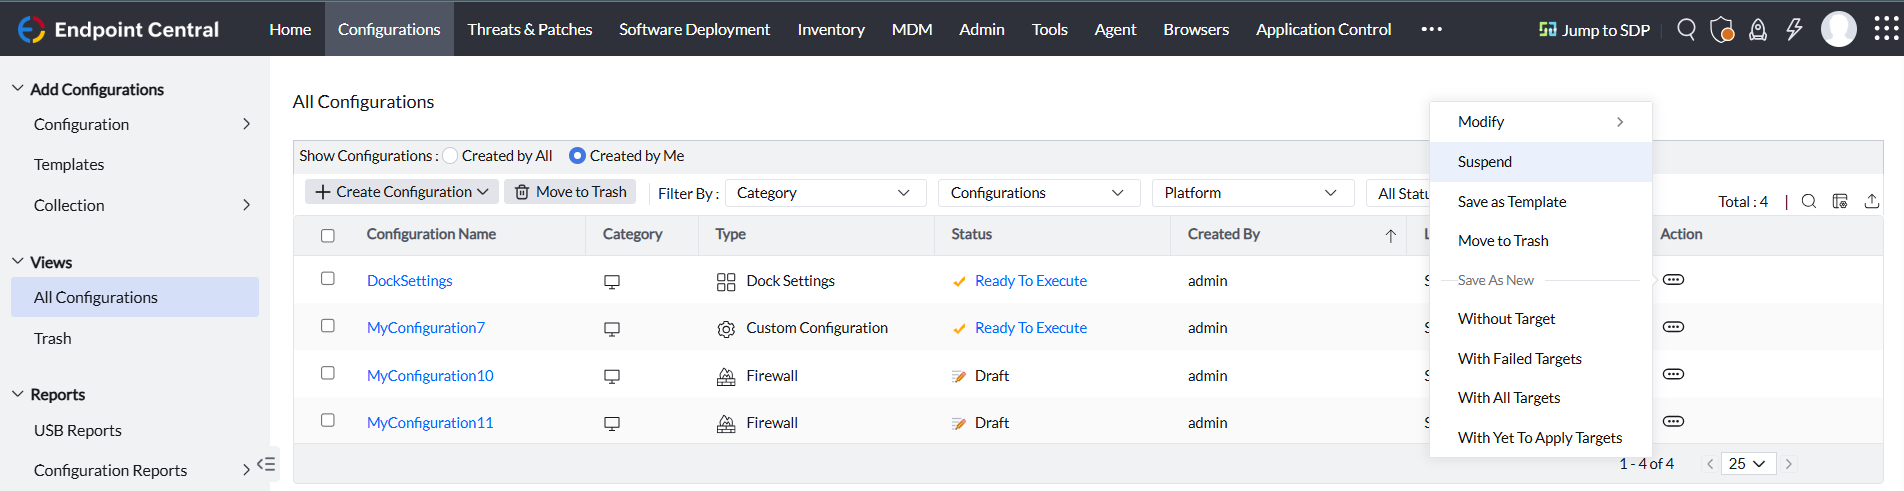
- In the Endpoint Central console, navigate to the Configurations > Views > All Configurations
- Select the Dock Settings configuration you want to suspend.
- Under the Action column, select the three dots icon and select Suspend.
You can resume the suspended Dock Settings configuration. To resume the configuration, follow the steps below:

- In the Endpoint Central console, navigate to the Configurations > Views > All Configurations.
- Select the suspended Dock Settings configuration you want to resume.
- Under the Action column, select the three dots icon and then select Resume.