Data Alerts
In business, keeping track of changes in your KPIs and metrics is vital to stay ahead of the curve. Data alerts in Analytics Plus notify you of key business events that you cannot afford to miss. This helps you quickly make informed business decisions.
- What are data alerts?
- Who can use data alerts?
- What are the various visualization types that support data alerts?
- What are the steps to create data alerts?
- How do I create data alerts over Threshold?
- How do I create data alerts over Anomalies?
- How do I configure email notifications for data alerts?
- How do I set up an In-App notification for data alerts?
- How do I configure a Slack notification for data alert?
- How do I set up a notification in Microsoft Teams for data alerts?
- How do I set up a webhook request for data alerts?
- Is it possible to create multiple alerts over a report?
- How do I edit data alerts?
- Who will be notified when the alert conditions are met?
- Is it possible to include the report in the notification email?
- How often will the data alerts conditions be verified?
- How do I view the alert's history?
- Is it possible to execute data alerts instantly?
- How do I delete a data alert?
- How do I manage all the alerts in the workspace?
1. What are data alerts?
To make informed business decisions, you need to track key changes in your business data. Manually monitoring all the important changes in business data is next to impossible. Data alert in Analytics Plus helps you combat this problem. With data alerts you can:
- Set up varying levels of conditions to be met for an alert.
- Be notified in-app, or via email, Slack, or Microsoft Teams channel.
- Create a webhook request to post alert messages in various messaging services, and even trigger workflows across integrated applications like ServiceDesk Plus, Endpoint Central, etc.
Data alerts give you an edge over regular analytics by letting you seize opportunities at the right time.
2. Who can use data alerts?
Any user of Analytics Plus can configure data alerts.
3. What are the various visualization types that support data alerts?
You can create data alerts over the following views.
- Charts
- Pivot View
- Summary View
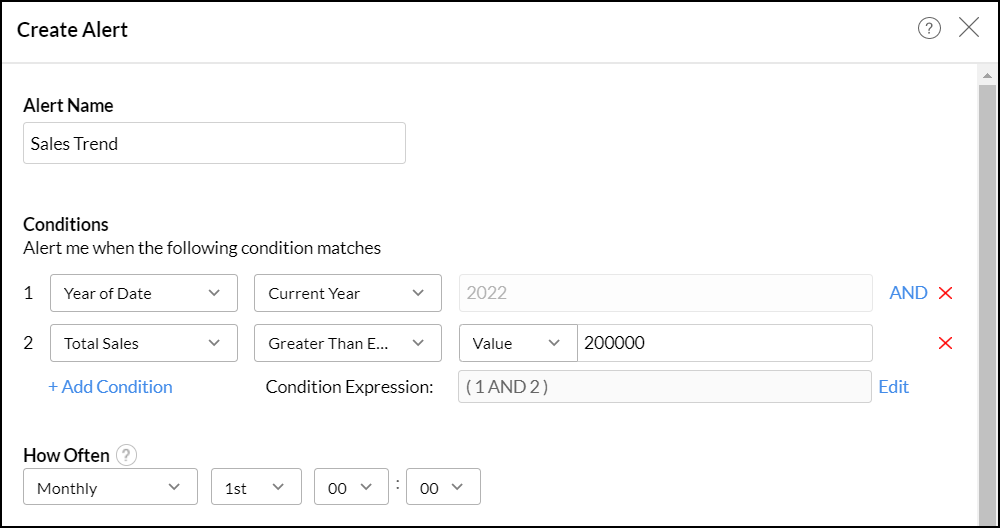
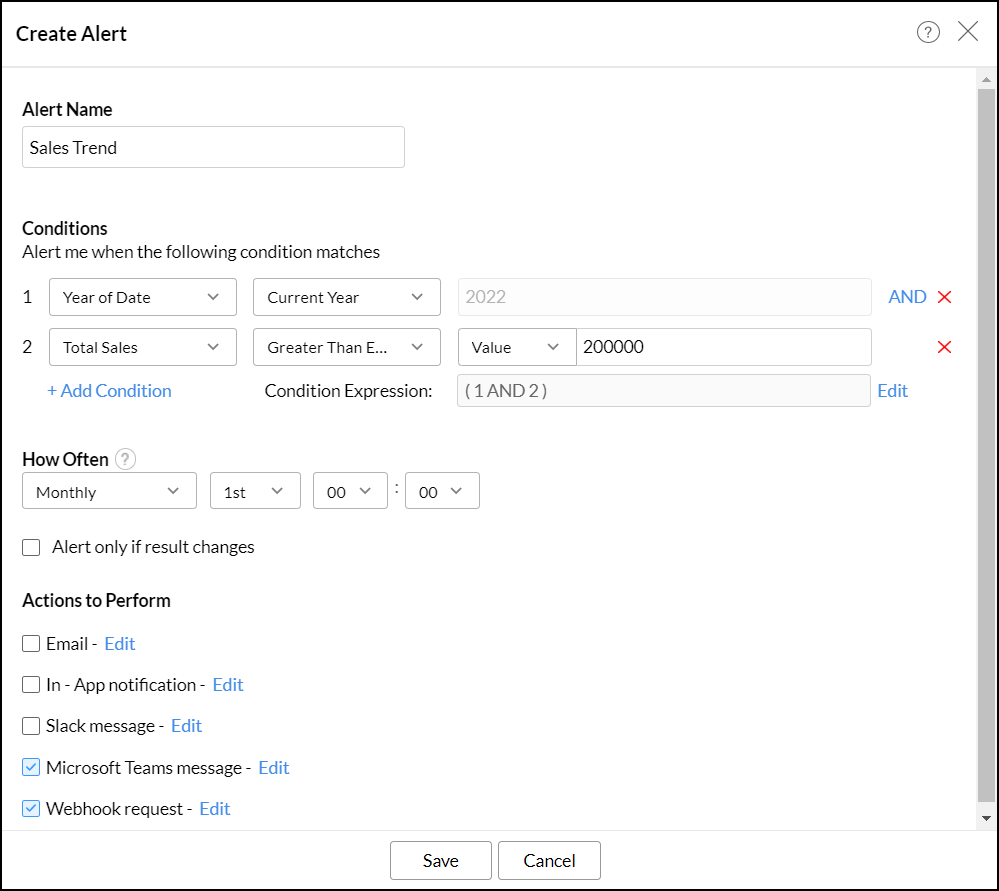
4. What are the steps to create data alerts?
To create a data alert, follow the steps below:
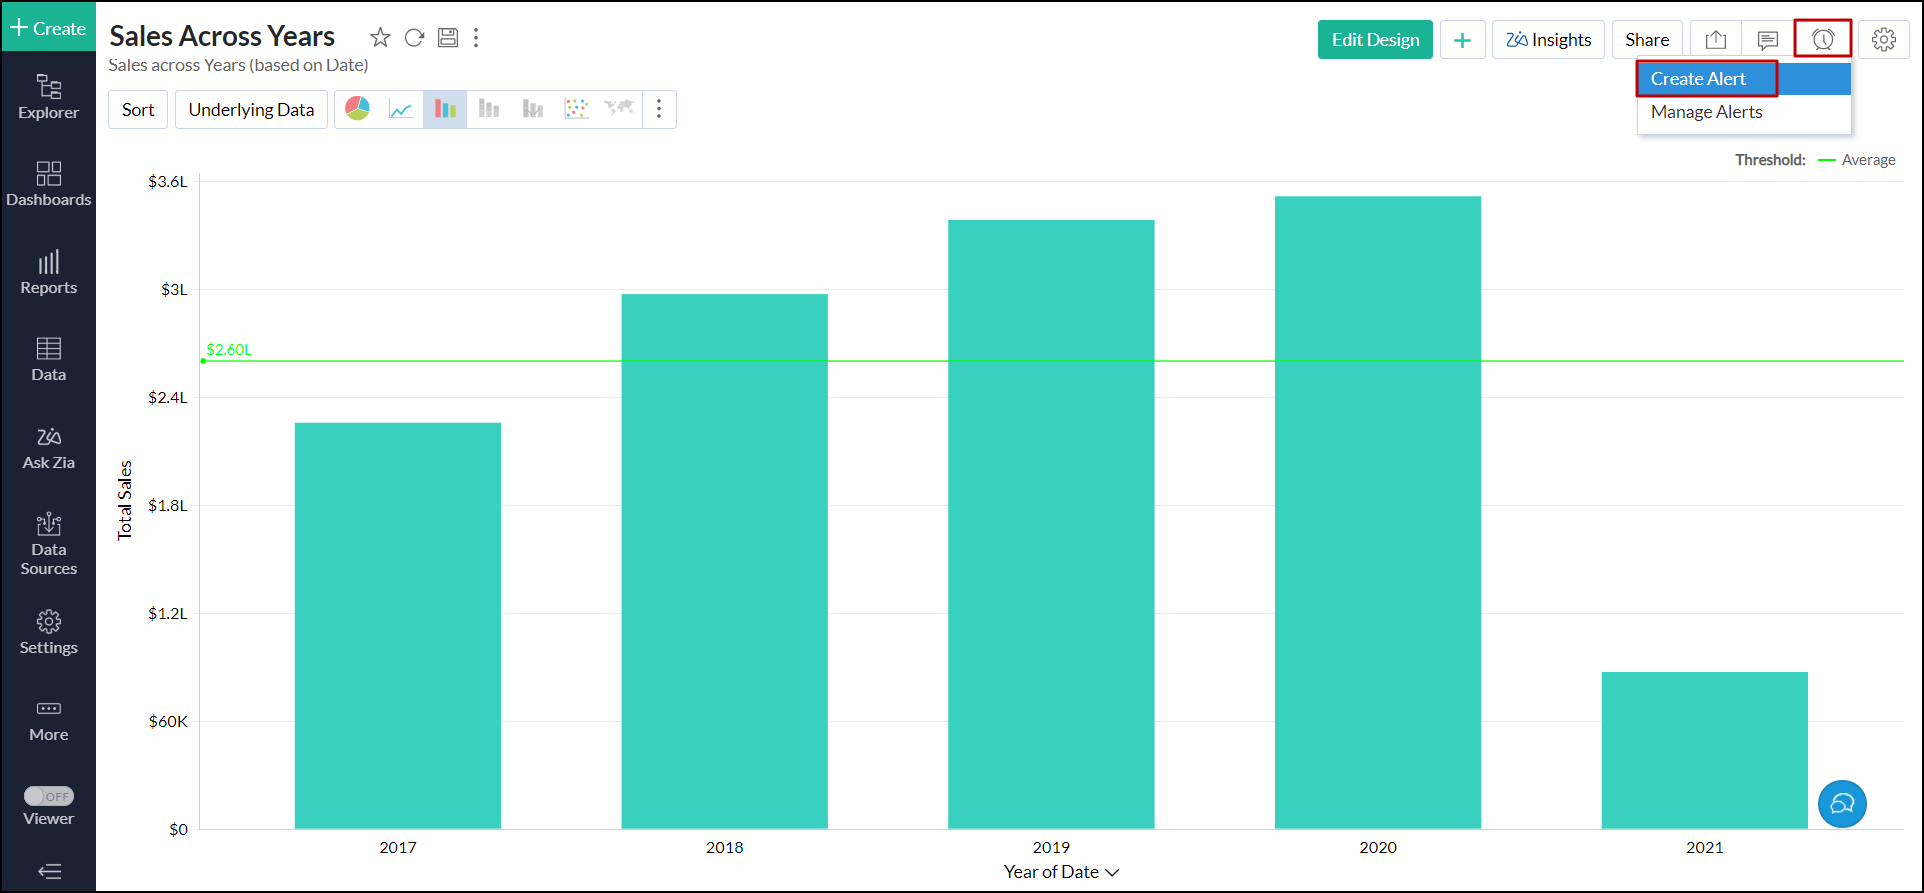
- Open the required view you wish to monitor, and click the Alert icon > Create Alert option.
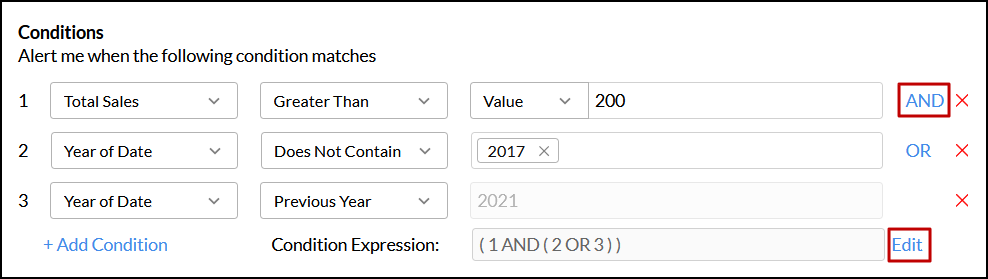
- In the dialog that appears, provide a name for the alert, and create conditions based on which the alert must be triggered. The data columns used for creating condition differ based on the selected view.
- Charts utilize columns that are used in its axes.
- Pivot tables use columns in the data section, use the row/column sub-totals, or the grand summary value.
- Summary views use columns in the summarize section.
To create a condition, select the required column and operator from the drop-down, and enter the value that the column has to be compared with. Click the + Add Condition link to add more conditions.

Analytics Plus allows you to create conditions with both AND and OR conditions. When you add multiple conditions, Analytics Plus uses the AND condition by default. To switch between AND and OR, click on the corresponding condition. You can also edit the conditions by clicking the Edit link corresponding to the Condition Expression textbox.
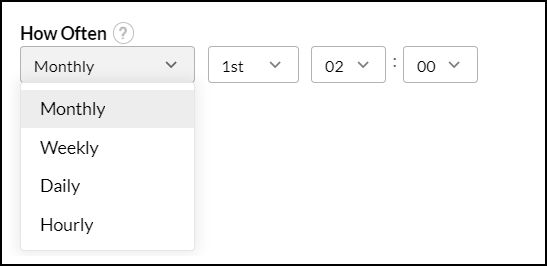
- Specify the frequency to perform the comparison with your data and to trigger the alerts using the How often? section.
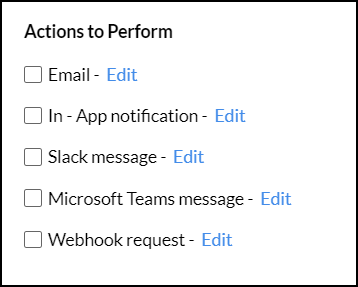
- Choose the channel on which you wish to receive alert notifications. You can choose to be notified through email, in-app notification, Slack message, Microsoft Teams message, or choose to configure a webhook request. Click the corresponding links to learn more about each option.
- On configuring the necessary parameters, click Save to create your data alert.
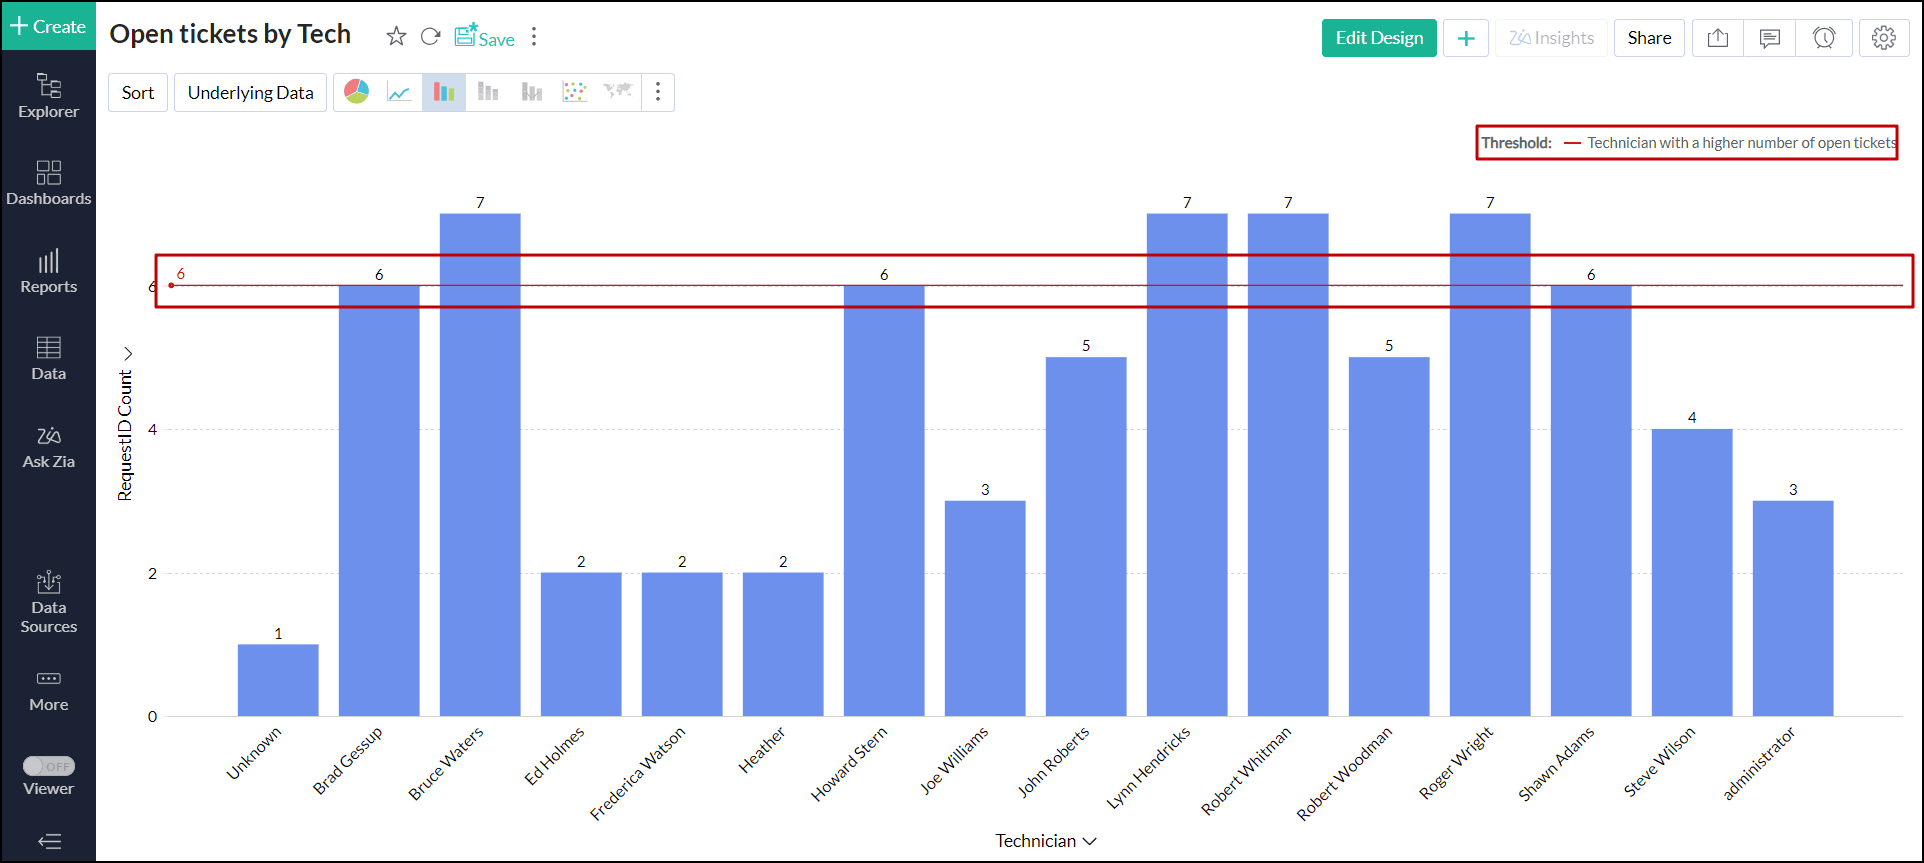
5. How do I create data alerts over Threshold?
Analytics Plus allows you to set up alerts based on thresholds for specific views. A threshold is a predefined value that acts as a benchmark for data points. When values exceed this threshold, an alert is triggered, facilitating the monitoring and response to significant changes. To create alerts over thresholds, follow the steps below.
- Open the desired view for which you need to create an alert.
Add thresholds to the desired values. To learn about adding a threshold value, click here. Ignore this step if you have a threshold configured already.
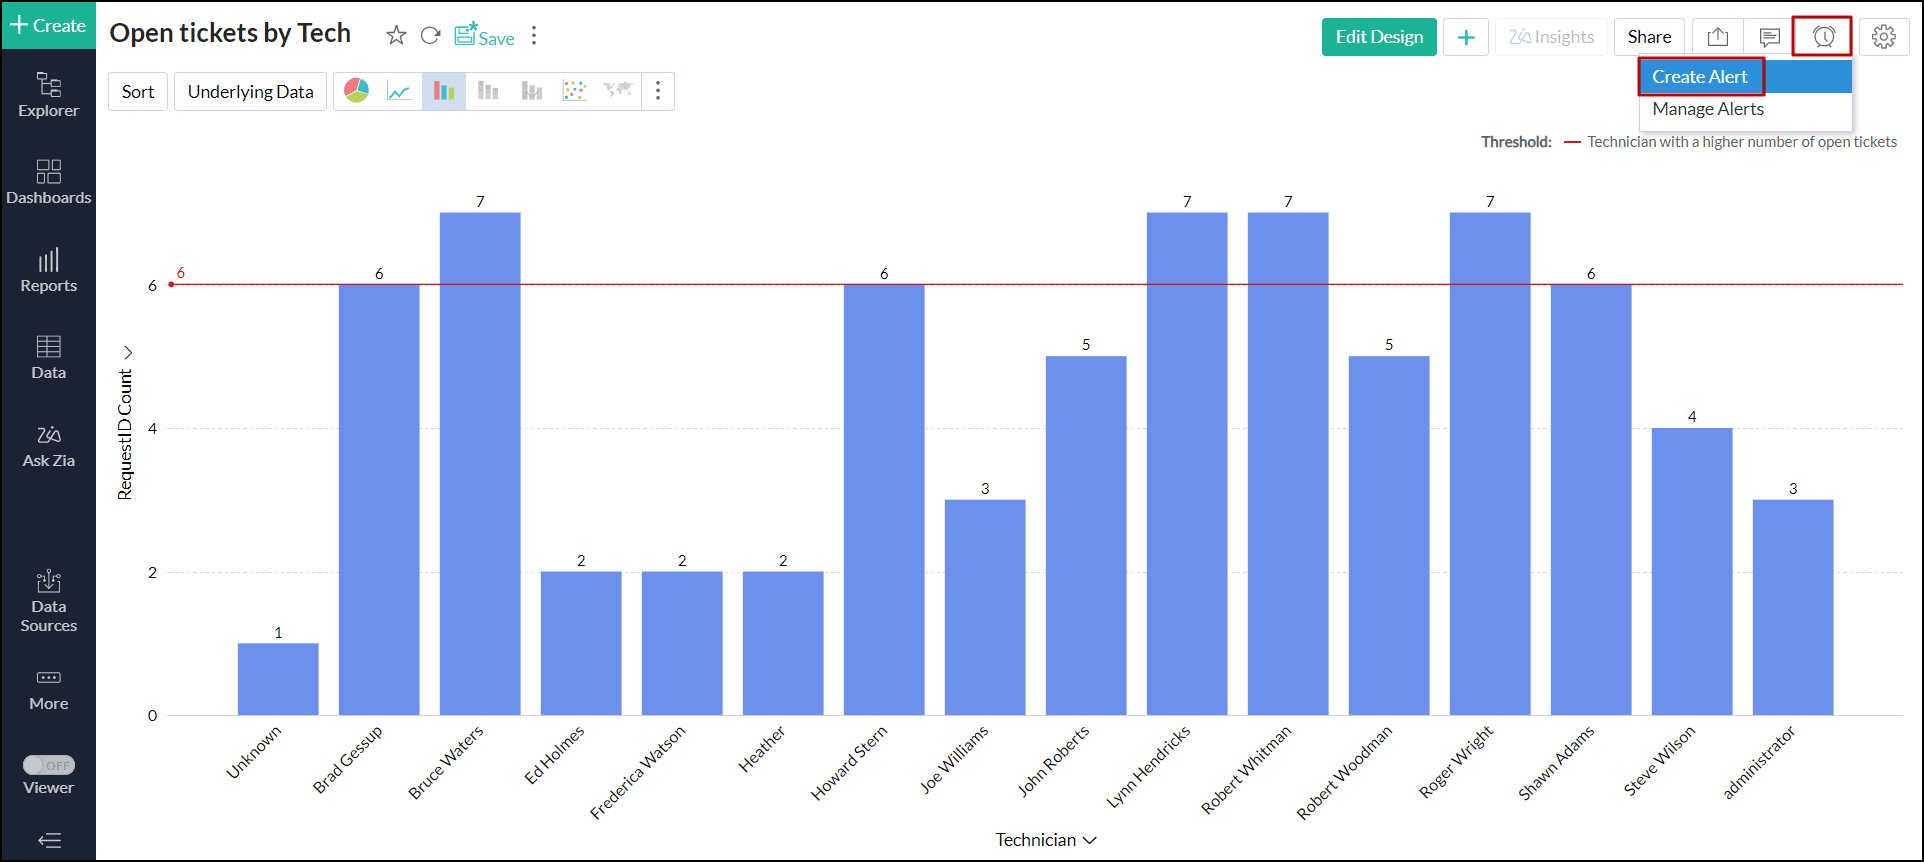
In the View mode of a report, click the Alert icon > Create Alert.
- In the dialog that opens, provide a name for the alert.
- In the Reference Axis drop-down, choose the column name using which the threshold is created.
Choose the Threshold option from the Alert based on drop-down menu.

- Using the How often? section, specify the frequency at which you want to compare your data and trigger the alerts.
- Choose the channel on which you wish to receive alert notifications. You can choose to be notified through email, in-app notification, Slack message, Microsoft Teams message, or choose to configure a webhook request. Click the corresponding links to learn more about each option.
- Upon configuring the necessary parameters, click Save to create your data alert.
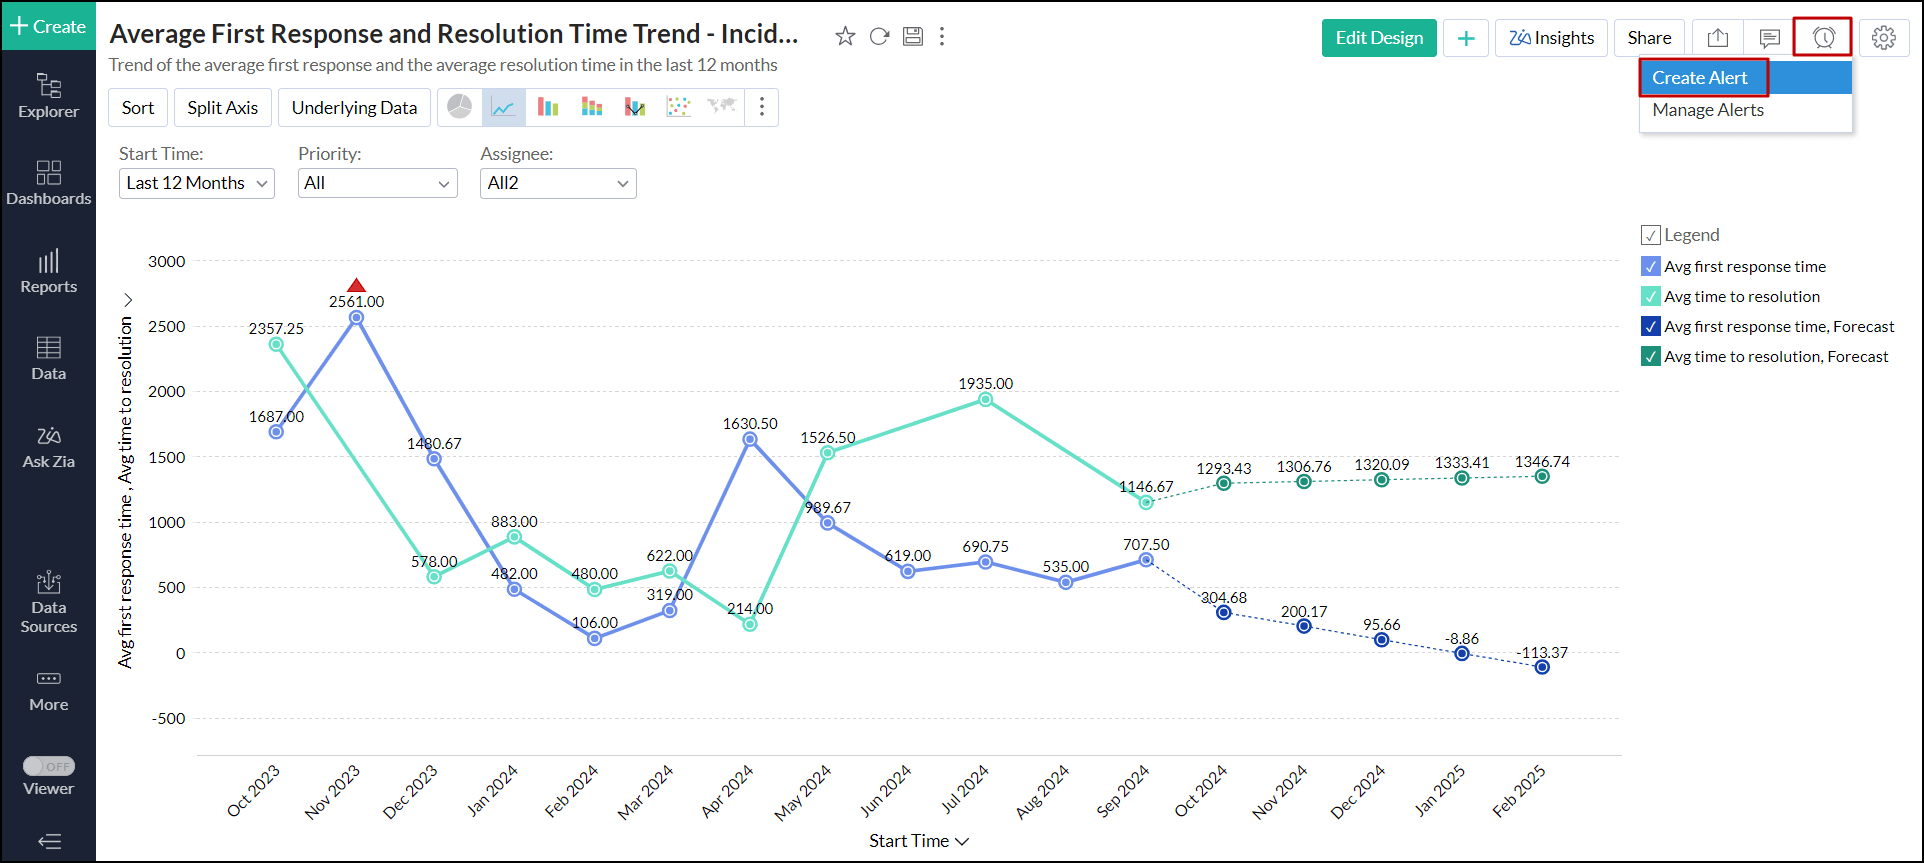
6. How do I create data alerts over Anomalies?
Analytics Plus allows you to set up alerts based on anomalies identified in a specific view.
Anomalies in reports refer to unexpected or unusual data patterns that deviate from normal behavior or trends. These anomalies often highlight errors, outliers, or significant shifts in data, prompting closer examination to ensure accurate analysis and informed decision-making. Follow the steps below to create alerts over anomalies.
- Open the required view for which you need to create an alert.
- Configure anomaly detection on the report. To learn about setting up anomaly detection, click here. Ignore this step if you have a threshold configured already.
In the View mode of a report, click the Alert icon > Create Alert.
- In the dialog that opens, provide a name for the alert.
- Navigate to the Based On Anomaly tab.
- Select the desired anomaly from the Choose Anomaly drop-down.
Choose the required options from the Generated Timeline and To Alert sections. These options vary based on the data on the X-Axis.
- X-axis with date value:
- You can choose the Generated Timeline, based on the date values in the X-Axis.
- To Alert drop-down has All and Top anomalies options. Choosing the Top option allows you to generate alerts for the top 1, 2, or 3 anomalies.
- X-axis without date value:
- Generated Timeline option by default will be selected as All and cannot be changed.
- The To Alert option will also be selected as All by default and cannot be changed.
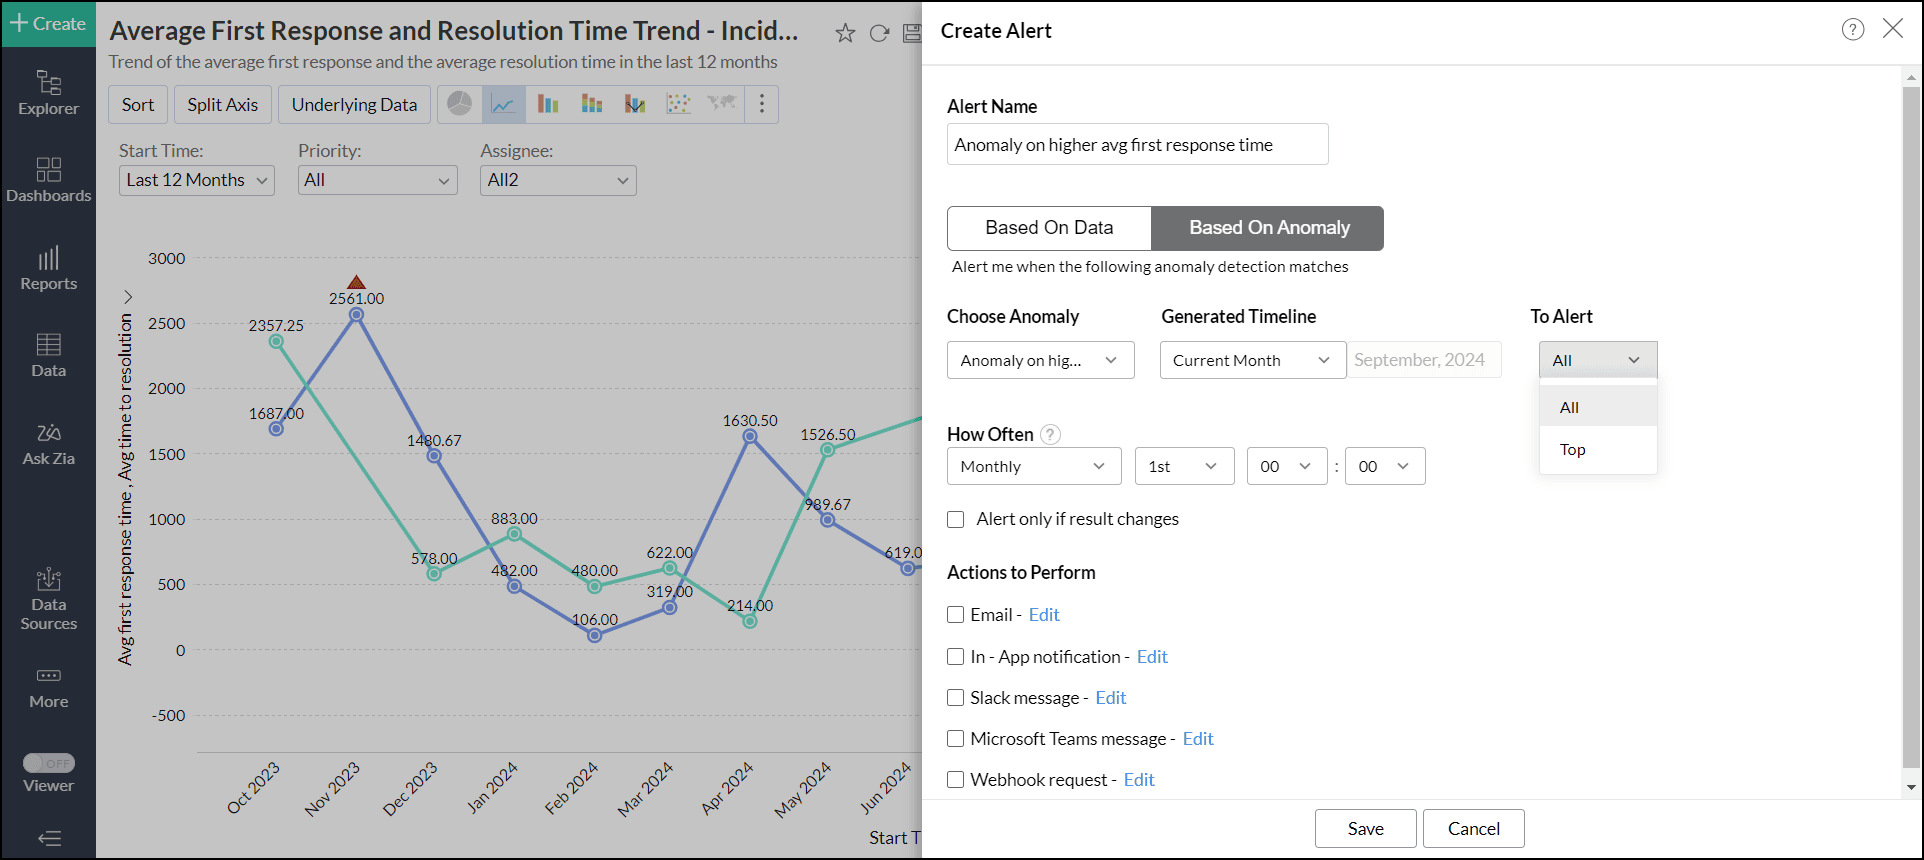
- X-axis with date value:
- Using the How often? section, specify the frequency at which you want to compare your data and trigger the alerts.
- Choose the channel on which you wish to receive alert notifications. You can choose to be notified through email, in-app notification, Slack message, Microsoft Teams message, or choose to configure a webhook request. Click the corresponding links to learn more about each option.
- Upon configuring the necessary parameters, click Save to create your data alert.
7. How do I configure email notifications for data alerts?
If you wish to get your alert notifications via email, follow the steps below:
- Open the required view you wish to monitor, and click the Alert icon > Create Alert option.
- In the dialog that appears, provide a name for the alert and create conditions based on which the alert must be triggered. Click here to learn about creating conditions.
- Specify the frequency to perform the comparison with your data and to trigger the alerts using the How often? section.
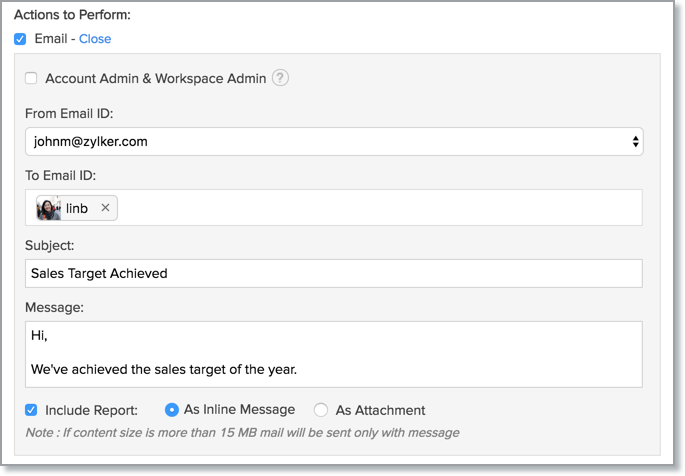
- Select the Email checkbox from the Action to Perform section.
- In the notification configuration section that appears, configure the following options:
- Select the Administrators & Workspace Admins checkbox to send data alerts to the Account admin, Organization admin, and workspace admin.
- Enter the required email addresses to whom you wish to send an alert in the To Email ID field.
- Add the Subject and Message as required.
- Select the Include Report checkbox to add the report along with your alert email. The report can be added either as an attachment or inline within the email message. Choose the required option.
- Click Save to create the data alert.
When the alert conditions are met, a notification email will be sent to the specified email addresses.

8. How do I set up an In-App notification for data alerts?
To get in-app notifications, follow the steps below.
- Open the required view you wish to monitor, and click the Alert icon > Create Alert option.
- In the dialog that appears, provide a name for the alert and create conditions based on which the alert must be triggered. Click here to learn about creating conditions.
- Specify the frequency to perform the comparison with your data and to trigger the alerts using the How often? section.
- Select the In - App notification checkbox from the Action to Perform section.
- In the notification configuration section that appears, configure the following options:
- Select the Administrators & Workspace Admins checkbox to send data alerts to the Account admin, Organization admin, and workspace admin. To send alerts to users with whom the report is shared, select the Shared Users checkbox.
- Add the Subject and Message as required.
- Click Save to create the data alert.

When the alert conditions are met, the notification will be sent to specified users. You can view the alert message by clicking the notification icon.

9. How do I configure a Slack notification for data alert?
Analytics Plus enables you to post alert messages on the Slack channel. To do this, follow the steps below:
- Open the required view you wish to monitor, and click the Alert icon > Create Alert option.
- In the dialog that appears, provide a name for the alert and create conditions based on which the alert must be triggered. Click here to learn about creating conditions.
- Specify the frequency to perform the comparison with your data and to trigger the alerts using the How often? section.
- Select the Slack message checkbox from the Action to Perform section.
- In the notification configuration section that appears, configure the following options:
- Slack URL: Create and enter Slack's incoming webhook URL. Click here to learn more about creating a webhook URL in Slack.
- Message Type: Choose the message type as either Standard or Custom.
- Standard: For standard message type, provide the subject and message for the notification.

- Custom: For custom message type, create your custom message card and paste it in the Provide your custom Message Card JSON text field. Click the Click here to create custom Message Card link to create your custom message in Slack.
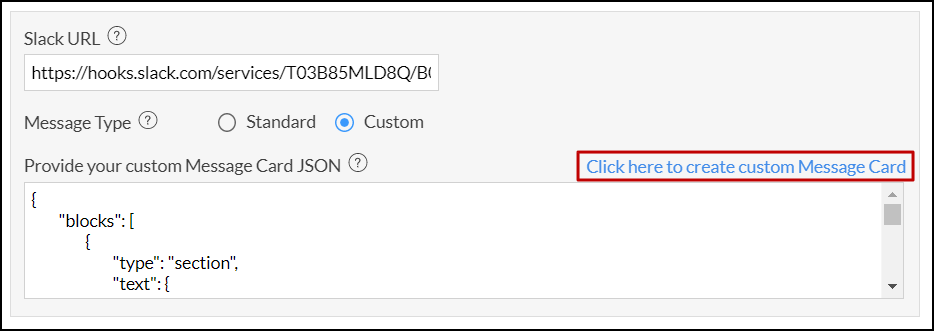
- Standard: For standard message type, provide the subject and message for the notification.
- Click Save to create your data alert.
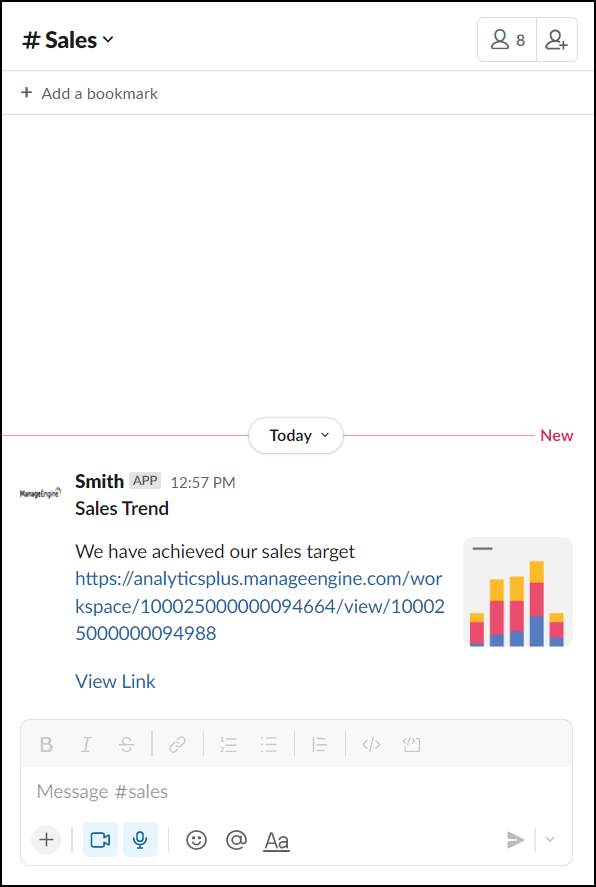
When the alert conditions are met, a notification will be sent to the configured Slack channel.
10. How do I set up a notification in Microsoft Teams for data alerts?
With Analytics Plus you can choose to receive your alert notification in the Microsoft Teams channel. Follow the steps below to do this.
- Open the required view you wish to monitor, and click the Alert icon > Create Alert option.
- In the dialog that appears, provide a name for the alert and create conditions based on which the alert must be triggered. Click here to learn about creating conditions.
- Specify the frequency to perform the comparison with your data and to trigger the alerts using the How often? section.
- Select the Microsoft Teams message checkbox from the Action to Perform section.
- In the notification configuration section that appears, configure the following options:
- Microsoft Teams URL: Create and enter the Microsoft Teams' incoming webhook URL. Click here to learn more about creating webhook URLs in Microsoft Teams.
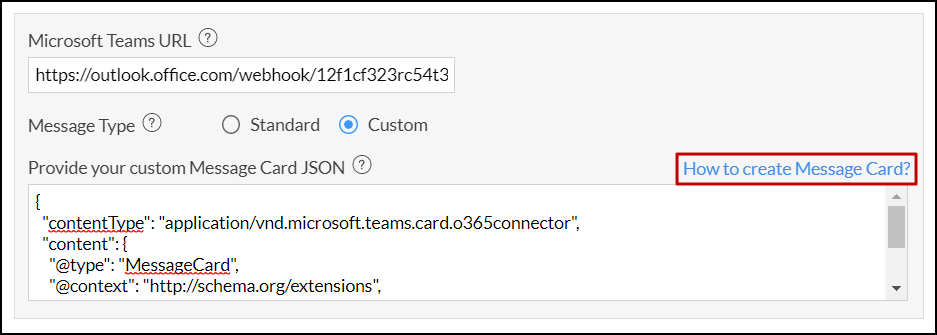
- Message Type: Choose the message type as either Standard or Custom.
- Standard: For standard message type, provide the subject and message for the notification.
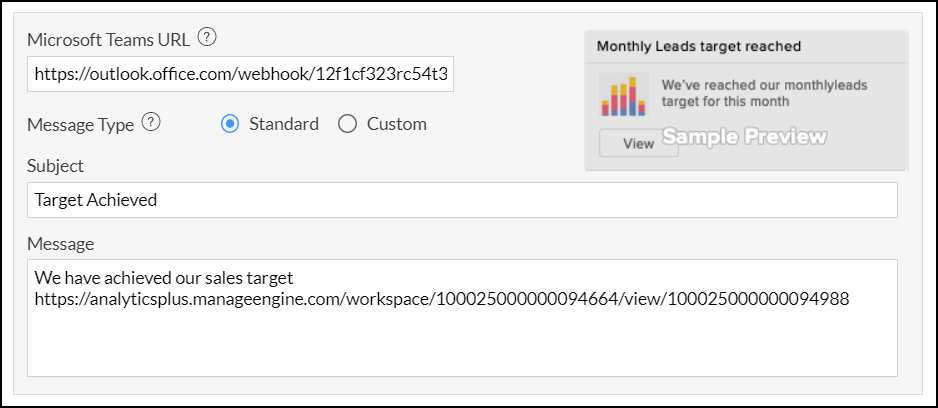
- Custom: For custom message type, create your custom message card and paste it in the Provide your custom Message Card JSON text field. Click the How to create Message Card? link to create your custom message in Microsoft Teams.
- Standard: For standard message type, provide the subject and message for the notification.
- Click Save to create your data alert.
When the alert conditions are met, a notification will be sent to the configured Microsoft Teams channel.
11. How do I set up a webhook request for data alerts?
Webhook request in Analytics Plus enables you to post alert messages in various messaging services or trigger workflows in target applications when the data alert conditions are met (Click here to learn more about Webhooks). Follow the steps below to create a webhook request.
- Open the required view you wish to monitor, and click the Alert icon > Create Alert option.
- In the dialog that appears, provide a name for the alert and create conditions based on which the alert must be triggered. Click here to learn about creating conditions.
- Specify the frequency to perform the comparison with your data and to trigger the alerts using the How often? section.
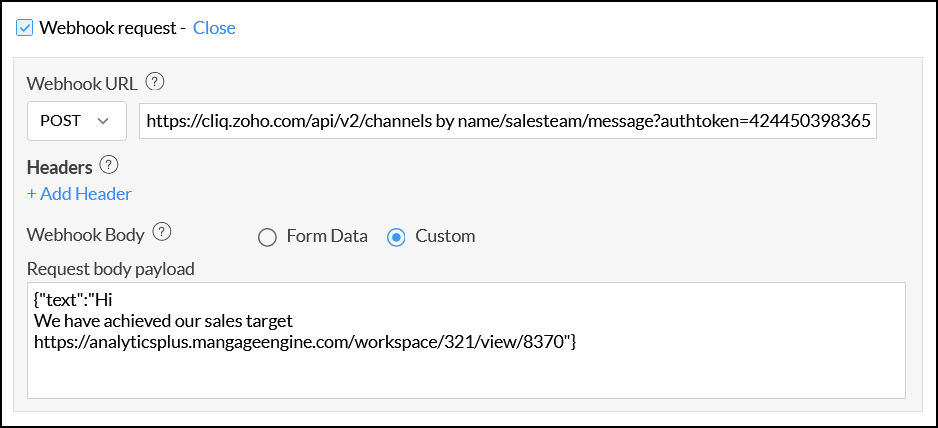
- Select the Webhook request checkbox from the Action to Perform section.
- In the notification configuration section that appears, configure the following options:
- Webhook URL: Select the URL type as Post, Put or Patch from the dropdown, and specify the corresponding application's webhook URL. In this example, we are delivering the webhook request to a Zoho Cliq [A popular chat application from Zoho] channel. So we have added the corresponding webhook URL.
- Headers: Specify the HTTP header which needs to be included in your webhook request.
- Webhook Body: Choose any one of the following options to add your webhook message.
- Form Data: Specify the Name and Value in the Parameters section.
- Custom: Enter the required message in the Request body payload section in the following format: {"text":"
"}
- Click Save to create your data alert.
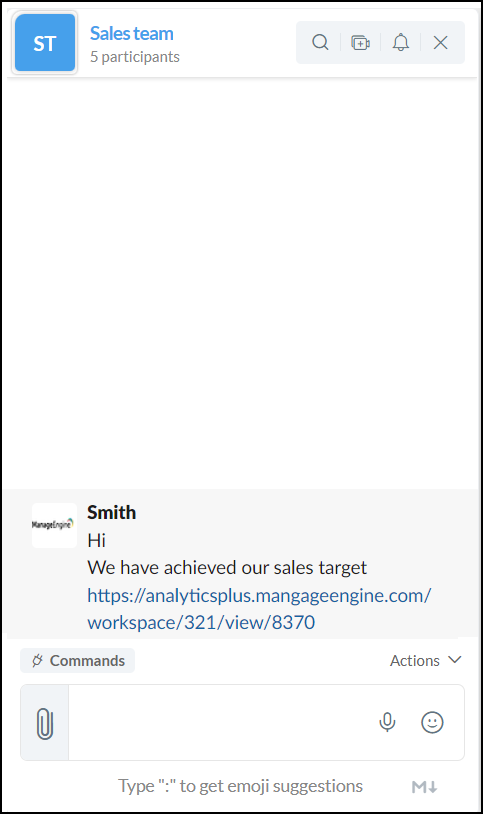
An alert message will be displayed on the corresponding platform when the data alert conditions are met. In the above example, we have specified a webhook request to deliver the message to a Zoho Cliq (a popular chat application from Zoho) channel when the data alert conditions are met.
12. Is it possible to create multiple alerts over a report?
Yes, you can create any number of alerts over a report.
13. How do I edit data alerts?
Follow the steps below to edit data alerts:
Open the report over which the alert was created.
Click the Alert icon and select Manage Alert.
In the Manage Alerts page, navigate to the alert that you wish to edit, click the More Actions icon and select the Edit option.

In the popup that appears, make necessary changes and click Save.
14. Who will be notified when alert conditions are met?
Analytics Plus enables you to notify users based on the channel selected to post notifications.
- Email: This option allows you to notify the Account Administrator, Organization Administrator, Workspace Administrators, and any other user you wish to notify.
- In-app notification: This option enables you to notify the Account Administrator, Organization Administrator, Workspace Admin, and the shared users of the respective report.
- Slack or Microsoft Teams message: This option allows you to post notifications to a particular group in Slack or Microsoft Teams.
- Webhook request: This option lets you post alert messages in various messaging services or trigger workflows in target applications.
15. Is it possible to include the report in the notification email?
Yes, you can choose to add the report by selecting the Include Report option. The report can be added either as an inline message or as an attachment using the corresponding options.
Note: The size of the attached report varies depending on the data in your current view. If the size exceeds 15MB, the notification mail will be sent to users without the report.
16. How often will the data alerts conditions be verified?
You can choose to verify data alerts in the following intervals, using the How often section while creating the data alert.
- Hourly
- Daily
- Weekly
- Monthly

17. How do I view the alert's history?
Follow the steps below to view when the data alert has been triggered in the past.
Open the required report over which the alert was created.
Click the Alert icon and select the Manage Alert option.
In the Manage Alert page, hover over the alert whose history you wish to access.

Click the Alert History icon. A calendar view appears, highlighting the days when the alert was triggered. Clicking on these highlighted days will display the alert runtime, triggered time, and the copy of the report when the alert was triggered.

18. Is it possible to execute data alerts instantly?
Yes. Follow the below steps to do this.
Open the required report over which the alert was created.
Click the Alert icon and select the Manage Alert option.
In the Manage Alert page, click the Run icon that appears on mouse over the required alert.

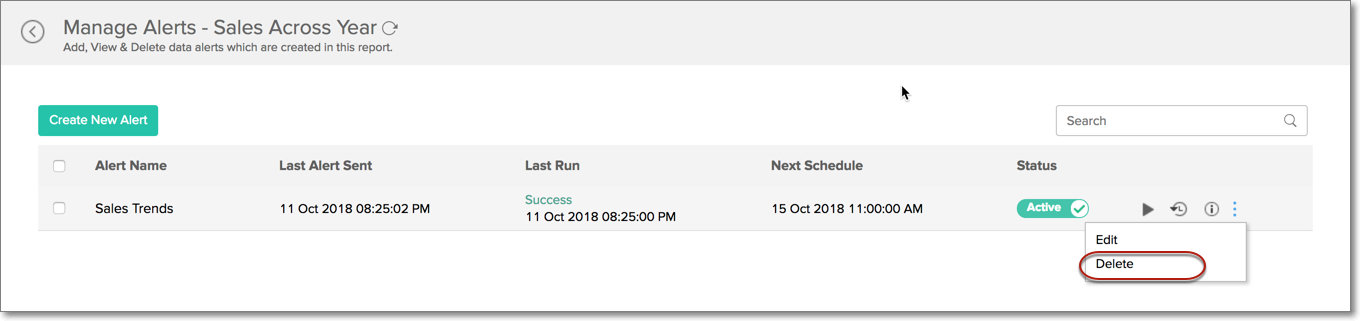
19. How do I delete a data alert?
Follow the steps below to delete a data alert:
Open the required report over which the alert was created.
Click the Alert icon and select the Manage Alert option.
In the Manage Alert page, click the Delete icon that appears on mouse over the required alert. Confirm your action in the popup that appears.
20. How do I manage all the alerts in the workspace?
To manage the data alerts in a workspace:
Click the Settings icon on the side panel, and navigate to the Alerts section.
Every alert created in the workspace will be listed on this page.

On mouse over a required alert, the following options will be available:
Status: This toggle button allows you to pause the data alert, and activate it when required. When the status is inactive, the conditions specified in the data alert will not be checked.
Run Now: This option allows you to run the data alert.
View Alert History: This option allows displays the various times the specific alert was triggered.
Info: This option displays the alert's created and modified times.
Edit: Select this option to modify the existing data alert.
Delete: Use this option to delete the required data alert.
You can also manage the various alerts created over a specific report by clicking the Alert icon on the top right corner of the report, and clicking the Manage Alerts icon.
