Windows 11 22H2 Feature Pack Deployment
This page explains how to download the Windows 11 22H2 dependency ISO file, upload it to the patch store, and deploy the September 2022 feature update using Patch Manager Plus — covering all edition and upgrade-path combinations and language-specific ISO file names.
- Deployment of the Windows 11 22H2 feature pack is supported only in Patch Manager Plus build versions 10.0.147 and above.
- The SSP (Self-Service Portal) method is not applicable for performing a feature pack upgrade from Windows 10 to Windows 11 via Patch Management.
Overview
Released in September 2022, Windows 11 22H2 is a feature update for Windows 11. For a full list of what's new, refer to the official Microsoft Windows 11 release information page. To install this feature update, the device must be running Windows 10 version 2004 or a later version. For a complete list of system requirements, refer to the Windows 11 specifications page.
Prerequisites
Complete the following checks before beginning the deployment.
- Run the Compatibility Check available at the end of the Microsoft Windows 11 specifications page to confirm all target systems meet the minimum requirements that affect upgradeability.
- Enable the Feature Pack option in Patch Database Settings:
- In Endpoint Central: navigate to Patch Mgmt → Settings → Patch Database Settings, click the Windows tab, and enable the Feature Pack option.
- In Patch Manager Plus: navigate to Admin → Settings → Patch Database Settings, click the Windows tab, and enable the Feature Pack option.
- Confirm that feature pack updates have not been declined under Decline Patches.
Patch IDs by Edition and Upgrade Path
Use the correct main patch ID and dependency patch ID based on the source OS version and the target edition. The dependency ISO must be uploaded before the main patch can be deployed.
Upload the ISO File
The dependency ISO file must be uploaded to the patch store before the main feature pack patch can be deployed. The steps below apply to all edition and upgrade-path combinations.
Builds 10.1.2282.6 and Above (Patch Manager Plus and Endpoint Central)
Two upload methods are available for these build versions.
Method 1 — Upload from the Error Prompt
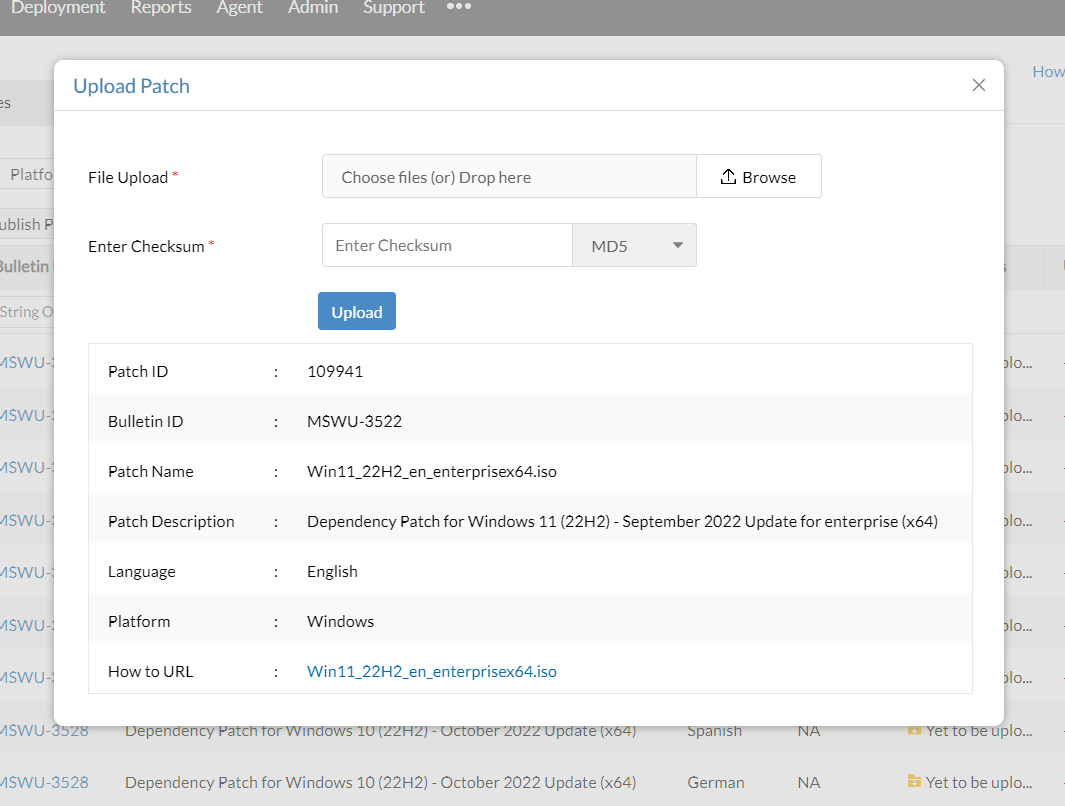
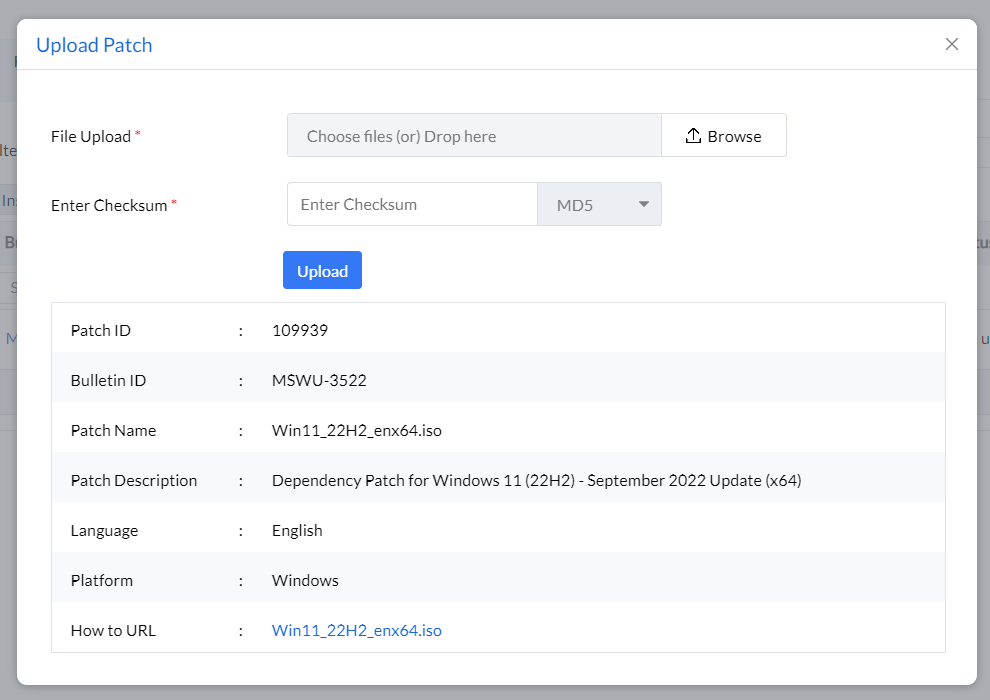
- Click Upload next to the Download failed error message.
- In the pop-up window, browse and select the downloaded ISO file.
- Choose a Checksum type (MD5 or SHA256).
- Enter the checksum value and wait for validation.
- Once validated, click Upload. The patch is ready to install once the upload completes.
The screenshots below show the upload dialog for each edition.
Enterprise Edition (Dependency Patch ID 109941)
Professional and Other Editions (Dependency Patch ID 109939)
Method 2 — Upload from Downloaded Patches
- In Patch Manager Plus: navigate to Patches → Downloaded Patches, search for the required patch, and click Upload under the Action column. Then follow Method 1 steps above.
- In Endpoint Central: navigate to Patch Mgmt → Downloaded Patches, search for the required patch, and click Upload under the Action column. Then follow Method 1 steps above.
Other Editions — Automated ISO Download by Product
For editions other than Enterprise, several products support automatic ISO download depending on the build version installed.
Endpoint Central Build 10.0.429 and Above
- Navigate to Patch Management → Patches → Supported Patches and search for Patch ID 109940 (64-Bit).
- Select the patch and click Download Patches. The installer and ISO file download automatically.
- After downloading, proceed to the deployment steps.
Patch Manager Plus Build 10.0.545 and Above
- Navigate to Patches → Supported Patches and search for Patch ID 109939 (64-Bit).
- Select the patch and click Download Patches. The ISO file downloads automatically.
- After downloading, proceed to the deployment steps.
Vulnerability Manager Plus Build 10.0.598 and Above
- ISO file download is automated in Patch Manager Plus for all editions except Windows 11 22H2 Enterprise. Follow the steps here to enable automatic ISO image download.
- After enabling, proceed directly to the deployment steps.
Builds Below 10.1.2282.6 — Manual ISO Placement
For earlier build versions, copy the ISO file manually into the patch store directory.
- Download the Windows 11 22H2 ISO file from the Microsoft 365 Admin Center.
- Locate the patch store directory:
- In Endpoint Central: navigate to Patch Management → Downloaded Patches → Settings → Patch Repository Location.
- In Patch Manager Plus: navigate to Patches → Downloaded Patches → Settings → Patch Repository Location.
- In Vulnerability Manager Plus: navigate to Patches → Downloaded Patches → Settings → Patch Repository Location.
- Copy the downloaded ISO file into the patch store directory and rename it according to the conventions below.
English ISO file names (64-Bit):
- Enterprise edition:
109941-Win11_22H2_en_enterprisex64.iso - All other editions:
109939-Win11_22H2_enx64.iso
For deployments in multiple languages, download the ISO for each required language and place all files in the patch store. See the language-specific ISO filename table below for the correct filename for each language.
Deploy the Windows 11 22H2 Feature Pack
Once the dependency ISO has been uploaded, deploy the main patch from the console using either a manual configuration or an Automated Patch Deployment task.
Manual Deployment — Upgrading from Windows 11
- In the server web console, navigate to the Missing Patches view.
- Select the applicable Windows 11 22H2 feature pack patch from the Patch IDs table above.
- Click Install Patch to deploy.
Manual Deployment — Upgrading from Windows 10
- In the server web console, navigate to the Supported Patches view.
- Select the applicable Windows 11 22H2 feature pack patch from the Patch IDs table above.
- Click Install Patch to deploy.
Automated Patch Deployment (APD)
- When creating an APD task, select the Feature Pack checkbox while defining the patch task criteria.
- Once the dependency ISO is in the patch store, the feature pack will deploy automatically to target computers during the next scheduled deployment window. A separate on-demand configuration can also be created for a specific patch if required.
Language-Specific ISO File Names
Rename the downloaded ISO file to match your language and edition before placing it in the patch store. Use the table below to find the correct filename.
Frequently Asked Questions
Yes, it is safe to update to Windows 11 version 22H2. However, it is generally recommended to take a backup of your system before upgrading to prevent data loss from unexpected issues.
To deploy the Windows 11 22H2 feature update via Patch Manager Plus, navigate to Admin → Settings → Patch Database Settings, click the Windows tab, and enable the Feature Pack option. Then follow the steps in the Deploy the Feature Pack section above.
To install the Windows 11 22H2 feature update, the device must be running Windows 10 version 2004 or a later version. For a complete list of system requirements, refer to the Windows 11 specifications page.
Related
- Deploy Windows 11 Version 21H1 Feature Update
- Deploy Windows 10 Version 21H1 Feature Update
- Deploy Windows 10 Version 20H2 Feature Update
- Deploy Windows 10 Version 1909 Feature Update
- Deploy Windows 10 Version 1903 Feature Update
- Deploy Windows 10 Version 1809 Feature Update
- Deploy Windows 10 Version 1803 Feature Update
- Automate Patch Deployment Tasks
- Scan Computers for Missing Patches
- Review System Health Status