Integrating Ansible with Applications Manager
- Overview
- How Ansible works in Applications Manager
- Prerequisites
- Configuring the Ansible integration
- Creating an Ansible Action
- Managing and running Ansible Actions
- Troubleshooting
- Related topics
Overview
Applications Manager can run Ansible playbooks automatically when an alarm is raised. Configure an Ansible control node once, then create Ansible Actions and associate them with monitors, thresholds, or alarm policies.
Ansible is an open-source automation platform for configuring systems, deploying software, and orchestrating IT tasks. Automation steps are stored in plain-text playbooks with the .yml or .yaml extension. Applications Manager connects to the control node over SSH or Telnet and runs the selected playbook with the arguments you provide.
How Ansible works in Applications Manager
- A monitor attribute crosses its threshold and Applications Manager raises an alarm.
- The Ansible Action associated with the alarm is triggered.
- Applications Manager connects to the Ansible control node using the configured credential.
- The selected playbook runs with the configured arguments. Alarm details such as monitor name, host IP, and severity can be passed as arguments.
- The result and playbook output are recorded in Execution Logs. An optional E-mail Action can notify you of the outcome.
Important: Ansible Actions open a connection to the control node and can change the state of your servers. Use playbooks and credentials with care.
Prerequisites
- A Linux machine with Ansible installed. The
ansible-playbookcommand must be available to the login user. - Network access from the Applications Manager server to the control node over SSH or Telnet.
- An SSH or Telnet credential saved in Applications Manager Credential Manager. Use an account with only the privileges required to run the playbooks.
- A playbook folder on the control node. The credential user must be able to read the folder and its sub-folders.
- Unattended playbooks. Interactive password options such as
-k,-K,--ask-pass,--ask-become-pass, and--ask-vault-passare not supported in Arguments. - Administrator access to add or edit the integration.
Configuring the Ansible integration
Go to Settings > Integrations (Add-On Settings) > IT Automation and select Ansible.
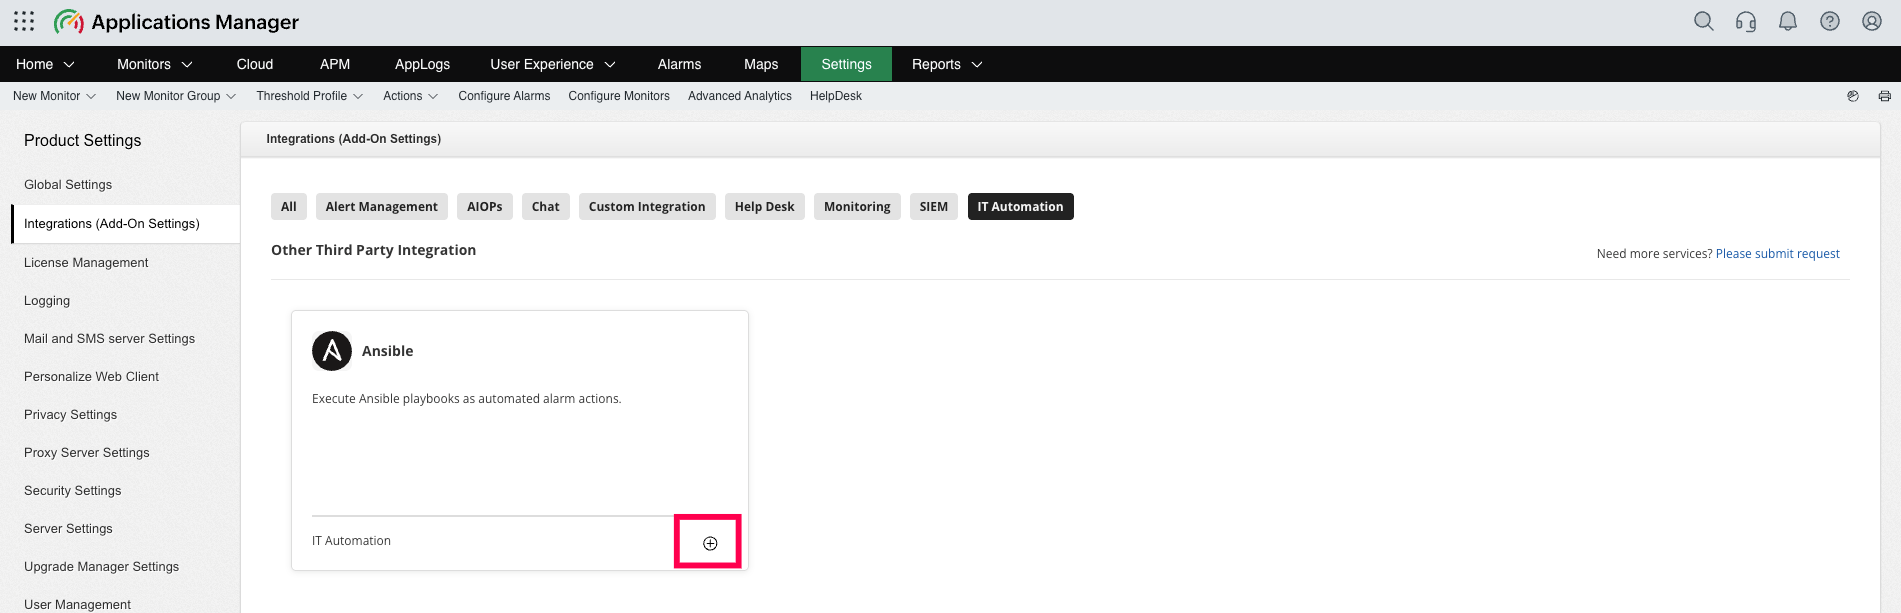
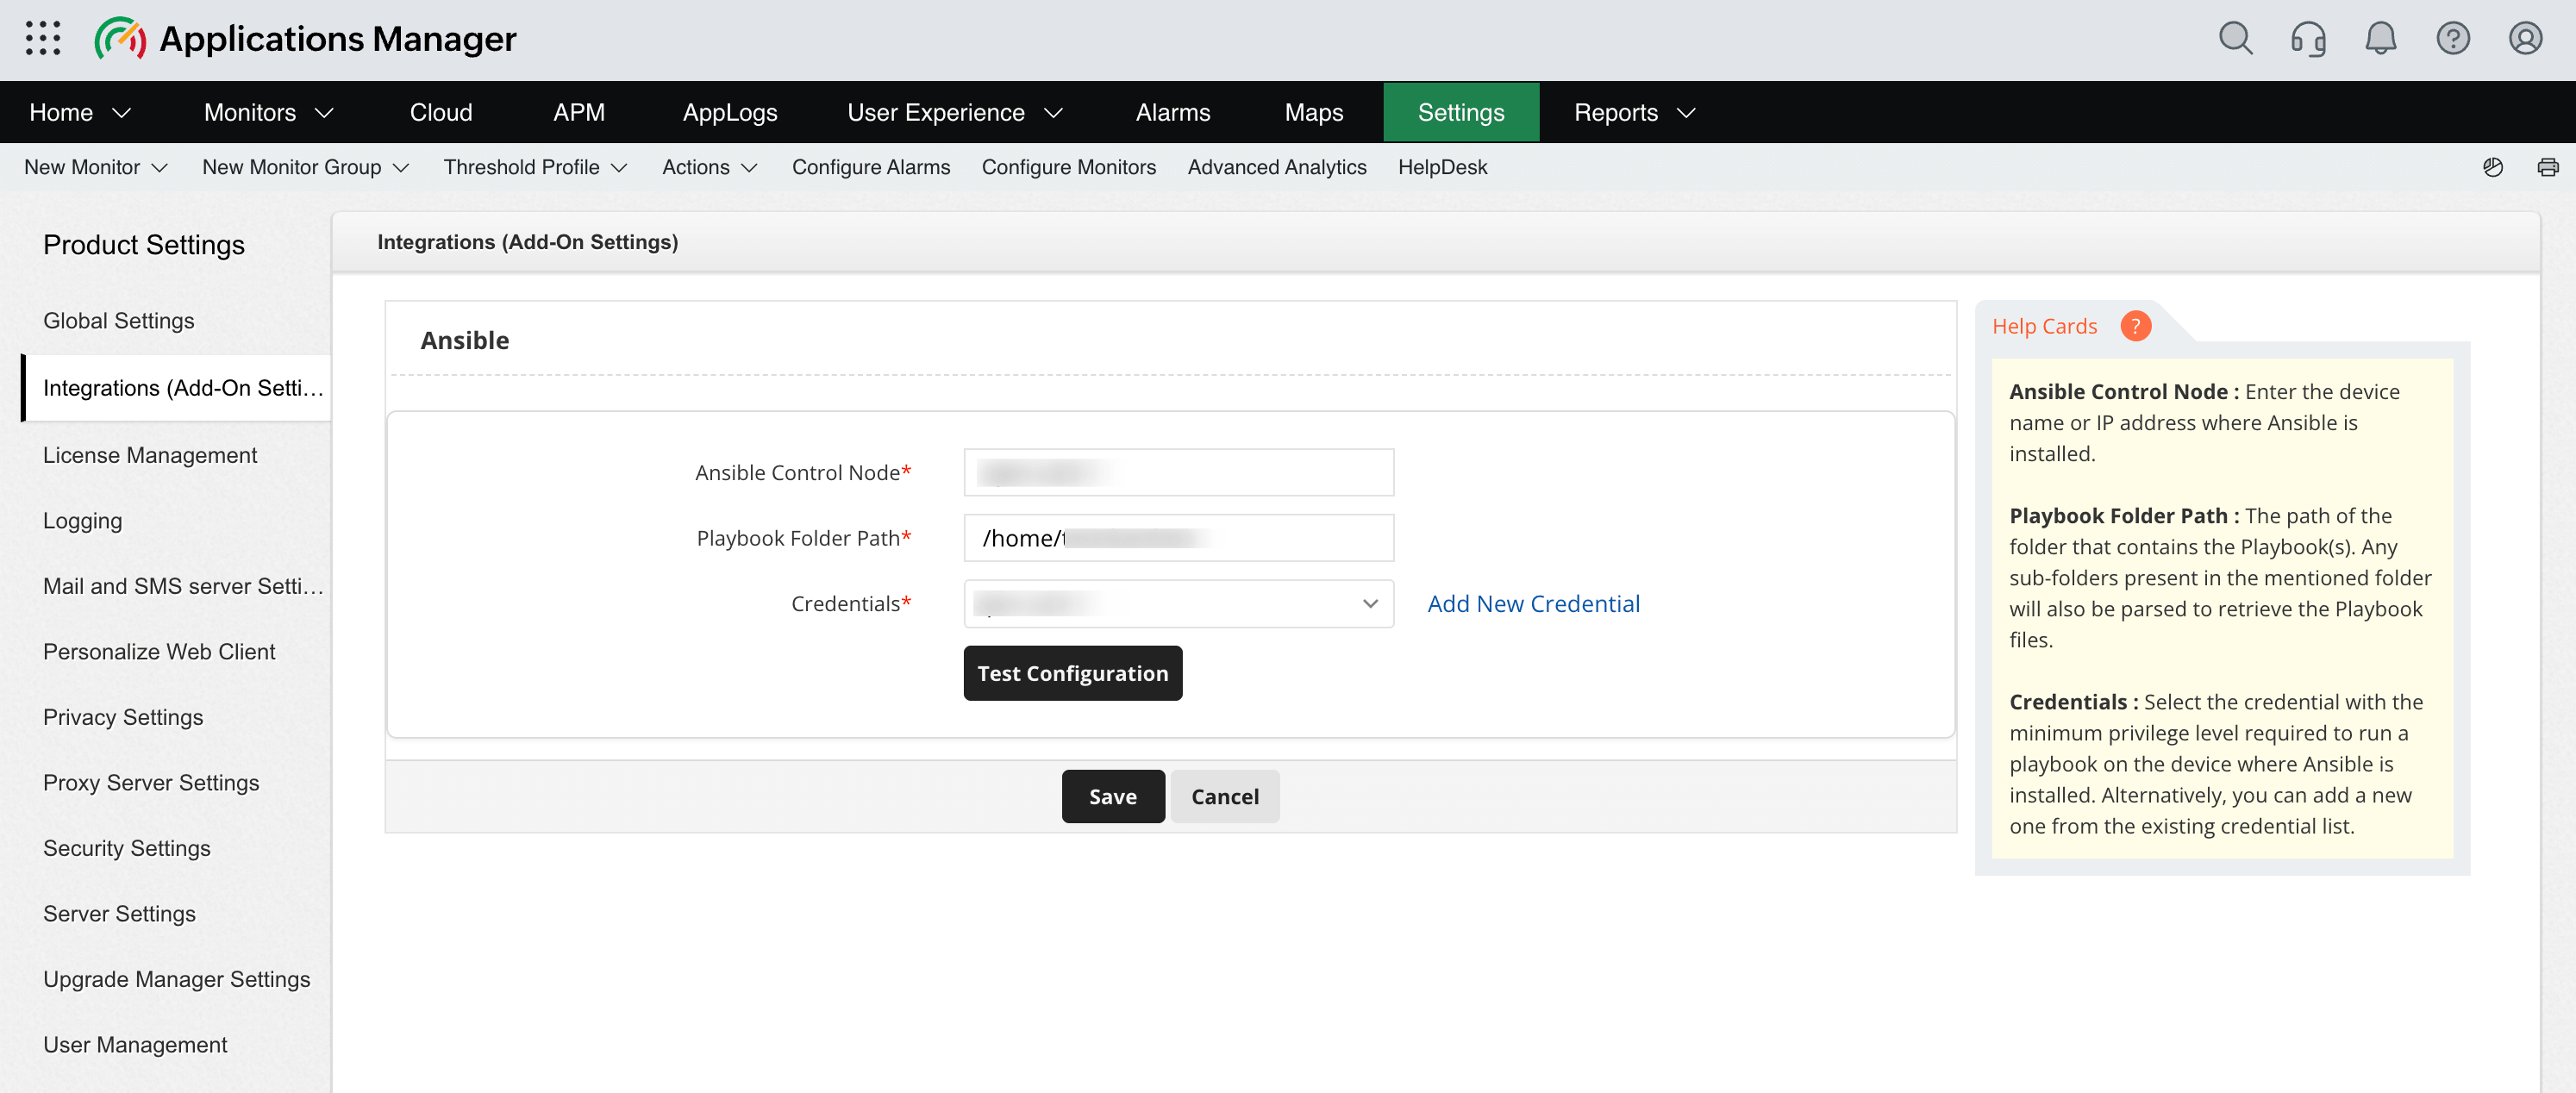
- Enter the Ansible Control Node host name or IP address.
- Enter the Playbook Folder Path, such as
/etc/ansible/playbooks. Applications Manager also scans sub-folders and accepts home-relative paths such as~/playbooks. - Select an SSH or Telnet credential from Credentials. Select Add New Credential to create a credential without leaving the page.
- Click Test Configuration to verify that the host and credential are reachable,
ansible-playbookis installed, and the playbook folder is accessible. - Click Save to store the integration. A successful test is recommended, but it is not required to save the configuration.
Managing the integration
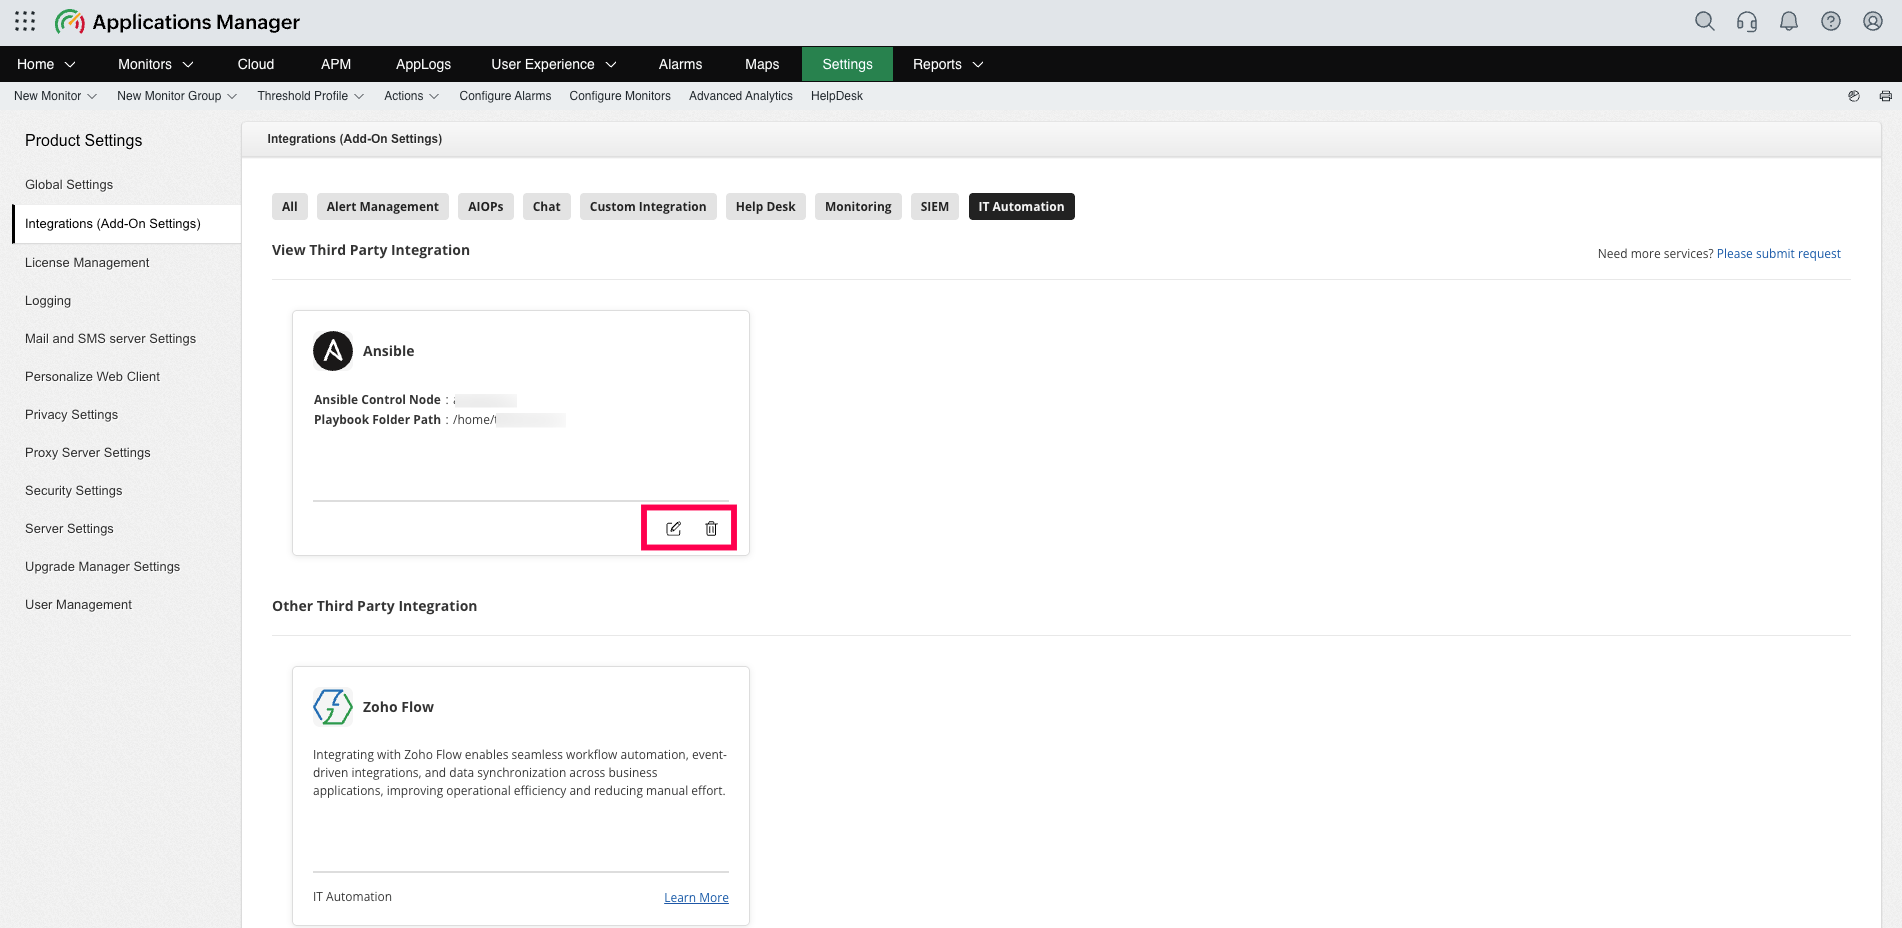
- The Ansible card displays the configured Control Node and Playbook Folder Path.
- Select Edit on the card to change the integration settings.
- Select Delete to remove the integration. Deleting the integration also deletes all Ansible Actions created under it after confirmation.
- Every add, update, and delete operation is recorded in the Audit Log under Ansible Integration.
Creating an Ansible Action
Use either Actions > Ansible Action or Settings > Actions > Ansible > Add New. Configure the Ansible integration before creating an action.
Action settings
| Field | Description |
|---|---|
| Profile Name | Name used to identify the action in action lists and alarm associations. |
| Playbook Path | Playbook to run from the configured folder. Select the refresh icon to reload the list after adding playbooks. |
| Arguments | Optional command-line arguments appended to ansible-playbook. For example, --extra-vars severity=$SEVERITY --extra-vars monitor=$MONITORNAME. Use the tag picker to insert alarm variables. |
| Timeout (seconds) | Maximum run time from 30 to 3600 seconds. The default is 300 seconds. |
| Success notification | E-mail Action sent when the playbook completes successfully. |
| Failure notification | E-mail Action sent when the playbook fails or times out. |
| Execute Action based on Business Hours | Restricts execution to a selected Business Hours profile during or outside business hours. |
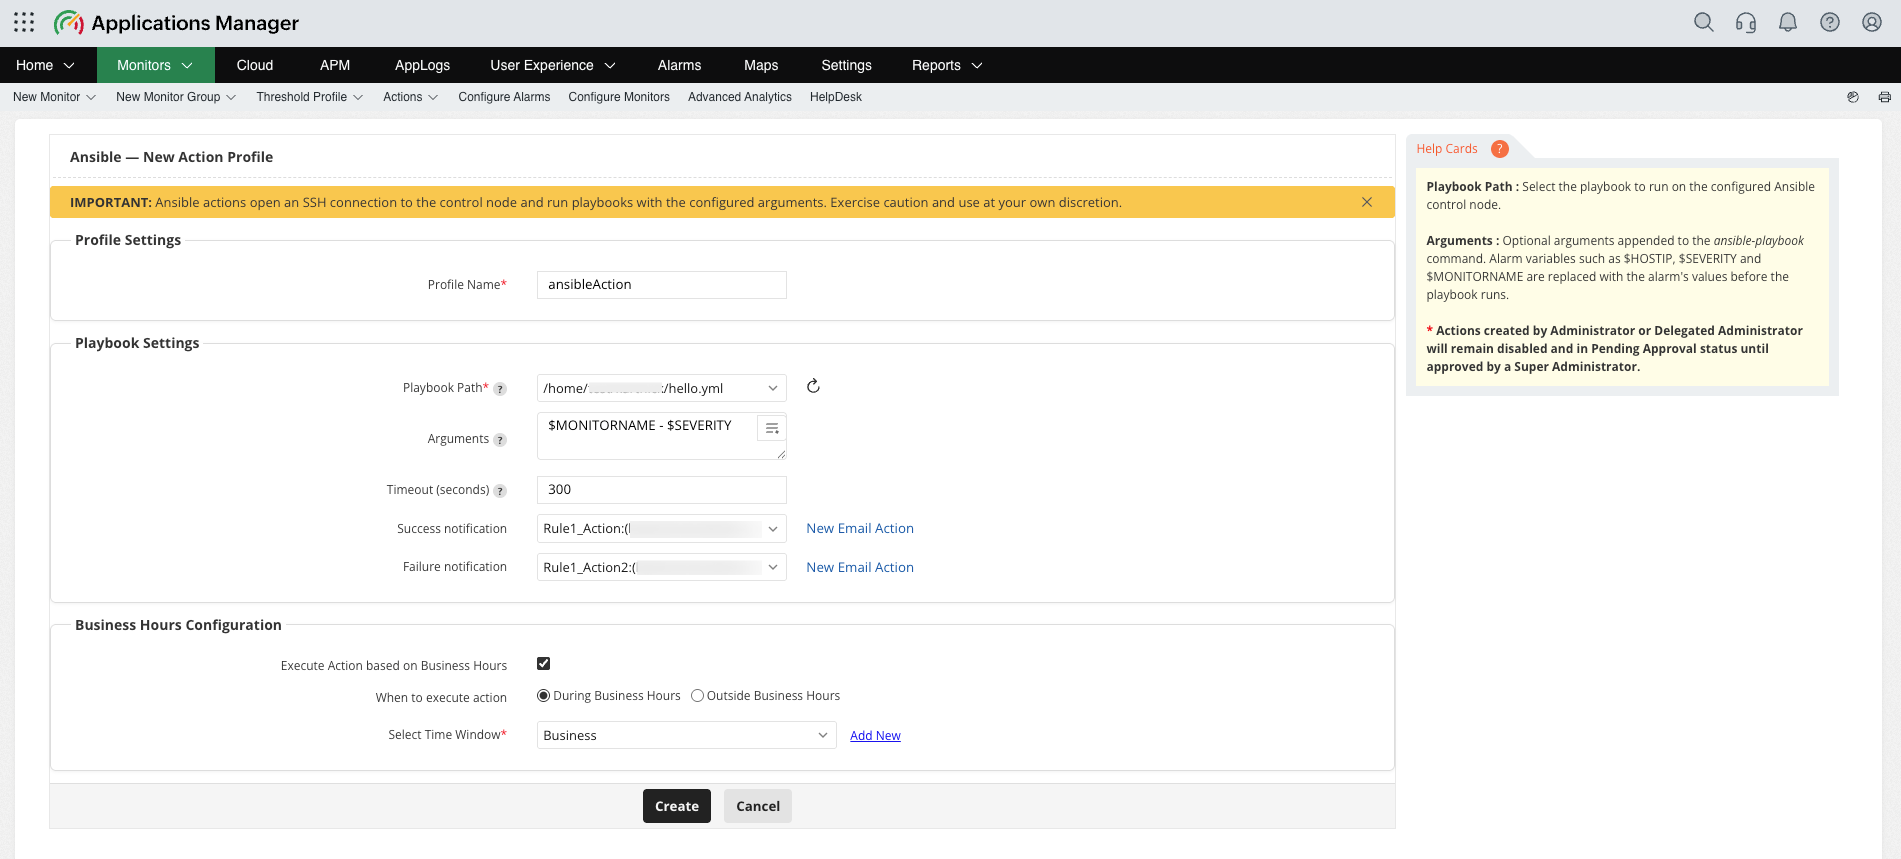
- Enter a Profile Name.
- Select the Playbook Path and optionally enter Arguments.
- Set the Timeout and select success and failure notifications.
- Configure Business Hours if the action should run only during or outside a specific time window.
- Click Save or Update.
Approval workflow
- An Administrator or Delegated Administrator creates or edits an action in Pending Approval status. The action remains disabled until a Super Administrator approves it.
- A Super Administrator approves a pending action by opening it and saving it. The Actions page displays the approval status and an Approve button.
- Actions created by a Super Administrator are approved immediately.
- Unapproved actions are not executed by alarms, manual execution, or the REST API.
Managing and running Ansible Actions
The Ansible section on the Actions page lists the profile name, playbook path, arguments, timeout, notification actions, usage, Business Hours setting, approval status, and Edit or Execute controls.
- Use Add New, Delete, Enable, or Disable to manage selected actions.
- Use Audit Log to review action changes.
- Use Export to download the listed actions as a CSV file.
- Use Execution Logs to review each playbook run, including the control node, playbook, arguments, trigger, status, and returned message. Logs are retained for 30 days.
After approval, associate the action with threshold profiles, monitor or monitor-group alarms, alarm escalation, or manual execution from the Alarms page action menu. The action runs when its associated alarm is generated, subject to the configured Business Hours setting.
Execution status
- Success: The playbook finished with exit code 0.
- Fail: The playbook returned a non-zero exit code or could not be started.
- Timed out: The run exceeded the configured timeout and is reported as a failure.
The full ansible-playbook output is available in Execution Logs. Applications Manager sends the configured Success or Failure E-mail Action after execution.
Troubleshooting
| Symptom | What to check |
|---|---|
| Test Configuration: Could not connect to the Ansible control node | Verify the host name or IP address, network access from the Applications Manager server, and the selected credential. |
| Test Configuration: ansible-playbook was not found | Install Ansible on the control node or add it to the PATH of the credential user. |
| Test Configuration: The playbook folder is not accessible | Verify the folder path and confirm that the credential user can read it. |
| The Playbook Path list is empty | Verify that the configured folder or its sub-folders contain .yml or .yaml files, then select the refresh icon. |
| The action is saved but never runs | Check whether the action is pending approval, disabled, outside its Business Hours window, or not associated with the alarm. |
| The action reports Timed out | Increase the timeout up to 3600 seconds or optimise the playbook. |
| Arguments are rejected | Remove interactive password options such as -k, -K, or --ask-*. Use --vault-password-file or the integration credential. |