High availability
Analytics Plus allows users to withstand server failures and application downtimes by establishing redundancy through the high availability functionality. Please note that two servers are required to configure a high availability cluster. When the primary server is affected, the standby server configured will automatically take over and continue to let users access the application.
- High availability in Analytics Plus
- Prerequisites
- Setting up the high availability configuration
- Setting up a common IP address
- Changing the server's credentials and port number
- Migrating the primary or standby server
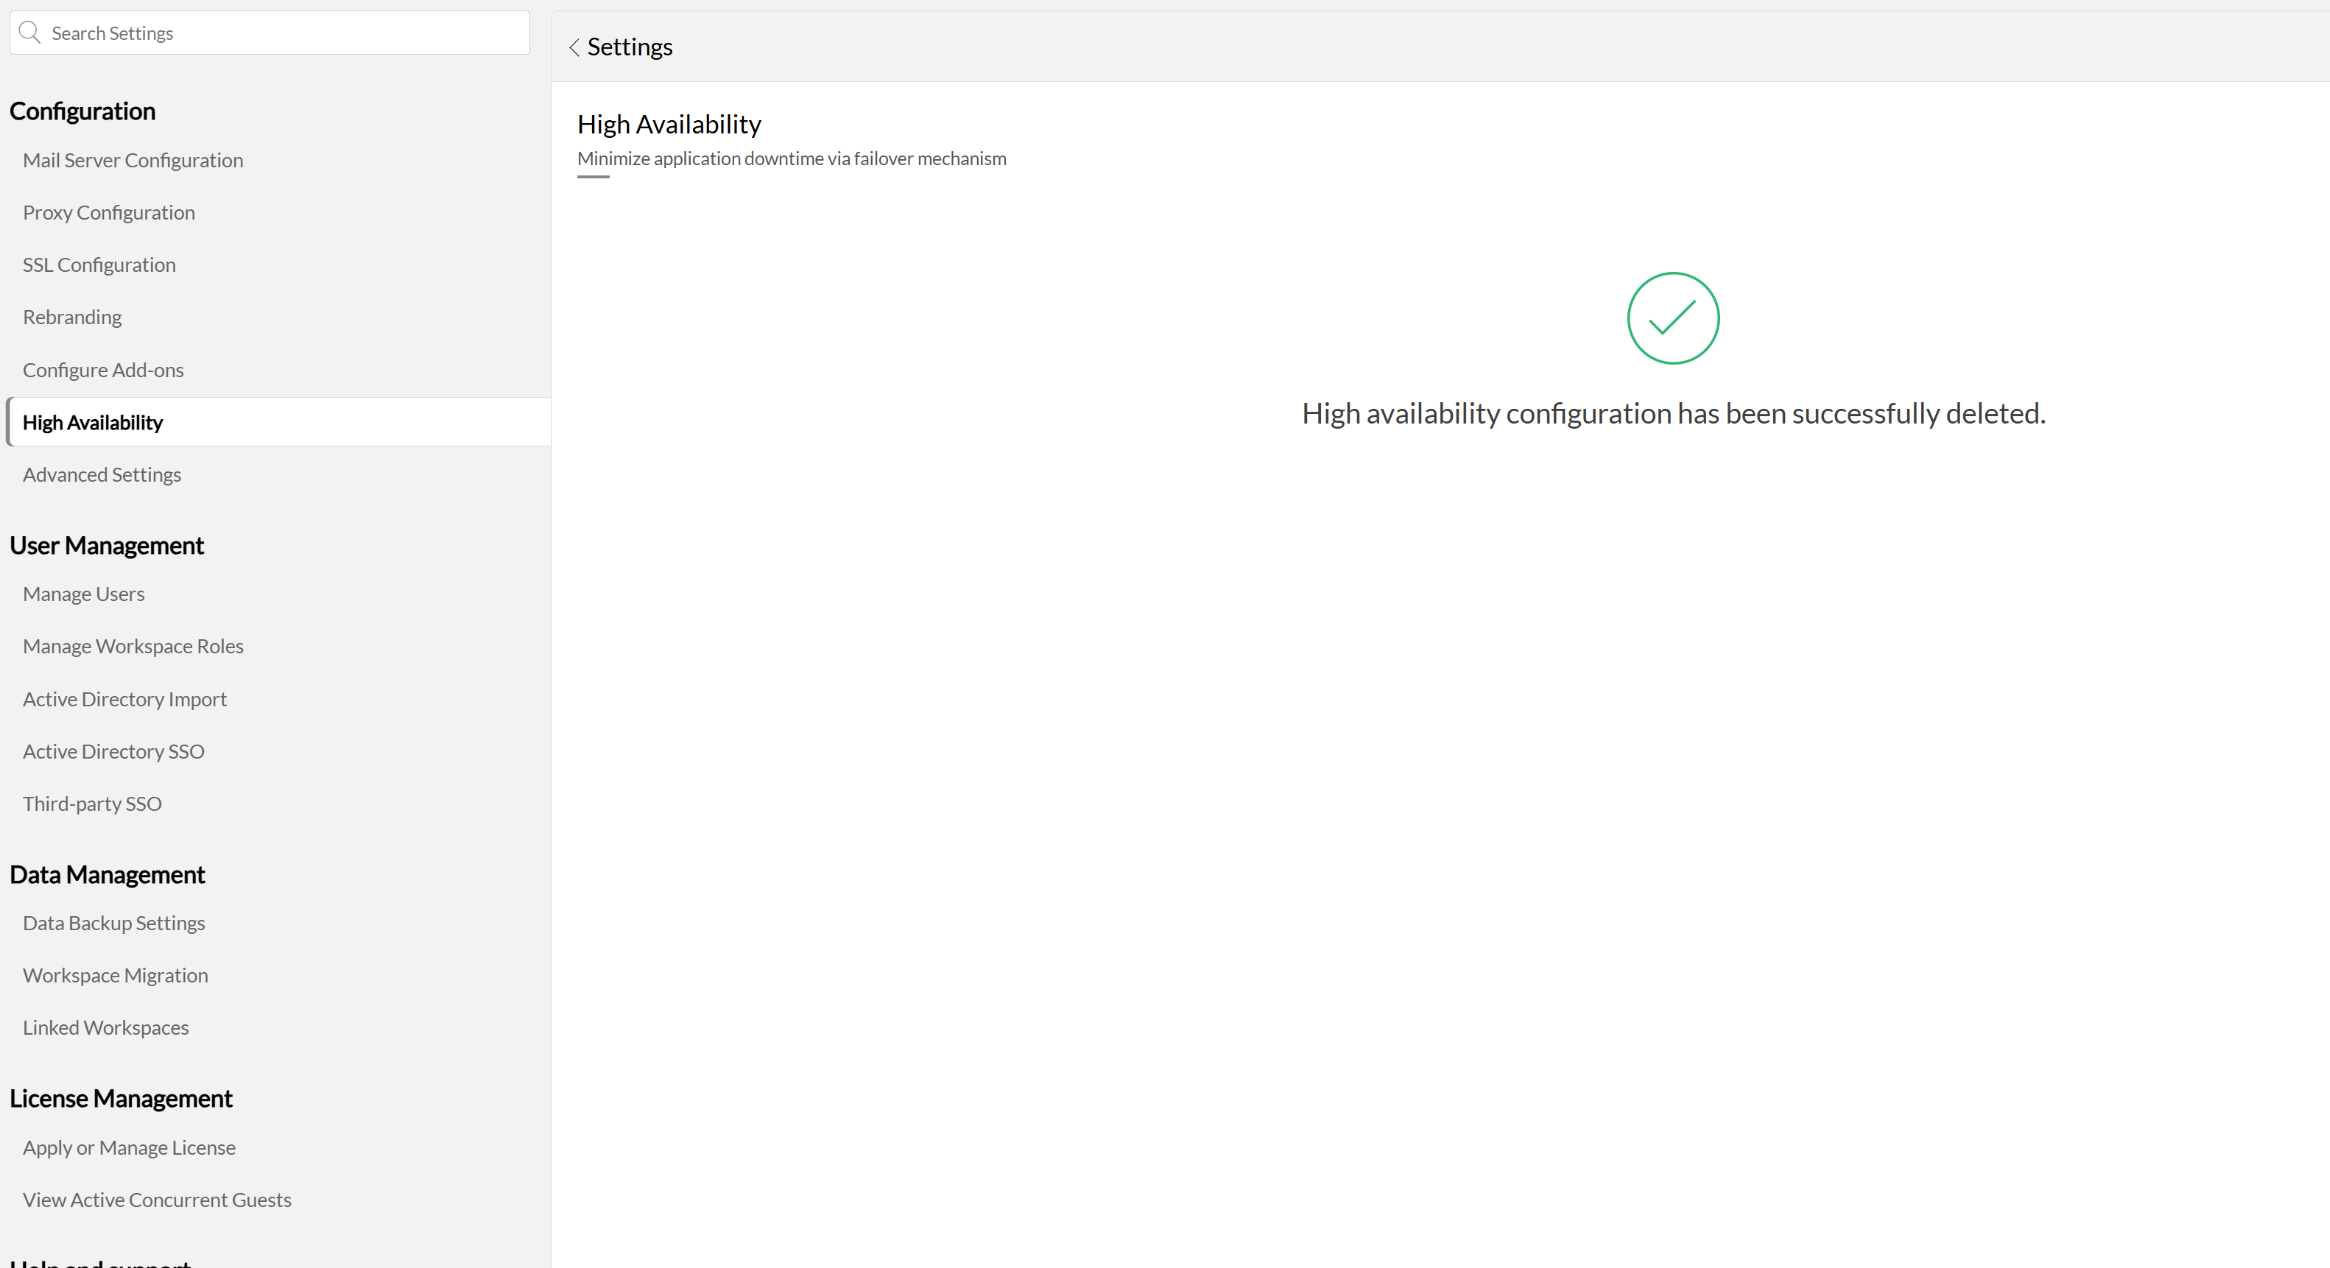
- Deleting the high availability configuration
High availability in Analytics Plus
By configuring high availability in Analytics Plus, you can easily establish redundancy and ensure business continuity during application downtime. To set up high availability, you will need two servers, one to be configured as the primary server, and the other to be installed as the standby server. On configuring the high availability cluster, data replication will periodically occur between the primary and standby servers.
In cases where the primary server fails, or the Analytics Plus application installed on the primary server faces downtime, the standby server will take over. The application installed on the standby server will automatically start, with up-to-date data, reports, and dashboards, thereby providing a seamless continuance of application usage. The standby server now becomes the primary server, and when the affected primary server is fixed, on starting the Analytics Plus application installed on the primary server, it will then function as the standby server.
Note: Analytics Plus users on build 4750 or above can configure high availability by simply installing a standby server. Click the corresponding links to learn more about configuring the standby server in Windows and Linux installations respectively.
Prerequisites
- Both the primary and the standby servers should be running in the same time zone and network.
- The primary and standby servers should be assigned static IP addresses.
- For Windows installations, it is recommended to have both servers in the same domain, to facilitate easier sharing of data. In scenarios where the servers are in different domains or aren't a part of any domain, the file-sharing configuration must be set up. To learn more about configuring file sharing, click here.
- The operating system and the hardware architecture of both the primary and standby servers should be the same.
- To restart the application, stop the standby server before proceeding to restart the primary server.
- Always start both servers with administrator permissions, and start and stop the application only through the wrapper service.
- Ensure your primary and standby servers have the recommended software and hardware configuration. Click here for the system requirements.
Setting up the high availability configuration
To configure high availability in Analytics Plus, you will need to install the application in two different servers, one of which will be your primary server, and the other the standby server. To learn more about installing Analytics Plus, click here.
High availability can be configured from the Settings panel after installing Analytics Plus in the two servers. Ensure that both servers meet the required prerequisites before proceeding with the configuration.
- Configuring High availability in a Windows installation
- Configuring High availability in a Linux installation
Configuring High availability in a Windows installation
Follow the steps below to configure high availability in a Windows installation:
Install Analytics Plus in the primary and standby Windows servers.
In the standby server, open command prompt as an administrator and navigate to the <Analytics Plus home>/bin directory.
Run the command grpcagent.bat to start the gRPC agent.
In the primary server, open Analytics Plus and go to Settings >> High Availability and click Continue.
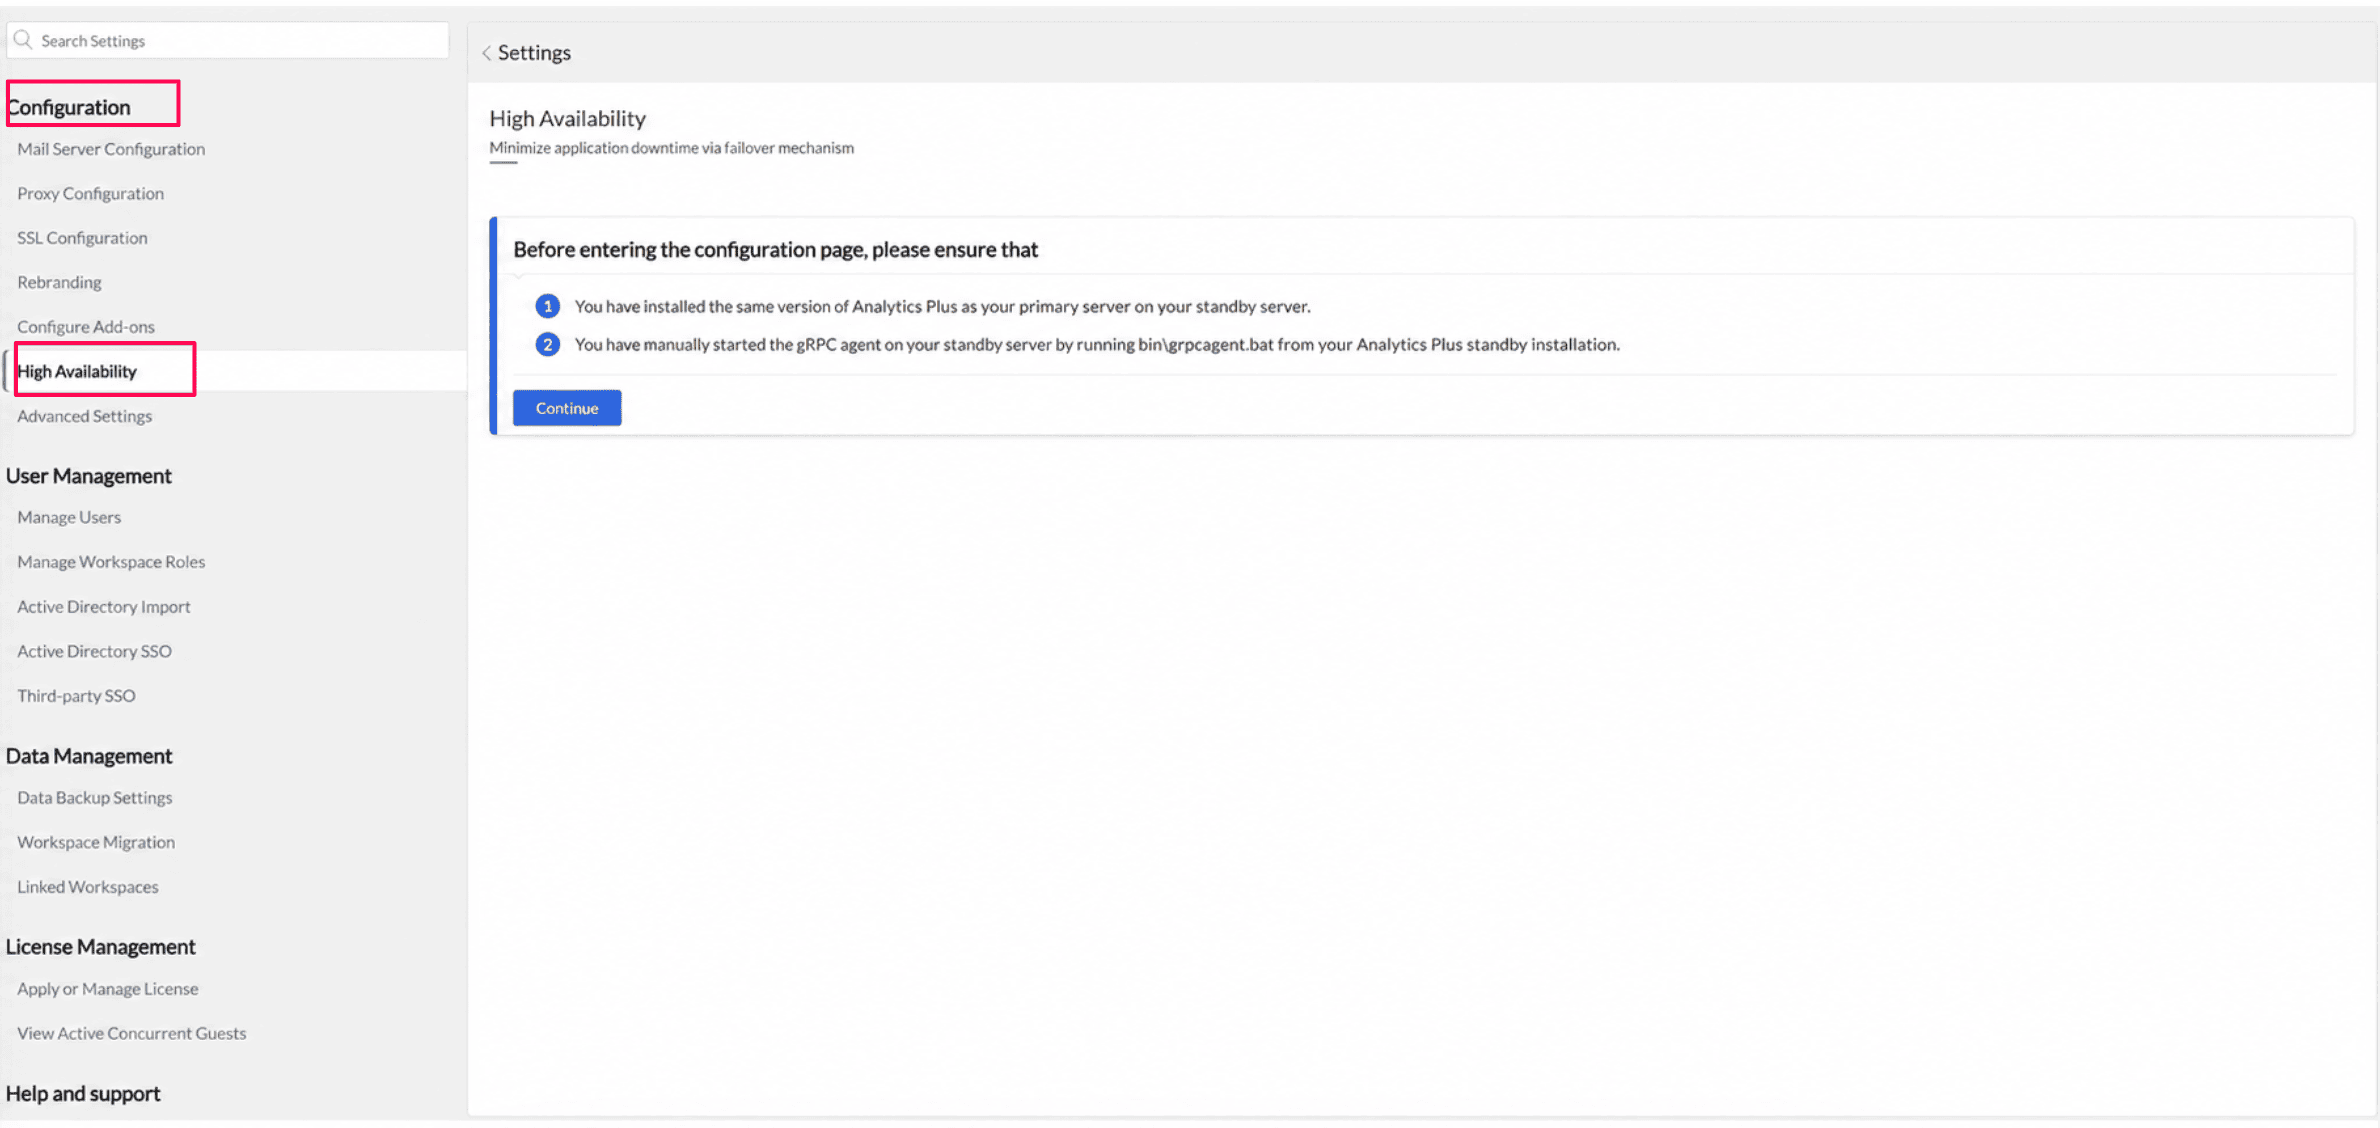
You can see that the Primary Server Deployment and Primary Server Build Version details are displayed automatically.
Enter the static IP addresses of the primary server and standby server.
Select Domain if both servers belong to the same domain, or Non-Domain if they belong to different domains.
For a non-domain configuration, enter the username and password of the primary and standby servers.
Click Save to configure high availability.
After successful configuration, restart the primary server.
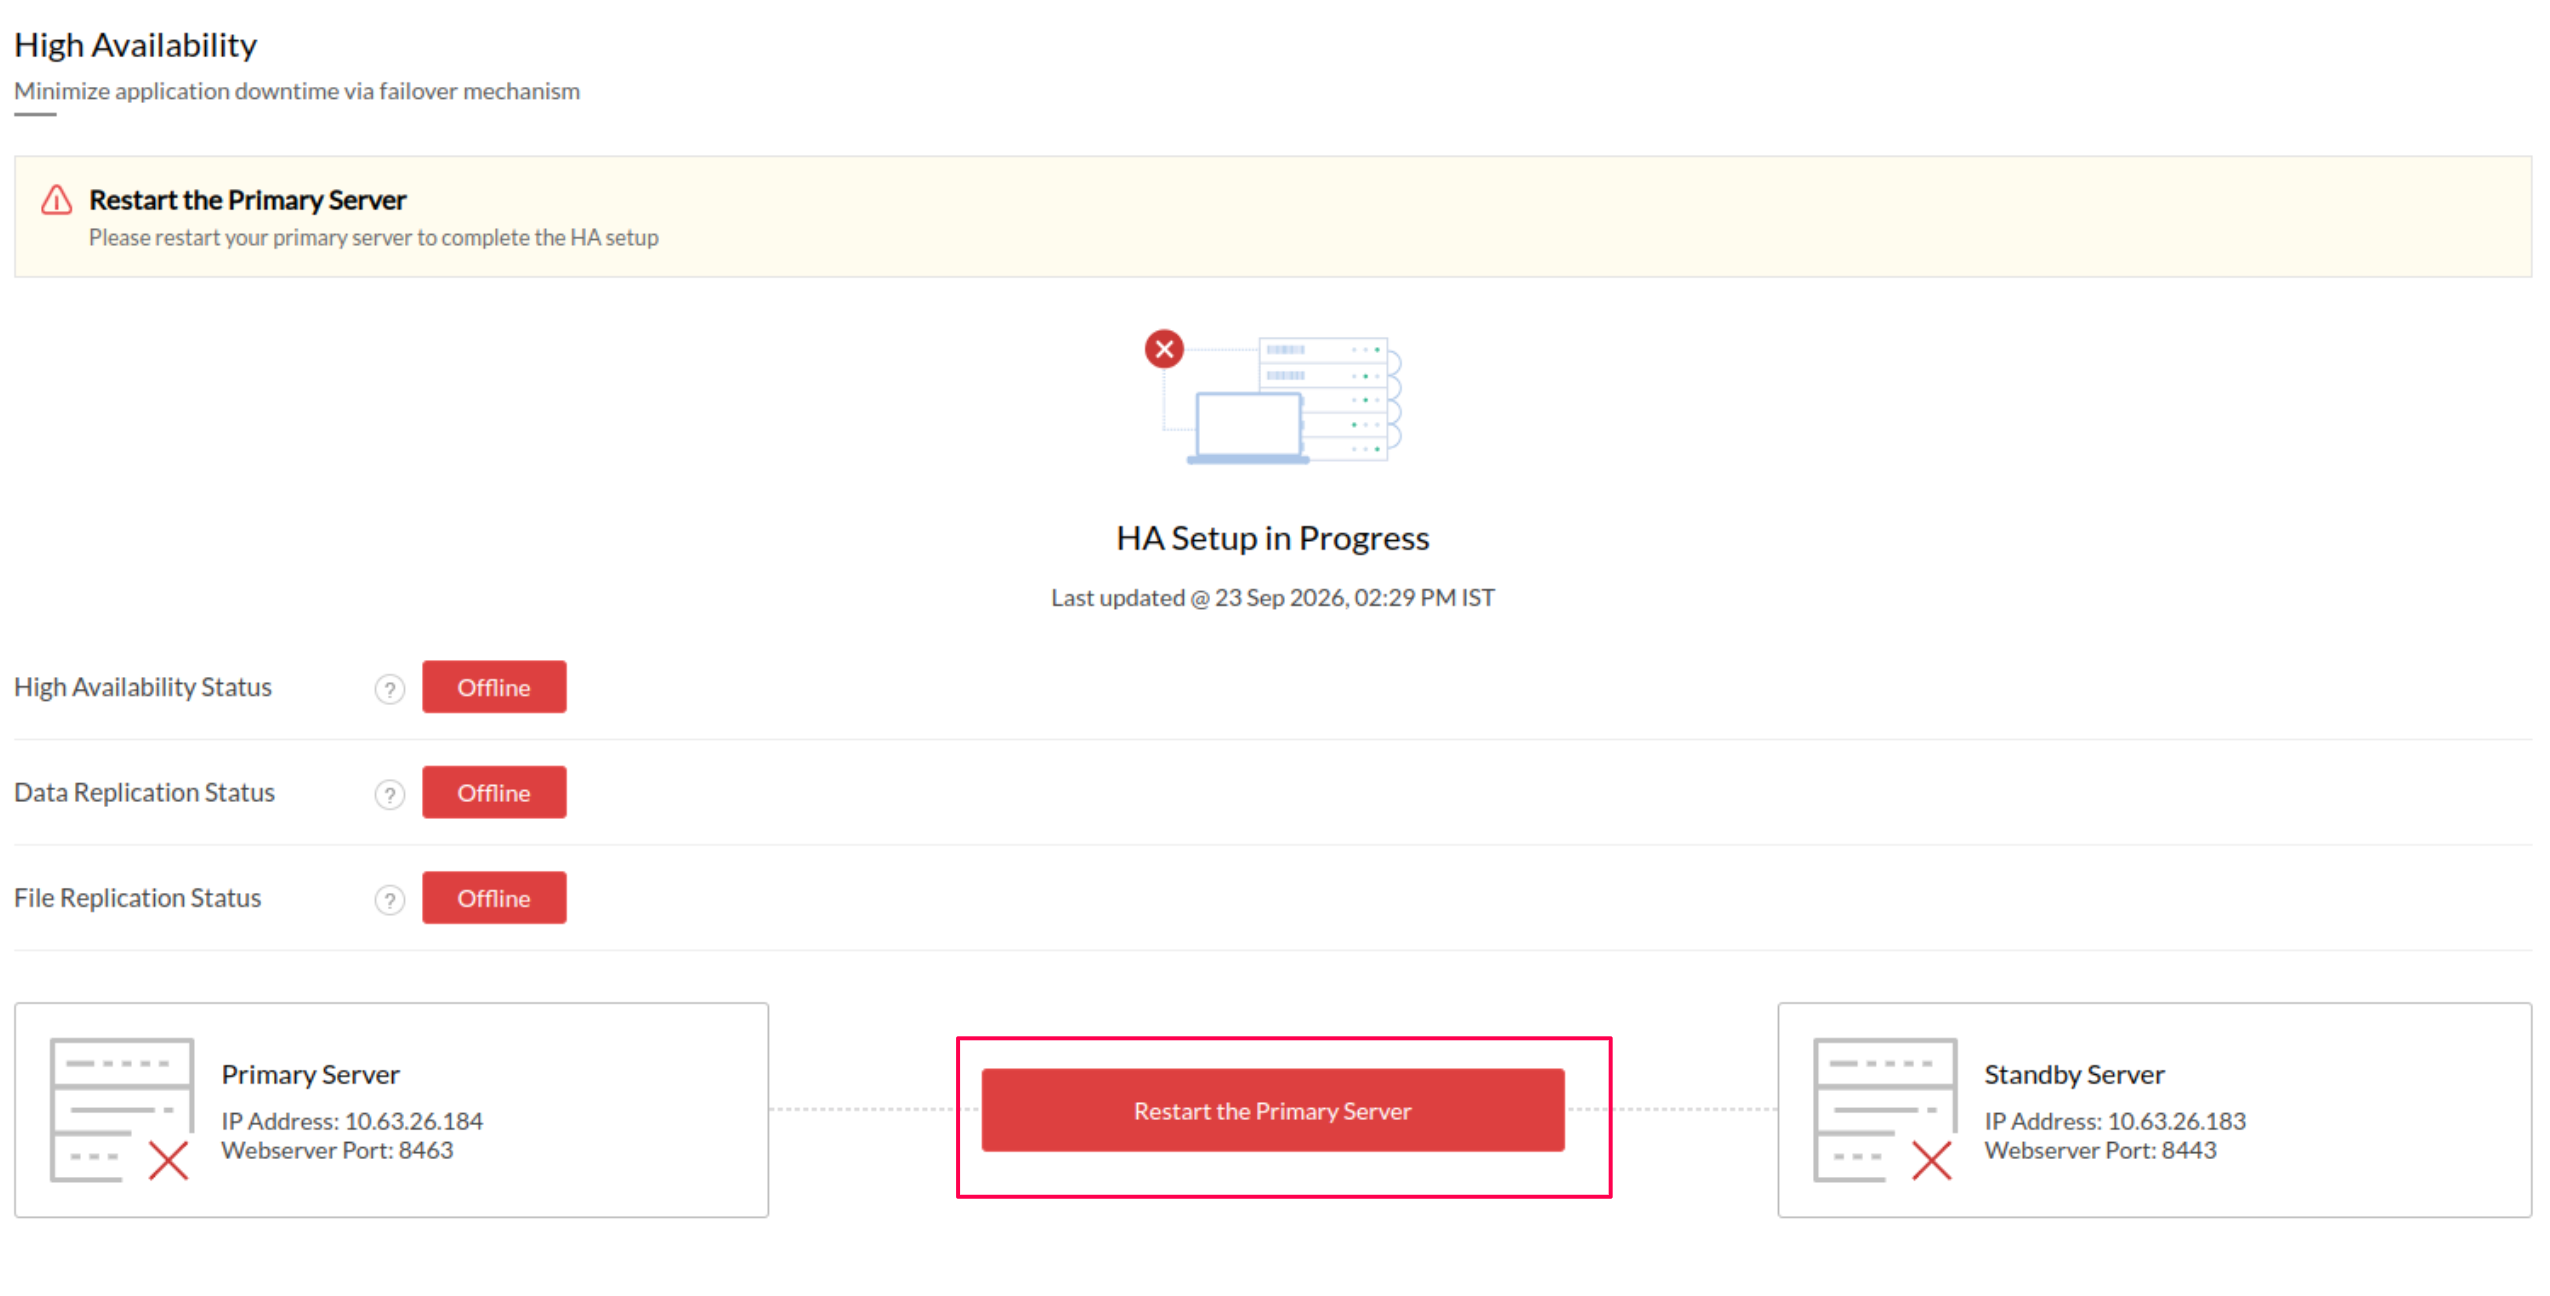
11. After the primary server is restarted, restart the standby server. Verify that the High Availability Status and Replication Status are online.
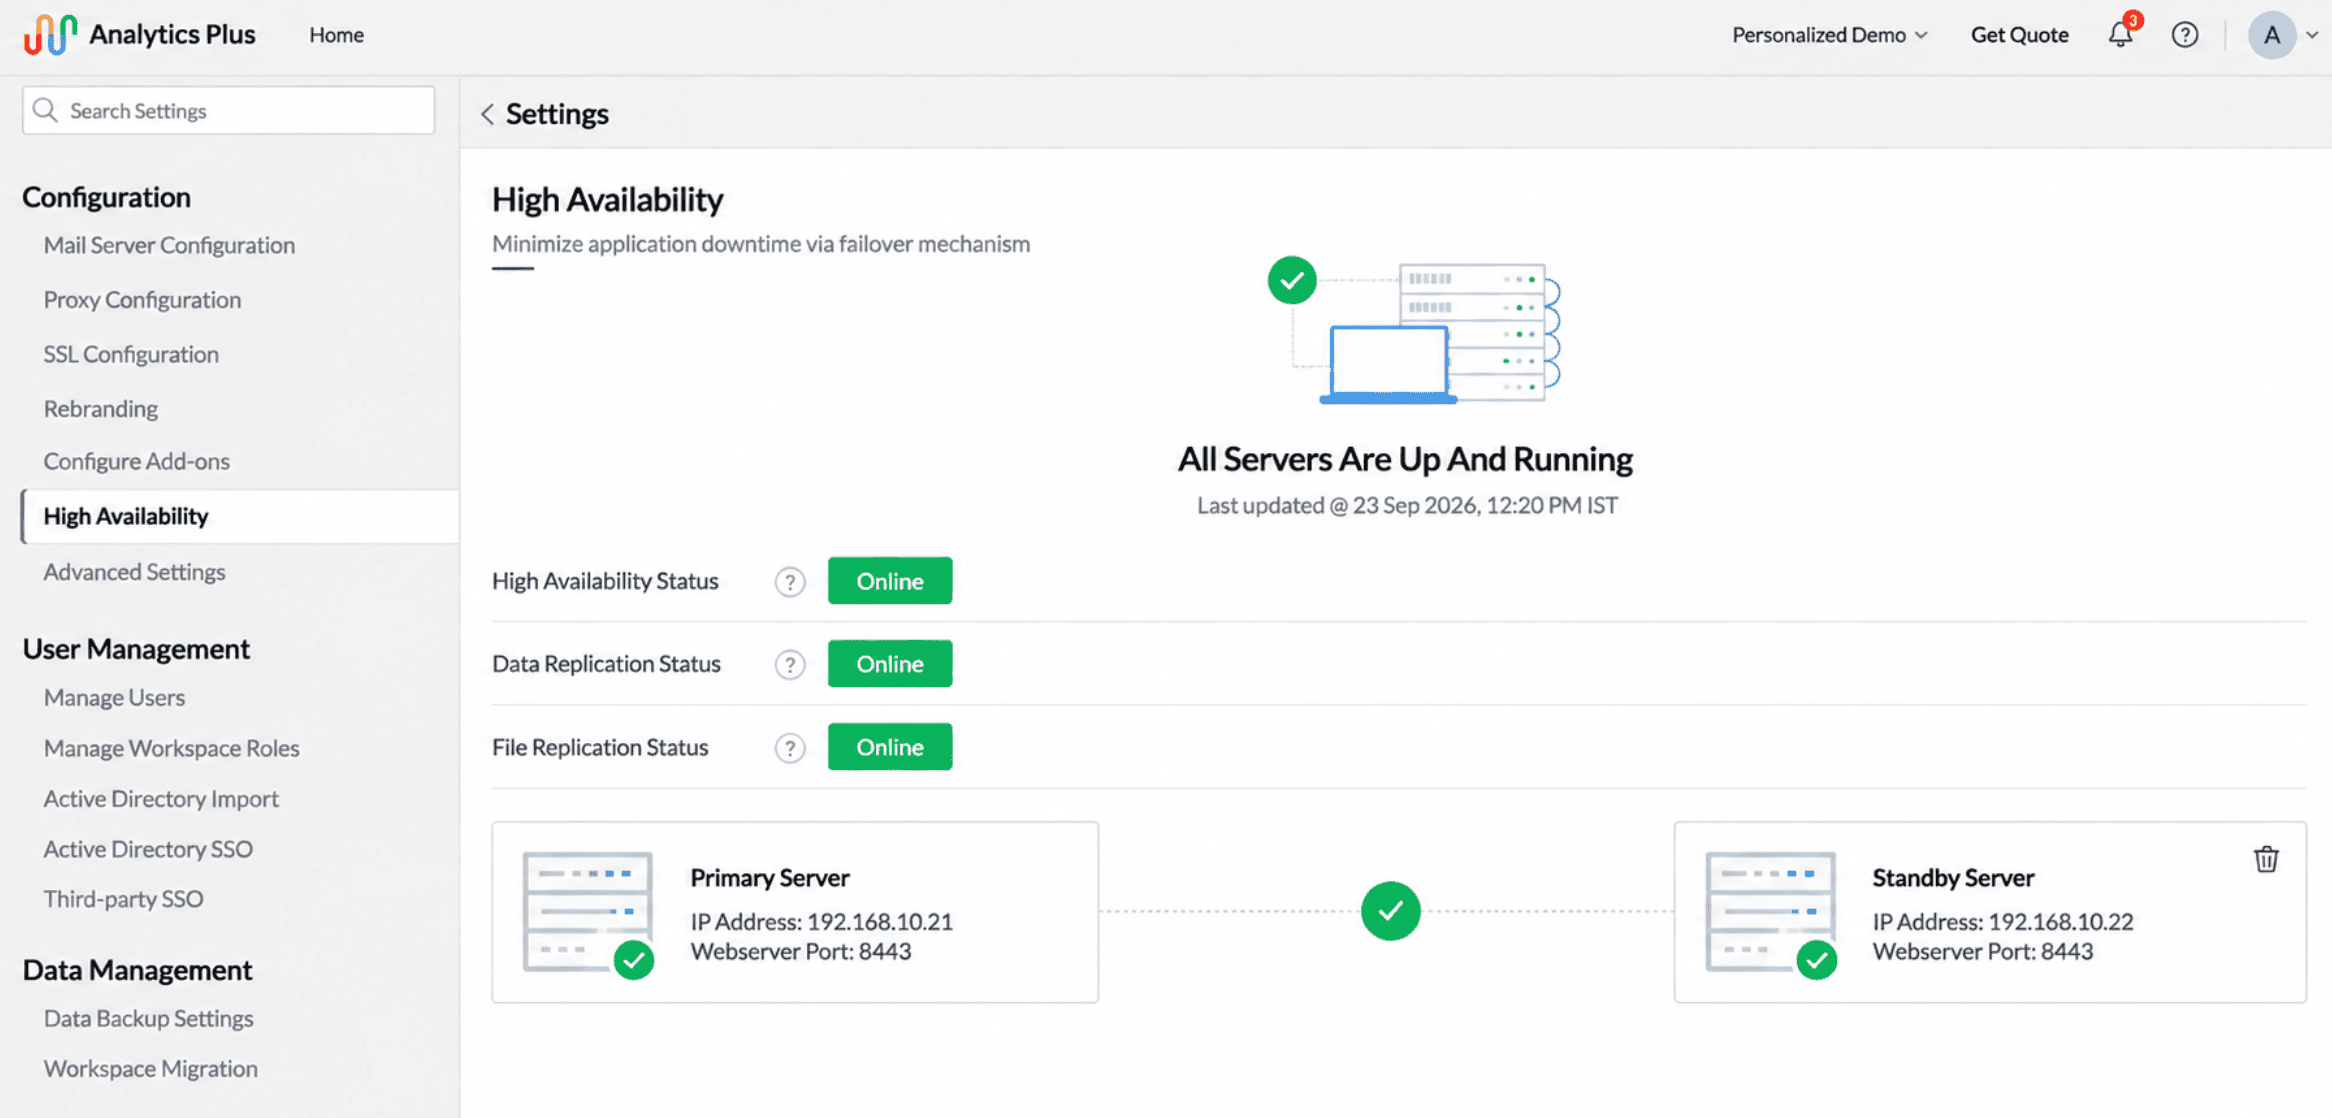
You will now need to configure file sharing between your primary and standby servers to ensure the data in both servers stays up-to-date. Head to your primary server, configure file sharing, and restart the Analytics Plus application. (To learn more about configuring file sharing, click here.) On successfully configuring file sharing, restart the Analytics Plus application in your primary server with admin privileges, and when the primary server is online, start the Analytics Plus application installed in your standby server. (To learn more about restarting the application with admin privileges, click here.)
Setting up file sharing
Follow the steps below to configure file sharing between your primary and standby servers in a Windows installation. You can configure file sharing for primary and standby servers that are in the same domain, or for servers that are in different domains or a workgroup. Note: File sharing must be configured in both the primary and standby servers.
File sharing within a domain
Follow the steps below to configure file sharing between two servers that are in the same domain in a Windows installation. Important note: File sharing must be configured on both the primary and the standby servers. The primary server's installation directory should be shared with the standby server and vice-versa.
- Navigate to the <Analytics Plus home folder>, right-click the folder, and select Properties.
- Head to the Sharing tab and click Advanced Sharing.
Enable the share this folder checkbox and click Permissions > Add.
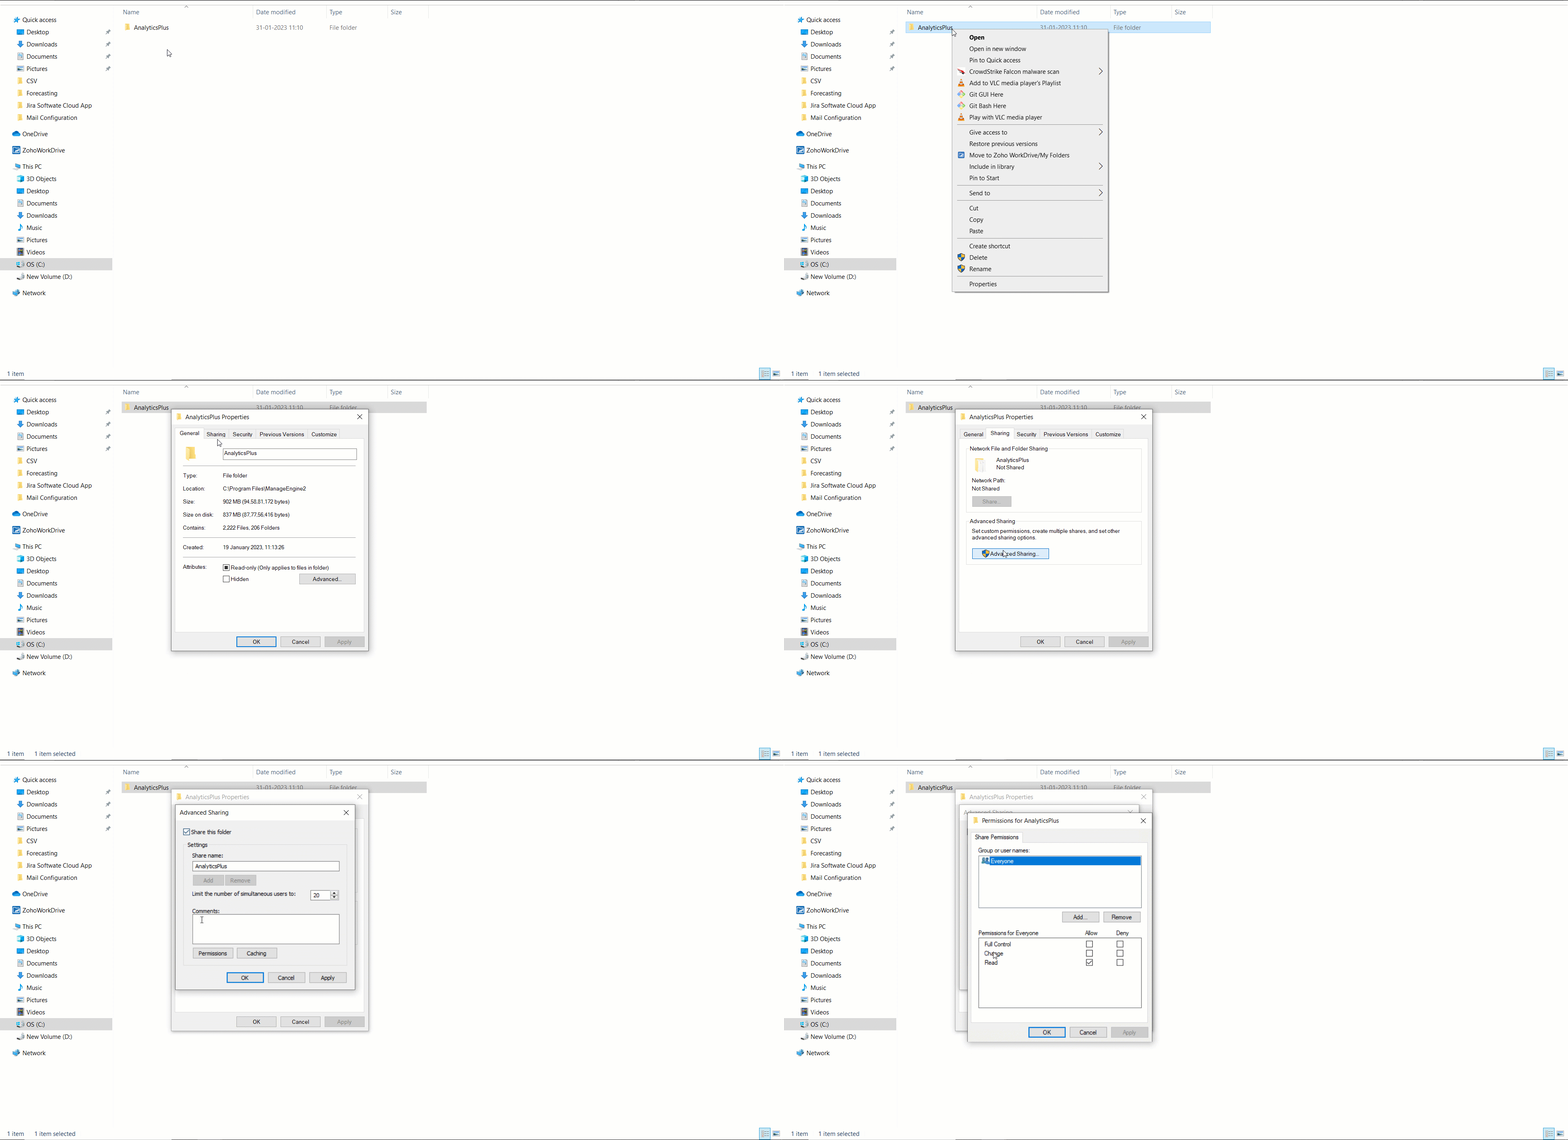
- In the dialog that appears, enter the user account name and click OK.
Select the newly added user and provide the Full Control permission and click OK.
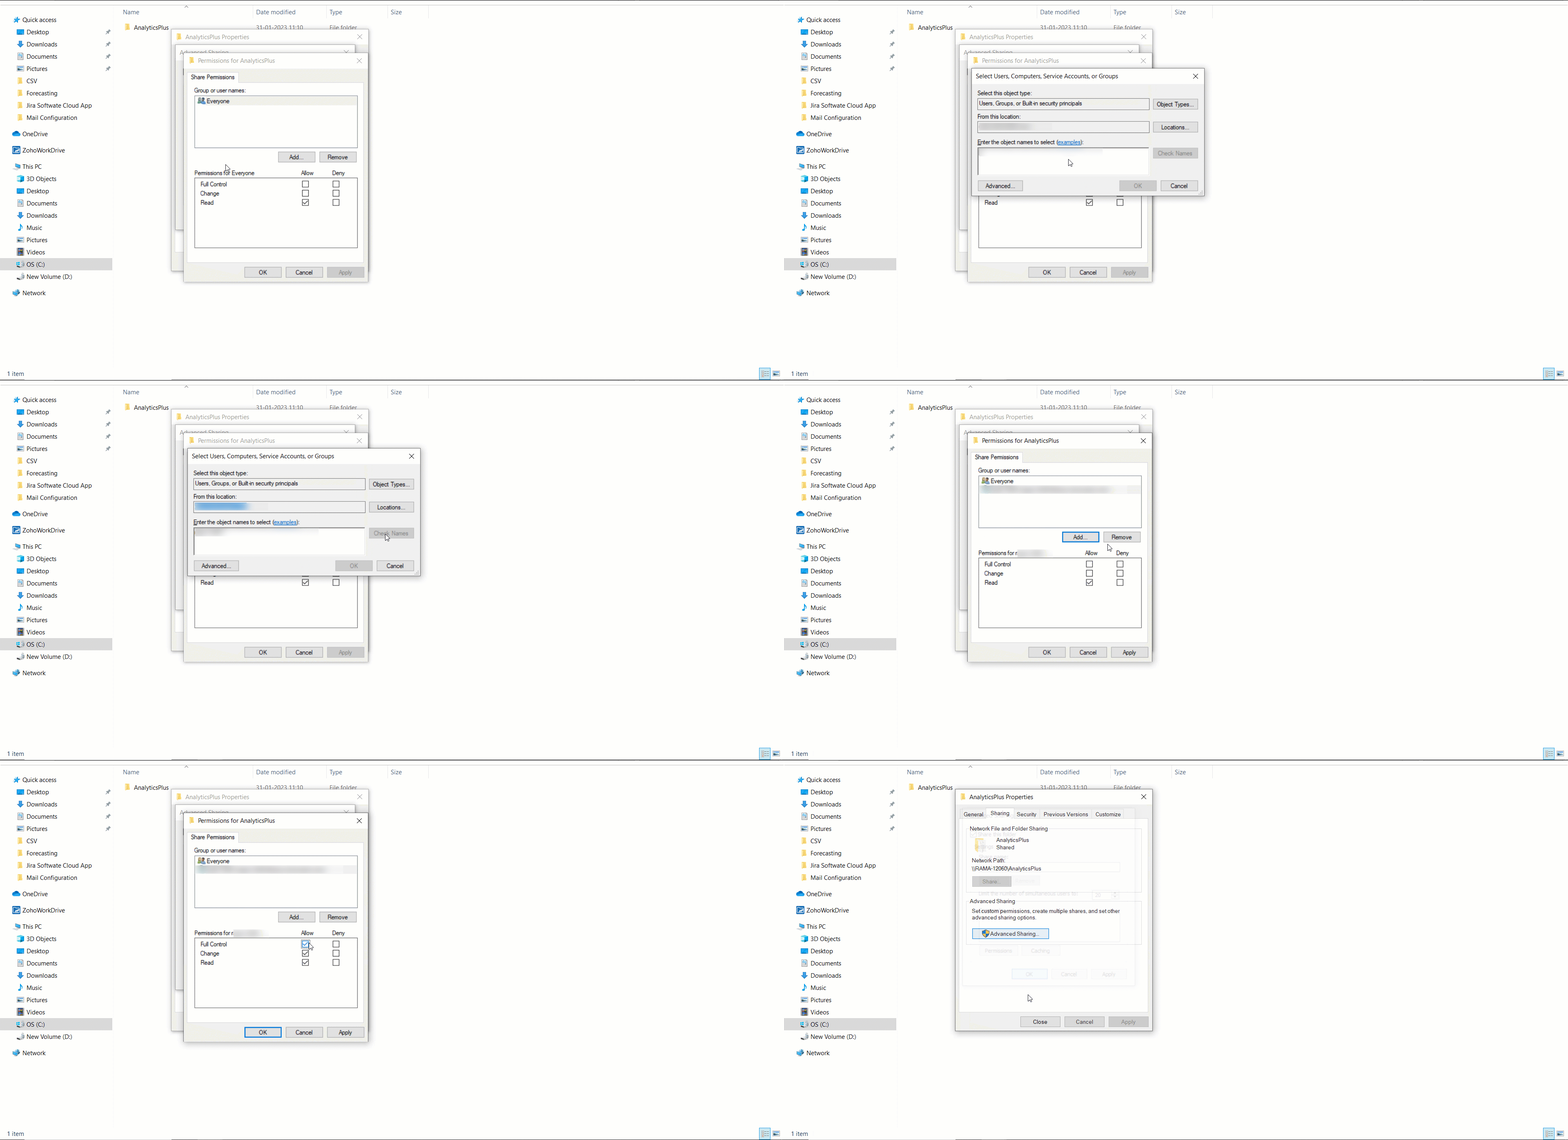
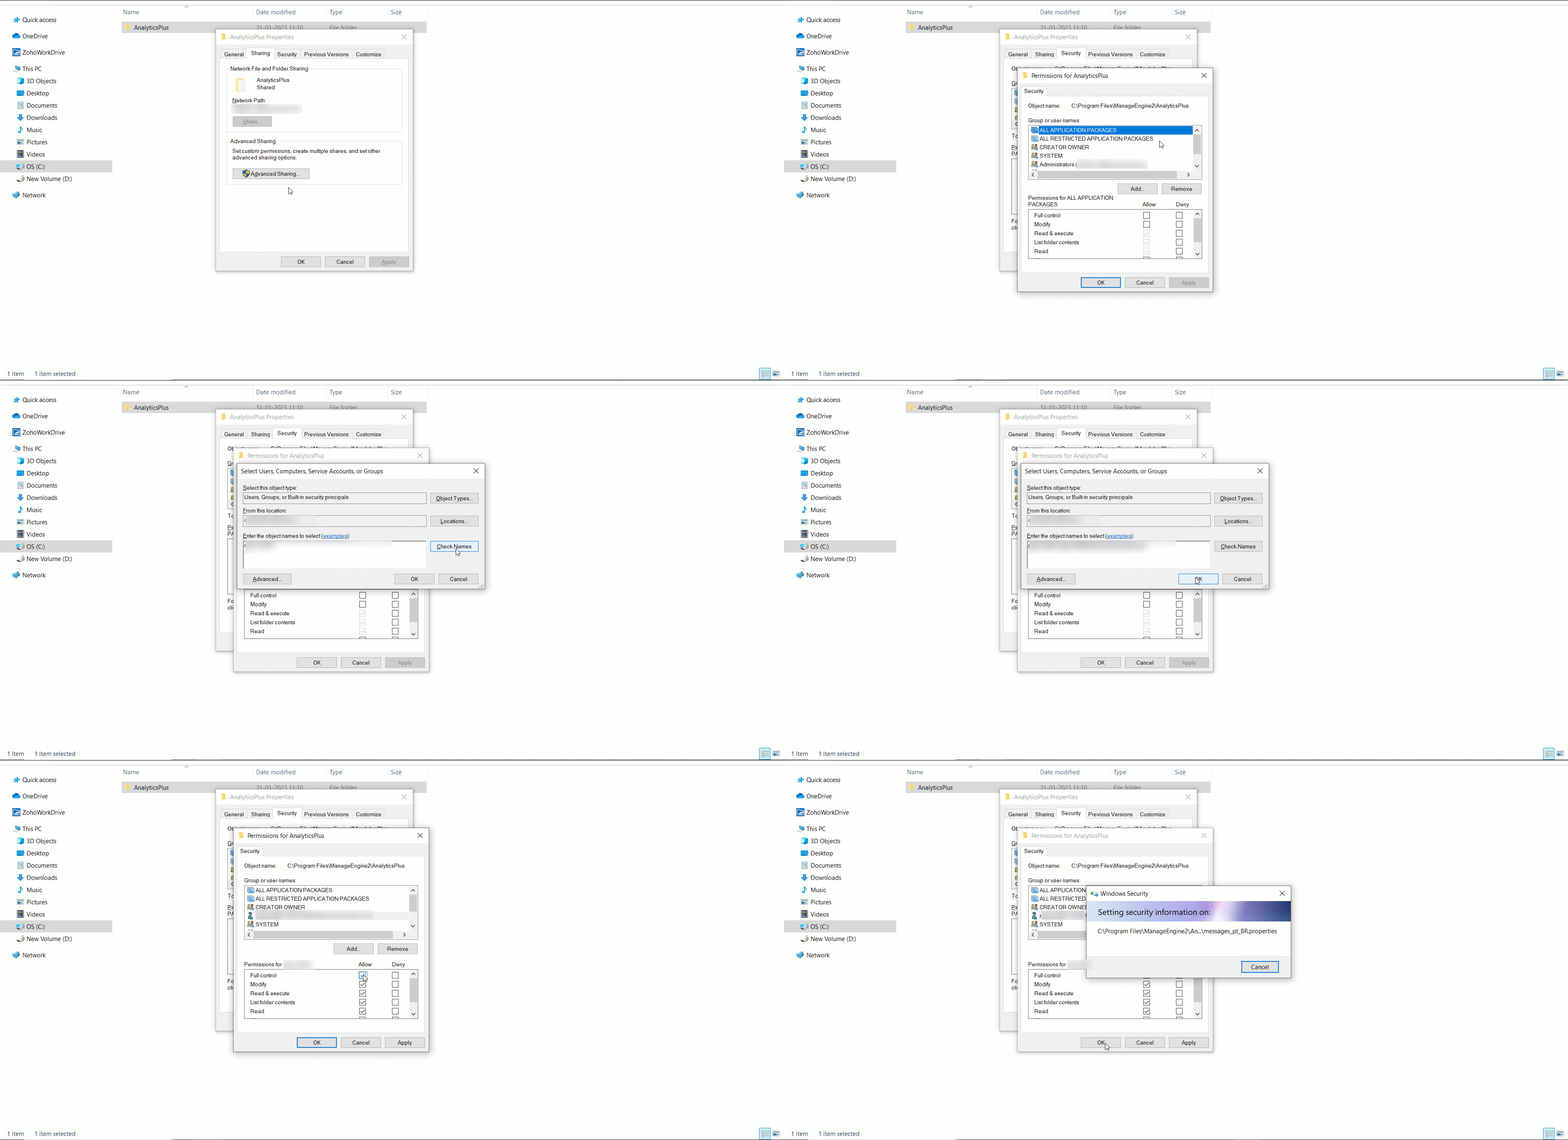
- Head to the Security tab, and click the Edit button.
- In the dialog that appears, click Add.
- Enter the user account name (added in the Sharing tab) and click OK.
Select the newly added user name and provide the Full control permission and click OK.
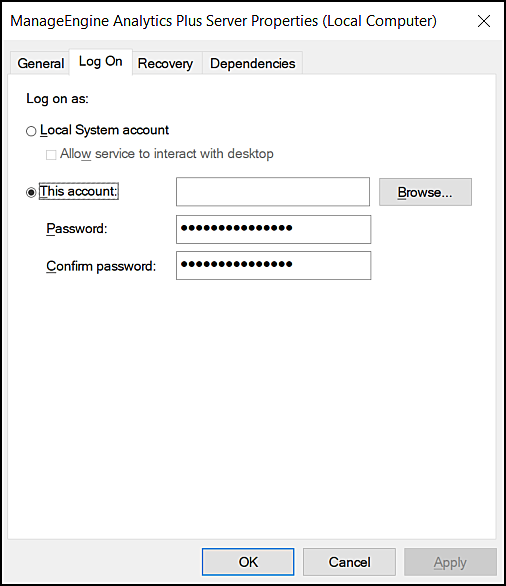
Open the Run dialog, type services.msc and click OK.

- Right-click the Analytics Plus application and select Properties.
- Head to the Log On tab and select the This account check box.
Enter the login credentials of the user account to whom you have given access, and click OK.
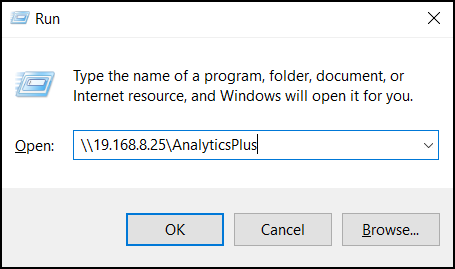
To verify the shared folder access, open the Run dialog and type \\<IP>\AnalyticsPlus from another server (i.e., If you are sharing the AnalyticsPlus folder present in the primary server, try accessing it from the standby server and vice versa).
File sharing in a workgroup or across domains
Follow the steps below to set up file sharing between two servers that are in different domains, or don't belong to any domain. Important note: File sharing must be configured on both the primary and the standby servers. The primary server's installation directory should be shared with the standby server and vice-versa.
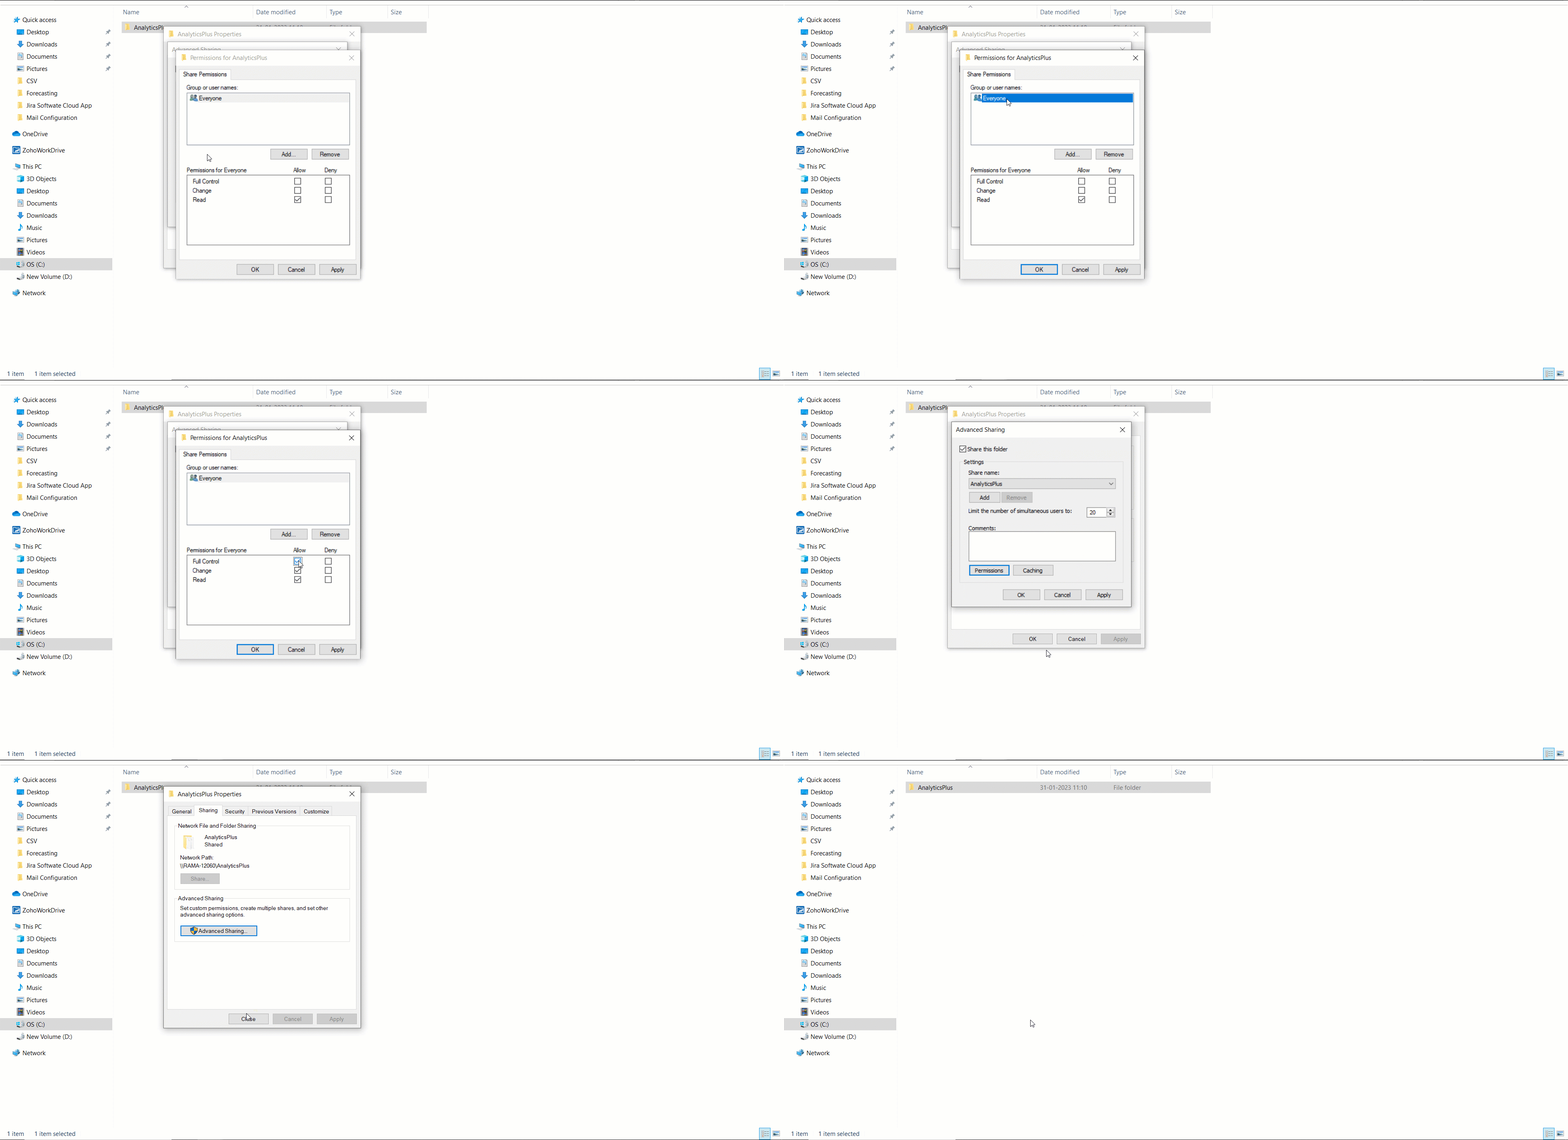
- Navigate to the <Analytics Plus home folder>, right-click the folder, and select Properties.
- Head to the Sharing tab and click Advanced Sharing.
Enable the share this folder checkbox and click Permissions.
Select Everyone and provide the Full Control permission and click OK.
- Head to the Security tab, and click the Edit button.
- In the dialog that appears, click Add.
- Enter Everyone and click OK.
Select Everyone and provide the Full control permission and click OK.
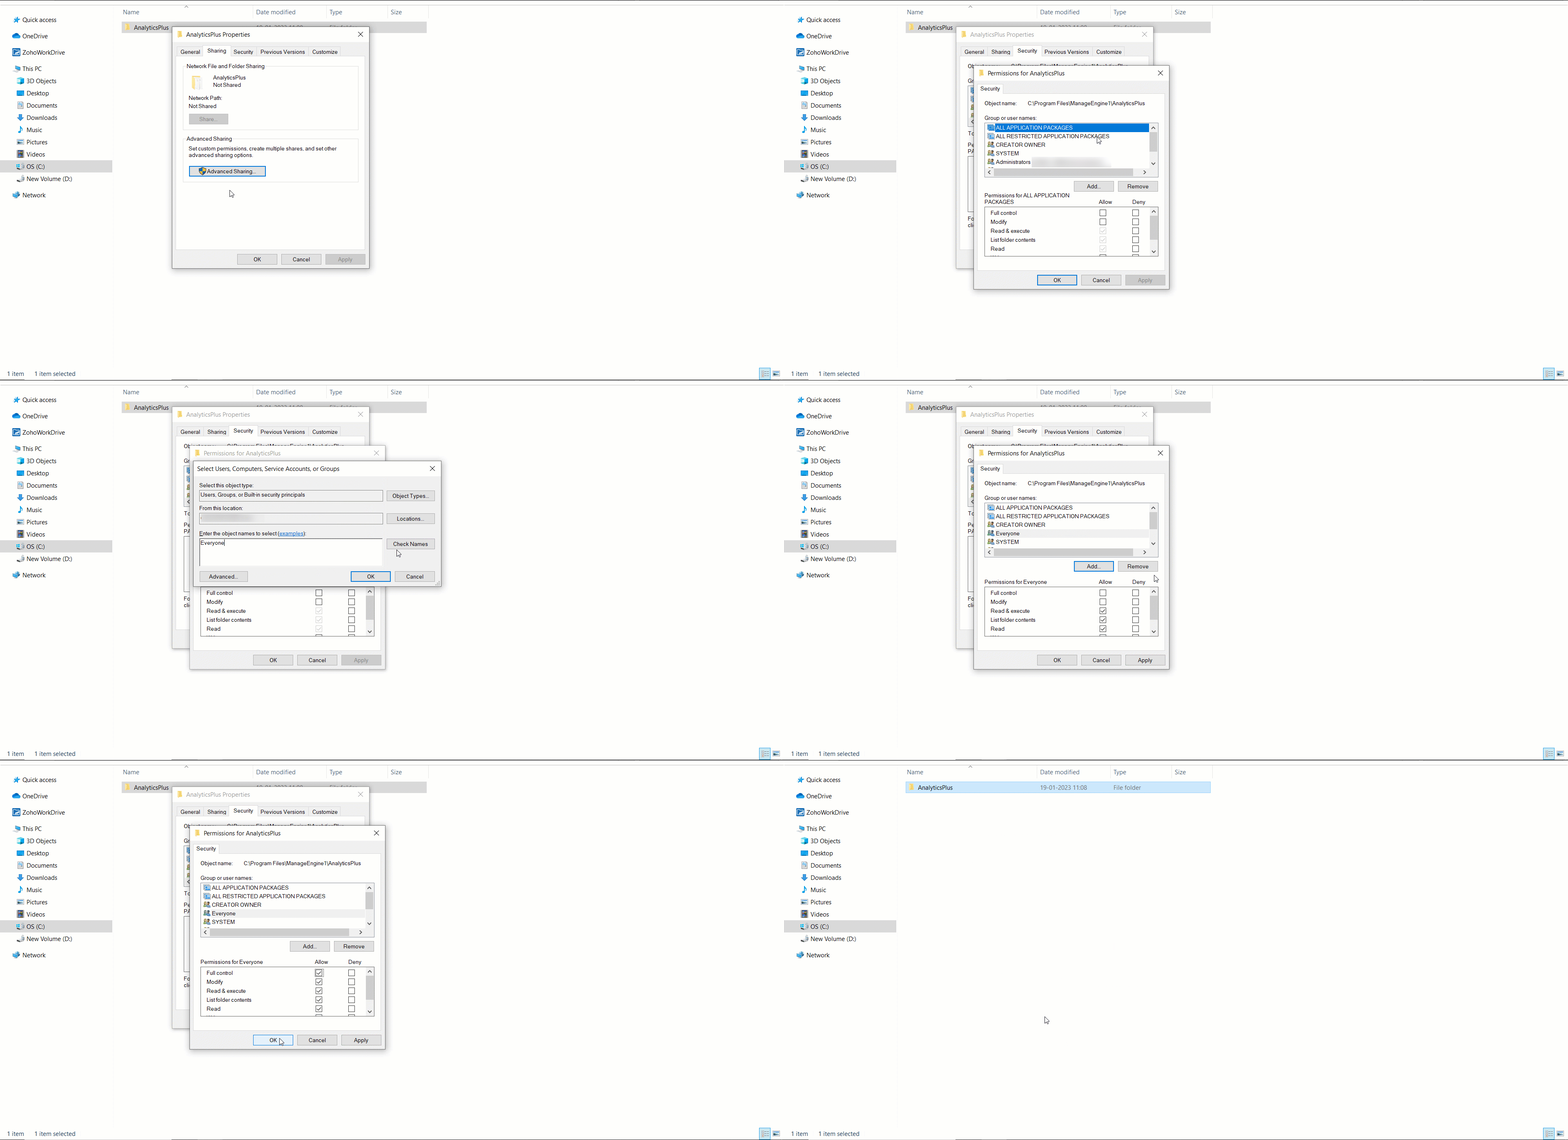
To verify the shared folder access, open the Run dialog and type \\<IP>\AnalyticsPlus from another server (i.e., If you are sharing the AnalyticsPlus folder present in the primary server, try accessing it from the standby server and vice versa).
Restart the application with admin privileges
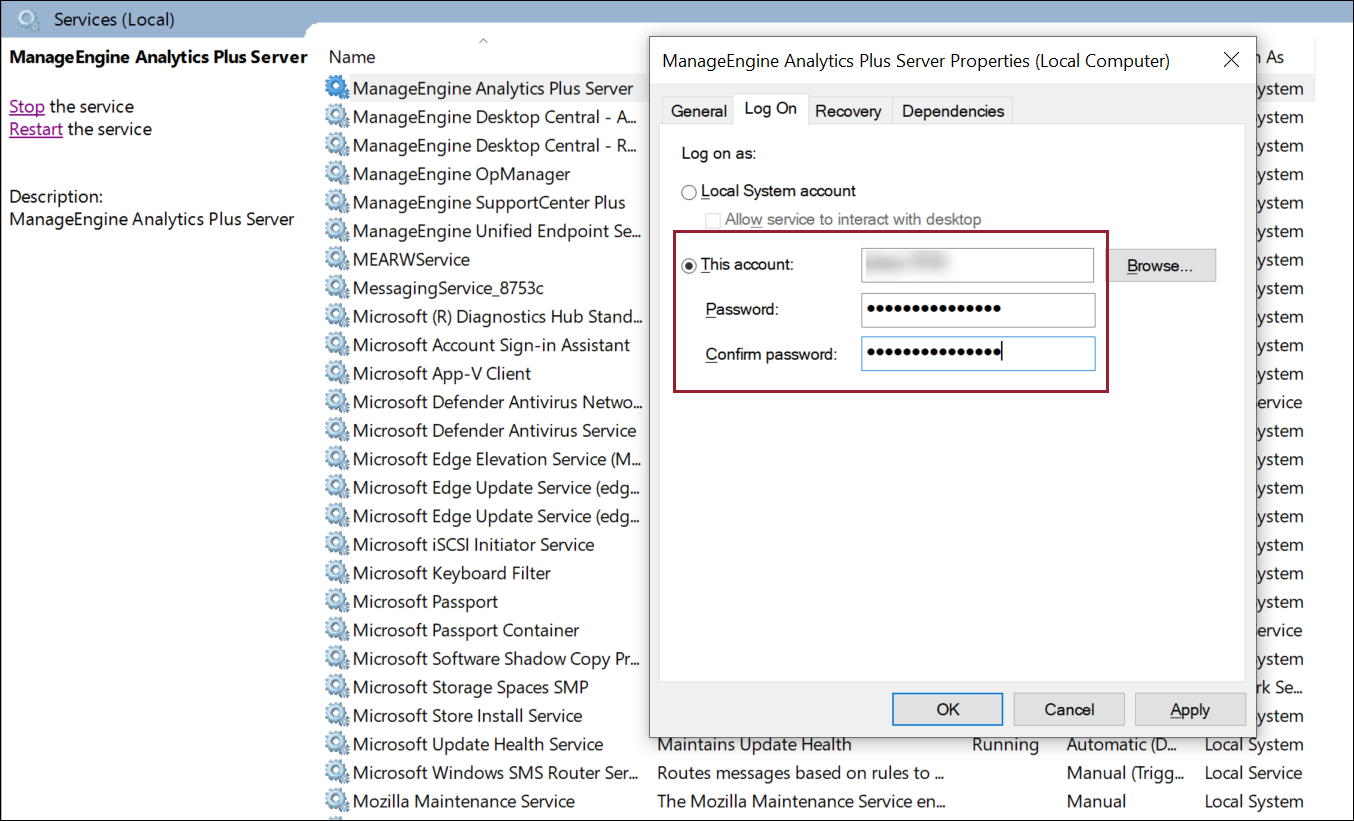
To restart Analytics Plus with admin privileges, open the Services window and navigate to the ManageEngine Analytics Plus listing. Right-click on the service name, select the Properties option and head to the Log on tab. Enter your administrator credentials, and click the Apply and OK buttons to reflect the change.
Configuring High availability in a Linux installation
Follow the steps below to configure high availability in a Linux installation:
Install Analytics Plus in the primary and standby Linux servers.
In the standby server, open terminal and go to <Analytics Plus home>/bin directory.
Run the command grpcagent.sh to start the gRPC agent in the standby server.
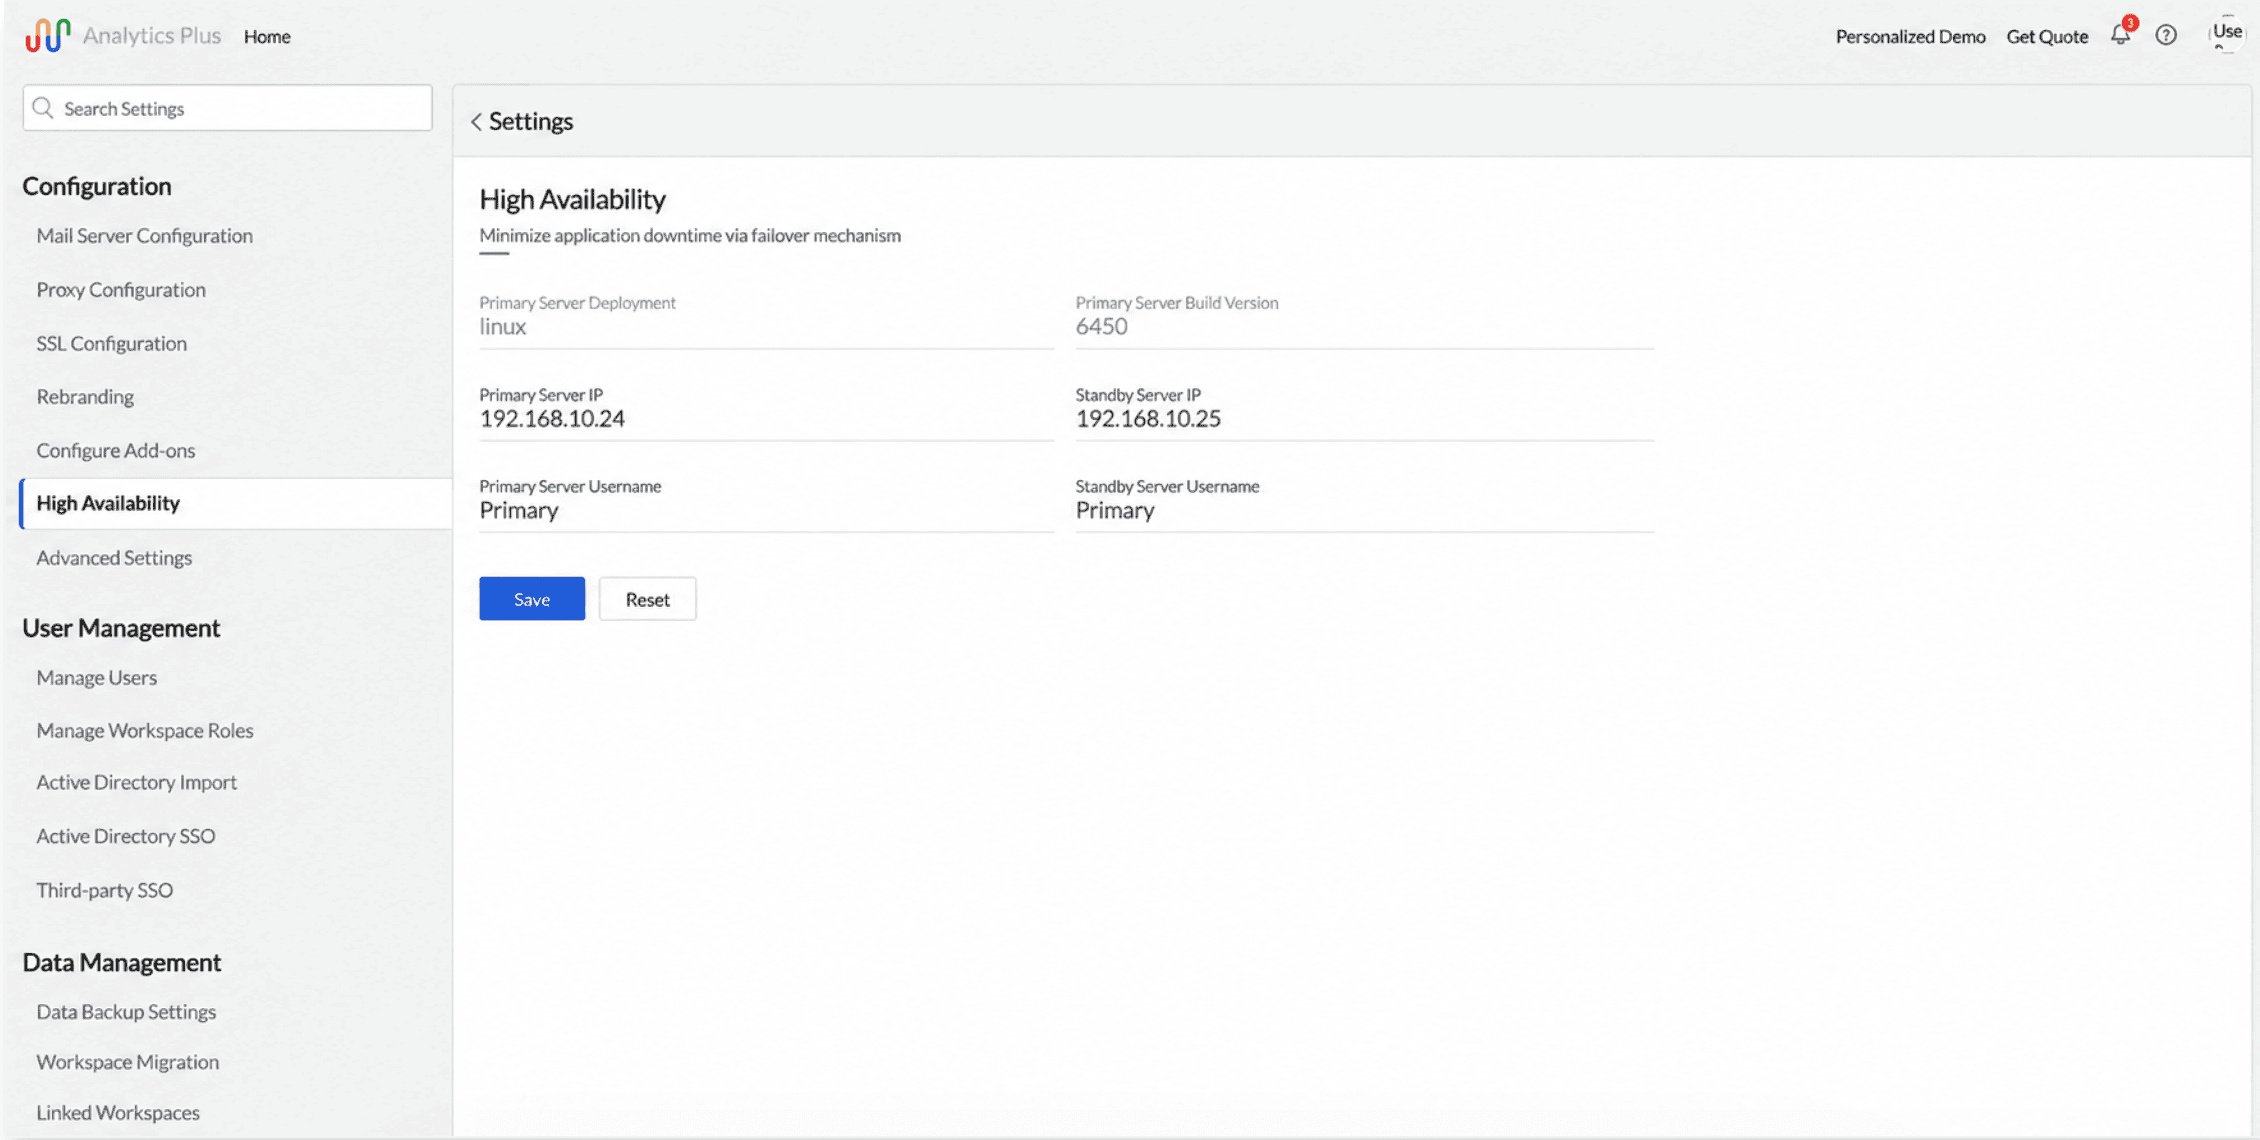
In the primary server, open Analytics Plus and go to Settings >> High Availability, then click Continue.
The primary server deployment and build details are displayed automatically.
Enter the required primary server and standby server details.
Click Save to configure high availability.
After successful configuration, restart the primary server.
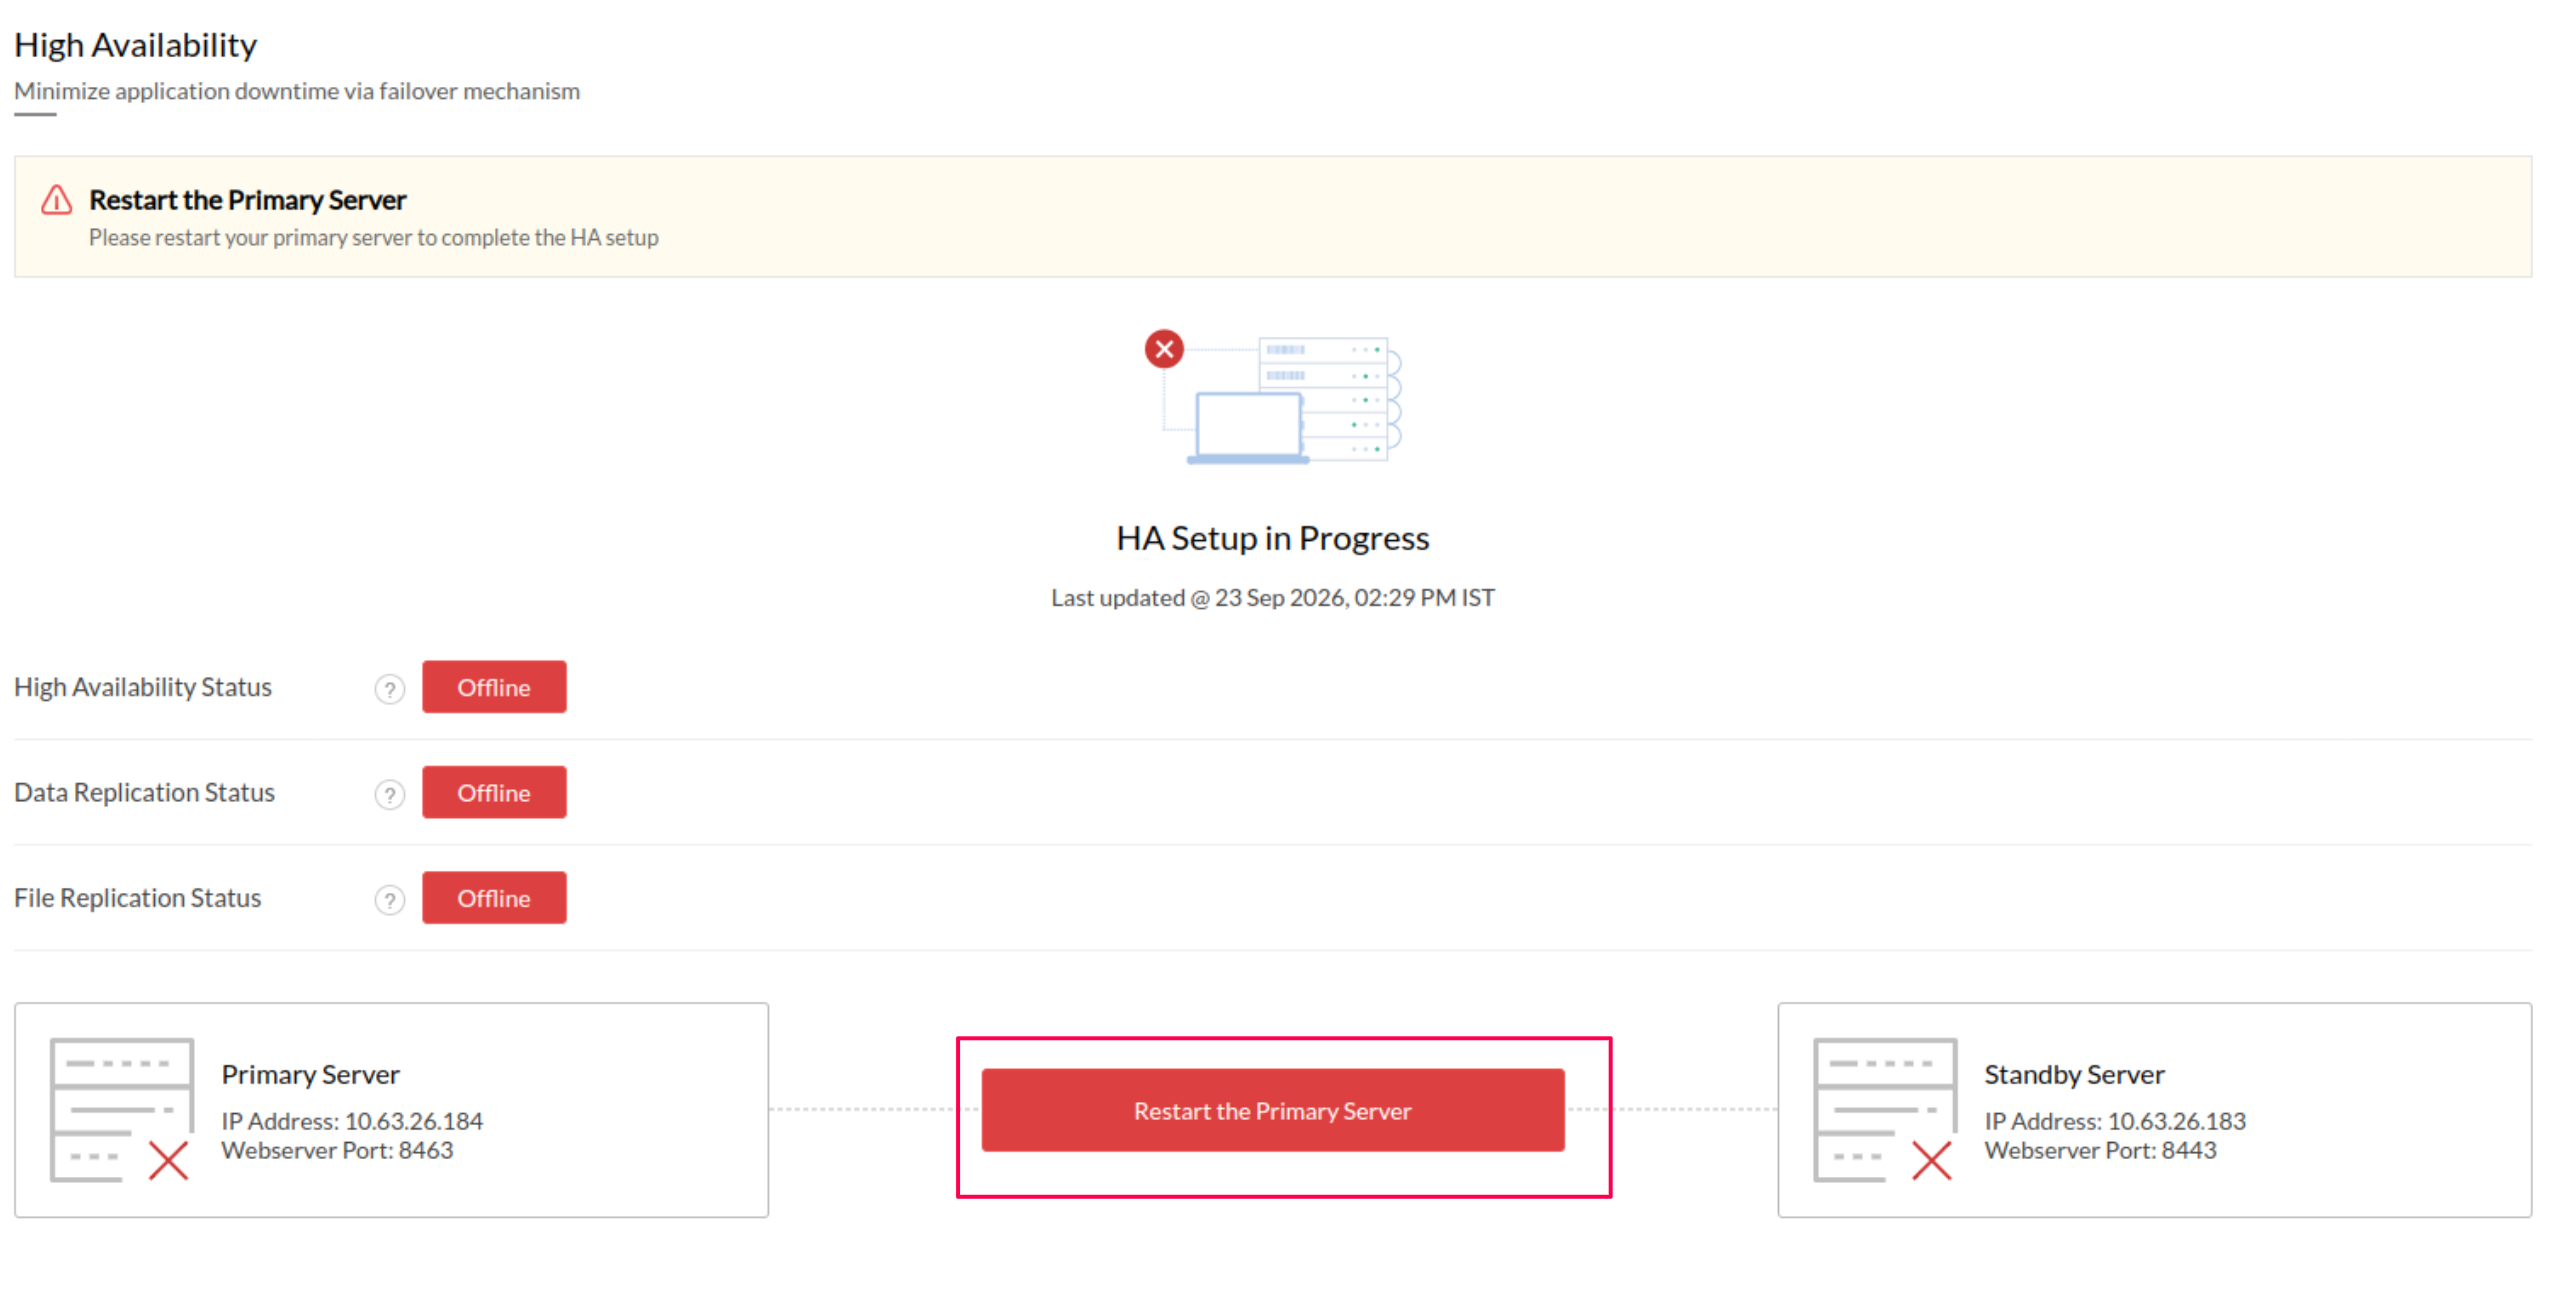
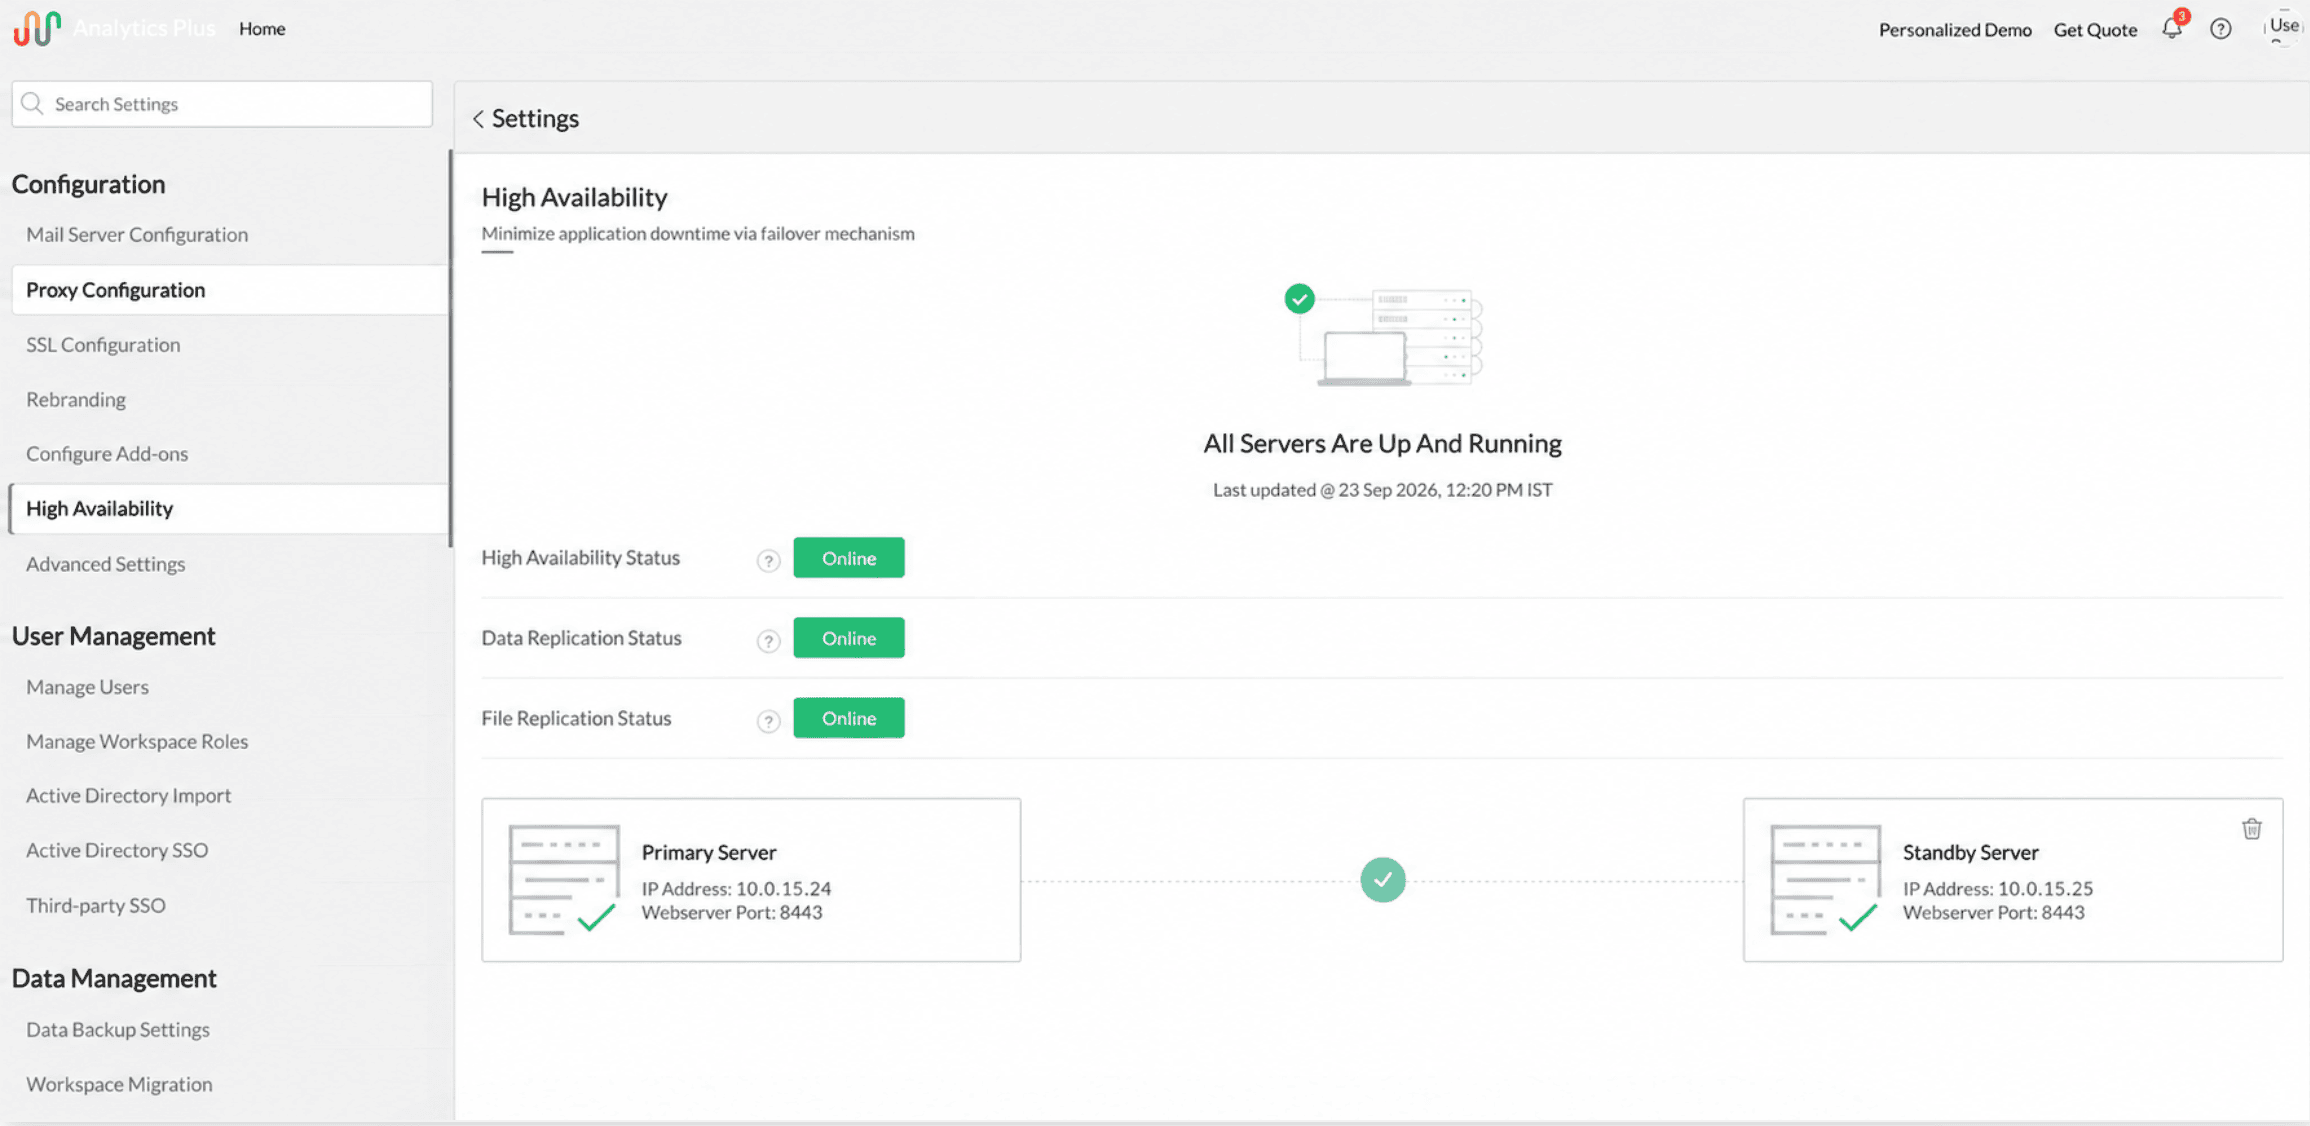
Once the primary server is restarted, restart the standby server. Verify that the High Availability Status and Replication Status are online.
Setting up file sharing
In Linux installations, you can configure file sharing between your primary and standby servers using Remote Synchronization (Rsync). Note: File sharing must be configured in both the primary and standby servers.
Follow the steps below to configure Rsync:
Log in to the primary server, launch a terminal and execute the ssh-keygen command. This will allow you to generate a pair of public and private keys.
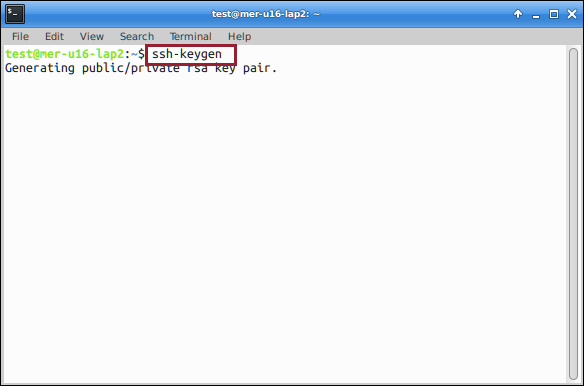
Provide the directory where the generated keys are to be saved and click the Enter key twice. The public and private key will be generated successfully.
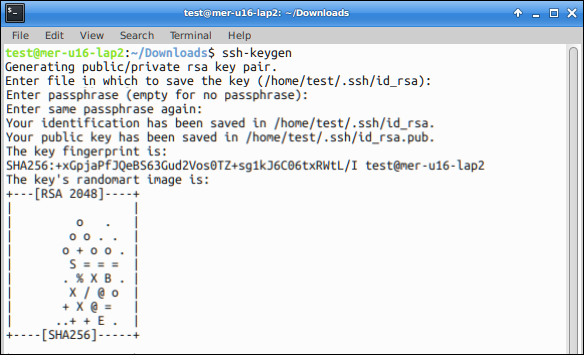
Copy the generated public key to the standby server using the ssh-copy-id -i <key-file-path>id_rsa.pub <standby-machine-name> command. <key-file-path> refers to the directory where the generated public key is saved.
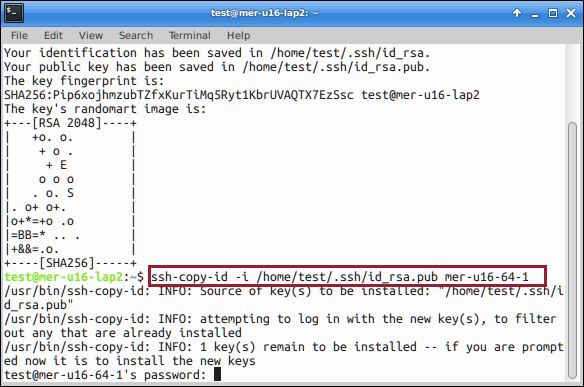
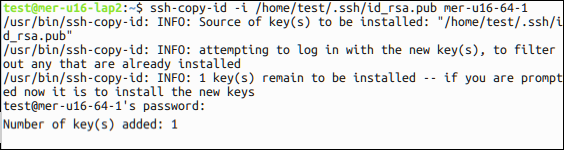
Enter the standby server's password to successfully copy the primary server's key to the standby server.
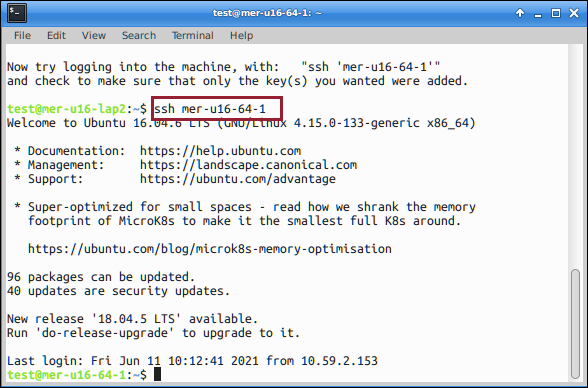
To verify if the key has been copied to the standby server, log in to the standby server from the primary server using the ssh <standby-machine-name> command.
Restart the application with admin privileges
To restart Analytics Plus with admin privileges in Linux installations, ensure that the user is a part of the Sudo group.
Setting up a common IP address
Analytics Plus allows you to set up a virtual IP address that can be served common to both the primary and standby servers. It enables you to access the Analytics Plus application using a common URL without any service interruption when either the primary or the secondary servers go offline. Follow the steps below to set up a virtual IP address.
- Choose a virtual IP address to which the primary and standby servers must be bound. The virtual IP address can be any IP address in the local network that is not bound to any specific machine. To choose a virtual IP,
- Open command prompt, and execute the command: ping {insert any IP address}.
- If you receive a request timed-out message, then you can use that as a virtual IP address.
- Get the NIC address from the primary and standby servers by following the steps below:
For Windows:
- Open command prompt, navigate to <Analytics Plus home folder>\bin and execute the iflist.exe file.
- Locate the NIC card whose Adapter Status is UP, copy the Adapter Name and paste it in a separate file. It will be the NIC address of the corresponding server.
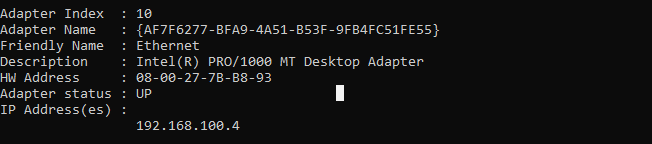
- For Linux: Open command prompt and execute the ifconfig command to get the NIC address.
- Get the subnet mask from the primary and standby servers.
- For Windows: Open command prompt and execute the ipconfig command to get the subnet mask.
- For Linux: Open command prompt and execute the ifconfig command.
- Shutdown both the primary and standby servers.
- From the primary server, navigate to <Analytics Plus home folder>\conf, open the ha.conf file, and add the below properties. Replace the text within "<>" with the actual values from your network.
- publicIP.enabled=true
- publicIP.ipaddr=<Virtual IP>
- publicIP.Ifname=<NIC address of the primary server>
- publicIP.netmask=<subnet mask of the primary server>
- From the standby server, navigate to <Analytics Plus home folder>\conf, open the ha.conf file, and add the below properties. Replace the text within "<>" with the actual values from your network.
- publicIP.enabled=true
- publicIP.ipaddr=<Virtual IP>
- publicIP.Ifname=<NIC address of the standby server>
- publicIP.netmask=<subnet mask of the standby server>
- Save the file and start the servers.
Changing the server's credentials and port number
In cases where the port number and credentials of the primary server is modified, the high availability configuration should be updated.
Updating the primary server's credentials
Open your Analytics Plus application, and navigate to the High Availability section in the Settings page.
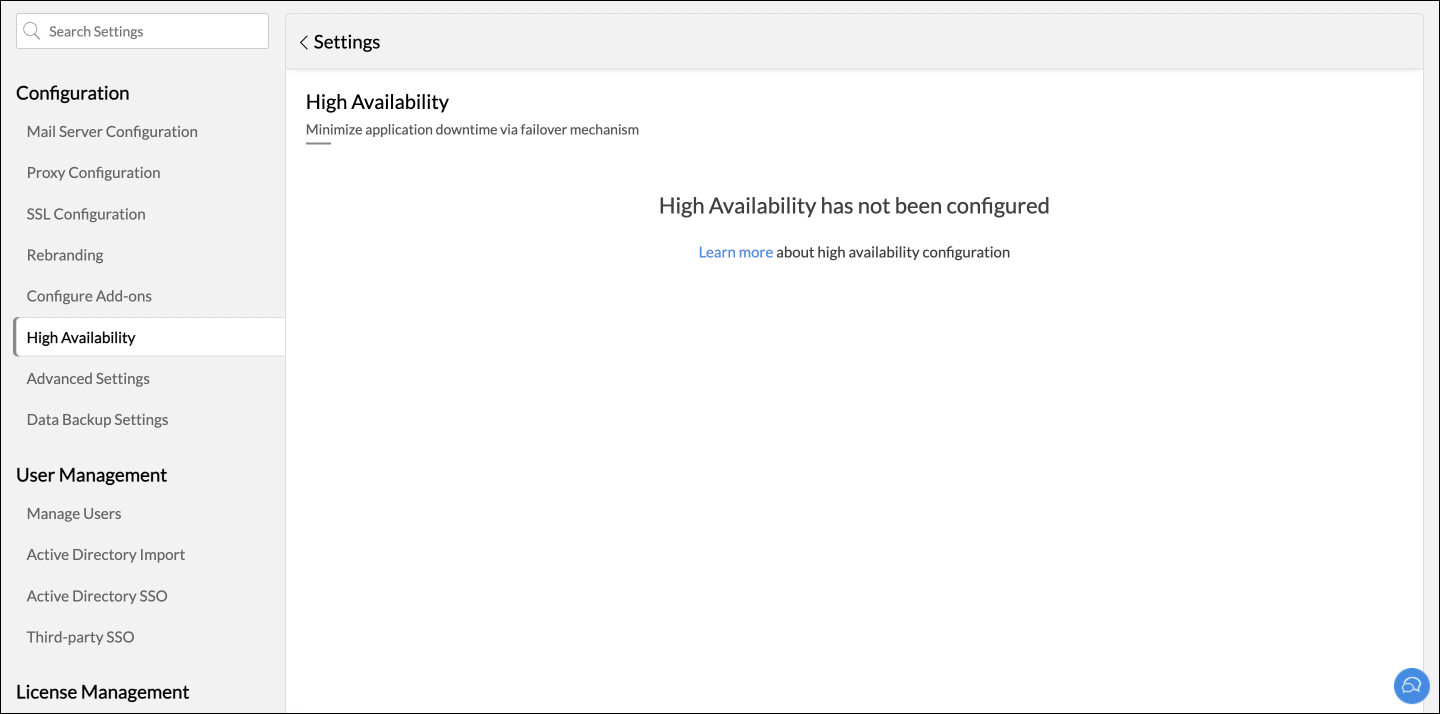
- Click the Edit icon that appears on mouse over the primary server details. Change the username and password, and click Apply. The standby server will be restarted automatically to let the changes take effect.
Changing the primary server's port number
Open your Analytics Plus application, and navigate to the High Availability section in the Settings page.
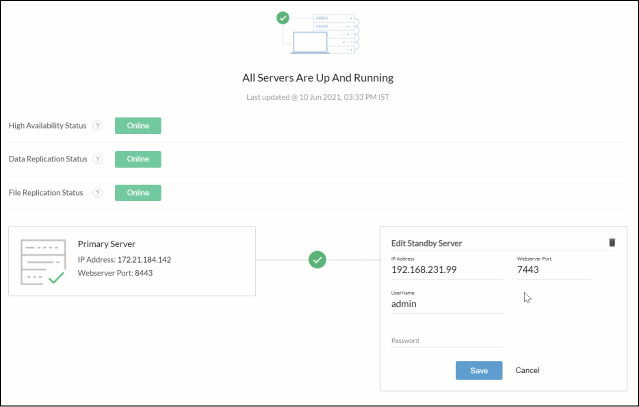
- Click the Edit icon that appears on mouse over the primary server's listing, enter the new webserver port number, and click Apply. The standby server will shut down automatically to allow you to complete the next step.
- Stop the primary server, and change the webserver port number. (To learn more, refer this documentation.) Start the service once the port is changed.
- Once the primary server is online, start the standby server.
Updating the standby server's credentials or port number
Navigate to the High Availability section in the Settings page, click the Edit icon that appears (on mouse hover) over the standby server details. Change the username, password or port number, and click Apply.
Migrating the primary or standby server
Follow the steps below when you wish to migrate the primary or the standby server:
- When you wish to migrate either the primary or the standby server, the existing high availability configuration needs to be deleted. To learn more about deleting your high availability configuration, click here. You can migrate your servers once the configuration is deleted.
- If you wish to move the primary server, install the application in the required server. Re-install the standby server in its original location, and configure high availability once again. Click here to know more about configuring high availability.
- If you wish to move the standby server, simply install the application in the required server. Click the corresponding links to learn more about installing the standby server for a Windows and Linux installations.
Deleting the high availability configuration
To remove the high availability configuration, stop the standby server first and then navigate to the Settings page and head to the High Availability tab.
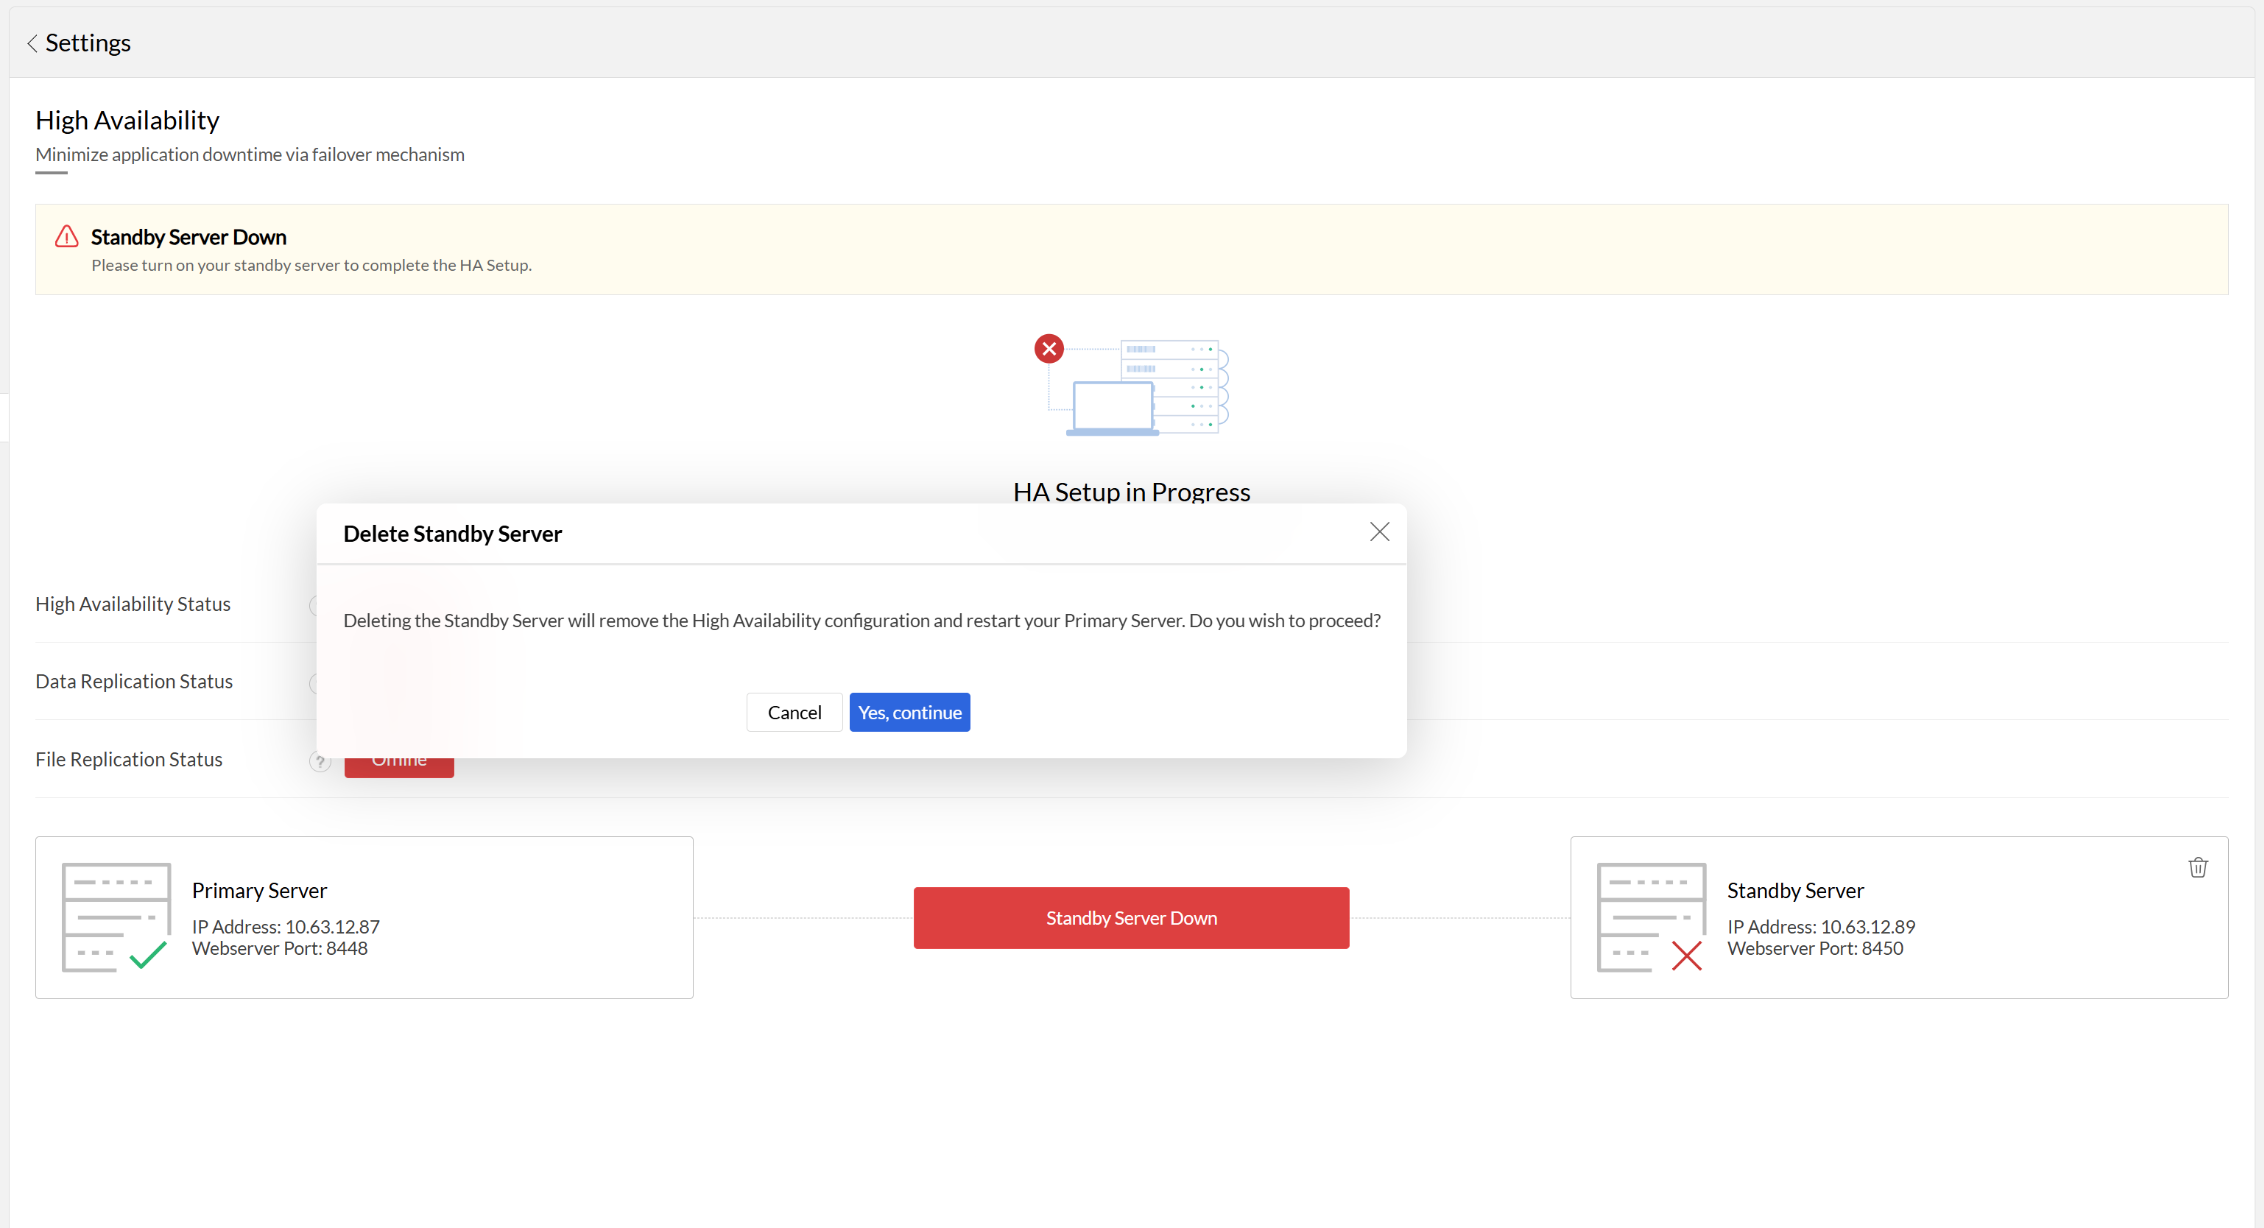
Click on the Delete icon that appears on mouse over the standby server's details. Confirm your action in the popups that appear to delete the high availability configuration.