Upgrading OpManager
Upgrading OpManager to the most recent version will help you stay more secure with security fixes, enhance performance with bug fixes, and gain out-of-the-box functionalities with new feature releases. This helps you maintain optimum network performance, while ensuring network security.
- Take Database backup for your OpManager setup or Central and Probe setups in the case of Enterprise Edition. You can either take backup via BackupDB.bat (https://www.manageengine.com/network-monitoring/help/data-backup-and-restoration.html) or SQL db backup (in case of MSSQL).
- Take backup of OpManager folder (including Failover setup) or VM snapshot (if required).
- Stop the product and ensure there is no java, wrapper, postgres or tray icon instances running.
- The OpManager directory should be given necessary permissions in the firewall.
- OpManager installation drive should have a minimum of 2 GB free space.
- OpManager should have a valid License with Annual Maintenance Support (AMS).
- The free disk space of the drive in which OpManager has been installed, should be at least 1.25 times the size of <OpManagerHome>/pgsql/data folder. i.e, if the size of the <OpManagerHome>/pgsql/data folder is 10 GB, the free disk space should at least be 12.5 GB.
- SQL server installation drive should have a minimum of 2GB free space.
- There should not be any connectivity issues between the MSSQL server and the OpManager server.
- There should be at least 15 percentage of free space available in the MSSQL Transaction logs. To clean Transaction logs refer here
For Failover models that do not use Virtual IP and share folder (Old failover model),
- Stop the primary and secondary servers.
- Upgrade the primary server first.
- After the upgrade is completed successfully, start the primary server.
- Once the primary server has started completely, stop it again.
- Now upgrade the secondary server.
For Failover models that use Virtual IP and share folder (New failover model),
- Stop both the servers before upgrading.
- The Secondary server's OpManager folder should be made accessible to the primary server.
To upgrade OpManager:
- Go to the service packs page and download the appropriate version.
- Open command prompt with administrative privileges and go to <OpManagerHome>/bin/ directory.
- Execute UpdateManager.bat (use UpdateManager.sh for Linux) file.
- Browse for the downloaded service pack (PPM) file and select the downloaded .ppm file.
- Click Install and proceed to complete the installation procedure.
- Follow the steps here to start OpManager.
Steps to import the public certificate during an offline upgrade
- Download the signature certificate.
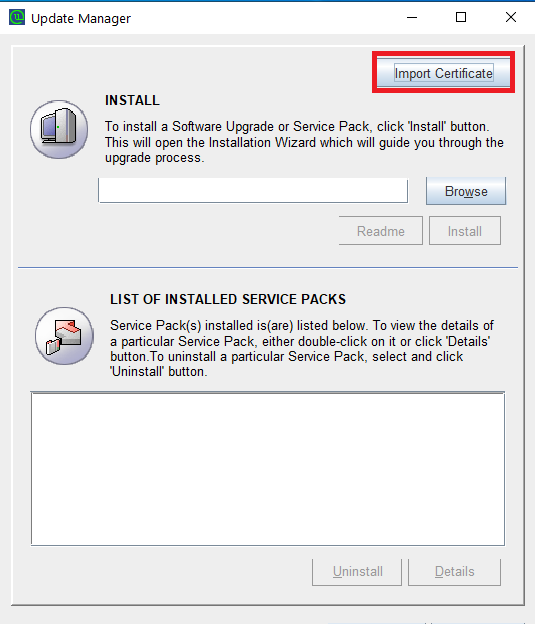
- Launch the Update Manager by running UpdateManager.bat (or UpdateManager.sh for Linux) located in the <OpManager_Home>/bin directory.
- Click the Import Certificate button in the top-right corner.
- Browse and select the downloaded certificate file, then click Import.
- Once the certificate is successfully imported, proceed with applying the PPM file to begin the upgrade.

Thank you for your feedback!