Working with Multiple Server
Key Manager Plus allows users to deploy multiple servers to certificates/add deployed servers to a certificate. By the end of this document you will have learnt the following:
- Deploy Multiple Servers to a Certificate
- Add Deployed Servers to a Certificate
- Modify the Server Details
- Edit a Deployed Server
- Delete a Deployed Server
- Auto Deploy a Certificate
- Check Sync Status
- Create Additional Fields
- Import Credentials
- Export Credentials
1. Deploy Multiple Servers to a Certificate
To deploy multiple servers to a certificate,
- Navigate to SSL >> Certificates tab.
- Select the certificate to which you want to deploy multiple servers and click Deploy from the top pane and select to which you want to deploy the certificate.
- Follow the steps here to know more about deploying certificates.
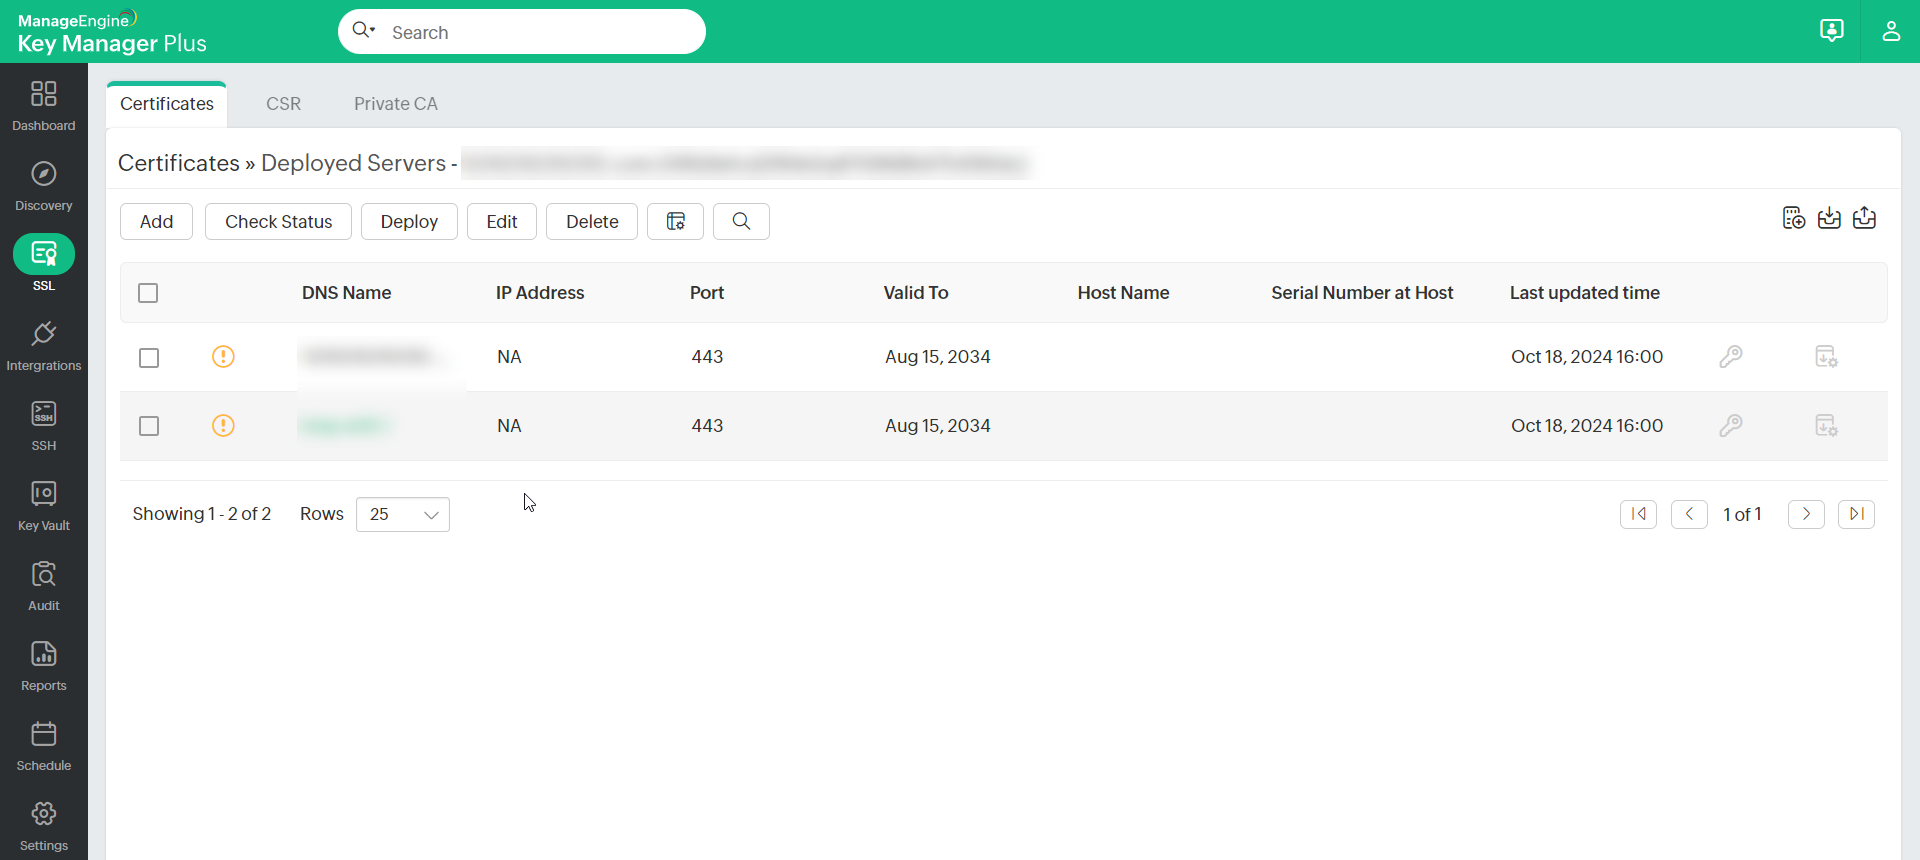
To view the multiple server page,
- Navigate to SSL >> Certificates tab and click multiple servers icon
 corresponding to the required certificate.
 - A window opens listing the servers in which the certificate is deployed along with other information such as IP address, Port and certificate validity, Host Name, Serial Number at Host and Sync Status.
2. Add Deployed Servers to a Certificate
- Navigate to SSL >> Certificates tab and click multiple servers icon
 corresponding to the required certificate.
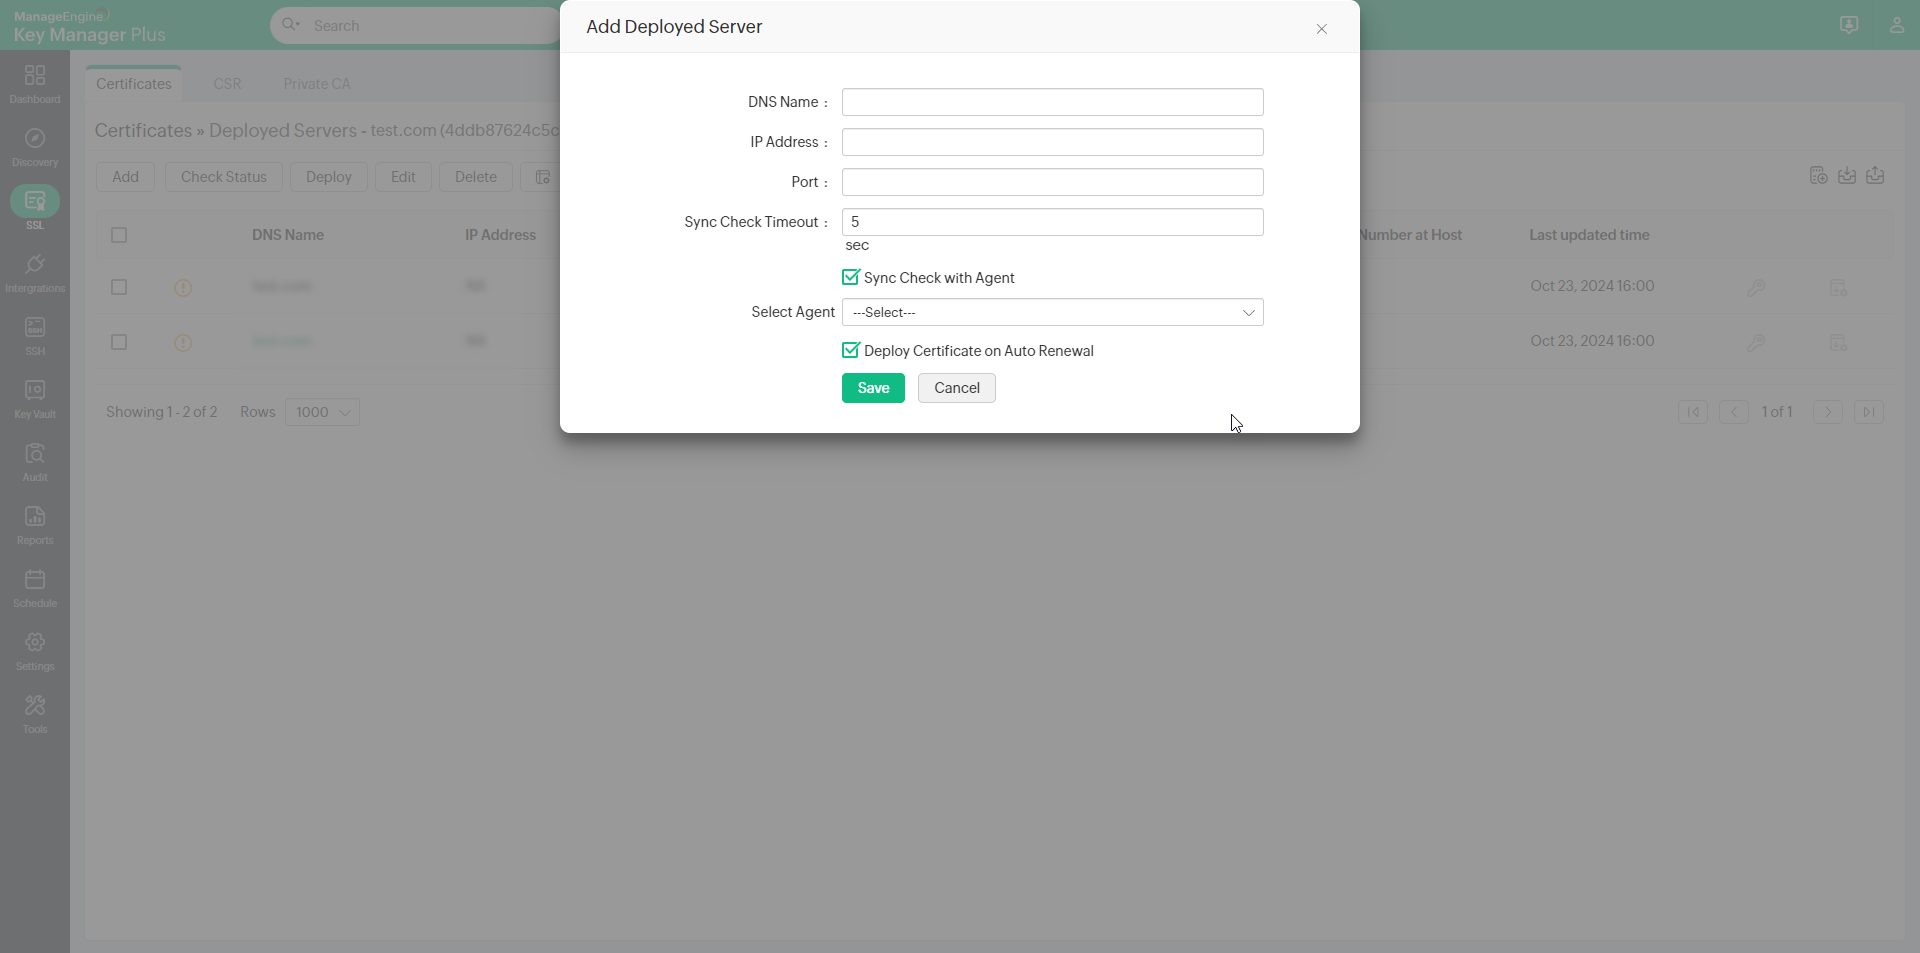
 - Click Add from the top pane to further add deployed servers to the certificate.
- You can also add deployed servers from SSL >> Certificates >> More >> Add Deployed Server.
- Now, the certificates have been successfully deployed using agent. To know more about SSL certificate deployment click here.
3. Modify the Server Details
- Navigate to SSL >> Certificates tab and click multiple servers icon
 corresponding to the required certificate.
 - To modify the Server details, click credentials icon
 corresponding to the required certificate.
 - Select the Server Type and modify the required details.
- If you choose the Server Type as Windows or Linux,
- Mention the user credentials or Use Key Manager Plus service account credentials for authentication, Port and the Path.
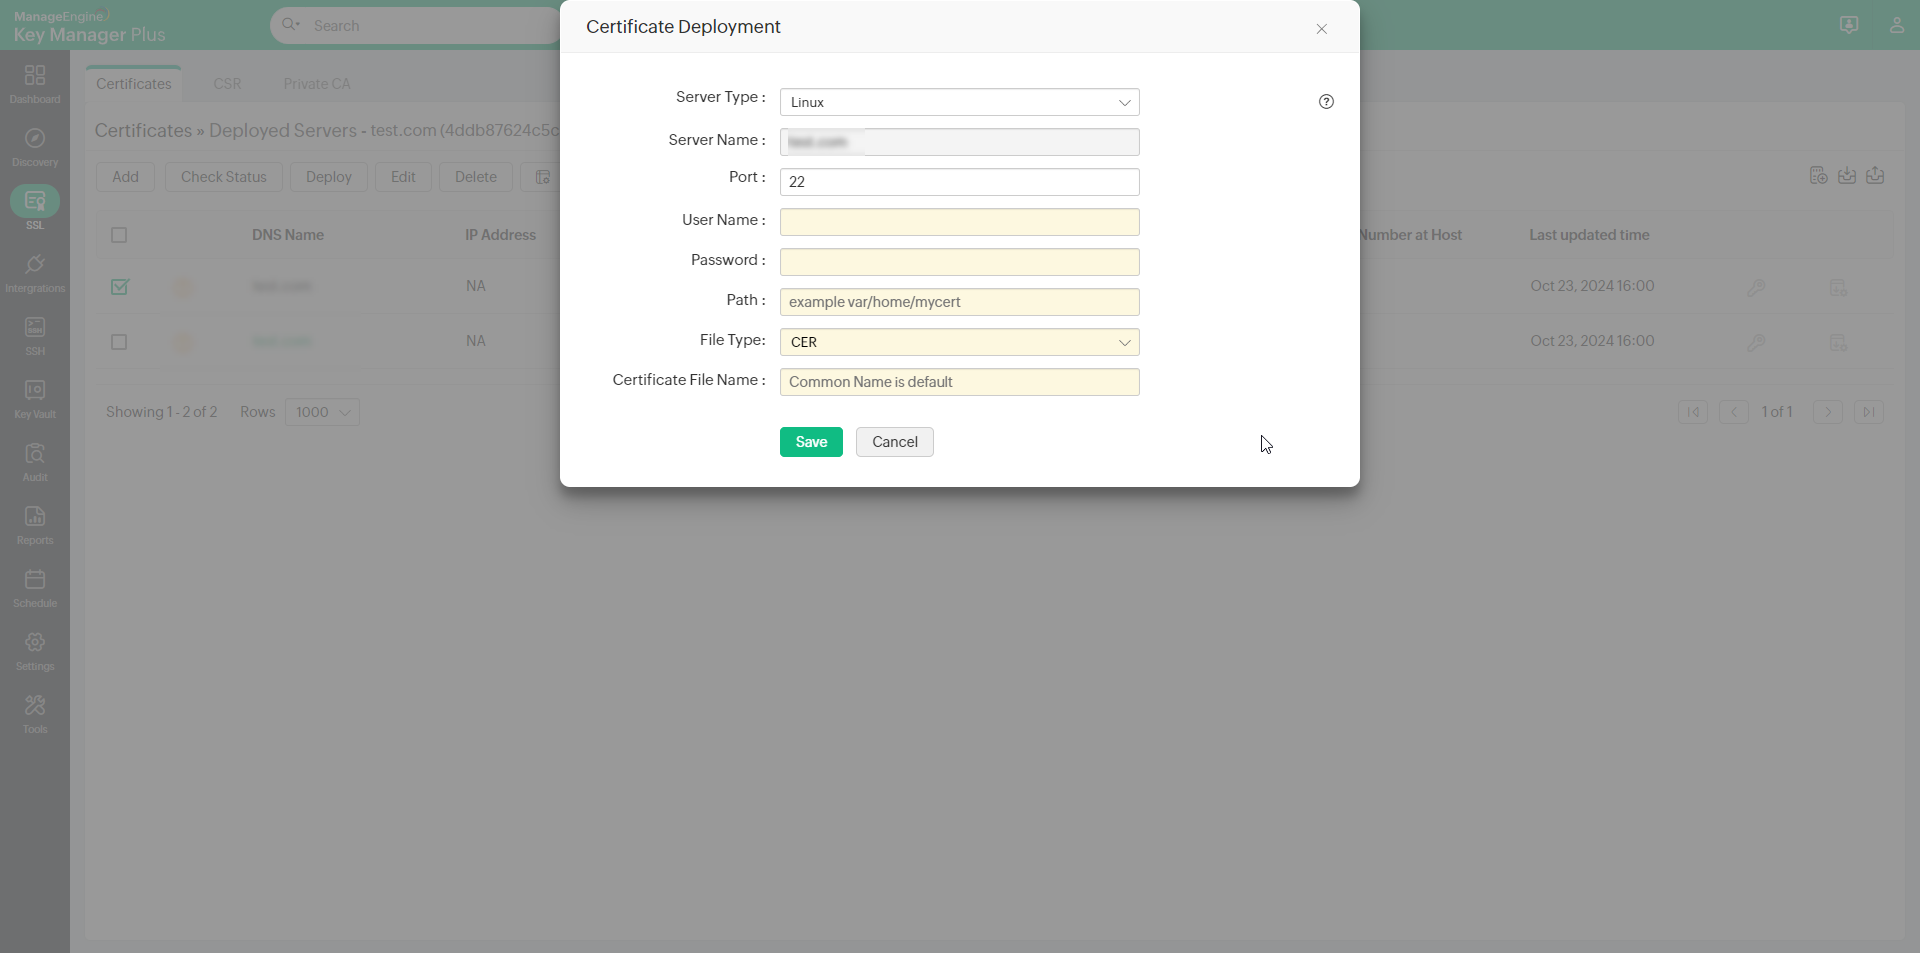
- If you select Certificate, select the File Type and enter the Certificate File Name.
- If you select JKS/PKCS, select the Keystore Type and mention the Store File Name.
- Mention the user credentials or Use Key Manager Plus service account credentials for authentication, Port and the Path.
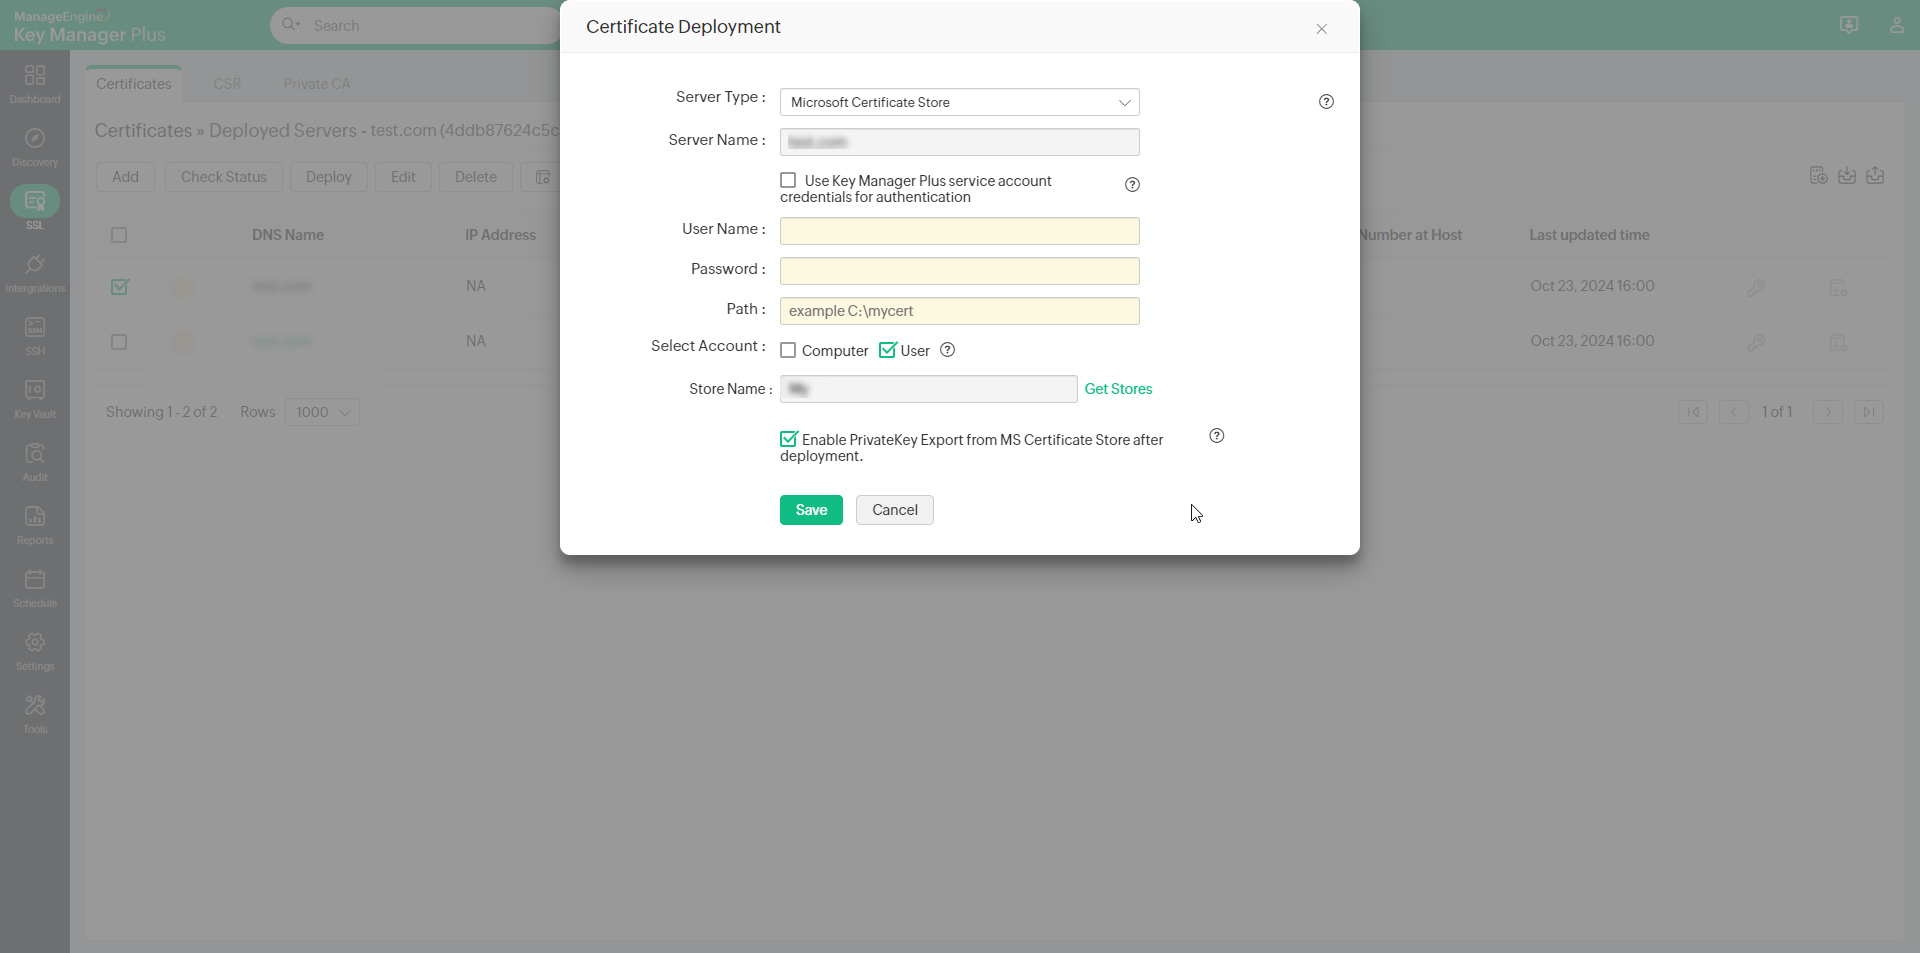
- If you choose the Server Type as Microsoft Certificate Store,
- Mention the credentials or Use Key Manager Plus service account credentials for authentication and the Path.
- Select Computer and/or User account to deploy the certificate to the selected account.
- Now, select Enable PrivateKey Export from MS Certificate Store after deployment to export private key from the certificate store.
- If you choose the Server Type as Internet Information Services (IIS),
- Mention the credentials or Use Key Manager Plus service account credentials for authentication and the Path.
- If you choose the Server Type as Windows or Linux,
- Click Save to modify the server details.
4. Edit a Deployed Server
To edit a deployed server, select the server and click the Edit button.
- In the pop-up that appears, you will be able to edit the DNS Name, IP Address and Port.
- Mention the Sync Check Timeout in seconds.
- If you choose to Sync Check with Agent, select the desired Agent.
- You can choose to Deploy Certificate on Auto Renewal.
- Click Save.
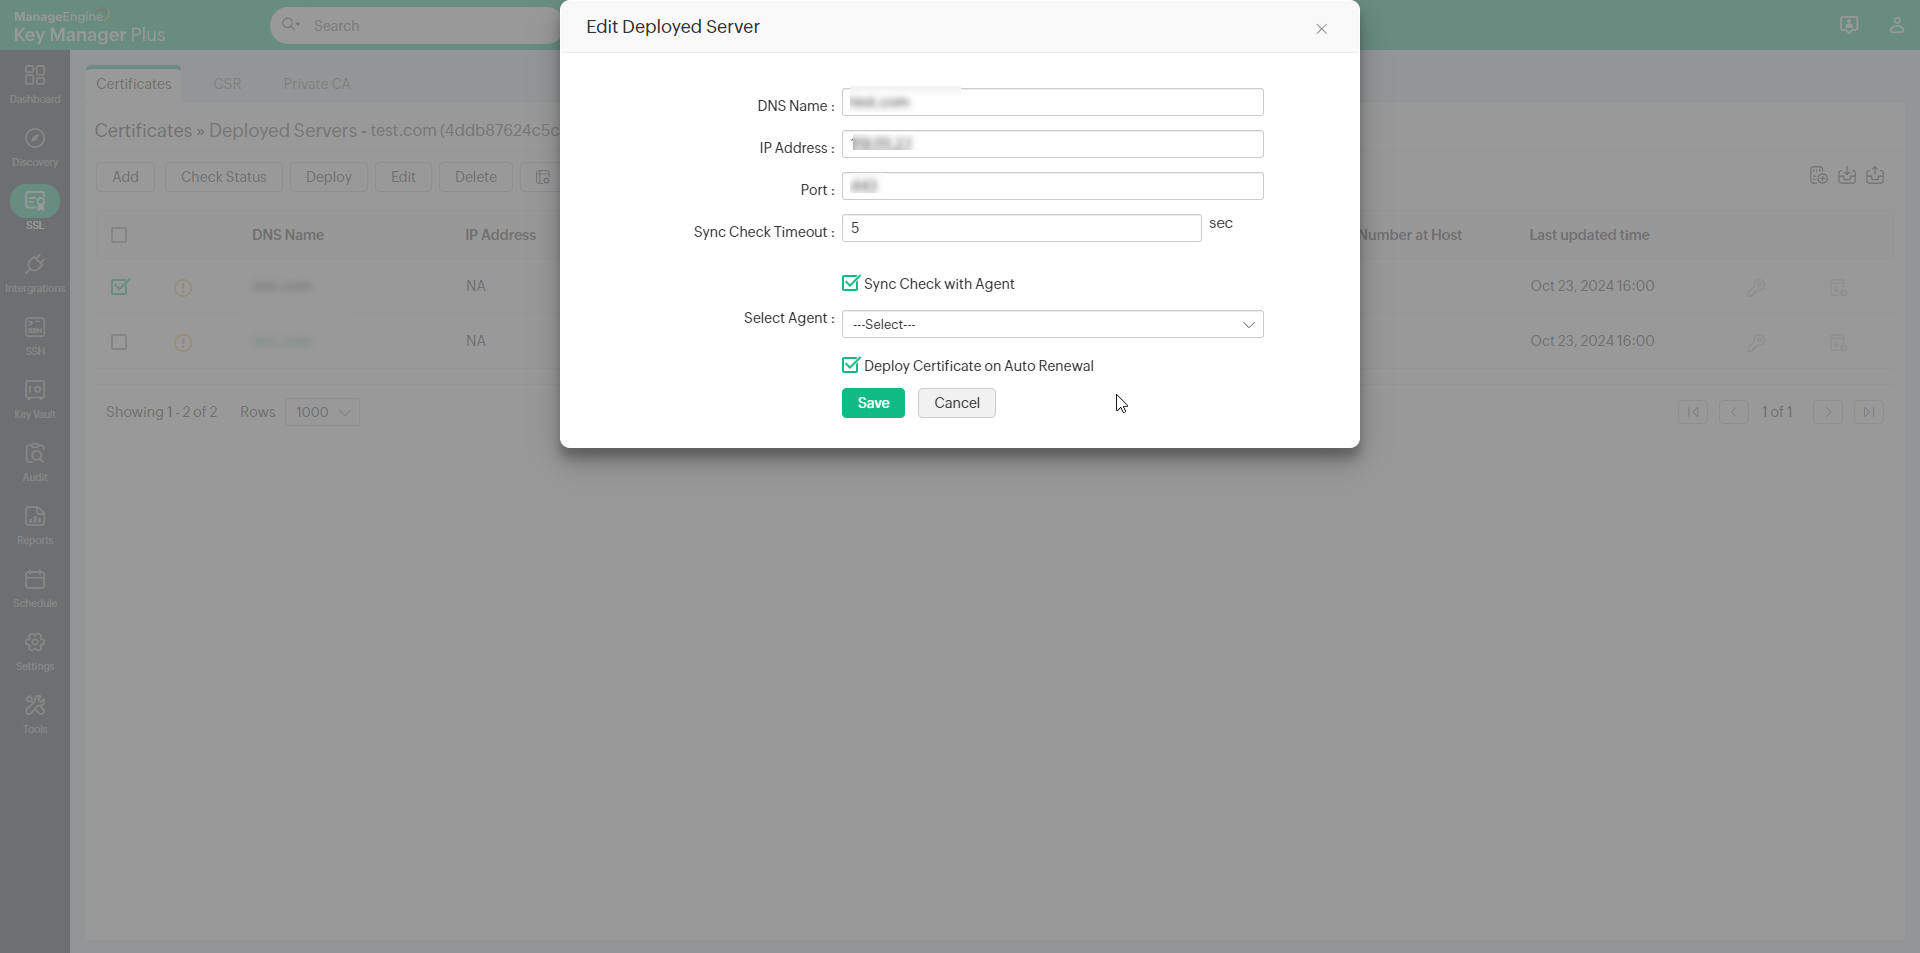
Now, you have successfully editted a deployed server.
Note: You will be able to deploy certificate to all servers on auto renewal only if the user credentials are available.
5. Delete a Deployed Server
Note: Users will not be allowed to delete the Primary server. Choose an alternate Primary Server and then proceed to delete the server.
- To delete a deployed server, select the desired server and click Delete from the top pane.
- If the server you are deleting is a Primary server, in the pop-up, select a new Primary server from the list and click Apply. This will assign the selected server as the Primary server.
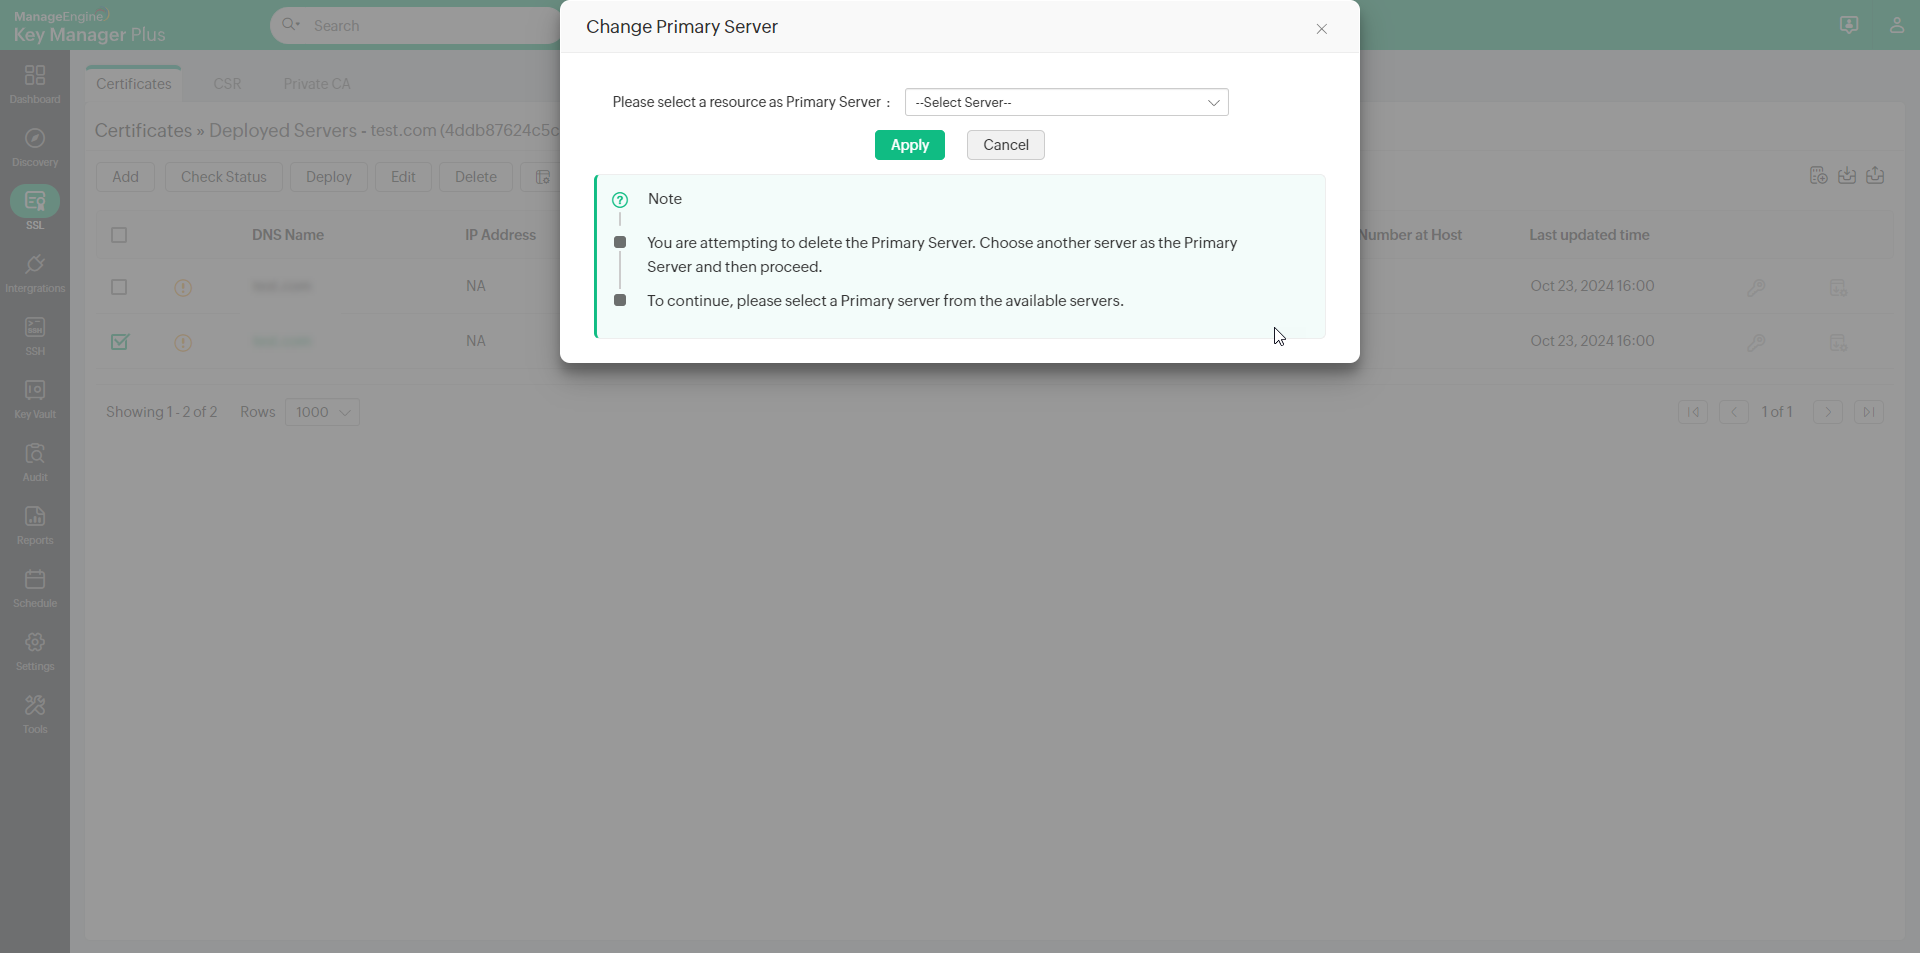
- Now, select the server again and click Delete.
- In the pop-up that appears, click Ok.
- You have successfully deleted a deployed server.
6. Auto Deploy a Certificate
- To auto deploy certificates after renewal, select the desired certificates and click the Edit button.
- Select Deploy Certificate on Auto Renewal and click Save in the pop-up that appears.
7. Check Sync Status
- To check the Sync Status using the agent, select the desired certificates and click the Edit button.
- Select Sync Check With Agent and select the desired Agent.
- Click Save.
- To check the Sync Status of the server, select a server and click Check Status on the top pane.
- Now, Key Manager Plus will check the Sync Status and will display it on the corresponding server's column.
8. Create Additional Fields
From the Multiple Servers page of certificates, you can add additional columns under three categories - Character, Date and Email using the Additional Fields option. Follow the below steps:
- Navigate to SSL >> Certificates tab and click the Multiple Servers icon beside the required certificate.
- Click the Additional Fields icon in the top right corner besides the Import Credentials icon.
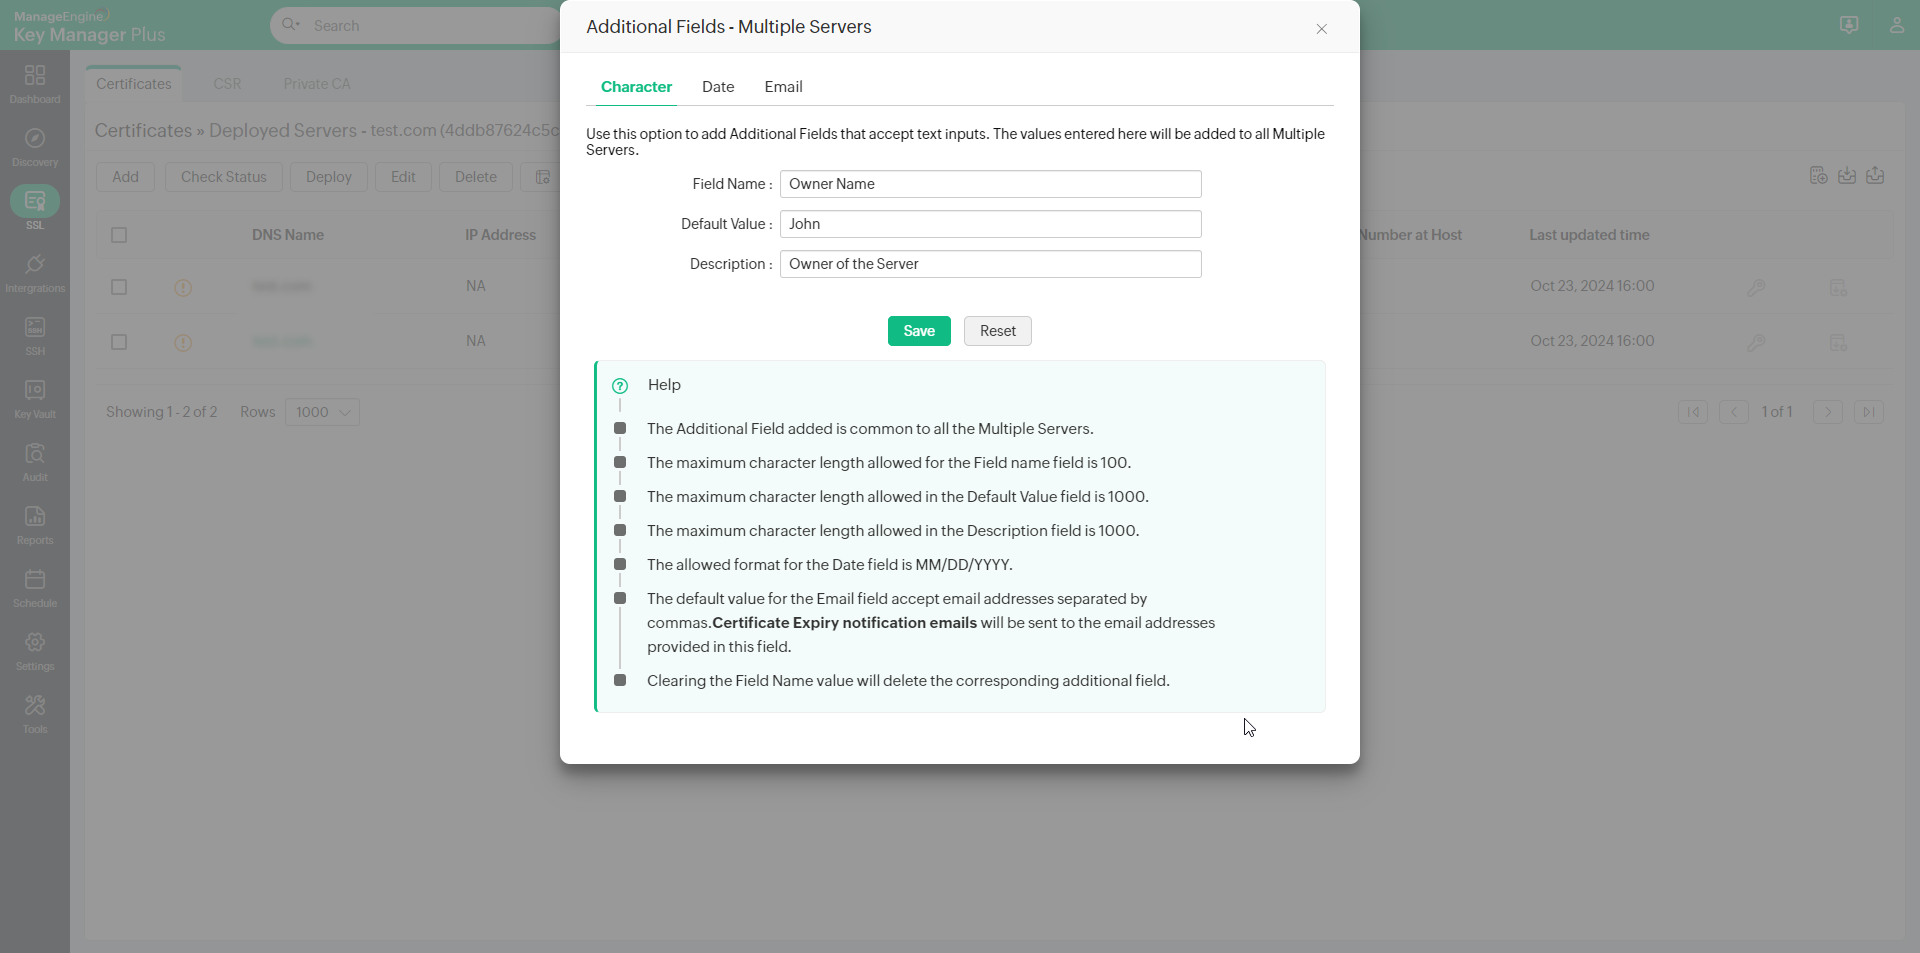
- In the pop-up that opens, navigate to the required category (Character, Date and Email) and enter the Field Name, Value and Description as per your requirements.
- Click Save to add the additional field successfully.
- Click Reset to remove the configured additional field.
- Using the Column Chooser list besides the Delete button, you can enable the added additional field to the multiple servers page of the certificate.
- You can also edit the existing Value of the additional field by clicking on the Edit button by selecting the respective server.
9. Import Credentials
- Click the import credentials icon on the top right corner.
- In the pop-up that appers,
- Browse and select the File Location from where you want to import.
- Select Certificate and/or JKS / PKCS and click Import.
- Now you have successfully imported the credentials into Key Manager Plus.
10. Export Credentials
Select the desired resources and click export credentials icon on top right corner to export the credentials to a text document.
