SSL Certificate Deployment
In general, SSL certificates procured from Certificate Authorities (CAs) are stored in a repository and then manually deployed on appropriate target systems. Key Manager Plus deploys the certificates from the repository on the correct target systems automatically. You can use Key Manager Plus to deploy the certificates on the various systems individually, or in bulk, based on your requirements. Also, you can use the Key Manager Plus agent to deploy certificates on servers that reside in demilitarized zones outside of the domain where the Key Manager Plus server is present.
Steps to Deploy Certificates on Different Target Systems
Follow the below steps to deploy an SSL certificate on various target systems:
- Navigate to SSL >> Certificates.
- Select the checkbox beside the certificate to be deployed.
- Click Deploy.
- In the dropdown, choose the required server type:

- For deploying certificates on Windows systems, MS Certificate Store and Internet Information Services (IIS), use your domain administrator account as the service login account of Key Manager Plus.
- If you are using a domain service account to run Key Manager Plus, ensure you already have it configured in your local admin group.
1. Windows Server
- To deploy certificates on a Windows server, choose the server type as Windows.
- Select the Deployment Type as Single,Multiple (servers) or Agent as per your need.
- For single server deployment, provide the required details: Server Name, User Name, Password, Path. You can optionally enable Certificate to choose the File Type and mention the Certificate File Name or/and enable JKS/PKCS to choose the Keystore Type and mention the Store File Name.
- If you select the checkbox Use Key Manager Plus service account credentials for authentication, you need not provide the username and password separately, as the service account credentials used for Key Manager Plus will be used here too.


- For multi server deployment, upload a .csv file with any one set of the following details: Server Name, User Name, Password, Path, Certificate File Name (optional), Keystore File Name (optional). You can optionally enable Certificate to choose the File Type or/and enable JKS/PKCS to choose the Keystore Type.
[OR]
Follow this format to use the Key Manager Plus service account credentials instead: Server name, SERVICE_AUTH, Path, Certificate File Name (optional), Keystore File Name (optional).
- If you choose the Deployment Type as Agent, choose the host name of the KMP agent from the Select Agent drop-down, enter the destination file path in the agent machine. If a destination path is not mentioned, the agent installation path will be taken as default. You can optionally enable Certificate to choose the File Type and mention the Certificate File Name or/and enable JKS/PKCS to choose the Keystore Type and mention the Store File Name.

- To configure post-deployment actions for the certificates deployed on a Windows server, enable the action that you want to perform after deployment:
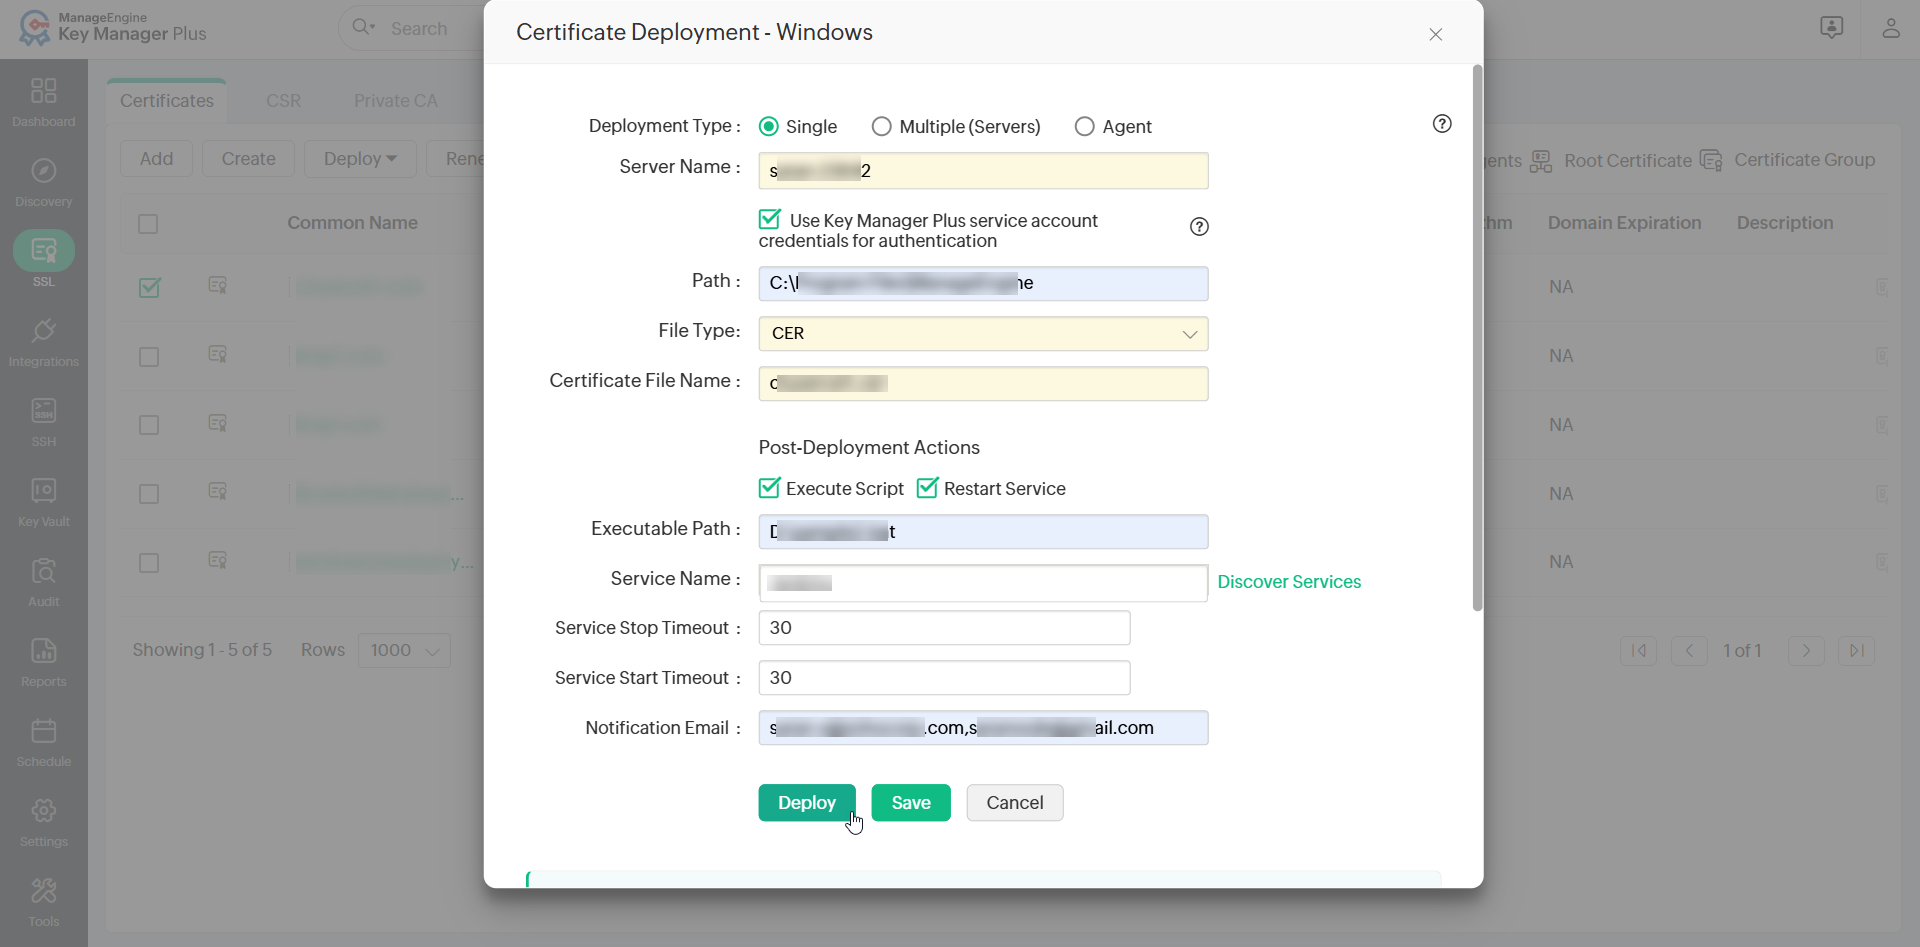
- Execute Script - Enable this action to allow Key Manager Plus to execute a batch script file on the target Windows server after the certificate is deployed. This is useful for running custom configuration tasks or application-specific routines that should be completed after deployment.
- Restart Service - Enable this action to allow Key Manager Plus to automatically restart a specific service on the target Windows server after the certificate is deployed. This ensures that the service reloads and applies the updated certificate without requiring manual intervention.
Note: Post-deployment actions applies to build 7120 and above and is applicable only for single server deployments.
- If you have enabled Execute Script, enter the full file path of the batch script in the Executable Path field. This should be the exact path where the batch script file (.bat) is saved on the Windows server. Key Manager Plus will locate and execute the script from this path.
Note: The batch script should echo EXEC_COMPLETE as its final output. Key Manager Plus uses this output to confirm that the script executed successfully. If this string is not printed, the execution will be treated as a failure.
- If you enabled Restart Service, perform the following actions:
- Enter the name of the service in the Service Name field. Alternatively, click Discover Services to retrieve and select the available services running on the target Windows server.
- In the Service Stop Timeout and Service Start Timeout fields, enter the timeout duration in seconds for each operation. During a service restart, Key Manager Plus first stops the service and then starts it again as two separate operations. The stop timeout defines how long Key Manager Plus waits for the service to stop completely, and the start timeout defines how long it waits for the service to start successfully. Configure these values appropriately based on the nature of the service. Services such as databases or application servers typically require a longer duration to stop and start. If either timeout expires before the operation completes, Key Manager Plus will treat the post-deployment action as failed and will not proceed with further post-deployment tasks on the target server.
- In the Notification Email field, enter the email address of the recipients who should be notified about the outcome of the post-deployment actions. If you want to notify multiple recipients, enter their email addresses in comma-separated format.
- Click Save to save the deployment configuration.
Sample Batch Script File
@echo off
REM Post-deployment sample bat: regex-replace the value of every cert="..."
REM attribute in an XML, regardless of what the previous value was.
setlocal
set "XML_FILE=E:\testFolder\sample.xml"
set "NEW_VALUE=certname3.crt"
if not exist "%XML_FILE%" (
echo ERROR: %XML_FILE% not found.
exit /b 1
)
REM Avoid embedding any literal " in the regex or replacement (cmd mangles them
REM when bat is launched via WMI). Use \x22 inside the regex and [char]34 inside
REM the replacement to represent the quote character.
powershell -NoProfile -Command "(Get-Content -LiteralPath '%XML_FILE%' -Raw) -replace 'cert=\x22[^\x22]*\x22', ('cert=' + [char]34 + '%NEW_VALUE%' + [char]34) | Set-Content -LiteralPath '%XML_FILE%' -NoNewline"
if errorlevel 1 (
echo ERROR: PowerShell replacement failed.
exit /b 1
)
REM Required by Key Manager Plus post-deployment - last line should contain EXEC_COMPLETE
echo EXEC_COMPLETE
endlocal
After providing the details, click Deploy. The certificate is deployed on the specified server/agent in the specified path followed with the configured post-deployment actions.
Note: For file-based deployment, if the Certificate and Keystore file names are not provided, or if multiple certificates are selected for deployment, the Common Name will be used as the file name.
2. Microsoft Certificate Store
- To deploy certificates on the MS Certificate store, choose the server type as Microsoft Certificate Store.
- Select the DeploymentType as Single,Multiple (servers), or Agent as per your need.
- For single server deployment, provide the required details: Server Name, User Name and Password, Path.

- If you select the checkbox Use Key Manager Plus service account credentials for authentication, you need not provide the username and password separately, as the service account credentials used for Key Manager Plus will be used here too.

- For multi server deployment, upload a .csv file with any one set of the following details:
- Server Name, User Name, Password, Path
- Server Name, Agent
- Server Name, SERVICE_AUTH, Path (Follow this format to use the Key Manager Plus service account credentials instead)
- If you choose the Deployment Type as Agent, choose the host name of the KMP agent from the Select Agent dropdown.

- Select Computer and/or User account to deploy the certificate to the selected account.
Note: For Agent deployment, the latest version of Key Manager Pus agent (6160) should run in the user account to which the certificates are to be deployed.
- Now, Enable PrivateKey Export from MS Store after deployment as required to export private key from the certificate store.
- Select the Store Name to which the deployed certificate is to be added. If you have selected the Computer account, you can add the certificate to all the available stores of the computer account. If you have selected only the User account, only the personal store (My store) of the user account will be available.

- For single server deployment, provide the required details: Server Name, User Name and Password, Path.
- Click Save to save the agent details. After providing the details, click Deploy. The selected certificates are deployed in Personal Certificates.

3. Internet Information Services (IIS)
Follow the below steps to deploy a certificate on the IIS server. However, this procedure will only deploy the certificate to the server; IIS binding must be done separately.
- To deploy certificates on a Microsoft IIS server, select a certificate with a Keystore file and click Deploy >> Internet Information Services (IIS).
- Select the Deployment type as Single, Multiple servers, or Agent as per your need.
- For single server deployment, provide the required details: Server Name, User Name, Password, Path.

- If you select the checkbox Use Key Manager Plus service account credentials for authentication, you need not provide the username and password separately, as the service account credentials used for Key Manager Plus will be used here too.

- For multi server deployment, upload a .csv file with any one set of the following details:Server Name, User Name, Password, Path.
[OR]
Follow this format to use the Key Manager Plus service account credentials instead: Server Name, SERVICE_AUTH, Path.
- For single server deployment, provide the required details: Server Name, User Name, Password, Path.
- Specify the name of the IIS server to which the certificate needs to be deployed, provide the user account credentials, and specify a path in the server where the certificate must be placed.
- Click Deploy. Now, the selected certificate will be deployed to the specified IIS server.
4. IIS Binding
Follow the below steps to deploy a certificate to the IIS server and bind the certificate to a site running in that server:
Notes:
i. IIS Manager should be installed/enabled in the Key Manager Plus server.
ii. IIS Binding for the Deployment Type Single will work only if the IIS server and Key Manager Plus are in the same domain, which has ASP.Net of .Net Framework version 4 or above enabled. However, if an IIS Server resides in a demilitarized zone, choose the Deployment Type as Agent and proceed with the steps for the same given below.
- To deploy certificates on a Microsoft IIS server and perform IIS binding, choose the server type as IIS Binding.
- If you choose the deployment type as Single, enter the required details: Server Name, User Name, Password.

- Specify the name of a valid IIS server to which the certificate needs to be deployed, and provide the user account credentials.
- Specify a path in the server where the certificate must be placed.
- If you select the checkbox Use Key Manager Plus service account credentials for authentication, you need not provide the username and password separately, as the service account credentials used for Key Manager Plus will be used here too.

- If you choose the Deployment Type as Multiple (Server), click Browse to upload a file and click Update Binding.
- You can login using three different ways: with Credentials, using Service Authentication, or using Agent. Upload the file with the content in the following format:
- For Single certificate selection,
<servername>, <CREDENTIALS>, <site name>, <binding information>, <server credentials>, <temp path>
(and/or)
<servername>, <SERVICE_AUTH>, <site name>, <binding information>, <temp path>
(and/or)
<servername>, <AGENT>, <site name>, <binding information> - For Multiple certificate selection, include <domain name> in the above format
Example: testServer,CREDENTIALS,test.com,Default Web Site,*:443:myhost,testUSer,testPwd,C:\ - For Multiple certificates with same common name, include <domain name> along with the <serial number> in the above format.
Example: testServer,SERVICE_AUTH,test.com,se123245d,Default Web Site,*:443:myhost,C:\
- For Single certificate selection,
- You can login using three different ways: with Credentials, using Service Authentication, or using Agent. Upload the file with the content in the following format:
- If the IIS Server resides in a demilitarized zone, choose the Deployment Type as Agent. Select an agent from the drop-down. Click Get Sites And Bindings to list all sites and their respective bindings available in the selected server. Enter the name of a site in the Site Name field, click Get Bindings to list all the bindings available for that site.
- Here, to add new bindings, click Add New Bindings and enter attributes such as Host Name, Port, IP Address, and select a certificate. Select the checkbox to Require Server Name Indication while configuring and updating IIS Binding. The newly added bindings will be visible under Settings >> SSL >> IIS Binding. The new site bindings added in Key Manager Plus will not reflect in the IIS server until they are deployed to the server using the Deploy and Bind option.

- To populate the list of sites associated with the IIS server, click Get Site Names and choose a site from the drop-down. To enter a site name manually in the SiteName field, click Hide List, type in the site name and click the Get Bindings option.
- Enter the Host Name, IP Address and Port of the site manually.
- Select the Restart Site option to restart the site automatically.
- Click Add Binding/Update Binding to deploy the certificate at the path specified in your IIS server and complete IIS site binding.
- To update multiple bindings, select the required bindings from the list, click Save. Go to Settings >> SSL >> IIS Binding, select the bindings and click Deploy and Bind.

- To save the specified details and deploy the certificate later, click Save. The server details and the respective site details will be available under Settings >> SSL >> IIS Binding.

- To edit the binding details, click the Edit icon beside a server. In the window that opens, modify any of the given details and click Save. Now, select the server name and click Deploy And Bind from the top bar. The selected certificate will be deployed on the servers and the IIS binding will be updated in the IIS server.
- Details of sites and IIS bindings displayed in the IIS Binding table above are local to Key Manager Plus. To update the binding entries here with the entries from IIS server, select the required entries and click Update Binding.
- Deleting entries from the above table will not remove any data from the IIS server.

5. Linux Server
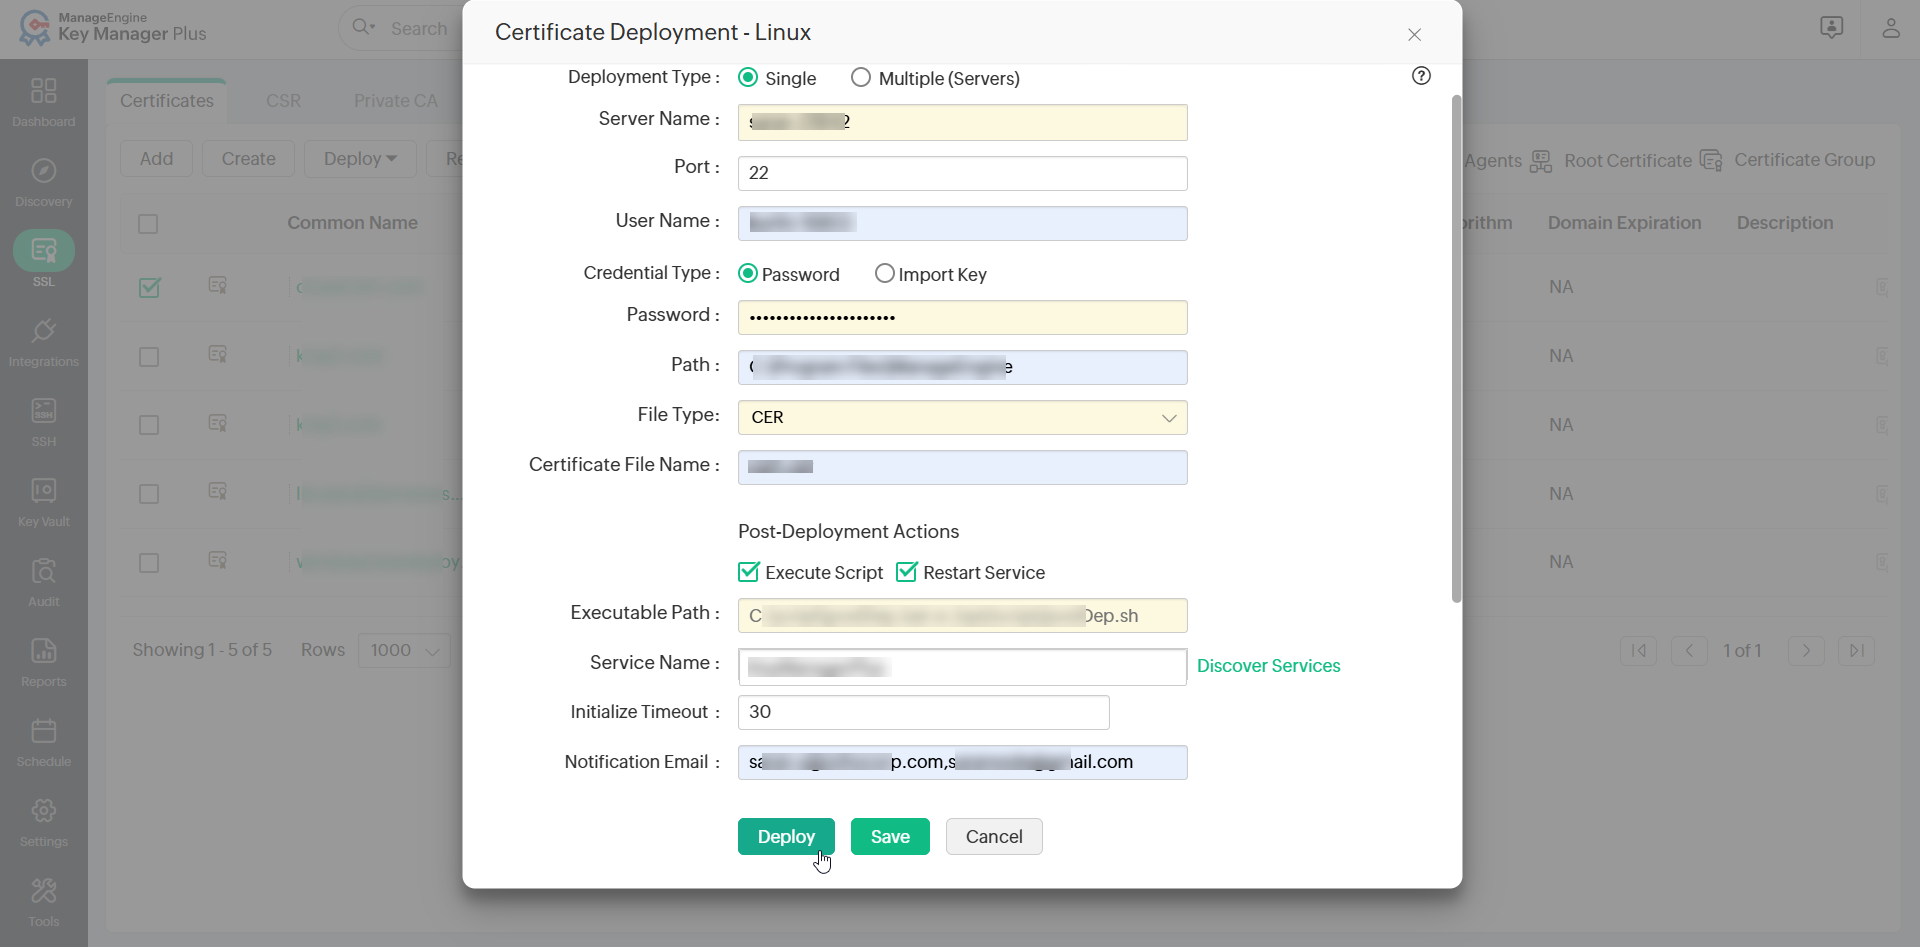
- To deploy certificates on a Linux server, choose the server type as Linux.
- Select the Deployment type as Single or Multiple servers as per your need.
- For single server deployment, provide the required details: Server Name, Port (port 22 is assigned by default), User Name, Password, Path. You can optionally enable Certificate to choose the File Type and mention the Certificate File Name or/and enable JKS/PKCS to choose the Keystore Type and mention the Store File Name.

- For multi server deployment, upload a .csv file with any one set of the following details: Server Name, Port, User Name, Password, Path, Certificate File Name (optional), Keystore File Name(optional). You can optionally enable Certificate to choose the File Type or/and enable JKS/PKCS to choose the Keystore Type.
- You can also opt for a key-based authentication for password-less servers by choosing the Import Key credential type. Upload the private key associated with the required user account in the target system and provide the key passphrase.
- To configure post-deployment actions for the certificate deployed on the Linux server, enable the action that you want to perform after deployment:
Note: Post-deployment actions applies to build 7120 and above and is applicable only for single server deployments.
- Execute Script - Enable this action to allow Key Manager Plus to execute a shell script file on the target Linux server after the certificate is deployed. This is useful for running custom configuration tasks or application-specific routines that should be completed after deployment.
- Restart Service - Enable this action to allow Key Manager Plus to automatically restart a specific service on the target Linux server after the certificate is deployed. This ensures that the service reloads and applies the updated certificate without requiring manual intervention.
Note: The service to be restarted on the Linux server should be managed by systemd.
- If you have enabled Execute Script, enter the full file path of the shell script in the Executable Path field. This should be the exact path where the shell script file (.sh) is saved on the Linux server. Key Manager Plus will locate and execute the script from this path during post-deployment before restarting the service.
Note: The shell script should echo EXEC_COMPLETE as its final output. Key Manager Plus uses this output to confirm that the script executed successfully. If this string is not printed, the execution will be treated as a failure.
- If you enabled Restart Service, perform the following actions:
- Enter the name of the service in the Service Name field. Alternatively, click Discover Services to retrieve and select the available services running on the target Linux server.
- In the Service Action Timeout field, enter the timeout duration in seconds. This value defines how long Key Manager Plus should wait for the service to come up and become fully operational after it has been restarted. Configure this value appropriately based on the nature of the service. Services such as databases or application servers typically require a longer duration to initialize after a restart. If the Service Action Timeout expires before the service becomes operational, Key Manager Plus will treat the post-deployment action as failed and will not proceed with further post-deployment tasks on the Linux server.
- If the Credential Type selected for the certificate deployment is Import Key, enter the Sudo Password in the field provided. Key Manager Plus requires the sudo password to execute privileged operations, such as restarting a system service, on the Linux server. Without this, the service restart step cannot be completed.
- In the Notification Email field, enter the email address of the recipients who should be notified about the outcome of the post-deployment actions. If you want to notify multiple recipients, enter their email addresses in comma-separated format.
- Click Save to save the deployment configuration.
Sample Shell Script File
#!/bin/bash
# .sh file should not use ~ or relative paths,
# during execution. Always use absolute paths for file operations.
XML_FILE="/home/username/Desktop/sample.xml"
NEW_VALUE="certname10300.crt"
if [ ! -f "$XML_FILE" ]; then
echo "ERROR: $XML_FILE not found."
exit 1
fi
# Replace all cert="..." values in the XML
sed -i 's/cert="[^"]*"/cert="'"$NEW_VALUE"'"/g' "$XML_FILE"
if [ $? -ne 0 ]; then
echo "ERROR: Replacement failed."
exit 1
fi
# Required by Key Manager Plus post-deployment - last line should contain EXEC_COMPLETE
echo "EXEC_COMPLETE"
After providing the details, click Deploy. The certificate is deployed on the specified server in the specified path followed with the configured post-deployment actions.
Notes:
- Key-based authentication option is available for single server deployment type only.
- The private key uploaded during key-based authentication is for one-time use only and is not stored anywhere in the Key Manager Plus database. If you wish to add it to the Key Manager Plus repository, you can manually do so by using the Import option from the SSH tab.
6. Browser
- To deploy certificates on a browser, choose the deploy type as Browser.
- Select the Server Type as Windows, Linux or Mac OS as per your need.
- If the server type is Windows,
- Mention the Server Name, User Name, Password and Path.

- If you select the checkbox Use Key Manager Plus service account credentials for authentication, you need not provide the User Name and Password separately, as the service account credentials used for Key Manager Plus will be used here too.

- Mention the Server Name, User Name, Password and Path.
- If the server type is Linux,
- Enter the Server Name, Port, User Name, Password and Path.
- Select the required Browser(s) (Firefox or/and Chrome) where the certificate is to be deployed.
- If you select Firefox, mention the Profile name. Click Get Profiles to choose from available profiles.
Note: The Get Profiles option gets all profiles path from profiles.ini file from the following location:
- Windows: APPDATA\Mozilla\Firefox\profiles.ini
- Linux: $HOME/.mozilla/firefox/profiles.ini
- Mac: $HOME/Library/Application Support/Firefox/profiles.ini
- Mention the NSS Tools Path.

Note:
In Linux, Chrome and Firefox use NSS shared DB to manage the certificates. This NSS tool can be installed using the following command: sudo apt-get install libnss3-tools
- For Chrome, the certificate is deployed in NSS DB in the following path: $HOME/.pki/nssdb.
- For Firefox, Profiles folder contains the NSS DB to manage certificates.
- You can also opt for a key-based authentication for password-less servers by choosing the Import Key credential type. Upload the private key associated with the required user account in the target system and provide the key passphrase.

- If the server type is Mac OS,
- Enter the Server Name, Port, User Name, Password and Path.
- Select the required Browser(s) (Firefox or/and Safari/Chrome) where the certificate is to be deployed.
- If you select Firefox, mention the Profile name and NSS Tools Path. Click Get Profiles to choose from available profiles.

- If you select Safari/Chrome you can choose to Use the login password for Keychain login or mention the Login Keychain Password.
Note: For Safari and Chrome, Mac OS uses System Keychain to manage certificates. For Firefox, NSS DB from profiles manages the certificates. To install NSS utils, use the following command: brew install nss.

- Click Deploy.
Now, you have successfully deployed the certificate to the selected browsers.
7. ManageEngine MDM
To learn about deploying certificates to ManageEngine MDM, click here.
8. AWS-ACM
To learn about deploying certificates to AWS-ACM, click here.
9. Load Balancer
9.1 Citrix ADC
- Select a certificate and click Deploy >> Load Balancer from the dropdown.
- In the pop-up that appears, select the Citrix ADC as the Load Balancer Type.
- Select the required Citrix Credential List from the dropdown.

- Click Manage Credentials to add or delete a credential.
- In the pop-up that appears, click to Add and mention the Credential Name, Server Name, Citrix Username and Citrix Password.
- Click Test Login to test the credential and click Save Credentials.

- To Delete a credential, select a credential you want to delete and click Delete and in the pop-up that appears click Ok.
- Enter the Citrix Password and a Passphrase. You can also use the Generate Password icon to generate a secure passphrase.
- During Citrix load balancer discovery using REST API, you can choose to bypass your proxy server settings by selecting the Bypass Proxy Settings checkbox. This option is allows you to bypass the proxy server you have enabled under Admin Settings directly perform Citrix load balancer discovery through the internet.
- Select Service Deploy. In the pop-up that appears, select the services to deploy the load balancer and click Select Services.
- Select Virtual Server Deploy. In the pop-up that appears, select the virtual servers to deploy the load balancer and click Select Virtual Servers.

- Click Deploy.
Now, you have successfully deployed the certificate to the selected LoadBalancer.
9.2 FortiGate Firewall
- Select a certificate and click Load Balancer from the Deploy dropdown.
- In the pop-up that appears, select the FortiGate Firewall under the Load Balancer Type.
- Select the required FortiGate Credential from the FortiGate Credentials List dropdown.

- Click Manage Credentials to add or delete a credential. In the pop-up that appears:
- To add a credential, click Add and enter the Credential Name, Server IP, and API Key.
- Click Save Credentials to add a new FortiGate Firewall credential.
- To delete a credential, select a credential that you want to delete and click Delete.
- In the pop-up that appears, click OK to delete the selected credential.
- If the certificate has a keystore file, select the Upload Type as Regular. Else, select the Upload Type as Remote.
- In addition, you can bypass your proxy server settings by enabling the Bypass Proxy Settings checkbox. This option allows you to bypass the proxy server that you have enabled under Admin Settings directly, to deploy the certificate to the FortiGate Firewall through the internet.
- Click Deploy to deploy the selected certificate to the FortiGate Firewall.
10. Azure Key Vault
(Feature available from build 7050 and above only)
To deploy an SSL certificate to Azure Key Vault via Key Manager Plus, follow the steps below:
- Navigate to the SSL tab, select an SSL certificate from the list, and click Deploy from the top menu.
- Select the Azure Key Vault option from the drop-down list.
- In the window that appears, select the Azure credential from the Credential Name dropdown. If you have not added any Azure credentials, click Add Azure Credential beside the dropdown, and enter the following details in the dialog box that appears:

- Credential Name
- Subscription ID
- Directory ID
- Application ID
- Key
- Click Save to add the Azure credential.
- After selecting the credential name, choose the Key Vault from the dropdown.

- Provide the exact certificate name in the Certificate Name field and click Deploy.
Note: Certificate names should only contain alphanumeric characters and dashes. The provided value may be copied globally to run the service. The value provided should not include any PII or sensitive information.
Now, the SSL certificate has been deployed to the Azure Key Vault. It can also be managed from Integrations >> Azure >> Azure Key Vault.
11. Azure Application
(Feature available from build 7050 and above only)
To deploy and manage an SSL certificate to Azure application via Key Manager Plus, follow the steps below:
- Navigate to the SSL tab and select the SSL certificate you want to deploy.
- Click Deploy from the top menu and select Azure Application from the drop-down list.
- In the window that appears, select an Azure application from the Application Name dropdown.

- Enter a Description if required and then click Deploy to deploy the SSL certificate to the selected application.
Note: To deploy an SSL certificate to an Azure application through Key Manager Plus, the application must have an associated private key. If no private key is available, refer to this document for instructions on adding a new one.
Now, the deployed certificate to the application will get reflected in the Azure portal as well. Furthermore, users can manage this certificate via Key Manager Plus.