Data Back up and Restore
Mobile Device Manager Plus stores information like configuration details, status of deployed configurations, and details about reports, in a database. Creating a back up of this database and certain important files like configuration files is necessary to prevent loss of data.
You can back up data automatically, by scheduling a back up using Mobile Device Manager Plus, or taking a back up manually. You can also restore this data when required. For example, assume that your hard disk crashes and you have to re-install Mobile Device Manager Plus. You can use the last back up you took to restore all the required information. Note that this is possible only if the back up file is stored in a computer other than yours.
Best Practices to be followed while using the 'Back up and Restore' option
- Make sure that you add the exclusion list for Anti Virus. When directories containing the MSSQL / PGSQL data are scanned by anti virus software, they misidentify the files content as spam and prevent the back up of that data.
- We recommended you to schedule the back up after working hours, so that it does not affect productivity.
- Ensure you have a minimum of 5GB space to store the back up data.
- Ensure you specify a valid destination folder.
- The remote database must be configured and has to be running during back up.
Learn how to create exclusions for McAfee, Symantec and Kaspersky.
Scheduling Data Back up
You can use Mobile Device Manager Plus to take a back up of the database regularly. For example, if you want to take a back up of the database every Friday at 5PM, you can schedule the same using Mobile Device Manager Plus.
- The time should be specified in the 24-hour format. For example, if you want the database back up to be taken at 6 PM, the time should be specified as 18:00:00.
- Using this option you can select how many database back up files should be saved. The older back up files will be deleted. For example, if you want only 7 back up files saved, select 7. This will ensure that at all times only 7 back up files are saved.
- Ensure that you have configured your mail server settings. This needs to be done in order to receive notifications.
To schedule back up of data, follow the steps given below:
- On the web console, select the Admin tab
- In the Tools section, click on the Database Back up option.
- Specify the time at which you want the back up to be taken, in hour:minute:second (hh:mm:ss) format.
- Select the number of back up files that you want Mobile Device Manager Plus to save.
- Specify the location where you want the back up files to be stored.
- Check the Notify when the database back up fails checkbox.
- Specify the email address(es) to which you want an e-mail message sent, if the database back up fails. Please note that you should have configured your mail server settings to get notified.
- Click on Save Changes
You have scheduled an automatic data back up to take place automatically at a specified time.
Manual Data Back up and Restore
You can manually back up and restore the database. You can do this using the Back up-Restore Utility GUI.
Opening the Back up-Restore Utility Graphical User Interface (GUI)
To open the Back up-Restore Utility GUI, follow the steps given below:
- Right-click start>Explore>Local Disk (C:)>Program Files>MDMServer>bin
- Double-click backuprestore.bat
You've opened the Back up-Restore Utility interface.
Creating a back up file
- On the Back up-Restore Utility interface, click the Back up tab.
- Select the location to where you want the backup file to be saved.
If you're using a network share, ensure that full control permissions are granted to the selected users or groups.
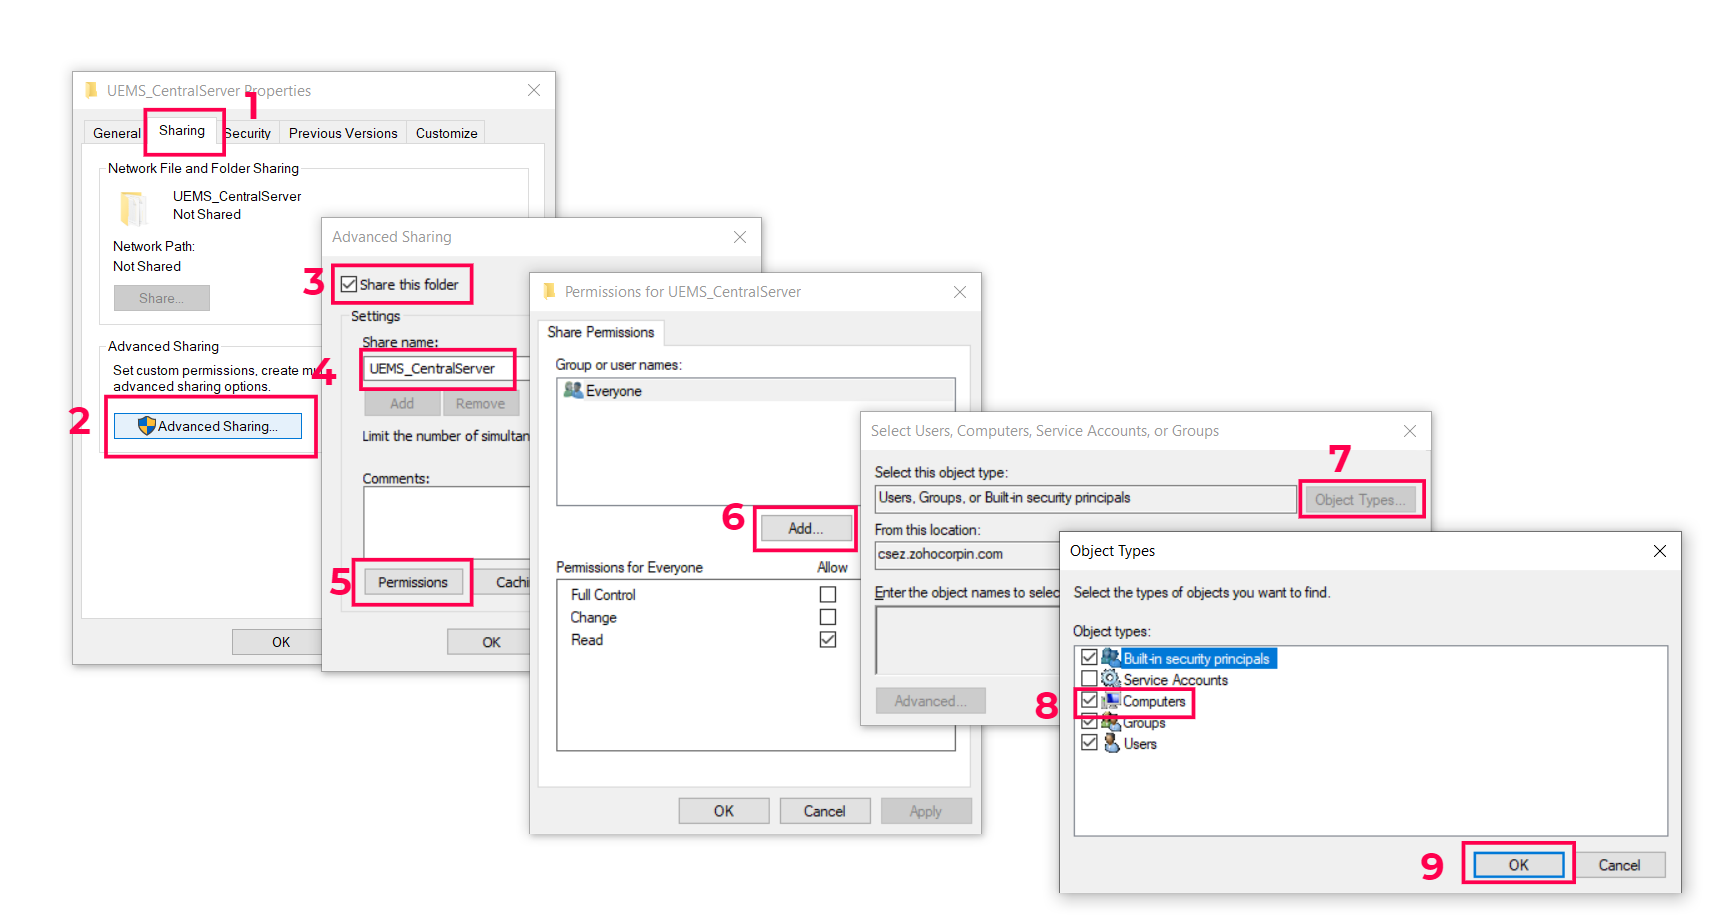
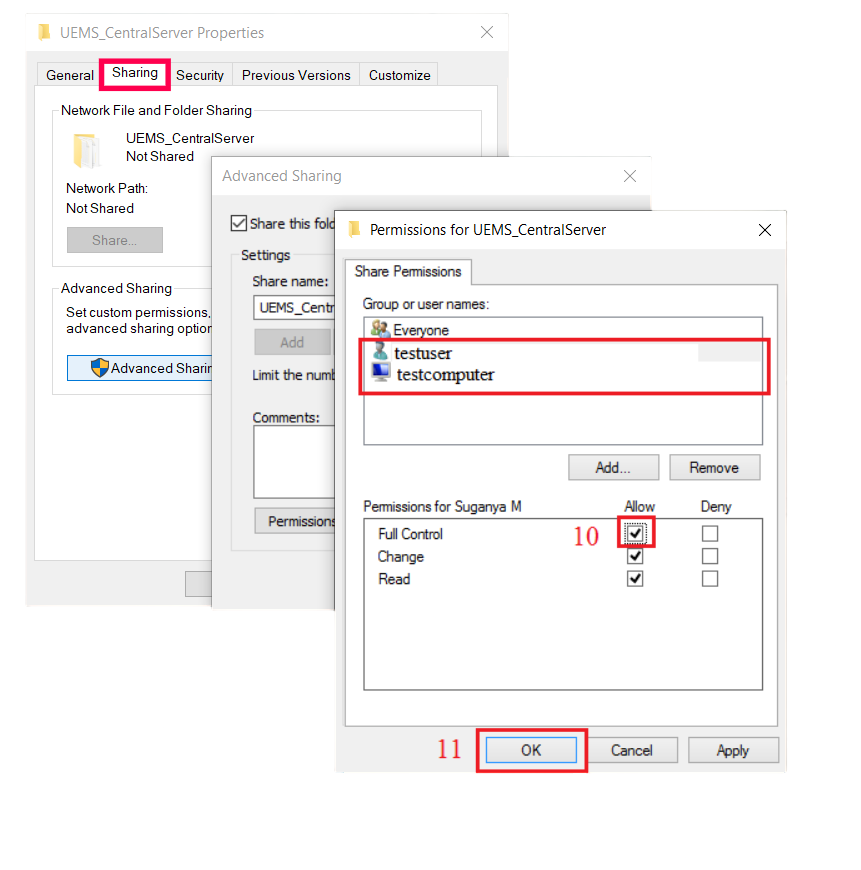
- Share(with full access) the backup folder to the particular machine on which the MDM server is installed.
- Mention the object type as Computer and give permission to the machine on which the server is installed.
- Open the command prompt and navigate to
/bin/ and execute the command backuprestore.bat - Browse the same backup location and execute the backup option given in the window.
- Click on Back up
A back up file is created and saved in the specified location. The file will be named using the build number-date-time.zip format. For example, 70120-Feb 25-2022-13-26.zip where 70120 is the build number, Feb 25th 2022 is the date and 13:26 is the time.
Restoring a back up file
- The build number of the Mobile Device Manager Plus server should match the build number of the back up file you are restoring.
- Ensure that you have shut down the Mobile Device Manager Plus server before restoring a back up file
- If remote database is configured with the Mobile Device Manager Plus server, ensure that it is running on a remote machine. After restoration, the changes made after the back up date will not be available.
- On the Back up-Restore Utility GUI, click the Restore tab
- Browse and select the required back up file.
- Click Restore
This will restore the specified data to Mobile Device Manager Plus server.