Securing Communication using 3rd Party Certificates
Securing corporate data is a top priority in every organization and encryption using third-party certificates is the most secure option. These third-party certificates ensure that the corporate data can only be decrypted if they have the certificate available. Mobile Device Manager Plus allows organizations to secure the communication with the managed devices using SSL certificates.
This certificate is valid for a specified term. If the certificate expires, then the devices won't be able to communicate with the MDM server. The admin won't be able to manage any mobile devices, till they renew the certificates and upload it in the MDM server.
Pre-Requisites
These are the pre-requisites for uploading TLS Server certifictes:
- TLS server certificates and issuing CAs using RSA keys must use key sizes greater than or equal to 2048 bits.
- TLS server certificates must have SHA-2 family hash algorithm.
- TLS server certificates must have the DNS name of the server in the Subject Alternative Name extension of the certificate.
- TLS server certificates must have "TLS Server Authentication" (id-kp-serverAuth (OID) - 1.3.6.1.5.5.7.3.1) extended key usage extension.
- The TLS server certificates being uploaded should have a maximum validity period of only 397 days.
- TLS server certificates must not be a self-signed certificate.
Follow the steps mentioned below to create and upload third Party Certificates:
- Create CSR and Key Files
- Submit the CSR to a Certificate Authority (CA) to Obtain a CA Signed Certificate
- Upload the third party Certificates to Mobile Device Manager Plus
Create CSR and Key Files
I.For MDMP Build Version : 10.1.2303.3 and above :
For Generating server.csr and server.key files, follow the steps mentioned below :
- It is recommended to take a backup of your existing server.key and server.csr file before initiating this process as these files will be overwritten during this process.
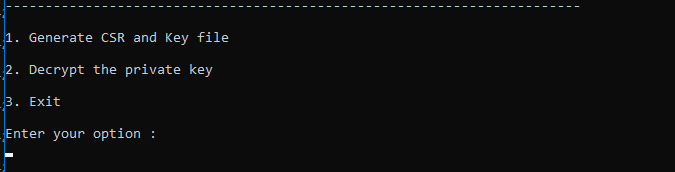
- Navigate to <server_installed_directory>/bin in command prompt with admin privileges and execute generateCSR.bat file.
- The command generateCSR.bat executes two operations :Creating the .csr /.key files and Decrypting .key files
- Enter 1 to proceed with .csr and .key file generation.
- Enter the country code by referring to this document.
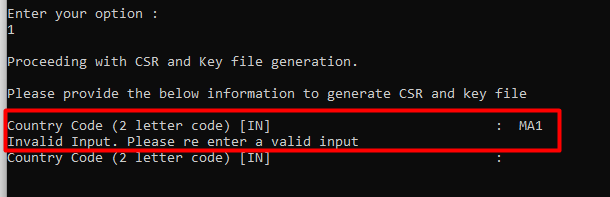
POINTS TO NOTE:
- Country should have exactly two characters (numbers and special characters are not allowed).
- If you enter the input wrongly, then you'll be given one more chance to provide the input.
- If it is entered wrongly again then the command prompt will be terminated and you shall be requested again to re-run the bat command to proceed.
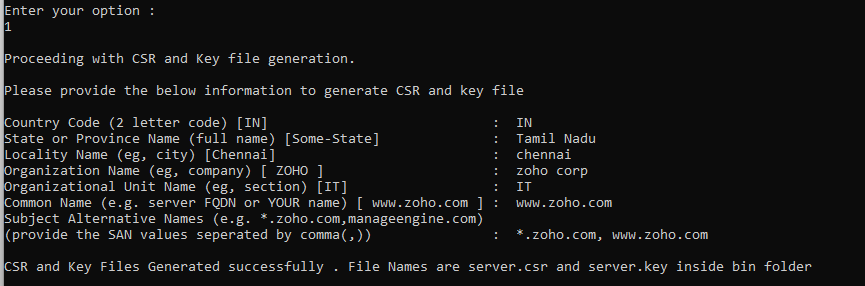
- Enter the necessary details for generating the .csr file like state, locality, organization, organizational unit, common name, subject alternative names etc separated by commas.
POINTS TO NOTE:
- The state or province name, locality name, organization name, organization unit name, common name should be filled with at least one character.
- If you enter the wrong input, then you'll be prompted to enter the valid input again.
- If the wrong input is entered again the command prompt will be terminated. Feel free to contact our support team in case of any assistance.
- You have successfully generated the server.csr and server.key file.
For decrypting the encrypted key file, refer here.
II.For MDMP Build Version below 10.1.2303.3 :
- In <Installation_Directory>\ManageEngine\MDMServer\apache\bin, create a file named opensslsan.conf, and copy the following code into the file:
[req]
prompt=no
default_bits=2048
distinguished_name = req_distinguished_name
req_extensions = req_ext
[ req_distinguished_name ]
countryName =
stateOrProvinceName =
localityName =
organizationName =
commonName =
[ req_ext ]
subjectAltName =
[alt_names]
DNS.1 =
DNS.2 =
DNS.3 =
- In the code, enter the two letter Country Code next to countryName. Check the two letter country code of your country here.
- Next, enter the full name of your state or province next to stateOrProvinceName.
- Next to localityName, enter the name of your locality. Specify the name of your organization, next to organizationName.
- Enter the name of your website or domain beside commonName. The FQDN of the web server (the host name), that is going to receive the certificate, is the Common Name. Do not include the following details while entering the Common Name:
-> protocol (http:// or https://)
-> port numbers or pathnames - Enter the Subject Alternative Name (SAN) of your website next to DNS.1, DNS.2, etc. in the code one by one. You can have many SAN for a single certificate. You can add more SAN by adding DNS.4, DNS.5, and so on, at the end of the code. Here is an example:
[req]
prompt=no
default_bits=2048
distinguished_name = req_distinguished_name
req_extensions = req_ext
[ req_distinguished_name ]
countryName = US
stateOrProvinceName = IL
localityName = Chicago
organizationName = Zylker
commonName = www.zylker.com
[ req_ext ]
subjectAltName = @alt_names
[alt_names]
DNS.1 = *.zylker-tech.com
DNS.2 = zylker-it.com
DNS.3 = zylkerteam.com
- Save the file, go to command prompt, and navigate to <Installation_Directory>\ManageEngine\MDMServer\apache\bin directory
- Execute openssl.exe req -out server.csr -newkey rsa:2048 -nodes -keyout private.key -config opensslsan.conf command.
- Files named server.csr and private.key are created.
- To verify the details, use openssl.exe req -in server.csr -noout -text -config ..\conf\openssl.cnf command.
NOTE: Do not delete the file private.key that is generated.
Submit the CSR to a Certificate Authority (CA) to obtain a CA Signed Certificate
- Submit created server.csr to CAs. Check their documentation / website for details on submitting CSRs and the cost to be paid to the CA.
- This process usually takes a few days time after which you'll be provided a signed SSL certificate and the CA's chain/intermediate certificate as .cer files
- Save these files and rename your signed SSL certificate file to server.crt
Upload the third party Certificates to Mobile Device Manager Plus
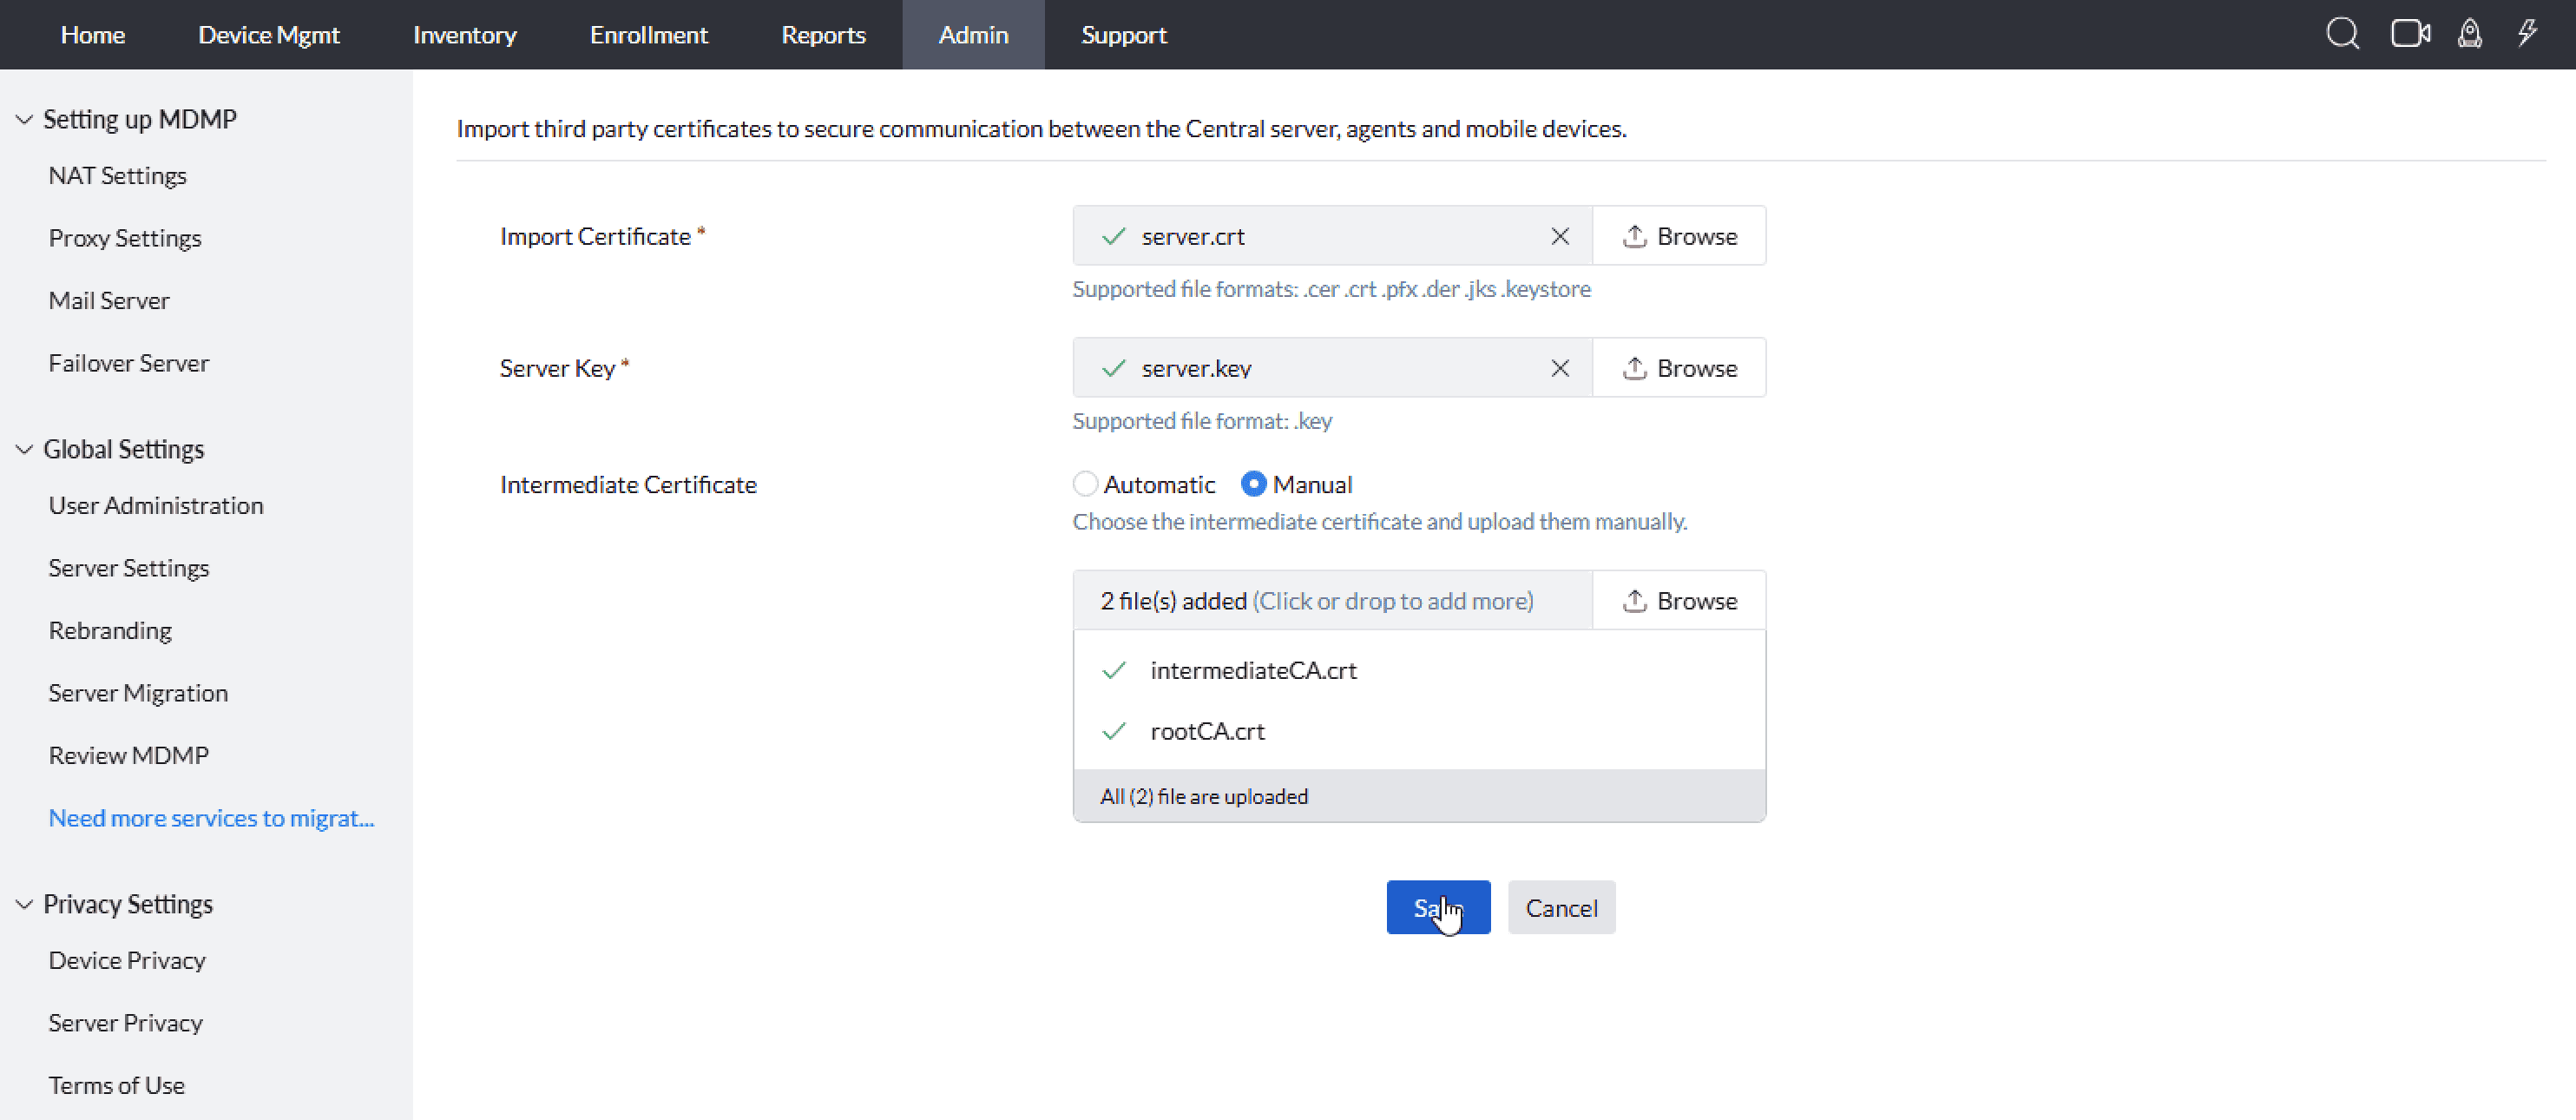
- On the MDM server, click Admin tab
- Under Security Settings, click Import SSL Certificates
- Browse to upload the certificate that you have received from the CA. The certificate will be available in .crt format for SSL and in .pfxformat for PFX certificates
- Once you upload a .crt file, you will be prompted to upload the Server Key. In the Server Key field, upload the private.key file generated while creating the CSR.
- After uploading the Server Key, you will be prompted to upload the intermediate certificate. If you choose Automatic, then the intermediate certificate will be detected automatically. However when the intermediate certificate is detected automatically, only one certificate will be detected. If you wanted to use your own intermediate certificate, or upload more than one intermediate certificate, then you need to select Manual, and manually upload the certificates.
- If you choose to upload a .pfx file, then you will be prompted to enter the password provided by the vendor.
- Click Save to import the certificate.
You have successfully imported the third party certificates to Mobile Device Manager Plus server. These certificates will be used only when "HTTPS" mode is enabled for communication.
NOTE:Click Admin tab and choose Server Settings, to enable Https mode under General Settings.
Importing Enterprise SSL certificate
While importing an enterprise SSL certificate, it is mandatory that the root certificate of the uploaded SSL is present in the trusted store of all managed endpoints. This is required to maintain secure communication between the MDM server and devices.
During the import process, two options are provided:
- Proceed to import
- Distribute root certificate
Each option works differently and should be selected based on the environment.
Case 1: Proceed to import
When Proceed to import is selected, the SSL certificate is imported immediately to the server without waiting for root certificate distribution. This option should be used only when the administrator is confident that the root certificate already exists in the trusted store of all devices.
Important points:
- Certificate is activated instantly on the server
- Root certificate is not distributed automatically<.li>
- Devices that do not trust the root certificate may lose MDM communication
- Such devices will need to be re-enrolled manually
This option is generally not recommended for live environments with active managed devices.
Case 2: Distribute root certificate (Recommended)
When Distribute root certificate is selected, the system first initiates the distribution of the root certificate to all managed endpoints before importing the SSL certificate.
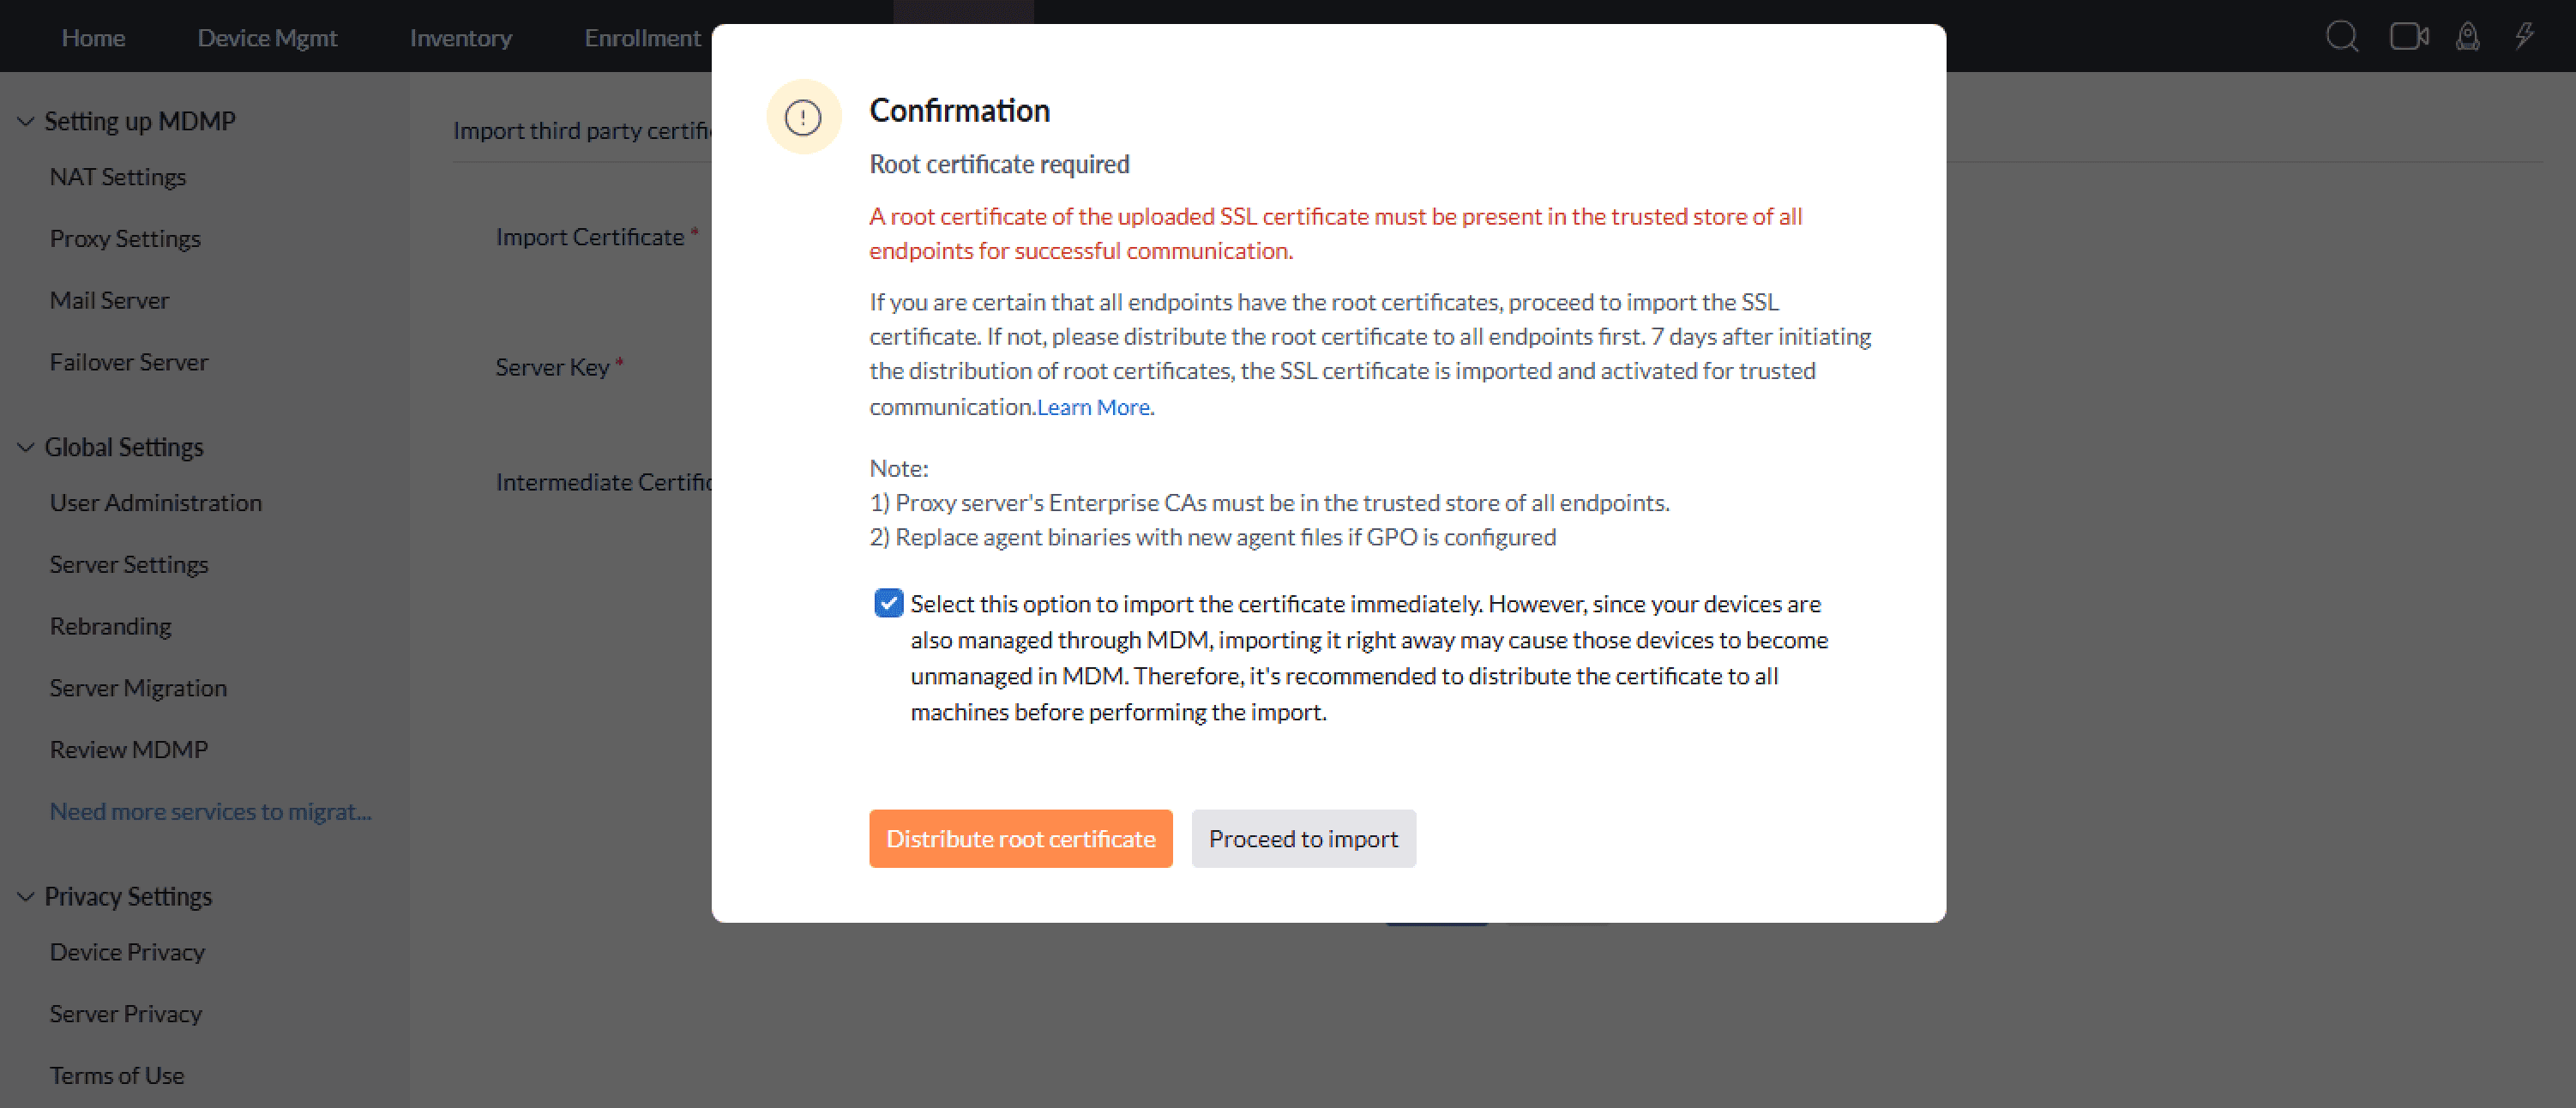
A 7-day distribution period is provided to allow devices enough time to receive and trust the root certificate.
During this period:
- Root certificate is pushed to all managed devices
- Devices install the certificate into their trusted store
- SSL certificate is not imported immediately
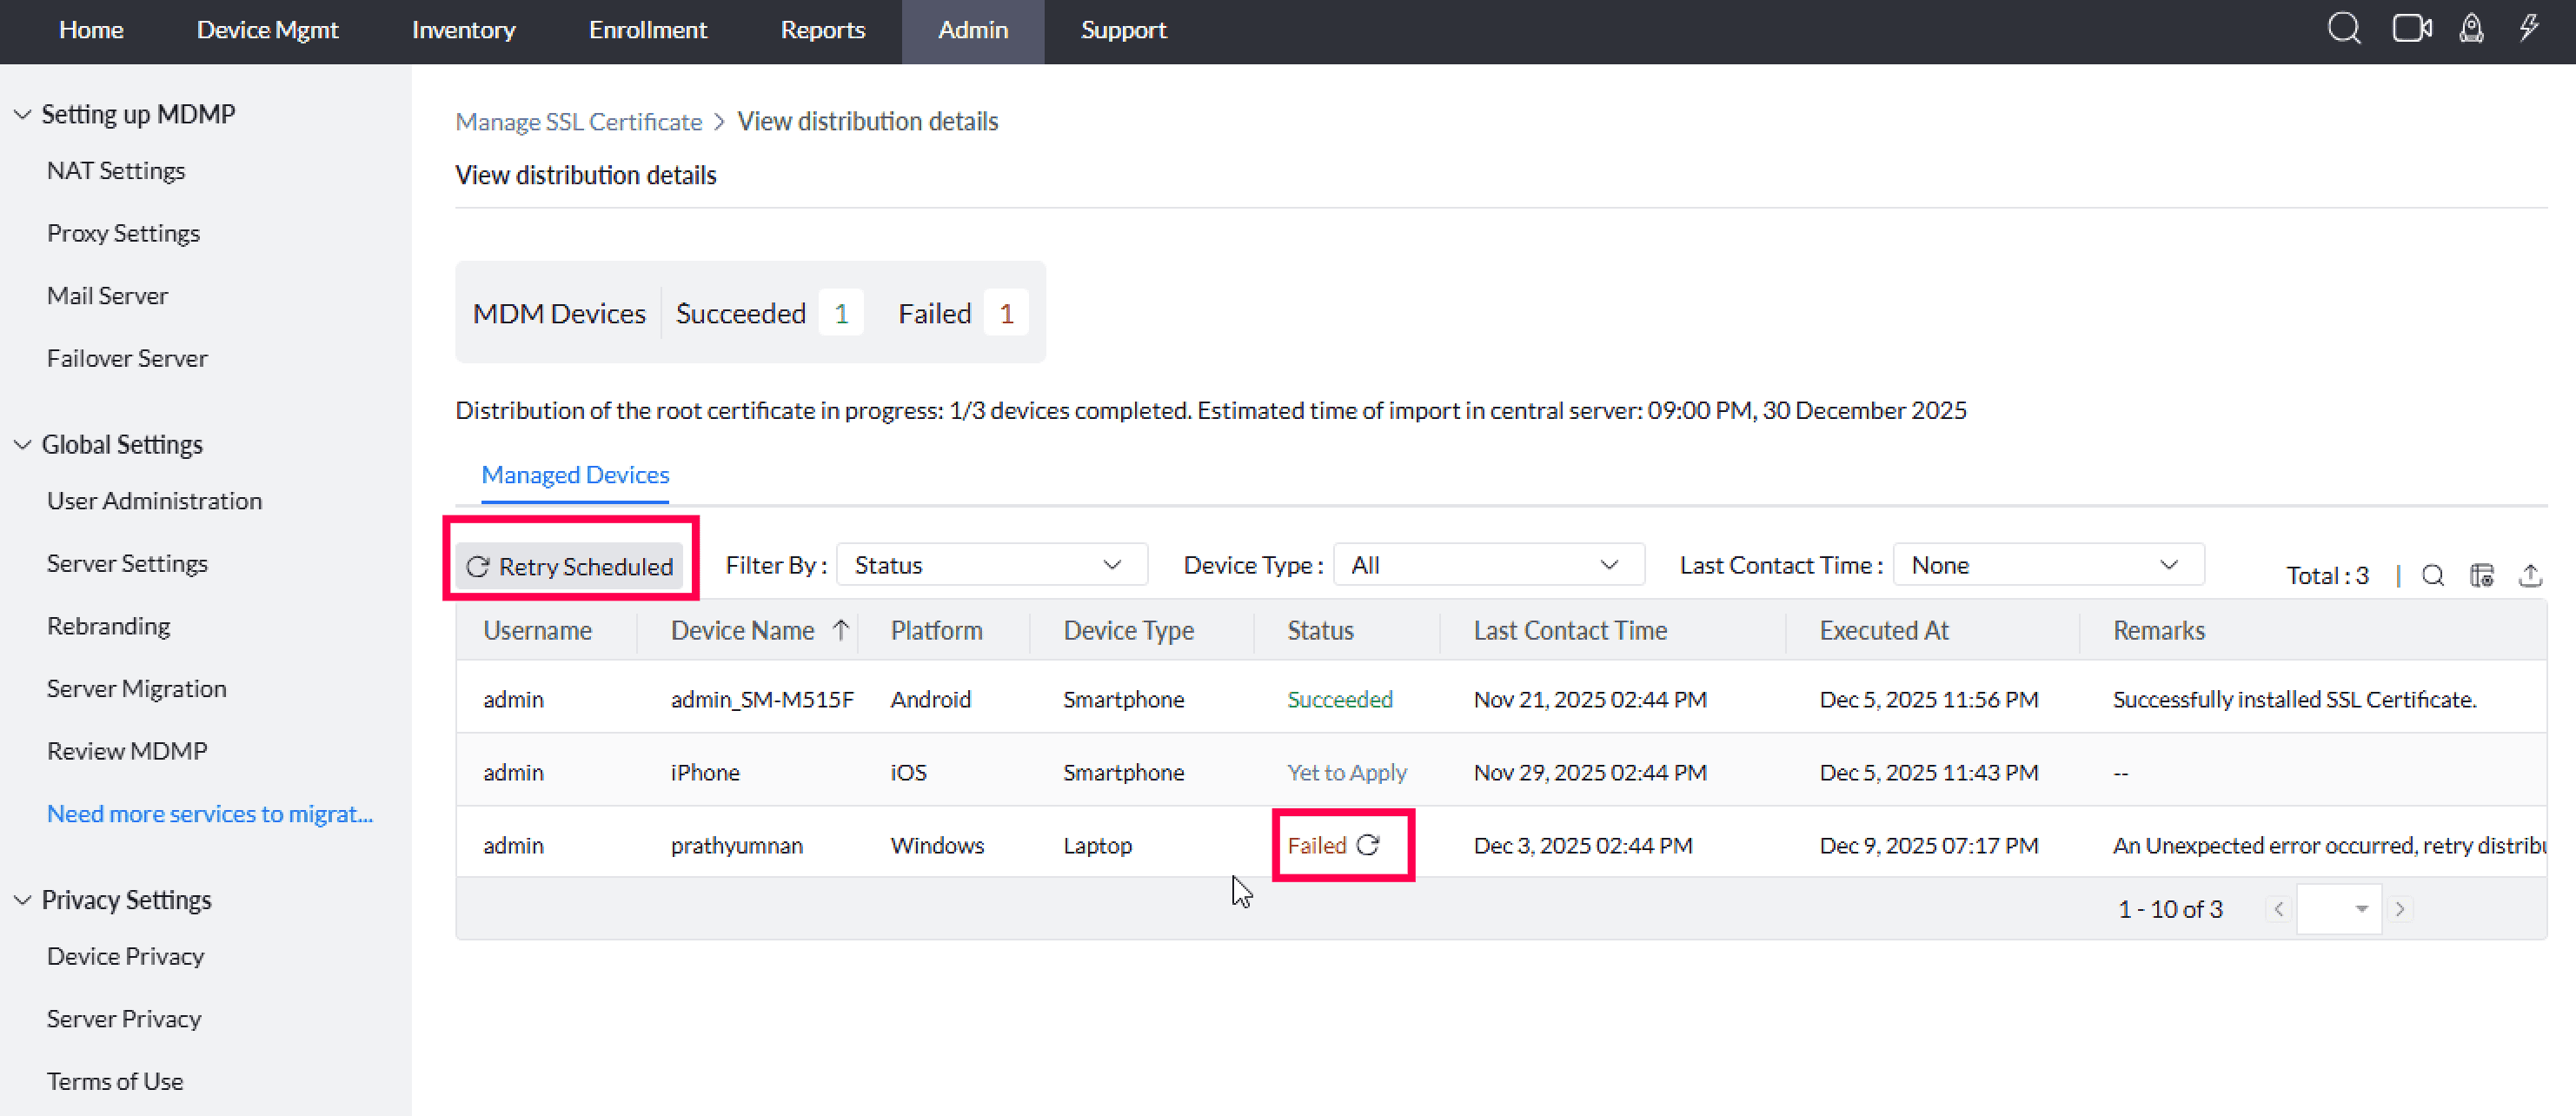
Tracking Certificate Distribution Status
The "view details" option provides visibility into the certificate distribution status across all devices.
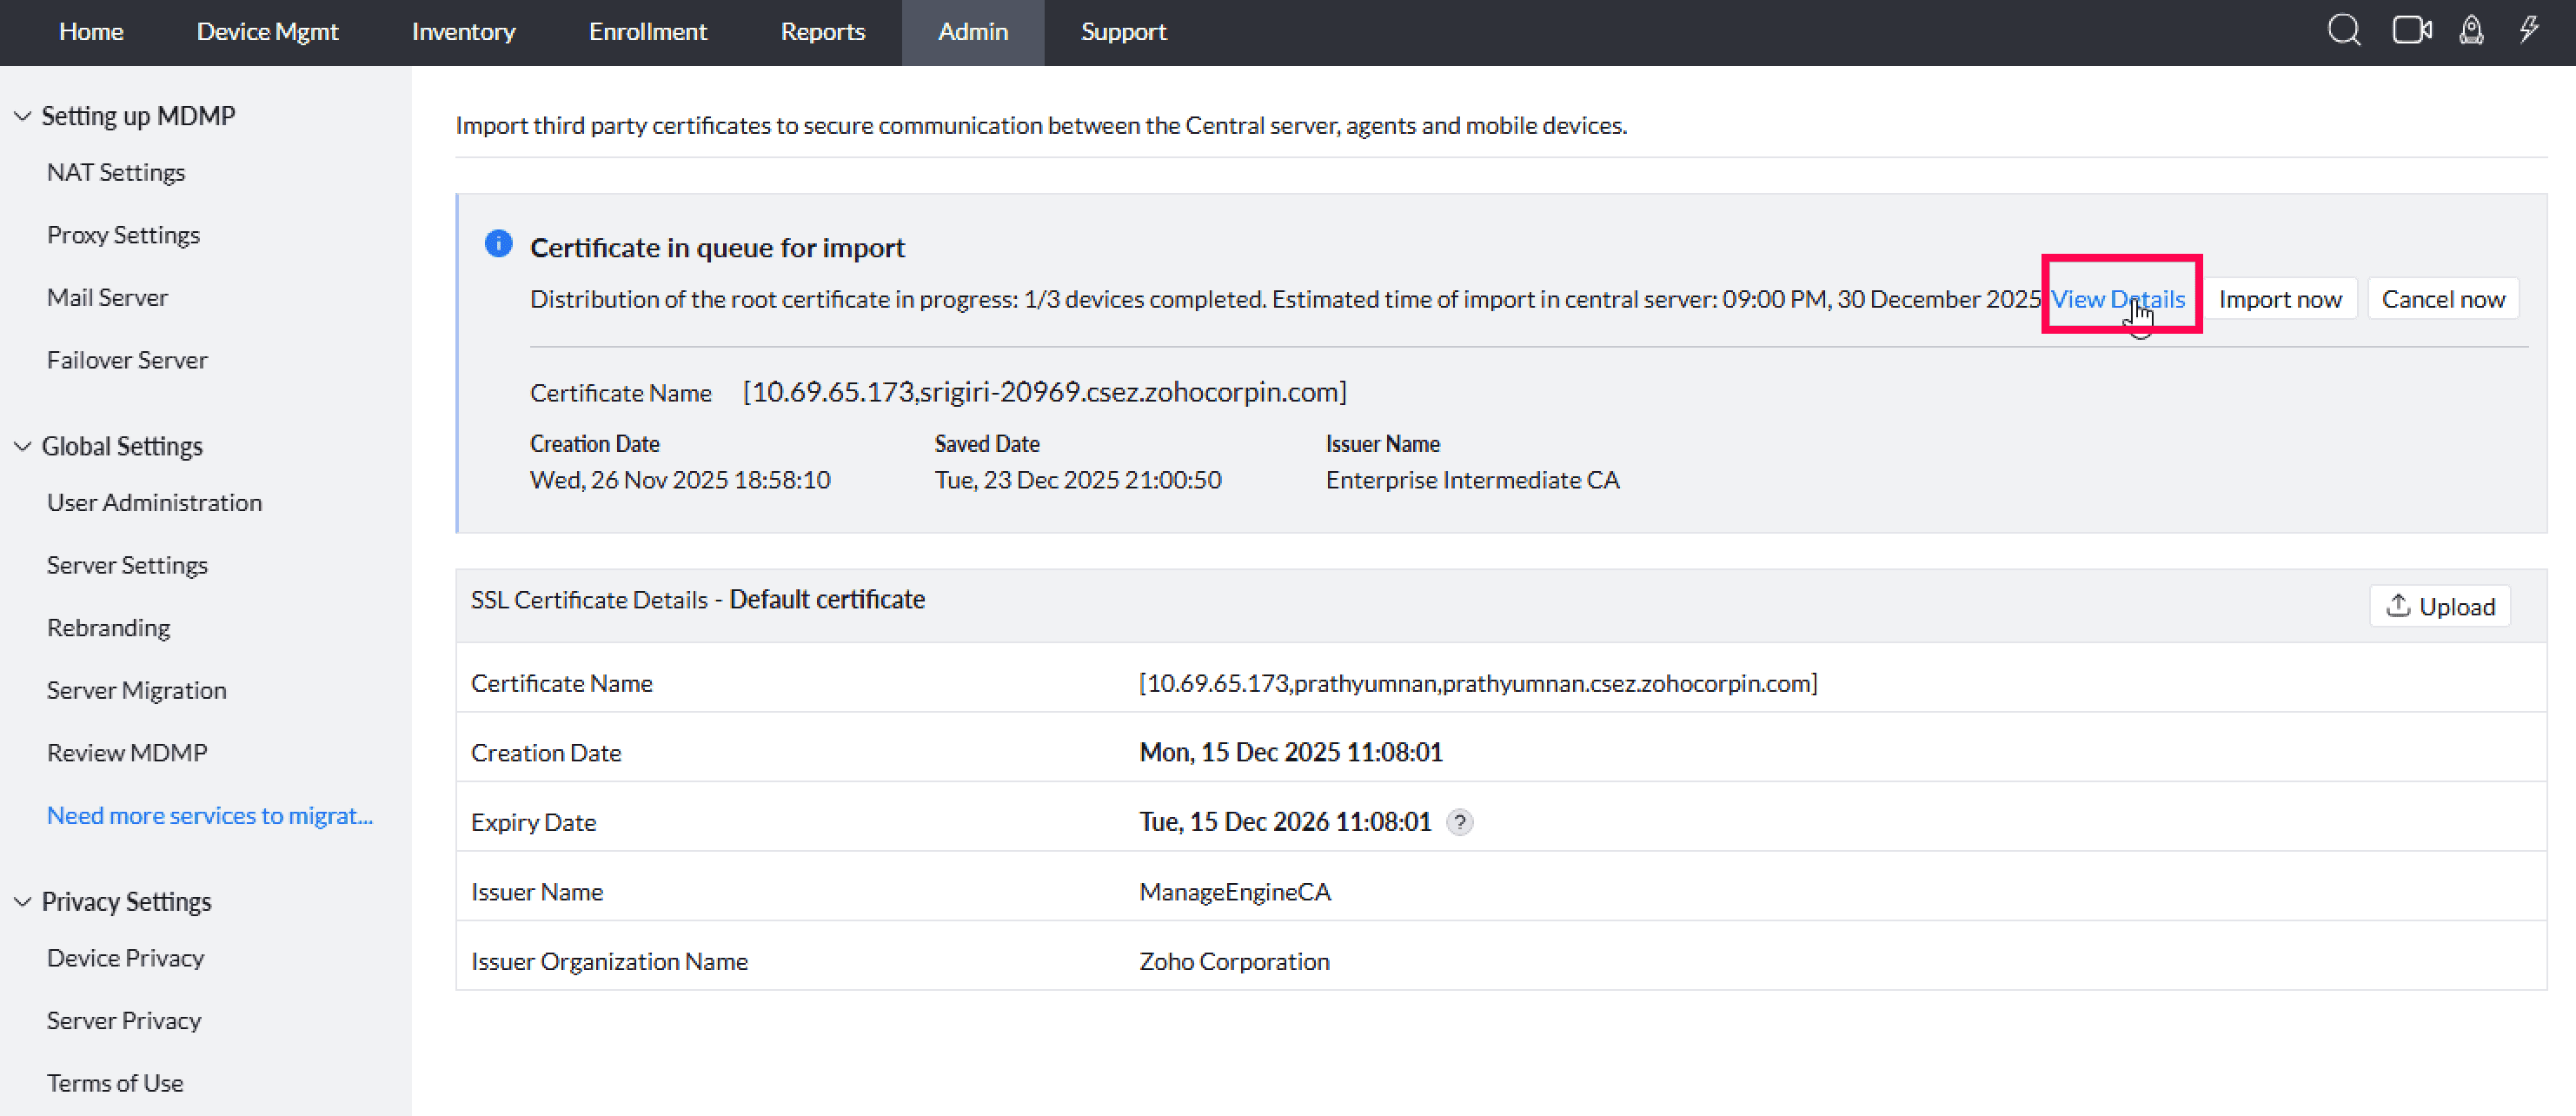
- All enrolled devices and their current certificate status are displayed.
- Devices with failed distribution attempts can be clearly identified.
Retry behaviour
If certificate distribution fails for certain devices, you can initiate a retry. Retry can be performed for Individual devices or Multiple devices (bulk retry).
Import timeline
On the 7th day, the SSL certificate will be imported only if the following conditions are met:
- Certificate distribution is successful
- The existing SSL certificate has expired
If these conditions are not met, the system extends the import timeline. The extension can continue by default for up to 21 days, ensuring devices have enough time to complete certificate installation.
Manual extention option
An Extend option is provided for administrators.
- The option appears from the 6th day
- When used, it extends the import time by one additional week
This helps customers who need more time for device connectivity or distribution.
Email notifications
To keep administrators informed, reminder emails are sent automatically on Day 6 (before the first scheduled import) and Day 13 (before the extended import window), helping administrators take timely action if the root certificate distribution is still pending.